Search the Community
Showing results for tags 'unsharp mask'.
Found 14 results
-
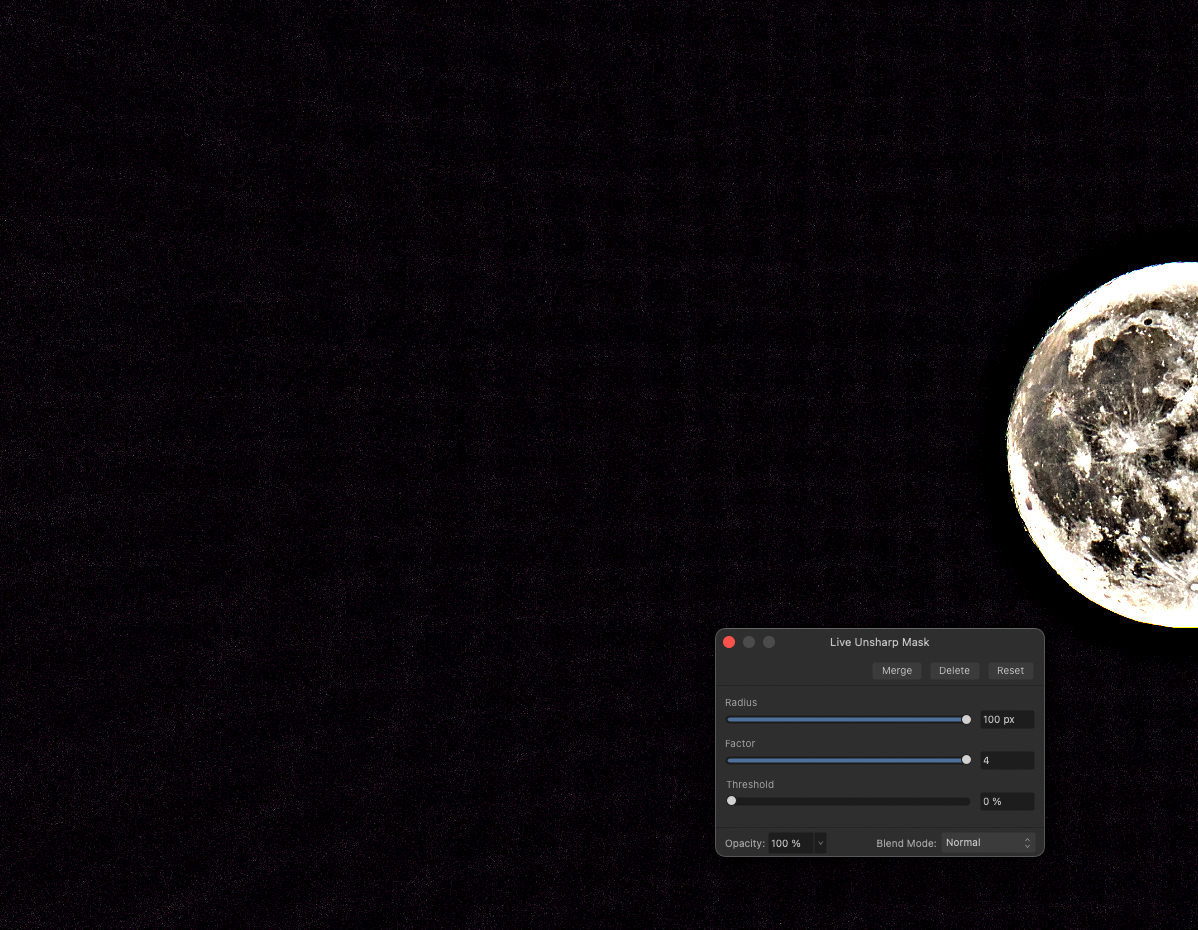
I have this moon shot with black sky/background, developed in Affinity Photo (2.1.1) on MacOS Ventura 13.4.1(c) on Mac mini M1, there's this weird mesh shows up in dark area, I don't see the same appear in Canon T3i raw file. This screen shot is with extreme setting just to show the problem, attached is the afphoto file with the raw embedded. 2023-07-31-EOS 6D Mark II-_MG_6237.afphoto

-
 Just downloaded 2.1beta and tested my ongoing problem with AF unsharp mask. (Scan small stamp at 6,400dpi, open in AF, straighten, resize to 300dpi without resample, and then filter/unsharp mask at 30,1.8,0. Still getting the artifacts reported with first version (and all others) of 2.0 Affinity Photo (1.10.6) still works as expected, so I am still using that version. AF 2.1.afphoto
 -
Not only export but merge visible will lose any sharpening as well. The top pic is a screen shot within AP, the bottom is a jpg export from AP. Export was Bilinear at 100% quality - no size reduction. Running Windows 10 Home. Any insight would be appreciated!
-
 Hi, The question may be very basic, but is there a method or way to use the Unsharp mask (live filter). I've search on the net and it seems that: - you start by dragging the Factor slider to either half or full to the right, then - you push up the Radius slider until you find it "to your taste", then - slide down the Factor to better define the sharpness. - Depending of the image (if noisy), you may use the Threshold slider to mitigate the effect and reduce the noise. Is it a consensus of using this tools? Why would some use a 2 (half) factor, preferably of a 4 (full) ? Any idea ? Thank you
 -
Hi there Serif This PNG viewed at 100% is best for evaluating this. I was comparing the settings and results of unsharp mask i AP to unsharp mask in Photoshop and the preview in Photo looked slightly blurry and inferior. After applying the unsharp mask, though, the result did not match that of the preview window. The result is somewhat better, fortunately, but the preview should match the result. I tried many settings that gave roughly similar results but with a 1 pixel radius it looks like results in Photoshop are more fine detailed while results from Affinity Photo remind me more of a clarity filter. The more you push the amount slider in both programs the more you see the difference. Same tiff file used. unsharp.afphoto
-
version 183.641 Affinity Photo I can reproduce this bug The bug does not happen for a new document Here is an accurate description of the problem... Conditions: Using Windows 10 The problem: This will occur with any 2 image files. You open a jpeg and then use Impainting brush or unsharp mask. Everything works as it should. Close the document but leave the program operating, and then open another jpeg, and then try to use either impainting brush or unsharp mask, and neither works as it should. To get it to work, you need to exit the program, and then restart it. Then everything works fine again. Computer hardware is a 1 year old DELL Inspiron with a graphics card and AMD processor Rizen 7. I am using a 500GB flash drive for drive C, and assigning all of my Windows 10 categories to an 8TB hard drive in drive D, such as desktop, documents, music, videos, pictures, etc.
-
 Greetings Readers., I am running Affinity Photo 1.8.3.641 and attempted to use the "Unsharp Mask" for the first time on a high resolution image of the crescent moon. Problem: When I look at the preview image it looks excellent and the Unsharp Mask routine works very well - no problem. But when I try to apply the preview settings to the full size image nothing happens. Perhaps somebody can tell me if I have done something wrong. Program setup preferences ? Many thanks in advance, Regards, Jeremy
 -
Maximum strength of unsharp mask on Affinity seems to be far weaker than Photoshop. Is there a reason for this? I may not use such strong unsharp mask often, but I wondered why.
-
 What I want to do is apply an unsharp mask in Lab mode on only a and b channels, is this possible? In photoshop (desktop) I would convert to Lab, select the a and b channels, apply an unsharp mask with a large radius (say 80px) then convert back to RGB edit: figured it out finally, tap document icon with three dots then convert document, then it shows up at the bottom
 -
 Hi. I have this problem for a long time i always tought it was me,but now i"ve downloaded 1,8,i see it's still there. When I applied it and want to finish my work i merge visible it goes back as i didn't do anything,is that correct,I think it"s not. regards. charles
 -
 Hi guys. I leave you a video to see what happens when I import a photo from Photo to Designer with the Unsharp Mask filter. I'm working from an iMac 21,5 4K 2017 (3,4 GHz Intel Core i5 / Radeon Pro 560 4096 MB / 8 GB 2400 MHz DDR4). Unsharp Mask.mp4
 -
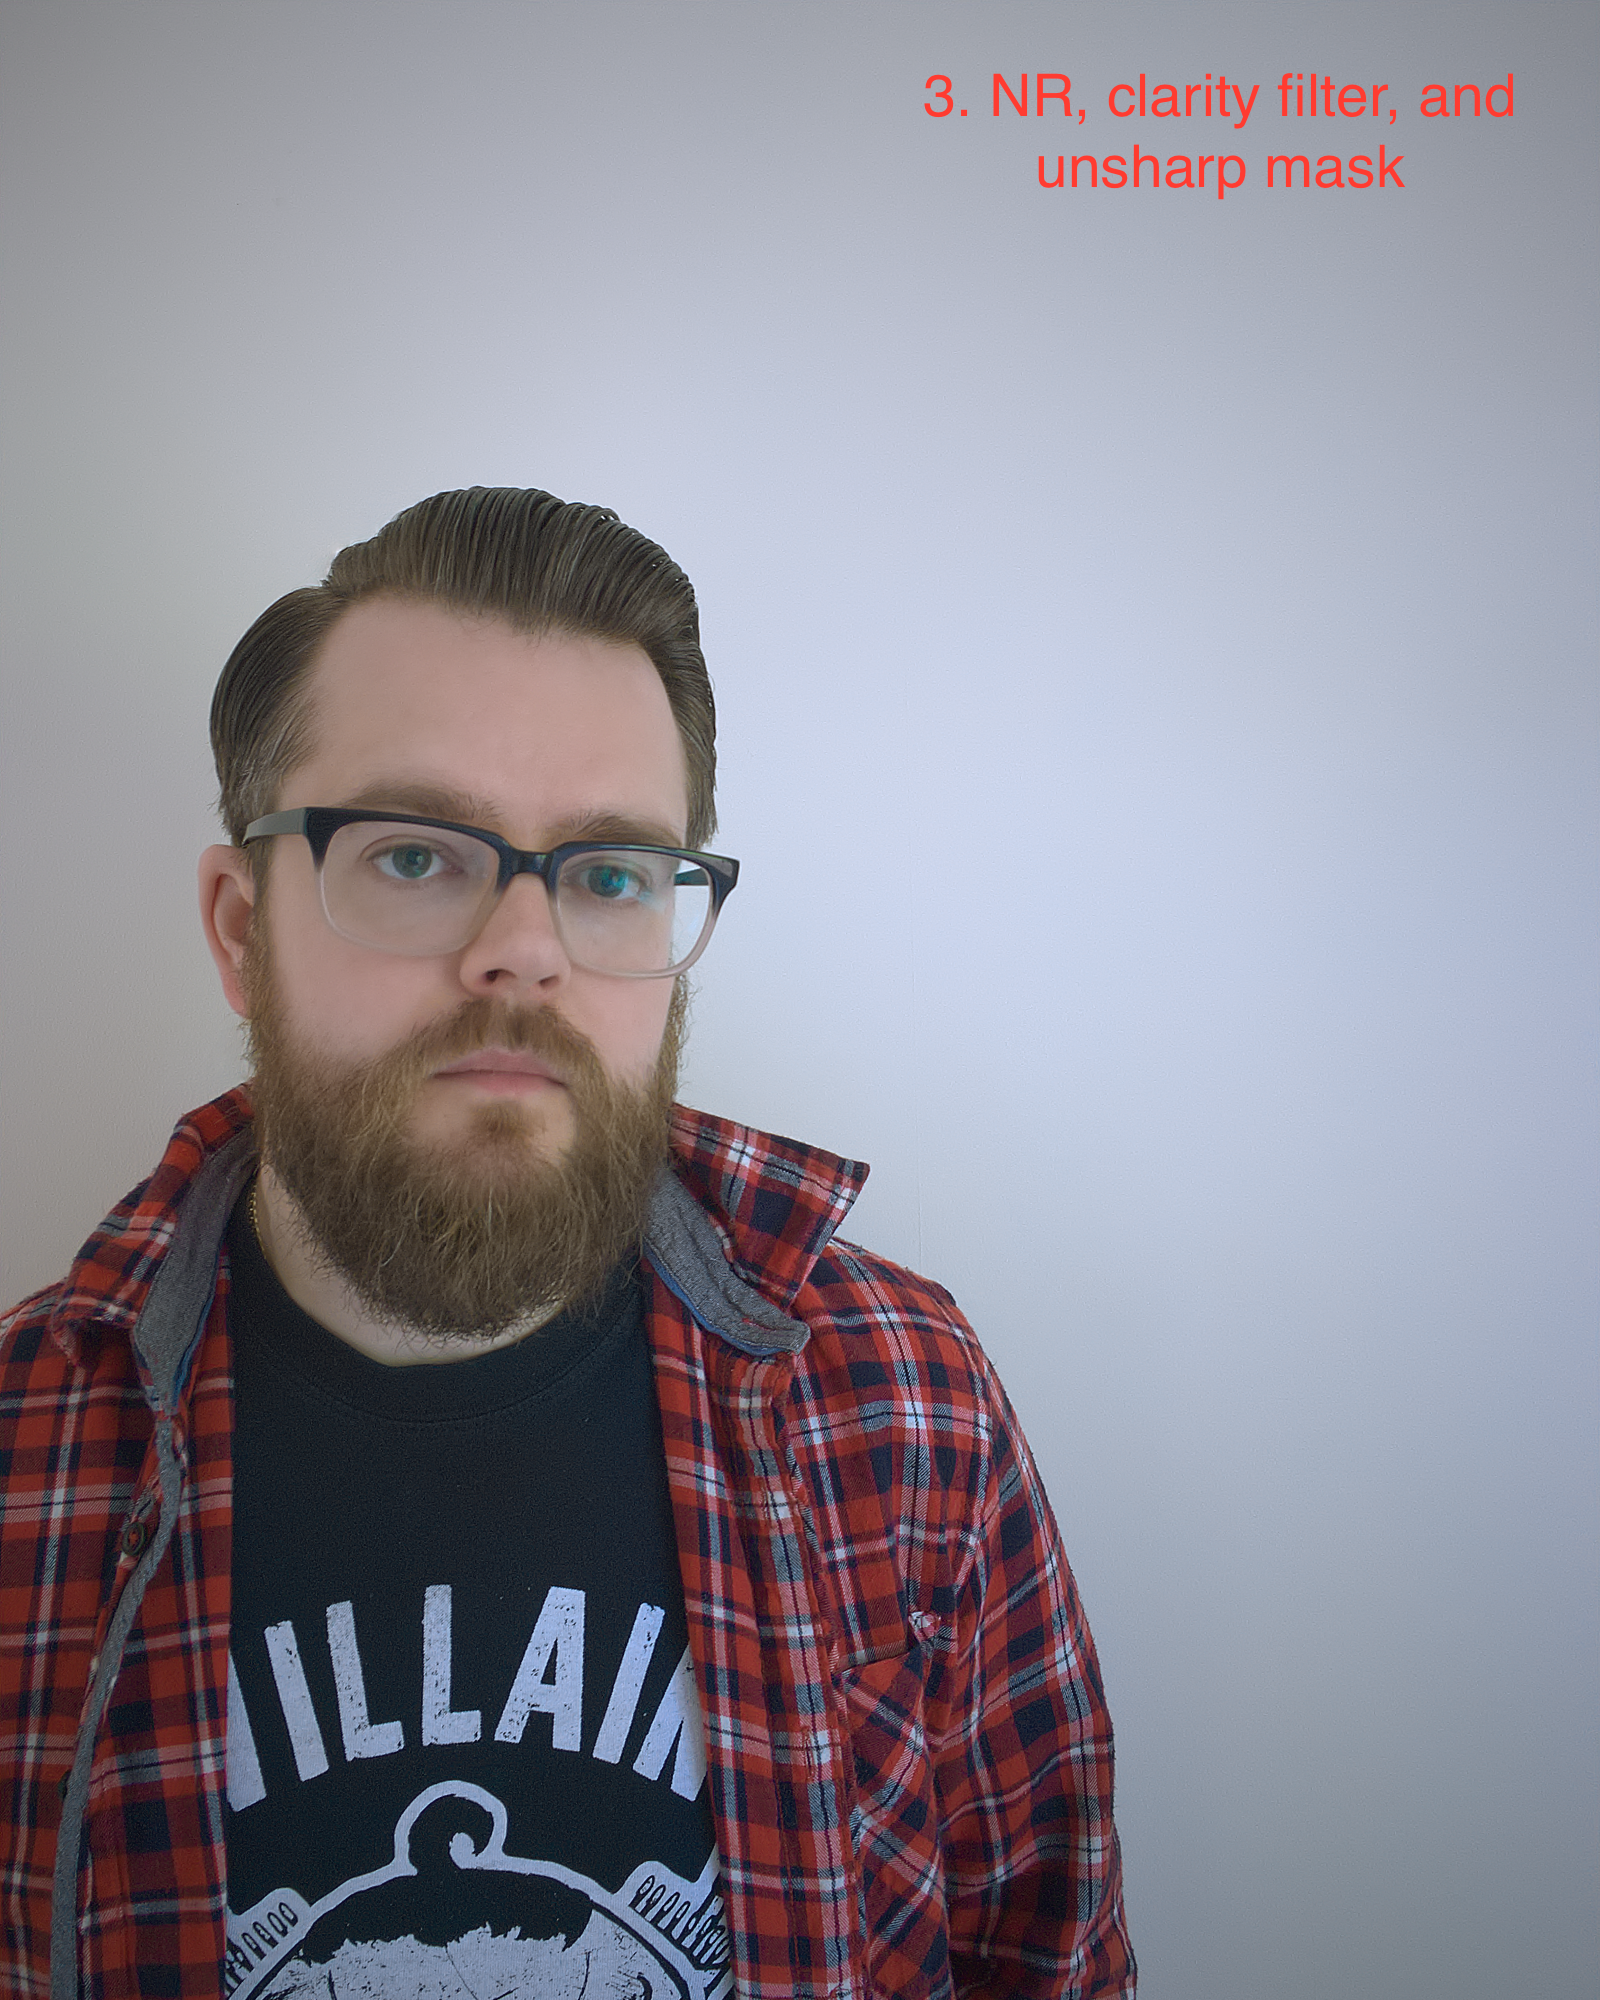
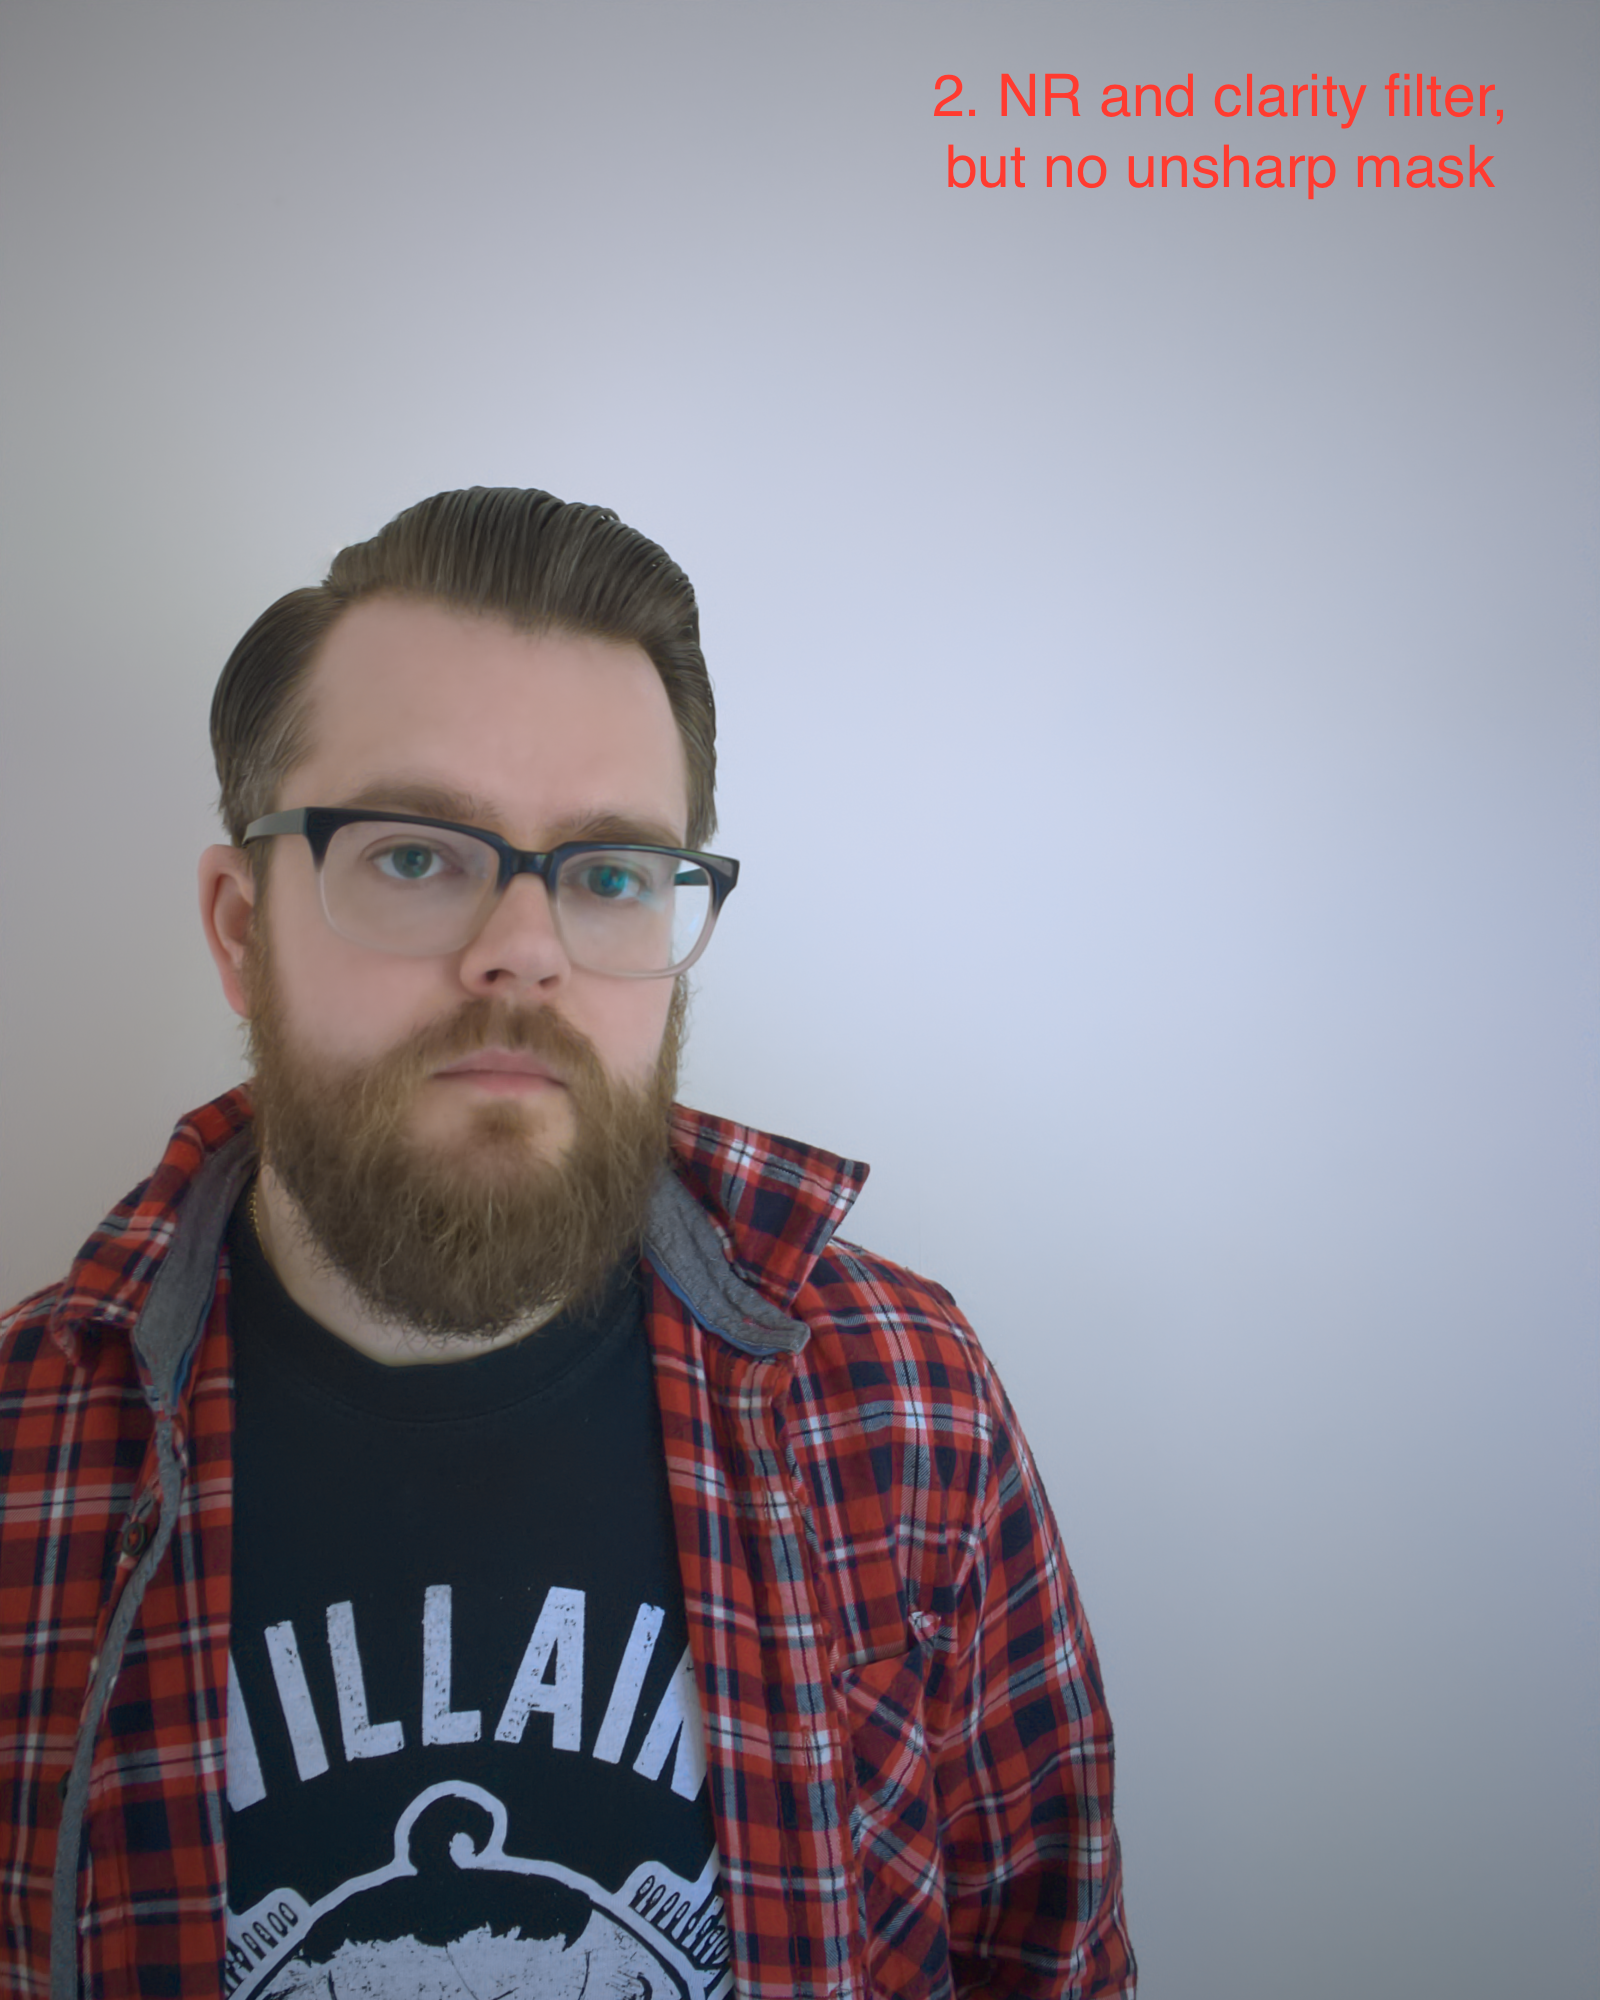
 I'm working on sharpening as it's a new concept for me, but ultimately necessary when editing RAW files. I don't think I've necessarily got this right, especially with dark colours. For reference, these have been taken with an iPhone 6s in natural light, are all PNGs at 1600px in width, output with an sRGB colour profile, with Bicubic sampling (apart from one image). For example, take the first image (1). It's without noise reduction, a clarity filter, or an unsharp mask. Notice the heavy noise (both colour and luminance) on the black t-shirt. The second (2) is with a denoise and clarity filter. The t-shirt here is too smooth, with zero noise on zoom at the heavy expense of detail. However, the third (3) image (which adds the unsharp mask) is perfect when viewed at a small size, but you can see a ton of noise when you zoom in. I'm thinking my sharpening technique is off here, but I could use some advice on whether this is acceptable. How can I retain the detail in the blacks, while not introducing noise when zooming in? I've tried setting the threshold, but I still get the problem of an undetailed flat t-shirt. I've also tried a High Pass filter first, which improves the initial sharpening, but as soon as the Unsharp Mask and Clarity filter are brought in, the noise returns. In short, I can't remove the noise and bring out the detail in the darkest elements without introducing noise and I'm getting annoyed. :-) Any advice, or am I simply overthinking it all and have got it right?
-
This GENIUS figured out a method that does edge-aware sharpening. The method is to do edge-detection on the image, and then using the detected edges as a mask to avoid sharpening the edges. It lets you massively sharpen textures while completely avoiding all halos around edges and it is the most amazing thing I have seen in a decade of photography. It's the biggest revolution since the invention of the Unsharp Mask. This technique is like the Yin to Unsharp Mask's Yang. The results are preferrable almost 100% of the time you want an unsharp mask. Because "haloed edges" are the bane of sharpened photos. If this is implemented, I would probably never use the regular Unsharp Mask again. Please consider creating a new "Edge-Aware Unsharp Mask" filter, which internally does all the work of finding edges and avoiding them when sharpening. So that we can keep all of the non-destructive power workflows of Affinity Photo, but still achieve this AMAZINGLY USEFUL new effect. www.youtube.com/watch?v=iVgfbiH4-fw PS: I don't see the embedded video above. If someone has the same problem, type this URL manually instead, to see the technique: youtube.com/watch?v=iVgfbiH4-fw PPS: Here is how to currently achieve this in Affinity Photo, with many minutes of very destructive pixel-based steps: youtube.com/watch?v=7EVXy6fc_rE This incredible technique begs for a built-in non-destructive filter.
-
 Hi, In diesem Affinity Photo Tutorial zeige ich aus der Serie Affinity Photo Foto Optimierung wie man das Foto Grashüpfer verbessern kann. Hier geht es nicht um große Effekte, sondern um viele kleine Verbesserungen, die dann hoffentlich für ein besseres Ergebnis sorgen. Dabei versuche ich ein wenig den Effekt zu imitieren, als wenn man ein Makro-Objektiv benutzt hätte. Viel Spaß Euer Jack In this Affinity Photo Tutorial, I show you from my serie photo optimization how to improve a photo. There are no great effects, but many details which hopefully improve the result. In this grasshopper photo I try to imitate a little bit the use of a macro lens. Have fun your Jack Link to YouTube Tutorial Foto / photo: eigenes / self made
-
- 1
-

-
- Affinity Photo
- Foto Optimierung
- (and 4 more)