Search the Community
Showing results for tags 'text boxes'.
Found 11 results
-
 I am using Publisher V2.04. I am having problems with text boxes which I cannot select. The boundary is outline in blue with X marks. An example is shown in the attached screen shot along with a screen shot of the layers panel. This has become such a problem that I may not be able to continue with Publisher. Thanks for any assistance David
-
 Hello, I have searched the fora (and internet at large) and found mentions of similar difficulties, but unfortunately none of the answers seemed to quite work for me. I am new at this so maybe I just don't quite understand everything correctly. I have created a very graphics heavy book in Affinity Publisher that I am trying to have printed through Barnes and Noble Press. Of note: if anyone else is trying to do this, set your document to 1/4" smaller on both dimensions than your desired finished dimensions. I have no idea why, but if you don't, B&N's system will reject it. I learned this through trial and error. Anyway, most of the book interior consists of text boxes laid on top of background pictures, and of course the cover does too. It looks perfect in Affinity, and it exports to a PDF just fine on my computer. However, when I upload it to B&N's system and download it as a digital proof, tiny thin white/grey lines appear around the text areas. I am concerned these lines will show up when the books are printed. How can I get rid of these lines? They look AWFUL, and seem to appear everywhere or almost everywhere text is on top of a background image. Below is a zoomed in example. What's especially interesting about this spot is that I used the 'text on a path' feature here - you can see that the text is on an arc bending upward, and those little faint lines are still there, but they are rectilinear! What gives?? Thank you in advance!
-
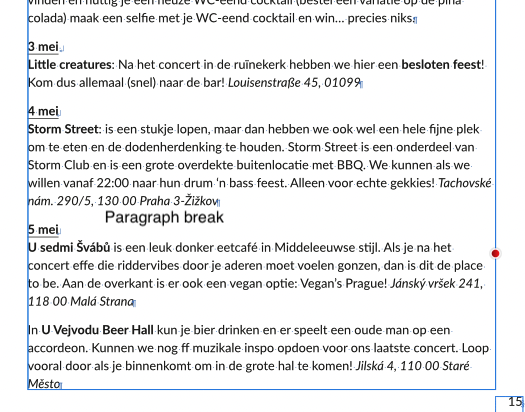
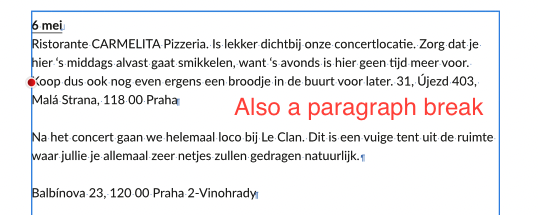
 I ran into a program-breaking bug. I'm suprised no one else reported about this. In the main text frame I applied proper styling: line spacing, paragraph spacing etc. The overflowing text, in a linked text box made using the proper link tool, the paragraph spacing is way larger. Alright, might be a styling inherited from the word document, no biggie, but: it doesn't respond to any paragraph spacing changes. Line spacing also does not respond. This all works fine in the first text box, but all text in linked text boxes/overflowing text does not respond to spacing settings. I have tried pasting text without styling, resetting Text Styles, but it all doesn't change the problem I am describing. This is absolutely program-breaking as I can't properly format documents with long texts now. I attached pictures to show the difference in paragraph spacing between the original and the linked text box. All text has the same styling applied to it (Body) with identical line- and paragraph spacing settings. There's literally no difference between the text- and paragraph style settings whatsoever. Note that in the linked text box (with the red annotation) the paragraph brake is not a manual line break, this really is a paragraph break with no extra special characters inserted whatsoever.
-
 I imported an CS5 .idml document and *essentially* everything was perfect except there are some light gray boxes that appeared behind the text boxes that I can't seem to find to get rid of. Anyone else experienced this?
 -
 After attempting to lay out some body text without reaching for my Mac I became furious with the process in Designer. This has been the case through my last 4 or 5 months with this tool. Here are a few thoughts on how it could be improved. When tapping into a text box, the interface attempts to keep the cursor in view at all times in the most jarring manner. When the on screen keyboard is up, this results in unintended jumps that make it confusing to pan and scroll the art board while editing. I would prefer that the interface either doesn’t move at all when editing the contents of a text box, or opens a content editor that takes you out of the layout completely while editing. The OS-default editing cursor doesn’t exist. This means if I want to go back, select a word, edit a word, or select a whole paragraph I need to use a confusing combination of hip-shooting exactly where I want the cursor to go with my giant fingers and selecting text without being able to control the beginning and end of the selection. Adapting to the OS-default would be great. Controls for resizing the text box and panning are still available when editing text. From a UX perspective, I would appreciate text editing being a completely isolated process especially on a device that invites fingery clumsiness. Tap the box to edit, all you can do is edit. Tap a done button, you’re back to the layout. (I’m experiencing way more ease writing this post in your little WSYWIG editor on my iPad than in Affinity D) Affinity is a great tool for comping up design ideas right on the iPad and I love it for that. But I DREAD when I have to put some text in there. Please consider these comments! Love Dan
 -
 I am creating a hexagon shape with six triangles within. I have tried using the triangle tool and with triangles created from the pen tool. Both have the same problem. I want to create a shaped text frame in each triangle, with the top on the base of the triangle. But no matter what I do, the text box is created with the top at the point of the triangle. Inverting the text also inverts the triangle. Help please
-
 I was working on an assignment for my technical writing course and half way through I decided to rescale the whole document from A5 to A6, including rescaling all the elements of the document. There is a lot of text flowing between text boxes in the document, and for the most part that is working OK in the resized document. However, in one or two boxes, the text has ended up not being resized. The real trouble is that it gets resized as it flows from one box to another. It is getting very confusing and it is hard to keep track of exactly what is happening to the text, but it seems to be that if I try to correct the corruption by reassigning the style concerned to the text, it then gets resized again as it flows into another text box. In the snapshot of the document that I am sending you, it is currently occurring on page 10. "If the alarm switch is off, the alarm will not activate" is supposed to be 8pt, but it is 5.6pt. The heading following is currently in the correct size (because I corrected it), but the text after is supposed to be 8pt, whereas it is in fact 11.4pt. There was quite a bit of back and forth between the two text boxes to get it into its current mess from its earlier state of mess. I am using Publisher 1.9.2.1035 on Windows 10 21H1. clock manual A5.afpub
 -
 I have a long text document in linked text frames. I have added figures I want to number and caption and be able to list in a Table/List of Figures. I want to group the captions with the Figures, and wrap the original continuous text around these groups of (figure(s) + caption(s). Attempts to add a Text box or frame for the caption breaks the continuous text, adding the caption content to the original text. How do I achieve my desired result? I guess I mean a box of editable unrelated text within existing text, that will travel with (or be grouped with) its image, not the original text. I seem to be missing something I should be doing.
- 20 replies
-
- 1
-

-
- text frames
- text boxes
- (and 1 more)
-
I got an award this year for my project final and they wanted me to make a short video for it. This was mostly for the book (which is on my Instagram profile) but I thought it was worthy of also bringing up here since the poster was done in Affinity Designer. I first tried to make it in Quark where the book was made but realized it was too difficult to rotate individual letters due to Quark text box funkiness. Maybe I will make a book in Affinity someday too!
- 1 reply
-
- 3
-
-
- text boxes
- punk rock
- (and 1 more)
-
This is what it says in iWeb Help: To show or hide text box boundaries: Choose View > Show Layout (or Hide Layout). In my View menu, Show Layout does not appear
-
 In Publisher, I created a text box that took up the whole page. I then pasted a ton of text into it. I do not see where there is the option to click on a plus sign at the bottom of the box and tell it to set up the same boxes on other pages the same size, and then have the text auto flow until all of the pages are filled. Has that feature been removed from Publisher? It is one I use all of the time. I see where I can keep dragging to create more boxes, but don't see the autoflow feature. Am I in error?