Search the Community
Showing results for tags 'soft proof'.
Found 17 results
-
 Hi all, I'm on a Windows 10, 64-bit machine and running Version 1.7.3.481 of Affinity Photo. The "Proof Profile" list in the Soft Proof adjustment continues to list icc files that have been deleted from C:\Windows\System32\spool\drivers\color. Here's a screen grab: You'll see that there is only one "PICTO_Lambda (...)" file in the color folder (...Satine_5.icc) in Windows Explorer, but there are three in the Proof Profile list in the Soft Proof adjustment (...Brillant_3.icc, ...Satine_3.icc and Satine_5.ICC (the extension presenting oddly in capital letters), this latter being the one in the color folder). Indeed, I had manually deleted the ..Brillant_3.icc, and ...Satine_3.icc profiles from the color folder because they were outdated. But, Affinity keeps showing them to me, which creates quite a bit of confusion. Is there a way to get Affinity to update the Proof Profile list to what is actually in the color folder? Thanks a million and happy retouching to all!
 -
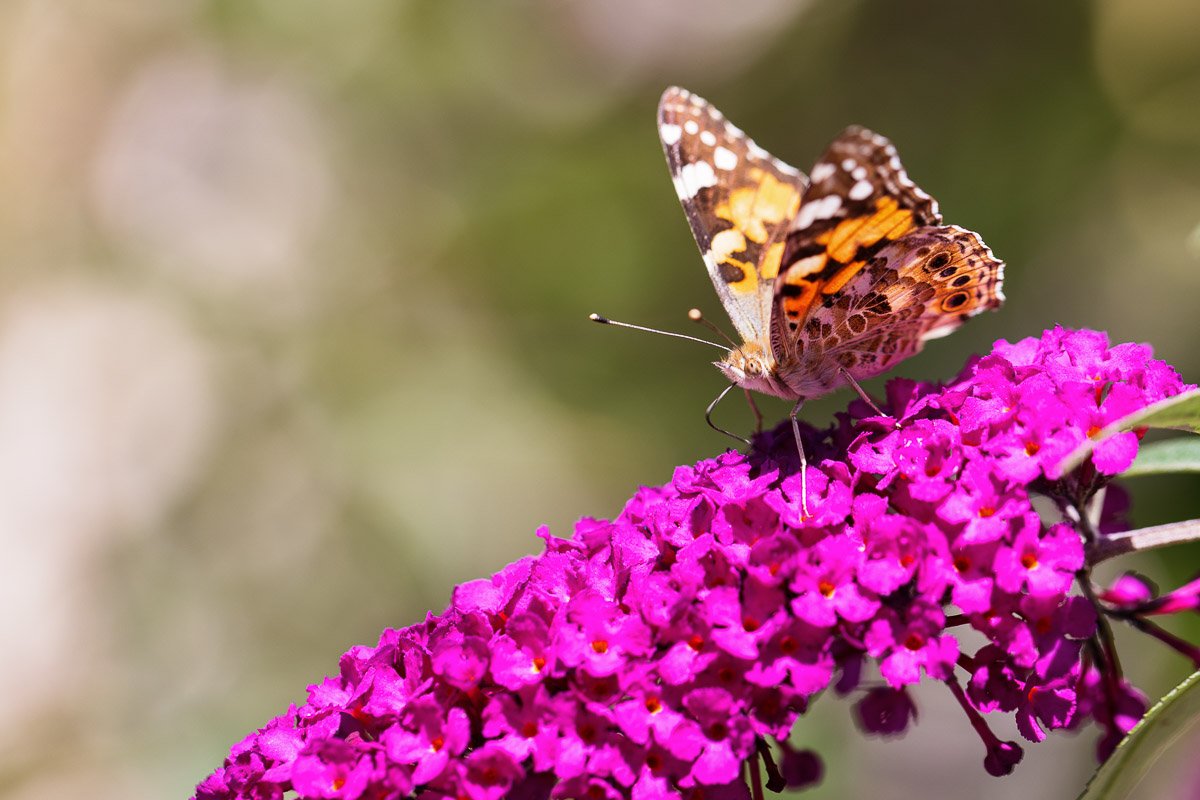
 Hi all, I'm new to the Affinity Suite and am a bit confused about color management (and noticable difference in color rendering compared to Adobe)... Maybe someone can help me out here? I'll attach the relevant data if someone wants to try out him/herself. Also, I'll use Publisher below, but i also checked with Affinity Photo - same story. I have also already printed the shot attached, so i know how it finally did print and the Adobe softproof is nailing it while the Affinity softproof is quite off. Start with opening the template*.idml attached. It's a print template to be used by the print store... First confusing thing here: They mention to do the full workflow in sRGB, but the document itself opens with CMYK in Publisher. Import the jpg attached (the jpg is sRGB). You'll immediately notice the color gamut problem when importing in this CMYK document. Save the file as "CMYK.afpup". Now in document settings, change the color space in this publisher document to sRGB. Save the publisher file under a new name e.g. "sRGB.afpub". Open both publisher documents side by side Now add a soft proof adjustment layer to both files, i have attached the relevant *.icc file, too. Use "Relative colormetric" as intend and "black point compensation". My findings are: When working with the document in CMYK, the color rendering is way off (the pinks are way too blown out. There is significantly more detail and texture in the final print). When adding the softproof layer it corrects the orange/reddish inner part of the blossoms correctly, but the pinks are still wrong. When working with the document in sRGB, the color rendering is at least ok (well it's sRGB, so yes nothing changes). However when i apply the soft proof layer to this file, then the contrast of the full soft proof picture decreases rather significantly (mostly visible around the butterfly). Also something that I don't see in the final print. So either way, things are off. Am i doing something wrong? If i export from either of both files (of course with the softproof layer disabled) to a PDF in print quality, sRGB and import this PDF into Photoshop and use the Soft Proof Function there, it works just perfectly fine (and is extremely close to the final print). Disclaimers: I have of course checked to have the soft proof options aligned. With that, I'm a bit lost how to adapt my workflow... it seems maybe it's best to just use sRGB for the document and don't do any softproofing in Publisher itself but export to PDF and do it in Photoshop then? Rather tedious... Thanks a lot for any help... Best regards! Christian template_42x28.idml SaalDigital_Fotobuch_matt_10-15.icc
-
 I know you can add a Soft Proof Layer Adjustment to a specific page in Publisher. That's fine for a single spread or a small document. But, what if you have a document that has 10, 20 or 50 pages? Do you have to add that same exact soft proof adjustment layer to every single page individually in order to soft proof the entire document? That would be a waste of time and effort, since the entire document will presumably be printed using the same output device, paper, ink and profile. Is there a way to add a "single" Soft Proof Adjustment Layer that soft proofs all pages in the document? And for clarification, I assume each placed or embedded element in the Publisher document (jpg, png, psd, ai, afdesign, etc) will have its own profile and will be converted using its embedded color space to the destinations color space. For example, there may be different linked images in the Publisher file, each with different embedded profiles...e.g., Adobe RGB, sRGB, grayscale, various flavors of CMYK, etc. Each element needs to be converted using its embedded profile as the source, to the destinations profile using the specified rendering intent. I'm also assuming all elements created inside the Publisher document itself will use the document's color space as the source, right? Thanks for any feedback.
 -
 It doesn't matter which file/document I choose, it keeps crashing every time I select Soft Proof. Affinity Photo 1.9.2 Affinity Photo 1.10.0 Affinity Photo 1.10.1 Screen-recording: ap crash.mp4 Attached 3 crash dumps. Let me know if you need anything else. 3e7acde3-1a54-416d-9e0a-970249c96bae.dmp ff9a4068-c6ca-4fd9-92f4-4ff9b80c86e8.dmp 8a4ecb5c-6c97-4035-bde8-0223e82a069e.dmp
 -
 I don't know if it's a question or feedback. For the past 5+ hours I've been trying to make sense of how to check how my work will look like when printed, and here's what I found. What I need I need a quick way to check whether my colors are within the printable gamut range and also to see the out-of-gamut colors. They keyword here is quick. What I get The Soft Proof layer works not like that. Suppose I am in the sRGB color space. It seems like it takes the RGB coordinates of current image of the sRGB space and simply applies them to the Proof Profile that I select (without conversion). But that's not what I want, this naturally gives the wrong results. What happens is that once I apply soft proof with the "U.S. Web Coated (SWOP) v2" profile I suddenly get a brighter image, as if it tells me that this is how it will be printed. And if I click the "Gamut Check" button most of image becomes grey. But it's not the case, it's not how it will be printed. In fact, all the original colors will be printed (in my particular case). The step that this Soft Proof feature misses is the conversion of Color Spaces for this "check". If instead of applying the Soft Proof layer I convert the color space (Document > Convert ICC Profile...) and select CMYK/8 + "U.S. Web Coated (SWOP) v2" then the image will remain exactly as is, it will not become brighter. Furthermore, if I now apply the Soft Proof layer and select "U.S. Web Coated (SWOP) v2" then the image will stay exactly the same, and if I click "Check Gamut" then no area will be grey. Because all colors are within the color space range. Bottom line It's very misleading what the Soft Proof shows if you don't convert your profile first. But if you have to convert your image profile to check the gamut then it makes the "Soft Proof" feature not helpful. I am attaching an image, just for reference, which I used to play around with this. Can you please help sort this out, why does it work like that and has that been done intentionally.
- 18 replies
-
- 1
-

-
- affinity photo
- soft proof
- (and 4 more)
-
 In Photoshop we were supplied by our printer a paper simulation profile the form of a PSF file. This profile gives us an idea on how the colors will be represented printed on our paper color. Can Affinity Photo read PSF files? If so, where do I place these files so they show up in the soft proofing profile list? If these files can not be read, what kind of file do I need in order for Affinity Photo to read them. So far I have been unsuccessful in getting these files to load. Will I need my printer to supply me with an ICC profile that corresponds with the PSF profile settings?
 -
 For the life of me I cannot figure out what I'm doing wrong with my printer profile. I am using Sawgrass Virtuoso 400 and I had been expecting to see it listed as a choice when using an adjustment layer for soft proofing. I had tried printing through the Sawgrass VPM but the colours are frustratingly wrong and I am totally out of ideas. As I am very green when it comes to these types of technical issues, any advice would be greatly appreciated.
 -
MacBook Pro 15" 2018 model with Touch Bar, macOS 10.13.6, AFP 1.7.2 I was working either with a Levels or Curve adjustment layer attending to out-of-gamut areas of a soft proof when AFP crashed. I wasn't doing anything I haven't done many, many times before. Several other .afphoto files were open in the same session. Here is the crash log: Affinity Photo_2019-08-22-231523_RRL-MacBookPro15.crash .
-
 I am very confused about printing. It doesn't make sense. Is there a tutorial on printing basics for Affinity Photo. I am very proficient on Photoshop but am finding it difficult to find my icc paper or how to create a profile for a certain paper. some presets appear from my photoshop printing but I don't see my list of papers until I go to Soft Proof. If i select a paper there and then select "Add Preset", that preset doesn't appear anywhere that I can see. any help would be a big help. thanks C.
 -
 I just updated to Affinity Photo 1.7. It seems that the option to check gamut in the Soft proof adjustment layer isn't working. In the previous version of Affinity Photo, when I imported a JPEG file created by DxO Photo Lab 2, added a Soft proof Adjustment Layer and configured it to use the profile for the Canon Pro 1000/500 Photo Paper Plus Glossy II, Absolute Colourimetric, Black Point Compensation and Gamut Check, large parts of the photo were displayed in grey and I had to add some adjustment layers to adjust out-of-gamut colors. In 1.7, no grey areas appear at all. Has something been corrected in 1.7 that was wrong in the previous version, or is something in 1.7 broken?
 -
 Hello Affinity community! I'm using Affinity Photo 1.5.2.69 on Windows 10. The soft proof adjustment offers me the following options: select profile Rendering Intent Black point compensation Gamut Check Opacity Blend Mode Blend Options But where can I enable or disable "simulate paper color"? I can't find it. Thanks for your help!
 -
 I have loaded the trial version of Photo and seem to have a problem with soft proof. As a test I exported some images from Capture 1 as PSD files. In Photo I add ( at the top ) a soft proof adjustment layer, select the canson Photo Lustre Premium RC profile. I can turn the layer on and off and there is no perceptible difference. With Capture 1 and Photo running concurrently on the same machine, same graphics card and same monitor I can switch between the Capture 1 image and the Photo image. Without soft proof on in Capture 1, the Capture 1 image seems to be the same as the image in Photo irrespective of the soft proof setting in Photo. When I select soft proof in Capture 1, the image changes significantly, this does not happen in Photo. The printer is a Pixma Pro 100S. There is clearly something wrong somewhere. I could have made a mistake but the process seems simple. I get the impression that I have not got any printer ICC profile to work in soft proof. I have not tried printing but I will not try that until I get soft proof to work. I have about 1 day left on the trial and I suspect that I am going to run out of time
 -
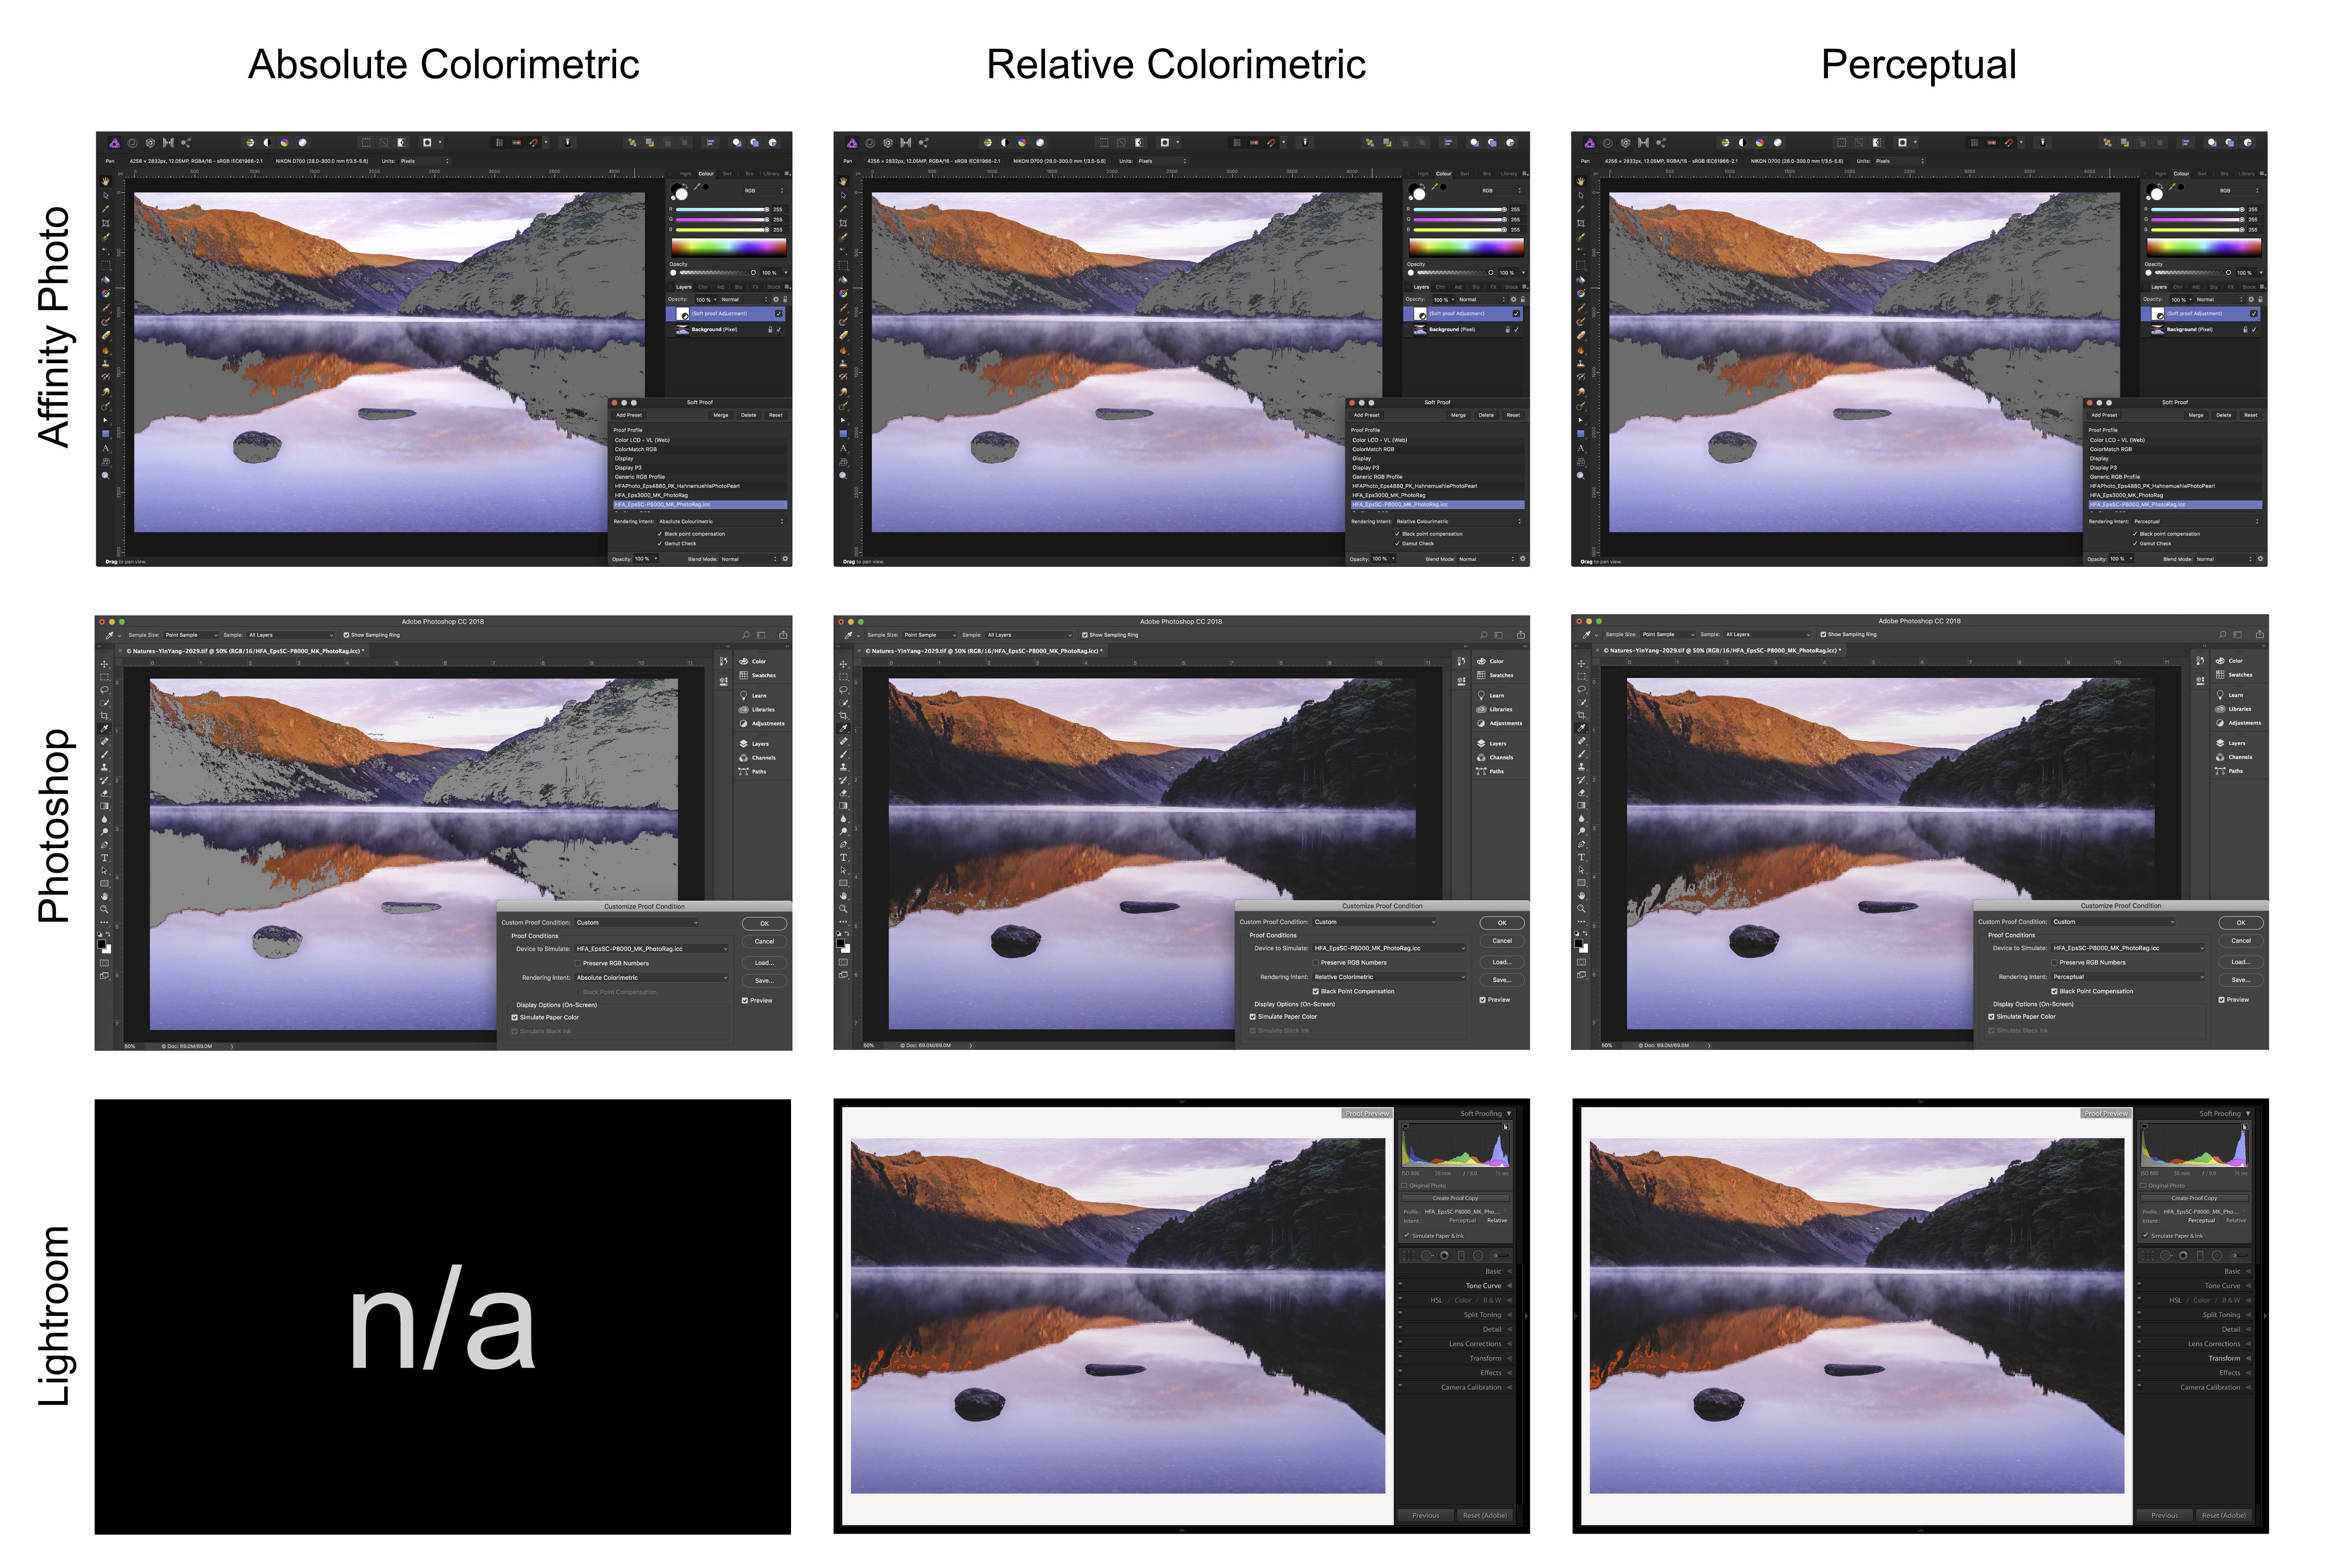
 Hoping someone can shed some light on an apparent issue with Soft Proofing in Affinity Photo, but first a little background; I am looking to switch from Adobe products and Affinity Photo will be taking over the role Photoshop has played so far in my workflow, and so far so good. Then recently I was contacted by a client that wishes to purchase a print of one of my photos. This is the first time I am making a large size print for a client so I am doing this via a gallery print lab (I have done printing on my home printer before so I know the basics of Soft Proofing, however it’s a home printer Epson XP-235 so no ICC profiles for that consumer model). So I though this is the perfect time to test out the soft proofing in Affinity Photo. However I am getting very strange, and what I assume are incorrect results out of Affinity Photo. The colour space required by the lab is sRGB and a TIF file with a DPI of 300 which will be printed on Hahnemüehle Photo Rag and are soft proofing using the ICC profile for the given paper and printer at the gallery, so far so good or so I thought. What first got me thinking something was off was when I changed rendering intent, in Affinity Photo and there was little to no difference between any of the intents and huge amount of out of gamut colour. So I went back to Lightroom and sure enough in Lightroom there was far from the same amount of clipping using the same ICC profile and rending intent. Hence I opened the file in Photoshop and here results were the same as Lightroom’s rendering intents (relative and perceptual), while Absolute matches what I see in Affinity Photo. I would have assumed since I use the same file with the same colour space and the same ICC profile on the same computer the results should be the same, unless one software is interpreting colours and the ICC profile differently which in that case begs the question; which is closest to the truth? Or is this a bug in Affinity Photo’s soft proof adjustment layer? (And yes I know that soft proof will never match the true to life print, however I like to get an as close to the print rendition as possible, but I now have a very hard time trustingt what I am seeing in Affinity Photo). Pictures speak louder than words, so here is a chart detailing the results I am seeing and as you can see it's a huge difference. Hope someone can answer this or if I am missing something in the workflow. Software versions: Affinity Photo: 1.6.7 Photoshop: CC 19.1.5 Lightroom: 6.14 standalone Thanks.
- 8 replies
-
- 1
-
-
- macos
- soft proof
- (and 2 more)
-
Hi, I have the latest version of Affinity Photo running on a MacBook Pro 17" under macOS 10.12.6. When I use a Soft Proof adjustment layer to soft proof my edited photo before printing, I check the box to show the out-of-gamut areas. The tutorial leads me to believe they should be grey, but they seem to be black on my setup, and, depending on the photo, it takes a lot of playing around with the Curves adjustment to get rid of most of them. Is there a special meaning to black areas, as opposed to grey? While I'm at it: Where can I read up on curves, gamut, etc.? I've never used such a photo editing program before, not even Lightroom or Photoshop. Thanks.
-
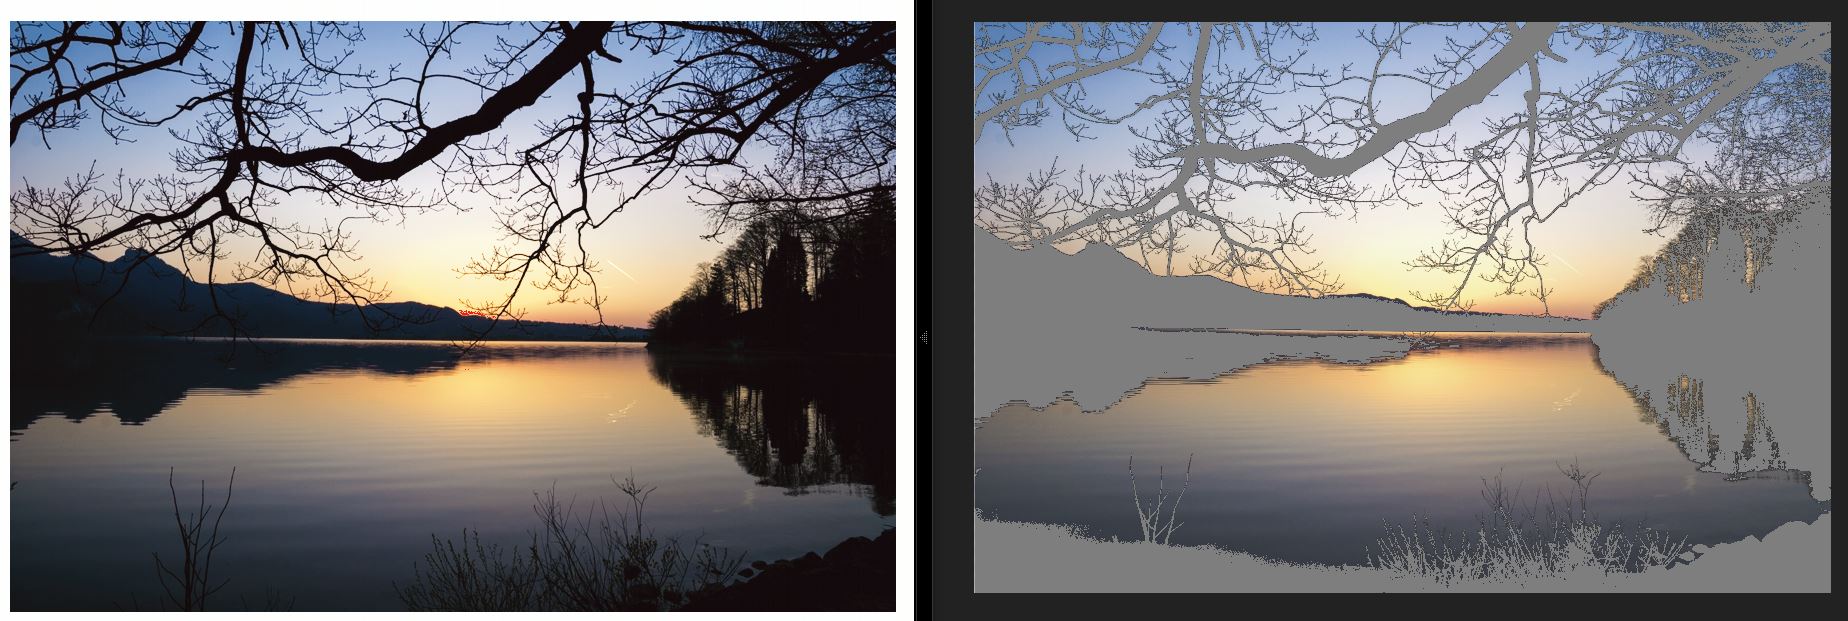
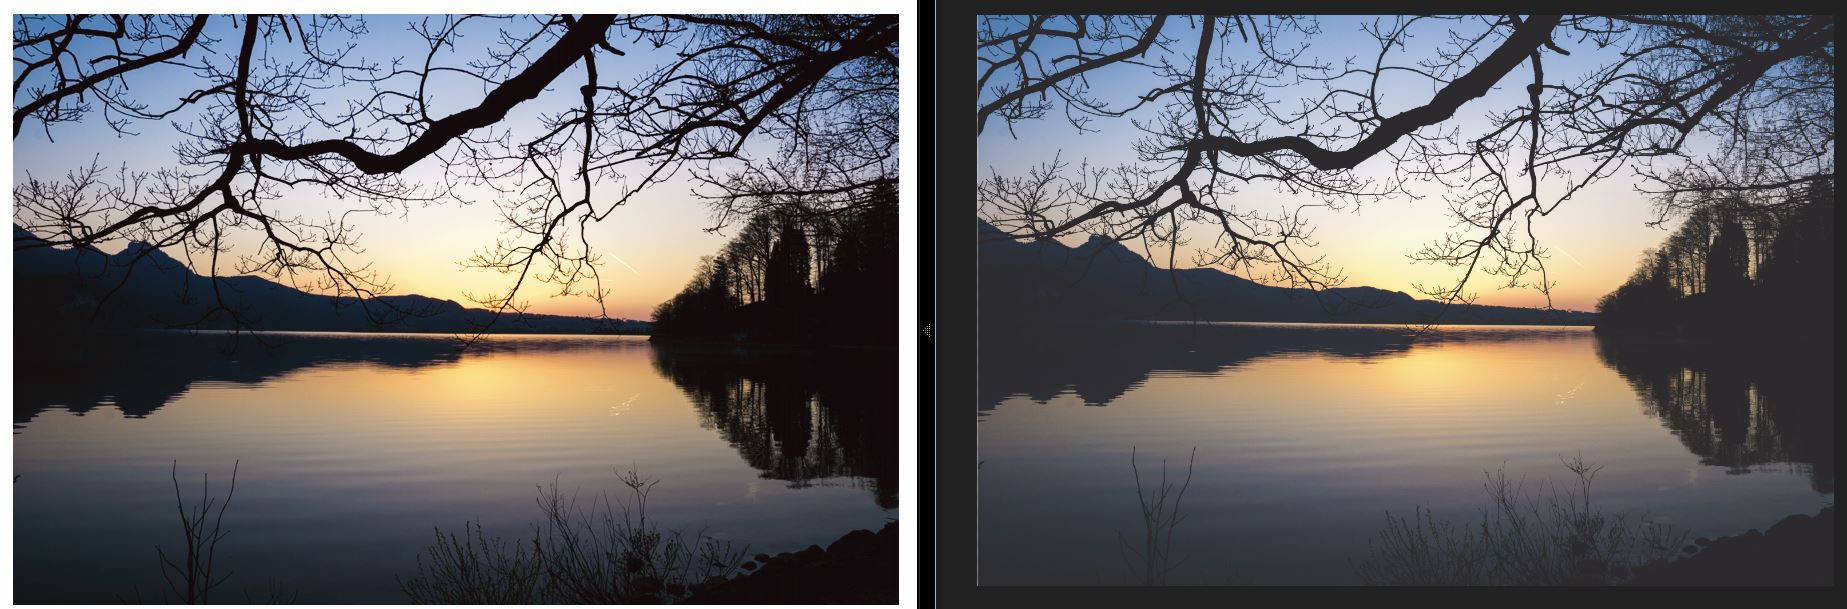
 Hi, I've got some problems using the soft proof adjustment layer in Affinity Photo. I am so far unable to replicate the behaviour of Adobe Lightroom (which worked pretty well). I've attached two images here showing the difference in results (left side LR, right side AP). Gammut check is totally off in AP and the shadows are way to bright in the preview. I'm using a color profile provided by the photo lab for their exposure unit and they specify exactly what settings to make for which of their products. In this specific case: Retain CMYK-numbers: n/a Retain RGB-numbers: off Rendering priority: relative colourimetric Black point/shadow compensation: on Emulate paper color: off The shadows in the LR preview also get (somewhat) brighter if I turn paper color emulation on, however that is wrong and I seem to be unable to turn it off in AP...? I hope I'm just missing some settings hidden in another dialog? It seems to me that AP sadly isn't usable for soft proofing in all cases...? I would be grateful to get rid of LR, so any help is appreciated! Thanks, Henning
-
 I'm puzzled about how I can use Adoramapix' icc profiles. I'm preparing grayscale images, originally medium format negatives scanned. Affinity assigns Grayscale D50. There doesn't seem to be a way to assign Adoramapix icc profiles to the documents, despite my having downloaded them from Adoramapix. Is my best option just to use the Adoramapix profiles to soft proof, and edit my work accordingly?
 -
 Hello, Do you think you could tell me what "Soft Proof" is? I click on it and the default preset looks quite nice on the photo. Should I use it for just getting a certain look or is "Soft Proof" something else that I shouldn't touch? Thanks!