Search the Community
Showing results for tags 'icc profiles'.
Found 15 results
-
 I have installed a couple of ICC print profiles to my Mac (running OS Monterey). They are available in the drop down menu when I export a pdf in APub 2 (so they are in the system) but are not visible options when I try to convert an image's profile in APhoto 2. Yet the profiles are visible when I select 'apply a new adjustment layer' and then 'soft proof'. However, when I come to assign and/or convert the image, the ICC profile is not visible in the drop down menu, just the 12 profiles that came with APhoto. I am very much a novice when it comes to Photo software and Affinity suite in particular. I am perplexed (again!).
 -
This is a Color Test (for my own illumination) and I'm sure others will have some wisdom to share. In the past, the safe route was to work in a wider gamut color space to preserve color and avoid premature clipping (ProPhoto RGB, Adobe RGB, P3, etc), then convert my small JPG files to sRGB for emailing and web posts to be sure other saw essentially what I saw (limited to sRGB, of course). That was a good approach for images heading to an inkjet or to a press too because sRGB whacked a lot of colors that can be printed using CMYK inks (not to mention additional ink colors and spot colors). I have a good friend who is an experienced, color management professional and it's his opinion that converting to sRGB is no longer necessary (with a few limited exceptions here and there). Most browsers and email clients are color managed these days. I respect his judgement, but it's always nice to test and get some confirmation and feedback, which is what this post is all about. I created a composite image in AP v2.4.0 and used Apple's Display-P3 profile in this file. I purposely chose an image that has skin tones, some subtle shades, some bright colorful portions, then added some grayscale and fully saturated color patches for evaluation. I wanted any differences to be visible if they existed. ( I haven't viewed the results on this forum yet, as I am still creating the original post.) I'll attach the original AP file, along with 3 different exported JPG versions, all 2000px on the long side, at 85% JPG quality. 1. First, I exported the Display P3 original from AP and embedded the Display P3 profile in my first export. On my Retina display, that is the brightest JPG of the three, since my display IS a P3 display. So, the color patches retain their original saturation and brightness. 2. Next, I exported the Display P3 file from AP, but on export, I converted the file to sRGB 1966 and embedded that profile in the export. As expected, the saturated color patches are less saturated because they are now clipped to the smaller sRGB gamut. The rest of the image looks pretty much identical on my Retina display and also on an old Viewsonic sRGB gamut LCD display (about 15 years old). That is what I was expecting and hoping for. 3. The third JPG image export I did differently. First, I converted my original AP file from Display P3 to sRGB. Then, I exported to sRGB. The color patches look the same as in No. 2 above, which I expected. My daughter also looks the same overall. However, I was a bit surprised to see that the foliage in the background showed a tonal shift (slightly darker) compared the the sRGB exported from a Display P3 working space. This was the same result on my Retina and Viewsonic monitors. As mentioned, I haven't seen the result as posted on the forum yet, but I will after clicking the "Submit" button. By the way, I chose Apple's "Display-P3" profile for this test. Why? It uses a tone curve that looks identical (or at least very similar) to the tone curve in sRGB. This should minimize any tonal changes between sRGB and Display P3 (which is why I was a bit surprised to see the foliage in No.3 above different from No. 2 above). DCI-P3 (at least the version I have) is an ICC v2 profile and was supposedly designed with cinemas and theaters in mind, so they use a very low white luminance and a gamma of 2.6. For the work I do, I felt Display P3 made more sense. BTW, the Apple Display-P3 profile I have is an ICC v4 profile. So, there it is. I suspect some people will have some interesting feedback, so bring it on!! I'm about to click Submit, so I'll get a look at the post at the same time you do. Thanks. P3-sRGB Test.afphoto

-
 This is one last Hail Mary before reporting the following as a bug. I'm rolling this over to this forum because the problem is still present in Affinity Photo 2. But do please see this post in the Pre-V2 Archive of Affinity on Desktop Questions. A brief summary: I'm on a Windows 10, 64-bit machine, now running Version 2.2.1 of AP. When I first reported this problem on February 4, 2020, it was in Version 1.7.3.481 of AP. The "Proof Profile" list in the Soft Proof adjustment layer continues to list icc files that were deleted from C:\Windows\System32\spool\drivers\color years ago thus. This continues to be the case even after a restart of Affinity, and for that matter after a restart of the computer, and for that matter after having updated from AP1 to AP2. To my knowledge, I never imported these ICC files into AP using the "Import ICC Profile..." function on the File menu. I think I've been through all of the various AP files installed on my computer, but have not been able to find these "ghost" ICC profiles. These "ghost" profiles actually work, i.e., selecting them changes the look of the image. So it's not just that they're still listed, it is that they are still active somehow... I'm hoping the fact that this problem continues to exist even after having updated from AP1 to AP2 might set off some bells for someone... Thanks in advance and happy shooting to all.
 -
 It would be nice if Affinity would symlink or just install the ICC Profiles that Affinity ships with into /Library/ColorSync/Profiles So they should up in the Color Sync Utility.app making it possible to view profile and compare them.
 -
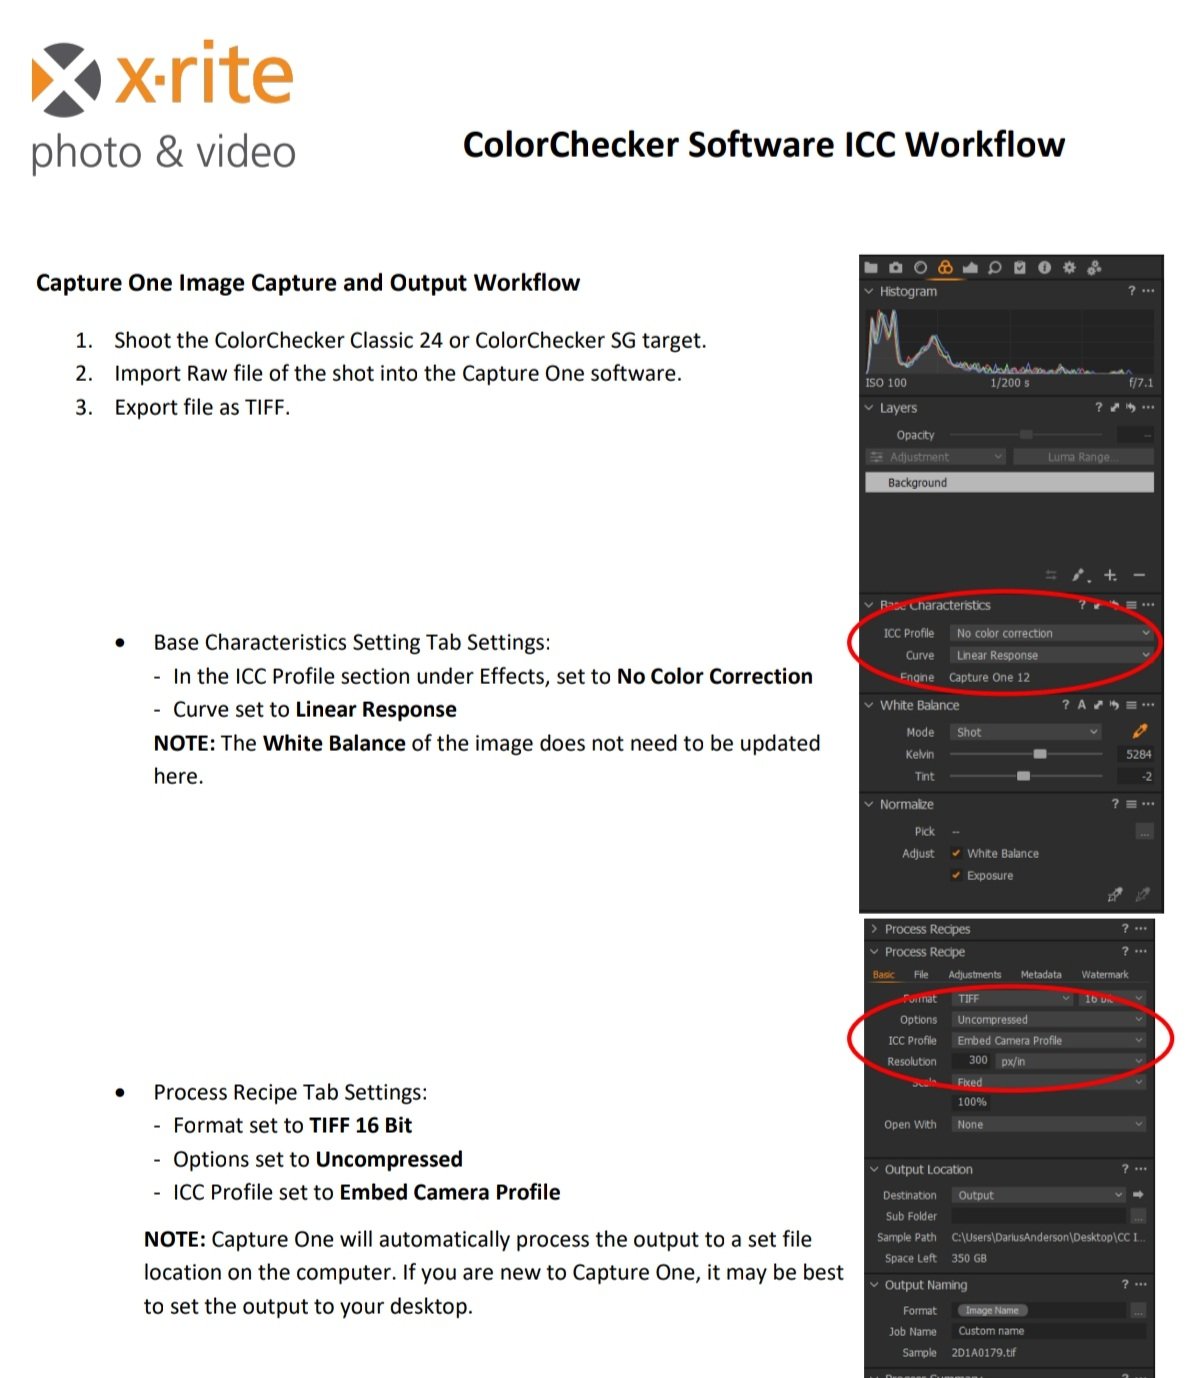
 It has been well established that Serif is highly unlikely to ever include integration with any calibration vendors' software in the Affinity products. Fortunately, many of these calibration tools will also generate an ICC profile which can be attached to an image file. The Calibrite/ X-Rite tool requires a TIFF file that has had no color correction whatsoever done to it. Unfortunately, they only provide instructions for exporting said TIFF file using Capture One, a very expensive program. I have included a screen shot of those instructions. Basically, they say to set the ICC profile to "no correction" and set the color curve to "linear response." Then export the TIFF as 16-bit, uncompressed, with the original camera profile that same "No Color Correction" profile embedded. So, the question is: Can Affinity Photo 2.1.1 export a similarly non-corrected TIFF file? If so, how? Conclusion: Affinity Photo can not export a non-corrected TIFF because it is impossible to get Affinity Photo to NOT apply any correction in the Develop Persona. It will always correct the image, both for viewing and for any exports. In addition, I have learned (thanks to @lepr that Affinity Photo would never be able to make use of any ICC Profile generated by the Calibrite software because, again, Affinity Photo does not let you change the ICC profile that it uses when in the Develop Persona. (If you ask me, they should change the name to something like "Let Us Force You to Do What We Want You To Do With Your RAW Files Persona. But anyway...) I have a tiny shred of doubt that this is true. But that doubt is based entirely on wishful thinking. So I'll see if I can prove @lepr wrong. But I doubt I will be able to. I have concluded that I will need to use the free and open source tools ImageMagick (suggested by @v_kyr) and RawTherapee, along with some scripts in my favorite DAM utility, IMatch, to get what I need done. It is a little disappointing to need to completely ignore the Develop Persona within Affinity Photo but oh well. And it will take more work. But I think I will be able to do it. After using those tools, I will then need to use a different script to export a color corrected TIFF file to be opened with Affinity Photo for any edits that need to be applied to only specific areas of the image.
-
 I've recently saw by random, during some script app parsing under MacOS, that all the ICC profiles inside the installed Affinity apps (APh, ADe, APub) have execution permissions ... > cd "/Applications/Affinity Photo.app/Contents/Resources" [/Applications/Affinity Photo.app/Contents/Resources] ○ > ll *.icc -rwxr-xr-x 1 root wheel 560 Apr 10 2021 AdobeRGB1998.icc -rwxr-xr-x 1 root wheel 552 Apr 10 2021 AppleRGB.icc -rwxr-xr-x 1 root wheel 557120 Apr 10 2021 CoatedFOGRA27.icc -rwxr-xr-x 1 root wheel 654352 Apr 10 2021 CoatedFOGRA39.icc -rwxr-xr-x 1 root wheel 560 Apr 10 2021 ColorMatchRGB.icc -rwxr-xr-x 1 root wheel 557168 Apr 10 2021 JapanColor2001Coated.icc -rwxr-xr-x 1 root wheel 557168 Apr 10 2021 JapanColor2001Uncoated.icc -rwxr-xr-x 1 root wheel 557172 Apr 10 2021 JapanColor2002Newspaper.icc -rwxr-xr-x 1 root wheel 557164 Apr 10 2021 JapanWebCoated.icc -rwxr-xr-x 1 root wheel 557168 Apr 10 2021 USSheetfedCoated.icc -rwxr-xr-x 1 root wheel 557168 Apr 10 2021 USSheetfedUncoated.icc -rwxr-xr-x 1 root wheel 557168 Apr 10 2021 USWebCoatedSWOP.icc -rwxr-xr-x 1 root wheel 557164 Apr 10 2021 USWebUncoated.icc -rwxr-xr-x 1 root wheel 654140 Apr 10 2021 UncoatedFOGRA29.icc -rwxr-xr-x 1 root wheel 654140 Apr 10 2021 WebCoatedFOGRA28.icc ... why are those icc-files flagged as being executables at all here?
 -
 I have an Epson ET-7700 ecotank printer on which I would like to print astro-photographs using Affinity Photo. So far results have been disappointing. The photos look dull and somewhat lack lustre and, although I appreciate they will not look as good as on screen, I feel they could be better. These photos are not for exhibition. They are just for pasting into my notebook or sticking up on the wall occasionally. This is not a question about how or where to get photos printed professionally. Does anyone have any advice? Some background info: All images are opened in Affinity Photo as tif 16 bit unsigned integer. I usually do a bit of resizing, changing DPI to 300 etc in Affinity and save as afphoto format. I am printing onto Epson Premium Glossy PhotoPaper which I can select within the printing menu. I have the drivers for this printer installed. They are updated. I use the printer for everyday printing, no problem. I have watched lots of YouTube videos on how to print in Affinity Photo including about ICC paper profiles, Soft Proofing blar blar blar but absolutely none of them have been any help whatsoever. Does anyone know: # Whether one should select ColorSync or Epson Color Control in the Color Matching menu? I’ve tried both without much effect. # Within the Color Sync menu there doesn’t seem to be a profile for the Epson Glossy Paper. Should there be? # If adding a soft proofing layer should one be able to select Epson glossy paper. The profile simply isn’t there in my case. I can boost the exposure a bit which helps. But I feel there should be a more systematic approach. Any thoughts/advice appreciated.
 -
 I'm new to Affinity products and having a difficult time understanding how to assign a printer output profile within any of the Affinity apps. I want the Affinity app to perform the color conversion when printing, not the print driver. Coming from the world of Adobe, where this process is pretty straight forward, I cannot find a similar methodology in Designer, Publisher, or Photo. Can anyone please explain to me how to tell an Affinity app that I want it to handle the color conversion, and to assign an output profile for my printer and paper, rendering intents, etc.? Typically, I use AdobeRGB as my working space. I do not want to have to do a manual conversion (menu: Document/Convert Format / ICC Profile...) from the working space to the printer color space before printing. I want the print process to handle the conversion on the fly. I'm on v1.8.3 on all apps, MacOS v10.15.5 Thanks!
 -
 I want to buy a Colorchecker passport soon, but understand that Affinity Photo has no support for that. So I wanted to test how it works when I create an ICC profile with X-rite's software, and assign this profile to a photo. I have downloaded a test file from the internet and generated an ICC profile. Only, when I want to print such a photo and use a Soft Proof adjustment layer, nothing happens. I'm pretty sure some colors are out of gamut. I tested that with GIMP, which does issue out of gamut warnings for the same image. But in Affinity Photo the image remains exactly the same with the Soft Proof adjustment layer on or off. Does anyone have an idea why this is so? Are not all ICC profiles compatible with Affinity? I wanted to attach the files I tested with in this post, but getting an error -200.
 -
 Hello everyone. I had hoped that such problems were behind me - but no. To begin with, let me say that I had similar problems with my Canon PRO100 but, after months working on them with help from Forum members, several Canon Tech people and Datacolor, I eventually managed to get my printer NOT to do its own color management (Even though color management was set to NONE, it still did it.) I was using Windows 7. Now, on another PC, running Windows 10, I have the same problem with an Epson XP960. The Auto setting does a pretty good job (I am using Epson paper) but I wanted to do better and so created (as I have done many, many times) custom ICC profiles. Soft-proofing on the monitor (a high-quality,14-bit LUT calibrated model) worked just as expected. I then, as the manuals instruct, switched off the color management in the Epson printer dialogs and selected color management by the App in Publisher (and in Photo). I then selected the ICC profile I had just created and printed. The prints were very dark, nothing like what the soft-proofing suggested (and I made sure that I de-selected the soft-proofing before printing). I then tried the additional things that, eventually, got things to work on Windows 7 with my Canon PRO100. (This entailed going into Properties, selecting the device and setting color management to Use My Settings and (manually) adding the new ICC profile to the list. Sadly, and although I have tried all the fixes I had to use to get the Canon PRO100 NOT to do color management (and let the app do it) I simply cannot find a way to STOP my Epson XP960 from doing its own color management. To summarize, if I let the printer do the color management, things work reasonably well. If I try to do better by having the app (either Photo or Publisher) do the color management (selecting the appropriate ICC profile and Rendering Intent) and selecting; More Options -> Color Correction -> Custom -> Advanced -> No Color Adjustment, the prints are much too dark, wildly different from the originals. Does anyone have a suggestion?
 -
 Hello, Adobe Acrobat Pro (and not Reader) allows an icc profile to be selected to match media. Looking to test a different software that also allows icc profiles to be set. For some reason, my Affinity Publisher PDF output files do not export correctly for printing in Acrobat. Chunks of image are missing, and data outside the image area like the colour bars and file name printed at the top of the document do not render correctly in the print preview window. The text is broken and rough. Lines are not connecting. This is confirmed on 2 different computers. It is the same with both Adobe Acrobat Reader and Acrobat Pro. This does not happen when printing straight from a browser. I am using the same Epson printer dialog. The same paper settings etc, except I cannot set an icc profile. Besides Acrobat, is there a preferred PDF editing software for Affinity Publisher users that allows advanced printing features? Thanks in advance. RT
 -
 I am very confused about printing. It doesn't make sense. Is there a tutorial on printing basics for Affinity Photo. I am very proficient on Photoshop but am finding it difficult to find my icc paper or how to create a profile for a certain paper. some presets appear from my photoshop printing but I don't see my list of papers until I go to Soft Proof. If i select a paper there and then select "Add Preset", that preset doesn't appear anywhere that I can see. any help would be a big help. thanks C.
 -
 In Photoshop, if I turn on 'Proof Colors', and in the 'Proof Setup' I choose my own monitor's profile (PS calls it 'Monitor RGB') I get to see the same colors during editing (in PS), exporting (save for web) and in Finder (in Quick Look, or in Preview), and even in all the browsers (Safari Chrome). As not all software can use ICC profile, I find this the best way, to ensure, that the image will look exactly the same everywhere. I'd like to do the same in Affinity Designer: I'd like to export an image with no embeddded color profile, but after export, the colors are slightly different. What I'm looking for, is a solution for seeing the end result before exporting. So basicly I'd l'd like to proof for 'no profile', or for the monitor I'm using. I'm familiar with the soft proofing method in AD (with a Soft Proofing adjustment layer) but I dont find 'no profile' option in the 'soft-proof' dialog. I found a profile named 'Display', and I thought this is how AD refers to the monitor's own profile, but It looks like this is not what I was looking for, as it doesn't change the colors at all. Is there a way to proof for no profile? Or a way to install a custom profile (my monitor's) Please advise! Thanks in advance.
 -
 Hallo, I am not actually sure if this is a 4 legged bug, but I was going through the soft proofing dialogue and noticed an absence of generic profiles that are always automatically added say for example in adobe creative suite packages. Namely those that come from a printer that you have installed. Since I need to have custom ICC profiles made I was wondering about two things: 1. Is there a reason why generic ICC profiles have not been picked up by affinity from my installed printer, and 2. Would affinity publisher automatically recognise custom made ICC profiles when I install them ? My "machine! is an 'orrible windows 10 all up to date, in case that is relevant? Thanking you for your hard work by the way. Chris
 -
 As described in the support request "Trouble with soft proofing", it would be great to be able to do proper soft proofing like in Adobe products (Photoshop / Lightroom). Among other things, an option to activate or deactivate the "paper and ink simulation" is currently missing, which is required for some icc profiles (i.e. from high-end photo print service providers). It would be really great not having to use Lightroom anymore for soft proofing! Thank you very much in advance!