Search the Community
Showing results for tags 'clipping mask'.
-
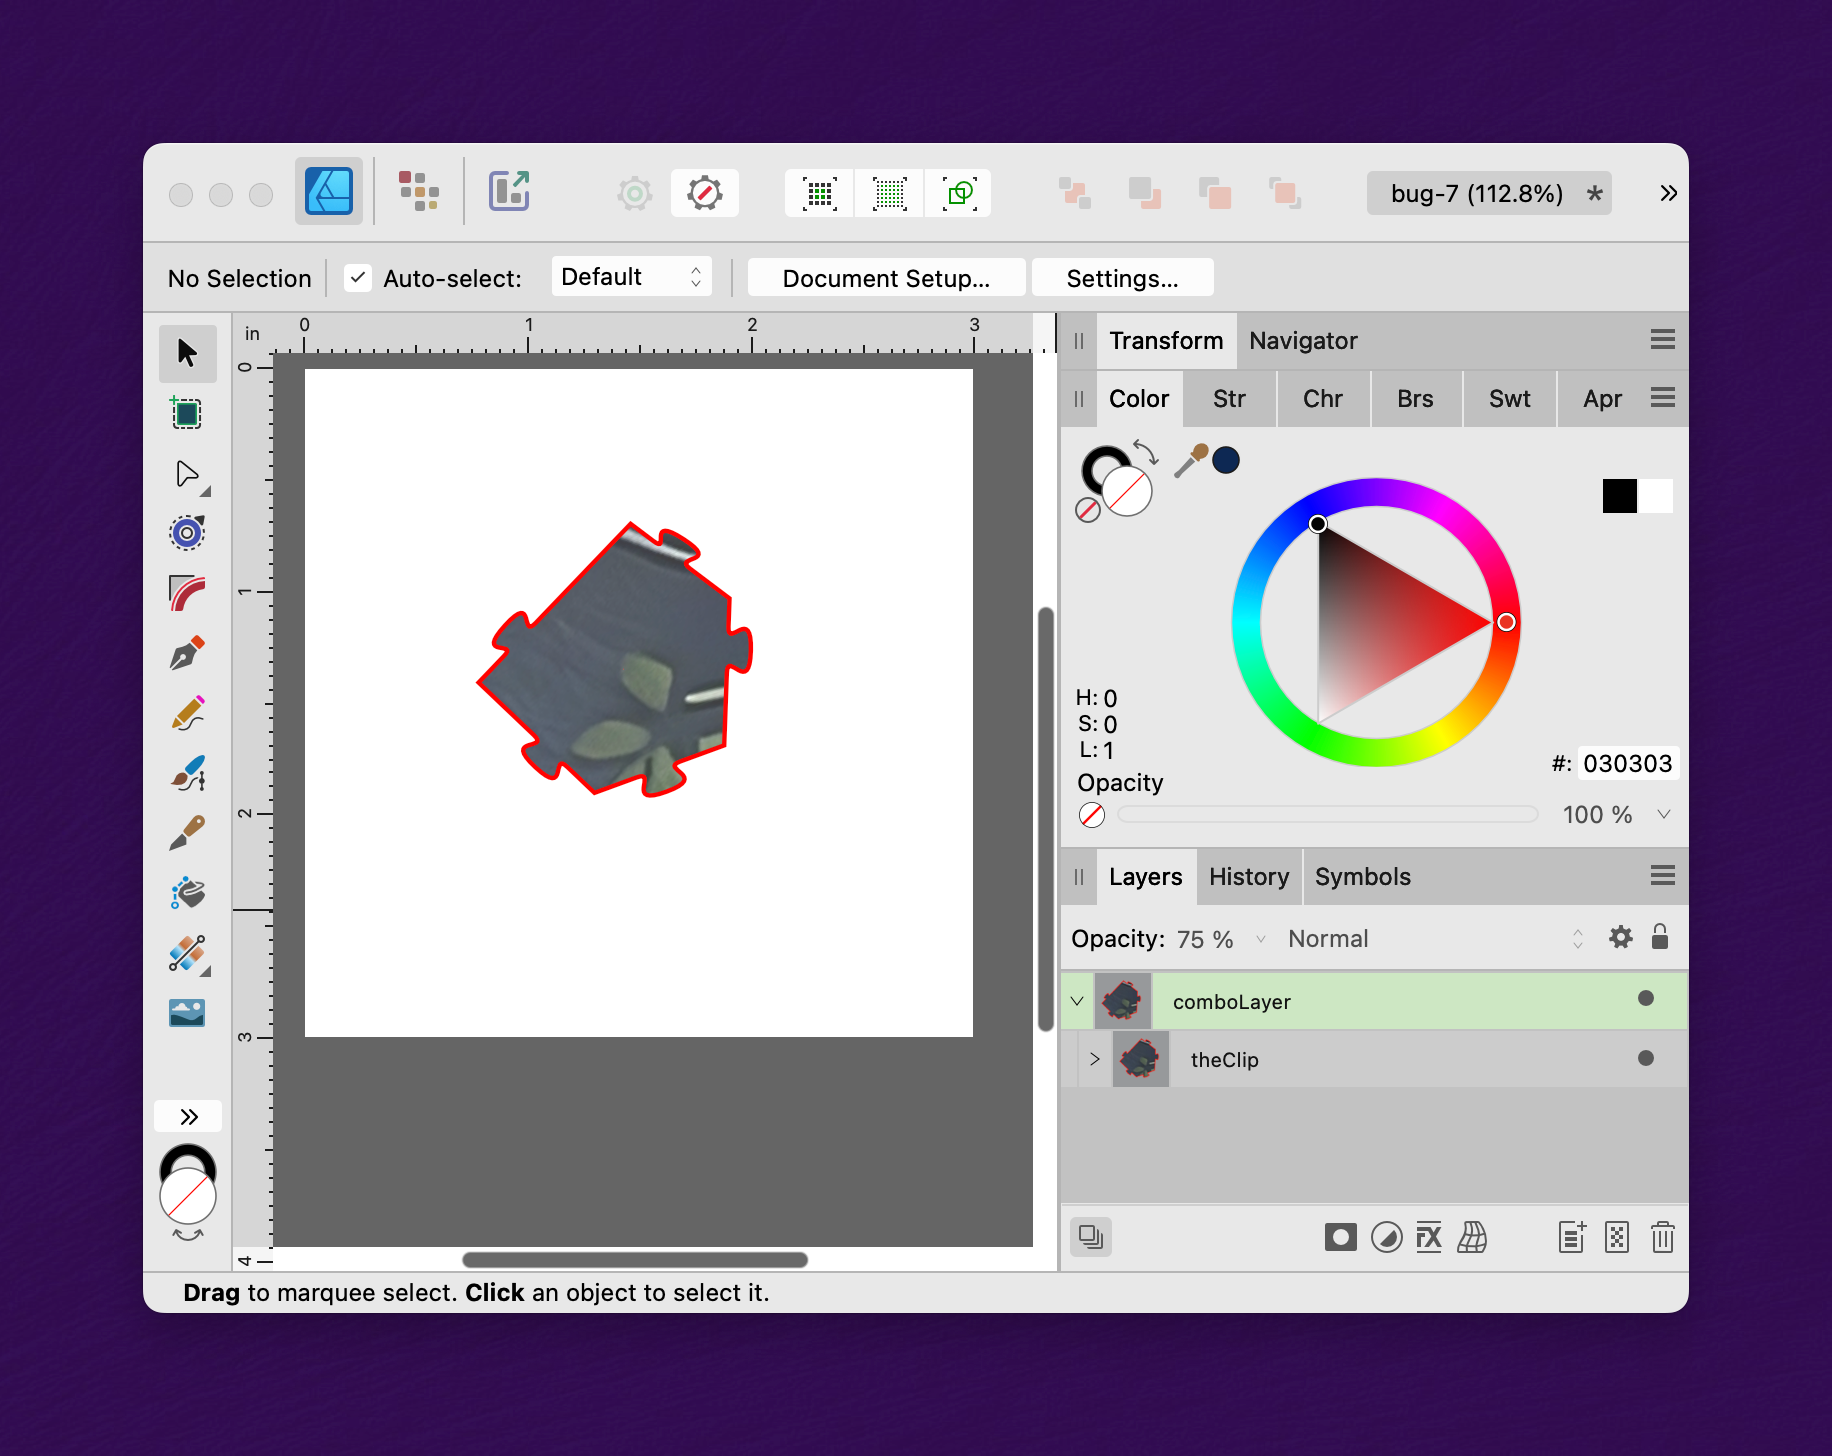
Summary: The object to be clipped unexpectedly moves when using Layer > Arrange > Move Inside (instead of using "Paste Inside", or dragging the object onto the clipping path in the Layers panel). Application: Affinity Designer 2.1.1 OS: MacOS 13.5 Reproducible: Yes. Detail: Open the attached .afdesign file. You see an image and a clip path. The task is to apply the clip path to the image. Either of the following procedures gives the correct result: A. (Works.) Select "theImage"; then "Cut"; then select "theClip", then "Paste Inside". B. (Works.) In the Layers panel, drag "theImage" onto "theClip". The correct outcome looks like this: However, the following procedure gives an incorrect result: C. (Doesn't work.) Select "theImage"; then "Layer > Arrange > Move Inside". As you can see in the screenshot below, "theImage" has moved inside "theClip" according to the Layers panel; but notice that the X/Y coordinates of the image have inexplicably moved, so that it no longer is within the bounds of "theClip". Additional notes: 1. The manual says that the action of "Arrange > Move Inside" is that it "moves the object inside the object above it on the Layers panel". That's a typo; it actually moves the object inside the object below it. 2. If you first move the image and clip path outside the layer, then it works as expected. 3. The reason I wish to use method (C) instead of methods (A) or (B) is that it's more suited for scripting with an external macro utility. Thanks for your consideration. bug-7.afdesign

-
 I was wondering, now I am using a vector object with a 50% opacity and multiply blend mode, but could I also use an Ellipse vector object to clip adjustment layers with? The workflow is that I have symbols which should affect the background image. by darkening the portion of the symbol.
-
 Hi, I'm rather new to Affinity Photoshop- I'm not amazingly experienced in Adobe Photoshop, but I'm way more familiar with that.... I recently began shooting color negative film and dislike the color correction in my scanners software and the Vuescan software and wanted to learn how to do it myself in photoshop. I found a tutorial online, however, I cannot figure out how to do the "Levels Clipping Mask," ...here is the tutorial: https://petapixel.com/2017/02/01/edit-color-film-negatives-photoshop/ Basically, I know from the Affinity help page that I can press the "alt" key when I'm adjusting the Black and White levels when I'm in specific colors such as red or blue, but it just turns my image either all black or all white, and I'm not sure how to make it actually work like it's supposed to? It seems to do the job when I do it on the Master for the RGB levels, but not any specific color? Am I doing something wrong? I hope this makes sense! Thanks! -Jenny
 -
 In this Affinity Photo v2 tutorial I show how compound masks can be so useful in your workflow. I saw this tutorial done on Photoshop by Mood on YouTube, but without compound masks and thought about how much better compound masks makes it in Affinity. https://youtu.be/vuRlbRMUA8k Note I also have an iPad version of this tutorial on y channel
-
- 3
-

-
- affinity photo
- v2
- (and 4 more)
-
Power tools of Affinity #29. Protect Alpha vs Clipping Mask Affinity Photo Tutorial. When should you use Protect Alpha in Affinity Photo and why? This Digitally Fearless tutorial shows how to do it in both the desktop version and iPad version of Affinity Photo. https://youtu.be/J7FhTQUQ7D8 #affinityphoto #clippingmask #digitallyfearless
-
 Hi guys, I'm back with another tutorial video. In this video, I'm gonna show you an easy photo composite idea, how to create Clipping Mask in Affinity Photo, a simple yet useful feature. I hope you enjoy and learn something new from this video, Thank you!
 -
Double Click #26 of Affinity Photo Powerful Tools. Using double click makes it easier and saves you time. This is an Affinity Photo beginner tutorial and number 26 of the Digitally Fearless Power tools of Affinity Photo playlist. https://youtu.be/chftxH7U7To
-
- 1
-
-
- double-click
- groups
- (and 2 more)
-
If you have trouble getting layers to clip, try using the Insert Inside Selection button. This is an Affinity Photo beginner tutorial and number 24 of the Digitally Fearless Power tools of Affinity Photo playlist. https://youtu.be/0rkizBHum50
-
 I'm having this recurring issue, where if I clip something to a shape/curve at an angle the original shape/curve fill bleeds into the edge, which is particularly obvious when clipping a light color to a dark color as shown here: Can anybody help? Much appreciated clipping mask error.afdesign
-
 This is driving me nuts and I'm sure there's a simple answer. I use clipping masks a lot when laying out content. In Illustrator, once I've placed the mask, I can easily resize/reposition the masked image without affecting the size or position of the mask itself. In Affinity Publisher, however, once I mask an image, I can reposition/resize the mask to my heart's content, but I can not for the life of me find a way to reposition or resize the image within the mask without releasing the mask altogether. Is this possible? If so, how?
- 4 replies
-
- 1
-
-
- clipping mask
- mask
- (and 2 more)
-
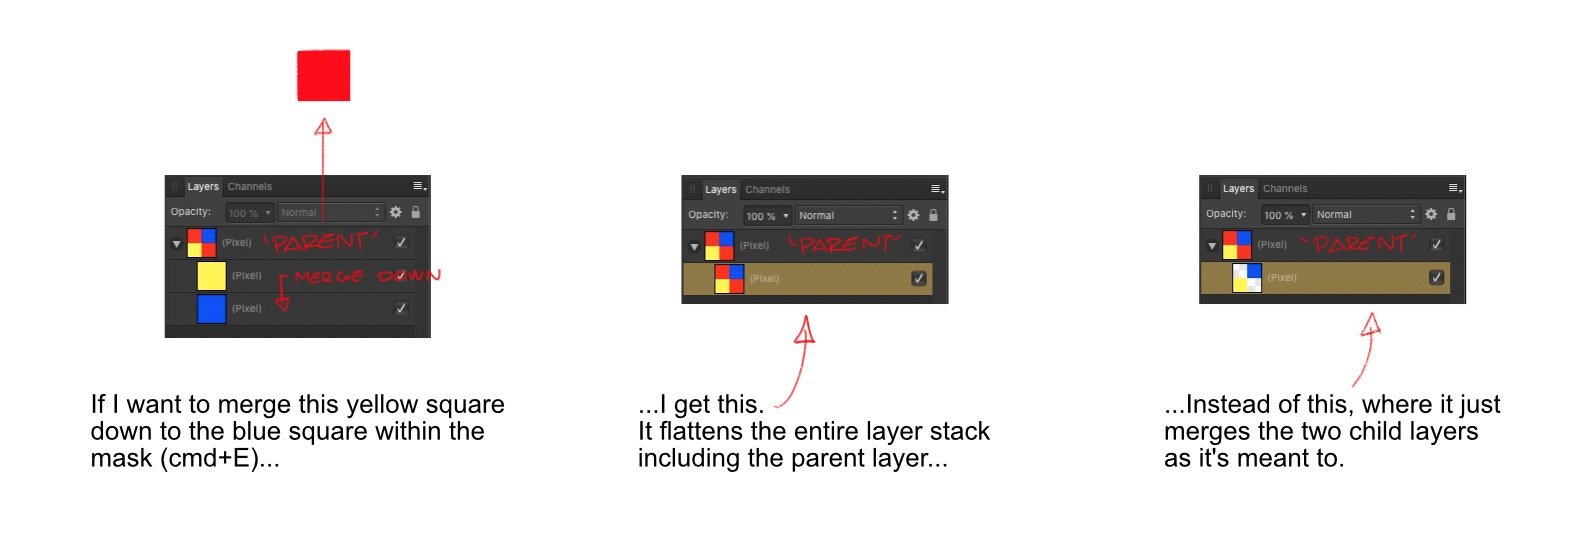
I've noticed a bug when merging layers down while they are part of a clipping mask. When you have more than one clipping layer on an object and you merge it down to the layer below it, it flattens the entire mask stack (including the parent layer) instead of just merging the two clipped layers. A bit tricky to articulate, but I've added an attachment here to try and visually explain what I mean.
-
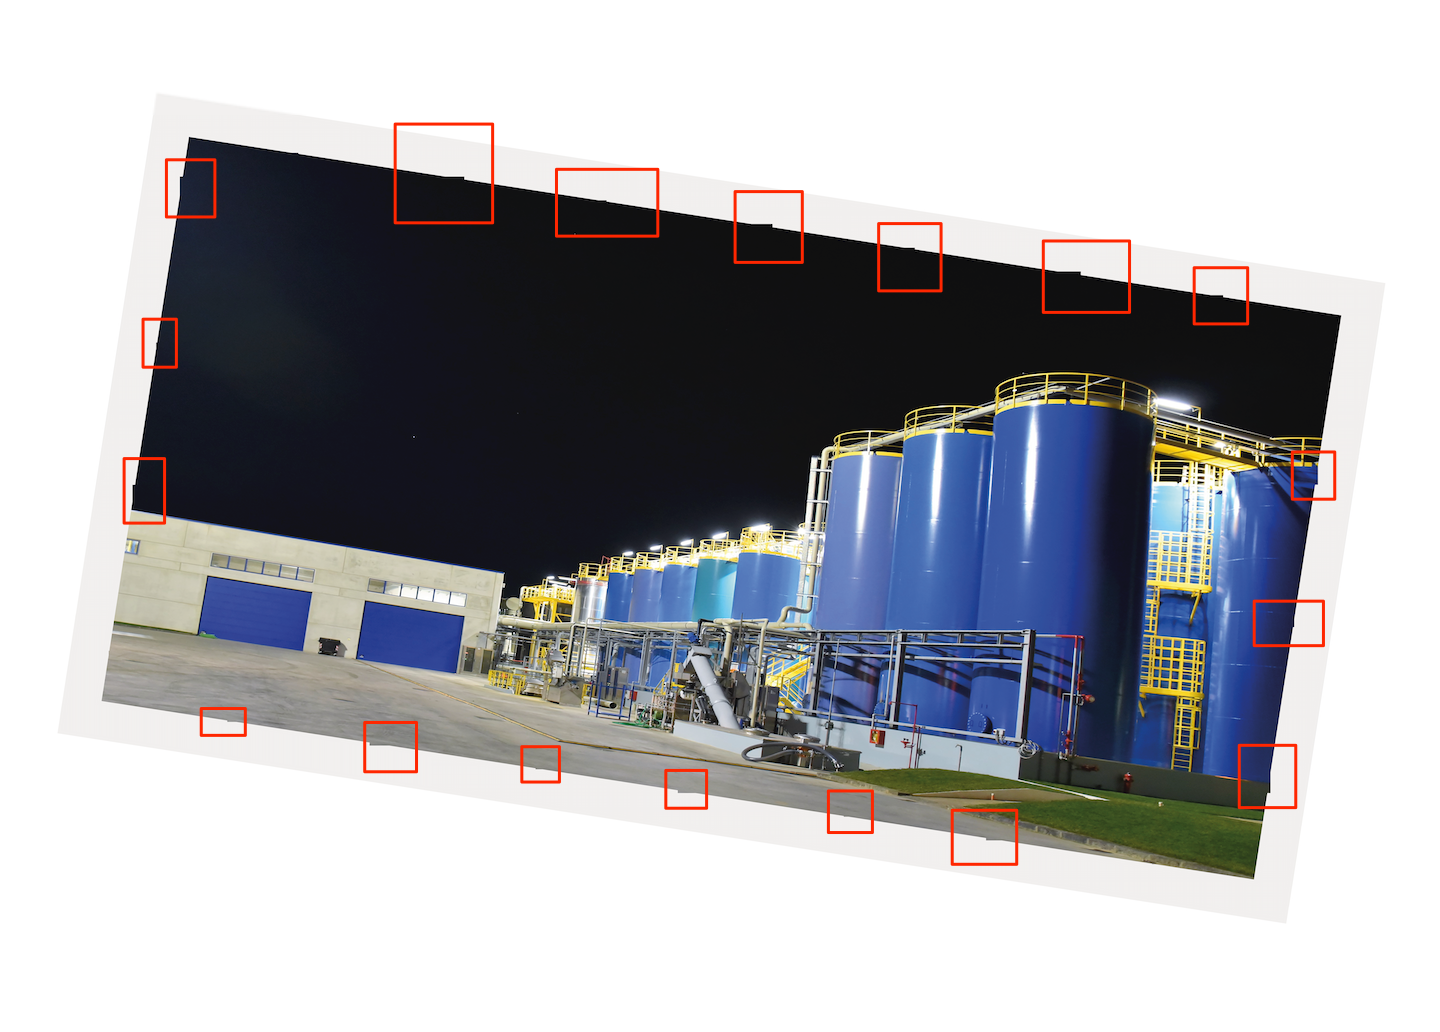
 Hi, I'm experiencing this issue: I have an image clipped inside a rectangle (mask), and the rectangle also have a stroke set. When exporting, or rasterizing the layer artifacts appear on the image edge, it looks like there is some computation error in the subdivision. To reproduce just open the attached Test.affinity and export in Tiff with default settings. Additional info, the issue happens when the clipping mask stroke is set to be inside, see stroke setting pic. Affinity Photo version 1.7.2 release, issue reproduces both on macOS and iPadOS Test.afdesign Test.tiff
-
 Just watched the video, I presume was released last year, about the new Studiolink. LINK - https://affinityspotlight.com/article/focus-on-studiolink/ At 6 min and 20 seconds, the presenter proceeds to clip a blurred image with a square set over a text box. This leaves the entire picture unblurred and only the area under the box is blurred. I have gone through that video step by step and cannot reproduce the effect he achieves. every time I attempt to clip the image with the box, I am left with just the blurred image inside the box and the rest of the image disappears. I am using Windows 10 and Publisher 1.83.642 (latest release), Designer and Photo are also of the same release, the presenter however is using a Mac, does Publisher perform so differently on a Mac that you cannot obtain the same results on a Windows machine?
-
 Hello, I am trying to get this design finished for a t-shirt, but I am having difficulty getting the palm tree/island and the seagulls (both in black) to where they are cut out of the background circle and appear transparent like the lines do. Help? I will say that the palm trees, island, and seagulls are all on different layers. It is not one joined image (which I believe is giving me the problems). When I used Photoshop, I would just use the magic wand tool and cut out the image (which would make it transparent). I made a red background to see the problem spots.
-
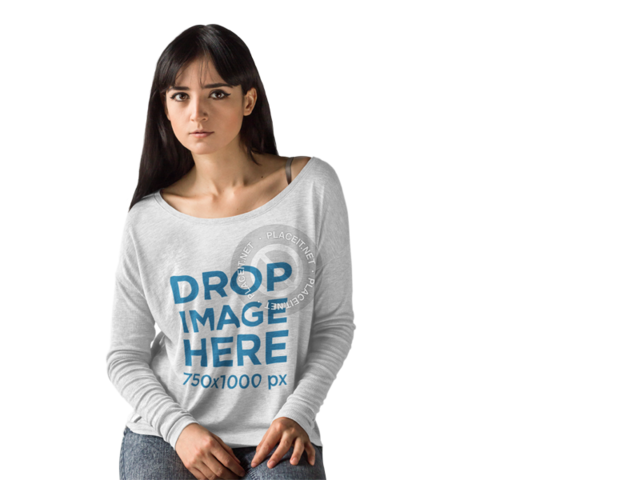
 Hey there, just started using Affinity Photo, and I cannot figure out how to drop an image into a phone case template that is at an angle. I know I how to drop image in, but than I have to turn the image to the correct angle of the case. Is there another faster way of accomplishing this? I've seen it done in photo shop so I am guessing there is. Thanks in advance, and attached is a image of the template I am referring to.
-
 In this tutorial you will learn how to work with clipping masks in Affinity Designer. It's a simple and enjoyable process, once you know the basic rules. Here is the link to the tutorial - watch If you find the video useful, please it. Thanks!
-
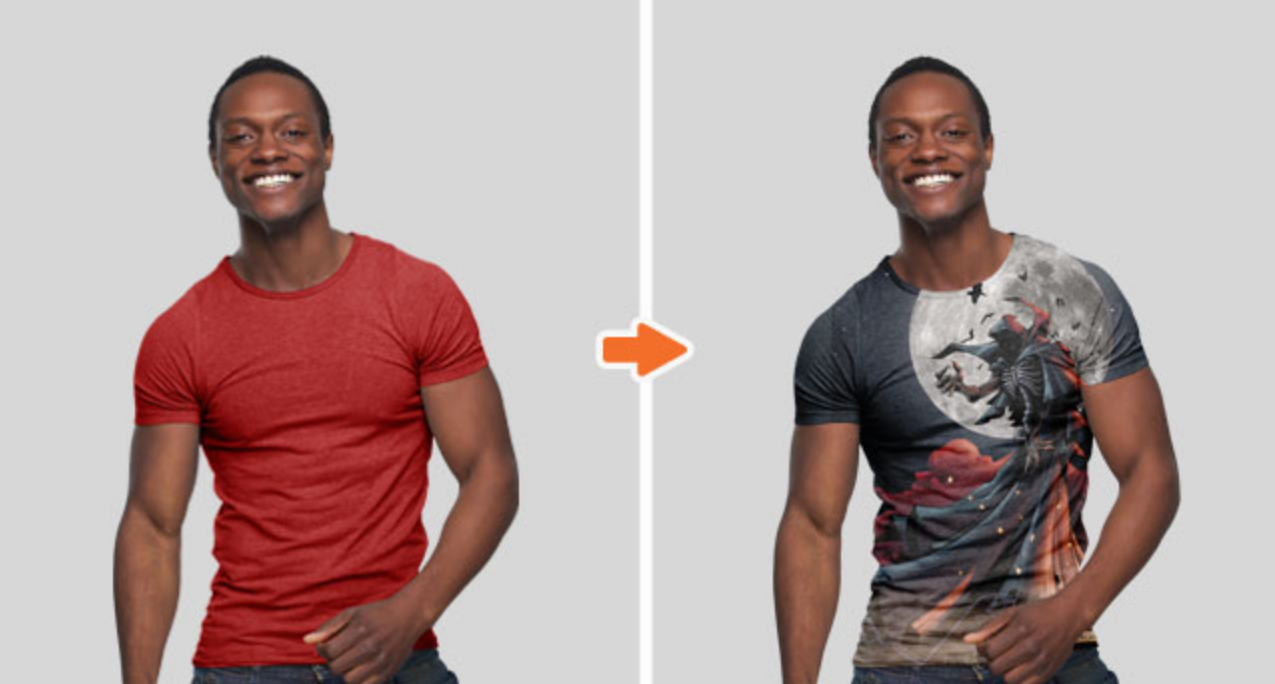
 Hi, Is there a quick way to add a text or image to (a model wearing clothing that has wrinkles) and make it look real? Thanks in advance! Salah
-
 Am on the 10 day trial of Affinity Designer, time running out. I can get an image inside a shape or text easily, but I need to know how to do the opposite. I want to reverse the text out of an image. The nearest way I have found is to stroke the text then make the text fill transparent. This leaves the image showing through, but I want the image "burnt out" by the text and thus it will appear white or checkerboard transparent. If someone can help me please or point me to a tutorial I would be grateful. Thank you.
 -
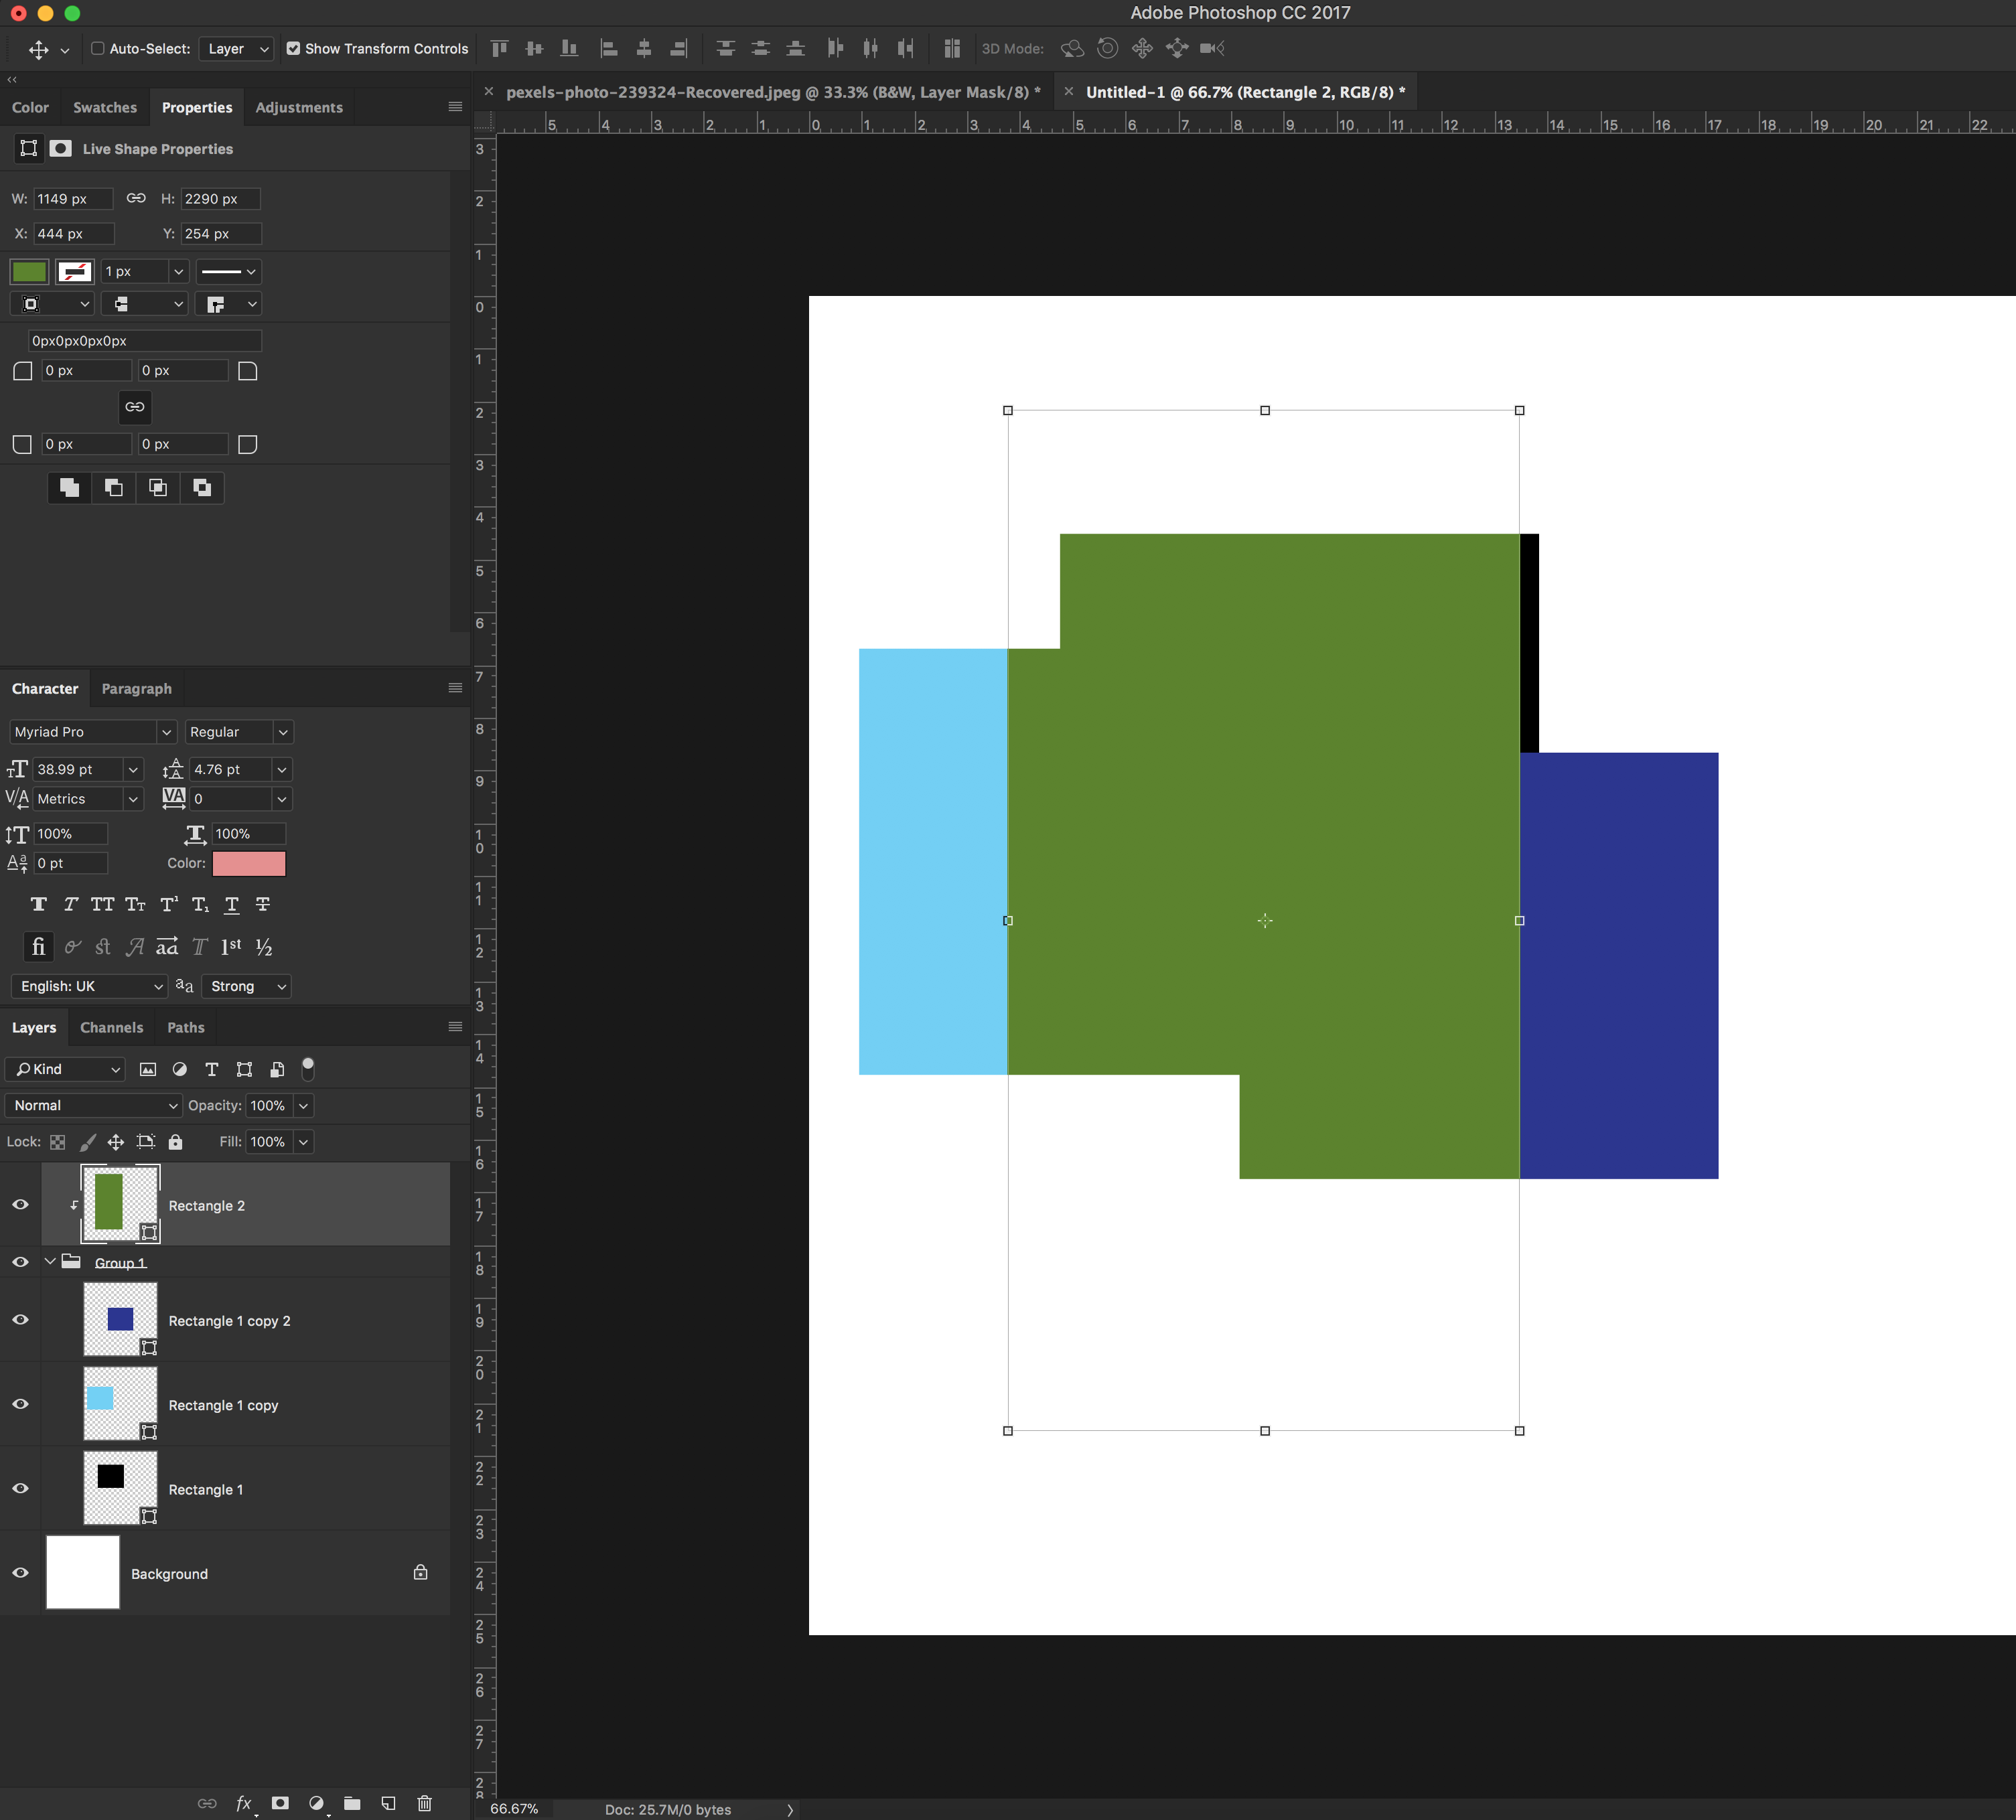
 Hello ^-^ I was wondering how do clipping mask within a group? For example within Photoshop you can "Alt" click between a layer and a group allowing the top layer to act as a clipping mask within the group or object below it. See image below for an example. But within Designer you can't seem to do this due to the "alt" click is replaced with "blue line" below a layer when pulling it to the right allows it to be nested within the layer tho when its a single object it works just like within photoshop but it dose not wok with a group since nesting the layer above it just puts it within the group. Tho the only work around I've found is to rasterise the group into a single rasterise layer then nesting the layer above it tho now the object is no longer a vector. See image below: Dose anyone know (if you can within designer) are allow to creative a clipping mask (or nest) within a group like within the photoshop example or the example in designer when the object is rasterise? Thank you for your time and I hope you all have a great day.
-
 Hi, in diesem Tutorial Affinity Photo Portrait Text zeige ich wie man ein Portrait mit Schnittmaskentext versieht. Dabei ist das Foto nur durch die Buchstaben zu sehen wie bei einem Fenster. Dazu spielen auch Anpassungen eine besondere Rolle. In this Affinity Photo Tutorial, I show you how to create a text with a clip mask on a portrait. Furthermore I refine the photo Have fun Your Jack Foto / photo: „85778626“ von www.shutterstock.com (Lizenz) Link to YouTube tutorial
-
- 2
-
-
- Affinity Photo
- Text
- (and 3 more)
-
 Masks do not work on an object and it's effects as a whole. For example, say you have a doughnut shaped vector (like an "O") and you want to add a drop shadow that only appears within the doughnut's hole; so you add the outer shadow effect to the doughnut and make an oval (without a hole) that fits perfectly on top of the doughnut and that use it as a mask on the doughnut. But, instead of cutting out the drop shadow that lies outside of the mask, the effect now acts on the mask and object as a whole. This might be an easier way of explaining it: What is should be: (object + fx) - mask What it's doing: (object - mask) + fx Hope that makes sense.
 -
 Hi there, Why is Affinity Designer creating clipping masks for all of the imported content? Instead of just drawing the shape, it creates a shape with a clipping. This is super annoying.. I have attached a screenshot.
-
Hi, In diesem Affinity Photo Tutorial zeige ich wie man den „double exposure“ Effekt erstellt. Wichtig dabei sind das Auswählen, Freistellen, die Schnittmaske und das Maskieren. Es gibt zahlreiche kreative Möglichkeiten zur Double Exposure. Ich habe mir hier eine Variante „Inky Woman“ ausgedacht. Viel Spaß dabei Jack Hi, In this Affinity Photo Tutorial, I show you how to create a double exposure effect. Important are selection, masking and clipping mask. There are many creative possibilities. And the „inky woman“ is my idea. Have fun Jack YouTube Video https://youtu.be/SI4gQ99TG_I
- 3 replies
-
- 4
-
-
- Affinity Photo
- Tutorial
- (and 4 more)
-
It's extremely useful for intensive image compositing. Pleeeeeease )
-
 Hi, I need help. The clipping mask I created in AD has jagged edge. It happens when putting several shape inside the parent shape. please see attache screen shot. thanks


.jpg.b5ea7300492766d7925f29f9552fe8c2.jpg)