Search the Community
Showing results for tags 'apply'.
Found 16 results
-
 Hey everyone, slowly but surely I'm losing my mind over here, haha. I think I've rebuild this master page at least three times by now, but every time I load images, some of them are mirrored. What's even more irritating: If I apply the same master page again, they get mirrored again. Now … what is going on here? Can someone please explain? Applying_Master_changes_single_frame_orientation.mov Even if the frame itself were mirrored (unfortunately this is not indicated anywhere, or is it?), it shouldn't be mirrored every time the master page is re-applied, at least from my understanding. I come accross this issue on almost (?) all the other master pages that use frames, hence why the master pages name ends with a 2. I tried to fix it several times now and feel like I’m running in circles, setting up the master pages from scrap over and over again. Is this a known bug? Am I doing something wrong? Any help would be greatly appreciated. Cheers!
 -
Hey all, Is there any way to recognise/use the enter key on the numeric keypad as a »regular« enter key? I can't get it mapped as I don't even know where I would set it under the shortcuts. But I would find it incredibly more intuitive this way than having to reach across half the keyboard afterwards to confirm (or alternatively use the mouse to find the appropriate button to confirm) after entering values in a transform process. I noticed this especially during the cropping process with the cropping tool in Photo. I would like to confirm the process, but the numeric keypad enter key is not assigned at all and only gets the error tone. Can someone point me in the right direction on how to set this up, if that's even possible? And if not: well, why hasn't that been an option for a long time? I couldn't be the only one who was bothered by this, could I? 😅 Cheers!
-
 Please fix the number of times you have to switch tools to use the Colour and Style picker. Ideally, you could switch to the Move tool by holding Ctrl (instead of adding to the swatches panel). Toggling tools requires one button instead of two. Another option is to turn both tools in a sampling mode (regular click) and apply mode (alt click). The apply mode then applies the colour or appearance to the object under the cursor. This current tool switching gymnastics should really be avoided.
 -
 This is my first post I'm new to this forum. Ive tried and looked for hours to find out how to save all my adjustment layers to Preset(s). From my understanding you have to save each layer and label it. For example, adjusting and then saving the Vibrance as a preset and naming it. After saving each layer preset on my finished picture and labeling them, I opened up another photo, which I want to have the exact same adjustments. I clicked on all the custom layer adjustment presets I just made but the picture doesn't turn out the same in the end? Even though when I click on each preset (in the new photo that I want to look like the previous) it says its tweaked the same as the one I saved, but the photo still looks drastically different? Do all NOT adjustments transfer over? Am I doing something wrong? Is there a better way to do this? (and im not talking about the background people photoshopped out, im aware of that) THANK YOU for reading this, this is so frustrating and it makes me want to switch back to Lightroom. (the picture without people is the look i want, the picture with people is what happens when i click on all the saved presets for the finished picture)
-
 This is actually still not happening. Thanks!
 -
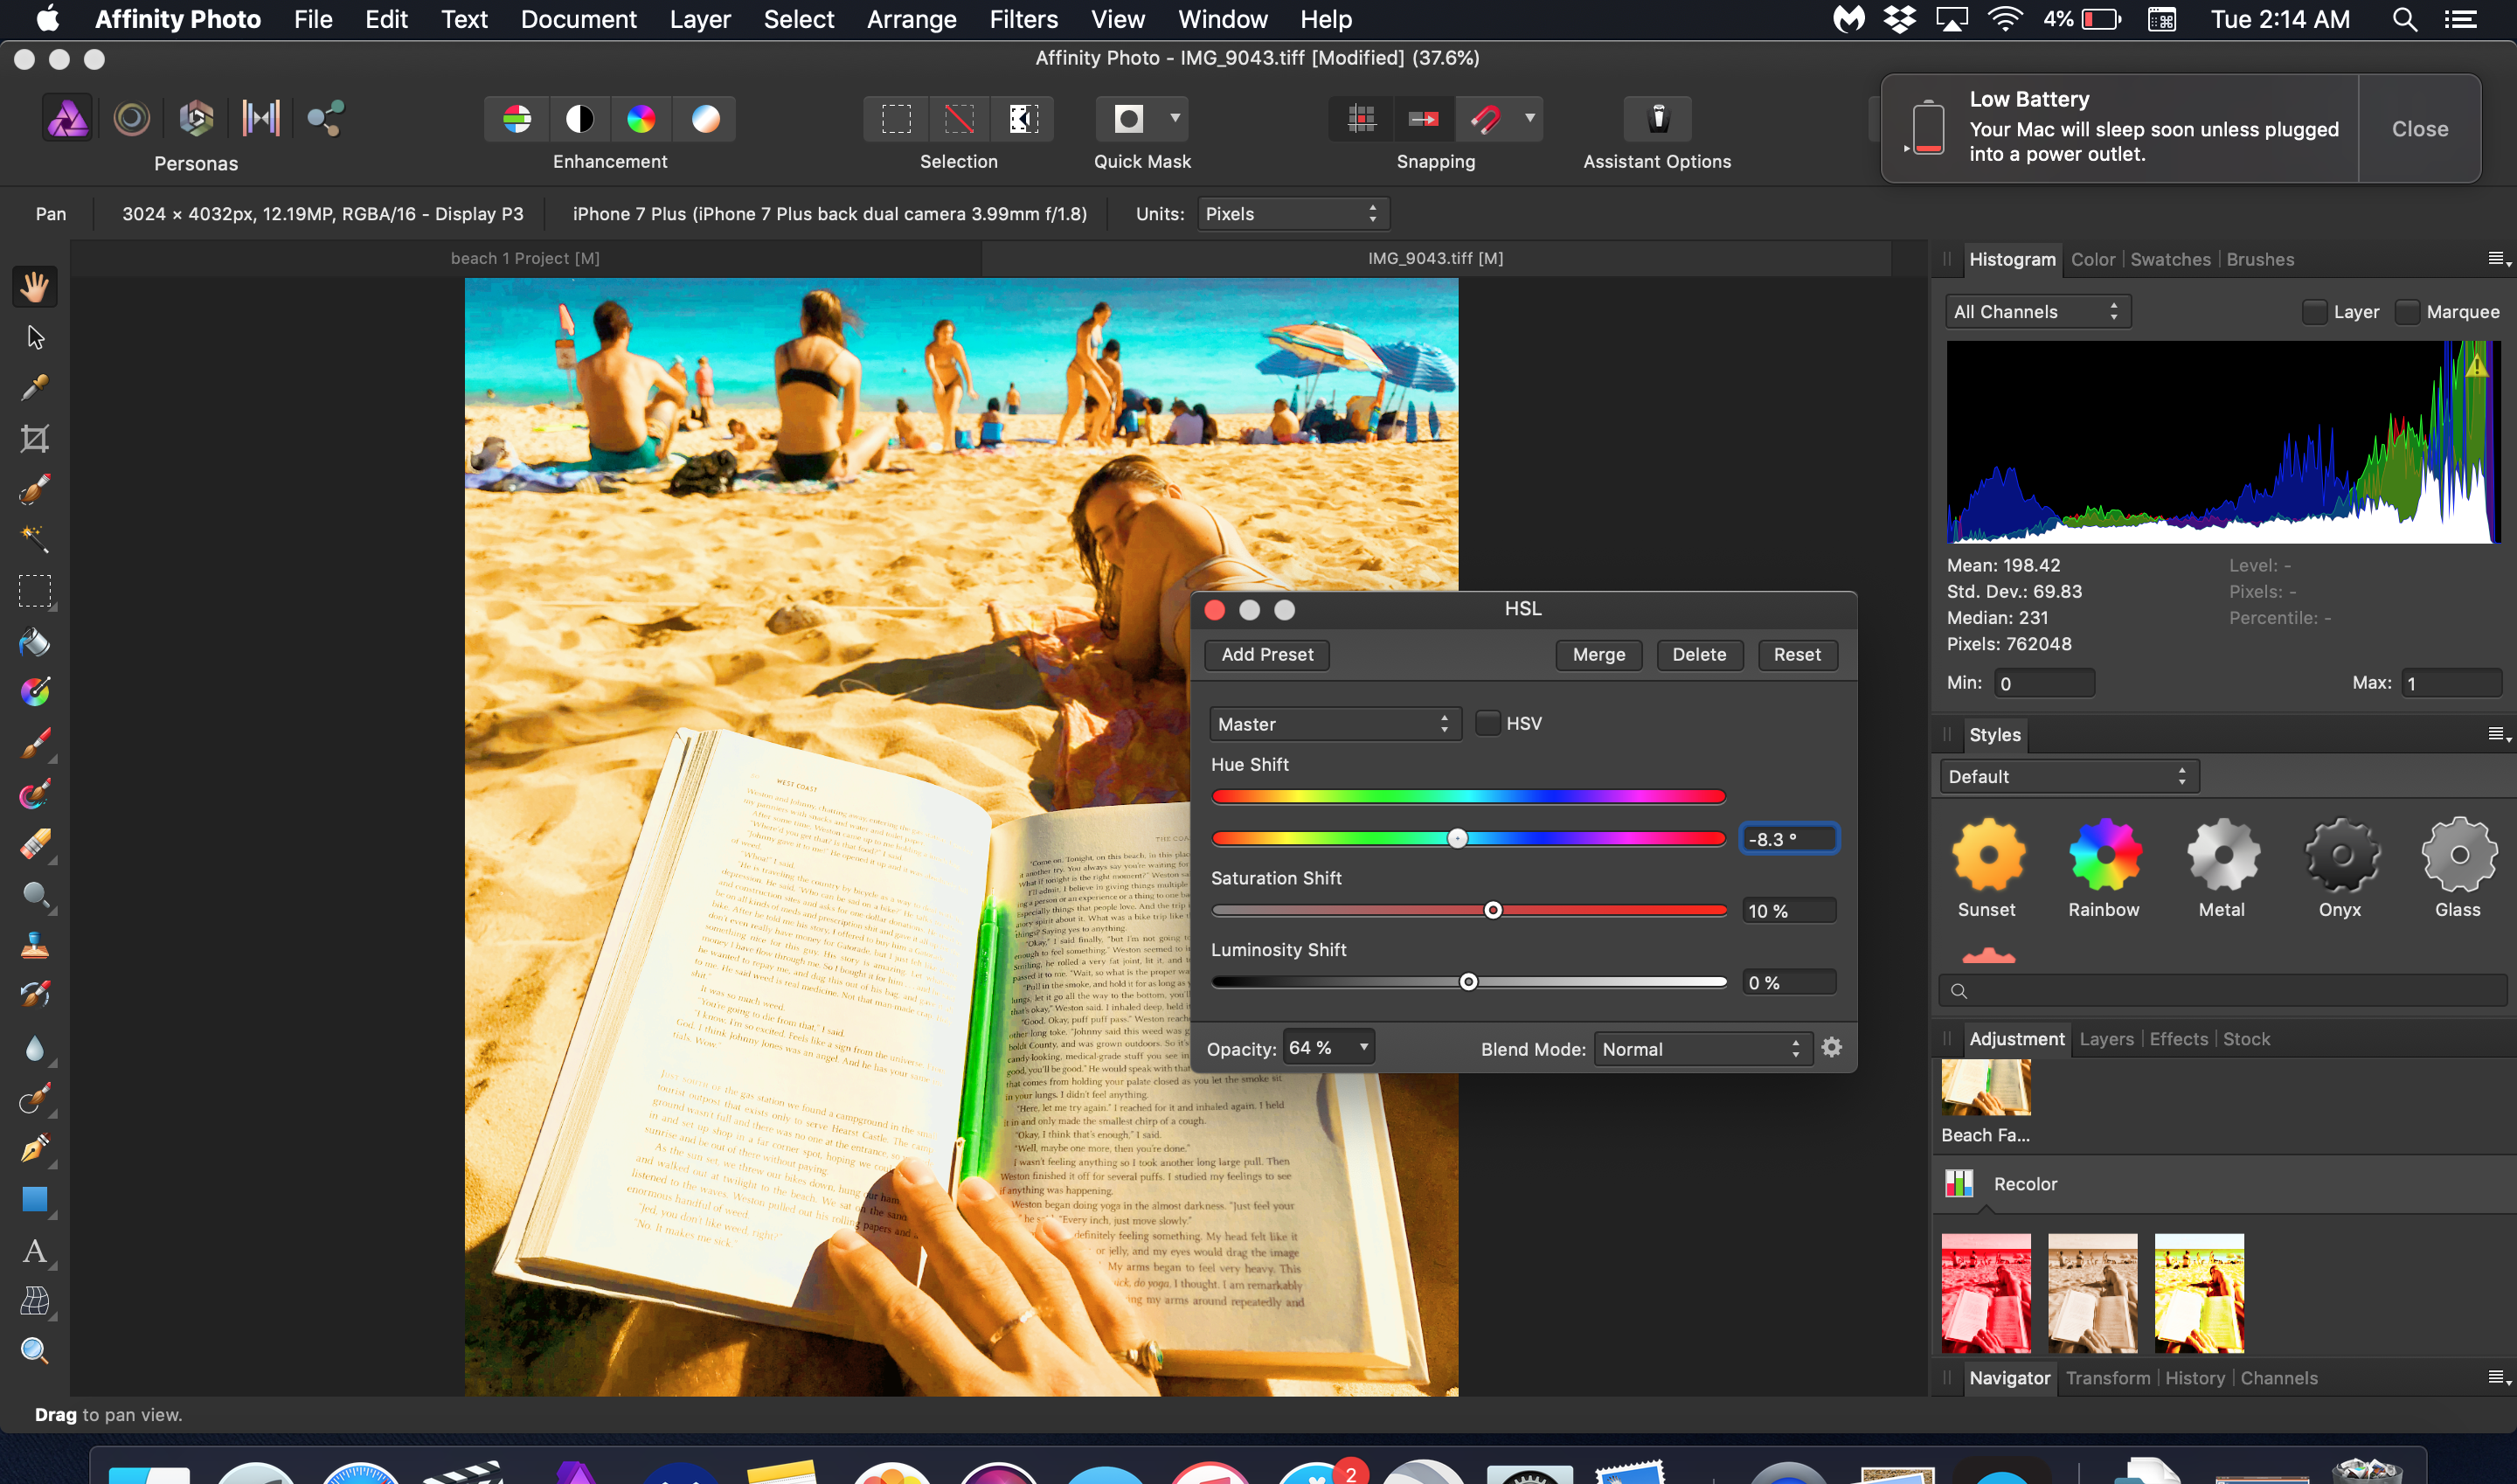
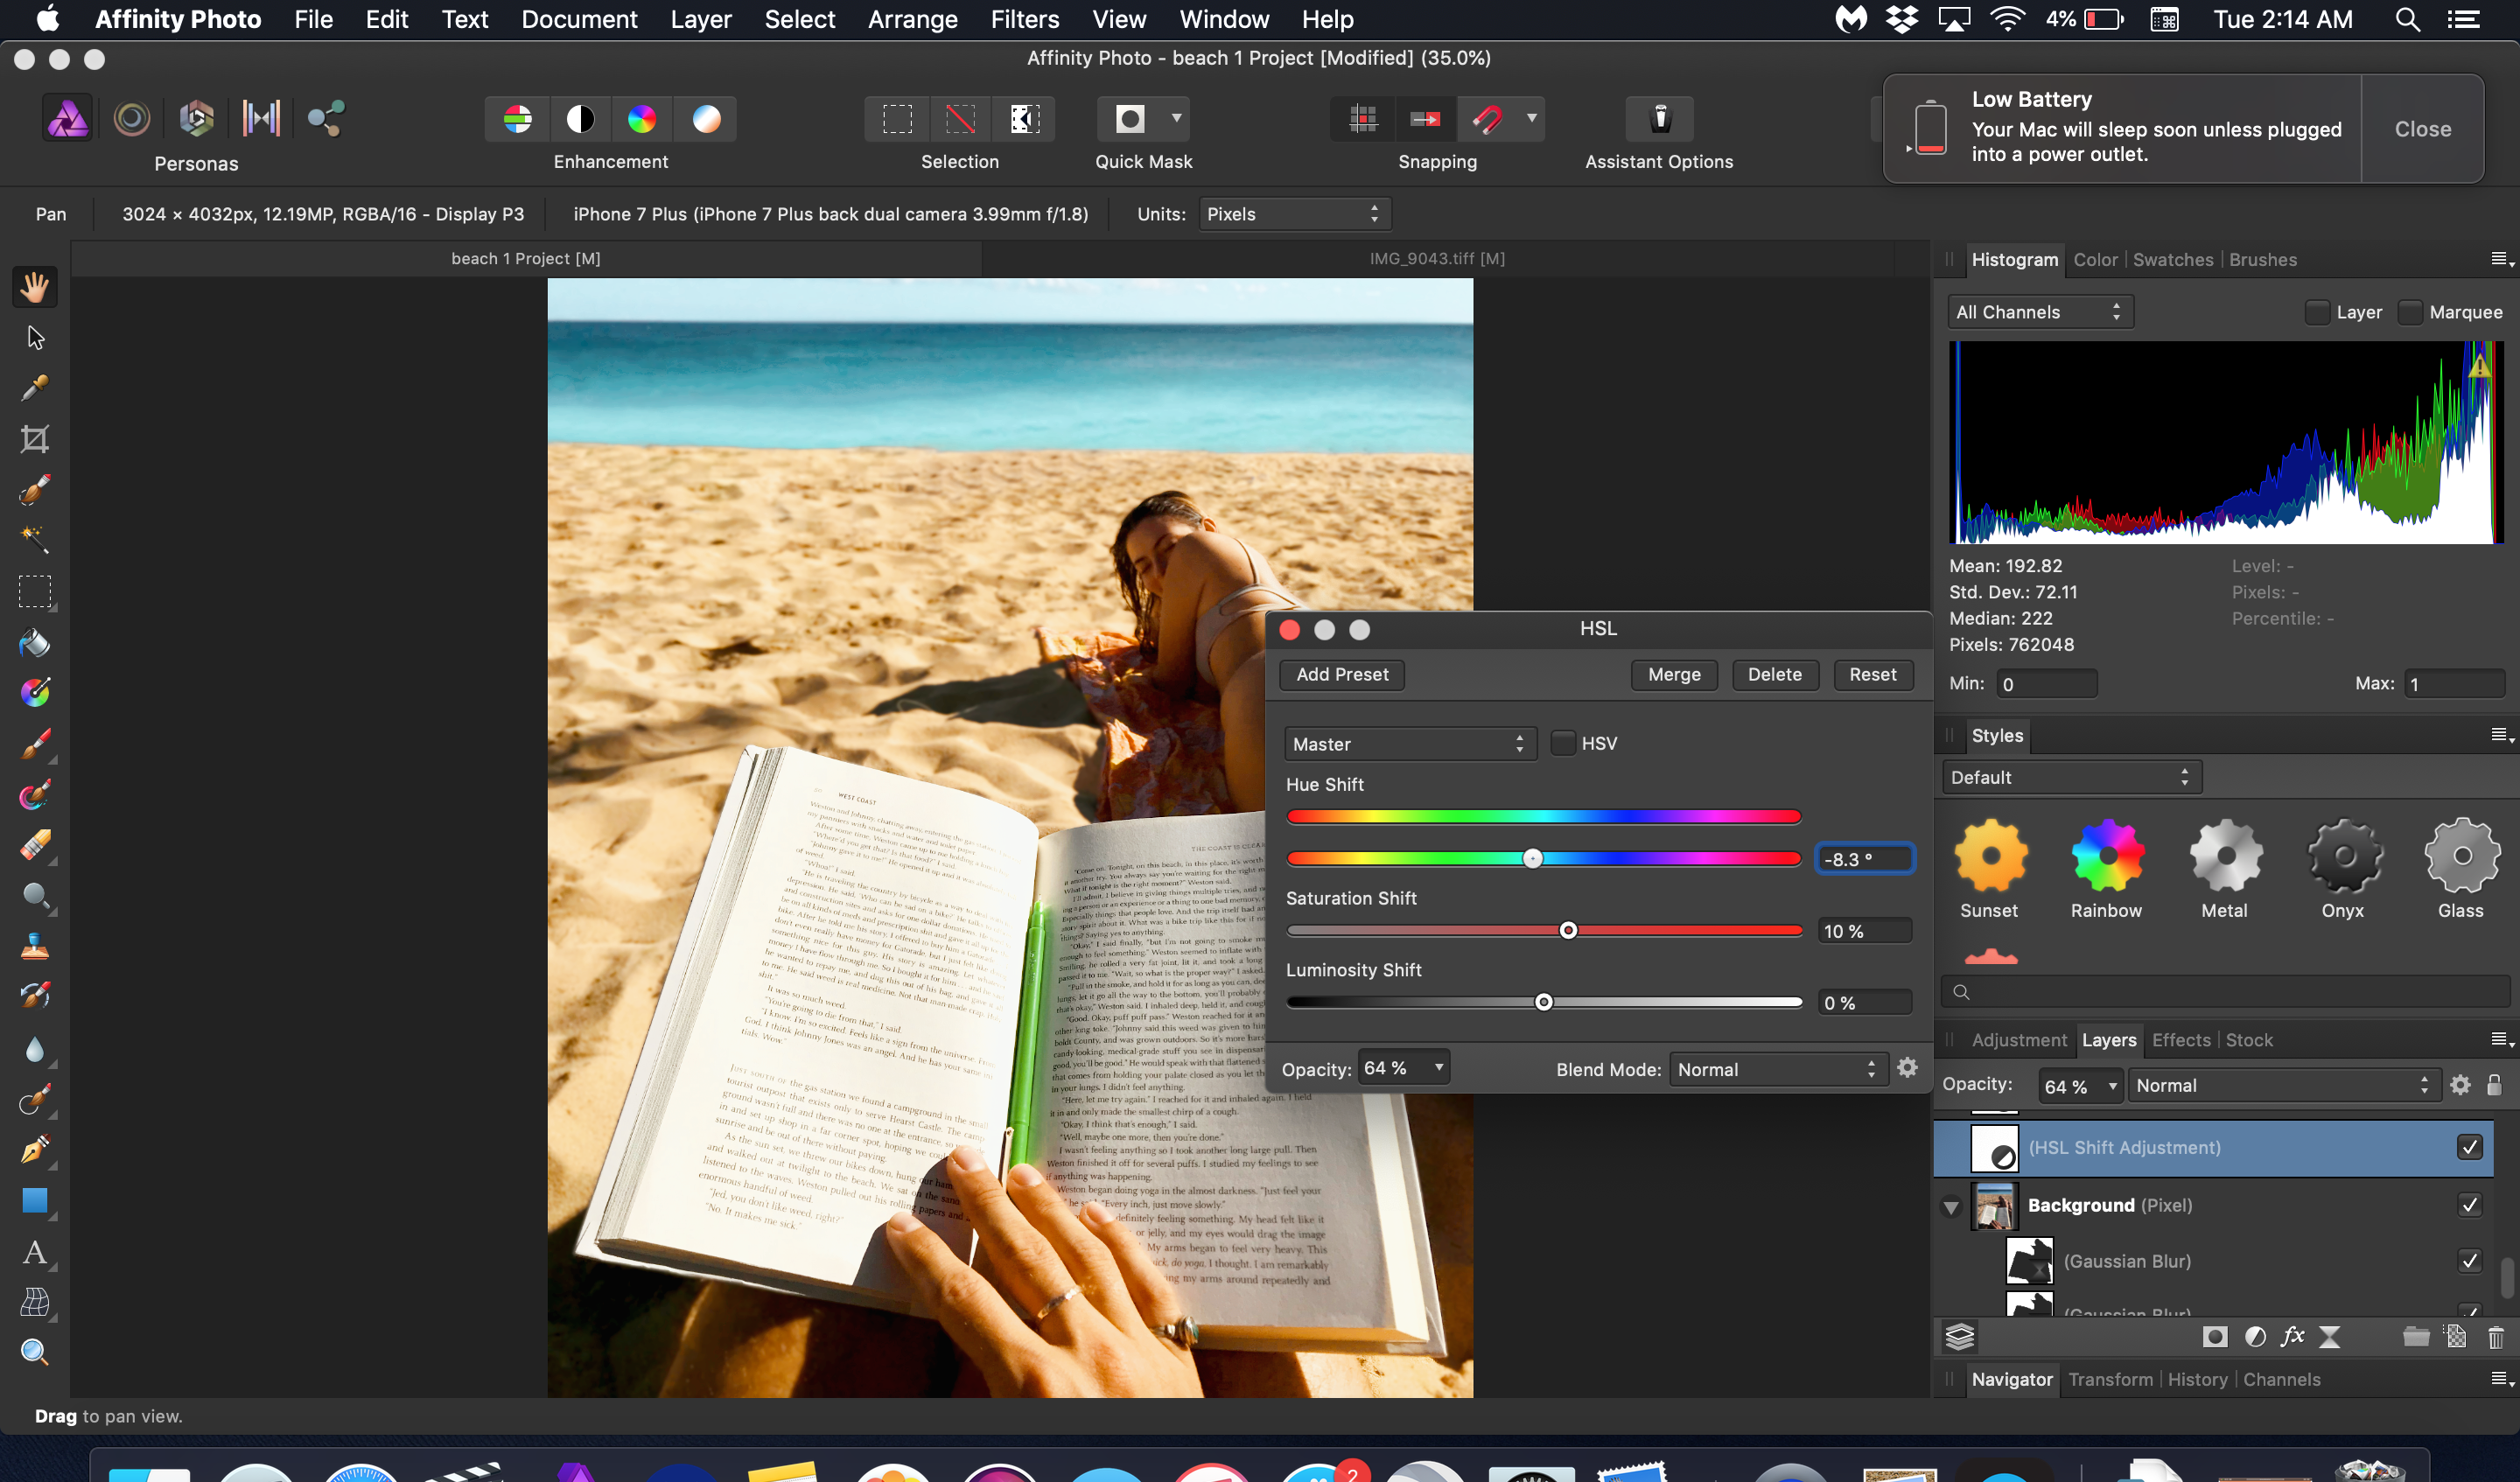
Hi, as far as I can get (unless I miss something) there's still room for new features in the Apply Image area, which in PrePress is paramount (second only to Curves). For instance Apply Image: channel on channel (example: one document open, apply the Red channel from layer A on Green channel, Soft Light, 50% opacity). It would be astonishing if you could borrow channels from on-the-fly conversion to a different colorspace. E.g. a RGB document: Apply the "a" channel from Lab to the Composite, Overlay (being the a of Lab calculated without the need of duplicating the document). Besides, Calculations in PrePress is often very useful too (New Alpha channel which is the result of, say, Difference of Green and Blue). Thank you, Davide Barranca
-
 Hi there! So with the new version of Designer for the iPad, I am having problems inputting numbers into either the palette of the resize dialogue box. I have a document that's 8.5" X 11" and I am trying to resize the canvas to 8" X 3.5". I am not using artboards. I am using the resize function in the app. When I try to resize to the new size, the file becomes 8" X 3". It disregards the .5" for the height. I have tried multiple times and the same thing happens. I have made sure that the lock icon is not selected and it still doesn't work. I'm wondering if others are having this problem. The experience is similar in the color palette. I will click on a color, like Cyan and change it from 60 to 40. WHen I hit okay, Cyan may jump to 100, not change at all or another neighboring color like Yellow may change its numeric value. Also, for export, there are files that I have that if I select an artboard to export as an image, the app will not recall the size of the artboard. I have to right down the actual size and type it in manually. There have been times that the lock icon doesn't work properly, and if I change the width, the height will not auto adjust to compensate for the new width. These issues around units are barriers for using the iPad 100% without having to switch back to the desktop. And as I've mentioned in earlier posts, adding more after the decimal point and not rounding after one decimal will really help too! Thanks for all you do! Overall, this software blows my mind and really makes being creative a joy!!!!! All the best! Stephen
 -
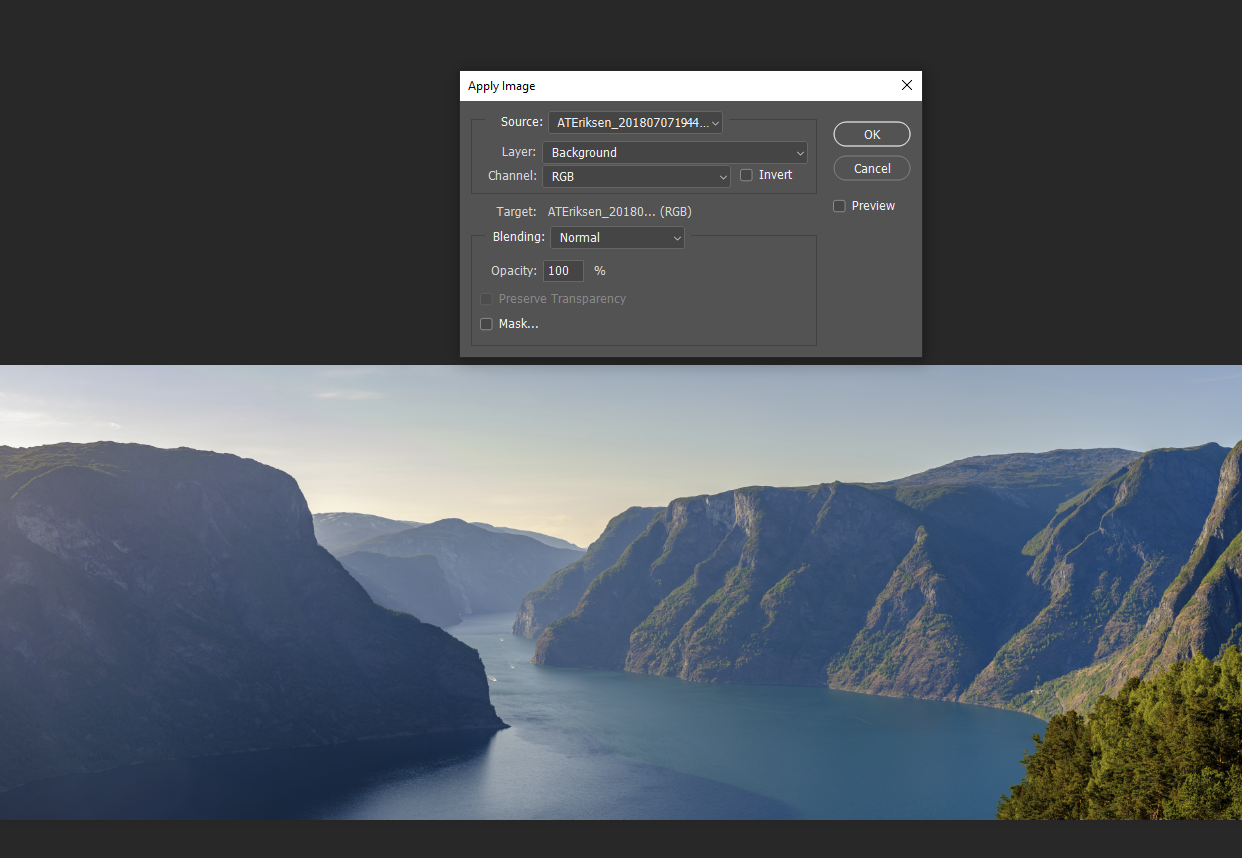
 Hello. Is there any "apply image" function in AP similar to PS CC's own "apply image"? I want to use it for "apply one channel of N layer to current selected mask", or "apply one channel to another channel for RGB mixing - with different opacity and blend modes", etc. It's one of my most used functions in PS CC. I use it almost daily in the winter when it's dark outside, just to give blue channel better SNR by replacing whole or part of the noisy blue channel. Thanks Aleksander
-
HI! I'm trying to use Apply image on iPad but I have unexpected results. First of all, how I can select another layer as source? In Desktop version I have to drag the layer on the Apply Image filter's box. (Why not to show all layers in the list???) Here on iPad it doesn't work. I didn't find any way to make it works. And I made a macro on Desktop version, doing something like this. Of course, it works with every single images. If I import that macro on iPad, I have very odd result. Something doesn't work at all on iPad with Apply Image.
-
 Hi, I suggest that, when in the Develop persona, hitting Return be configured as meaning Develop. Same thing in the Liquify persona, Return should be made to mean Apply. It would save time and avoid a lot of superfluous mousing around. Thanks!
 -
 Just downloaded and installed Affinity Photo Trial on a fairly new Win 10 laptop. CROP is unable to work because there is no APPLY button on the Context Menu. The Context Menu is visible, and seems to have all the appropriate buttons and switches for the Crop function as explained in the Help documentation, except there is no Apply button. Attached is an image of the context menu as I see it. I can adjust a crop area, with or without constraints, and rotate it, etc, but there is no way to finalize/accept/confirm/apply the crop. I can only cancel it or choose some other tool. Perhaps I am misunderstanding where it should be...
 -
 the attached image is overexposed in the background and underexposed on the subject. I duplicate the layer and add a mask and set the layer to screen. I try to apply image as the manual describes and nothing happens!!! I paint in the mask with brush tool and it does what it is supposed to do. Why cannot I apply image of the photo and invert it in the mask? I am trying to do a similar task that is quite easy in photoshop cs6. what am i doing wrong? why is the manual so confusing? equations are nice, BUT what I am trying to do is quite simple in photoshop. thanks in advance
-
Hey, I asked this question a while ago in the adobe forum, but I never got a reply. So I'll try my luck here. I'd like to have a feature to "apply" clipping groups. Let's take several shapes and combine them into a clipping group (see attachments 1 & 2). The apply operation would have the following result: -children which are actually intersecting with the clipping path are intersected (standard boolean operation) --children which are not available for intersect-operations remain in the clipping group -children outside the clipping path are deleted -children completely inside the path will remain unaffected It would be a great feature, especially when you decide to clip whole artworks or cutting them apart. ~Andrej
-
 Ok so I'm trying to make a gradient stroke object which is converted to curve. I'm Trying to make a material design FAB for mobile interface (Which you guys lack even the most basic components needed for making it) I attached a Video of it A FAB button for mobile has the following: 1. Black Stroke Gradient that starts with 4% opacityto 0. From buttom to top 2. White stroke Gradient that starts with 12% opacity to 0. From Top to bottom 3. A 6px blur shadow with 0 offset (both x and y) with 12% opacity, color black 4. A 6px blur shadow with y=6 , x=0 offset with 24% opacity, color black Unless you can apply these simple basic needs of a material design, (multi shadow, multi stroke, Gradient stroke) You shouldn't call yourself the opponent of softwares such as sketch in terms of mobile design bug report - Gradient Opacity.zip
 -
Hi, I'm just trying out Affinity because it looks very nice, but I do have some questions. I'm used to Photoshop so please excuse me trying to get same out of the programs :P ,, Love that you can combine RAW processing and power of retouching tools. * I have some problems getting good quality out of your RAW processor with my 5D Mark III, Nikon D750 and Fuji's. Anyone got "secret Affinity ninja tips" to pull most out of the details and noisereduction and the tools in general? The tools I find on RAW converter feels like a hammer to a glass sometimes. I only have a couple day more on trial and want to see how it performs. * When filling a layer with 50% gray and put it to overlay or soft light, it should not affect brightness/darken the photo, at least from my photoshop experiences. In Affinity the image become darker for every 50% layer in overlay/soft light mode, is there a way around this? * Lets say I want to replace "Blue" channel with "Green" and set top layer to luminosity, how do I do this in Affinity? I found no way to replace one channel with another one, I might be blind tho. I try "Load to Pixel Blue" but I see no changes on composite layer. * I really want curve to affect a selected composite channel in "Channels", lets say I want to adjust the blue channel, how do I do this without making a adjustment layer? In PS you could CMD+M (CTRL+M) on the layer or channel to bring up a curve that will affect only "Blue channel" without making a new layer. Thanks for reading my stupid questions =) Aleksander
-
Would like to see the enter button on the keyboard be the equivalent to Apply whenever its applicable.
- 1 reply
-
- 2
-

-
- Apply
- enter to apply
- (and 2 more)