Search the Community
Showing results for tags 'affinity help'.
Found 3 results
-
 In the help topic Grids for both Affinity Designer & Affinity Photo, there is the following: To create a fixed angular grid: From the View menu, select Grid and Axis Manager. Uncheck Use automatic grid. Select Advanced. From the Grid type pop-up menu, select Two axis custom. Set the Angle of either axis. Click Close. As far as I can tell, there is no "two axis custom" grid choice anywhere in the Grid & Axis Manager, just the two axis presets like isometric, diametric, etc. So how do we set two axis custom angle grids? While I am on the subject, I know there was a post somewhere that explained how to enable the "Up axis" but I can't find it now. Anybody know anything about that?
 -
I really like Affinity help...very useful. Still, it could be more useful: Feature Request (which may not be possible in the short/medium terms): Make a subject a 'live link', allowing a user to click on it, bringing them to the actual tab/tool etc. Alternatively, (and less complicated): Use a screenshot to show precisely where a given tab/tool etc. is, making it easier for newbies (me included) to find. Thanks for listening!
-
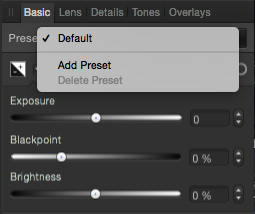
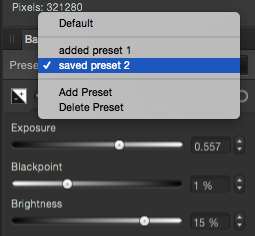
 Hi All, Trying to figure out how best to save the changes/settings after I've worked on a RAW file. I've looked in the Affinity Help and so far while looking in the Basic Develop Persona section I found mention of "Save Presets" and an icon associated with it. (see the screen shot attached). I've also found a mention in the forums of adding presets via the pull down menu above the Basic/Exposure settings (screen shot also attached) It's difficult finding specific topics in the built in help as some things are mentioned once but can not be used as search criteria to find out more info. Having used Photoshop previously I think some of the trouble is terminology and a bit of semantics, but it would be good to clear up what means what, and how you might be able to see changes after you save a Raw file as when I return to a changed and saved Raw/af.photo file the sliders are all back to zero, which is not what I'm used to using Photoshop. So, questions: 1. How does one see what changes have been made to a Raw file after adjustments have been made and the file saved and re-opened, as it seems on reopening all the sliders are zeroed and not showing the changes that had been made? 2. Where can the "Save Presets" icon shown in Affinity Help be found on screen or in which menu? 3. Is there an equivalent of an .xmp file created after adjusting a RAW file? 4. Do you have to "add preset" via the Basic pull down menu each time you want to save your adjusted settings to each and every file instead of it re-opening with the settings already done and showing on the sliders? 5. Is "adding" the same or equivalent of "saving" presets, or are they two separate things doing two different jobs? (tried to illustrate this with another screen shot) Think that covers it.