Search the Community
Showing results for tags 'Multi'.
-
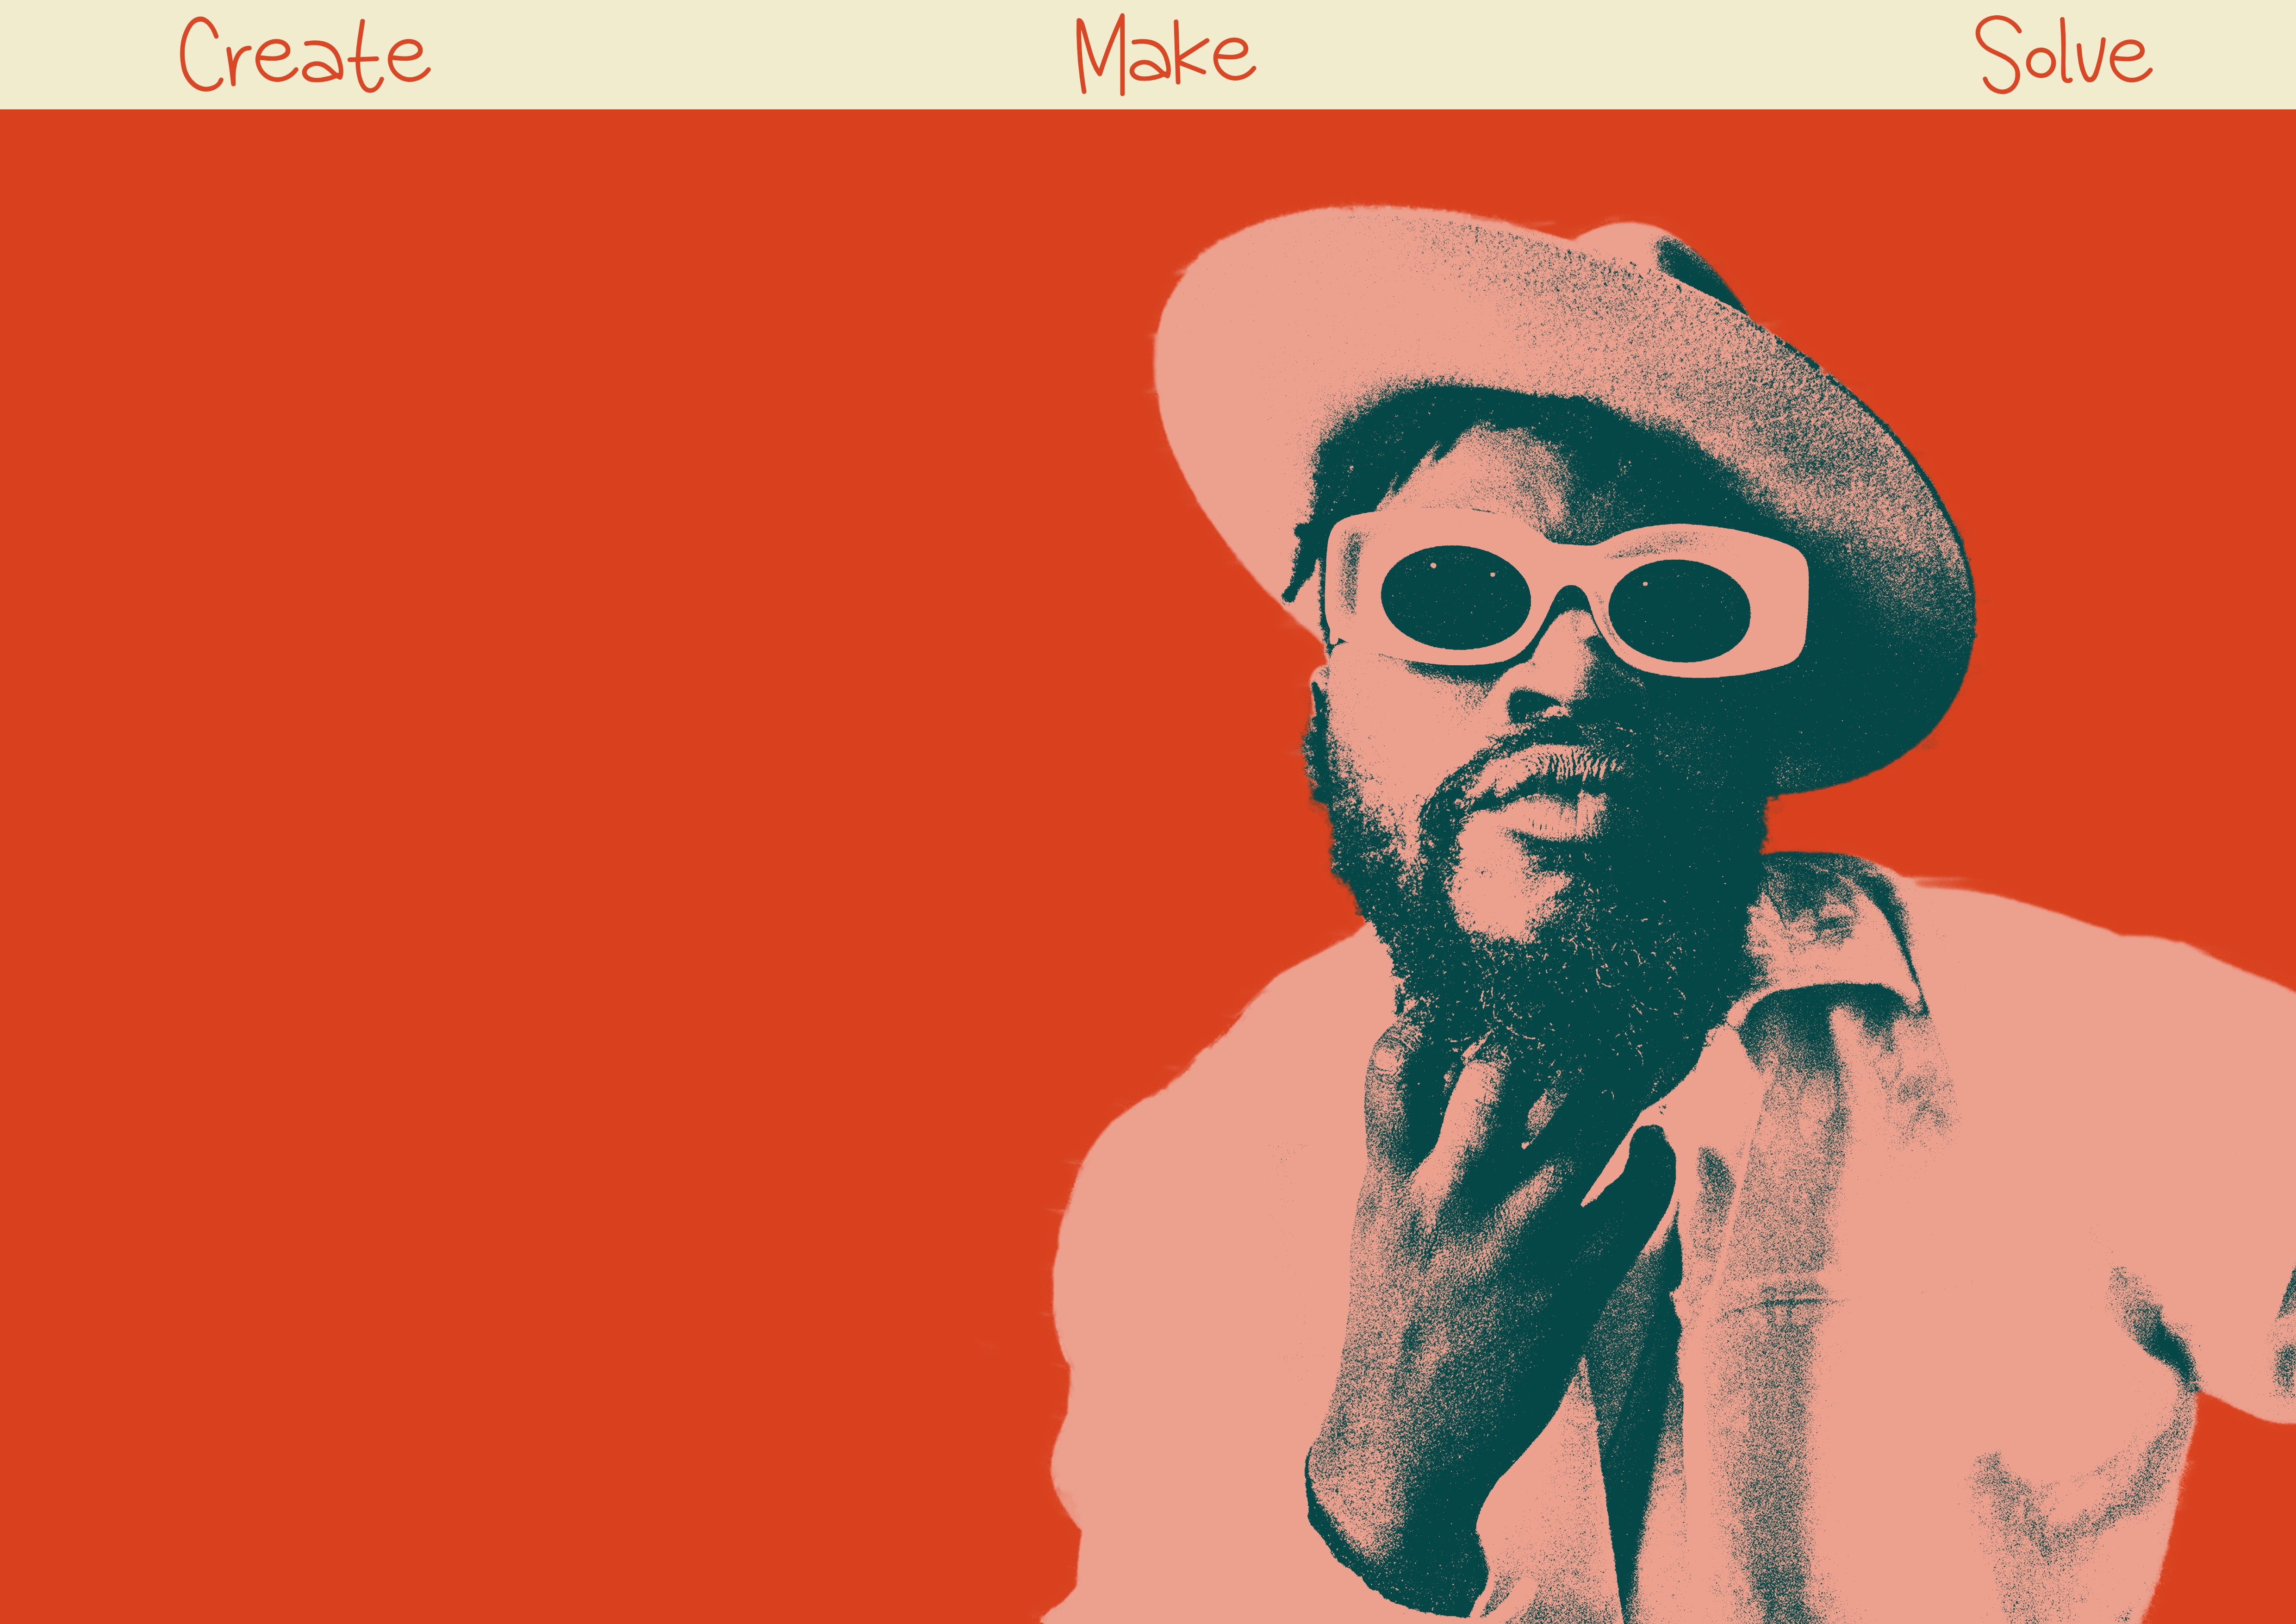
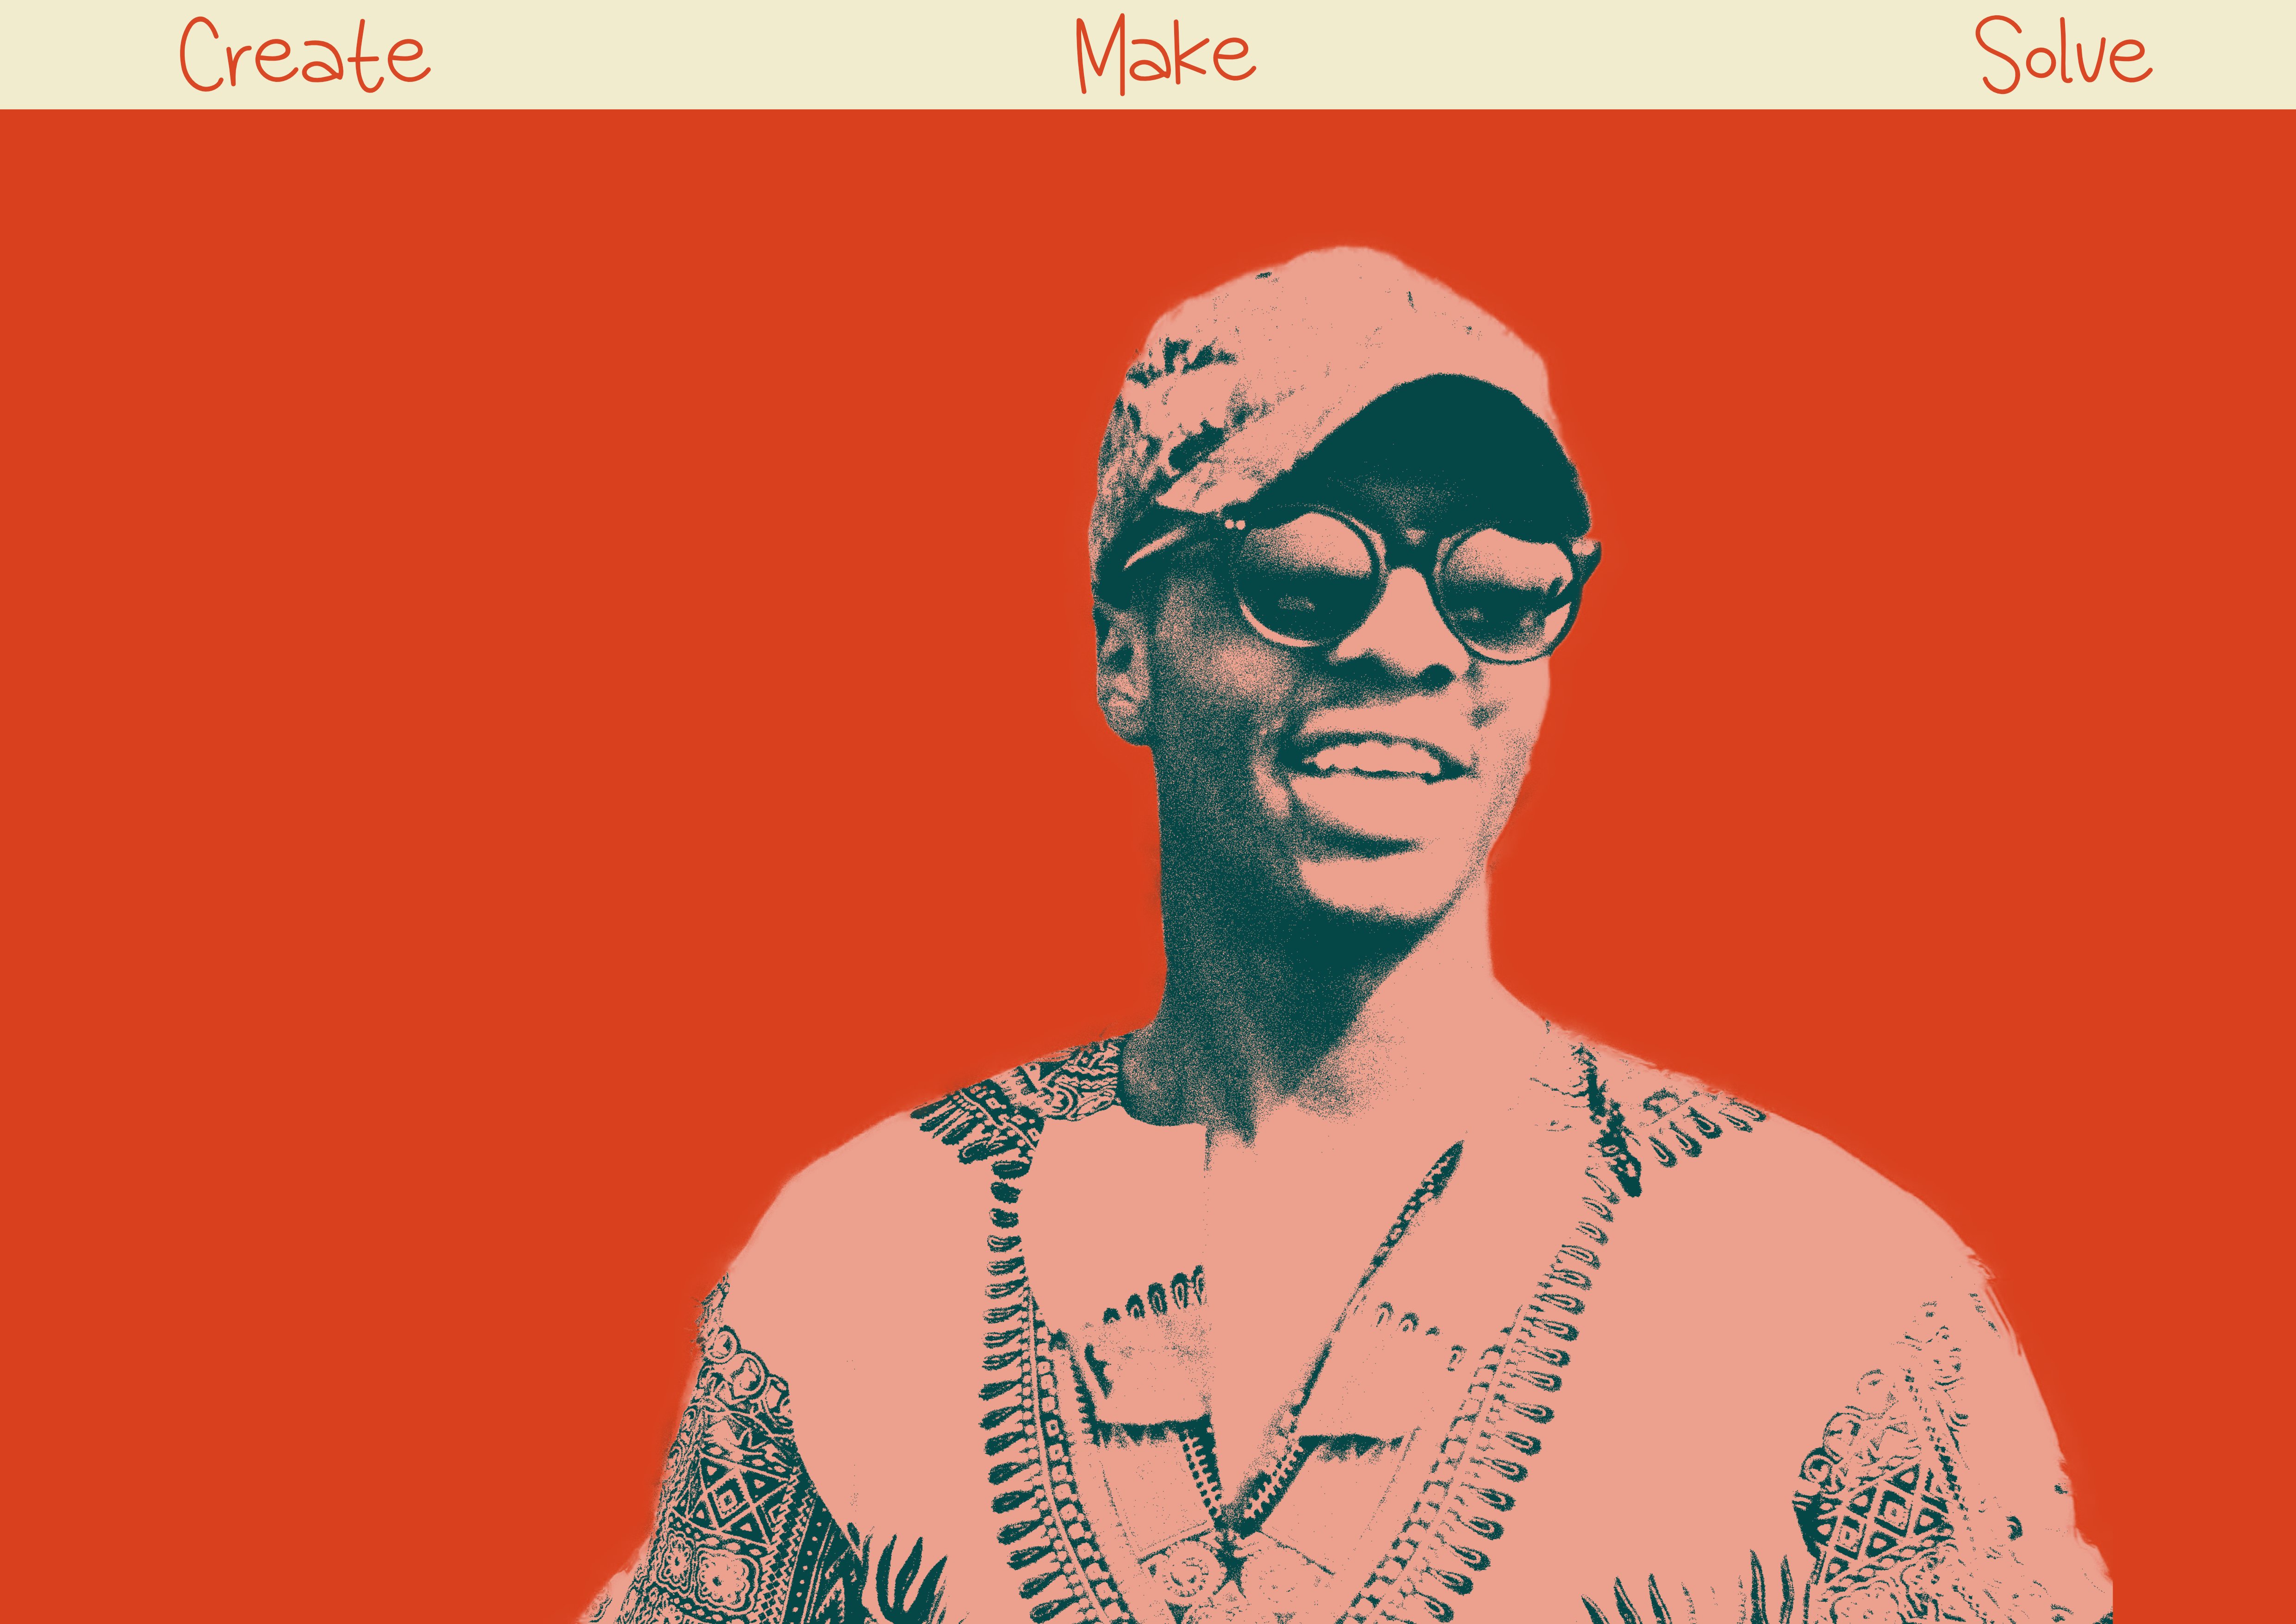
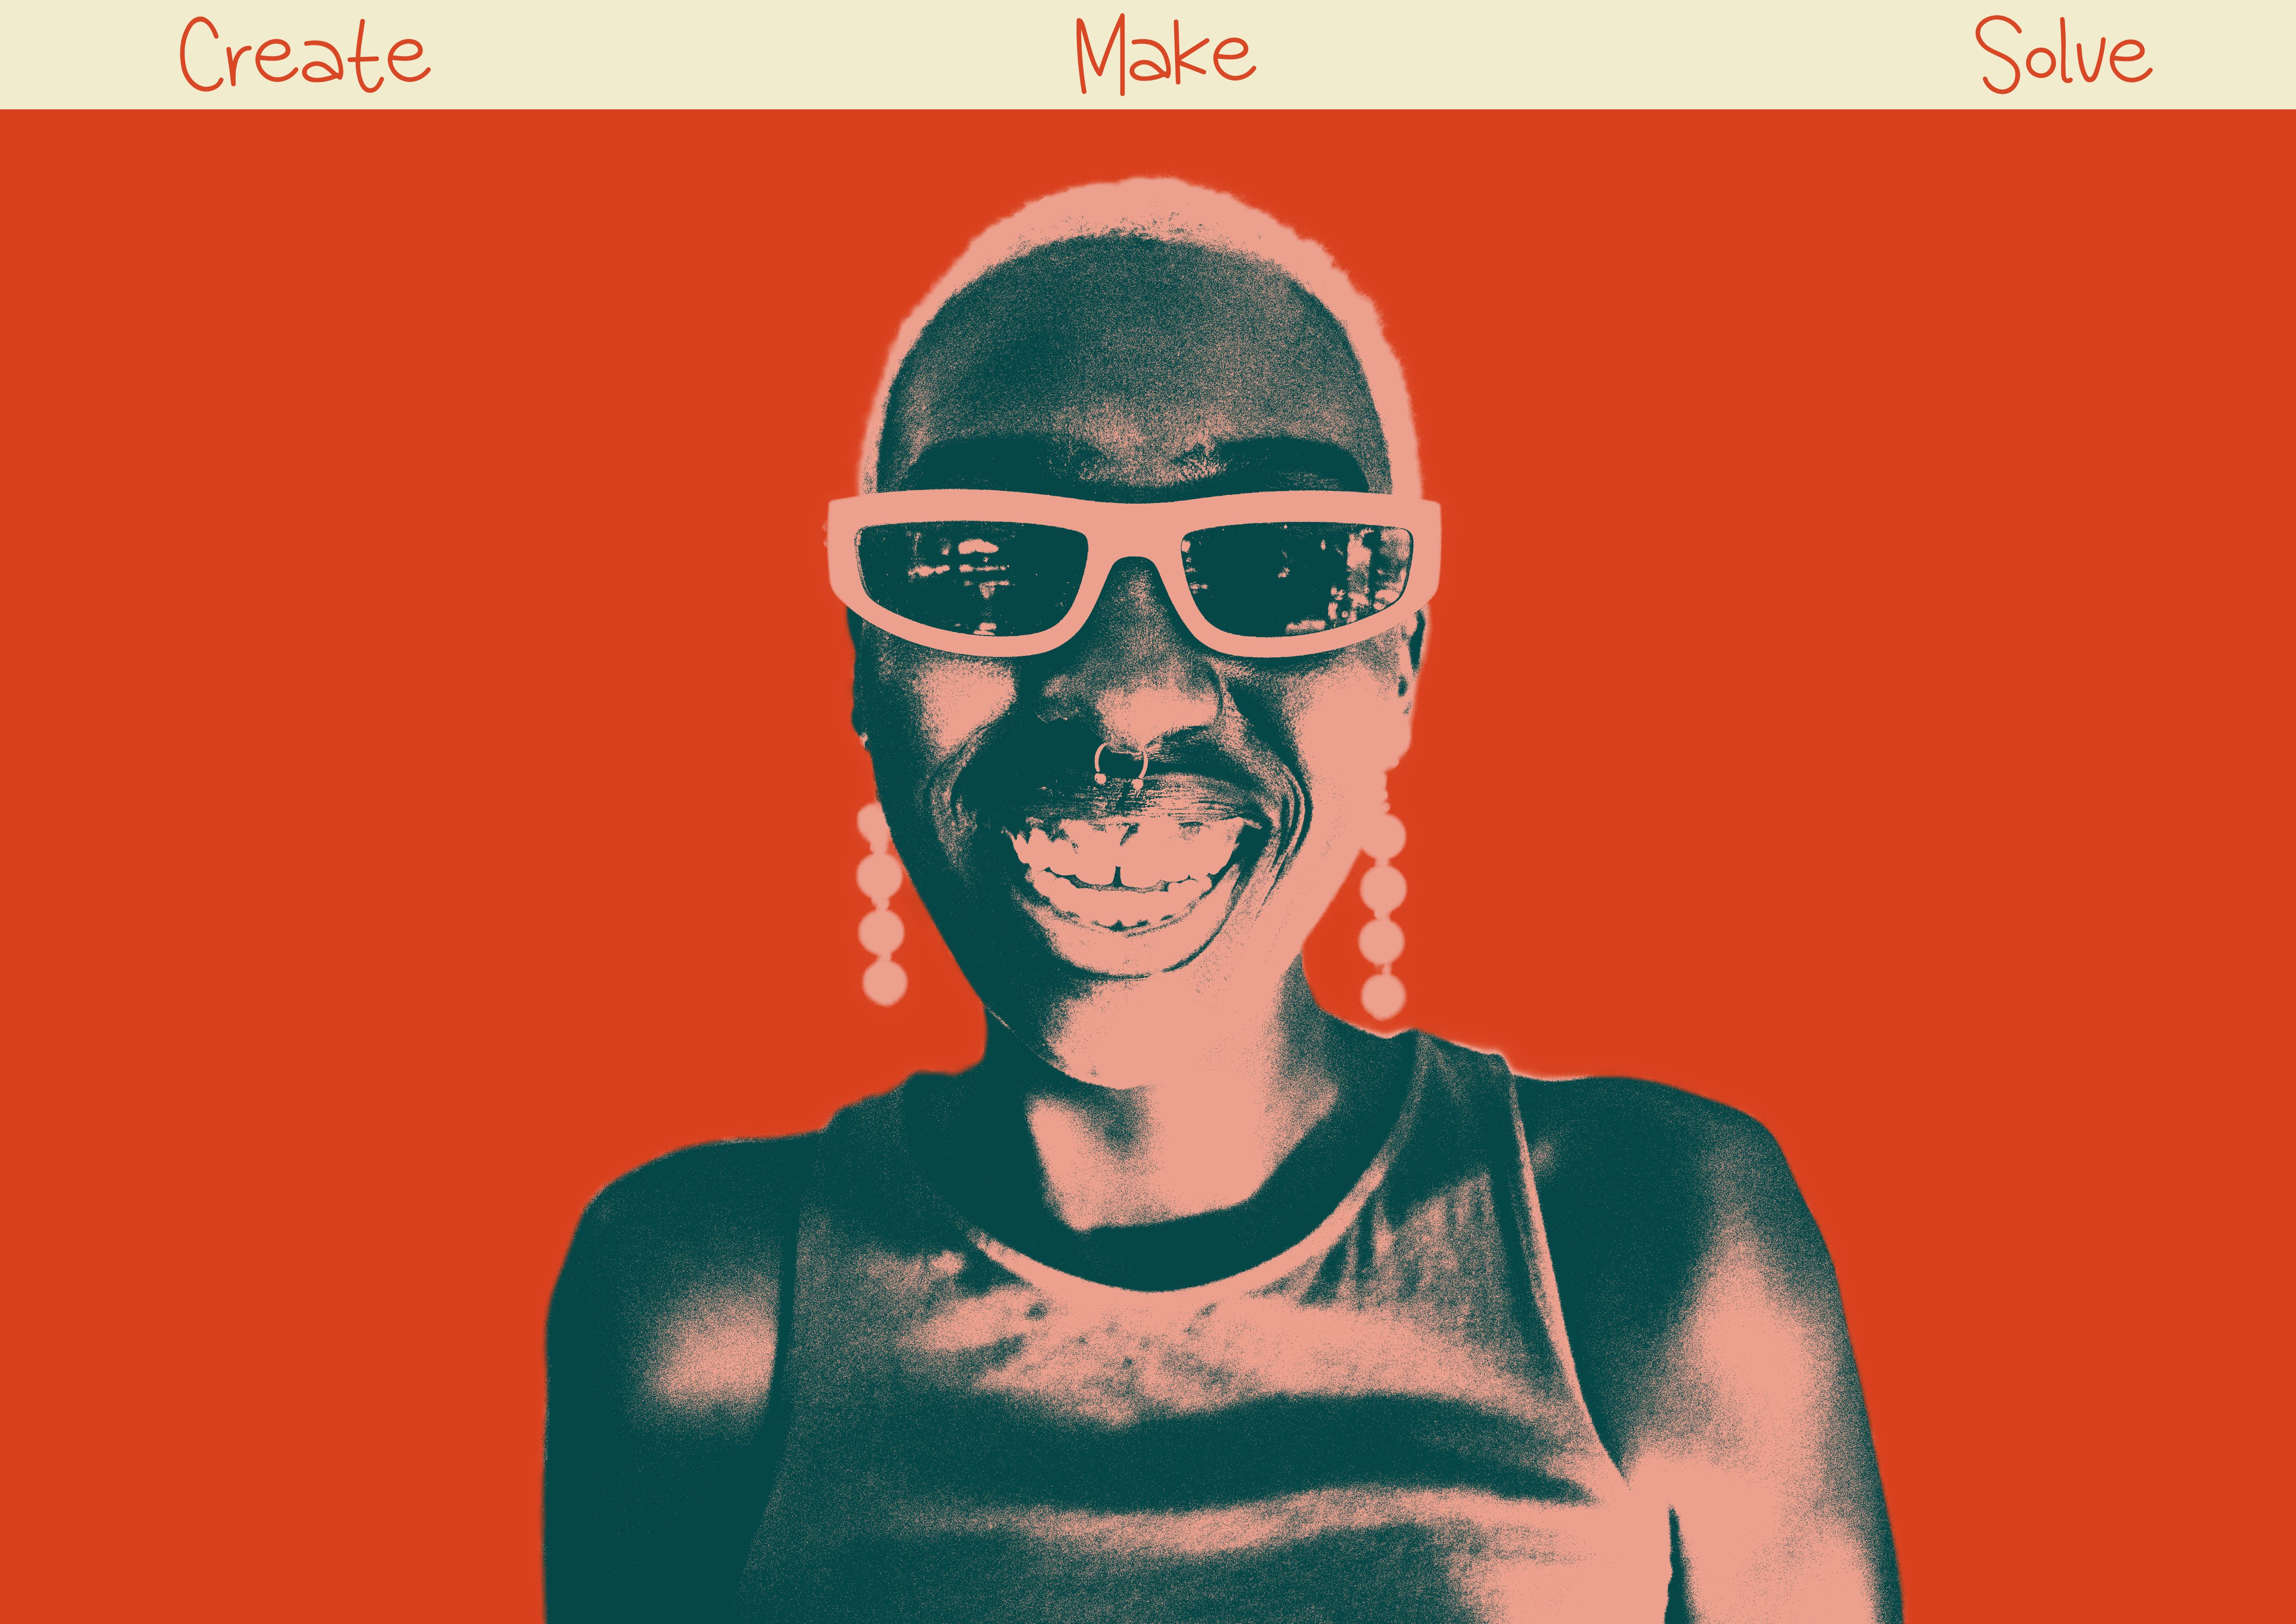
CREATE I can create. I will create. It is time to create. MAKE I can make. I will make. It is time to make. SOLVE I can solve. I will solve. It is time to solve. Tools: Affinity Photo, Affinity Designer Let's connect: https://www.behance.net/bah-is-life https://www.instagram.com/bah_is_life/

-
With all the hype surrounding Canva's acquisition, let's not forget it's Easter. Have a great Easter. Made with Affinity Photo, assets from @v_kyr.
- 5 replies
-
- 8
-

-

-
- affinity photo
- affinity designer
- (and 1 more)
-
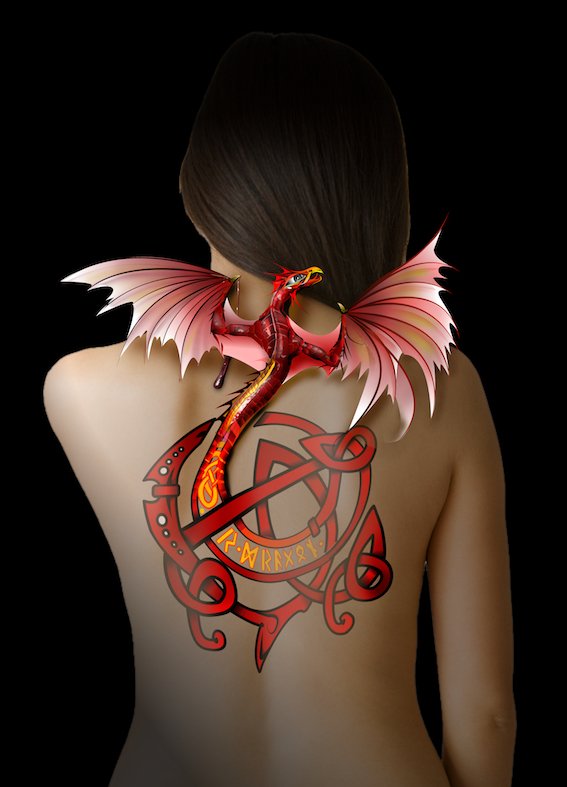
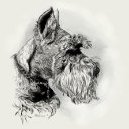
I have always wanted to do something on the lines of Boris Vallejo, especially the one where the dragon tattoo comes out of the guys arm. And by now I have weaned myself totally off Photoshop and Illustrator.
- 1 reply
-
- 6
-
-
- scratchbuild
- affinity designer
- (and 1 more)
-
This design was created using Affinity Designer and Photo. Ehh the color and quality loss after uploading is painful and have had similar results on Pinterest. Anyway, Batman the Ride is one of the greatest coasters ever and had visited Six Flags over Texas and Great America last fall. There was no cool merch for the ride anywhere, so wanted to try and create something to do the ride justice. I created the outline using the pen tool in Designer with some vector fills to block in certain areas. I then imported the file into Affinity Photo and started coloring and adding detail with various brushes. I've had good results with the Nathan Brown brush packs. Thanks to Affinity for creating this great program, I will never go back to Adobe again. I WAS NOT commissioned by DC or Six flags to create this art.
-
Another video! When I lived on the Isle of Wight, we could hardly move without falling over a Morris Dancer. As a folksinger, I naturally met and made friends with a lot of dancers and musicians there. Some years ago, a lady name Helen Akitt wrote this funny song poking gentle fun at her Morris chums, a parody of the lovely song The Whitsun Dance, and I've been singing it ever since I discovered it. The assets in this still--the grass, trees and flowers--actually came from DrawPlus. I saved them as svg and imported them into AD. The unusual format with decorations down each side is because I made the 'pages' in A3 format with a view to printing them some time; YouTube resizes everything to 16:9, which would leave black bars at the sides. And now I'm going to have a rest . . .
- 1 reply
-
- 5
-
-
- movieplus x6
- drawplus
- (and 4 more)
-
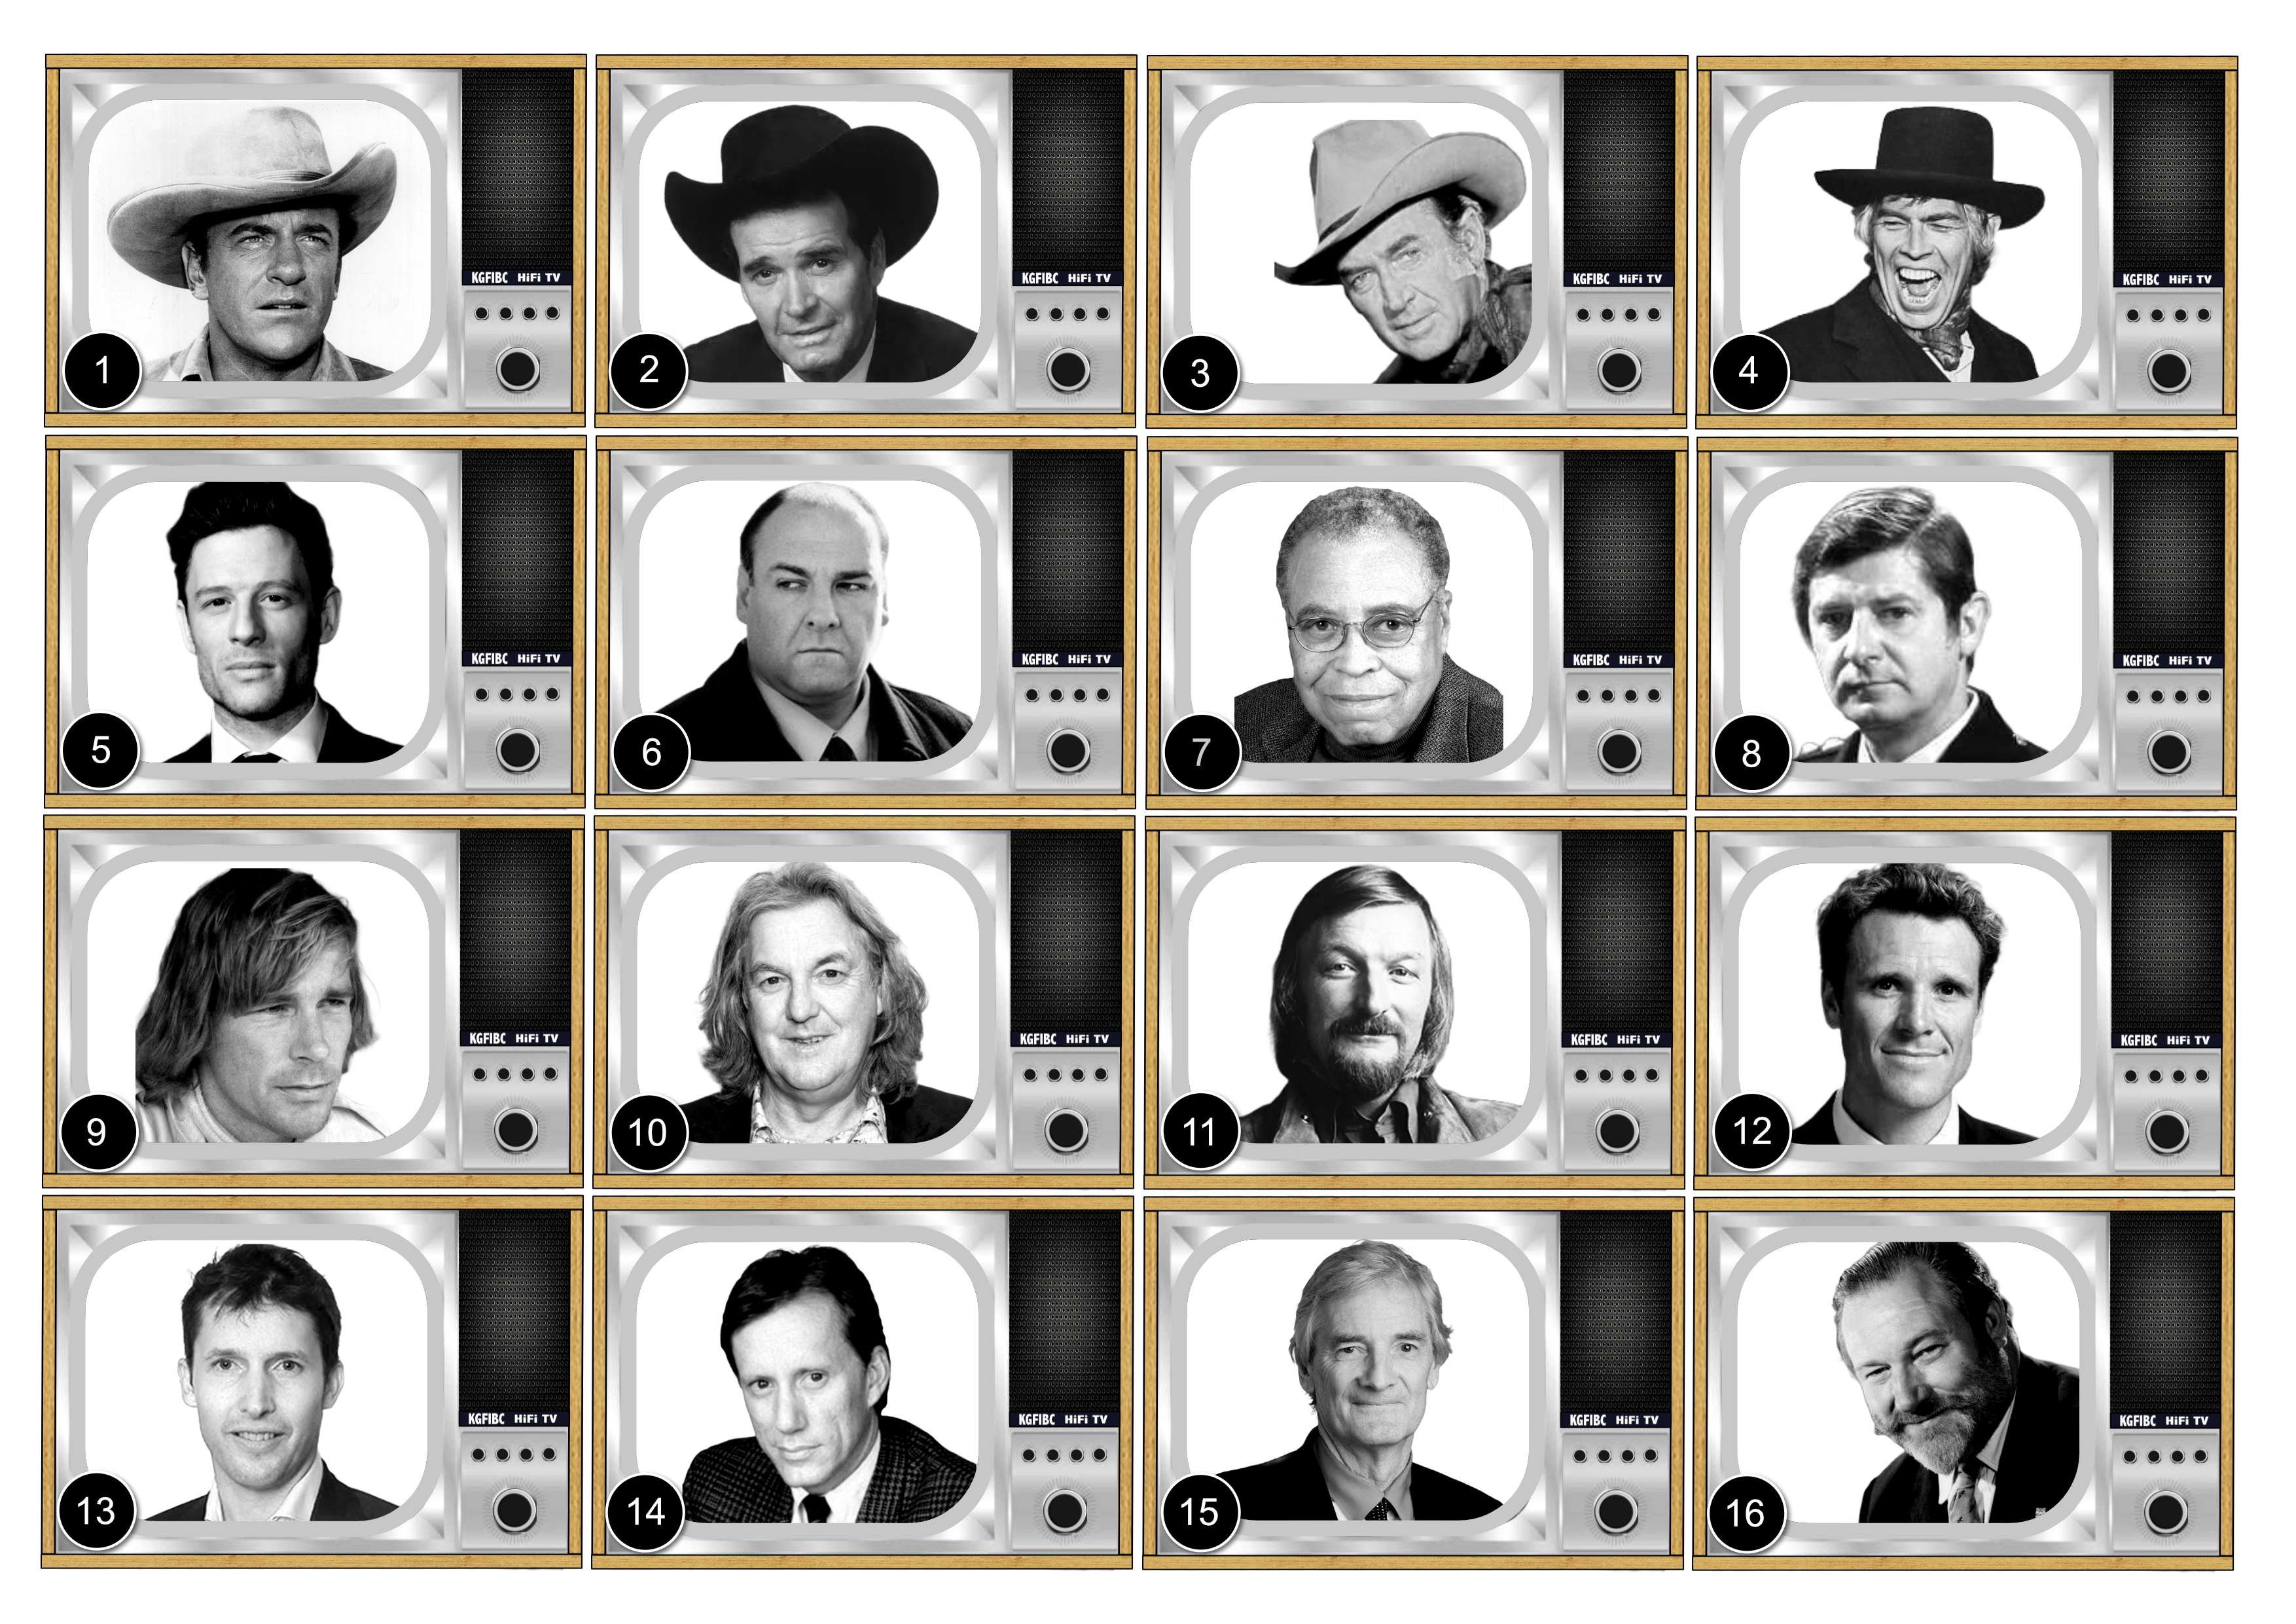
My latest picture quiz round. Tv set created in designer. 20 placeholders inside the TV image for the images. All images converted to B&W and a levels adjustment on the majority of images. I created masks to obliterate the backgrounds in the images to take away the fussy details. in APhoto. designed on an A4 will be enlarged to A3 one per team on the night. Comments on the creation and final (almost) presentation as always are welcome. have fun with identifying the faces. As always I look forward to @William Overington blistering observations which are 2nd to none
-
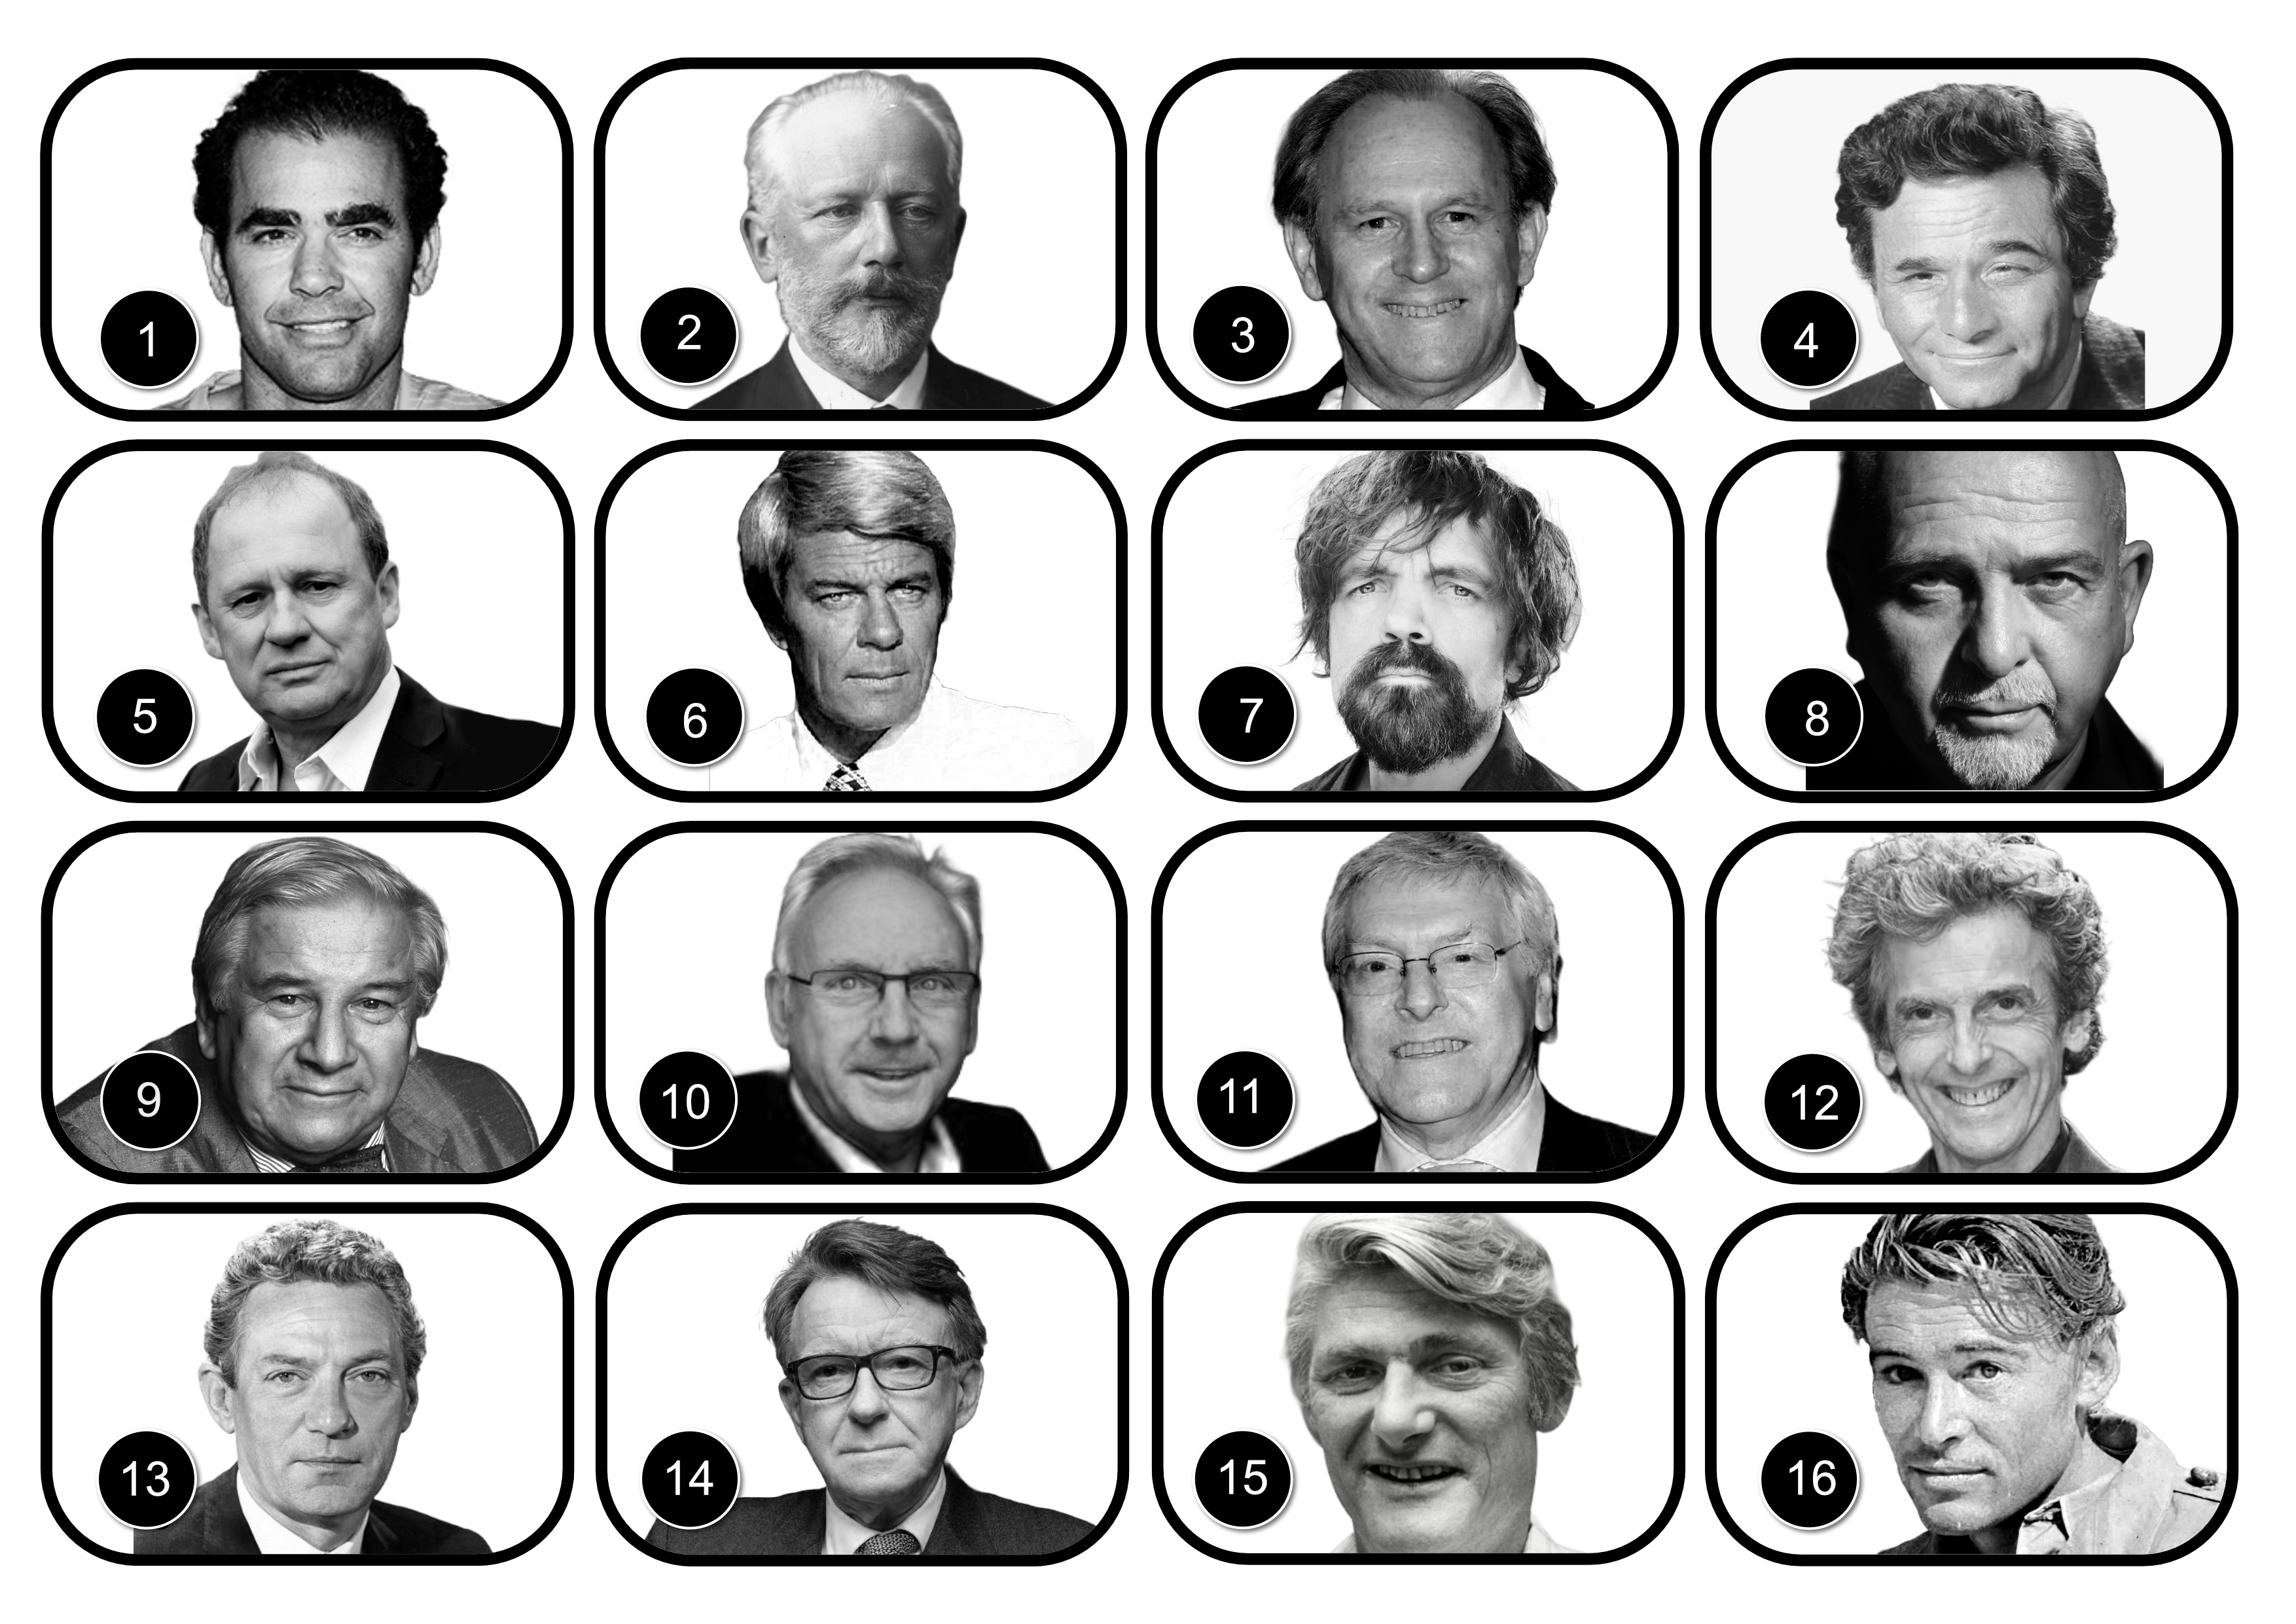
I create most of the Quizzes for my local bowls club and I always l try to make the half time break quiz a bit different. Most of the time I just hash a picture quiz together with no shape of form but I thought of this design for the latest picture quiz. the 16 Box layout and numbers created in Designer. The rest of the work in Photo. I usually just pick images at random but sometimes with a theme. This one has a theme which once guessed makes the quiz even easier.
-
 Below is my list of written tutorials I have done over the years. The first few were done using early versions of Affinity programs but they should still be ok. Some menus may have changed or tools look different but the basics are the same. Also most are for Affinity Photo, but some could be done in Designer. Plus the "Beginners Look at Affinity Photo" ones will pretty much be the same in Affinity Designer and Publisher as all 3 programs have same basic functions. PhotoPlus and Affinity Photo – make a fake Starry Sky background https://www.dropbox.com/s/3la5z4amc11wcgx/starry-Sky-PhotoPlus_and_Affinity_Photo.pdf?dl=0 Affinity Photo – Silk Embroidery Effect https://www.dropbox.com/s/9h4mpso7i77z1oq/Affinity%20Photo%20-%20Silk%20Embroidery%20Effect.pdf?dl=0 Affinity Photo – Silk Embroidery Effect V2 https://www.dropbox.com/s/6usbza25vidgmck/Embroidery%20Tutorial%20v2.pdf?dl=0 Affinity Photo – Vintage Cabinet Frames https://www.dropbox.com/s/bj2dsmwmy0juazk/cabinet-frames.pdf?dl=0 Affinity Photo – Fake Evening Sky with Rain and Lightening https://www.dropbox.com/s/mlcdnducotitp1d/Fake_Evening_-_Lightning_-_Rain_-_Affinity_Photo.pdf?dl=0 Affinity Photo - Art Projects Shows 2 ways to make a blank canvas on an easel have what might be a painted image on it, from a photograph. https://www.dropbox.com/s/8fx18c77t2dnulb/Art-Projects-sept2018.pdf?dl=0 Infrared V2 – Affinity Photo 3 ways to make fake Infrared images I Needed a project to use in the Affinity Publisher beta, so I thought I’d update an old Serif PhotoPlus tutorial to an Affinity Photo tutorial. It basically shows 3 methods to get Infrared style images. https://www.dropbox.com/s/0c0mgqfrbrdv4q5/Affinity%20Tutorial%20-%20Infrared-v2.pdf?dl=0 Affinity Photo – Convert German Video – Film Strip Image in 3 parts pt 1 https://www.dropbox.com/s/iewleyt95a8qhdk/Photo_Film_Strip_-_German_Tutorial_pt1.pdf?dl=0 pt 2 https://www.dropbox.com/s/2j35gkvxr9emcq6/Photo_Film_Strip_-_German_Tutorial_pt2.pdf?dl=0 pt 3 https://www.dropbox.com/s/6yvxubgne0kqct4/Photo_Film_Strip_-_German_Tutorial_pt3.pdf?dl=0 Affinity Photo – False Water and Reflection https://www.dropbox.com/s/4sm0qqikvp0hs0a/affinity-photo-false_water_and_reflection.pdf?dl=0 Affinity Photo – Chinese Painting Styles in 2 parts pt 1 https://www.dropbox.com/s/uvqn9hf9mo2xwbr/Chinese_Painting_-Pt_01-_affinity-photo.pdf?dl=0 pt 2 https://www.dropbox.com/s/6ovc317ncjjosd0/Chinese_Painting_-Pt_02-_affinity-photo.pdf?dl=0 Affinity Photo – Beginners Look at Layer Masks https://www.dropbox.com/s/c0lsf9e7kdymdyd/A-Photo-%20Beginners%20Look%20At%20Layer%20Masks.pdf?dl=0 Activ8 issue 1 – Better Cloning https://www.dropbox.com/s/a1d283mn7icltzc/ACTIV8-issue1-BetterCloning.pdf?dl=0 Activ8 issue 2 – Spheres https://www.dropbox.com/s/igufcf3unu4z84b/ACTIV8-issue2-spheres.pdf?dl=0 Activ8 issue 3 – Affinity Photo - Select Tree - Replace Sky – 2 ways https://www.dropbox.com/s/lx0ko7f2xjqsg3r/ACTIV8-issue3-replacesky.pdf?dl=0 Activ8 issue 4 – Tri-Fold Image https://www.dropbox.com/s/1iyp59mr3bzjlri/ACTIV8-issue4-TriFold-image.pdf?dl=0 Activ8 issue 5 – Emboss With Lighting https://www.dropbox.com/s/t5r6tiz3c7k7o1s/ACTIV8-issue5-emboss-with-light.pdf?dl=0 Activ8 issue 6 – 3D Text https://www.dropbox.com/s/gif1x6xrtfrp2z8/ACTIV8-issue6-Three-D-Text.pdf?dl=0 Activ8 issue 7 -Affinity Photo, Designer and Publisher – A look at Styles This written tutorial, mainly aimed at beginners of any of the Affinity Software made for PC and Mac. It may work the same on iPad version but I don’t own one so can’t confirm that it will. It looks at what Styles are, how to make some Gradient Styles and some Styles made from images. Then how to Export and Import your newly made Styles. After that I do a basic overview of a couple of video tutorials I have made in the past. Using the Mirror Filter and the Equation filter to make new images, to then make Styles from. Lastly, another overview of a recent video tutorial, which looks at using the Vector Crop Tool in Affinity Designer to grab sections of an image to then make Styles from. The end of this PDF tutorial has interactive links to all the video tutorials and links to the downloads of all the Styles I have made in these video and written tutorials. https://www.dropbox.com/s/82szaatnflaw8fk/ACTIV8-issue7-Styles.pdf?dl=0 Activ8 issue 8 – Affinity Photo – Make Sketch Image With Just The Channel Mixer A while ago I made an Affinity Photo video tutorial about making a sketch image just using the Channel Mixer adjustment. I thought I’d up-date it slightly in this written tutorial, which can be done in Affinity Photo, Designer or Publisher. https://www.dropbox.com/s/6etmt3am6ljprwn/ACTIV8-issue7-ChannelMixer-Sketch.pdf?dl=0 Activ8 issue 8a – Affinity Software – 4 Creative yet simple ways to use Blend Modes This is a written tutorial update of a video tutorial I did in Feb 2018. They are fairly basic edits and will work best with an image that has a white background. So, I will use one I got from Pixabay, as are the other images used. Links to the video and image are in the written tutorial. The video was done in Affinity Photo but this will be done in Affinity Designer but I see no reason why it can’t also be done in Publisher. https://www.dropbox.com/s/sluebvjl86nuk8e/ACTIV8-issue8-Four-Uses-for-Blend-Modes.pdf?dl=0 Activ8 issue 9 – A Beginners Look At Affinity Photo part 1 Looking at opening images and saving your edits. Plus, file formats also a look at the Layers Panel and Colour selection Although tutorial is for Affinity Photo all will work pretty much the same in Affinity Designer And Publisher https://www.dropbox.com/s/7ztaxn4siom7evd/ACTIV8-issue9-Beginners%20Look%20at%20Affinity%20Photo%20pt01.pdf?dl=0 Activ8 issue 10 – A Beginners Look At Affinity Photo part 2 Looking at opening and setting up a new document other than an image. The Brush Tool and changing the Brush Tips. Then looking at the different types of Pixel and Vector layers you can make. Layer Masks and their use. Plus, a quick look at Text and Shape layers and the Glyph Browser. As with part 1, most (if not all) of the information in this tutorial will work just as well in Affinity Designer and Publisher as all 3 programs are so similar. https://www.dropbox.com/s/kourodnfojwq26l/ACTIV8-issue10-Beginners%20Look%20at%20Affinity%20Photo-pt02.pdf?dl=0
 -
A5 flier, all done in Designer and Photo apart from the 5 star logo and Chef along with Gary's image. Colour laser printed (20 A5's for double sided Perspex table flier holders)(3 A4's for notice boards) (1 A5 emailed as an attachment to the membership)
-
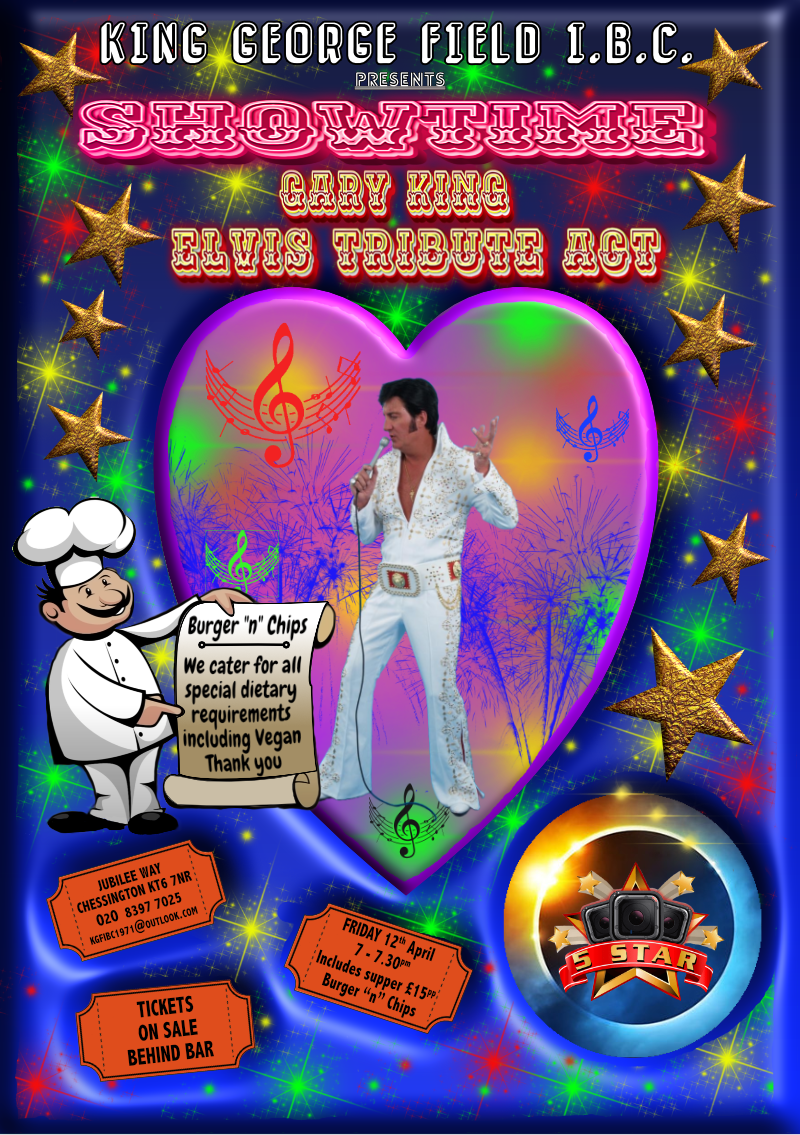
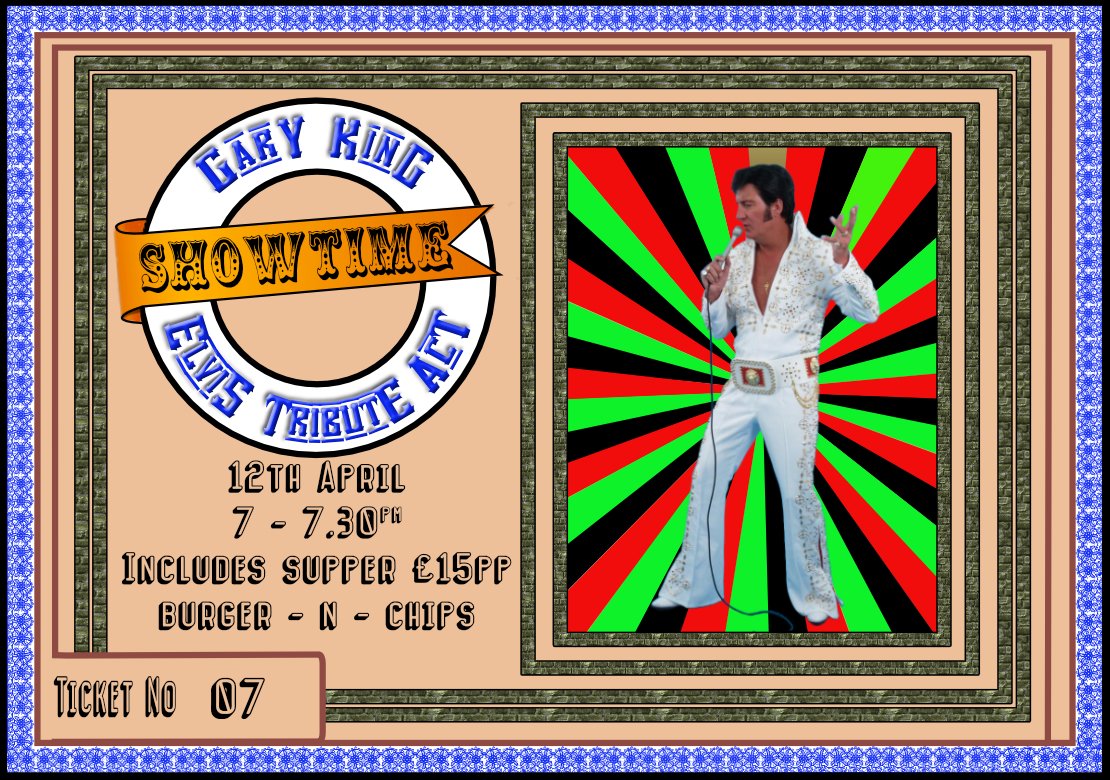
Latest ticket template 9.4x 6.6cm. everything created in Designer apart from Elvis image and creating the page numbering in and printing from publisher. Size is designed to give me an n-up print of 9 to an A4 page on a colour laser.
-
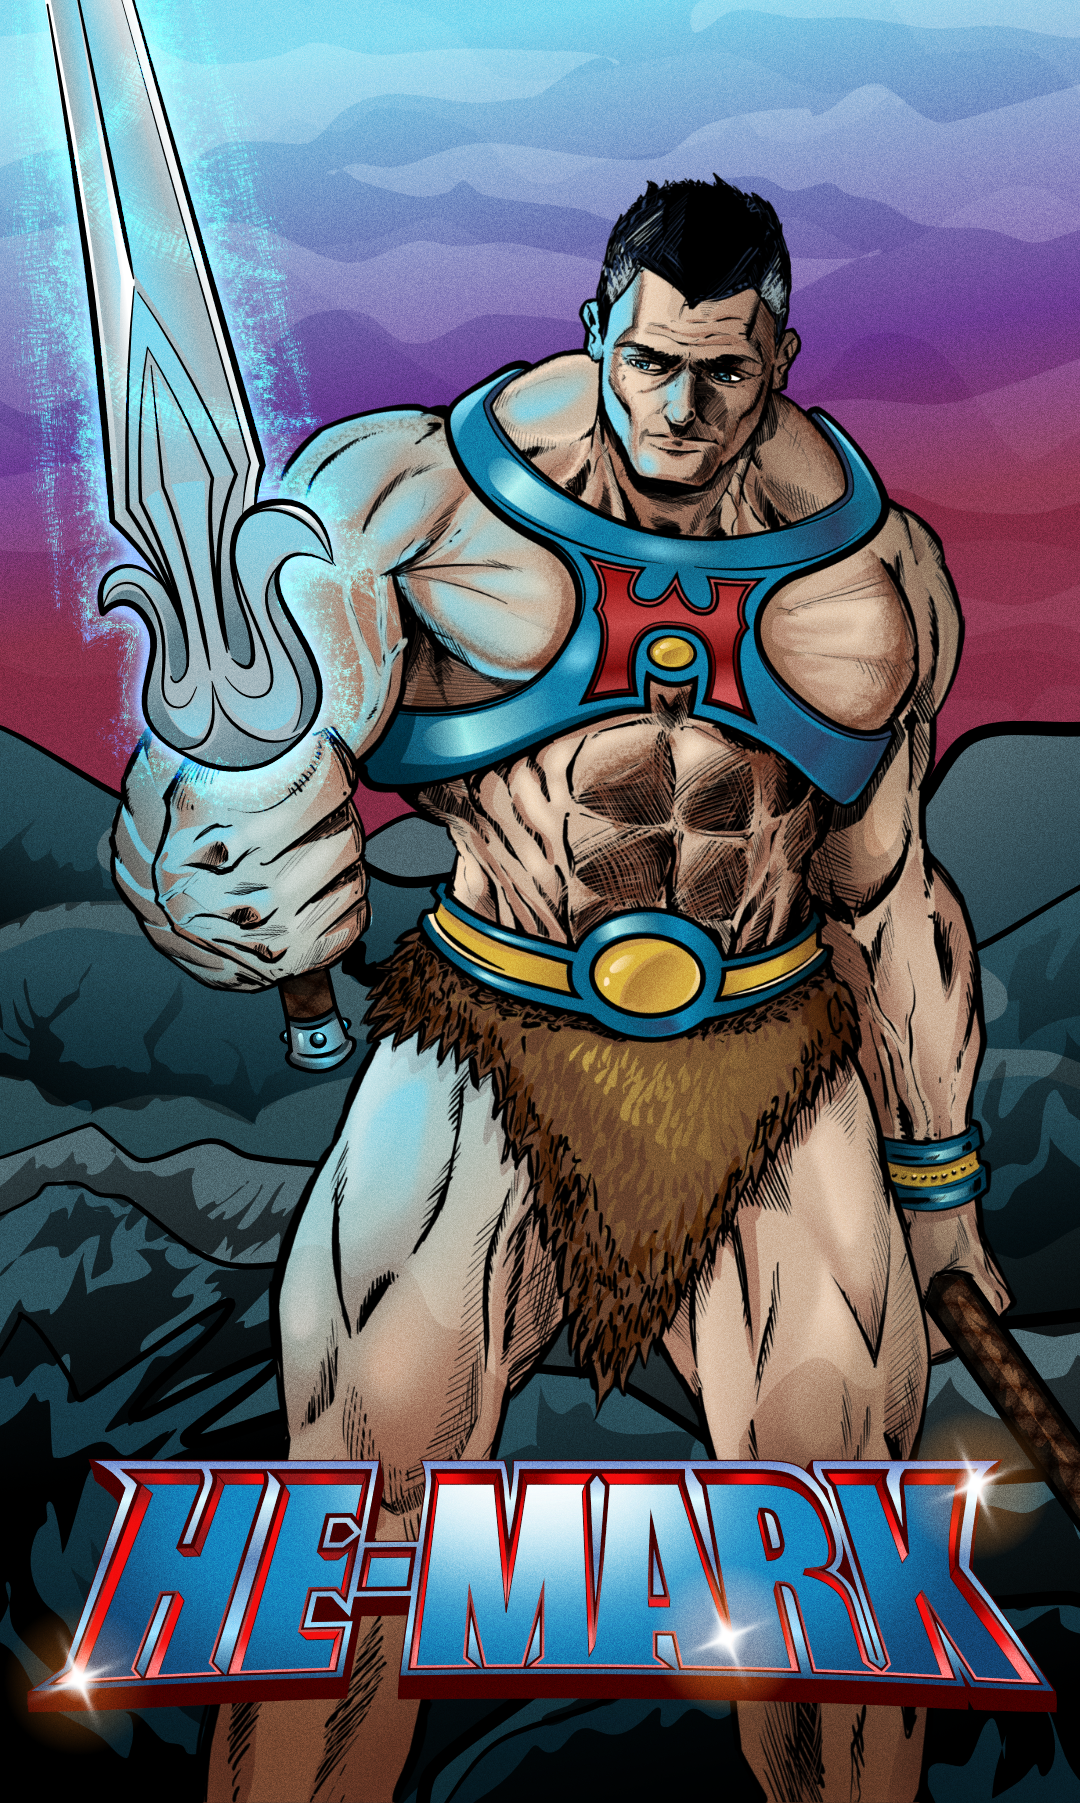
Millenia pass and with Mark as its Emperor the Viltrumite nation grows from strength to strength. With peaceful expansion now on his mind, Mark reaches out to the farthest corners of the universe, discovering new planets and lost civilizations… not all are thriving. On one new planet, darkness has taken over, and its Masters have gone. A whisper calls out to Mark as he wanders the baron land, drawn to a castle in the distance. Wedged in its mighty wooden doors is a rusty old sword. Mark reaches out to grasp the hilt of this leftover relic. A sentence screams into Marks mind… “By the power of Greyskull, I HAVE THE POWER!!” Don't know why but I felt compelled to create this! lol Initial sketch - Artflow Inks - Clip Studio (I did attempt to ink in Designer with vectors, but just wasn't happy the results) Colours and Logo created in Affinity Designer. I also used Affinity Photo do to some liquify and fix elements. It's not perfect, but I'm attempting to create more!!!
-
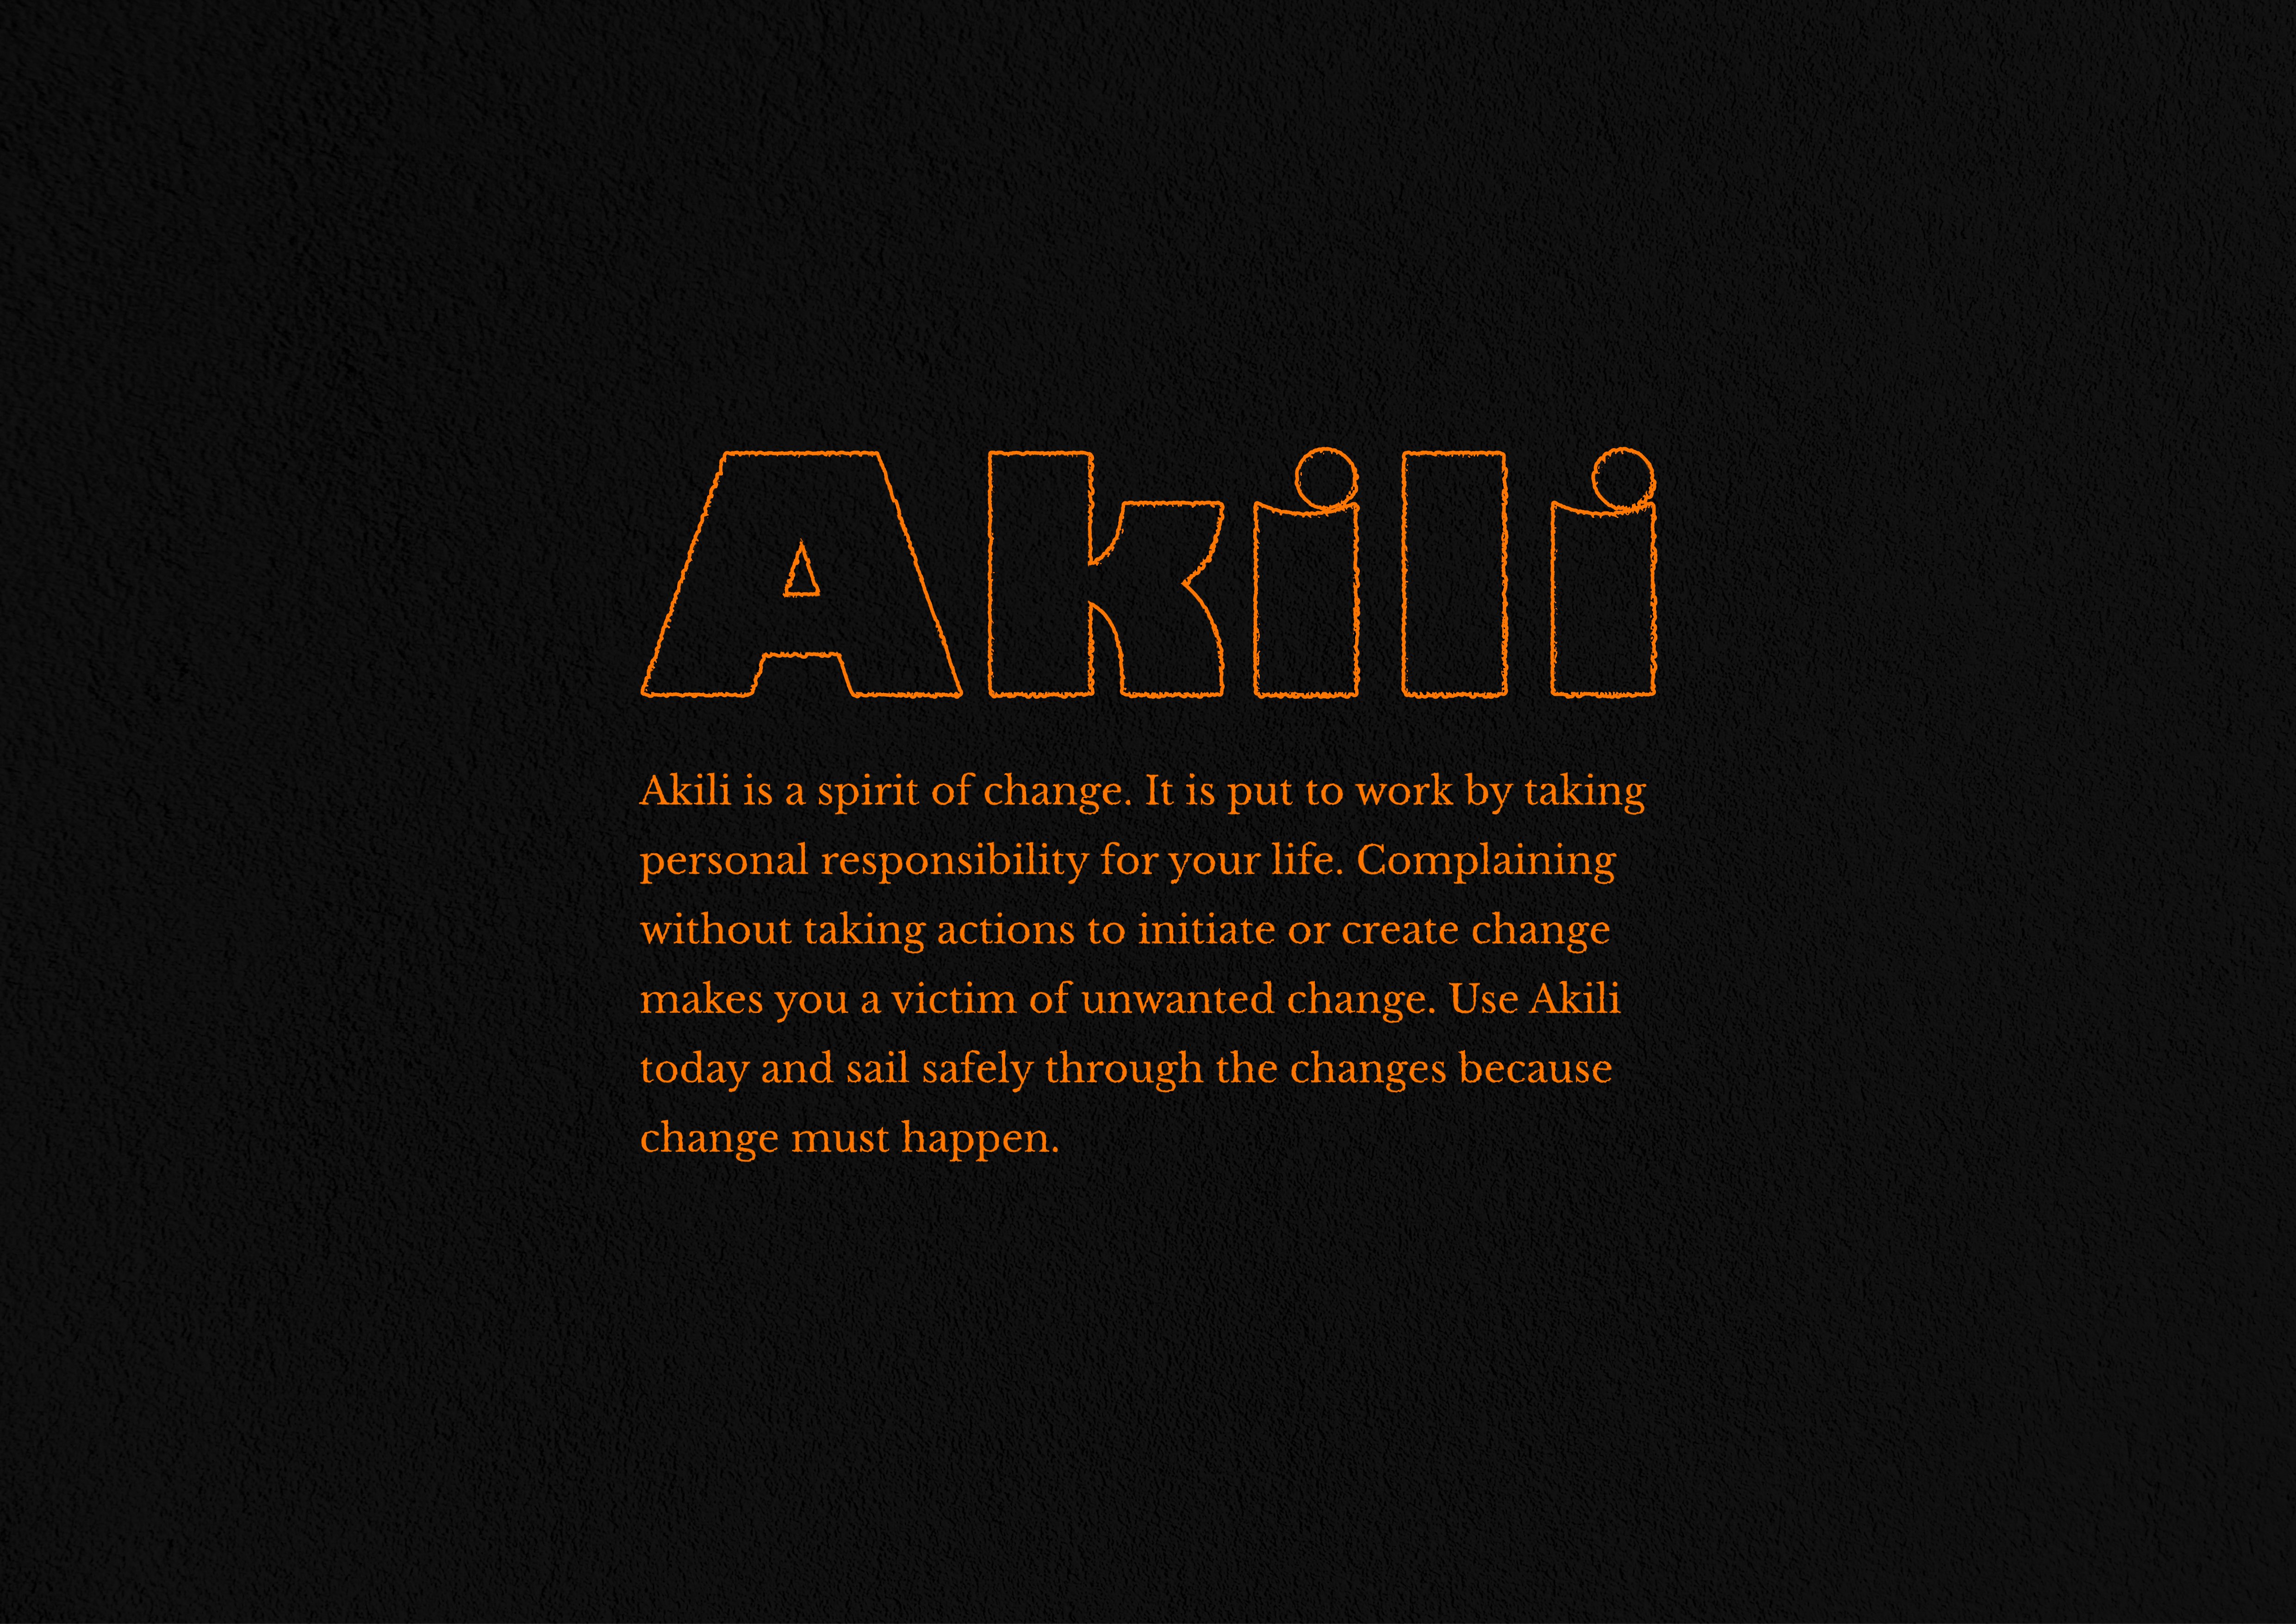
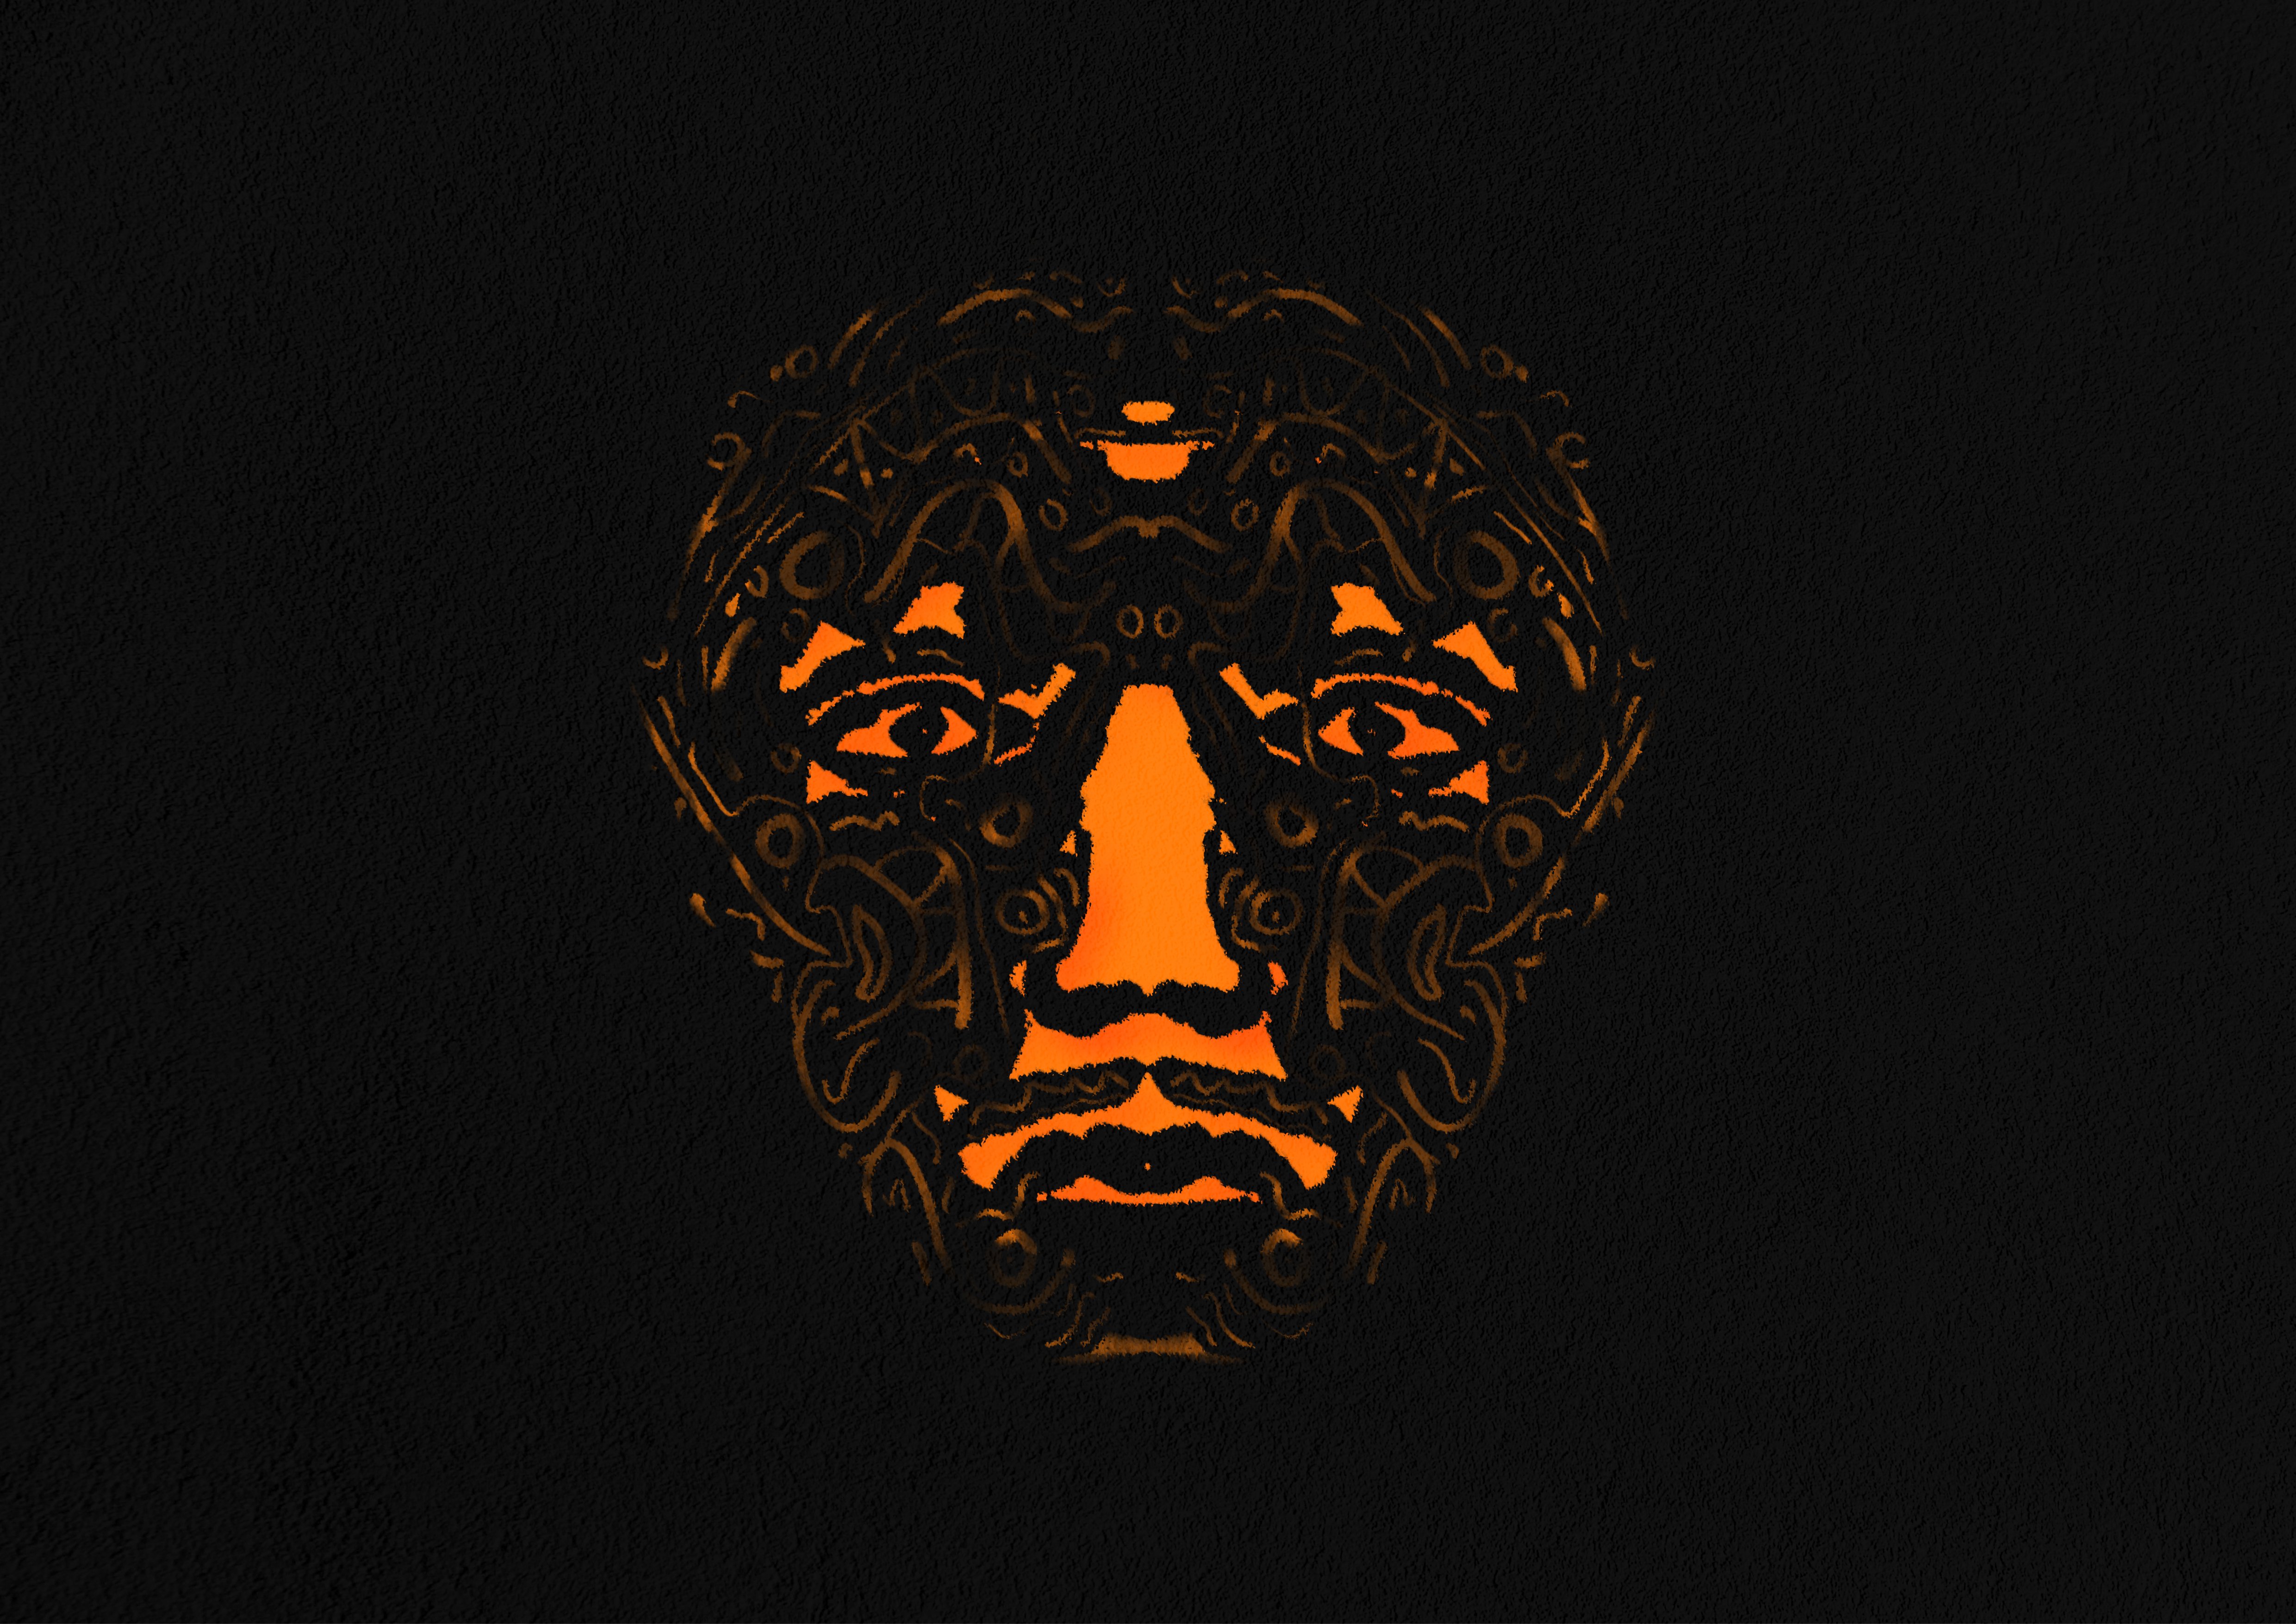
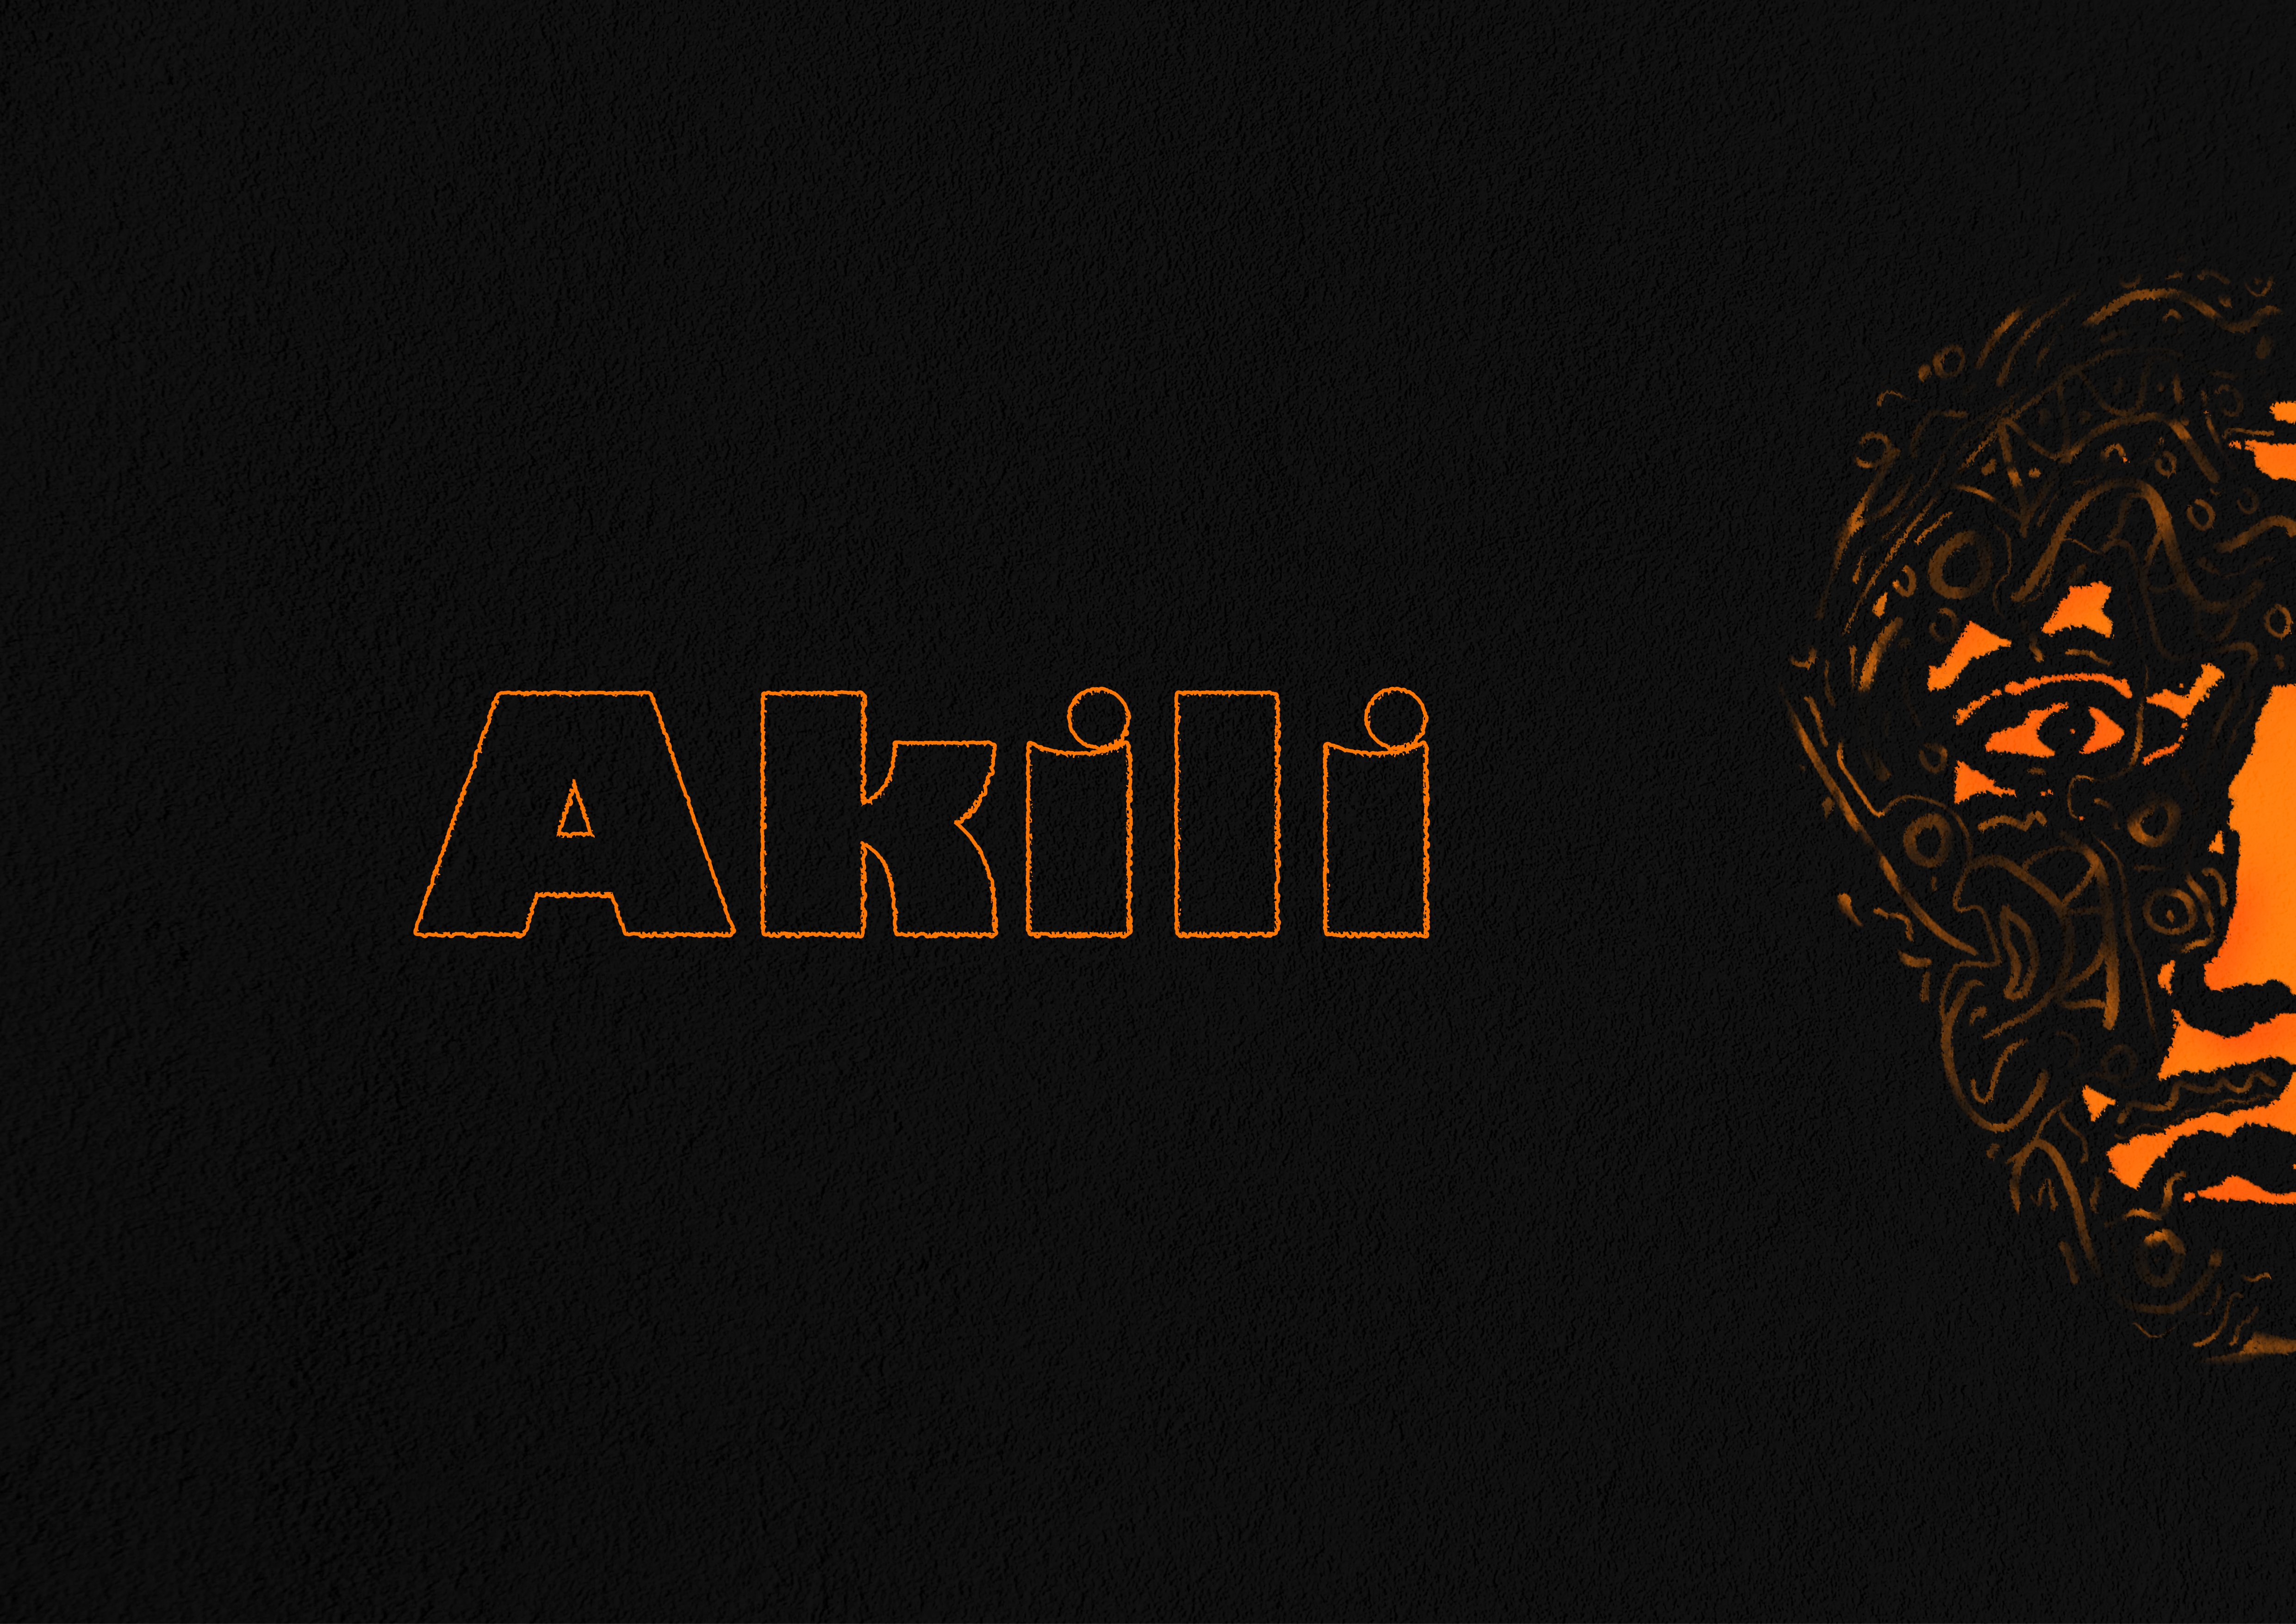
This is an update 1.1 of project Akili. Which version do you prefer? Thanks. Tools: Affinity Photo, Affinity Publisher Let's connect: https://www.behance.net/bah-is-life https://www.instagram.com/bah_is_life/
-
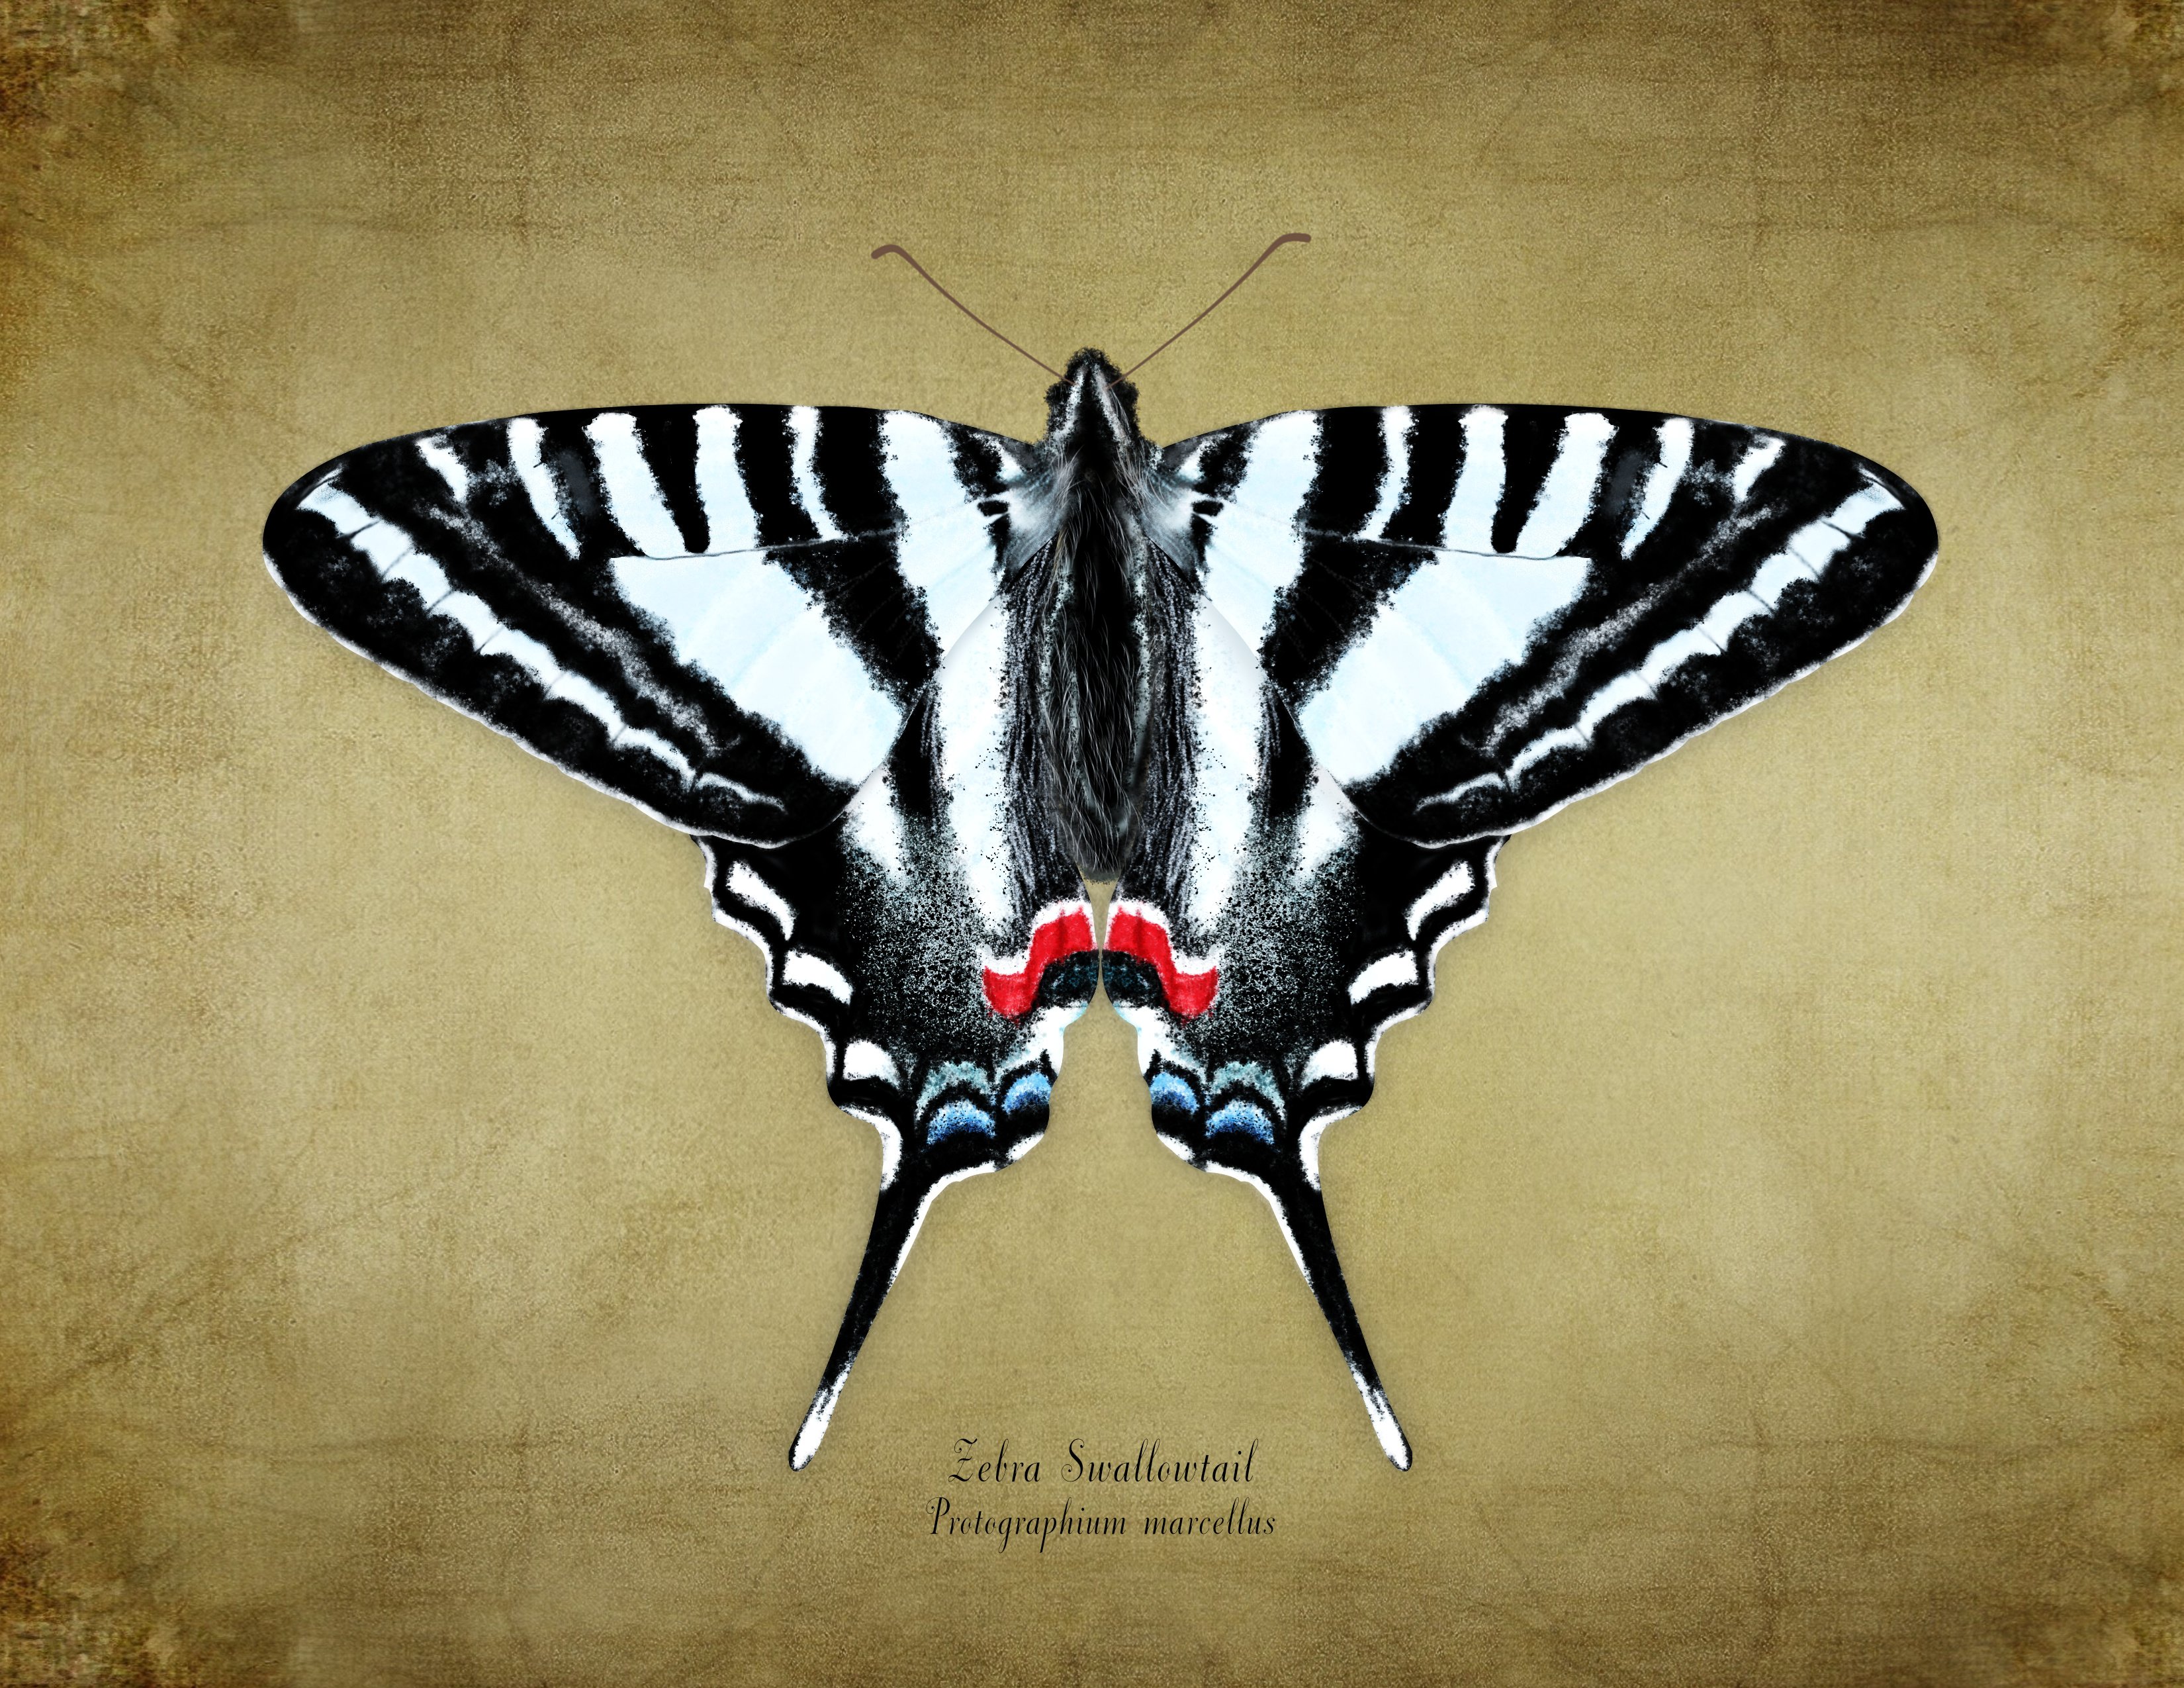
I recently illustrated a Zebra Swallowtail Butterfly (Protographium marcellus) for my brother. He wanted a photo, which I did not have, so I decided to create an illustration for him instead. I used AD v2.31., but spent a lot of time in the Pixel Persona. I also made a few trips to Affinity Photo for a few features that AD does not support. Hope you like it.
- 2 replies
-
- 17
-
-
-
- pixel persona
- butterfly
- (and 3 more)
-
Geometric line art. The figure itself created in Affinity Designer, and the effects and background added in Affinity Photo.
- 2 replies
-
- 12
-
-
- affinity designer
- affinity photo
- (and 1 more)
-
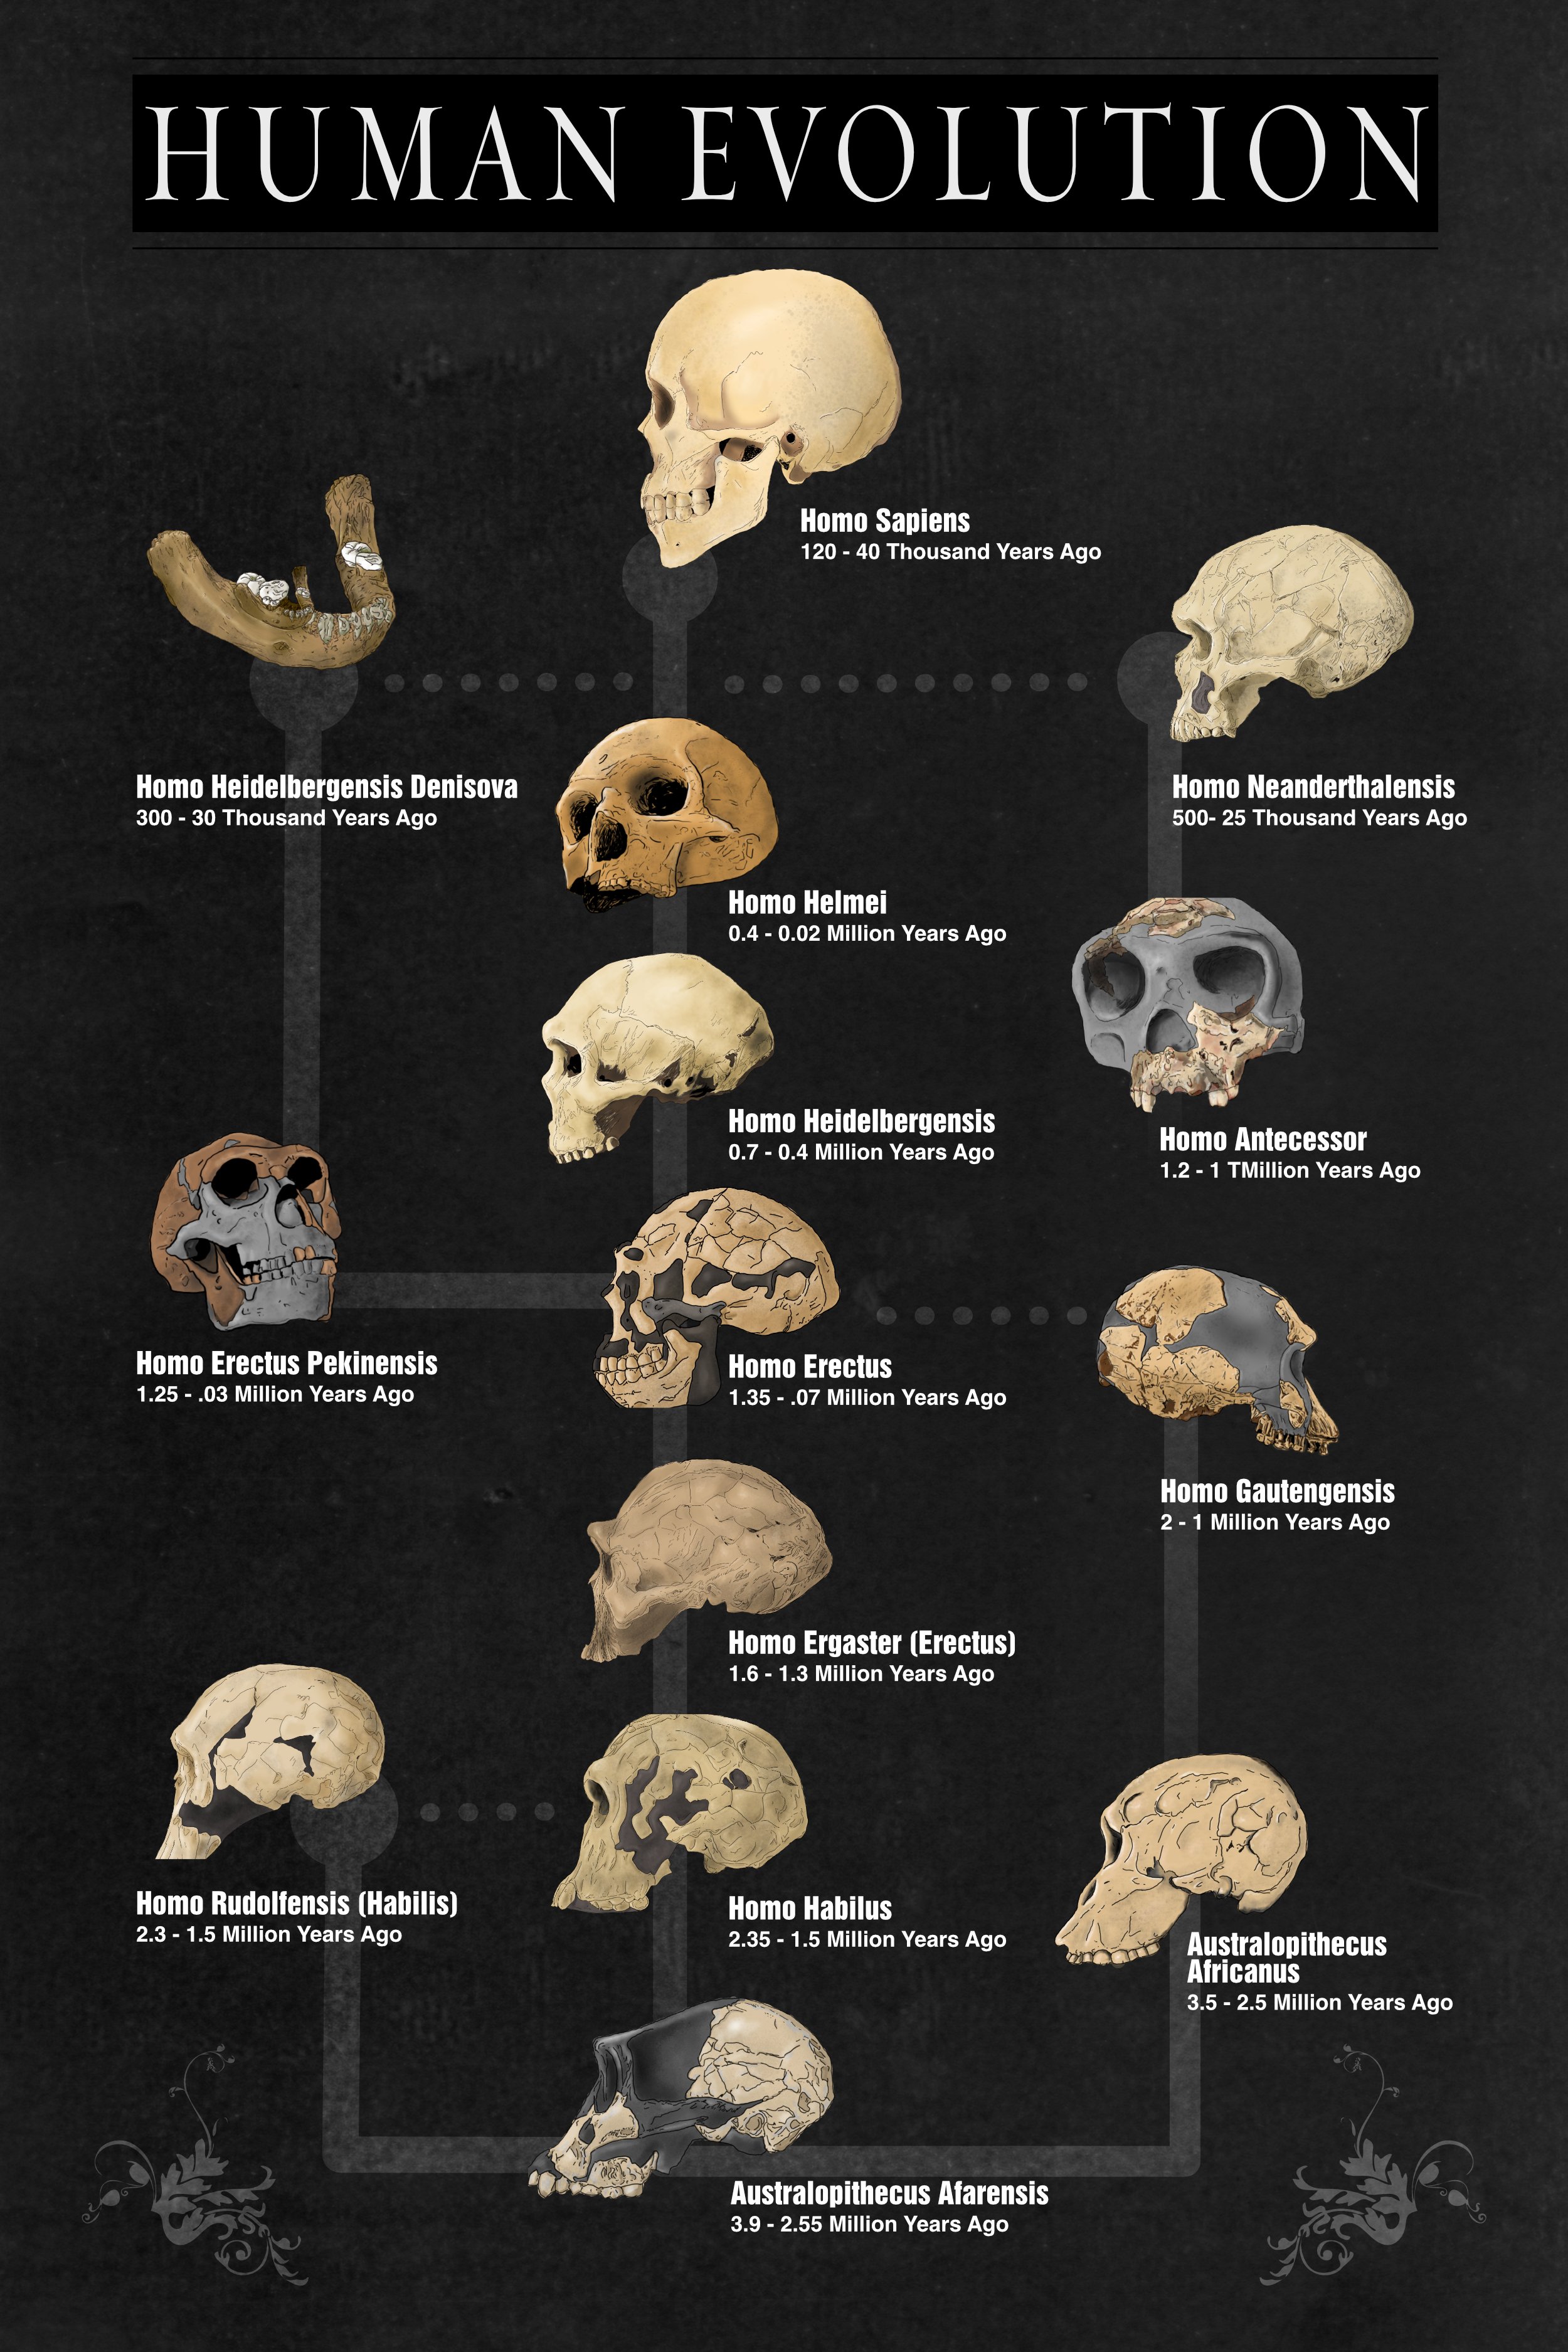
My brother bought a new place and requested I make him a poster on human evolution using the skulls. It took a while to research and decide what would work and to weed through alternative ways to present to timeline. The images were draw in AP and it was set up in Apub. The illustrations separately are on 15x15" canvases and the printed poster will be 12x18".
-
Freehand (analog) airbrush on canvas, Affinity Photo: pallet manipulation and saturation, Affinity Designer: enhancement of skin texture with the Gradient tool to edit bitmap textures and brushes. (work in progress as of Dec 2023) (3D version created in Plasticity 3D)
-
- 1
-
-
- affinity photo
- affinity designer
- (and 1 more)
-
3-4 Years ago my Nephew and I decided it would be funny to create an animated series based on some weird cockroach drawings he did as a child that he called 'COCs'😅. We came up with some characters and story lines and the name C.O.C SQUAD (Combat Orientated Cockroaches). It's based on early 90s action movies and cartoons and went through quite a few different art styles and approaches until we found what worked. The movies Showdown In Little Tokyo and Hard Target were particularly influential. The characters were designed in Affinity Designer and Affinity Photo. There were then exported to various pieces of animation software. We recently launched a Kickstarter to try and get some funding to finish the first episode in a reasonable amount of time (It's half done). I would love to know what you guys think of it. More info available at https://www.cocsquad.com/
- 2 replies
-
- 6
-
-

-
- animation
- affinity photo
- (and 1 more)
-
 Quick Tips: for finding Affinity content with Google Search Search engines: It’s easy to underestimate the power of a simple Google search (and it’s apparent many people on online forums who don’t know how to make use of it). It can save you a lot of time, because someone, somewhere, at some point has undoubtedly had the same question you have—all you need to do is find out where they asked it and what answers and problem solutions they got in response! With a few helpful Google search engine tricks, searching the Affinity Forum via Google can be made much more effective. The Common Search In general, you should string search terms with a space together to start the context search. Thus, the input "Affinity forum gradient" or "Affinity forum macro" in the search window shows all found link entries on the screen which contain those terms. Quoting ("...") helps to search after more closely related search text here. Extended or Exclusive Search To make Google search more effective, you should use so-called operators. Here are some of them. A tilde (~) before a search term makes the term synonymous. So "Affinity ~forum" brings both the Affinity forum as well as hints for possible other related forums. With a minus sign (-) you can specifically exclude terms from the search. For example, the minus designer in "Affinity layer masks -designer" calls up a list of Affinity layer masks related entries without designer in the context. With a plus sign (+) you can instead specifically include terms to the search criterias. Search in and for Websites To specifically search a particular website/page, prefix your search term with a "site:URL" - where the URL is the web address of the site/page on which you read the info recently. For example, "site:affinity.forum.com macro recording" searches and calls for a list of threads which deal with macro recording on the Affinity forum. A minus sign in the "-site:URL" input behind the actual search terms excludes results from the named URL. So "Affinity video -site:youtube.com" will exclude all Youtube videos from the search. With "site:de" it will only search German websites with the extension .de; Of course, other endings like .org or .com etc. can also be used here. With "related:URL" you can find out if other websites have similar content. In order to browse only publications from a specific period, you must connect the adjacent years with three points: here "2014...2018" only lists publications between 2014 and 2018 in the results list. For example in order to find at affinity.forum.com current practical contributions to macro recording you would use "site:affinity.forum.com macro recording 2016...2018". Some helpful browser shortcuts To speed up the search in general, there are a few shortcuts available. For example, "Ctrl + F" will bring up a small search window at the bottom of the page that will help you to search the current page for terms. Ctrl + or - enlarges the view, zooms in or out. Ctrl + L moves the cursor back to the address bar so you can enter a new website or search term. Calculations, units of measurement and currencies The Google search engine can also calculate and convert. For those of you who struggle with mental arithmetic, just type the math questions directly into the Google search window using the +, -, * / symbols. This calls at the same time the calculator for further input of even more complicated tasks. If you want to convert units of measure or currencies, you can also type these directly into the search window. Thus, the input "inches in millimeters" picks up a unit calculator, with "pounds in euros" you get the current price displayed as well as references to various currency converters.
 -
https://www.artstation.com/artwork/VJYr95 Had some fun painting one of my favourite Spider-Man villains, Venom. Had a blast working with more painterly brushes for the skin.
- 5 replies
-
- 7
-
-
- painting
- affinity photo
- (and 2 more)
-
Who's in dribbble so i can follow you? My accounts: https://www.instagram.com/heavyblazenight/ https://dribbble.com/heavyblazenight https://www.behance.net/heavyblazenight
-
Creating a custom palette in AD is so simple stupid that this post should sound pleonastic... :) Anyway I'd like to share these two palettes. The first one is the famous FlatUI color set. The second one is the legacy Fractal Design Painter color palette, I'm carrying with me since I was sixteen :D palettes.zip
- 22 replies
-
- 18
-
-
-
Just testing to see how many filters, adjustments, blend modes, etc I could use before crashing the latest Photo and Designer Betas. Couldn't!
-
This my first artwork totally using Affinity Designer and Photo. I've converted from Adobe as I'm now retired and just producing pictures for my own pleasure (mainly motor racing). This is the late Carlos Pace's Martini Brabham BT45 at the German GP in 1976. Based on a photo by the brilliant Rainer Schlegelmilch.
- 1 reply
-
- 14
-
-
- affinity photo
- affinity designer
- (and 1 more)
-
Hello, these are some title pages from web site shopping mall product presentations created in APublisher. Thanks. https://www.behance.net/gallery/170509823/Graphic-Design-Product-pages https://www.behance.net/gallery/170510013/Pen-Case-Graphic-Design-development
- 2 replies
-
- 2
-
-
- affinity publisher
- affinity designer
- (and 1 more)
-

multi Oh crap...I need an 'album' cover stat, you got 3 days.
Junkbox posted a topic in Share your work
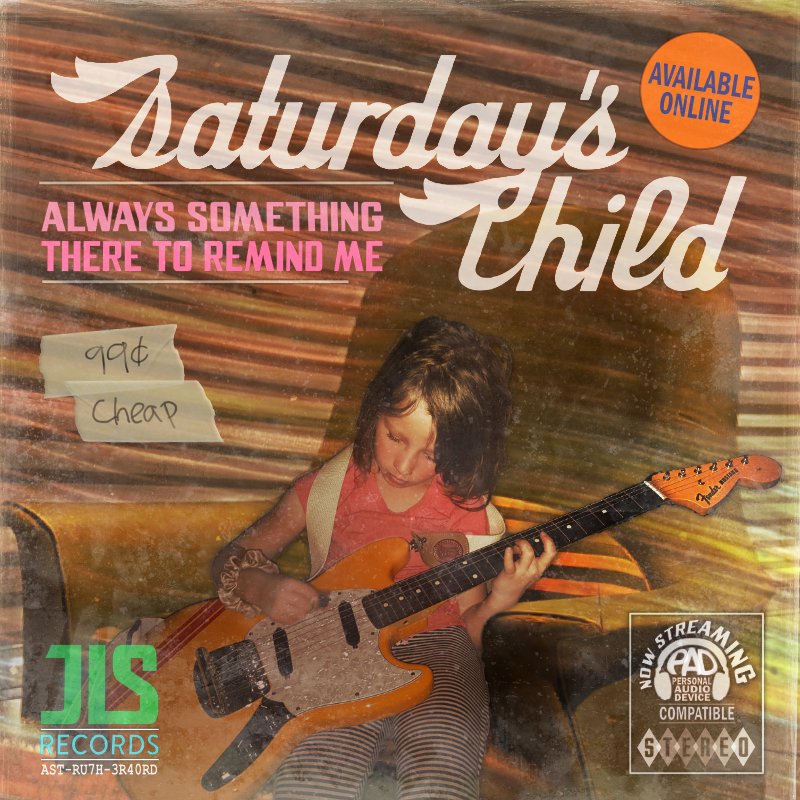
So my good buddy calls me says I need a CD/album cover in like a few days. Apparently, as we artists are the last to learn there's been all sorts of contemplations that the designer is only privy to after significant procrastination. Then come to find out that a late night decision the release is to be under their newly independent label. This has no effect on my process. I've done many graphics for the band, and even played in a side band or two with em. So yes, of course I'm in. The title track is a Burt Bacharach cover, so the idea was to make the 'album' cover appear as a dusted out 70's LP, replete with the 'I've been sitting in Mom's basement' look. Here's the final. This is the first time I've used Affinity Suite exclusively for a project like this. Just wanted to share. The suite works well, glad to do a full project with it. Thanks.
- 5 replies
-
- 12
-
-
- affinity designer
- affinity photo
- (and 2 more)


.jpg.ea8df5c4d74280ad4e4f38ac5725a4b8.jpg)