Search the Community
Showing results for tags 'Greyscale'.
Found 23 results
-
 Hello, forgive me if I'm raising this subject in the wrong forum, but I found it challenging to find the correct one. This issue has bothered me for a while. If I'm creating a document specifically for publication in print form and it's in colour, I absolutely understand that it must be set up in CMYK, and exported to PDF also in CMYK. But what is the absolute correct setting when exporting a document intended for print that is in black & white. I have one printing company that I use that says it too should be exported in CMYK, and another that says it should be exported in greyscale. Admittedly, when I've chosen the advice of the former, the finished result (physical copy) is that there is not a rich black appearance; rather it comes out more on the 'brown' side. And exporting in greyscale has produced a better result. But now I'm confused, because in Affinity 2, when I hgo to set up a new document in greyscale and try to export it, I'm getting the pre-flight warning of 'Document colour profile not suitable for PDF/X'. This is suggesting to me that it's not correct to have even set up the document in greyscale. I'm really hoping to resolve this issue that seems to be so divided. For Black & White publications what is the best setting recommended in colour profile for both: 1. Document set up 2. Exporting to PDF Thank you in advance, Peter
 -
 In Publish, Is there a way to convert select pages of a color document into greyscale?
 -
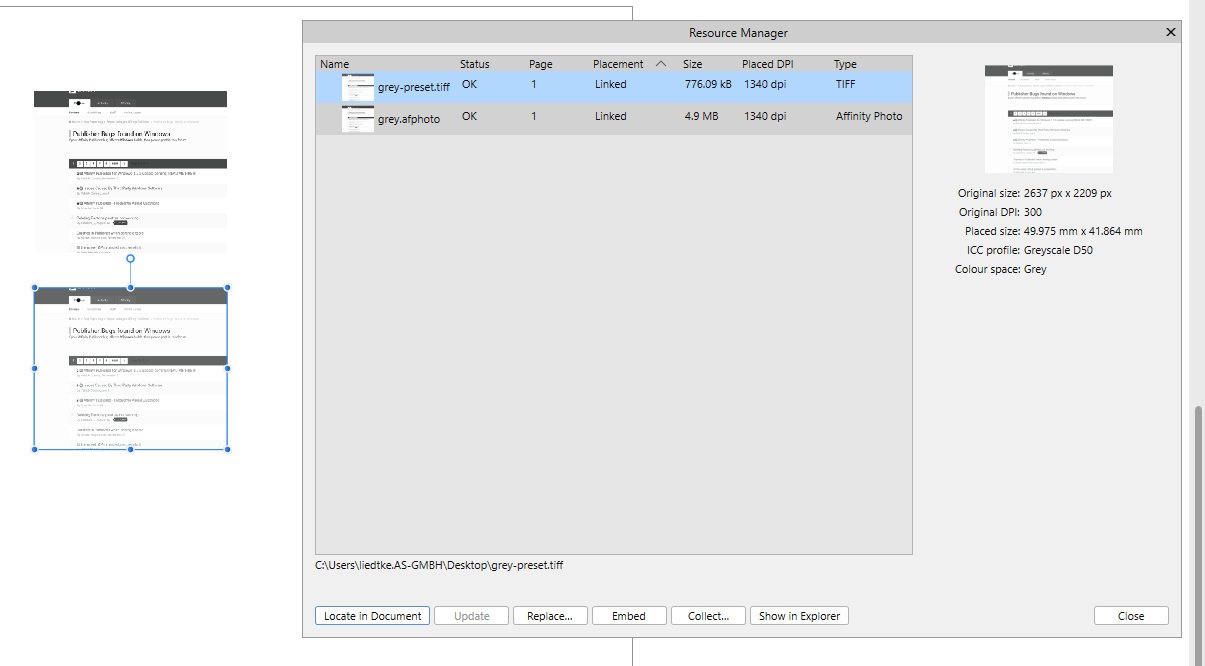
 I am not sure if this is a bug in APu or AP or both or by design? 1. Create a CMYK document in APu. In my case with ICC PSO Coated. 2. Convert a 8bit RGB image to Grey 8bit D50. It does not matter which Grey ICC profile and save it as .afphoto. 3. Export this image as 8bit Grey TIFF using the preset for it. 4. Place both images linked in your CMYK document. 5. Open Resource Manager in APu and look at the images. Results: The .afphoto is Grey, the TIFF is CMYK. 6. Export the document Press Ready and open in Acrobat. Result: The .afphoto is CMYK, the TIFF is Grey. Now the Magic! 7. Export from AP as TIFF again and have it automatically updated in APu. 8. Revisit Resource Manager. Result: The TIFF is now also Grey ... Magic!
-
 Hi everyone, I hope my English is good enough for you to understand. In Affinity Publisher, I used the greyscale for the fonts: grey 0% and opacity 100%. But using the pipette tool (I hope it's also this name in the English version), the font is suddenly grey 5% (and opacity still 100%). Do you have any ideas how this could be fixed? I'd be very grateful...
 -
 Hi all, I have a question regarding greyscale document setup in Affinity Designer and image greyscale format in Affinity Photo. My normal workflow is to create a Grey/8 Greyscale D50 document in Affinity Designer. I first edit my images in Affinity Photo and convert the images to Grey/8 Greyscale D50. I then import the images into Affinity Designer. My question is, what is the best workflow for accurate greyscale images? The other options are Generic Gray Gamma 2.2 Profile or Generic Gray Profile - what is the difference between the three options? Also what settings is recommended for pdf export for printing on press. *The setup is for a Year Book where most pages will be printed on a press with black ink only. Thank you.
 -
 For my taste the inpainting brush tool is not visible enough working on greyscale images, because it is grey on grey and sometimes hard to see. So I would like to see the red colour of the brush even in greyscale mode.
- 4 replies
-
- 2
-

-
- greyscale
- inpainting brush tool
- (and 1 more)
-
 Hi Everyone, I am trying to restore old photos and have had some success with recolour. I currently have a family photo from around 1955 where the bottom corner is torn off and lost. I am copying and pasting sections of brickwork, peoples legs and foliage from around the background. There are huge differences in 'greyness' and I wondered if the greyscale graph from 1 section could be used in another. Any tips would be appreciated. Regards, Rob
-
 BW Images still open as colour, and even if converted to BW, lose all the Foveon benefits. There's two ways to obtain BWs from Foveon RAWs, and neither works. Similar crops below from the same image, all at 200% zoom (slight variations in cropping). Most recent of multiple posts (prior beta) Above: AP 1.7.2.414 choosing BW Above: AP 1.7.2.414 choosing BW and only using blue channel Above: IrfanView 4.5.2 as opened (uses DCRaw) Above: Sigma Photo 6.6.1 Export using Blue Channel only
-
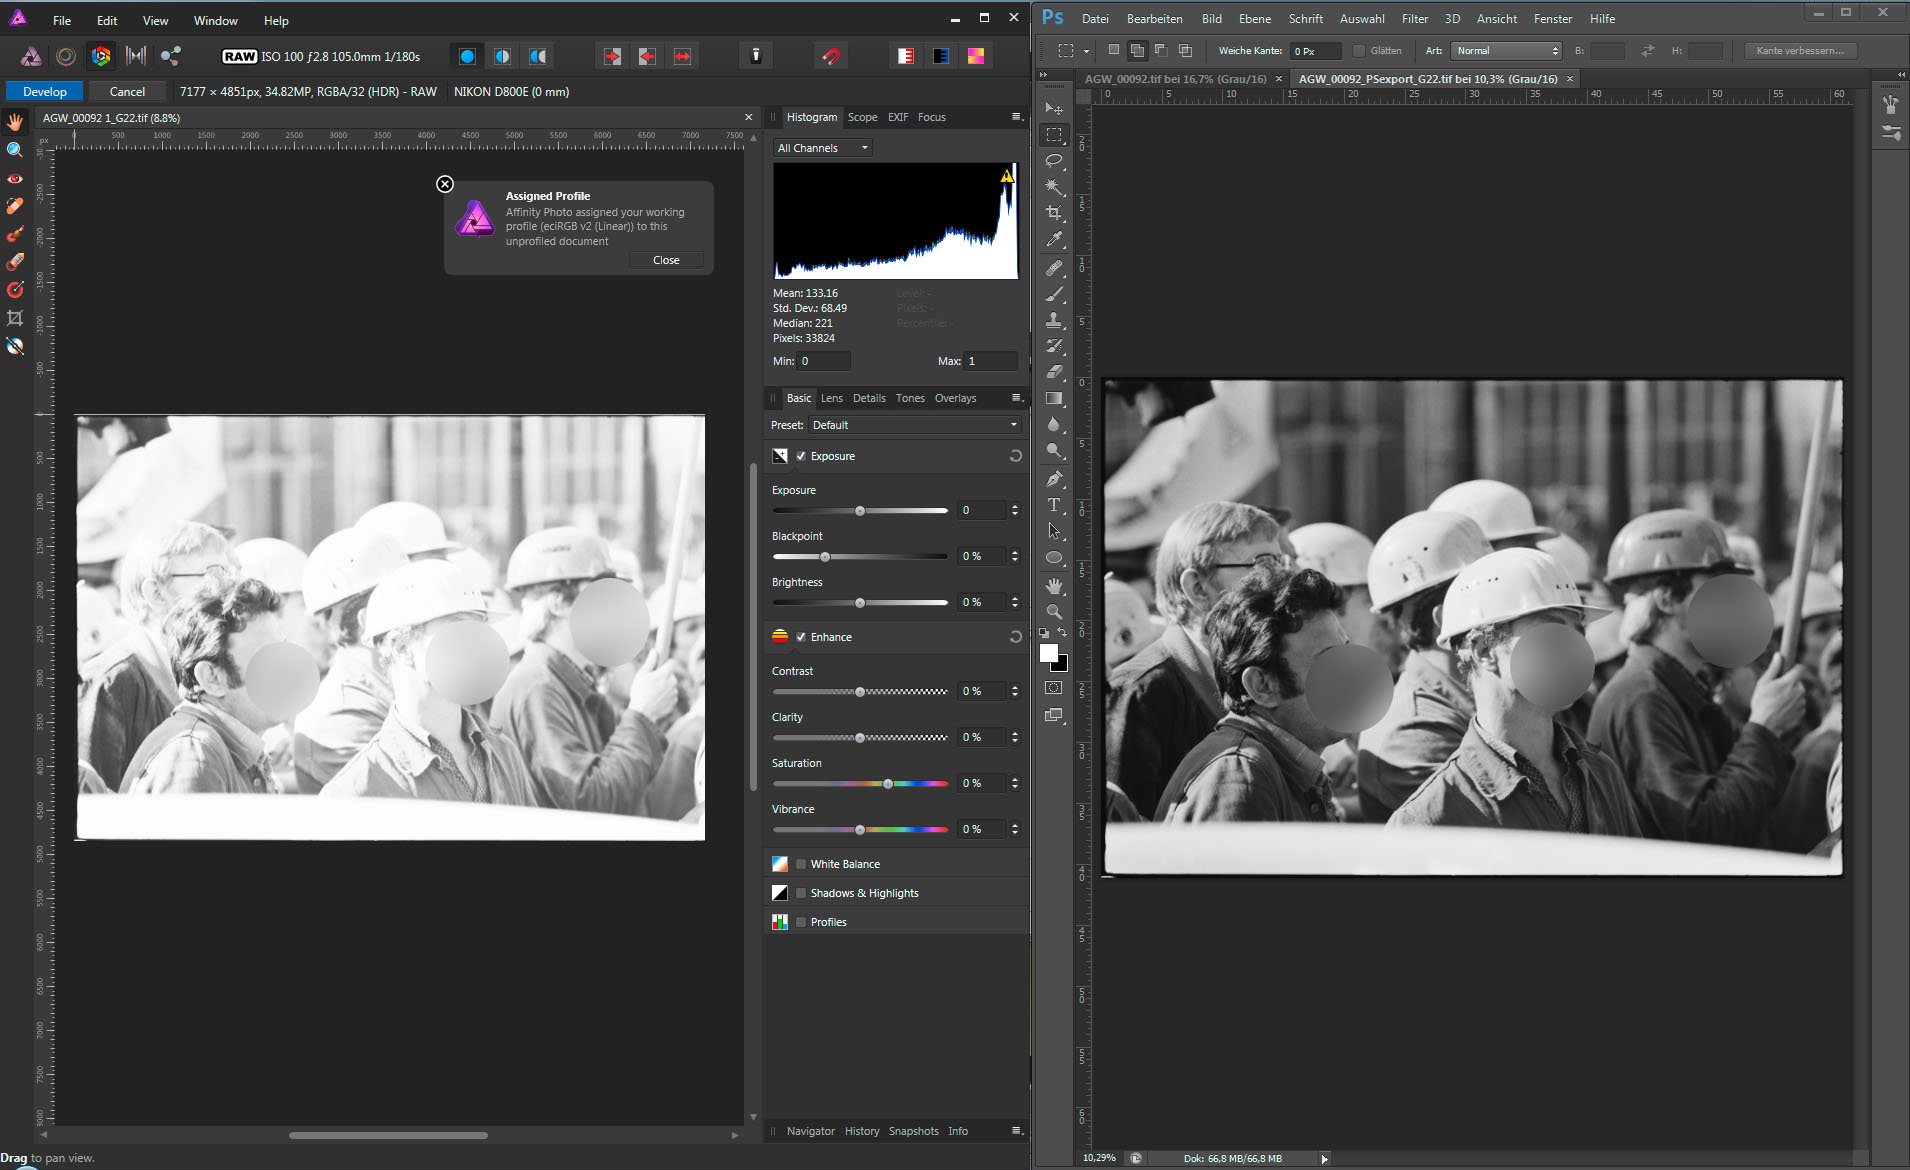
 Hello! First to introduce me: I´m a professional photographer for 35 years, with experience in many cases of professional photography, developing b&w, color negative, color positive processes, digital photography from its beginning, colormanagement. Meanwhile I work in a public photo archive with 100.000´s of photos from historical until now. About 90% are b&w photos. Digitalization of these photos and managing them in a DAM is my main work here. Right now I try to get a workflow with applications out of Adobe. But there seems to be a bug on the interface between CaptureOne and Affinity Photo. In CaptureOne 10 I export a b&w-file with embedded profile Gray Gamma 2.2. In Affinity Photo (V1.6.5.123) the settings for colormanagement is Gray Gamma 2.2 for b&w-files. When I open the exportet b&w-TIFF with embedded Profile, AP opens it in the Develpo Persona, shows the file extremely bright an assigns the profile for RGB to the photo because AP couldn´t recognize any embedded profile. I can´t rescue the file by assinig other profiles or by developing the file to what it should look like. If I open the same file in Photoshop with the same colormangement-settings, the file will be opened correctly without any profile-warnings. If I "save under..." this file without any changes, but with a new name in Photoshop and open this in AP, it will be opened correctly with the right profile an the right brightness. Any hints for wrong settings or steps in my workflow? Greetings Mikelike
-
 I've been scanning my old 35mm negatives with a Minolta Minolta Dimage Scan Dual IV so that I can put them up on my website. The negatives and all black and white and in need of a bit of attention, so my plan was to run them all through Affinity Photo to remove any dust and scratches and tweak the levels. I did this a few years ago with an old copy of Photoshop CS2 with no issues, so assumed the latest version of Affinity Photo should have no trouble. As I did the last time I scanned a batch of negatives, I have been scanning them with Vuescan as 16bit greyscale TIFF files. When I open the resulting TIFFs in Affinity Photo however, they are opened in the Develop persona with the picture completely blown out. On some occasions they fail to open at all and leave either a blank window reading 0x0 pixels, or crash the app completely. I'm happy to provide a copy of the error log if you think that would be helpful. I can kind of fix the blown out image (for the ones that do actually open) but it really shouldn't be necessary. The files which fail to open at all open fine in Preview, Photoshop CS2 and pretty much anything else I try to open them in. As it is, I am getting better results out of the almost 15 year old Photoshop CS2 than I am out of Affinity Photo. I know I could just use Photoshop, but my copy won't run on my current Mac so I have to open my TIFF files on an old Windows 7 machine. I would much rather however use Affinity Photo as I otherwise find it works very well for my needs. Is there any way in which I can open these TIFF files normally in the photo persona? Is this a bug or the intended behaviour for 16 bit TIFF files? Any help would be much appreciated. Thanks
 -
 I use VueScan to scan lots of black-and-white images. Within VueScan, I set the input as B/W and the output to 1-bit Tiff. After saving the image, it automatically opens in Affinity Photo with the message that the default profile is automatically being applied. This means I get an 8-bit RGB image. Now I know that Affinity does not (yet?) support 1-bit images, but it is annoying to have to set the image to Greyscale every time. I tried to look up this Colour Profiling, but it seems that it is a global setup that will affect any unprofiled images that it loads. VueScan says that the saved tiff file will be 'profiled' whatever that means. I find that Corel Photo-Paint does not do this. It loads the tiff as a 1-bit image. Is it possible to prevent this happening? If I am about to scan a batch of black-and-white images, would it be possible to prevent this default profile being applied? I posted a similar query to VueScan support and got the following reply from Ed Hamrick: Profiles only work for scans that are in color. They don't make any sense for 1 bit per pixel, so I don't store a profile. John
-
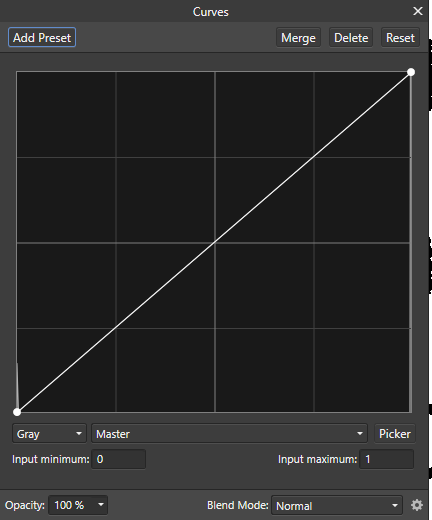
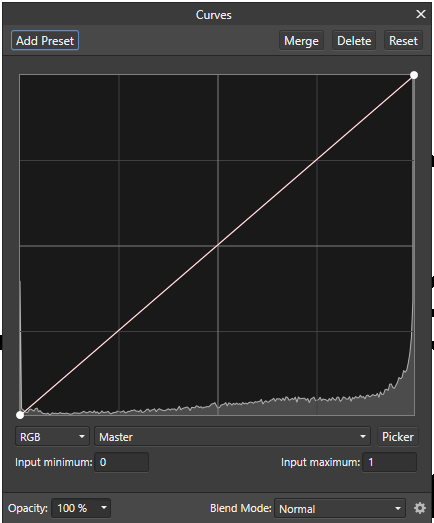
One feature missing from Affinity Photo is the ability to handle One-bit, or black-and-white images. I do a fair amount of scanning black-and-white documents, making small edits (typically cleaning up) and then saving them. I typically use Vuescan which will scan my documents and save them as 1-bit black-and-white tiff documents. I can open these in PS CS5 or in Paintshop Pro, and they open as 1-bit documents. If I open these tiffs in AP, they open as 8-bit RGB! Not even as Greyscale. I would expect that the histogram should show just black and white pixels, such as in this histogram (from Curves): However, what it shows is a histogram like this (also from Curves): Affinity has clearly found a range of pixels (in a 1-bit image) with intermediate values. I can apply a threshold in the Curves Adjustment at 127, which does indeed give me the histogram as seen in my first image. Can anyone explain this phenomenon? John
-
 I once saw a very good Affinity Photo video on how to apply a colour to a greyscale tiff. I need to review this but cannot locate it although searching through the official list. Anyone know where I can find it or the link to it?
 -
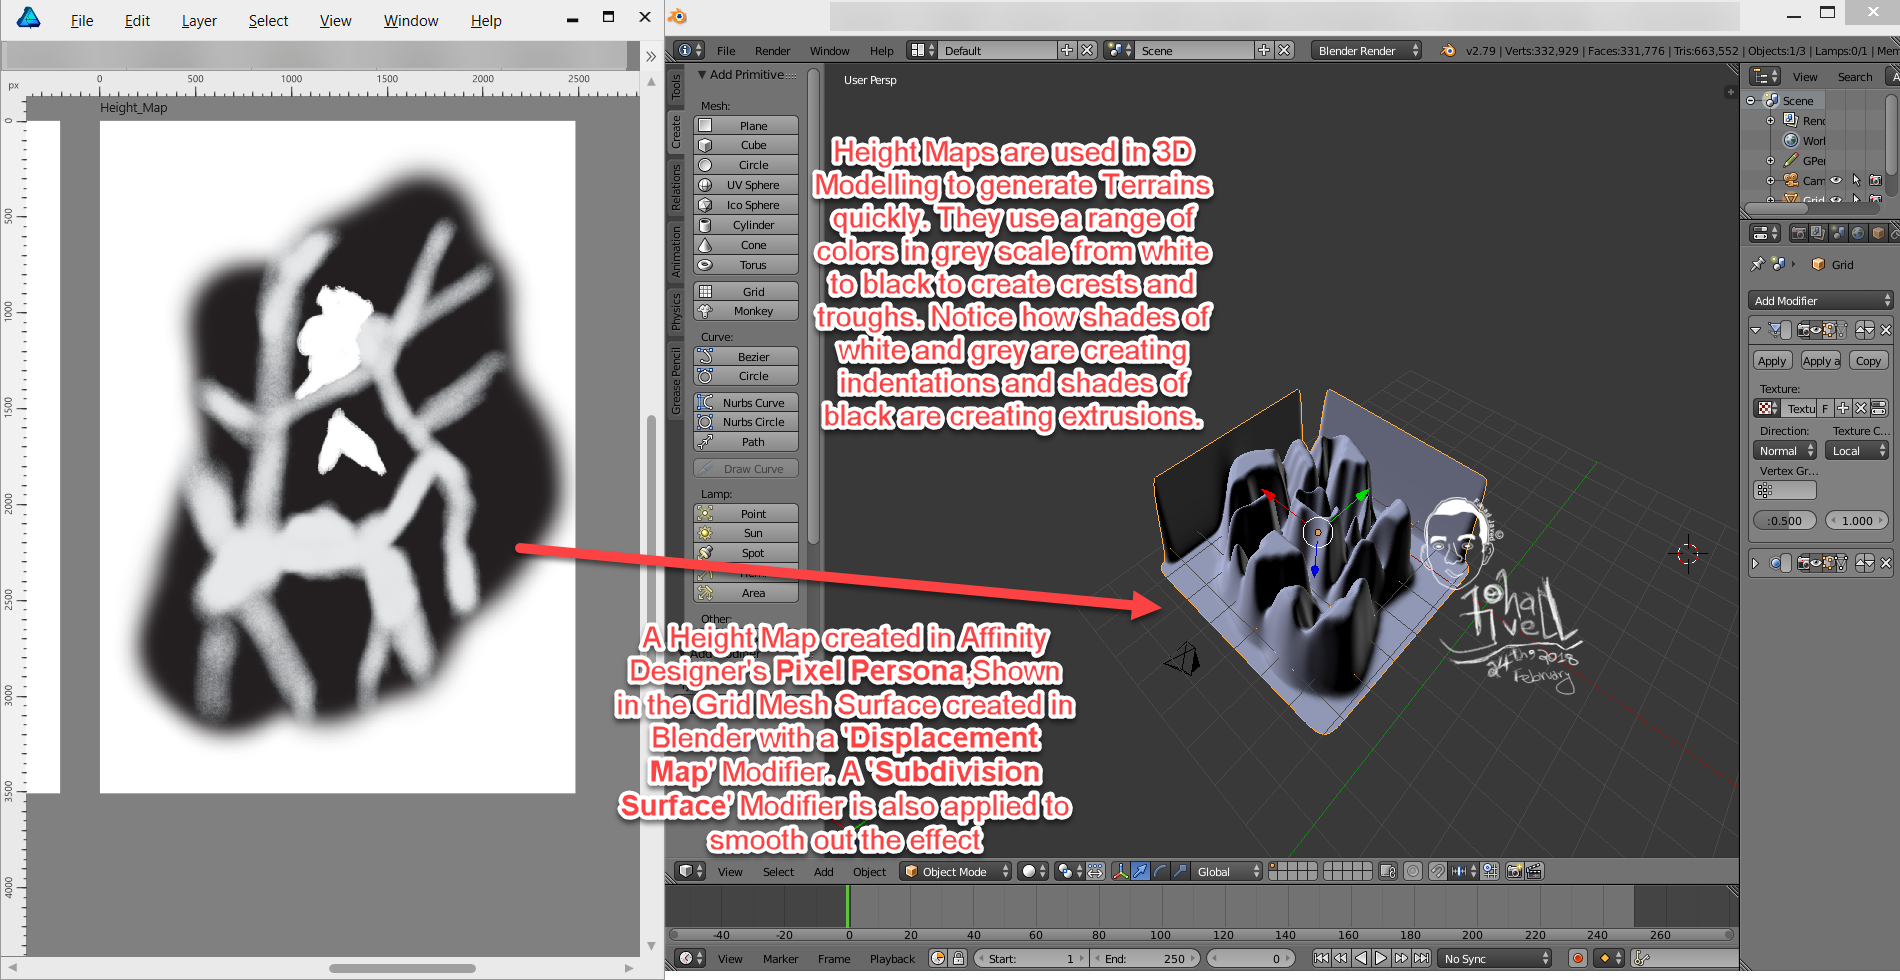
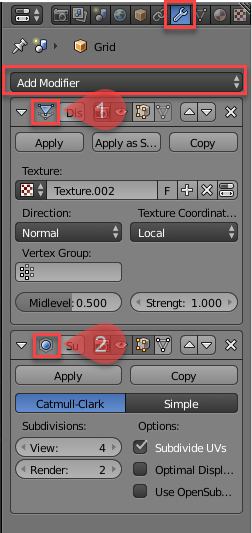
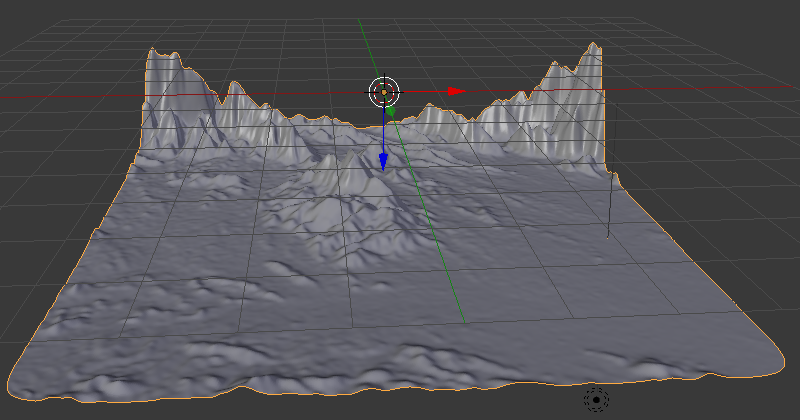
 The screen shot shows a roughly created height map in Affinity Designer's Pixel Persona[] using the Paint Brush tool[] and using grey scale values[] and how it is used in generating a 3D Terrain in Blender by applying this height map Image as a 'Displace'[] modifier on a Grid []Mesh Surface. For smoothness, i have applied a 'Subdivision Surface'[] modifier. Modifiers in 3D Modelling tools help modify an object's geometry. They can be accessed in the Tabs on the right side[] and have a 'wrench icon'[] . Just click the 'Add Modifier'[] dropdown to add the modifiers mentioned above. Notice, if you apply these modifiers by clicking the 'apply' button it will apply the effect and remove the modifier from stack of modifiers applied. If you want fine tune control over these without removing them from the stack of modifiers,don't apply them. [1] = Displace Modifier Added, [2] = Subdivision Surface Modifier Added [ >>>> [Source Files]] > The Height Map file in Affinity Designer has also been attached[File Name = Terrain_Height_Map.afdesign]. > The Blender Source File with the Height Map Applied has also been attached[File Name = Blender_File_with_Terrain_Created_Using_Height_map_from_Affinity_Designer.blend][Added on 27th February 2018] [ >>>> [Video File]] Here is a short video[around 3minutes and 26 seconds] that demonstrates the steps required:[Update: Added the Video on 26th February 2018] Blender can be downloaded from the following link: https://www.blender.org/ [ >>>> [Exercise]][Added on 27th February 2018] As an Extra Exercise,apply these concepts by making use of Real Terrain Height Maps[that contain Real World Elevation Data] generated by the following website for your own country or city: https://terrain.party/ Just search your city or country and press the Export Button[] to export a zip file that contains the height maps for the searched area. Extract the zip file and apply it to your own blender files. Notice how the grey scale values are used based on Real World Elevation data. Here is a sample of a terrain i generated using the Height Maps generated by this website: Happy Learning
- 1 reply
-
- 1
-
-
- greyscale
- fahadjaved
- (and 4 more)
-
 I have an unprofiled grayscale image that AP insists on opening in RGB color space, not Grayscale. The Color Profiles section of Preferences has different scenarios for assigning profiles, but is there a way to open an unprofiled grayscale file in Grayscale color space? Photoshop opens unprofiled grayscale files in grayscale color space as expected, why can't AP? I opened said file in PS, re-saved it as grayscale with Gray Gamma 2.2 profile, AP now opens it in Grayscale color space with Greyscale D50 profile. But what about AP opening it in Grayscale with the Greyscale D50 profile from the get go?
 -
Hi All, Anyone knows what is a good method to convert color images to greyscale non-destructively? Except the Black & White feature. I'm working on a school yearbook, most of the images is groups of children, class group images and sport group images. Thank you.
-
 Hi, it is possible to Import a Mask from a greyscale picture? Thanks
 -
Is it possible in Affinity for iPad to add colour to a greyscale image. If so how do you do it? If anyone needs any more info just ask. First post!
-
 In the beta version I could save images in greyscale. Now that I have purchased the full version I can no longer save images in greyscale. I can change the color format to greyscale and export it as a jpeg but it is exported in an RGB profile. How can I save it as a jpeg file in a greyscale profile?
 -
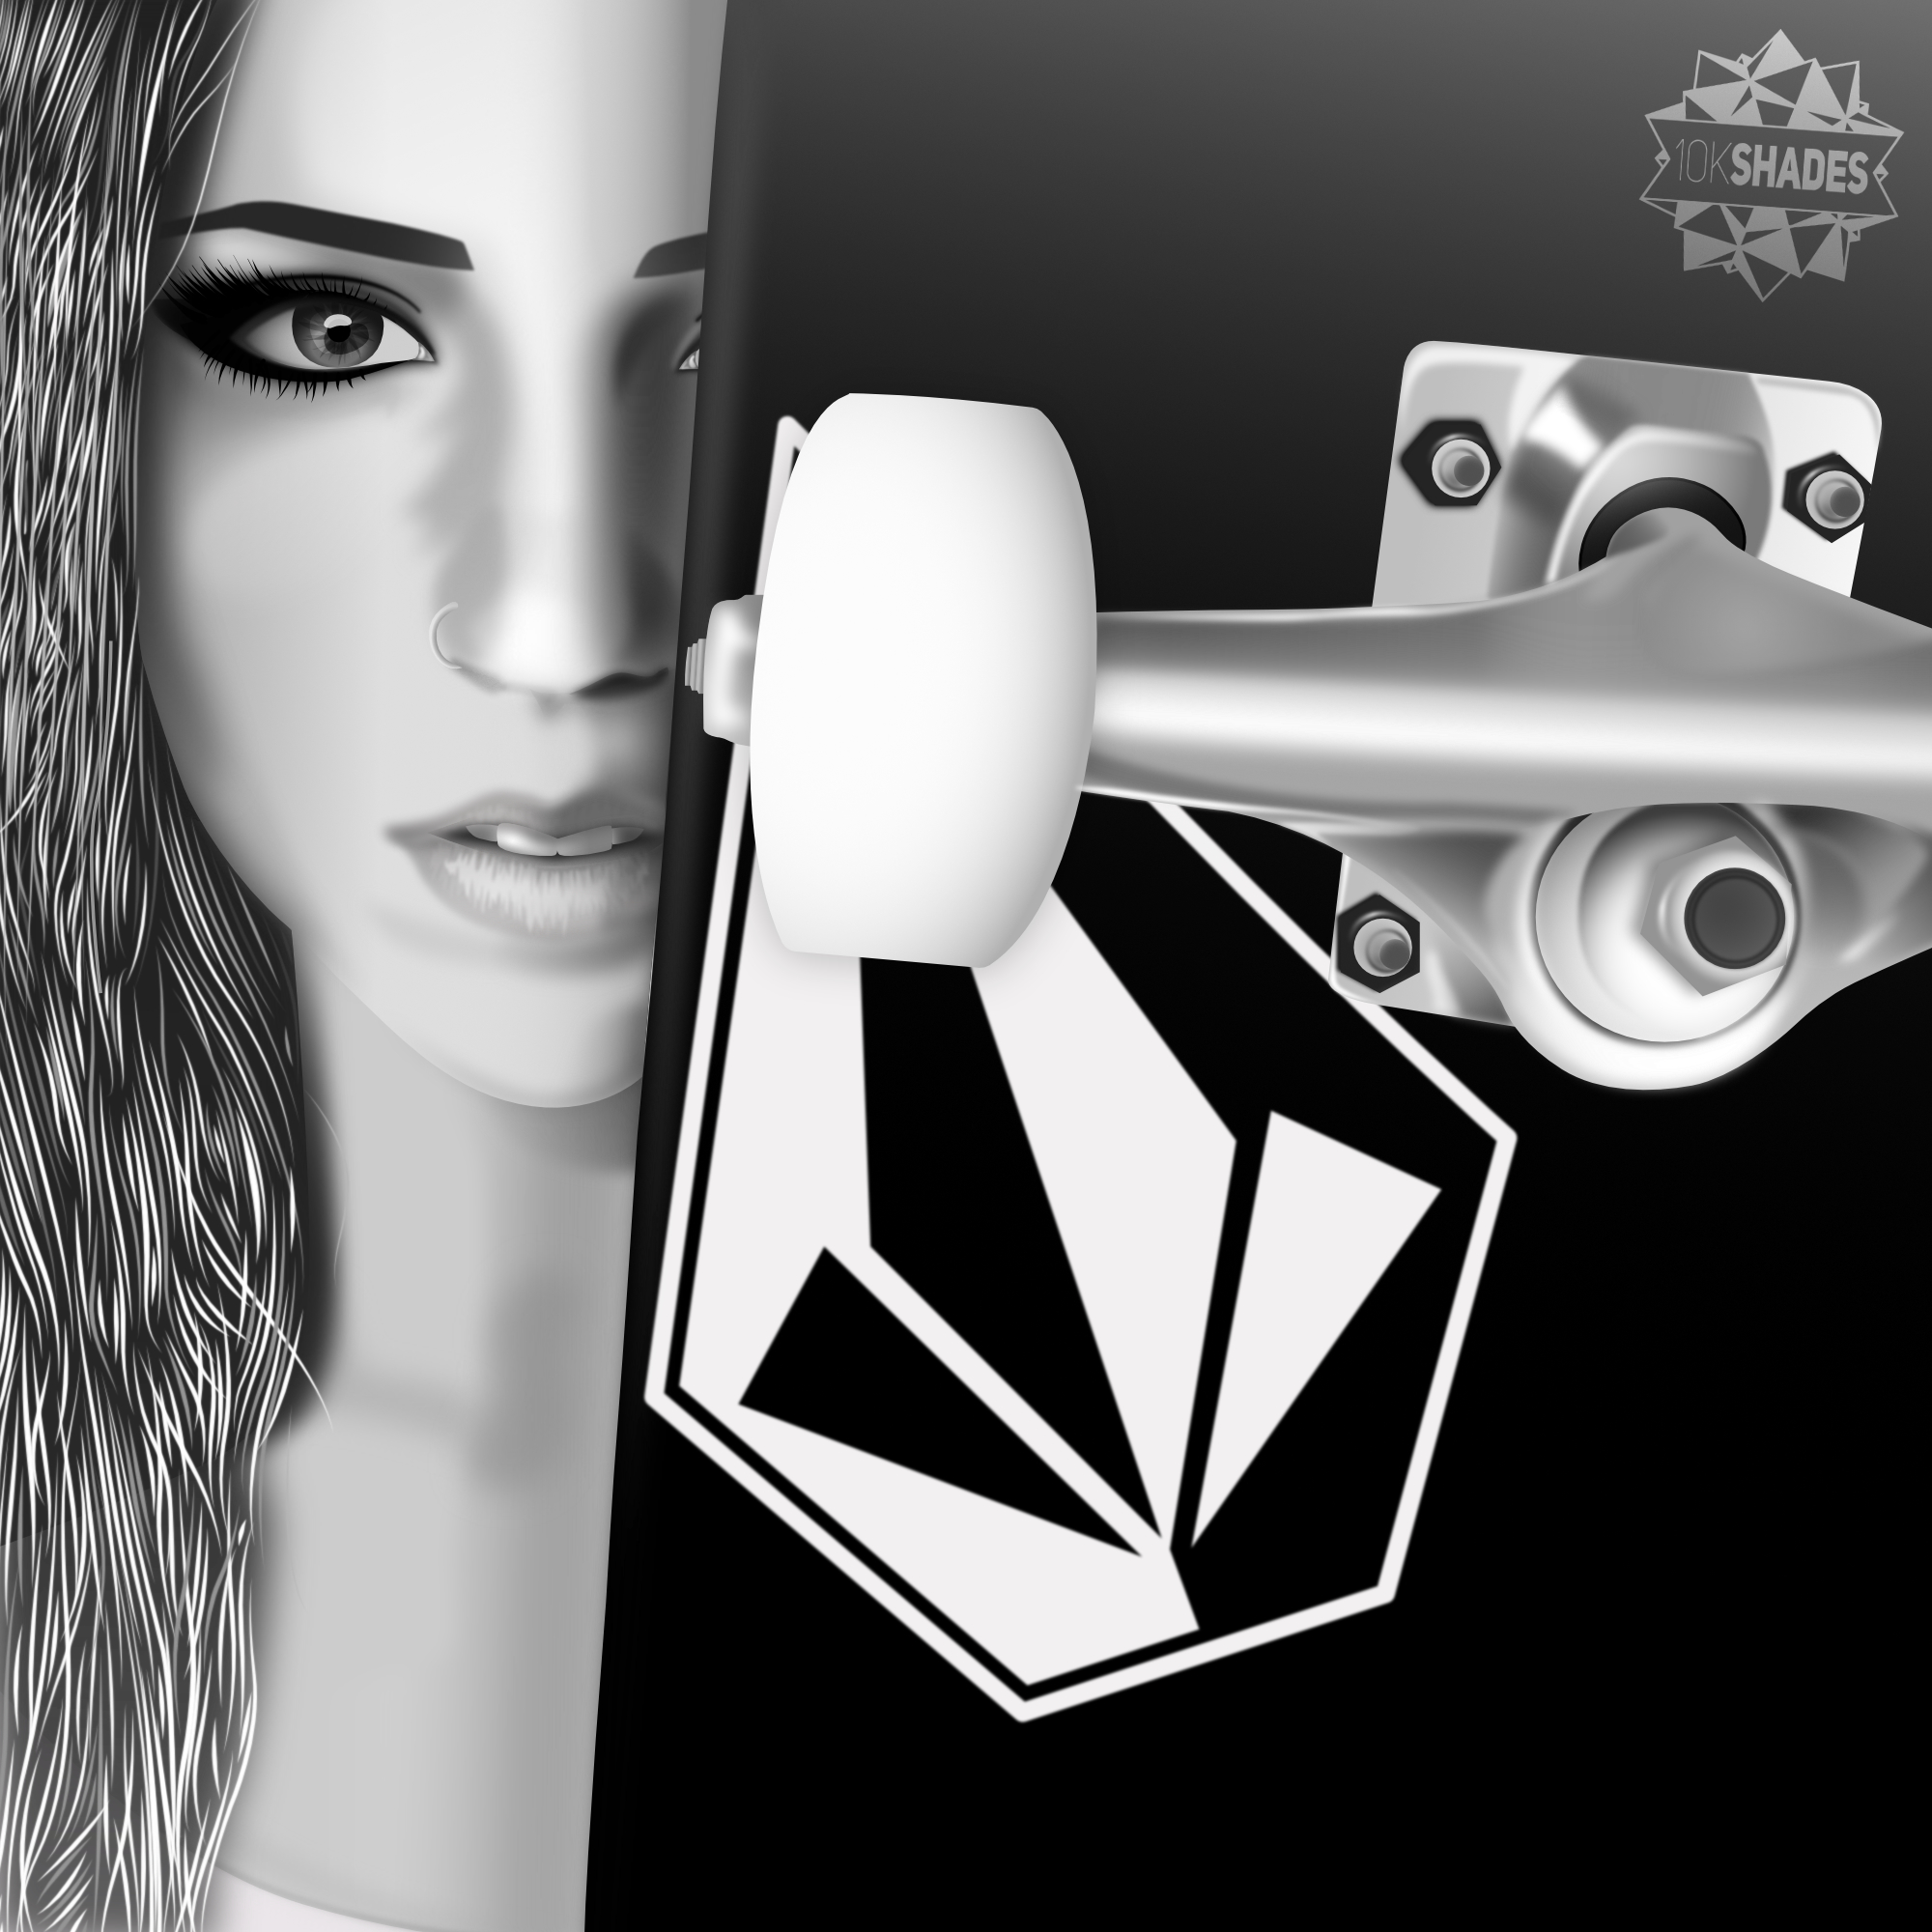
Hey! This is my first upload here, I just wanted to share a grayscale illustration of the beautiful skater Leticia Bufoni. 100% made in Affinity Designer, awesome software! I hope you like it! :D
- 7 replies
-
- 1
-
-
- leticia bufoni
- skater
- (and 4 more)
-
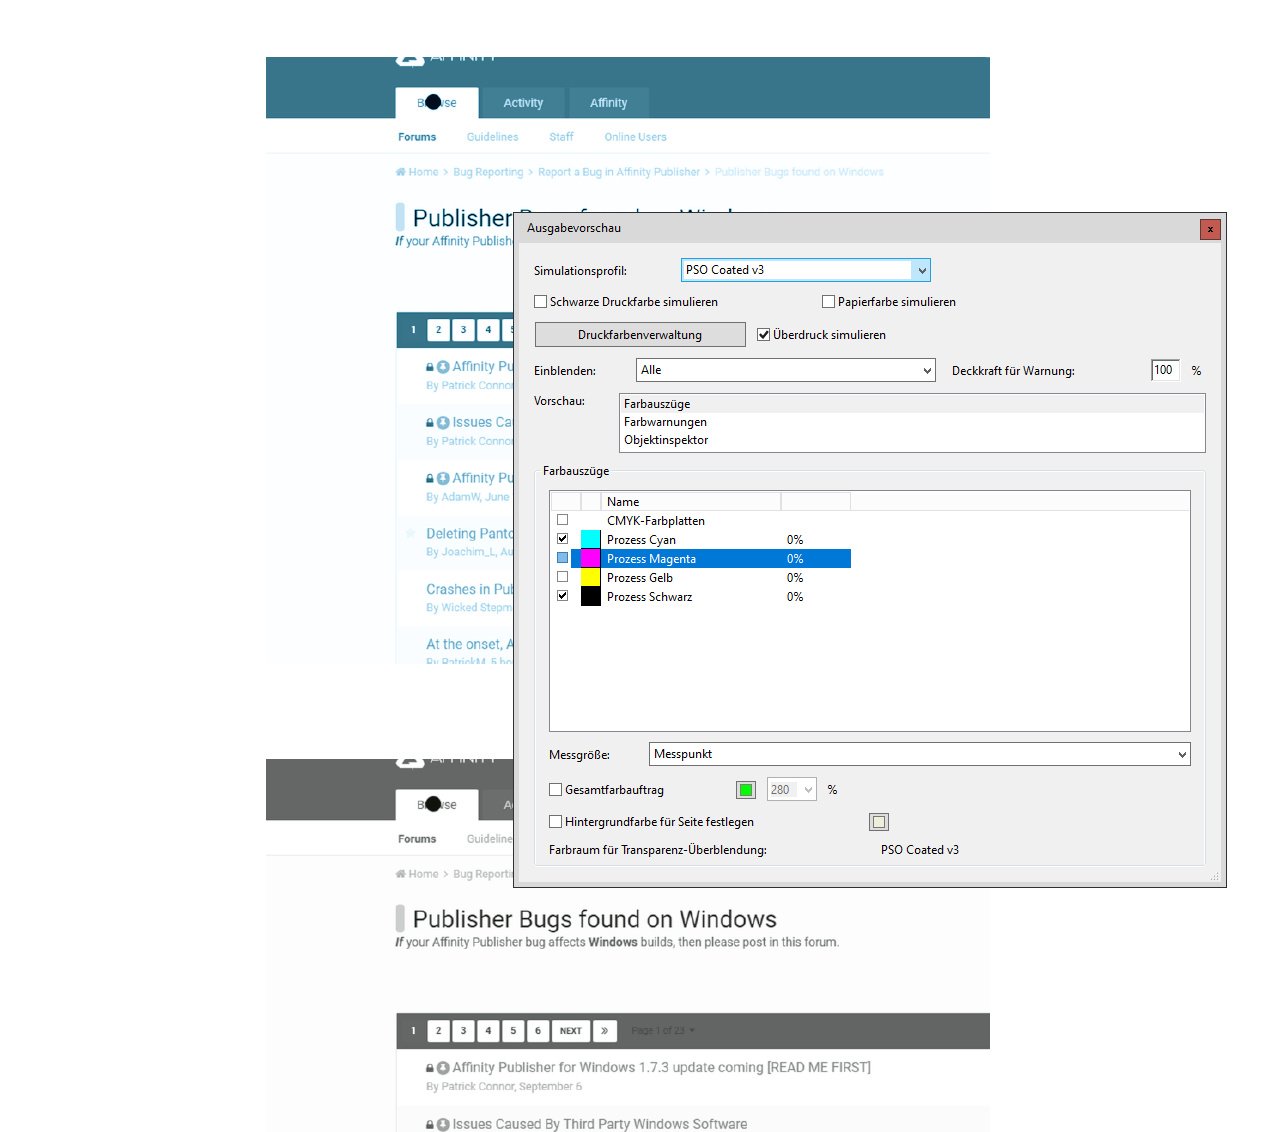
 A feature I often use in Adobe apps is the Proof Setup option. In InDesign this allows me to check how document colours will look across different print and screen colour profiles, including some greyscale profiles. In Illustrator and Photoshop this menu option also checks how document colours would appear to someone with Protanopia or Deuteranopia-type colourblindness (for some reason this feature isn’t in InDesign). The colour profile previewing is nice to have, but I usually focus on just using the greyscale profiles as a way to test contrast in my artwork colours, and in Illustrator I often like to check that I’m not using colours that wouldn’t read well for a colourblind person. I’d love for Affinity apps to include greyscale and colourblindness preview options, as well as any other preview modes for visual impairments that may be useful. Having the ability to proof specific colour profiles would also be useful.
 -
File won't attach
-
I've made two variations of the same logo using only my first and last initial. I'm looking for some feedback on which catches the eye better. P.S. Can someone tell me how to make a perfect equilateral triangle?

.jpg.a1a3c02e6c44c564a9f1b2efa6bbeb64.jpg)