Search the Community
Showing results for tags 'Align'.
-
 I’ve shown one method to do this in my attached video (the text below isn’t a step-by-step guide, just notes on the video). “Enable Snapping” should be ON, “Snap to object bounding boxes” should be ON, and “Include Bounding box mid points” should be ON. Part A – The first circle If you are not using Designer, and therefore can’t use the Point Transform Tool, or you just want to do it quickly, then, instead of the instructions in this part, you can simply snap the left ‘side’ of circle B to the right ‘side’ of of circle A and then rotate all the circles to how you want them later. Draw a line from the centre of circle A to anywhere. Use the Node Tool to move the end of the line to get the angle you want. Use the Point Transform Tool to move and rotate circle B. Use the Point Transform Tool to translate circle B so that it touches circle A. Part B – The second circle The width of the first construction circle should be: width of circle A plus width of circle C. The width of the second construction circle should be: width of circle B plus width of circle C. If you aren’t using Designer (and can’t use the Point Transform Tool) you can draw a line from the intersection of the two construction circles (to anywhere, the end point doesn’t matter) and then use snapping with the Move Tool to drag circle C into place. Note: If you don't want circle B to be rotated after this then you can just double-click the rotation handle to reset it. Important: There may be tiny gaps between the circles but that’s because they aren’t perfect circles, and that’s because of the way the Affinity applications draw circles using bezier curves. I don’t think there’s anything we can do about this. 2024-02-04 08-50-06.mp4
-
 In AD 2.3.x the alignment of some tools does not work as expected. E.g. lines drawn by pen tool, or Serial Tool. Using e.g. the Heart Tool has no issues. No such problems in AD 1.x Please watch the video ➡️ Line and Brush alignment issues Alignment AD 1.x.afdesign Alignment AD 2.x.afdesign
 -
 Hey everyone, Update: Okay, apparently I completely missed the introduction of Key Objects somehow. Thanks for telling me it’s already there! 🤯 Firstly, however, part of my original subject was that key objects should work for any alignment – this includes the spacing operations »Space Vertical« and »Space Horizontal«. They currently work for the general alignment options such as top/bottom, left/right. From my logic it could/should work like this: If NO key object is selected, the last set »Align To:« option works as intended and expected. However, if a key object IS selected, the »Align To:« option should react and prioritise it by changing the »Align To: Key Object«. As soon as there’s no Key Object selected, it switches back to the previous item in the list, like »Last/First Selected«. Without checking, I think this is how it works in Illustrator as well. And I mean, it's just logical (at least to me): If a user actively selects a Key Object (and for Designer this can't be accidental, since you have to hold down an extra key on your keyboard), the user most likely wants to use it as such. So the Key Object should always have the highest priority in the list of alignment candidates/options. Secondly: They also only work from the Context toolbar – when I work with the toolbar popup and want to align (top/bottom, left/right, ...) it prioritises the selected »Align to:« option from the drop down. I think there's an item missing from this list for key objects to work in the toolbar popup as well, and I think that's the culprit. It's not at all obvious that »First Selected« equals »Key Object« in the »Align To:« dropdown in the Toolbar (not Context Toolbar). ––– I very dearly miss the ability to click on one of multiple selected shapes (especially in Designer and Publisher) in order to define it as some sort of »pivot« object, so to speak, around which all other alignments will happen since day one switching to Designer almost ten years ago. (Wow, Designer really turns 10 next year!) The »First/Last Selected« options in the »Align to:« dropdown come close to what I mean, but are not as intuitive, nor do they work for all alignment operations such as »Space Horizontal/Vertical«. Illustrator has solved this more elegantly and functionally by allowing you to mark one of the already selected objects as the »centre« by clicking on it, around which all further alignment operations will take place. They call it »Align to Key Object«. Here's a short clip of how it works. Here’s a video that explains its differences a little bit better compared to other alignment options present in Designer. Please please pleeease Affinity, I need this QOL back in my process and would love to see it and in the Affinity Suite. 🥲 Cheers Dennis
- 20 replies
-
- 2
-

-
- affinity designer
- alignment
- (and 6 more)
-
 Dear support, I have installed AfD 1.8.3 and found out that if I select two or more object and go to the alignment icon, the Align to option is grey and not accessible. I need to click to a align icon at first and then Align to is accessible. I have Win 10 and I don't know if it is some kind of a new feature but it's annoying. The picture after click to alignment icon is attached. Thank you in advance for your reply. Kind regards, Roman
-
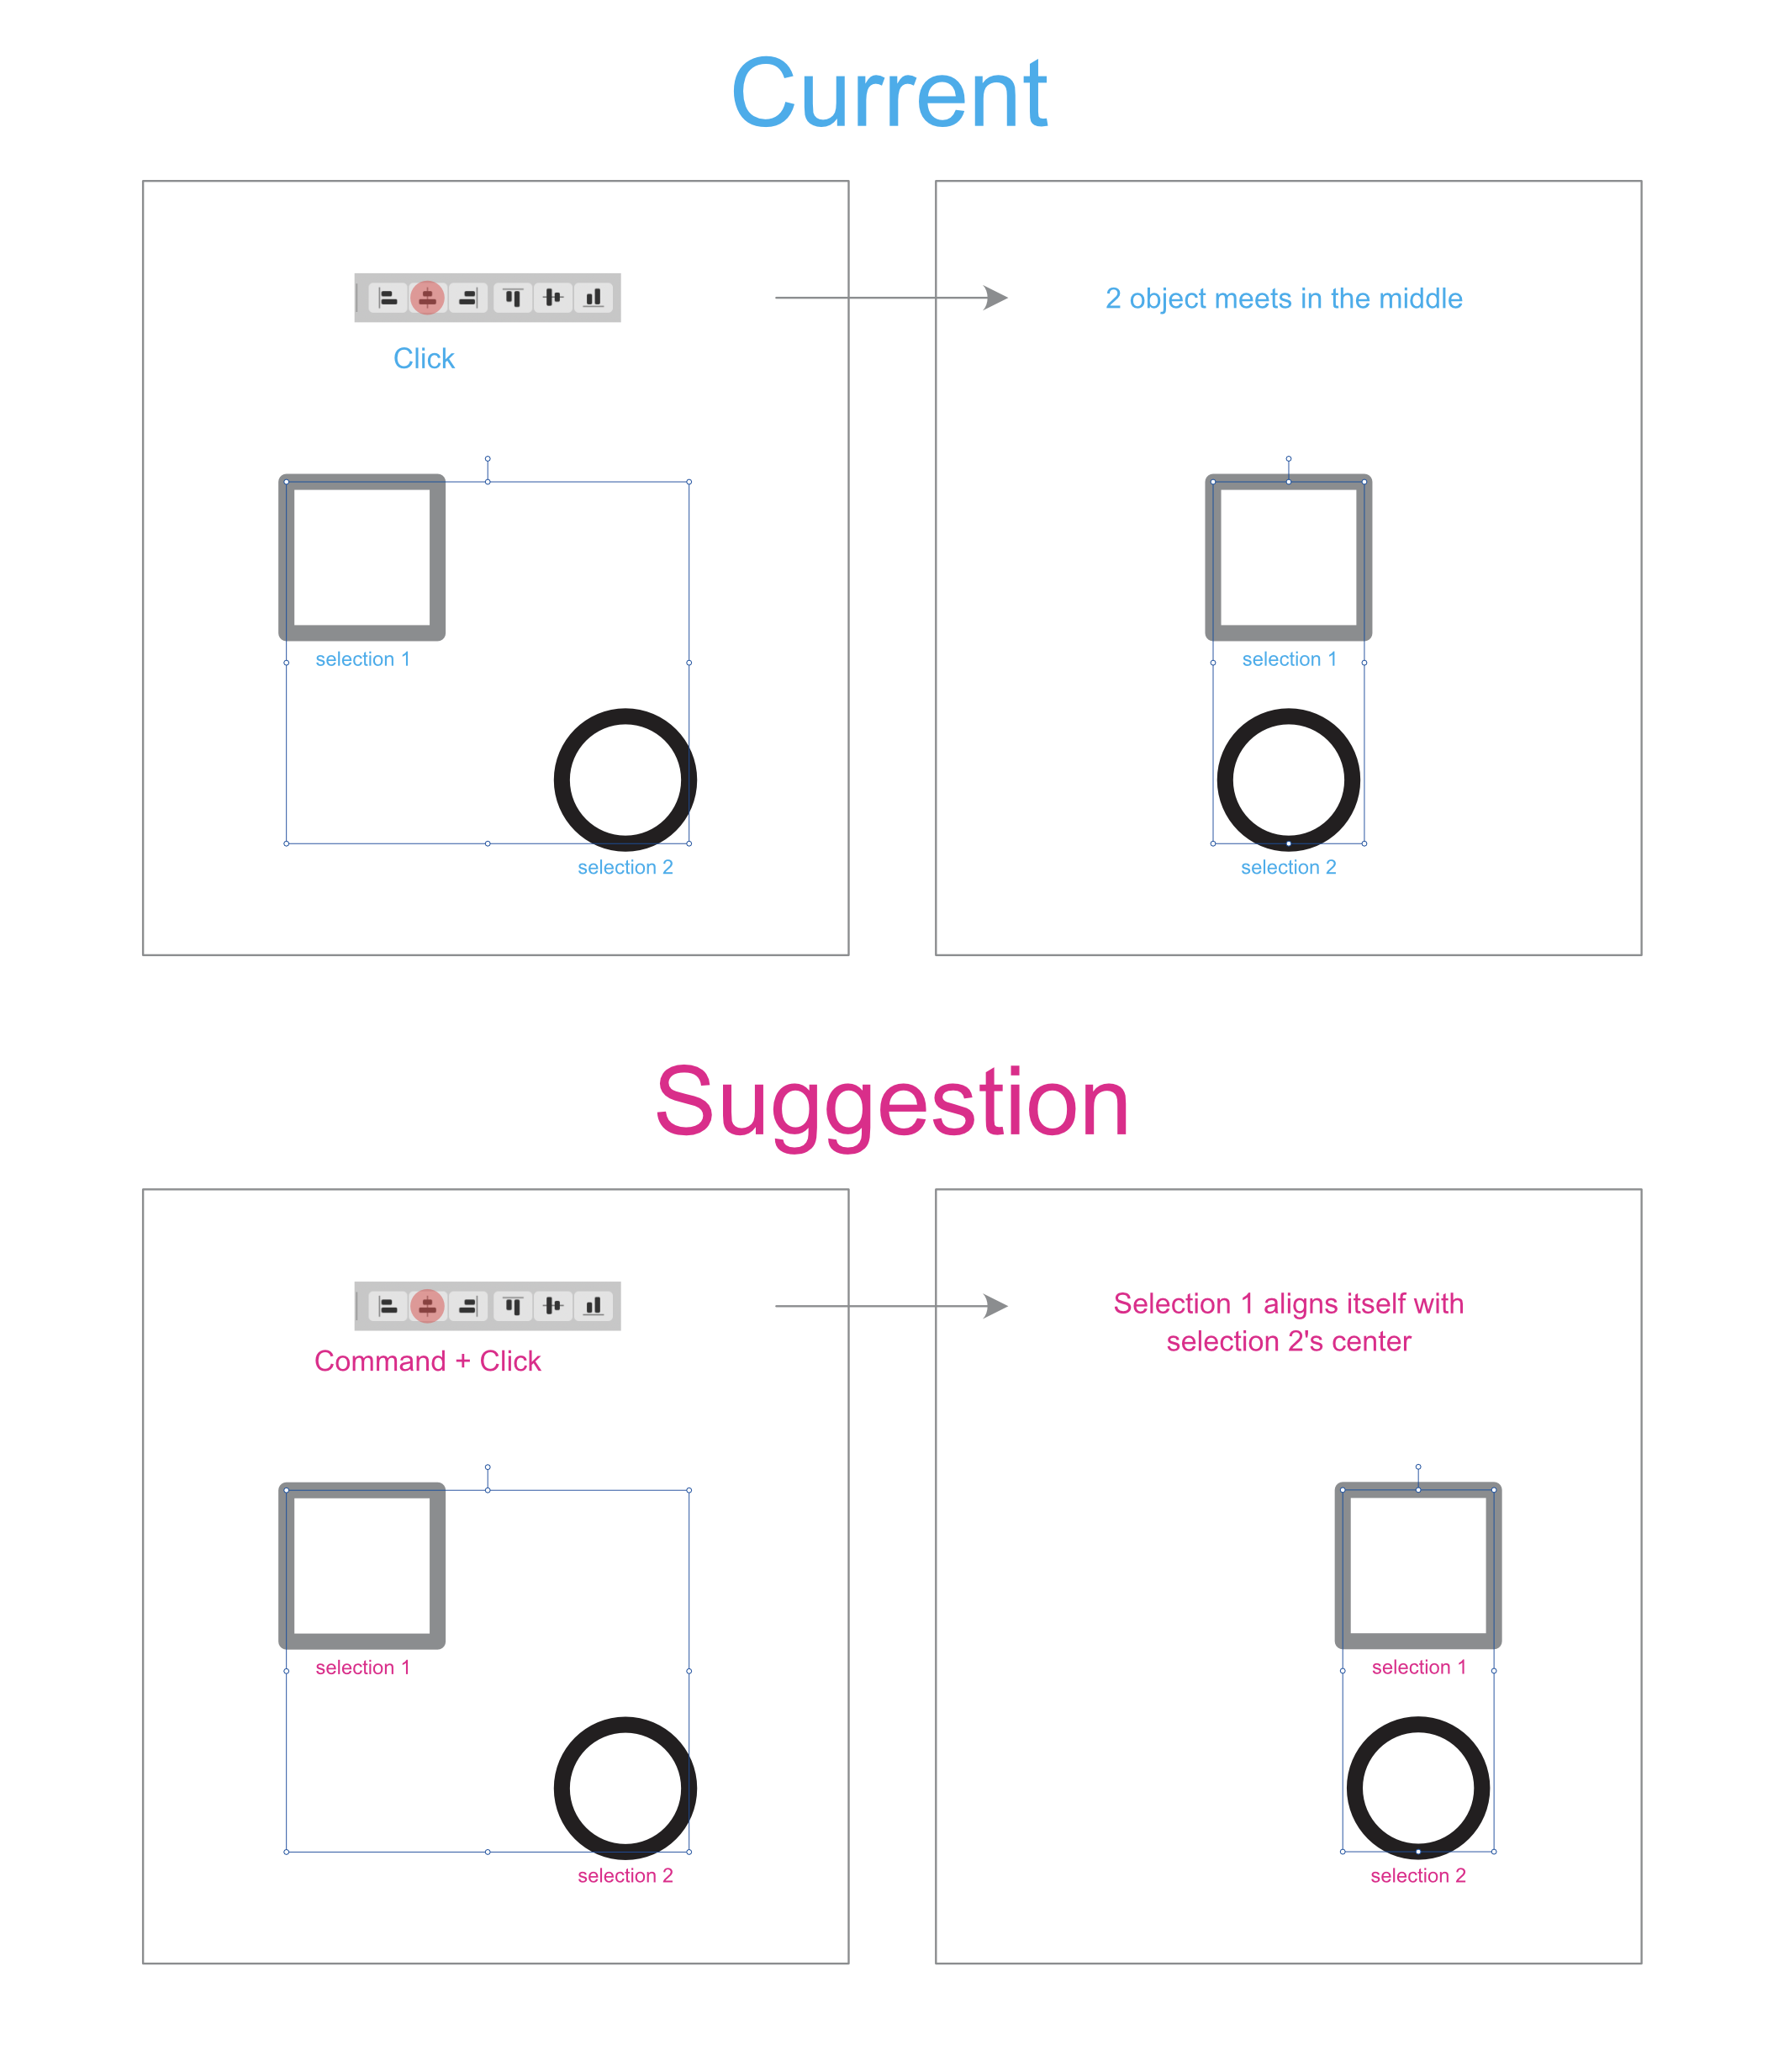
Hello, I don't know if this has been requested/suggested before but I have a small suggestion to improve workflow for someone like me. The idea is to use the align function with a modifier key. Right now whenever you choose multiple objects and align them center or middle from the context toolbar (without going through the alignment option and choosing the first or last selected objects) they just meet in the middle of the selection bounding box. My suggestion is to use the align option from the context toolbar with the command or shift to align with the last object you selected. Attached is an image of what I mean.
-
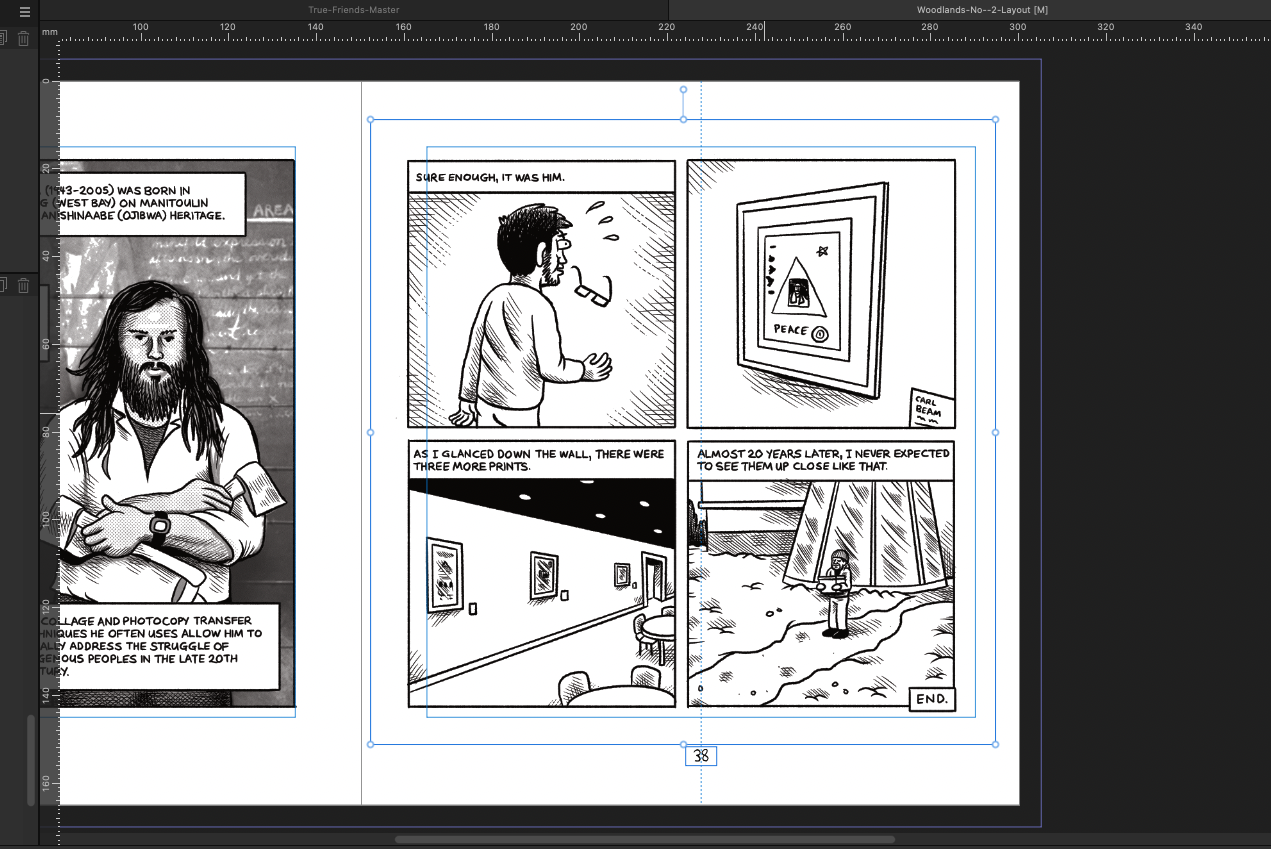
 I'm new to Publisher but know my way around software well. Never really picked up more than the basics of InDesign, so I'm enjoying getting to know Publisher. I'm working on layout out a comic and sometimes I change my mind on what pages to include or the order. I can delete or add pages and move them around etc which is great. However, when I do this my artwork goes out of alignment as my guides are asymmetrical (1/2 inch more on the 'Inner' guide) to give more room for the spine fold. I'm thinking this could be solved in one of two ways I can think of: Lock placed artwork to guide (auto aligns horizontal and vertical to guide) Select all, align to guide (aligns horizontal and vertical to guide) for the entire document Are either of these possible? Or am I thinking about this the wrong way. As of now I am just clicking on every spread, select all and then align horizontal, align vertical, rinse and repat. It gets old quick.
-
 I can't seem to get the Stroke Align to change.
-
 How can I make the right align of a text frame respect the spaces at the end of a line? Right now, if the last characters of a line are spaces, the line is aligned by its last visible character, not the last character of the line. I am trying to indent lines from the right.
 -
 Currently, Affinity Photo does not have the full align panel available in the toolbar: Although I could opt to add the individual align buttons, it takes up more valuable toolbar space. So, could this one be added to Photo too?
-
 I think this is a bug. I could not locate, using forum and Google searches, any previous reports of this. The text parts and whole text line, disappears when aligning using the Align in the Toolbar. Steps to Recreate Create new document. Size, DPI, is immaterial. Using the Artistic Text Tool, type some text. Using the Align tool in the toolbar, choose to Align to Center, then Align to Middle of Spread. Part of and then the whole text line disappears. It seems like it's masked. However I'm thinking it might be a redraw issue. I can move the text and it appears. Attached screen recording showing this in Designer. I've also tested this in Photo with the same results. 2022-03-11 12-51-53.mp4
 -
 Dear Affinity experts, I have to do the following: I have two images, camera location and scene is the same. One is a photo and the other one is a still image from a video. Unfortunately size and cropping are not the same. Therefore I have to align the photo so that it matches the still exactly. I did this by placing both in two different layers, make the upper one semi transparent and then adjust size and position of the photo by dragging the handles. This does work, however it's fairly tricky: When I drag the left handle and adjust a detail at the left and then drag the right handle and adjust at the right, the left detail is affected either and I have to perform the procedure recursively until everything is matching. My question is: Is there a procedure or trick to make this easier? Best regards - Ulrich
 -
 Is it possible in Designer to align a group of objects (in my case images) to a path (in my case a circle)? And is it possible to then set the orientation of those objects either in their normal way (in my case upright) or aligned to the path, meaning rotated according to the "angle" of the path?
 -
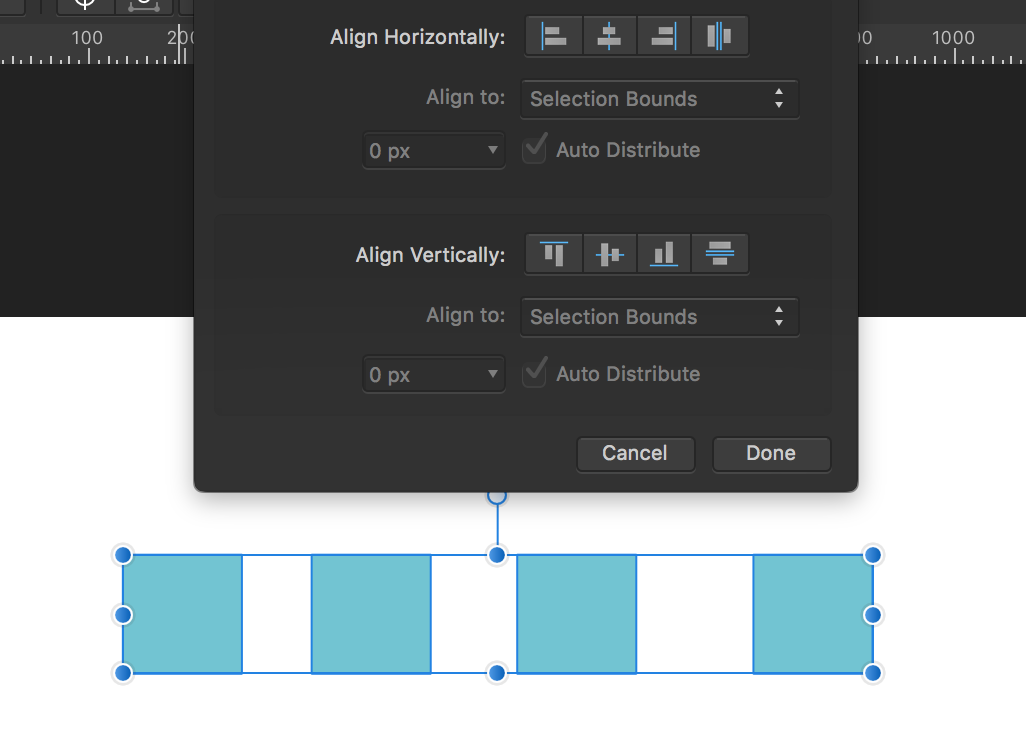
 The Auto Distribute options under Arrange panel is disabled. I am not sure if I am doing something wrong, or if this is a bug. How do I enable it? I am using the free trial v1.4 i believe on OS X 10.11.3. Kindly help.
-
 Hello, is it possible to automatically align layers or photos? For example if I have 3 photos with 3 different exposures which I shot handhold, so the photos differ slightly. Is there a way to align the photos? There doesn't seem to be the possibility to make an HDR, will it be implemented in the future?
 -
Someone can help? I'd really appreciate! Photoshop: select all layers to be aligned Edit / Auto-Align-Layers Affinity Photo: select all layers to be aligned nothing found... 🤔 Cheers, Roland
-
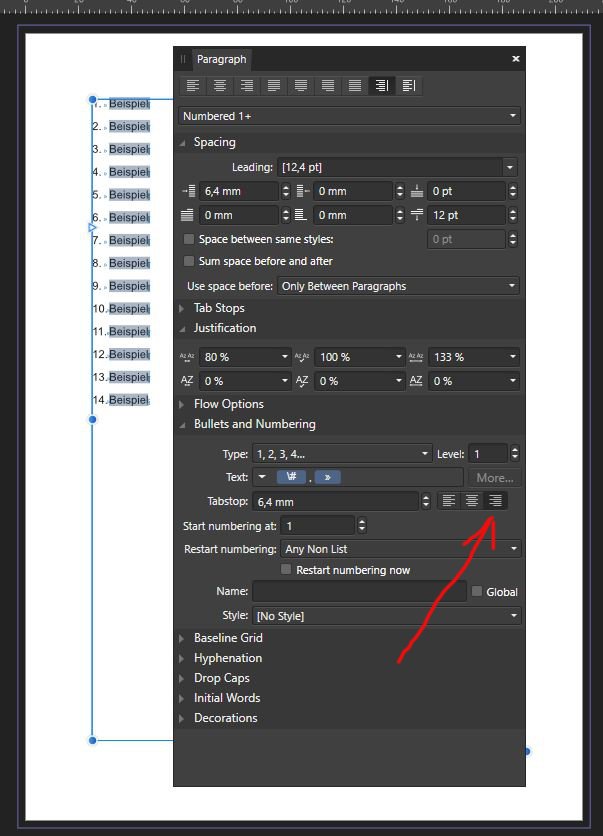
 Hi! I tried to create a numbered list in Publisher and wanted the numbers to be aligned to the right, while the following text is still aligned to the left, because it would look more aesthetic. But it seems not to work. I think the option "Tab Stopp right alignment" (screenshot) should do this, but it doesn't have any effect. By the way, "align right" was predefined. But none of the three options shows any effect. There are already two threads about this issue, as far as I can see: https://forum.affinity.serif.com/index.php?/topic/92543-does-anyone-have-a-good-way-to-do-‘fly-out-numbering’-in-publisher/&tab=comments#comment-492183 and https://forum.affinity.serif.com/index.php?/topic/139881-align-numbers-in-numbered-lists/ My version of Publisher is 1.9.2.1035 on Windows 10.
-
 If a text is Bottom Aligned, by default, it is placed exactly on the line/outline of the selected area. This not happens when the same text is Top Aligned. How to perfectly align text to the top? text is Bottom Aligned here text is Top Aligned HOW TO ELIMINATE THIS GAP?
-
 The Stacking option under File->New Stack etc. is great, what I really wish for though, would be the option to do this with already loaded layers and also the stacking tool taking any masking into account. This is vital when stacking milkyway images, since it usually aligns to the foreground and not to the stars, which can be compensated for when you mask out the foreground. Cheers
 -
 Hi there, I´m missing the 'distribute with spacing' function from InDesign. I did not found a workaround for Publisher to distribute objects with no space. Are there any plans to realized that in upcoming versions? Thanks for your great work! Bekim
 -
Hello! I've been trying to use Affinity Photo for a while (trying to switch from Photoshop I've been using for many years), and I noticed that there are some features missing. But I will only ask you to add this one, since not having it in the editor is terribly annoying. Please add the ability to align objects/layers to Selection Frame. Like so: In this example, the objects are aligned to the center of Selection Frame. Having this feature (aligning to Selection Frame) would help a lot! This is how "align to selection" works in Photoshop, and sadly doesn't in Affinity.
-
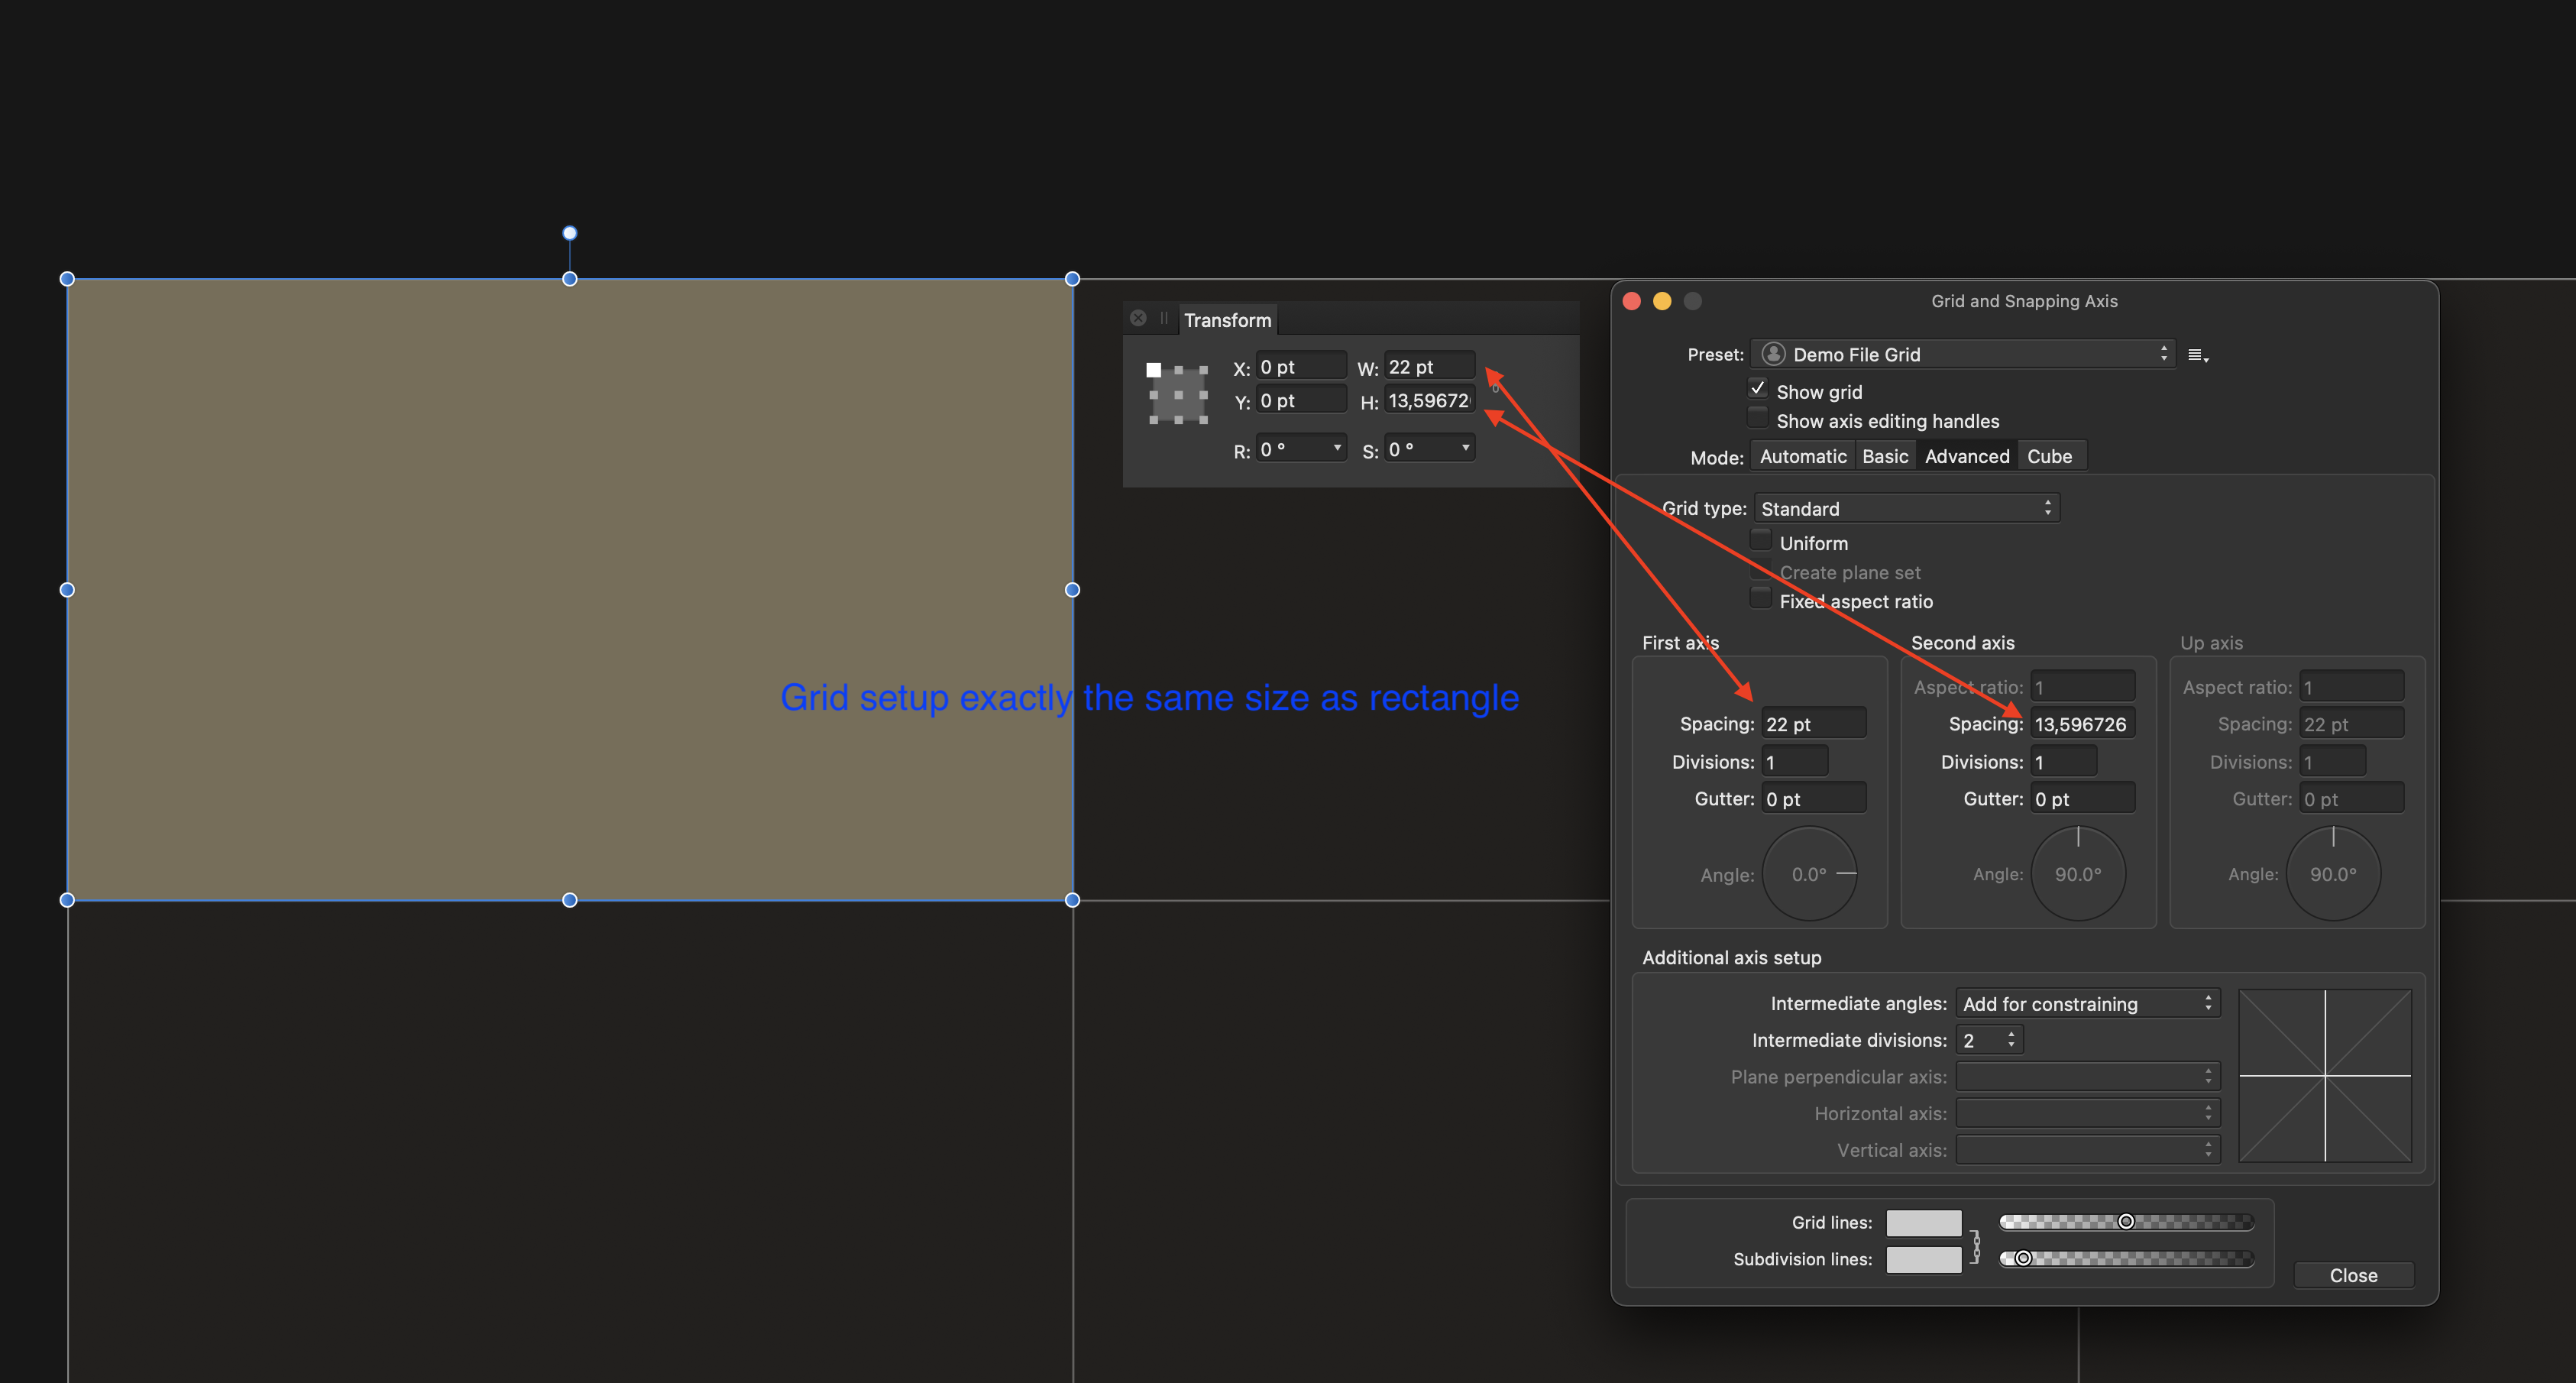
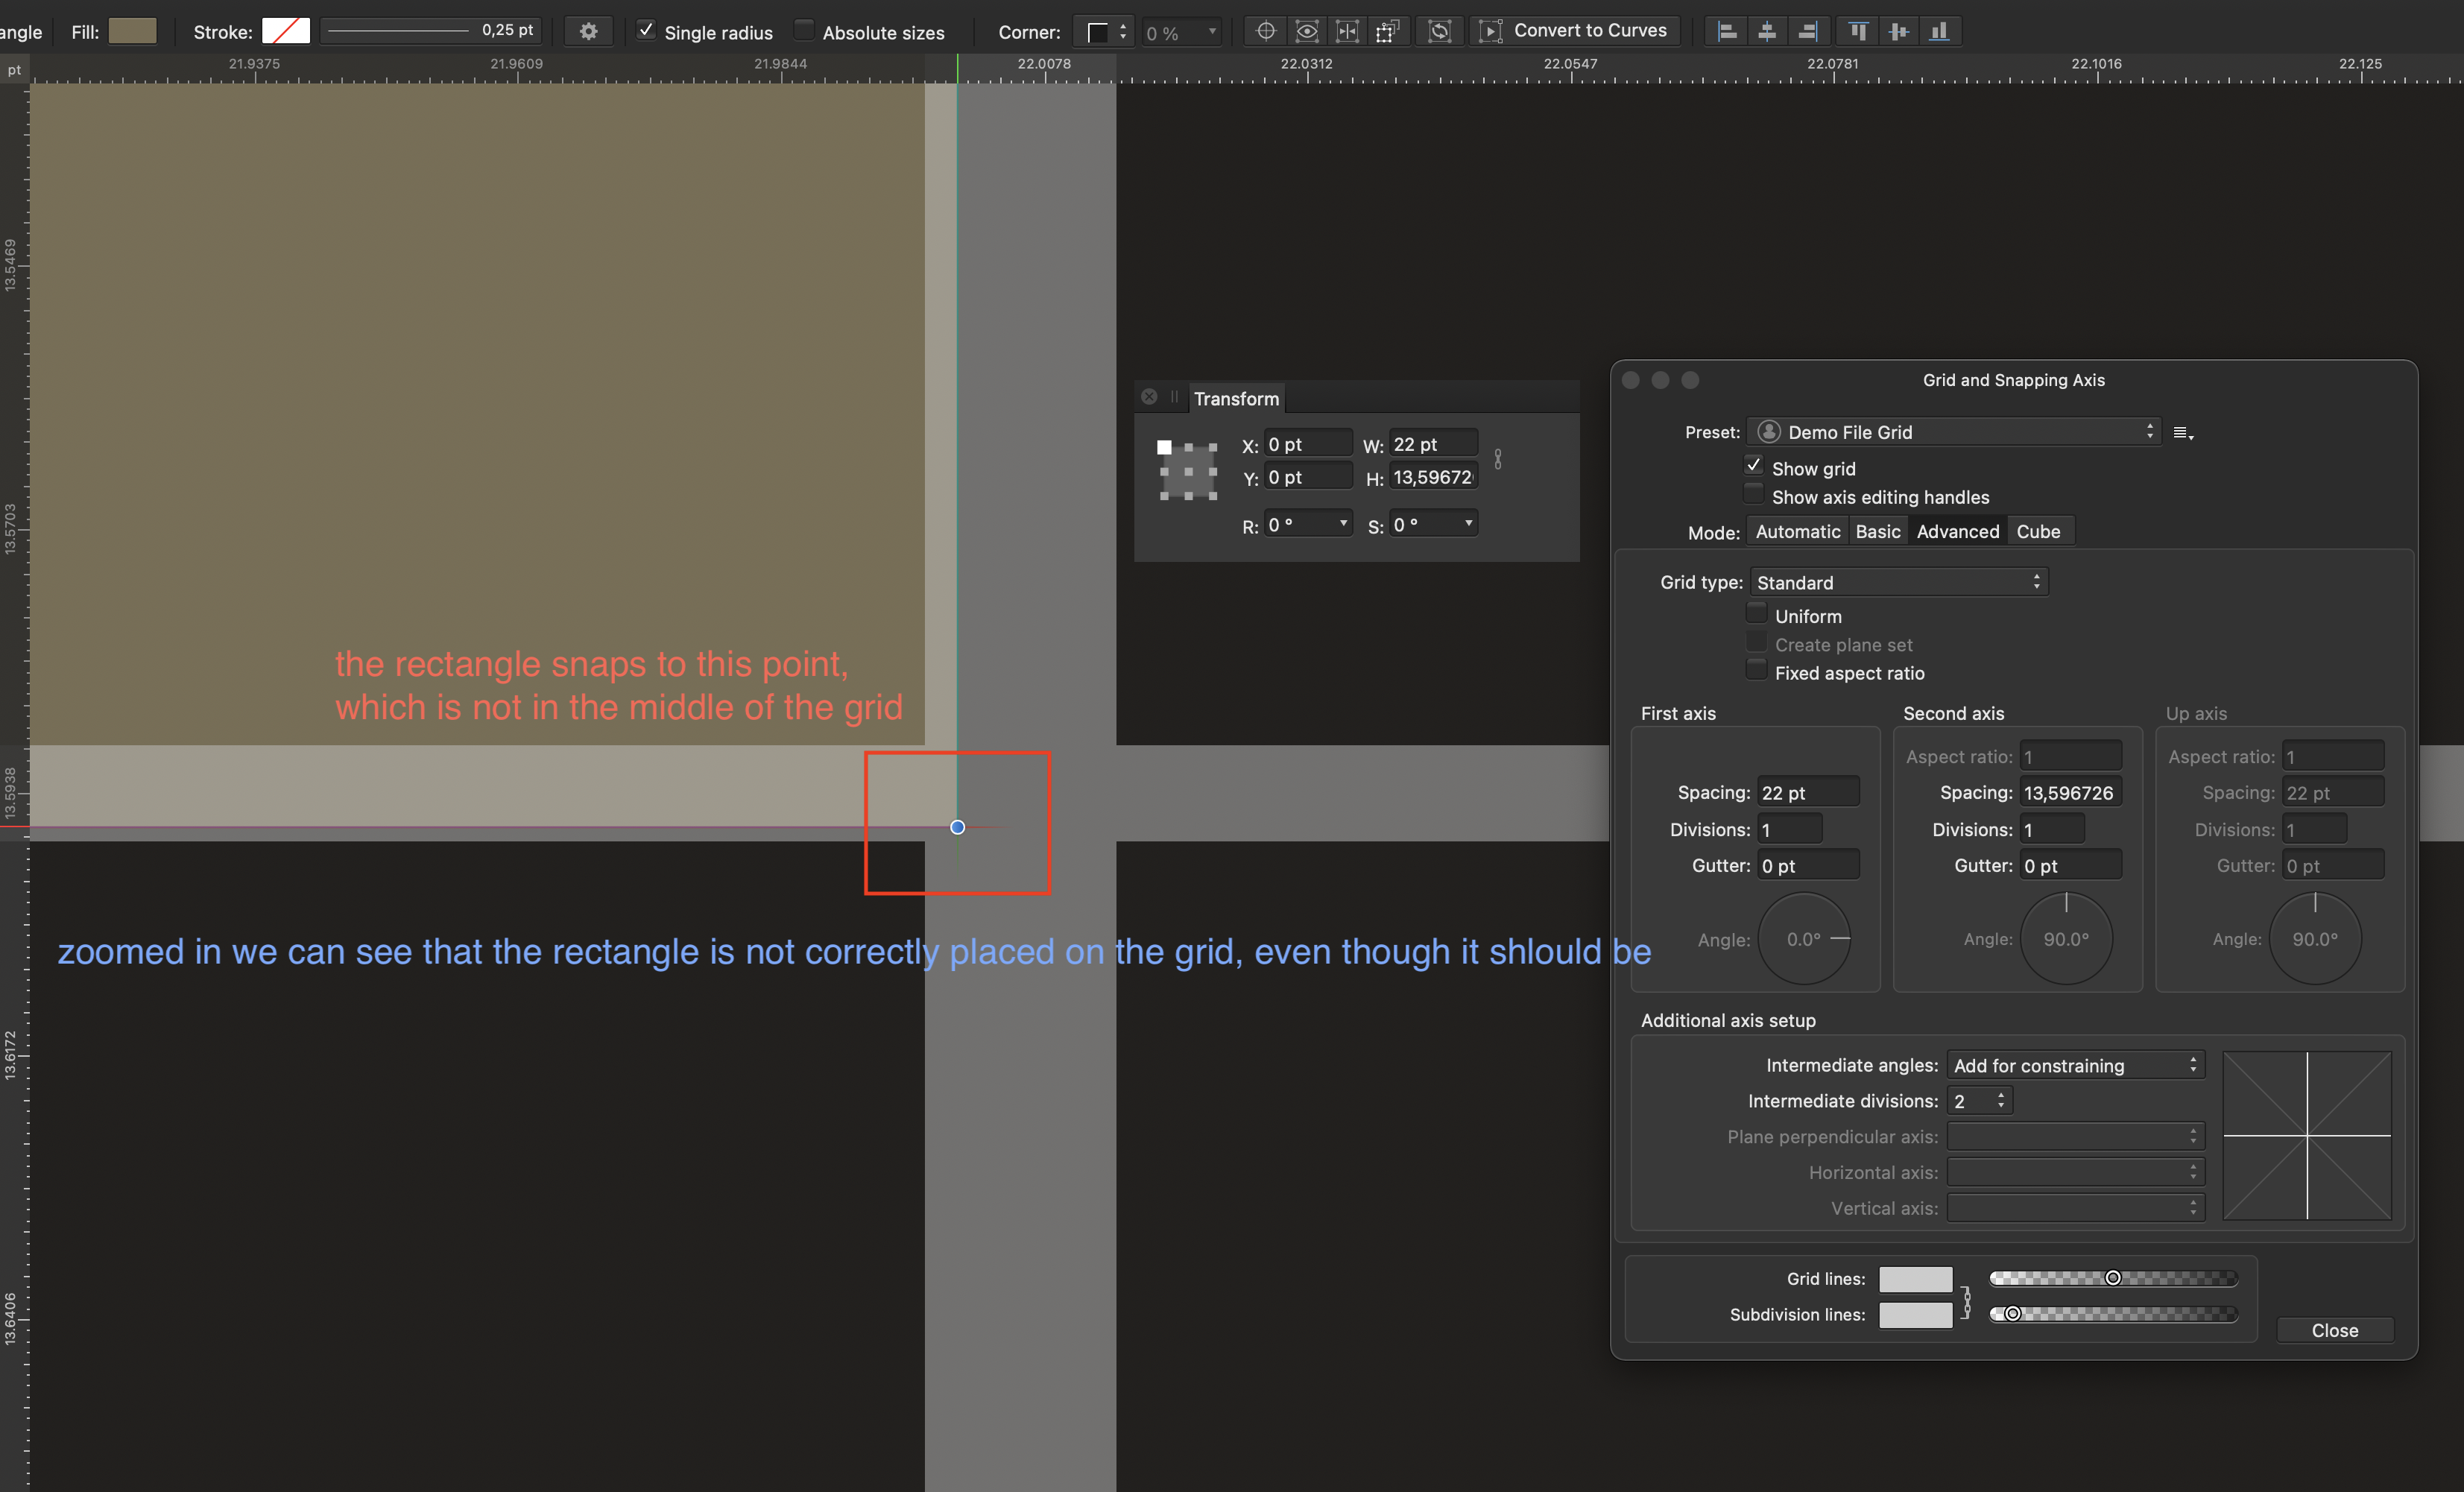
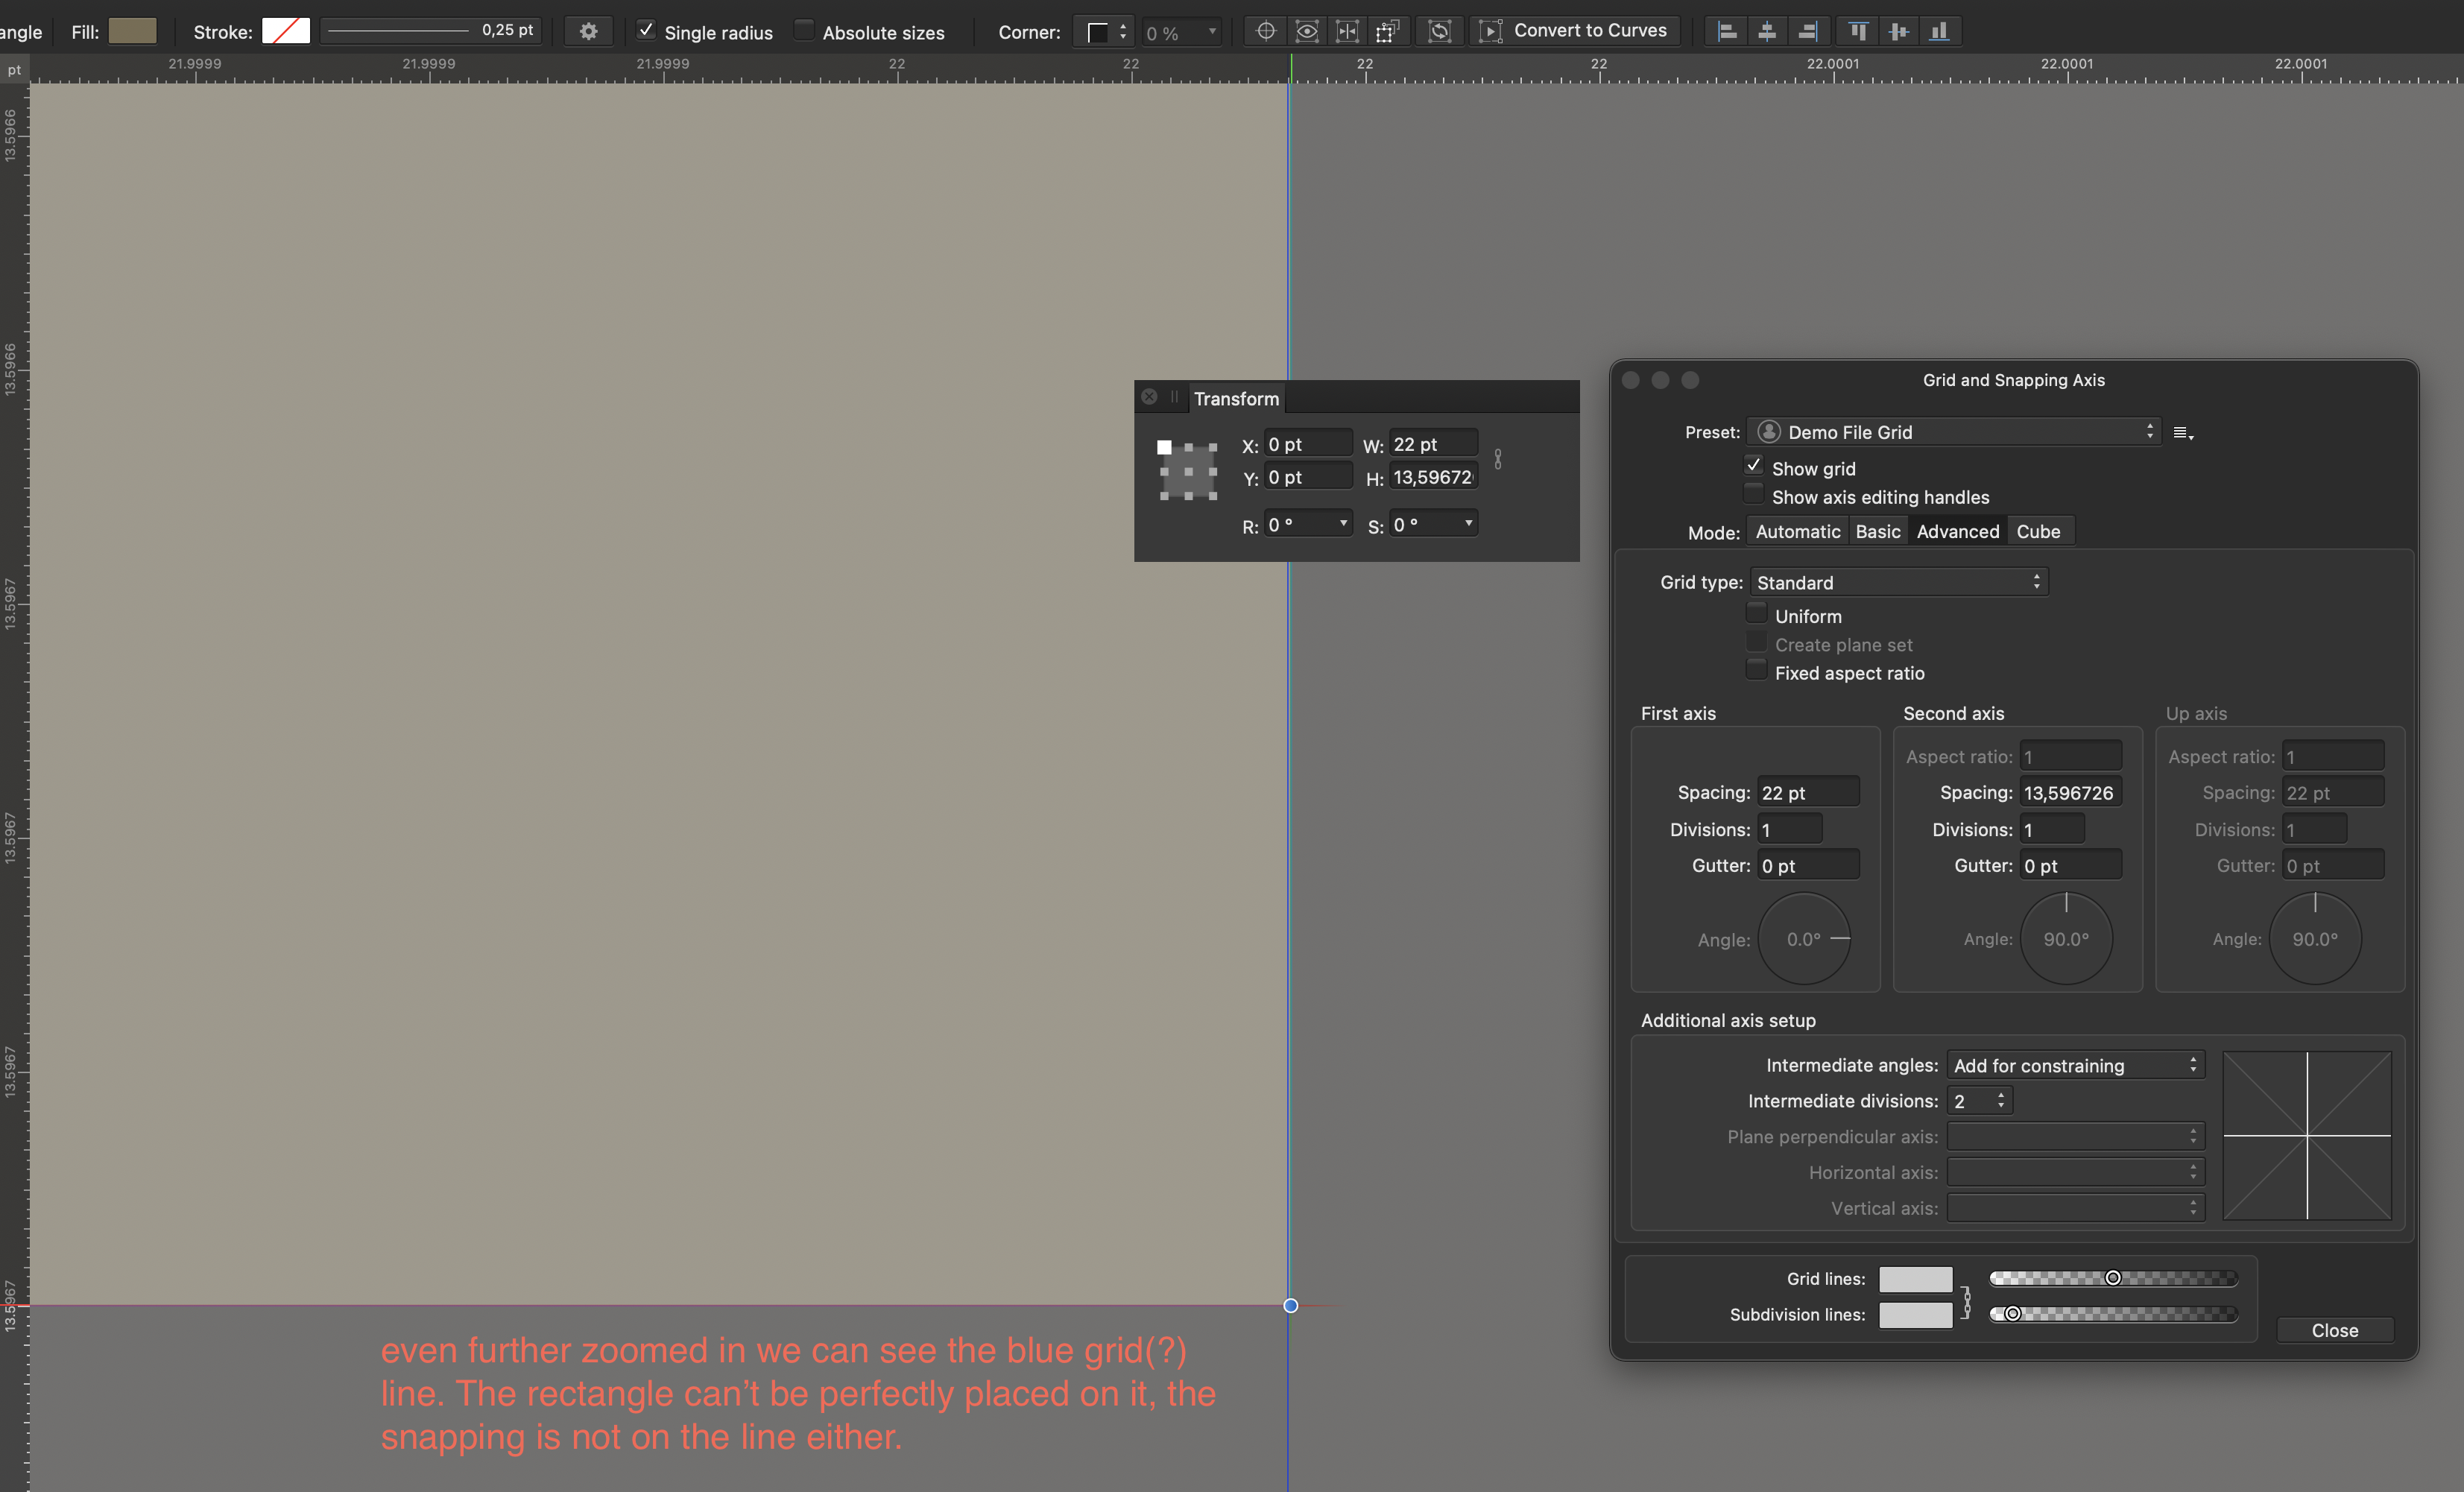
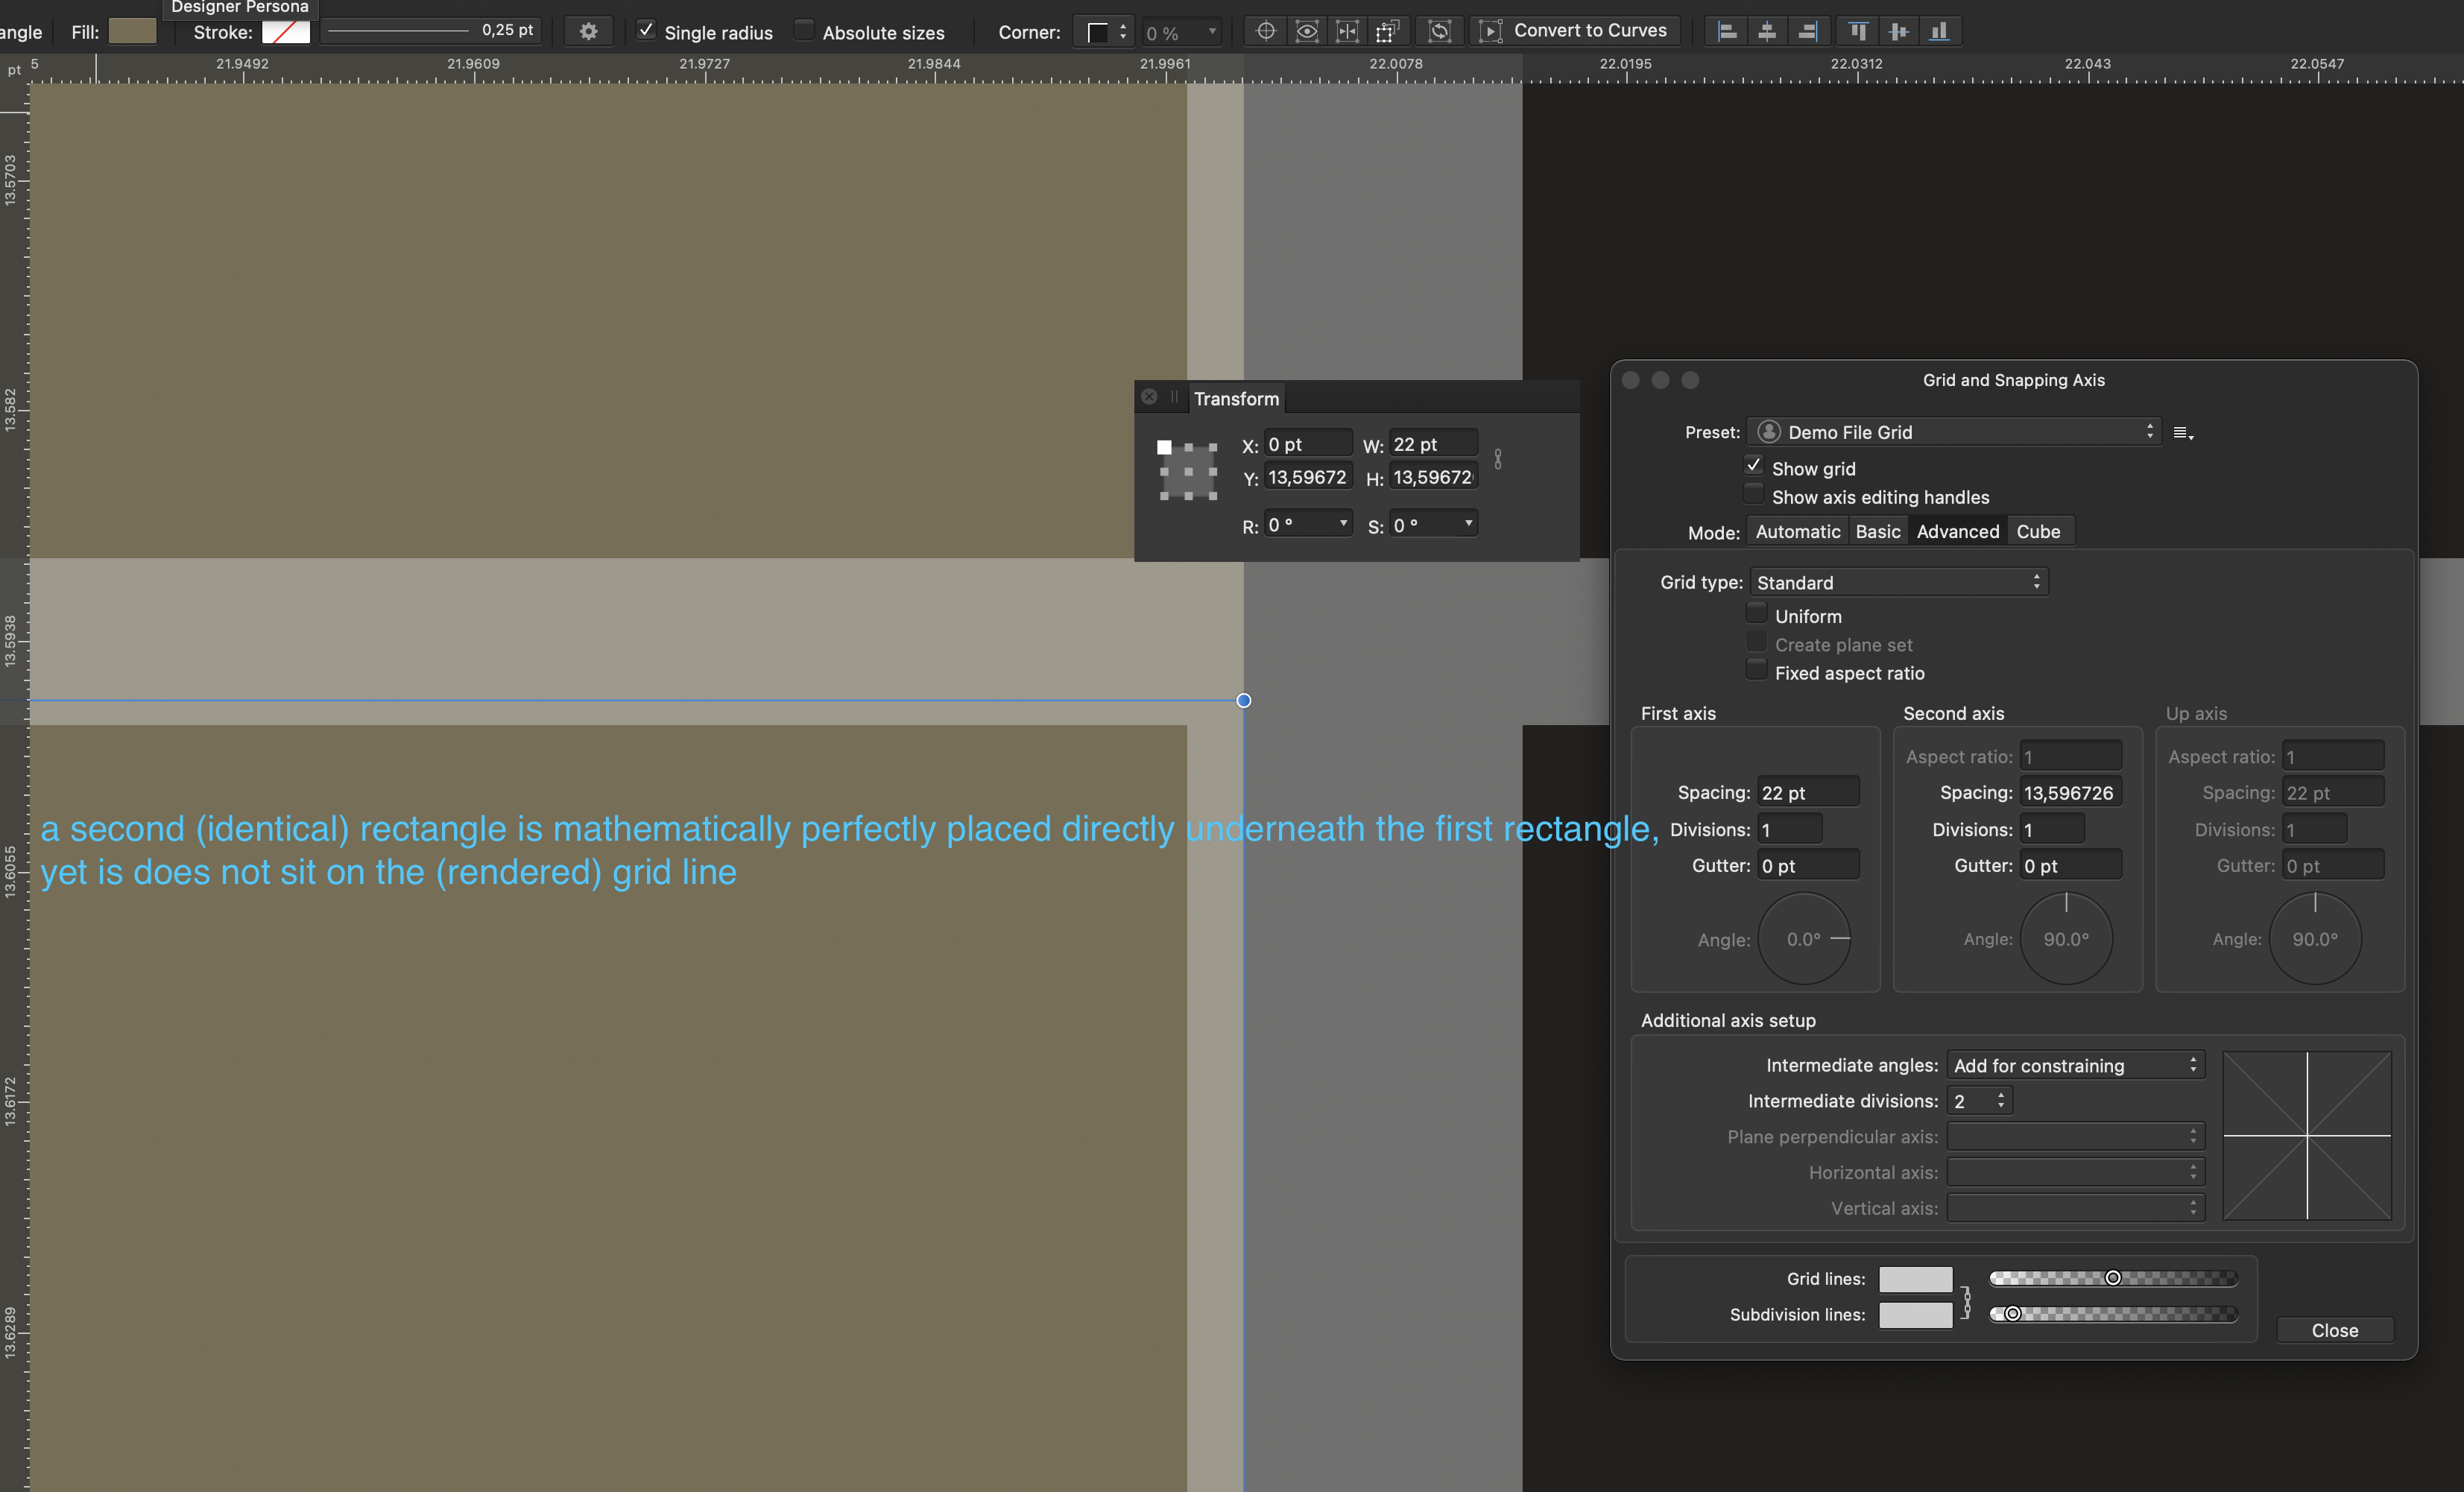
Hello everybody, before I start to decribe my problem I want to say thanks, that it is possible at all to work with such precision, it does really make a difference to the quality of the work I produce and it's exactly the reason why I switched to working with the Affinity Apps! Now here's the problem: I am currently working with a high-precision document where the decimal places for unit types are set to level 6. In this document I have created a rectangular grid, which is also finely calculated with 6 decimal places. If I now want to align objects to this grid, I run into a problem with the rendering of the grid. The objects do not snap in the middle of the grid line, but somewhere on the side of the line. However, this becomes visible only at an extreme magnification. The problem is, if I place objects with the size of a grid unit directly underneath each other, at some point they will no longer lie on the grid, because this minimal shift causes the objects to protrude further and further beyond the grid lines. On top of that some other questions arise. When I zoom to the maximum magnification everywitng I created turns white but what I believe to be the actual grid line (I did not create any guide lines) becomes visible in blue (however this is only true for the vertical grid line). Yet it is not possible to align objecty perfectly with this grid line either. And as you can see the grid lines don't have the same width.This is not really an issue if the objects snap correctly but it looks like it could be related to this problem. In used Metal as a render engine. I also tried OpenGL, but the problem was not solved. I attached some screenshots (sorry for the ugly colored text) and a demo file so you can recreate the problem. So that leaves me with the question, is there anything I can do? If not it would be very important for me to have this problem fixed, since my work depends on this. Thanks in advance. Luca My setup: macOS 11.0.1 MacBook Pro (15 Inch, 2019) Processor: 2,6 GHz 6-Core Intel Core i7 RAM: 16 GB 2400 MHz DDR4 Grafics: Radeon Pro 555X 4 GB Affinity Publisher 1.8.6 (also checked on 1.9.0.857) Demo File.afpub
-
 Hi, Does anyone know how I can align a nested object to it's parent's centre? For example I can align two objects that are not nested by selecting them both and setting align to "selection bounds" but I i want to align to the object that I am "inside of" this doesn't work...
 -
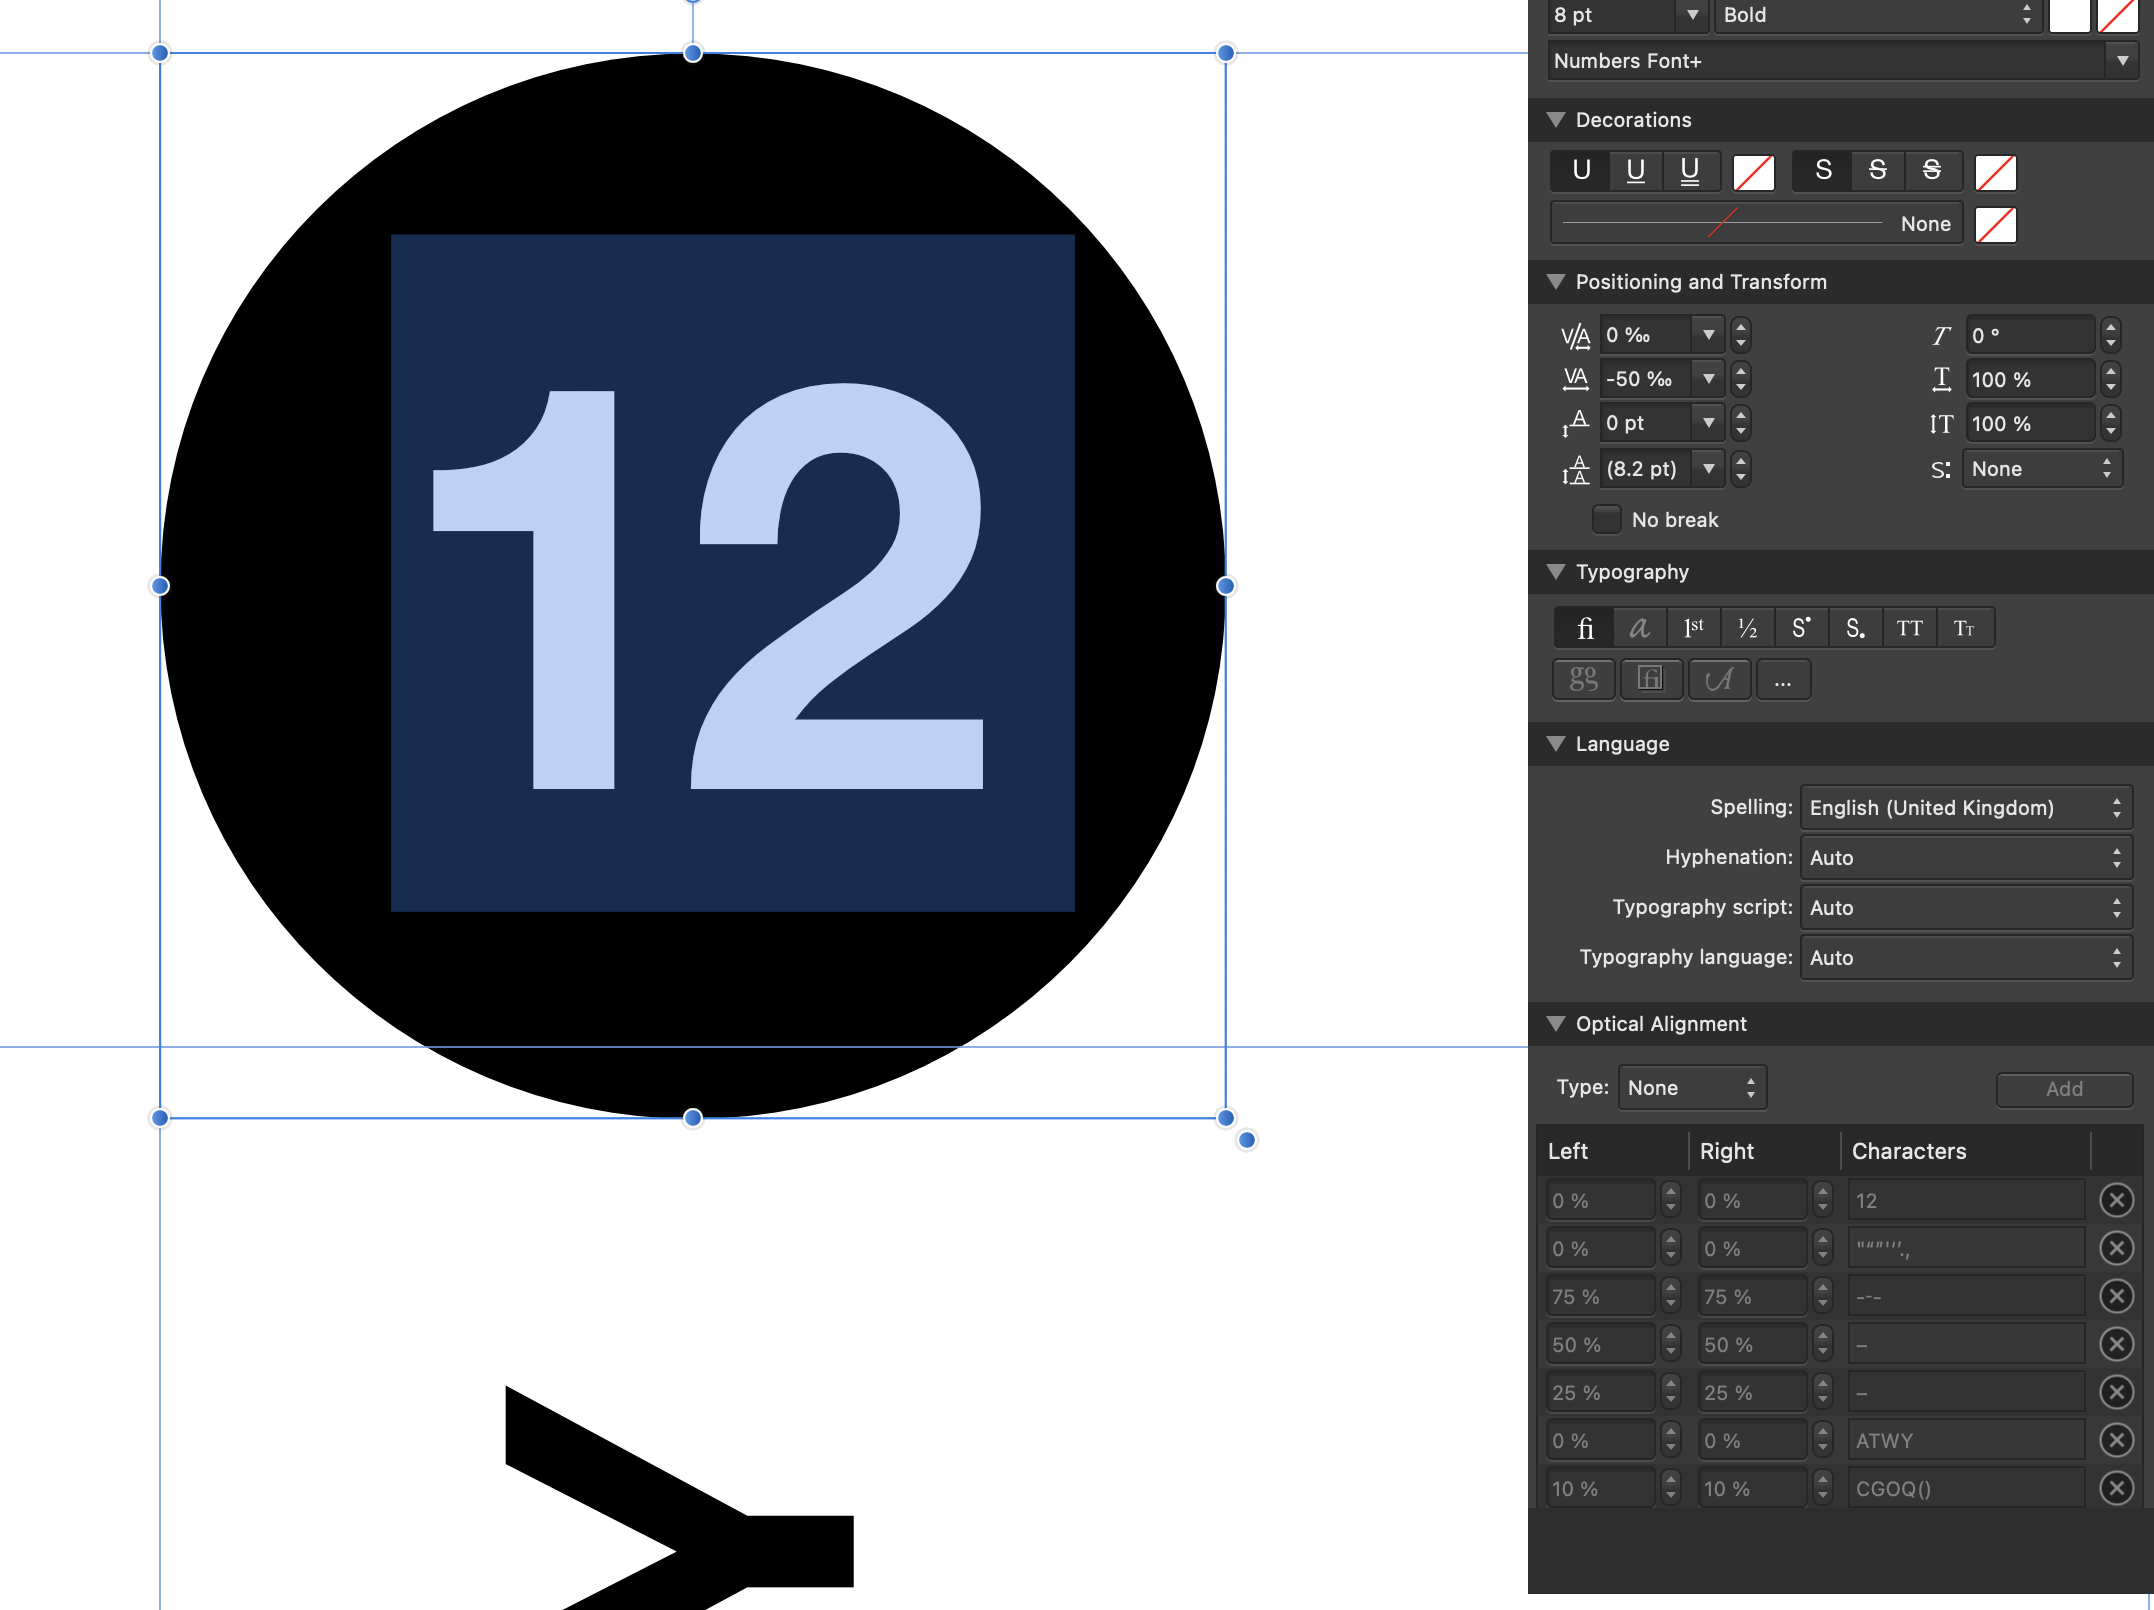
 I *think* it may be to do with optical alignment but I can't work it out. Any ideas?
-
 Hi, I just purchased your complete Affinity series and am really happy with it so far. Although I just started working with it yesterday But I already encountered some small problems I can't solve myself. My most important question so far is about the alignment function. As a previous Adobe user I am used to be able to align two objects while one is staying in place. Using Affinity Designer I can't find a way to do that. Whenever I want to align two or more objects they all move and meet up in "the middle". With Adobe I was able to select multiple objects, then release the [Shift]-Key and klick on one of the selected objects. That object would then stay in it's place while all the other selected objects would align with it after clicking one of the [align]-buttons. Is there a way to do the same thing in Affinity Designer? Thank you very much in advance. Cheers, Michael
 -
 Hello designers! Here is a tutorial you might find useful if you need to align or distribute objects in Affinity Designer. Enjoy!
-
- 1
-
-
- affinity designer
- alignment
- (and 8 more)


.png.0cc71ebcad9431a47d8730e0338b311e.png)