Search the Community
Showing results for tags '1.7.0.139'.
Found 6 results
-
 I guess this is not a bug, but a limitation from the Windows clipboard. But maybe it can be handled in APub internally? Original elements come from Indesign CS6, page size A4. Target is APub page size A4 with 300dpi. So when I copy the elements from Indesign - which is imo the better option comparing to importing a PDF - the elements in APub will have a size of about 25%, which is the ratio between 72 and 300dpi. If I set up APub with 72dpi all elements are placed just fine, changing later to 300dpi makes no difference at all. Maybe copied elements from the clipboard can have the "correct" size? Just asking because I am lazy and don't want to do the extra step.
 -
 When trying to choose different bullet styles in the Bullets and Numbering section of the Paragraph Panel, Publisher will stop showing the actual bullet that you've chosen and display a colored square instead. I tried making a video but the synch didn't work properly between the mouse pointer and what was being displayed, so I'll use some screenshots instead. (1) Screenshot before I do anything: (2) Next I select Bullet in the Type box. Publisher shows me a basic bullet, and a Tab. (3) As I want a different bullet style, I backspace over the Tab and bullet character, and use the Text pulldown to choose the Right Rriangle. Publisher displays: (4) To see the actual selected bullet, I switch back to Type No List (see first screenshot for the result), then switch back to Type Bullet. Publisher displays the correct result:
-
The View > Studio submenu is displayed in almost alphabetical order with the UI set for English. It should probably be completely alphabetical, as it is for Photo and Designer.
-
 I create a Table and modify the stroke. Then align the table to a guide and it snaps at the middle of the stroke. To be correctly aligned, shouldn_t it snap to the outer border??? I searched n snapping manager for an option to change this behaviour, but didn't find.
-
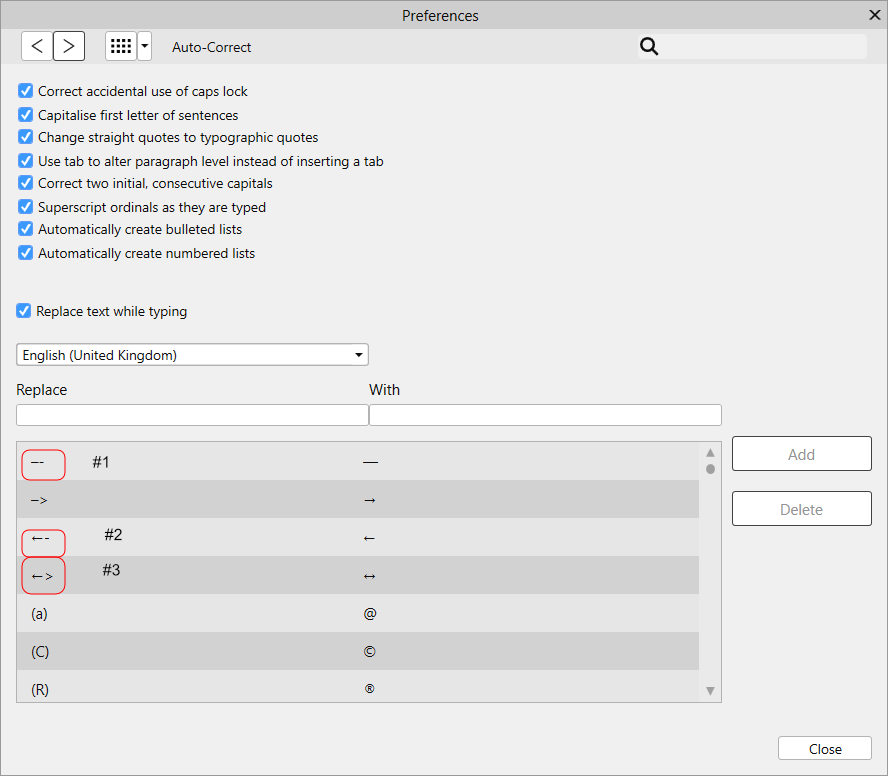
Looking at the Auto-Correct Preferences I noticed 3 strange default entries: This entry shows as –- which (I think) is en-dash + hyphen. The actual (and more reasonable) characters that work are -- (hyphen + hyphen), and –- does nothing. The entry shows as ←- (left arrow character + hyphen). The actual (and more reasonable) characters that work are <- (less-than + hyphen). This shows as ←> (left arrow character + greater-than). That does nothing. My best guess, <->, also does nothing.
-
I've seen this mentioned in the Suggestions forum, but not in the Publisher Bugs forum, but I don't recall seeing any comment from Serif. I'm mentioning it here to suggest that it be investigated as a possible bug. Edit the ruler origin. For example, drag it 1 inch to the right and 1 inch down in the page. Drag a new horizontal or vertical guide onto the page. If you watch the tooltip as you're dragging the guide, it still starts measuring 0 at the original ruler origin (top left corner of the page). Thus, by the time the guide reaches the new origin point, the tooltip will show that it's at 1 inch, not at 0.