Search the Community
Showing results for tags 'wrap'.
-
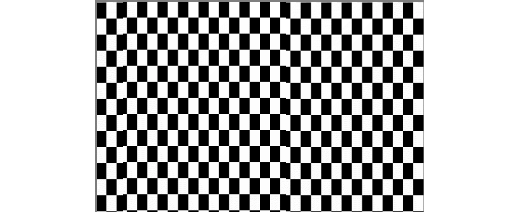
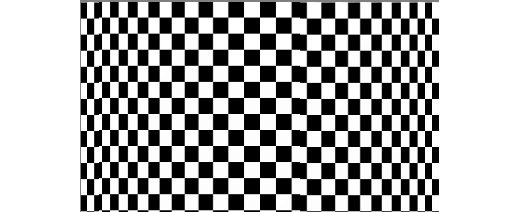
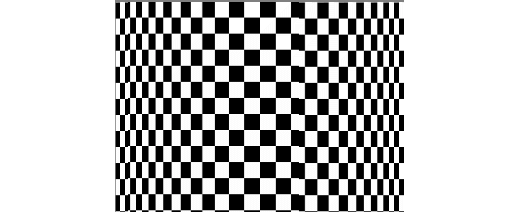
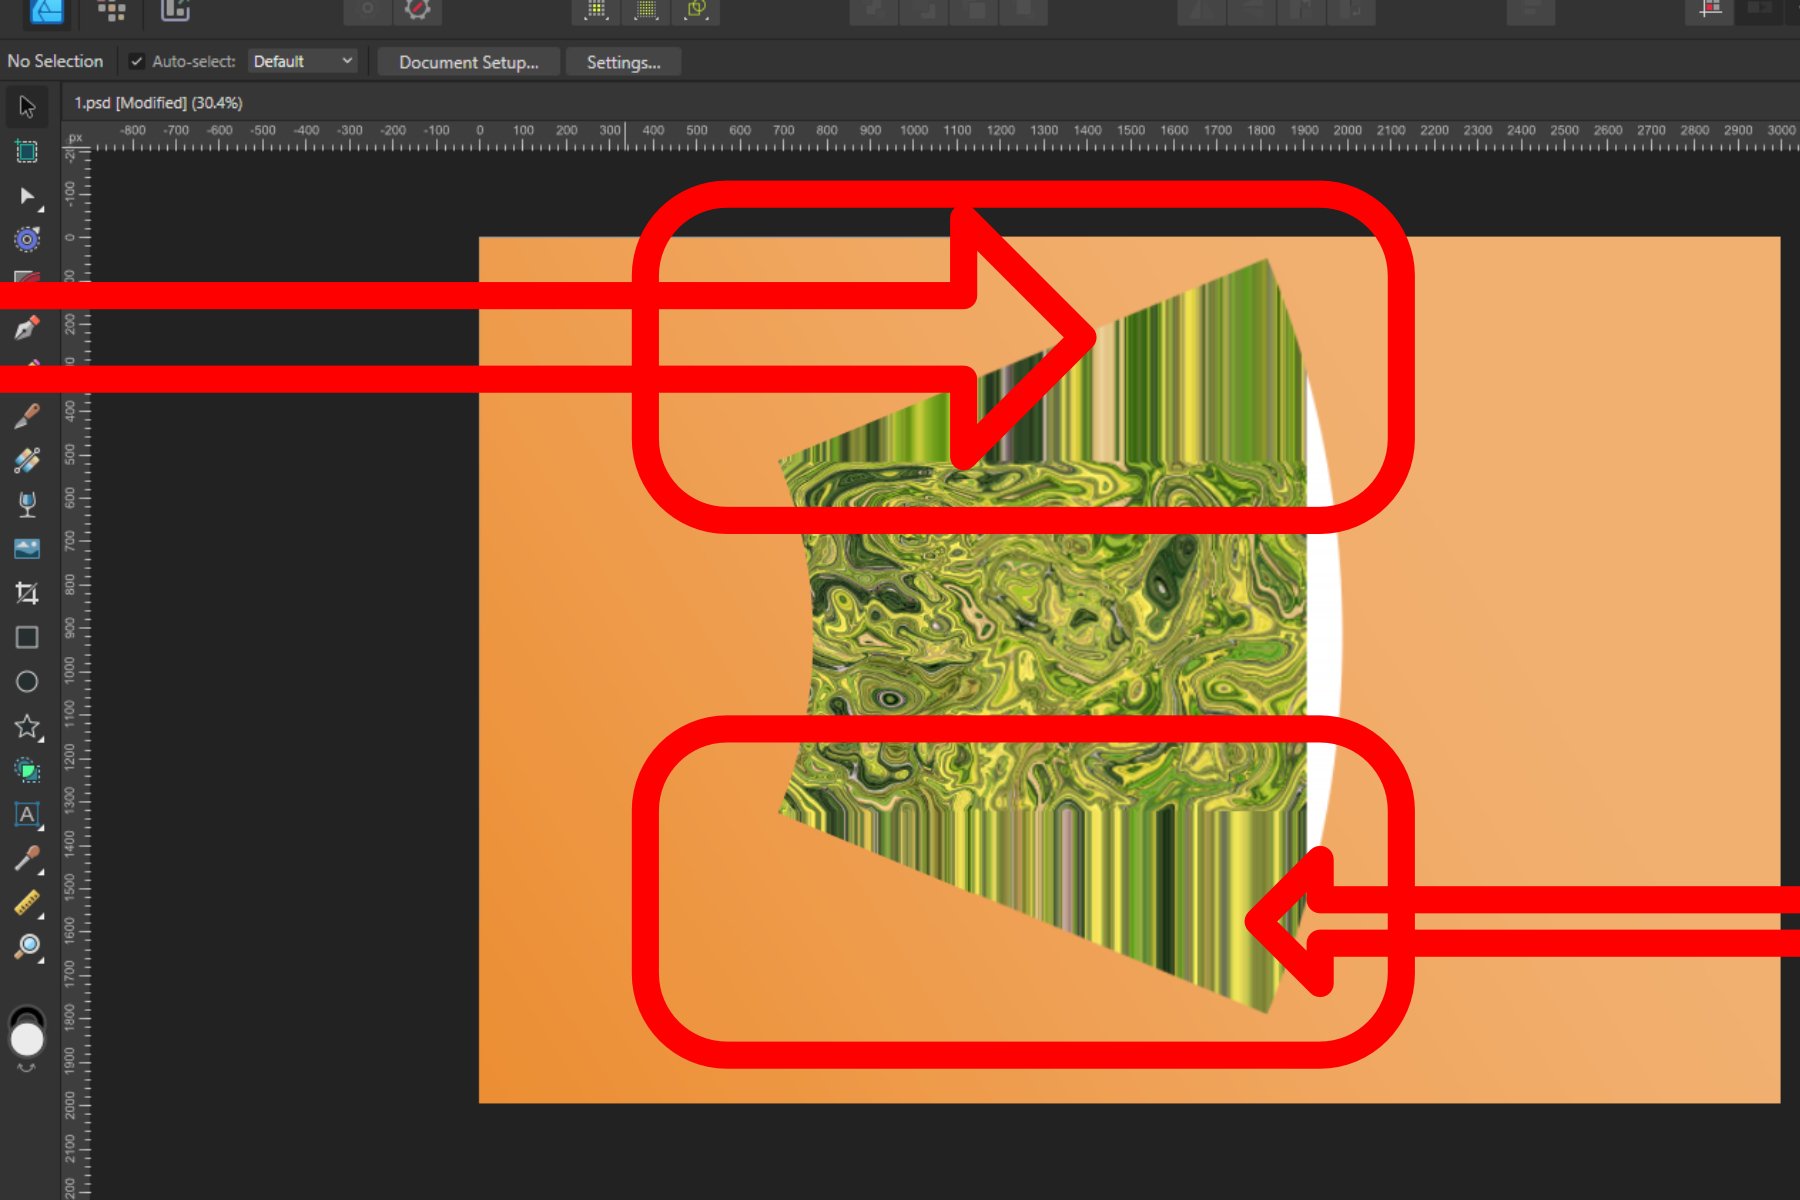
Some time ago I produced a macro to Wrap an Image around a Bottle or Mug. This involved some complex trigonometrical operations on the image. I present here an alternative approach for a macro to perform the same action. Here is my original image: o It is easily possible to produce an equation that contracts the image width-wise to emulate the reduction in perceived width as the image is wrapped. Such an equation has the form: x=w/2+(w/2-x)*pi/2 and has the result of: The contraction is uniform across the reduced width. The expression pi/2 is the appropriate scaling for a bottle diameter that accepts the image around its half-circumference. What I was aiming for was a function that would scale the edges so that they appeared contracted, whilst applying zero scaling to the centre of the image. After much trial and error, I came up with this: x=w/2-(w/2-x)*(1+1.571*(1-sqrt(1-(1-2*x/w)^2))) Edit: Note that this has a minus sign after the first w/2. The original had a plus sign. The value 1.571 is just half pi. The resulting image is: This is a single result. I have further refined by including a scaling parameter, a, which accentuates the compression at the edges. w/2+(w/2-x)*(1+(1.571/a)*(1-sqrt(1-(1-2*x/w)^2))) Here it is with the a parameter around half. Note that in these images, the central squares remain square. Edit: Like my previous version it has a parameter (in this case b) which affects the viewpoint, above or below. If you want to use this then you need to enlarge the canvas vertically beforehand to give room for the curvature. You may wish to use Document > Clip Canvas at the end in this case. Edit: various members had pointed out that the final image was flipped horizontally. This has now been fixed. I have also added Layer > Unlock and Layer > Rasterize at the start of the macro. I have not added a clip canvas at the end. Do you think that this is desirable? Here is the macro: WrapAroundV2.afmacro John

-
 Hello, can someone explain why this happens,s, please? I can't use the perspective wrap tool to wrap this background on a laptop screen. thank you all ♥ 2023-06-06 14-02-32.mkv
-
 Hello, i have a question how to CONVERT TEXT IN to SHAPE affinity designer? In Ai is so easy but i am not sure how i can do that in Affinity designer? Here is a link you can see what i mean. I am not sure how i can do that in Affinity Designer?
-
 I wish to produce a table that includes cells with text and images in them, and wrap the text around the images. This means the following: One cell has text and an image inside it (the image is inside the table's cell in addition to the text) The text inside the cell wraps around the image inside the cell Repeat this process for other cells Is this possible, and if so, by what means?
 -
 I have an image that I want to position in the upper-left corner of a text frame so that the text wraps around it -- see attachment, which shows the image and text as separate objects. How can I do that in Affinity Designer? I am using Designer version 1.10.4 on a Mac running Version 12.0.1.
-
 These tutorials are really helpful, and well done. I've looked but cannot find a tutorial on how to wrap horizontal text around the corner of a building. Can someone helop me out? Thanks! Phil
 -

Text wrap issue with text at bottom or top
Georg Dörrwand posted a topic in V1 Bugs found on Windows
Hi Publisher team, I'm facing the problem that I can't set the distance from text as exactly as I'd like to. That applies to images as well as rectangles. (I haven't tried circles and other objects but believe that this is a general issue.) Details: I place an image inside my document. Next I draw a text frame and type some Lorem ipsum etc. Then I let this text frame snap to the bottom of the image so that the top of the text frame is attached to the bottom of the image. Now comes the mystery: I select the image and chose a text wrap with the wrap style 'Jump' or 'Square' and set the distance from text to 1 mm from the bottom. Instead of moving the text 1 mm down the text jumps down 1 line. I understand that it makes sense when an image is placed inside running text. But when the text starts under the image, it would be nice when I could control the distance between image and text as seen in the dialog. My work-around right now is to set the 'Space Before Paragraph' to the delighted distance and set 'Use Space Before' to the column-top-option. That's fine for me, but it would be more logical if I could do it the other way, too. Nevertheless Publisher is a great software and I don't miss InDesign at all. Thanks, folks! Georg text-wrap-issue.afpub
-
As shown in the video, I am very confused as to why the text isn't wrapping properly when I 'edit detached' the height of an object that is created on the master page. Screen_Recording_2020-08-15_at_4_34.07_PM.mov
-
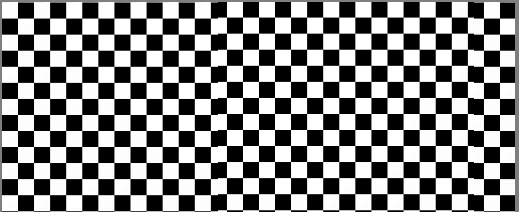
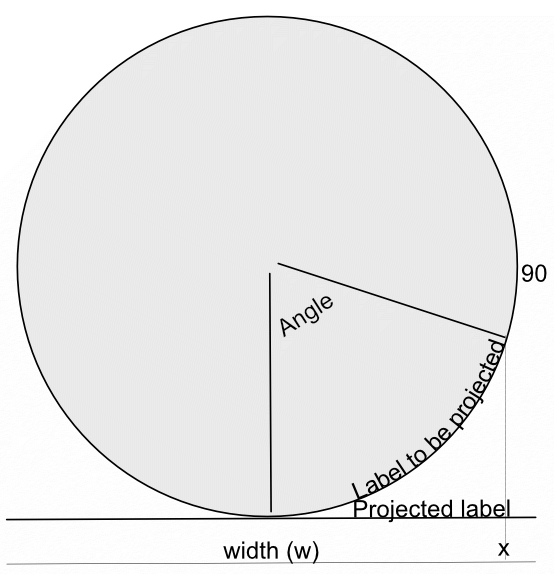
 In a recent post in Questions, @Maxxxworld asked how he could warp an image to apparently wrap it around a bottle. I posted a solution to his problem there, which I expand upon here. Consider the facing semicircle of the bottle as seen in this diagram: The visible part of the label extends from -90 degrees (on the left, not shown) to 90 degrees on the right. This will correspond to the width of the original image. This will project onto the final width of the image (the line below). The final width is less than the original width by a factor of pi/2. A bit of trigonometry shows that the sine of the Angle indicated is given by (x-halfwidth)/halfwidth, where halfwidth is both the label and the final image. Putting this together and re-arranging a bit gives us an Equation: x=(asin(2*x/w-1)*w/180)*pi/2+w/2 A bottle is typically viewed from above, so that the label has a curve, typically with a dip in the middle.This can easily be simulated using equations, using: y=y-Const*x*(w-x)/w/w The Constant determines the depth and direction of the curve. I have used the expression w*(0.5-a) as a scaling factor, where a is a parameter chosen at runtime. This will change the curve from negative (curving down) at the default a=1 to positive at a=0. Inserting this into the equation gives: y=y+(0.5-a)*x*(w-x)/w Note that the w in the numerator and denominator cancel out. The value of (0.5-a) determines the curvature as described above. As an example, here is the Great West Window of Chester Cathedral. I chose this because it has lots of verticals to see how the filter affects it. (It has verticals once I had put it through the Mesh Warp.) And here is the image after the filter: Before filtering I cropped it close to the sides of the window and then Rasterized it to remove the invisible sides. I then added space at the top and bottom to allow room for the curvature part to operate. I then followed this by Clip Canvas to remove surplus transparent ends. The calculations for this filter are complicated by the algorithm that Affinity uses to effect these equations, which I explain in this Tutorial here. I have created a macro that effects the filter, and then uses Clip Canvas. By clicking on the cogwheel, you can alter the degree and direction of curvature. EDIT: I have discovered that this macro will only perform once (per Affinity Photo session). I add here a version recorded in version 1.8 which does work properly in Photo 1.8: WrapAround1.8.afmacro I alos onclude here the original macro, recorded in version 1.7: WrapAround.afmacro John
- 20 replies
-
- 14
-

-

-
Thanks for the upgrade guys, but i miss one imported thing and that is vector text wrap or perpective posibility. This is a very imported tool for designing.
-
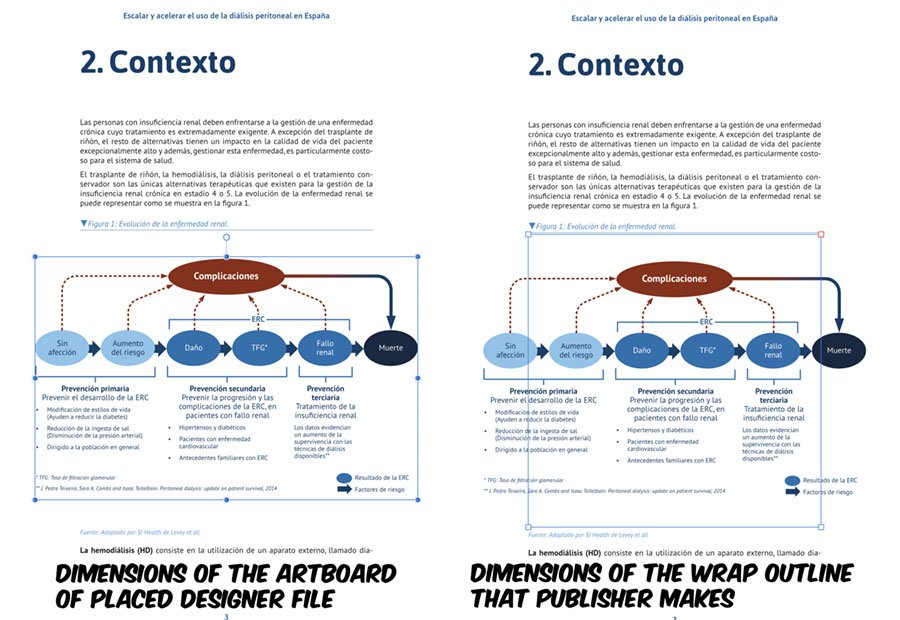
 Whenever I place a Designer document on Publisher and wrap text around an artboard, the wrap outline does not match the size of the artboard, in a totally random way, so I must resize the wrapping manually every time I place a Designer file. If I modified the artboard later on Designer, and do a "Reset Wrap Outline" it reverts to the incorrect wrapping, despite having modified the artboard size, instead of detecting and resetting to the new artboard size. Steps: Do some text layout on Publisher Place a Designer document with artboards Add a text wrapping to the placed artboard (Results on incorrect wrap outline) Edit the incorrect wrap so it matches the artboard size. Tested with different Designer files with multiple artboards (also single artboard documents) and each result in a totally aleatory wrapping size. Each tried document result in a totally different wrapping error, with no noticeable pattern. Publisher 1.7.3 - Designer 1.7.3 - Mac OSX 10.15.2
-
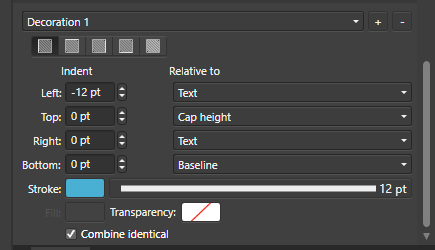
 Windows 10 Home 1903, Publisher 1.7.2.471. I have a decoration in a paragraph style which doesn’t allow for the text wrap settings of the layer it is near to. See attached GIF to see how the decoration goes behind the image. The decoration is in the right place related to the text but the decoration isn’t being spaced from the image layer properly (which would force the text farther to the right). I’ve also attached images showing some settings. Have I got something wrong or is this a bug?
-
 I have a text frame that needs to change shape, from narrow to wide column. I can change the shape, but have to manually remove line endings. I'm sure this is not intended in a professional product. As a work-around, I copy the text into Notepad, clean up the words that are now not separated by a space and the line endings that are not where they are needed. Presumably, this is a buy you will fix!
-
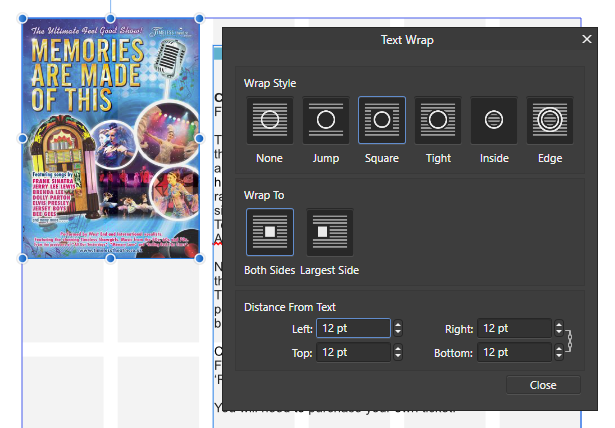
Windows 10, Publisher Build 145. I've noticed something about tight text wrapping around a curved shape that seems wrong, but maybe someone can explain it to me. Have a look at the first attached image. The text is 7pt Arial on a 9pt baseline grid. The filled blue circle is a layer that has tight text wrapping with a gap of 2pt all-round. The outlined blue circle - on the right-hand diagram - is 4pts wider and taller than the filled blue circle (observing the 2pt gap of the text wrap). As you can see, the text is further away from the circle at the top and bottom than it is at the right. I can understand why, for example, "hendrerit" below the circles isn't anywhere near the outlined circle because the baseline forces it to be further away, but I don't understand why the other text is so far away from the circle. The second attached image shows the same sort of issue but it looks a lot worse there. Can anyone explain why this is supposed to happen, or is it a bug? It just doesn't seem quite right to me. (I've also attached the afpub file in case anyone wants to have a play with it.) tight wrapping round curves.afpub
-
 There seem to be a big performance hit when text wrap (tight, both sides) is applied to grouped vector graphics. Spinning ball everything halt for about 5-6 seconds.
 -
 Hi all, my first post here. I am using photoshop since CS2 and I am pretty good in it. Never the less it became to expensive for me to use it just once in a while so I decided to buy Affinity Photo. Great programm so far. I have just one question: Since AP doesnt behave like it is said in the helpfile I was wondering, if I am doing something wrong. I just want to place a text on a path or curve. I create the path/curve and select the text tool. It is said, that the curser would change, when I come next to the curve with the tool selected. But that little devil mouse icon wont change. Hence I cant wrap my text along the curve. Am I missing something here? A simple checkbox somewhere to click? Any hint will be much appreciated. I found a lot of hints for Affinity Designer, but that differs to Photo. Hopefully someone can give me a tip. Many thanks in advance. cheers Marcus
 -
Page wrap should be built in. it is something that should always be there. it is not something you should have to turn on every time you use a word processor. i tried to turn the feature on and nothing happened. the words just kept going off the page. this needs to be addressed.
-
Missing in Photo: more options for output format in export (important for TIFF - more compatibility with old software) BMP export on/off dither for rasterizing tolerance option for "Selection brush tool" user presets for all filters snapping for "Crop tool" circle overlay in "Crop tool" "Mesh warp tool" for curves (without rasterizing) "Warp text" like in Photoshop "Invert mask" function base RGB adjustment (3 trackbars with range -255 - + 255 (in 8 bit)) adjustment presets in DESIGNER Thanks for considering proposals.
-
 I am fairly new to Affinity so struggling a bit here, all I want to do is add mirrored edges along all four sides of a photo for printing on to canvas preferably with a blur so that the image wraps around the frame seamlessly, I am sure there is a way but I struggling with this, all the ways I have tried have been successful to a point but I am sure there must be a simpler way. Can anybody help? Mark
 -
Recently I face a problem where I had to put a text on to a perspective product in a circular form. I was unable to do that and had to get it done from AI and shift to AD. I also found that there are no text wrap options into this.
-
hey guys I recently was using Adobe illustrator and I was using the specific tool in it such as effect menu but when I started using affinity I notice that there is no effect panel like illustrator, for instance, to make zig zag effect or wrap extra
- 1 reply
-
- 1
-
-
- illustrator
- effect
- (and 3 more)
-
Feature currently available in Photoshop & Illustrator. Very Useful when you design something with a bounding/text box and decide later you would prefer using Point text & vice versa.
-
Hi all I have an arrow and want to bend/wrap the group after construction to a path. Example attached. The arrow in it should follow/bend like the curve. I am currently stuck and really appreciate any help and hints :) Many thanks in advance, Roland Pfeil.afdesign
-
 The Affinity Designer intro video shows text and graphics being dynamically wrapped on a box package. Are there any videos or tutorials to show how to accomplish this automatic text and graphics wrapping on a package?
 -
Please see example: