Search the Community
Showing results for tags 'workflow'.
-
 Well ! The title says it all, Affinity Publisher is missing/lacking of the essential Export Persona. On a workflow like mine where i use Affinity Photo to process everything pixel, Designer to Process everything Vector and make them all converge to Affinity Publisher for project finalization. So, 80% of my exports happens there because Affinity Publisher does it better when it have to print stuffs ! Please bring a shiny but powerful export persona to Publisher.
 -
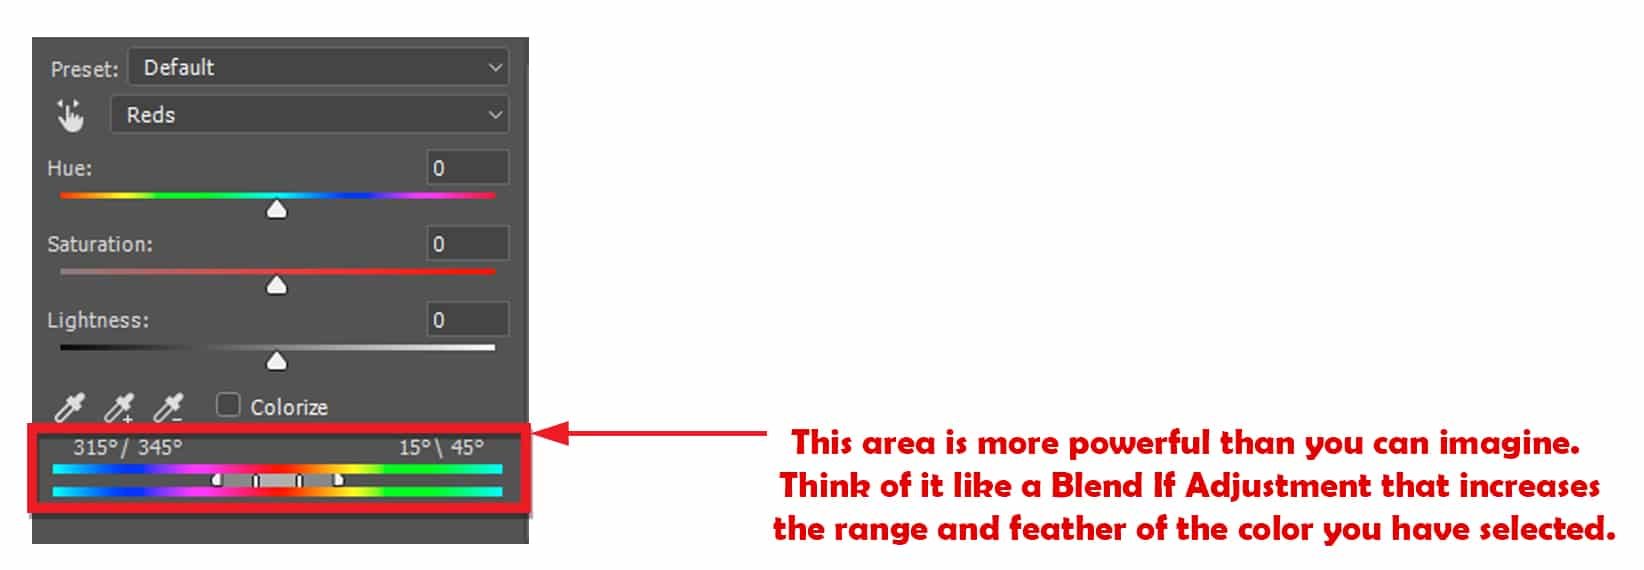
 Yesterday I tried to make some ajustments using affinity but unfortunately I wasn't able to get it right. There are two missing features. There isn't something like an eyedropper for selecting the color. Sometimes PS considers something as yellow when it looks green for instance. But much more importantly, there isn't any way to change the range of the color it's trying to affect. This is crucial for a lot of HSL ajustments. A lot of apps do offer the ability to adjust the HSL range. Now you can adjust only parts of an autumn leave for instance, the red channel doesn't cover everything and the yellow channel covers other things too so it's just not possible. Maybe you can work around this issue by using something like color range, but that limits your options to only one color and it's more work and less flexible. Please refer to the attached screenshot to see what I mean.
- 1 reply
-
- 1
-

-
- hsl
- ajustment layer
- (and 2 more)
-
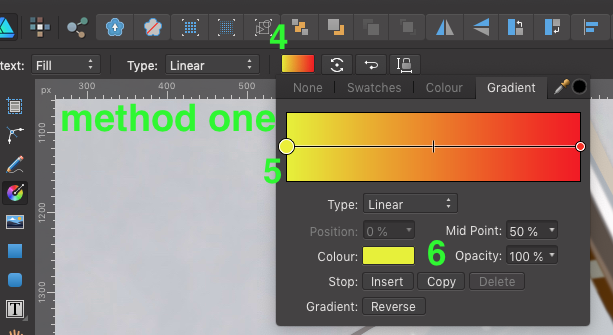
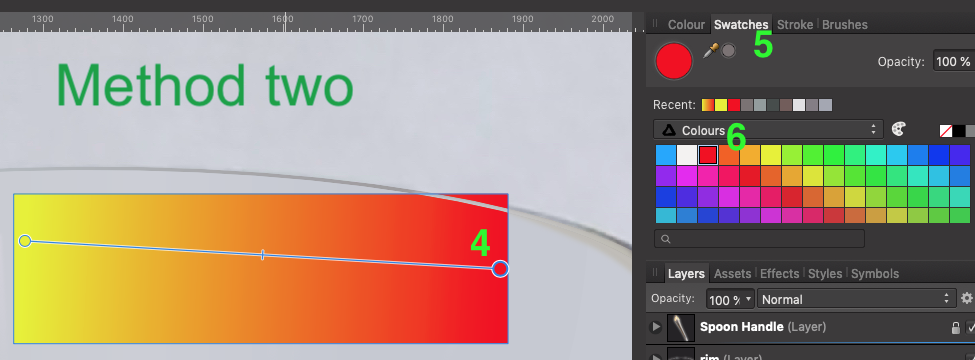
 I struggle to create gradient fills easily and efficiently. Here are the two methods that I use, and perhaps the only way. I'd be curious if someone out there has another method. Method one: Create object select "G" on the keyboard draw gradient Select the Gradient color box at the top toolbar make active a node on the gradient line select color from colour box Repeat steps 6 -7 for each node in the gradient line. Method two: Create object select "G" on the keyboard draw gradient Select the node in gradient bar Select Swatches tab in the docker on the right Select color in the Swatches pallet. Repeat steps 5 -6 for each node in the gradient line. Suggested Improvements: A) What I would like to see is the ability to double click on the color node on the object itself, not the node from the methods above, and by double click the node a swatches pallet opens for you to make your color selection. B) Another option would be to select color node, select the eyedropper in the tool bar and while holding the Shift key down select the color you want applied to that node. This method is great for sampling color from other drawings or reference images. I appoligize if there is another method alreay in place, I just haven't come across it yet. Thanks in advance. -Bill
-
 I just want to share with you, that I have just launched an Affinity Photo Workflow Video Course. I have for a long time felt a lack of training videos, that tie the features of Affinity photo into one professional workflow. So, I have created a course, that: Allows you to begin to use Affinity Photo like a PRO with confidence. Explains a Start-to-Finish Affinity Photo workflow. Get to know all the post-processing steps: from opening a RAW file to publishing or printing the finished image. 140 minutes of video content, including explanations of key processing techniques and case videos. Includes 3 bonus workflow macros included. Specially designed for this video course. Gives you everything you need to establish your own non-destructive workflow using Affinity Photo. There is already a lot of great videos about how to use Affinity Photo, however with this new course, I think that many photographers can improve their understanding of Affinity Photo and establish their own editing workflow. By the way, as a thank you to Serif for giving photographers a great product, all interested users in this forum can use the coupon: forum.affinity.serif at check out get an extra 15% discount on the video course. I hope you welcome it into the growing pile of professional training material for Affinity Photo. Cheers, Peter Dam
 -
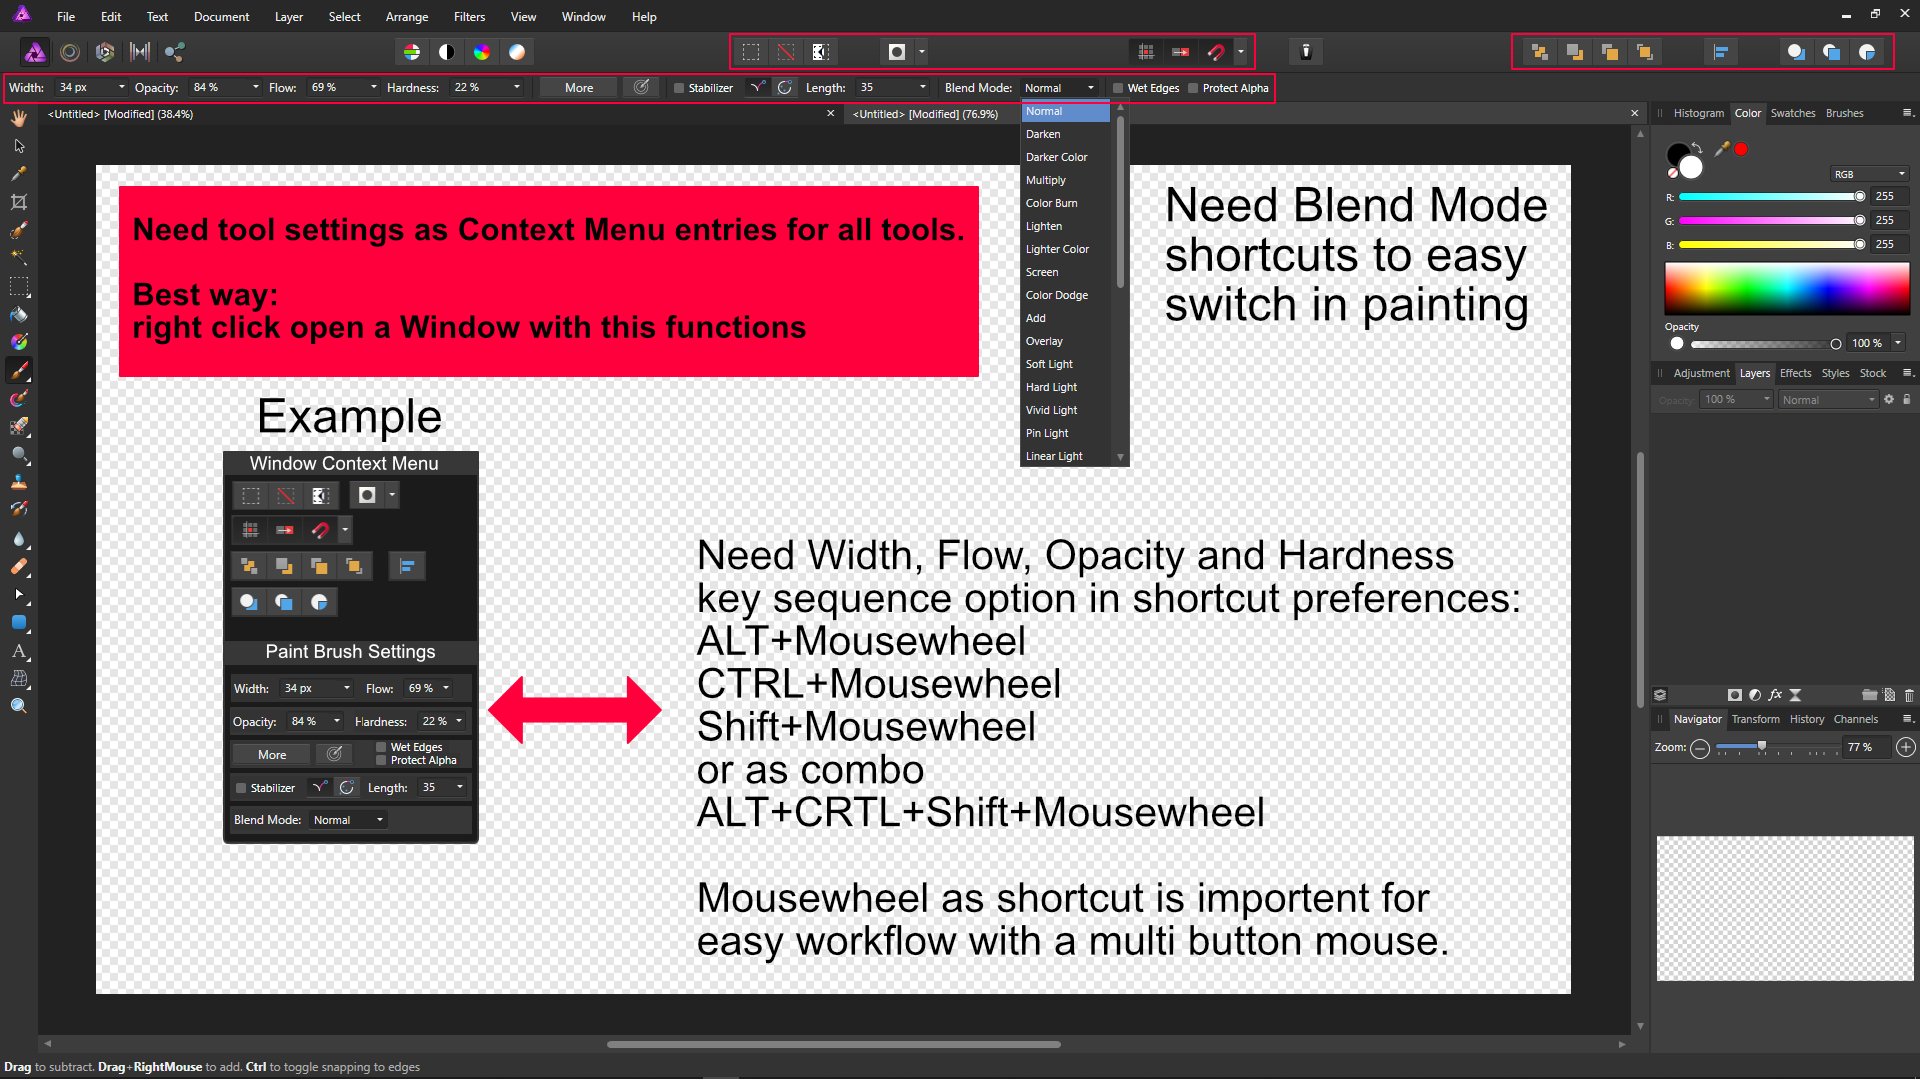
 more specific context menu entries for each tools and an option to customize the context menu in settings.
-
 Hello, during the last couple of days I spent a lot of time with Designer. I watched most of the official tutorials and read the relevant parts of the documentation. So far, I love AD, but the following behavior drives me nuts and renders AD almost unusable for me. I am trying to draw a brushed illustration using a Wacom. I have hundreds of strokes and want to clean them up: sort them into groups assign different stroke widths etc. However the selection process seems to be almost impossible hard. Please consider the following quick screen-capture: <iframe width="560" height="315" src="https://www.youtube.com/embed/_DsJZdXqWzY" frameborder="0" allow="autoplay; encrypted-media" allowfullscreen></iframe> ( https://youtu.be/_DsJZdXqWzY ) It shows the following problems: Frequently, I'm am accidentally creating copies by dragging with ALT or CMD Pressing CMD-Z once will only undo the offset but not the duplication which leads to two identical copies of the strokes precisely on top of each other (it took me hours to actually notice this behavior and now I'm always using slightly transparent stroke colors) Trying to select a stroke by clicking with CMD+SHIFT is totally random. Sometimes I'm lucky but it feels like most of the time a random neighbor stroke is being selected. (SketchApp always shows the inner bezier-line as hover before clicking which makes it possible to quickly select the right element without trail and error) Trying to select several elements with marquise-selection frequently does more damage than help, because I just create more accidental drag-copies. Drag zooming with SPACE+CMD+Drag is super fast. But if I accidentally press CMD+SPACE+Drag (pressing in the wrong order) -> Yay, I just created another invisible copy and have to Press undo twice. I can't figure out the "Edit all Layers"-toggle. It should lock me into focusing on a single layout (without accidentally switching when CMD+selecting or dragging). But it doesn't seem to make any difference. The Isolate Layer-Mode (ALT+Clicking on a thumbnail) would be super useful, but sadly it is abandoned as soon as you want to select several elements. I have a hard time figuring out the precise working of the layer-player (Group vs. Layer vs. Component). Sometimes it seems to have an impact on the selection (esp if the toggles of "layer-items" are highlighted with a circle). The CTRL+CMD+Click context-selection frequently only lists a single "Curve >" icon, that can't be selected. I guess I must be using it wrong so I'm looking for advice from advanced users. How are you doing this kind of basic selection work? As mentioned above, I frequently work with Sketch, and selecting stuff seems to be million times more efficient and logical there. Thanks for your help. Any tips or pointers are very welcome. Tom EDIT: I finally figured out, that the "Edit All Layers" toggle is to be taken literally: After promoting many of by Groups into proper Layers, this already helps quite a bit. affinity-designer-problems-01-selection.mov
 -
 Hi All I've recently purchased Affinity Photo and Designer plus both workbooks and intend to get into both of them. Up until now I've been a big Lightroom fan but, have recently debated the value of subscribing to Adobe as a photography enthusiast rather than pro. Now I have invested in a Surface Pro I'm looking at my workflow and debating how I can get the best out of both. Setup Prior to Surface Pro: LR CC Classic RAW Photos and Catalog Synced with One Drive for backup Choices moving forward: 1. Stick with LR CC Classic Sync Catalog via One Drive RAW Photos move to an external drive and use between the two Use Affinity as my go to editor Plus Points: A workflow I'm used to with LR CC Classic Negative Points: Still paying for Creative Cloud, catalog needs to be synced before opening on surface and vice versa 2. User LR CC Sync all RAW photos to the cloud with LR CC Plus Points: Works seamless between both devices Negatives Points: Still paying for Creative Cloud and cannot open in Affinity from LR CC (Booooo!) 3. Sack of Creative Cloud Use Windows to manage files / other software and run with Affinity Photo RAW Photos all synced with One Drive Plus Points: No Creative Cloud Subscription Negative Points: Need to adopt a new method for managing RAW Photos and quick edits. These are the options I think I have but, as this is the place for all Affinity Photo questions, I'm sure others have their workflows that they could share. What RAW Processor / File Management System do you all use prior to opening Affinity Photo? I've seen DarkTable amongst others and also debated converting my files to JPG once finished editing, one to save disk space and two means the files are how I want them to look. Obvious downside is reverting them back to original if you don't keep the RAWs. Thanks for anyone's help in advance, it's greatly appreciated. Carl
 -
 I have an Affinity Photo document with many dozens of layers. I frequently need to export one of the layers individually to a PNG (hiding all of the other layers/content in the document). I've found this very difficult to do, as I can't currently find shortcuts to either: a) hide all layers except the selected one or b) directly export a single selected layer Also, I need layer effects of the parent group(s) to still be applied. Which means doing something like copying the layer and then choosing New from Clipboard and then exporting won't work well for my purposes. Perhaps I'm overlooking something obvious? Can anyone offer suggestions on the easiest way to do this?
 -
Hello everyone i'm currently working on making my workflow with affinity products to be as fluid as it can so i won't mind not having other products installed. i know Designer and Photo use the same file format and i've learned about the place tool etc... but here is my need: Case: in Past days, using Adobe Products, i could prepare an A4/A5 Canvas on inDesign the work on my photo with PS then all vectors with Ai and when all is done just place them on my inDesign, adjust and if any change i want to do, i just right click on the stuff (picture or vector) select Open/Modify with, select the right software, do necessary changes there click Save come back to inDesign and see all changes Synched. i've tried to do that with Affinity products but up to now, i can't get the updated file synched after i have made changes and Saved the whole thing; it's just stays as it was the minute i placed it; so; maybe i'm missing something here on how to team them and use as efficient as i would do with Ai+PS+iD. Thank you all for your inputs.
-
 Hello all ! I am Chrisas, a french student in graphic design and programming. I'm a user (BIG FAN) of Serif's softwares since October 2016. It really helped me in several fields such as logo design, illustration, web design, apparel and social media graphics. Since I started working with affinity designer and photo, I bought some specific resources I discovered after several days of research. But There was one problem, there is not a place to buy, sell or present resources for affinity softwares. I mean for illustrator and photoshop you can found thousands of stuff in any sorts related to them. Example : to present my work I sometimes have to open photoshop to use mockups ( i'm a mockup lover) but I always want to speedup my workflow so my idea is to create resources that will be useful for other creatives like me. I built some stuff for myself but I do not know what will be useful for you, what you need, and what you are looking for. For now, my aim is graphics pack about : assets, macros, colors palettes, styles, and mockups, uikits. The purpose is to make the work of creatives easier, faster and funnier. So here is my question , what kind of resources do you need ? I am open to any suggestions, so feel free to comment ! > An Illustration project I'm working on : https://prnt.sc/inpq5g > My dribbble : http://dribbble.com/chrisas > My Portfolio (5 months of work are missing x) ) http://behance.net/chrisas
 -
I sometimes have a group of photos to process. Each one doesn't necessarily take long, but the whole sequence of operations might. I may use other tools as well in the process, and eventually bundle the results off by email to an interested party. As an example, today I was asked to take close up photos of a table top. I took a bunch of photos - then I wanted to upload them all to AP. Then I wanted to select a few, and make some changes, such as blurring out the background, and finally I wanted to save them somewhere unique, and then send them off. I don't know how big a problem this is with other photo editing tools - it may actually not be any easier - but as I have already written, each small step adds up and in the end the process becomes tedious. A more streamlined process would help.
-
 I have edited several photos of a photo session. Lets say a have several dozens of images ready to export then as JPEG. In LR, I just select all final images and choose export to create the JPEG of all selected photos. What is the best way to do that in Affinity ? What is the best workflow to deal with editing and saving all selected images of a photo session ? best regards
 -
 I want to deliver uncompressed 16-bit TIFF files to a client (unfortunately, I don't know the specifics on how they will be printed, like size, paper stock, etc..,) so I would like to give them the best image I can, then they can do what they need to on their end to meet their print needs. So I'm trying to work out the best workflow. There are 12 images I need to deliver, so I was going to batch process them into 16-bit TIFF files (from the RAW files), then open them in Affinity Photo to edit. Keeping in mind that AP can't export uncompressed TIFFs, what's the best workflow from this point? Open in AP, edit, save as TIFF with layers, then flatten, and deliver as is? Assuming that the TIFF I'm working with is uncompressed. Or , edit, save as TIFF with layers, then open in Preview and save as an uncompressed TIFF? Is there anyway to work with the photo in AP's file format, then get it back to an uncompressed TIFF? Not sure if I'm over complicating things, but all I really want to do is Take my RAW file, edit in Affinity Photo, and deliver an uncompressed TIFF. (The client actually requested a EPS file, because they will use Illustrator at some point, but that's not my problem lol.) Thanks for the help.
 -
I'm conscious this has been asked before but there seem to be no recent updates here in the forums. On the iPad, can we please have a meaningful default filename when exporting images? I am using Affinity on an iPad Pro, it is fully up to date. I have tried a number of methods to import my images in the first place, but the one that seems most efficient is via the iPad SD card reader which is reasonably quick (once it has built tons of thumbnails... every time), where the Photos app imports the files. My source images are RAW files, sometimes paired as RAW & JPG (Olympus OMD camera). I have seen on the earlier threads on this subject the comment that "Photos doesn't retain the filename on import." That may once have been true but certainly is not true now and hasn't been since before the last Affinity iOS update. Both FileBrowser and in Lightroom Mobile can see the exact original filenames, same as if I had imported to my laptop. Affinity has been left behind and insists on "Untitled.jpg" as the only default option, so I have to open one of those other apps up to remind myself what the exported jpg filename actually should be (if I want to be able easily to recognise later where the export came from, which I do). Terrible workflow, and gets in the way of processing a batch of photos. An enhancement would be also to add (insert, replace) other standardised filename stubs - personally I like to prefix the capture date, others might like to add an album name when working on a bunch of photos. Any chance of an update?
-
 I know that files are interchangable, and can be opened in other app from menu, but sometimes it's overkill IMO. When goal is to make some quick edits in one photo while document contains dozens of them, more convienient way would be just edit this particular image. Something like: select bitmap -> edit in Photo -> do what you want -> save directly back to Designer. Same thing could be useful in reversed situation: select vector object -> edit in Designer -> do what you want -> save directly back to Photo Cheers
 -
 Hi forum, On both Photo and Designer, I'm often confused by when my vector stroke styles are either inherited from the last object I create or not. I can't work out the rules for how this happens - can anyone advise on how to control this behaviour either way? Similar issues when I just want to draw a new vector with a new fill colour. So I might select the previous vector layer because I want to insert a new object in front of it. This object will always inherit the style of the one I have selected, which is often not what I want, and can make it hard to see the new shape. I have to change the fill and stroke afterward to stand out against the underlying object. I'm sure I'm missing something simple here!!
 -
Hi, Affinity imports EPS, PDF, AI ... They support Pantone and other color books... but what if they do not see the Pantone names in the imported PDF file? If you have a description of colors attached to a document - you substitute, if not - you guess... You can create a palette from a document, but the name of colors is not helpful... Corel, Illustrator can read colors names - Affinity can not (even from the PDF generated by them)? Anyone have some worked Adobe - Affinity workflow?
-
Hi, in Affinity there are nice tools to stack photos (focus, panorama, ...) :-) It is not possible to sent files from outside the program directly to this tools. But this would be nice, becaus of integration in Lightroolm and similar software. In the moment you can sent more photos to Affinity, but you are not able to use them in the stacking tools. Of cause, a "real" Lightroom integration would be the best for the workflow. For the moment it will help, if there will be a way to send photos to all tools in Affinity (and reimport the result). Regards Stephan
-
First of all thank you for the improvements in windows handling in the latest beta 1.6.3.98 - this is already a good step in the right direction. I'd like to add some further optimisations on the window topic: 1) When you drag & drop a file from the windows explorer please: - open it in an undocked window (elsewise no second drag an drop is possible unless you float the first window)! - if possible in 1:1 Zoom (not enlarged to windows size as in place right now) - and with an adapted windows size to fit the original file 2) When you float a or all windows please make the floating window(s) fit the picture in the current zoom level (optimal windows size) - if it fits in the workspace. 3) If a window is larger than the original document (regardles if docked or floating) please automatically center the document within the new window (and disable the view tool in this window). If you resize a floating window smaller than the document: dock the document at the top left corner. Maybe it makes sense to implement a general setting "Always center documents when smaller than window". If a document is smaller than the window there is no need to be able to move the document within the window. One could avoid accidentally "loosing" the document in "outer space" if it would always be centered in the docked window (if smaller than the window) 5) When you work with docked and floating windows in combination you can't bring the docked window to the front. This is a general problem. It could be solved by only allowing docked or floating windows mode but no mixture. Floating windows can be brought to the front. 6) It would be nice to arrange all floating windows optimized on the workspace (e.g. horizontal, vertical, tiled) with one click (menu command) 7) Also nice to have: additional information of document size (height/width in current units somewhere at the windowsframe of a document) 8) If I undock many documents why do they cascade at the top right(?) corner of my screen? 9) Drag and Drop of layers between documents should be possible These are just some suggestions that come to my mind. Cheers, Timo
-
 I was recently advised to check out affinity. I must admit I didnt check the price or functionality before buying but so far its practically useless for me. I generally import my pics onto my pc or nas using lightroom 5.7. this works well for my pc centric workflow and I am not interested in upgrading lightroom at present. What I want is to auto sync a number of folders to the ipad so I can introduce an ipad work flow. The minimum I want to do is review pics and remove them. Perhaps Ill progress to doing some raw edits prior to syncing back to the pc. I do not at any stage want to use the cloud or import pictures 1 by one. Lots of apple apps can see my nas although I have not found an option to download a whole folder or folders. Ive looked at the import from options and they just seem to be missing an import from nas option. Any thoughts/help greatly appreciated.
 -
 Hi everyone. After being part of a conversation with one of the forum members where they expressed a wish to have a start to finish set of tutorials about developing landscapes I thought I'd do something about it. So here it is: https://www.udemy.com/affinity-photo-developing-landscapes/ I've tried to make it different from the other courses I've done. Instead of presenting a range of tools and techniques, I've made the workflow a priority. You get to develop a series of (downloadable) landscape photos and follow a series of steps to get to the finished photo. There are variations with each photo, but the process is similar each time. I've done this for two reasons. The first is that, given this is a workflow based course, it seems only sensible to practice that workflow repeatedly to make sure people get comfortable with it. The other is that I've chosen different kinds of landscape photos to demonstrate the flexibility of the method. I hope it's of some use to you and thanks for your time, Simon
- 16 replies
-
- 4
-
-
- tutorial
- affinity photo
- (and 2 more)
-
Export/save from develop persona
InnerPeace posted a topic in Feedback for Affinity Photo V1 on iPad
I would like to be able to save an image directly from the develop/RAW persona without having to do a roundtrip through the photo persona. This would be especially great if the edits could be saved non-destructively. Some pictures don't need editing with the photo persona, this would definitely speed up my workflow for certain images. -
 Apologies if this has been answered somewhere already, but even Google could not find that answer for me, so here goes... I have created a CMYK document "Print (Press ready)". - Can I place RGB images in the document which will automatically be converted to CMYK on export to PDF? (InDesign workflow) - Or do I need to convert images to CMYK before placing them in the document? (XPress workflow) Many thanks!
 -
I'm aware that the focus of development has not been on essential workflow elements but I seriously beg you to have a look at some of the basic daily work topics for daily work users (it's not features that differentiates AP from PS ... it's workflow!) Taking a closer look at the windows handling: Dragging a window from the docked position to a free floating position leaves the windowns in XXL size instead of adjusting it to the current document size - it's a nightmare! Is there a chance to center the document within an optimised size of the window adapting to the current size of the document (within the current zoom state)? The situation gets even worse since the handles for adjusting the windwsize are active in such a small region that it's extremely hard to resize a window to the desired size. There's probably 2 pixel space that makes the cursor change from horizontal to diagonal and vertical resizing (or simply clicking in an unused space) ... why don't you make handling easier? Why don't you automatically center the document within a given window but leave it to the user to center the document with much effort? I would as well appreciate a button that releases all existing documents from a docked position to a free flaoting position, automatically rezising and cerntering them - what an easy programming task but a big improvement for the users ...if you want to be competitive (you got the features), start with meeting the basic handling requirements! Cheers, Timo
-
 Hello there! This request may sound stupid, because the least thing you'd want to happen when working on a file is being unable to go back to a previous color adjustment/setting. And in that regard, Affinity Photo is a beast! I've files with literally dozens of Adjustment Layers stacked upon each other... UNLESS... you're working on a schedule, being TIME your most relentless enemy when you're hired per hour. Last week I helped on a matte-painting project for a gaming company and (I haven't noticed this workflow issue until then), creating an Adjustment Layer whenever you need to make a quick Levels, Curves, HSL, etc. tweak and keep painting over, can become your worst nightmare when having just 8 hours to deliver 4 on-set paintings. I know you can merge that layer immediately after you've made the adjustment (even with a shortcut), but BELIEVE ME, having to: 1. Create the Adjustment Layer. 2. Nesting it to the specific layer you need to apply the tweak (if not, it affects all layers) 3. Merging it down 4. Repeat for the next one... It's a very tiring set of tasks you need to do, only to make the shadows of a single tree more intense (I.E.), inside a dozens-of-layers scene. Hope this request makes sense, because it's directly related with money and delivery times and will improve A LOT certain type of work pipelines. Cheers, Enrique