Search the Community
Showing results for tags 'vector brush tool'.
Found 8 results
-
 This is what I'm trying to do, that I could do in Serif CraftArtist 2.0 before, and loved: The shown brush is one that CraftArtist uses to produce the effect. While it is a PNG file, there is no transparency in it. It appears that Edge brushes are different from other brushes, and Affinity doesn't support them. I'm going to have work to get the same effect, and I'm willing. But I'm having trouble making that happen, and I could really use some advice. Obviously CraftArtist does some masking under the covers, but I sure can't figure out which algorithm it uses. For example, in Affinity, if you use "Mask to Below," anything opaque reveals the layer below it, and transparency obscures it from view, with semi-transparent colors showing some transparency in the layer below. But if you use "Rasterize to Mask," white reveals the layer below, while black and transparency obscures it from view, with colors showing some transparency in the layer below, depending on their closeness to black. I have no idea what CraftArtist does, but this brush image won't do for Affinity, so I filled the bottom white pixels with black. My plan is to create the Smudge brush and outline a black rectangle with it, white to the outside, then apply an Invert adjustment to get a white shape with black around the outside. To keep things simple, it will be for the "Rasterize to Mask" algorithm. And I've tried, but I ran into so many problems. Here's my story: I pulled up Affinity Designer Version 2.1, made a pure black rectangle with a pure black stroke. Then tried to build the brush. I didn't know which brush to build -- textured intensity or textured image. Both take a single image as their basis, using the "repeat" method. So I built and tried both. Here's what the textured intensity brush looked like, at 24 pt, aligned to the center of the line, with the rectangle behind the line: It's not bad, but the fine transparency that should be inside the rectangle is covered up. I proceeded anyway, and added the Invert adjustment, and got: I really expected a white center with a black outline. Nope. So I tried the textured image brush instead and got: And the brush is upside down! After I while, I figured out I could select the middle top handled and pull it down past the bottom edge of the rectangle (which is a really weird thing to do) and I got this: This not only puts the brush in the right position, but also gives back transparency over the rectangle, although there appears to be a line where the brush starts. Obviously, the brush image is not made with pure black. Not only that, but the brush doesn't look like it's held it shape well -- either squashed horizontally, or stretched vertically. So I inverted it, anyway, and it looked like: Not even close to what I expected. WHY IS THIS? What am I doing wrong, and is there a better way to do this? Thanks!
-
 Is there any way of constraining the Vector Brush tool so the brush stroke is a straight line (similar to holding down the shift key when using the pen tool)?. I can obviously delete intermediate nodes after using the brush, but that seems a bit clunky.
 -
 This did not happen before, but now every time I finish drawing a line (black) with the Vector Pen Tool and my Tablet, I go to fill the new shape (Red). When I click the Vector Pen Tool, the stroke is now RED instead of black, forcing me to constantly switch back to black. This is the first time I've seen the color change based off of whatever color I used to fill a shape. Does anyone know how to keep the black as default and stop changing?
 -
 I want to know how Affinity Designer decides what the stroke weight of strokes for shape tools should be when applying a textured intensity brush as the stroke with the Brushes panel/studio. In the default set of textured intensity brushes in the Brushes panel/studio, "Classic Pencil HB" from the "Pencils" category (the one that appears at the top of the list for me) has a default brush width of 128. If I select the Vector Brush Tool and then the Classic Pencil HB in the Brushes panel, the "Width:" value in the Context Toolbar says "128 px". However, when I actually draw a curve with the Vector Brush Tool and select the curve with the Move Tool or the Node Tool, the stroke width for that curve says "64 pt"—exactly half. Why isn't it 128 px, like Classic Pencil HB says in the Brushes panel? Likewise, when I create a shape using one of the shape tools, like the Rectangle Tool, and then apply Classic Pencil HB as the stroke, it's also 64 pt. Is this somehow related to the DPI value in the "Document Setup…" dialog box? If so, what is the relationship—how do the mechanics of this work? There appears to be some relationship between pt, px, and DPI that I don't understand.
 -
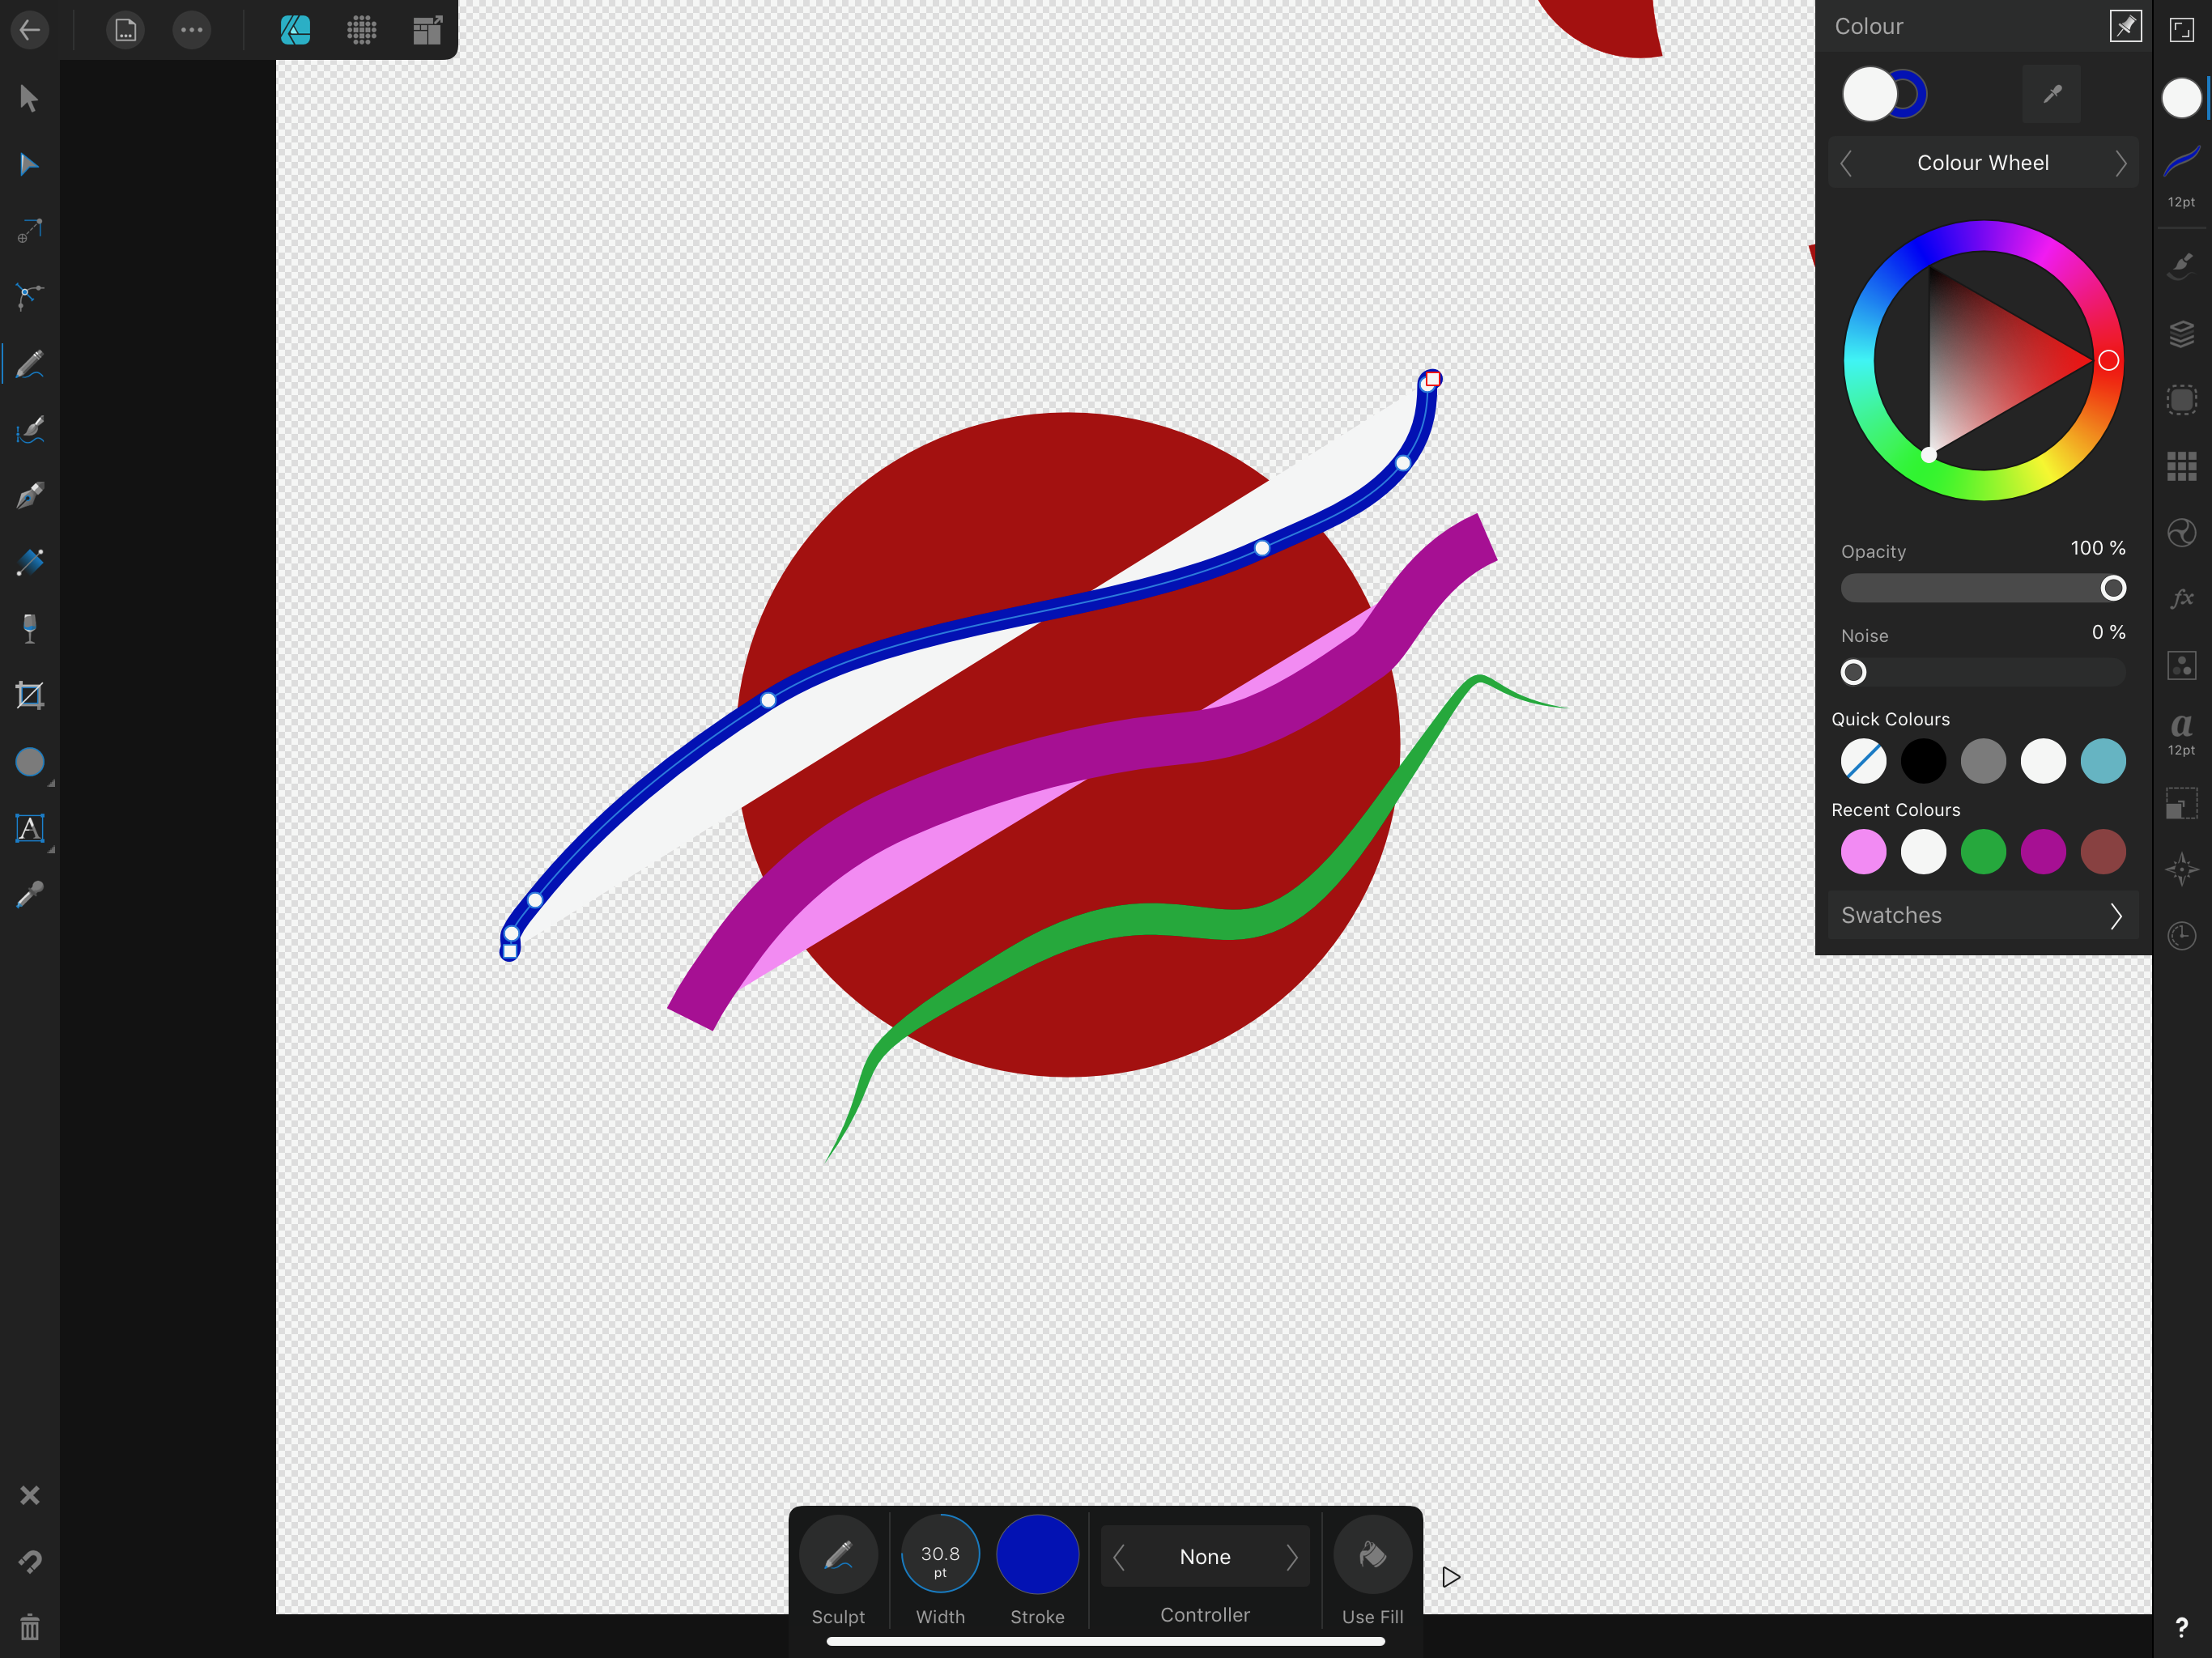
 Hi - I'm sorry if this is just me not really knowing how vector engines work, but I've run into a problem with a project I'm working on. So, what I'm trying to do is use the boolean operations to cut out a section of a shape with a vector brush tool/ pencil tool/ pen tool. However, what's being cut out of the shape is the "fill" of the brush shape. So, if you draw a curve and set its fill to a colour, it will "fill in" from the curve's starting point to endpoint. And that is not what I'm trying to do. I just want to cut out the shape of the actual brushstroke. Is this possible or am I just going about it the wrong way? I've attached a simplified image that basically visualises what I've written so you might be able to better understand what I'm trying to do and formulate. *edit: so the blue and purple line illustrates what's happening while the green line is the thing I actually want to cut out. If possible, the ideal scenario would be that the green that is within the red circle would be cut out or would become its own shape while leaving the outside parts unchanged. Best, fjdb
-
 I'm combining vector shapes and vector brushes, both colored with the same spot color. After the export to PDF, the spot color is preserved in vector shapes with fills and basic strokes only. Vector brushes with textured strokes are still translated in to CMYK colors. Is this bug or missing feature?
 -
This is probably a daft question and maybe I’ve changed something that is doing this.?? when I’m using the vector paint brush, whether I use my finger or pencil, the paint mark doesn’t start immediately and there is a line that seems to trail between the pen tip and the start of the paint line. It’s like the paint line is being dragged by a piece of string! I’ve attached an example.... 72E38397-A6C9-4AC0-BC07-16FE275ABDD0.MP4
-
 Hi, when drawing with the vector brush or pencil tool, I sometimes get wired endings (when drawing long lines crossing itself several times and “pressure-controller”). The ending changes when choosing a different ending, but never disappears - only if i move certain points. Is it a bug or is it just me being stupid? EDIT: Added the .afdesign file. 896AF28E-14B6-4981-856E-8373A642B2CD.MOV copy.afdesign