Search the Community
Showing results for tags 'tutorial'.
-
 All have started with this tutorial Non-Destructive Dodge & Burn. When I tried to use it I found that I don't have same effect as real dodge & burn tool. Then I asked this question in Forum, and got some ideas. But still wasn't happy. I decided to figure it out and followed next steps in my investigation: dodge&burn simulation.afphoto - I prepared stepped gradient. - Copied it and applied dodge and burn tools with different tonal ranges (highlights, midtones, shadows) and different opacity and hardness (100% and 50%). - Above original gradient I created new 50%-grey layer with Overlay blend mode. - Draw with white (for dodge) and black (for burn) brush with same opacity and hardness preferences. - Edit Blend options for this new later to get same result as appropriate dodge and burn And here are results that I have: Dodge Highlights. Dodge midtones Dodge shadows (yes, shadows are very similar to midtones). Burn highlights This can't be simulated with "Overlay" blend mode, because in overlay white always states whites, but with burn highlights white becomes grey. I tried over blend modes, but without success. Very hard to simulate. Burn midtones I didn't have exactly match. But very close. I don't think you will notice a difference in real work. Burn shadows I also attach Affinity Photo file with my experiments, so anybody may try. Here are some shortcuts used to name layers: - d - dodge - ds - dodge simulation - b - burn - bs - burn simulation - h - highlights - m - midtones - s - shadows - o-100% - opacity 100% - h-100% - hardness 100% dodge&burn simulation.afphoto Conclusions: using non-destuctive dodge&burn with Overlay blend mode may be pretty tricky. I hope developers will make native non-destructive dodge-burn tool. Something like healing tool with option "Current and bellow".
 -
 Hi Everyone, I've just put up a tutorial on YouTube - https://www.youtube.com/watch?v=MagvUcQoiiE&feature=youtu.be which is all about creating the bleach bypass effect you see all over the place these days. I show you the effect along with describing potential problems & what to do about them. This video is part of a greater series of tutorials from the course I'm working on at the moment which will be called 'Affinity Photo: The Little Box of tricks' and has been designed to sit directly with and follow on from one of my other courses, 'Affinity Photo: Solid Foundations'. The latter course is aimed at beginners, the one I'm working on now builds on those foundations and will give you plenty of creative ways to send your images off in all manner of new directions.
 -
Hi all, I've just released the next course for Affinity Photo. This one is all about using the Develop Persona to develop Raw files. You can view the course here - https://www.udemy.com/affinity-photo-raw-image-development/or you can watch a video about the course here - https://www.youtube.com/watch?v=8vqOTtmo11g . The course is over 3 & a half hours and is focused on the Develop Persona and Raw files. I created it with the course 'Affinity Photo: Solid Foundations' (also at udemy.com) in mind so that the two of the act together. I explain what a Raw file is, the advantages (and disadvantages) of Raw files over jpegs, and I go through the tabs and tools to give a thorough grounding in Raw file enhancement. As well as the theory and tool demonstrations I also take 10 Raw files and develop them so you can see the development process repeatedly. You get the same 10 Raw files as downloads to experiment with. Hope it proves useful to someone, Drippy Cat Hang on! - go here - https://www.udemy.com/affinity-photo-raw-image-development/?couponCode=AffinityRawPromoor enter ' AffinityRawPromo' (no quotes) to get a discount off the regular price until the end of May 2016!
-
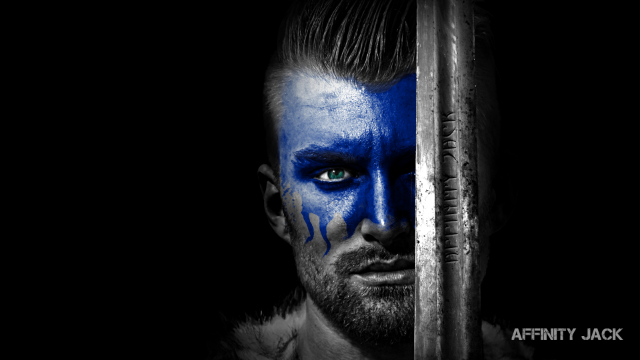
 Hi, in diesem Affinity Photo Tutorial zeige ich wie man den Stil vom Kino Poster Warcraft erstellt. Das Kino Poster vom Film Warcraft inspirierte mich dazu, den Effekt zu versuchen. Es stecken ein bisschen Cinematic Effekt, Dragan Effekt und Color Splash Effekt darin. Die wesentlichen Arbeitsmittel sind hier die Anpassungsebenen, Blendmodes und Masken. Besonders alles, was die Kontraste erhöht, die Verlaufsumsetzung und Dodge & Burn. Viel Spaß In this Affinity Photo Tutorial, I show you how to create the style of the movie poster Warcraft. Die cinema poster of Warcraft inspired me to try this effect. There is a little bit of cinematic effect, Dragan effect and color splash effect in it. The main methods are adjustment layers, blendmodes and masks. Particularly all what increases the contrasts, the gradient map and dodge and burn. Have fun. Ciao Jack Video Tutorial auf YouTube
- 4 replies
-
- 3
-

-
- Affinity Photo
- Tutorial
- (and 6 more)
-
 Good morning everyone! It is Tuesday and I have another video tutorial for you! Since so many of you asked for it I decided I needed to show you how to do it yourself. Today, I will be sharing with you my technique for creating your very own smoke brush. Also I have a big announcement that I am super excited about. Make sure you watch the video all the way until the end! I have thought about doing this for along time and I hope these videos help! I would love to see how you use the information I give you in your own work! Please post your work in this thread so I can see how my videos have helped you! Thank you all for your really inspiring comments, works and Ideas! Those of you who have taken the time to reached out to me I like to say thankyou, I really appreciate your kind words and support it proves to me that it worth it! Click here to view the course Smoke brush 3 demo.afbrushes.zip
 -
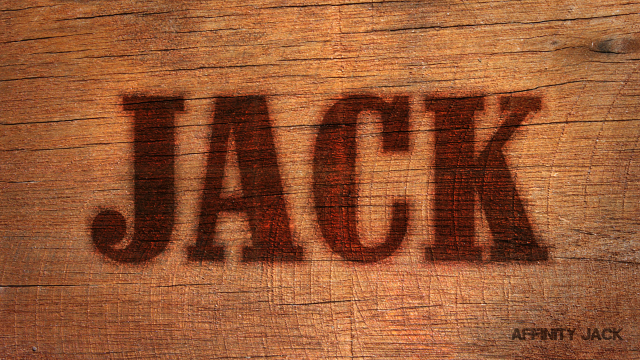
Hi, In diesem Affinity Photo Tutorial zeige ich wie man den Burn Wood Text Effekt erstellt. Oder zu deutsch den eingebrannten Holz Text Effekt. Es soll so wirken als wenn der Text mit einem Brandeisen in das Holz gebrannt wurde. Das bedeutet, dass der Text dunkler sein muss, besonders an den Rändern. Er braucht eine leichte Prägung. Die wesentlichen Arbeitsmittel sind hier die Ebeneneffekte, Blendmodes und Masken. In this Affinity Photo Tutorial, I show you how to create the Burn Wood Text Effect. It should seem like a hot iron burned the text into wood. The main methods are layer styles, blendmodes and masks. Have fun Ciao Jack YouTube Video: Burned Wood Text Effekt (English Subtitles)
- 2 replies
-
- 2
-
-
- Affinity Photo
- Tutorial
- (and 4 more)
-
Hi, In diesem Affinity Photo Tutorial zeige ich wie man den Gras-Text-Effekt erstellt. Ein Klassiker, den man immer wieder sieht. Er ist schnell und einfach zu machen. Passt zum Frühling. In this Affinity Photo Tutorial, I show you how to create the Grass-Text-Effect. Classical, and to find everywhere. It is fast and easy to produce, even in spring. Ciao Jack YouTube Tutorial: Gras Text Effekt
- 4 replies
-
- 6
-
-
- Affinity Photo
- Tutorial
- (and 5 more)
-
Hi, in diesem Affinity Photo Tutorial zeige ich wie man einer Landschaft einen dramatischen schwarz/weiß Look verpasst. Dazu gehört die Arbeit in den Farbkanälen und auch dodge & burn. Viel Spaß Euer Jack In this Affinity Photo Tutorial, I show you how to create a dramatic look of a black and white landscape. I work with channels and dodge & burn. Have fun with this Your Jack YouTube-Tutorial
-
- 2
-
-
- Affinity Photo
- Tutorial
- (and 3 more)
-
 Hey all, Take a look at this,.. In this tutorial we look at using a really cool app called Lingo to organise and store your assets, - icons, logo's illustrations, photos etc and how it works seamlessly with the Affinity Apps. Organising your assets -Tutorial Don't forget to click subscribe to stay up to date... Allan
 -
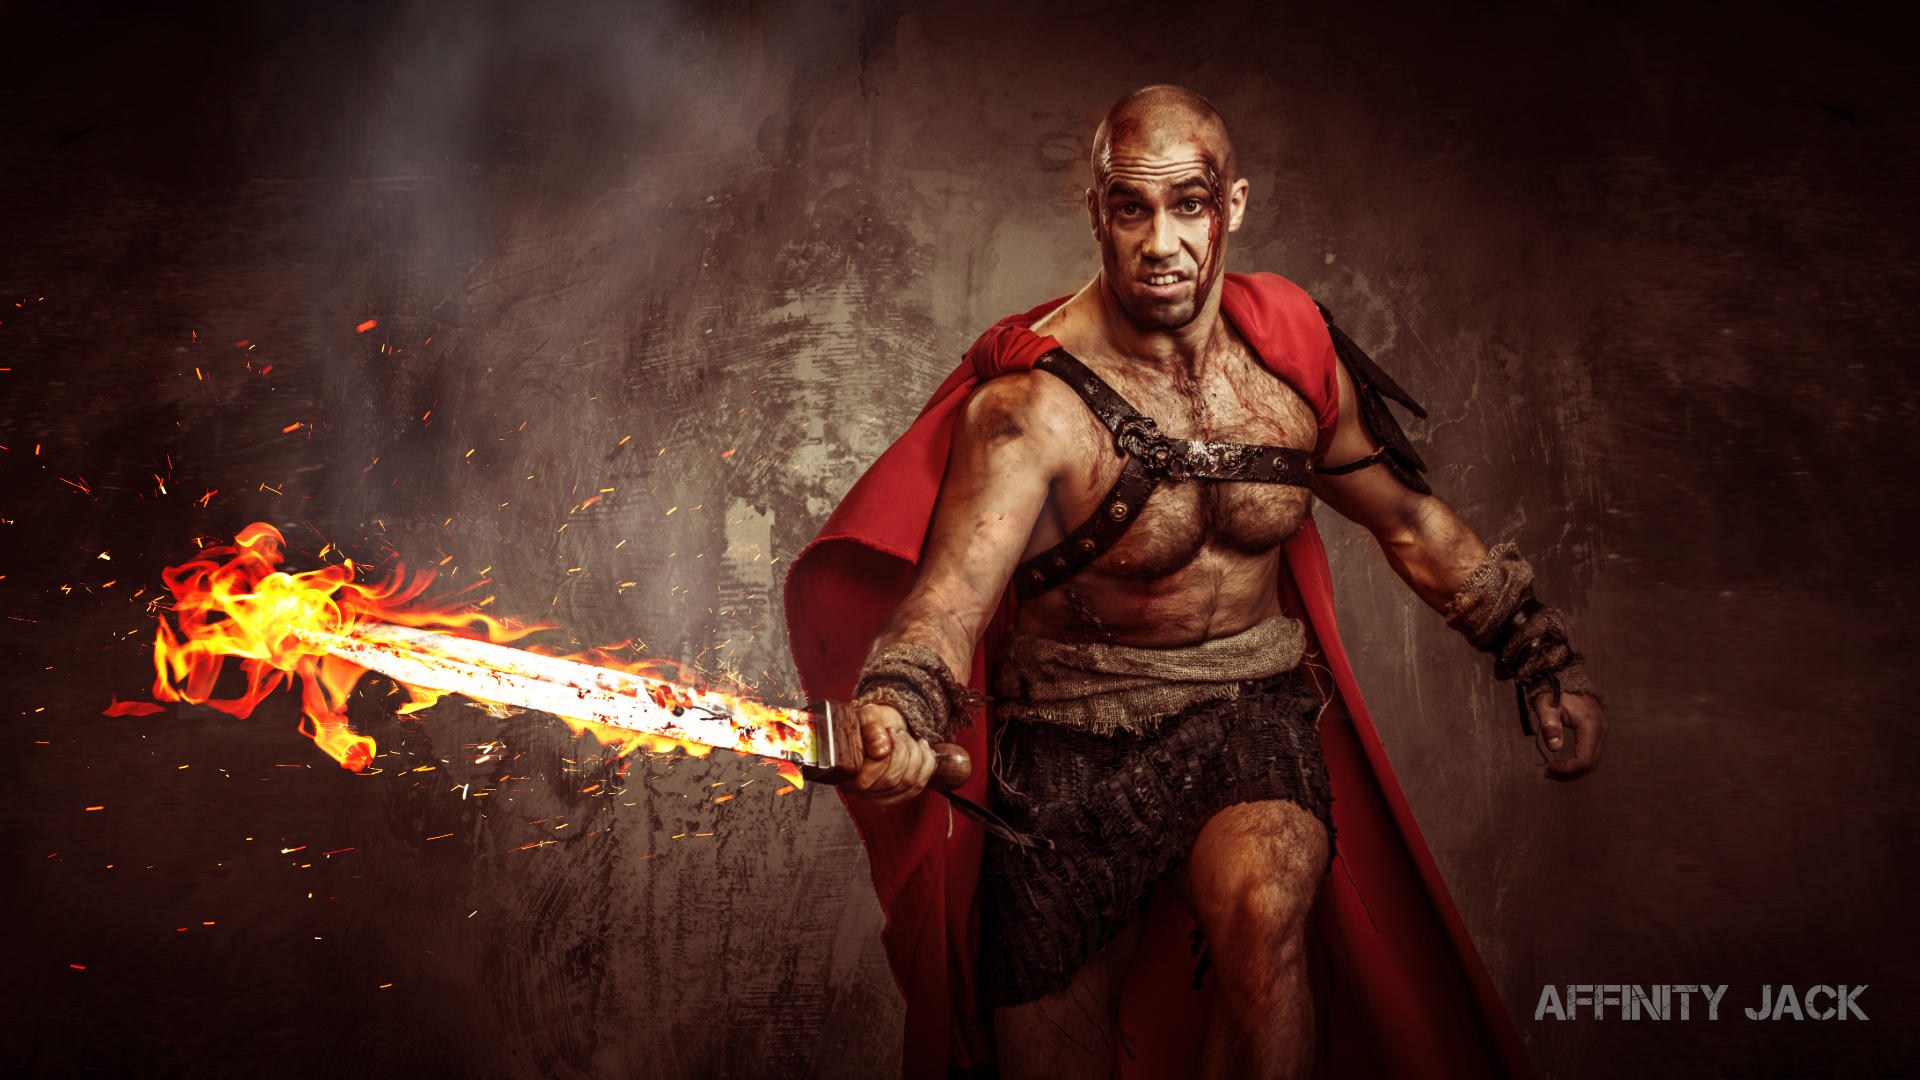
Hi, In diesem Affinity Photo Tutorial zeige ich wie man einer Szene einen feurigen Look verpasst. Dazu werden Flammen hinzugefügt, Rauch und ein roter Lichtschein erstellt. In this Affinity Photo Tutorial, I show you how to create a fiery scene. Therefore I add flames, smoke and a red glow. Ciao Jack YouTube Tutorial
- 2 replies
-
- 3
-
-
- Affinity Photo
- Tutorial
- (and 3 more)
-
 I am using Magic Trackpad. But you can not really use the trackpads pressure functionality. For that, I I followed exactly https://vimeo.com/111534016, but if I try to modify stroke width as shown in video, I can drag the points and lines in the pressure profile as I want to: absolutely nothing happens to my line... Would really appreciate any help... Cheers, Roland
 -
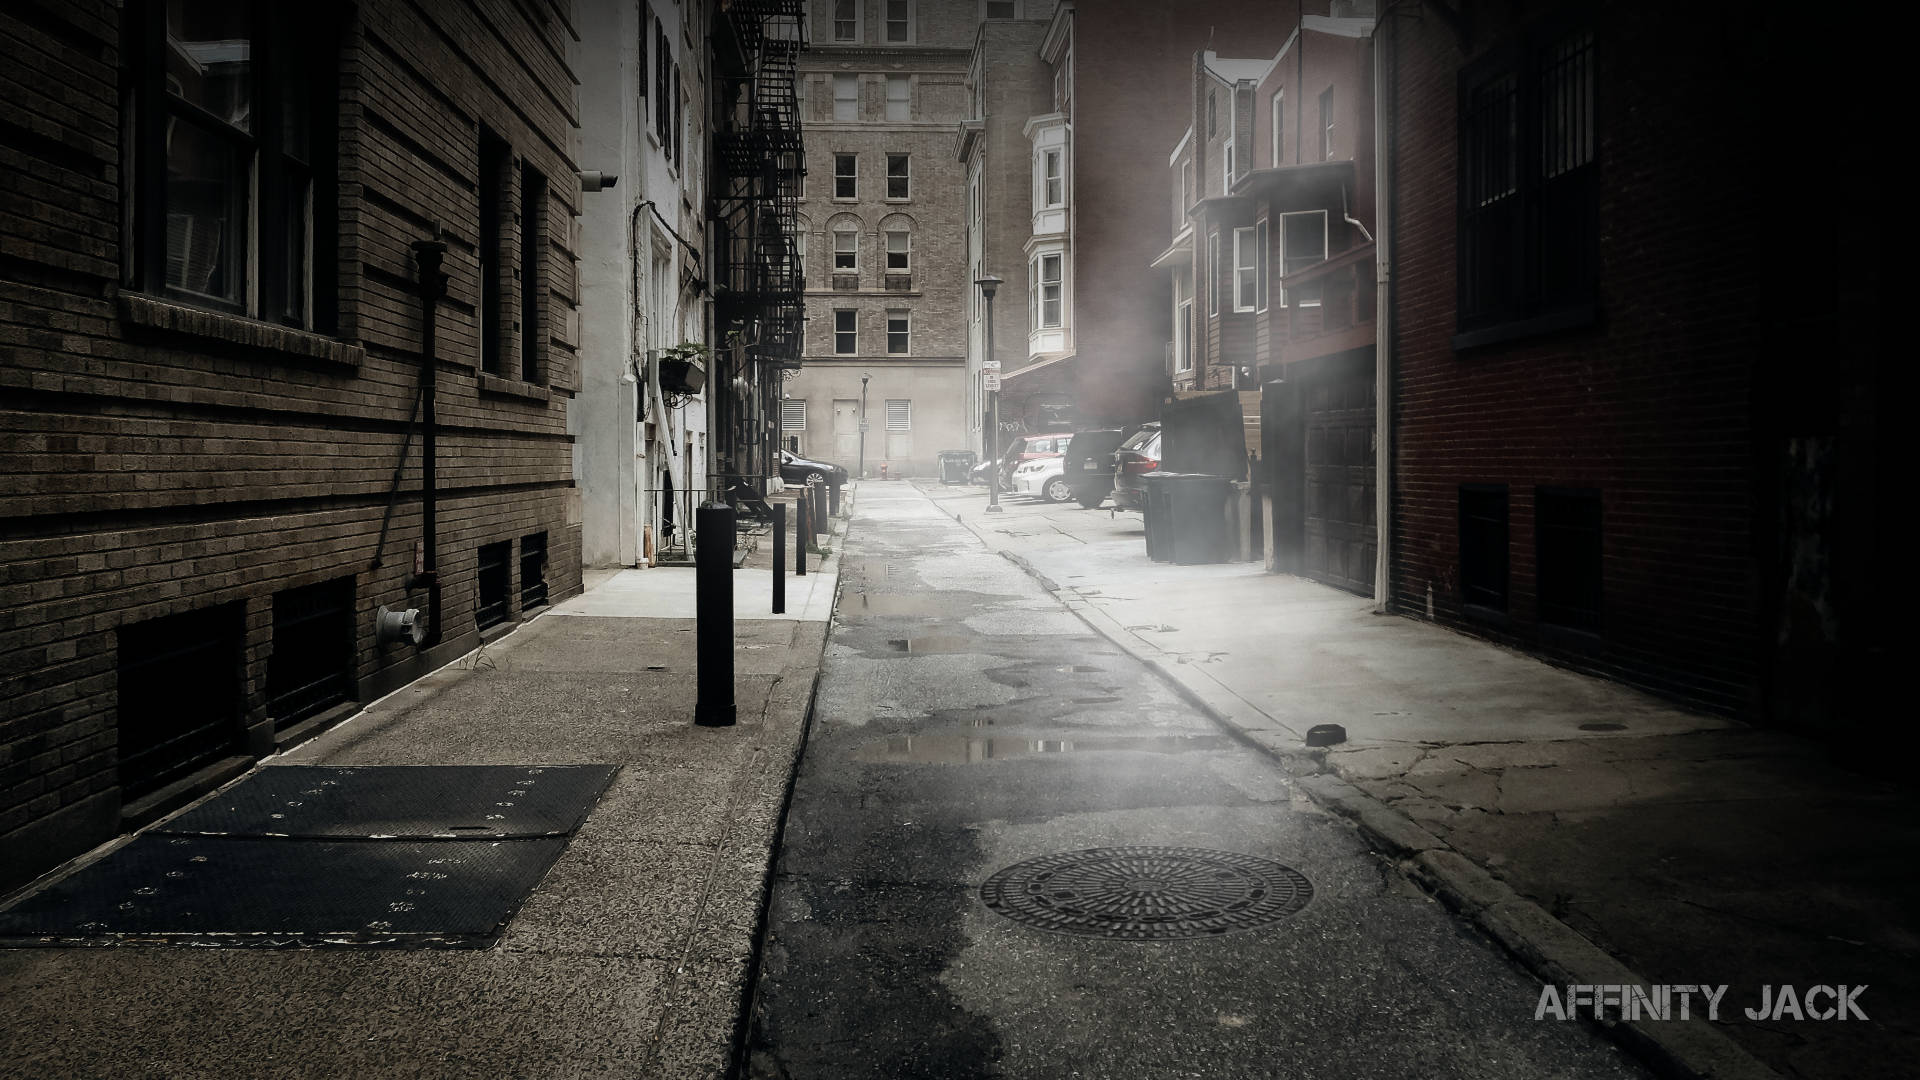
Hi, in diesem Affinity Photo Tutorial zeige ich einen dampfenden Gully-Deckel in einer dunklen Straße. Dabei wird Dampf erstellt. Die Methode bei Rauch wäre aber die gleiche. Es gibt viele Anwendungsmöglichkeiten, ganz nach Geschmack. Ich wünsche Euch viel Spaß. Ihr könnt mir Eure Ergebnisse und Ideen gerne posten. Ciao Jack Hi, in this Affinity Photo Tutorial, I show you a steaming manhole cover in a dark street. I create steam, but the method for smoke would be the same.. There are many possibilities for the application, like you want. I wish you fun. You can post your results and ideas. Ciao Jack YouTube-Tutorial: Dampf / Rauch - steam / smoke https://youtu.be/lzHKy2TFhhM
-
- 2
-
-
- Affinity Photo
- Tutorial
- (and 5 more)
-
Hey, Another one from Affinity TV. A quick look at using the blemish removal tool to remove spots. How to remove spots Enjoy.
-
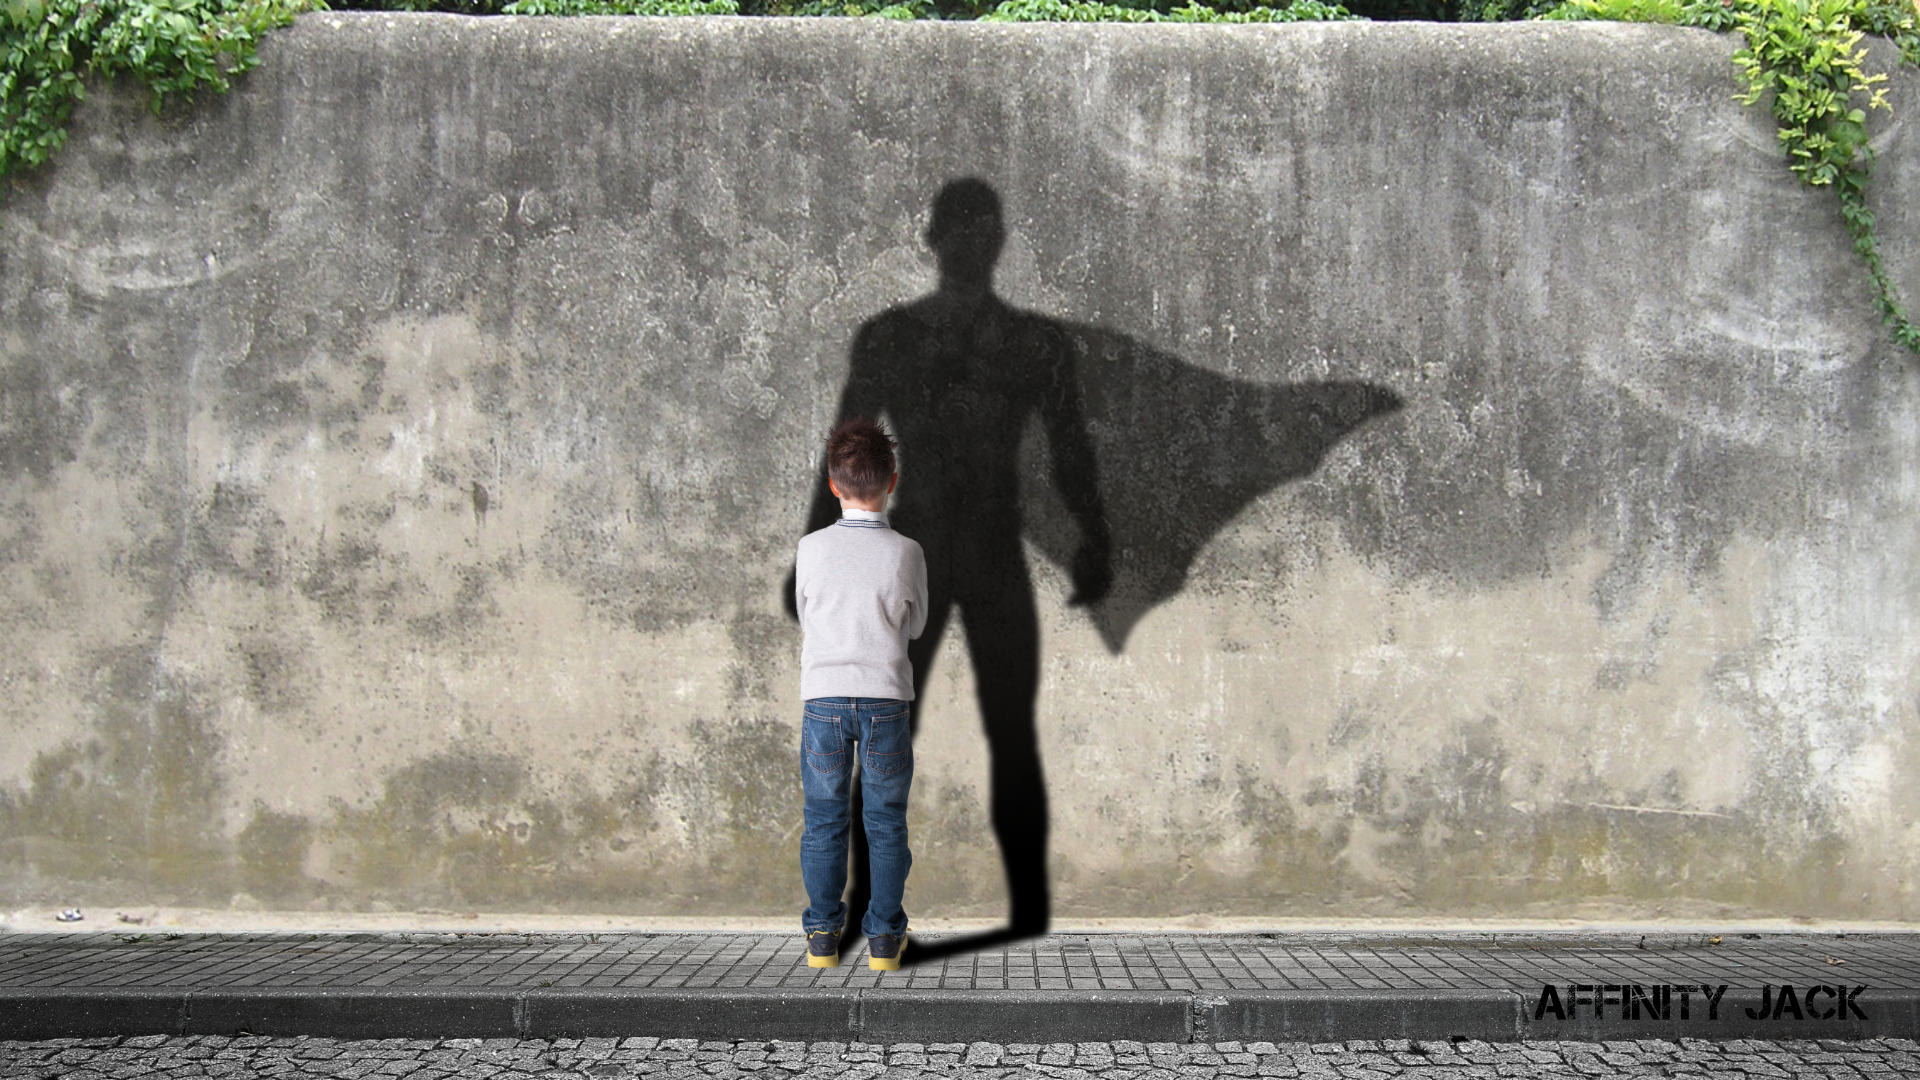
Hi, in diesem Affinity Photo Tutorial zeige ich wie man Schatten erstellt. Es geht um 3 Arten von Schatten: Schlagschatten, gemalter Schatten und realistischer Schatten auf dem Körper. Das ist meine Idee „Traum ein Superheld zu sein“. Viel Spaß Ciao Jack Hi, In this Affinity Photo Tutorial, I show you how to create shadows. Here, there are 3 kinds of shadows: drop shadow, drawn shadow and a realistic shadow on the body. This is my idea of „dreaming of being a super hero“. Ciao Jack YouTube: Schatten (English Subtitles)
- 4 replies
-
- 6
-
-
- Affinity Photo
- Tutorial
- (and 3 more)
-
Hi, In diesem Affinity Photo Tutorial zeige ich wie man den „double exposure“ Effekt erstellt. Wichtig dabei sind das Auswählen, Freistellen, die Schnittmaske und das Maskieren. Es gibt zahlreiche kreative Möglichkeiten zur Double Exposure. Ich habe mir hier eine Variante „Inky Woman“ ausgedacht. Viel Spaß dabei Jack Hi, In this Affinity Photo Tutorial, I show you how to create a double exposure effect. Important are selection, masking and clipping mask. There are many creative possibilities. And the „inky woman“ is my idea. Have fun Jack YouTube Video https://youtu.be/SI4gQ99TG_I
- 3 replies
-
- 4
-
-
- Affinity Photo
- Tutorial
- (and 4 more)
-
Hey, This week Affinity TV takes a quick look at personas in Affinity Photo and answers the question what are they? What are Personas? Allan
-
Hi all, If you haven't already go and check out this list of tutorials from Affinity TV to enhance your skills and knowledge of Affinity Photo & Designer and take them to the next level. Don't forget to subscribe to stay up to date. AFFINITY DESIGNER TUTORIALS 1. How to create album artwork 2. Create slides for Keynote/Powerpoint 3. Create artwork on your phone & edit in Affinity 4. Web Design & Prototype 5. Create a business card 6. Create an email signature 7. Create a logo & animate using Motion & Final Cut (In this we create something similar to a Google advert) AFFINITY PHOTO TUTORIALS 1. How to swap out a face 2. Select & change the colour of a car 3. Using mockups 4. Compositing images 5. How to place a logo in perspective Allan
-
I wanted to try giving a recent photo a vintage look. I had watched a photoshop tutorial at phlearn.com: phlearn.com/create-vintage-photo-photoshop (you can download the distressed papers from that tutorial). I wanted to try to do something similar with Affinity photo. I thought I would share my process for others: A quick note: —I should have mentioned that all my adjustments are below the gradient map so that the map colors all the adjustments (border, spots & textures, etc). —at about 5:50 in the video I select an irregular brush: you find those irregular brushes by choosing the "Texture" option from the drop-down menu in the brushes palette. Thanks for watching.
-
 Hier eine kleine Bildschirmaufnahme wie man z.B. bei einem Logo (PNG Datei mit transparentem Hintergrund) einen Glitch/3D Split Effekt macht. Habe unnötige bzw. falsche Schritte nicht rausgeschnitten. Erklärungen gibt es nicht, die Bildschirmaufnahme ist aussagekräftig genug. Here is a short tutorial for a Glitch / 3D Split Effect for Affinity Photo. I show this with a PNG File with transparent Background. There are no explanations, you get the point by viewing. Further didn't i cut out unnecessary or false steps. Grüße, Best regards, Ben. https://youtu.be/0i9WOd2KzK0
-
 Sharpening with an edge mask 1. This is a portrait after RAW conversion with standard sharpening applied to eliminate anti-aliasing from the sensor. The image is sharp, but not tack sharp. I will improve on this by using a sharpen filter in Affinity Photo. The problem is, that the effect is applied globally to the entire photo. Smooth gradients, like the skin will be affected also and in most cases this is not desireable. Therefore, I will show you a way to create an edge mask, which allows to only sharpen the edges and leave the gradient portions of an image intact.
-
 I'm new and using the video tutorials. In the first video, there is a menu bar underneath the Pan bar that has tabs labeled 01-Levels, 02-Black and White, etc. I've tried to match my Affinity screen to all the settings in the video, but I'm not seeing that menu bar. Since the tutorial uses those tabs, I'm stuck. Anyone know the problem? My screenshot is attached. Affinity.tiff
 -
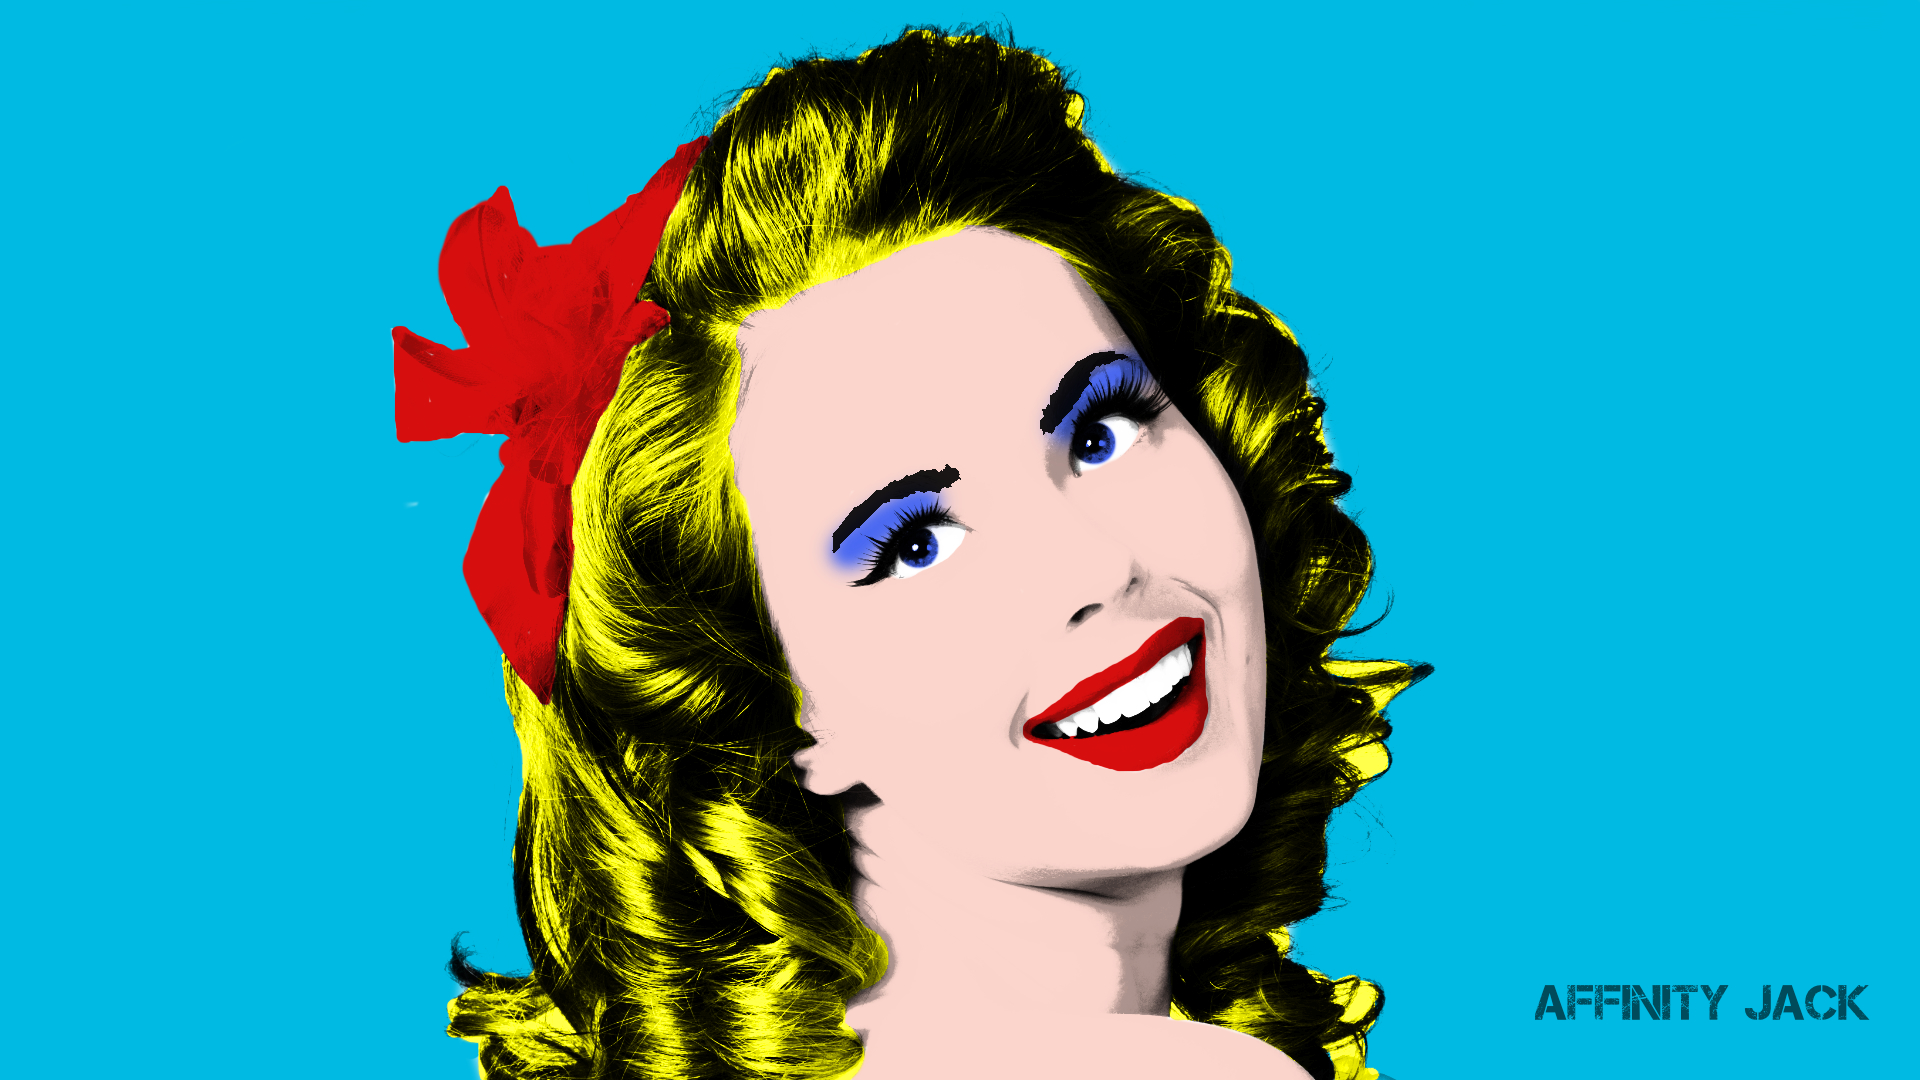
Hi, in diesem Affinity Photo Tutorial zeige ich wie man den Pop Art Effekt erstellt. Er wurde in den 60ern von Andy Warhol erfunden und damals analog durch Entwicklung und Druckprozessen erstellt. Es gab ja kein Photoshop. Heute zeige ich wie man es mit der Software machen kann. Es gibt viele Gestaltungsvarianten, ganz nach Geschmack. Viel Spaß Euer Jack In this Affinity Photo Tutorial, I show you how to create the Pop Art Effect. It was an invention of Andy Warhol who created this with analog techniques like development and print processing, because there was no Photoshop. Today I show how to create this effect with software. There are many variations, like you want. Have fun Jack benutzte Farben/used colors: Hintergrund/background: blau/blue, #00bae3 Haut/skin: rosa/rose, #fbd5cc Lippen & Schleife/lips & hairband: rot/red, #d80e0e Augen & Schminke/eyes & makeup: blau/blue, #4566f3 Haare/hair: gelb/yellow, #ffff4d YouTube-Video https://youtu.be/wF2O1Z1Rpf4
- 3 replies
-
- 1
-
-
- Affinity Photo
- Video
- (and 5 more)
-
In this tutorial we look at a family portrait and how to swap out the face of one of the kids who doesn't look to happy. Enjoy... How to swap out a face Allan
-
 Hi everyone :) I am a relatively new photographer who has been at it for the past 3 months now and I am enjoying my new venture. I purchased the Affinity software as I would now like to try retouching photos. I found that I enjoy portraiture very much and I would like to learn how to retouch portraits. However, I've searched high and low to look for basic tutorials in retouching portraiture and I could only mostly find pointers on how to do so in Photoshop. May I ask if anyone could give any pointers in diving into the use of Affinity for this? (So far I know how to do the basic adjustments and how to use the blemish brush lol) Thanks much! :)
 -
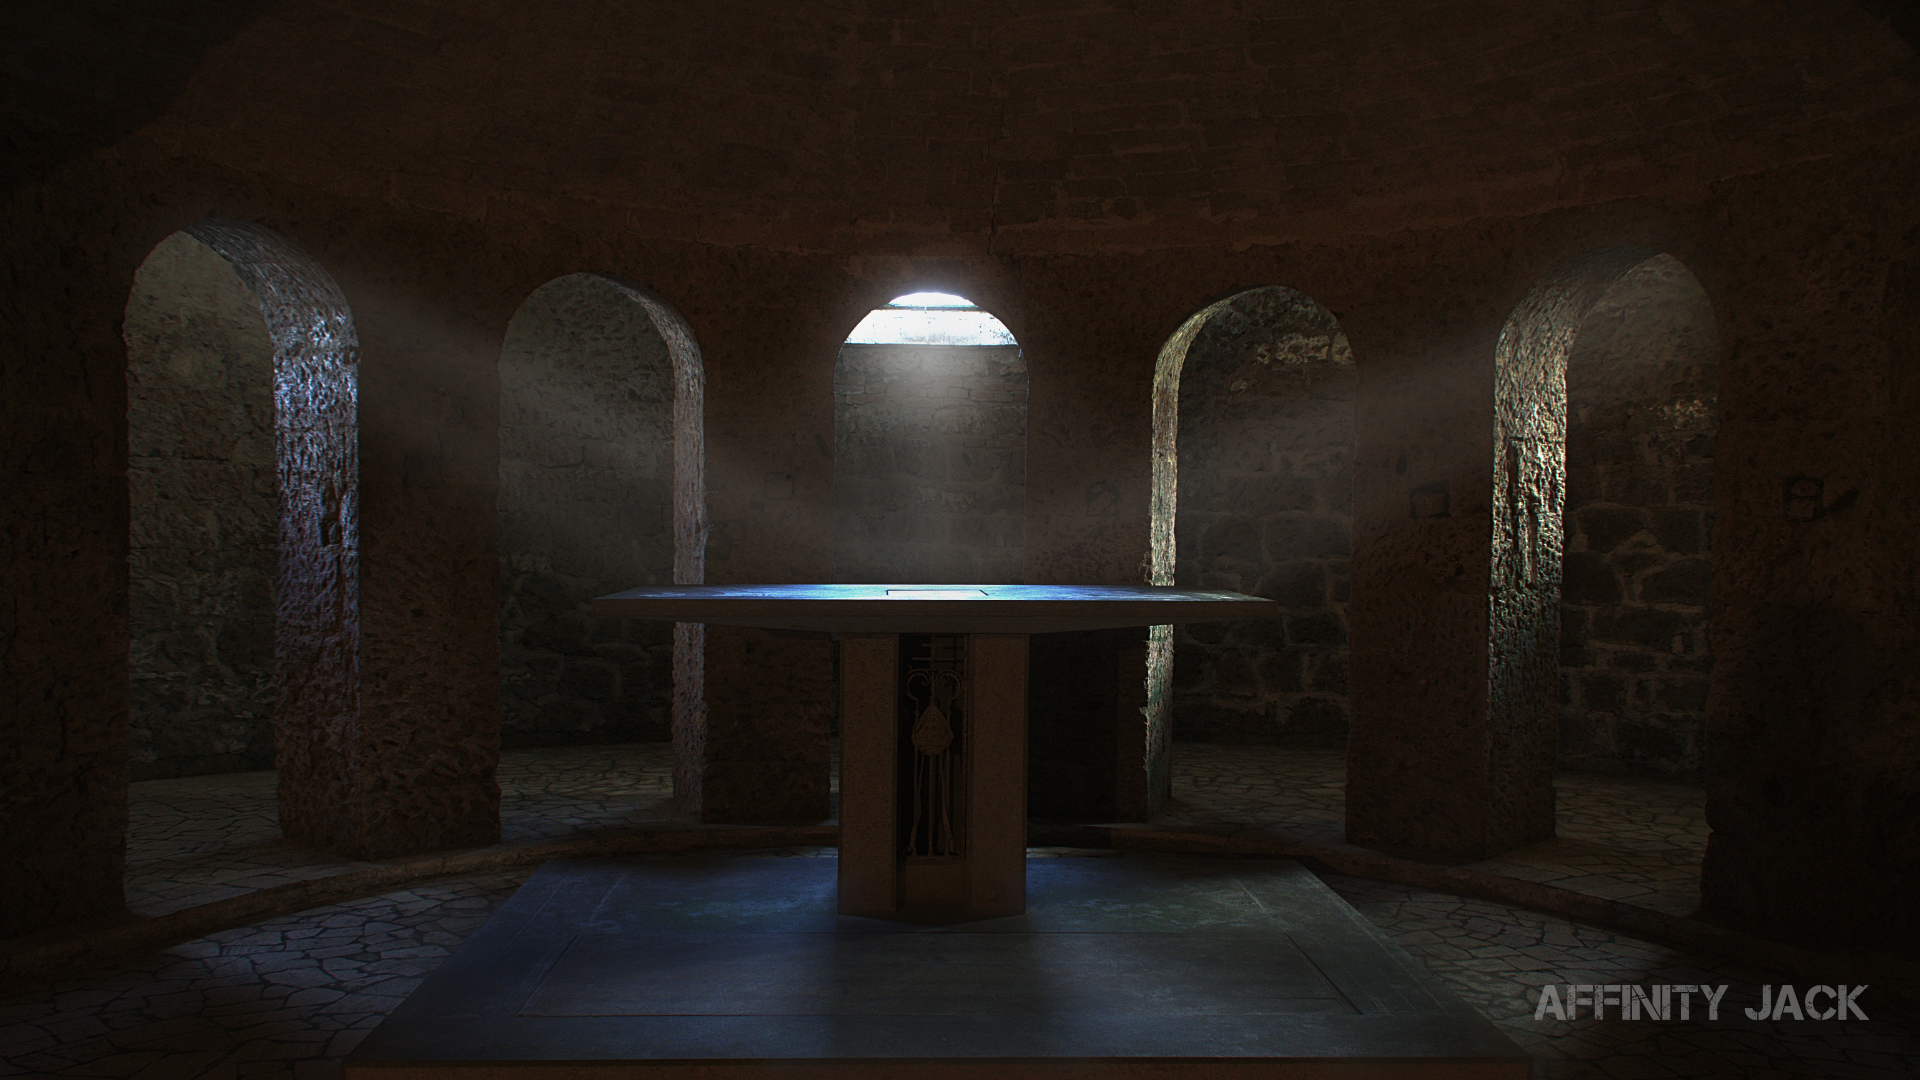
Hallo, In diesem Affinity Photo Tutorial zeige ich wie man Lichtstrahlen und Schatten erstellt. Man kann das mit einfachen Schritten in jedem Bild machen. Mit dem Zeichenstift, ein paar Ebenen und Filtern. Viel Spaß, ich bin auf Eure Projekte gespannt. In this Affinity Photo Tutorial, I show you how to create a light beams and shadows. You can create this in a few simple steps in every photo. With the pen tool, some layers an filters. Have fun, I'm curious to see your projects. Ciao Jack https://www.youtube.com/watch?v=XDeTPbc4F8U
-
- 2
-
-
- Affinity Photo
- Tutorial
- (and 6 more)