Search the Community
Showing results for tags 'transparent'.
-
 Hi there, So I would like to change this barcode so that the black bars and numbers are transparent, while keeping the surrounding white as is. I'm not sure how to do this with it being a flat image (not already broken up into separate layers)--can anyone help?
-
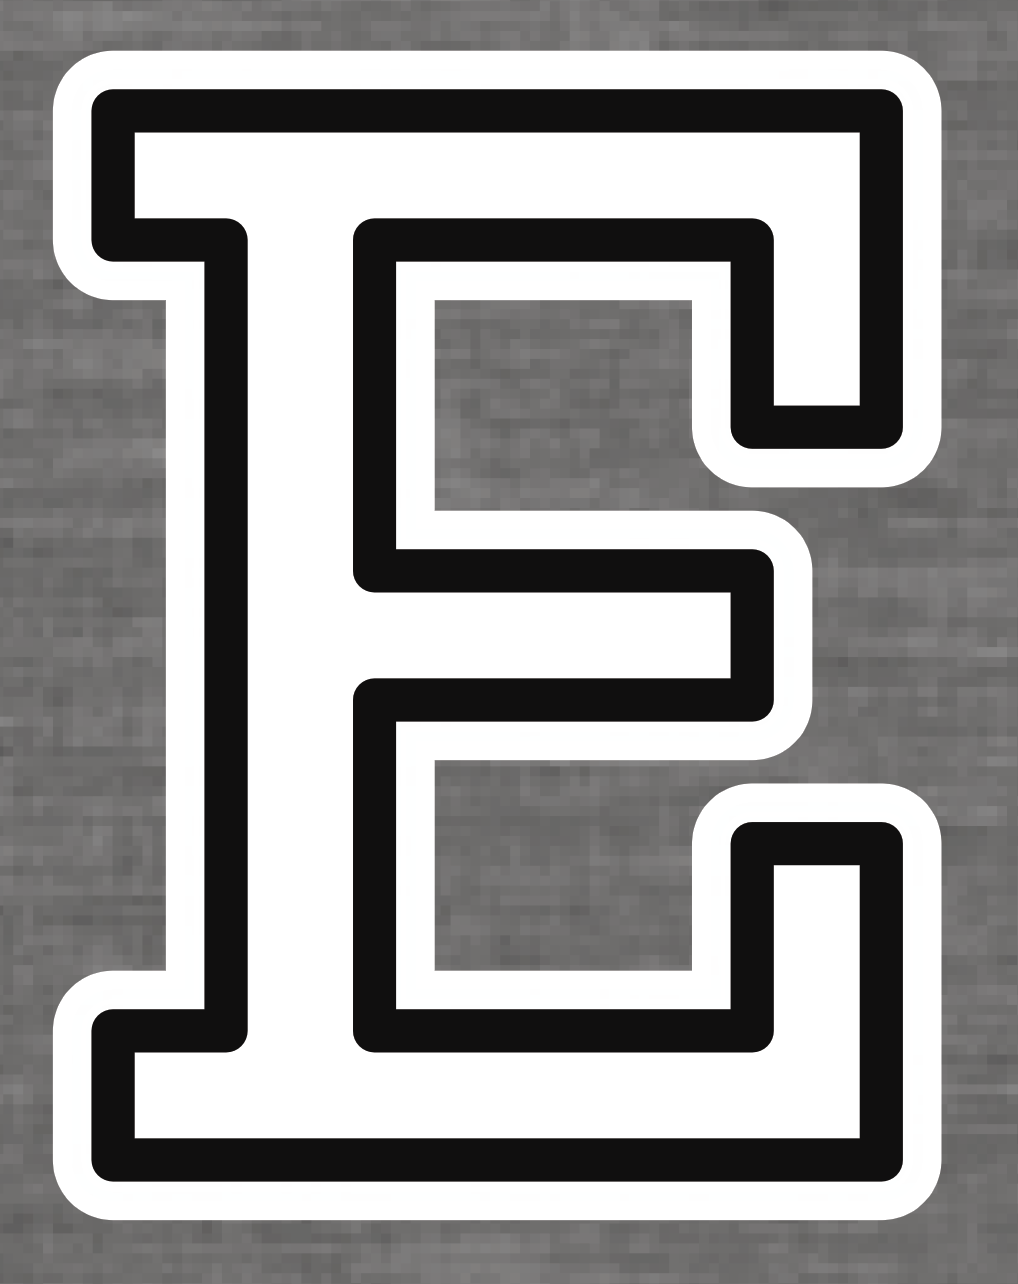
 I’m designing a University Style Logo in Affinity Designer, and am using the font you can see in the photos. I’m using a white fill, black stroke and white fx outline. I’m trying to make it so that the black stroke is essentially 100% transparent, so that the stroke takes the colour of the fabric it is printed on. I’ve scoured the internet for how to do this but found no answers. I’ve tried converting to curves and subtracting the black stroke from the white letter behind and nothing. Any help would be tremendous. Thank you.
-
So, whenever I try to add a transparent image to my canvas on affinity designer the background on the image turns from transparent to black? How do I make it transparent? am I doing something wrong?
-
 In the adjustments>HSL adjust please add a transparent adjust because we may want to make a color transparent... example we may want to make for example just all the purples transparent. (our job can be done ways faster if we choose the purple or if we set the color area in the HSL color range and then turn it transparent) thanks!
 -
 Hi everyone! I want to know how I can export to EPS format (to impression) with transparent background. I have a image (with (Pixel) type in the Layers panel, not (Image) type). This layer have a mask. But when I export to EPS format, the mask doesn't work. I did the same thing into Photoshop, export to EPS and import into Affinity Photo to see what's happened. The only difference that I can see is that the image have (Image) type and not (Pixel) type. I don't know if it is the key, but if it is, I don't know how I can change the type of the layer (Pixel to Image). Someone can help me? PS By the way, I'm a French guy, so I'm sorry for my english (correct me if you want, I learn)
 -
 In my workflow, I often have to take an image that I've created in another program (a 3D program). I set the background color there to be distinct from the object I want so that I can select it and make it transparent. In AD, the process (the best one I could find) is the switch to Pixel, Rasterize, then Select -> Select Sampled Colors. When I select the background color, the marquee does indeed seem to properly select the object. Unfortunately, it doesn't really work this way. If I cut (intending to cut out the background) color is lost from the object as well. If I invert selection and cut (intending to cut the object for use elsewhere in AD) some of the background comes as if some of its color were still present. I want the marquee to represent a clean separation between object and background so I can place my images with other layers in a final graphic file. Essentially, I'm trying to treat "Select Sampled Colors" like magic wand. Is there a way to do this? The invert selection option seems to work better except that I still get a grayish, partially transparent box background instead of a fully transparent background.
 -
 I have created a logo including letters and symbols in Affinity, and am trying to export the logo as a jpeg file for import into my website. Problem is that no matter what technique I try, the exported image includes a rectangular white background - even though the logo was created against a transparent background. What am I doing wrong? Sorry again to ask a stupid question... grovel grovel ... Robert
-
 I am using Affinity Photo. I'm a novice to photo editing. Please excuse me if I don't explain what happened well. I uploaded a photo to Affinity with a transparent background. When I exported it back to my computer, the background became white. Or maybe I saved it. I don't exactly recall. At any rate, I've lost my photo with the transparent background and I need it for changing backgrounds on it. How can I get it back? Please help.
 -
 When two or more shapes are alligned (from anchor to anchor), and these shapes have no stroke, it results in a transparent edge instead of no edge. See Example. Each of the triangles here are perfectly alligned from point to point, which should leave no space between shapes. The stroke is set to no colour, and the weight set to none, so I would imagine that the 'fill' should take up 100% of each shape. However, it seems that the stroke (which shouldnt exist), stil takes up a fraction of the shape, and allows the background to show through ever so slightly. The obvious way to get around this is to slightly overlap each shape - as you can see, there are quite a lot in the above, so this would be impractical. Is there any obvious way to get around this? Apologies, this question has probably been asked before, but I was finding it dificult converting this question to a searchable term.
-
 Hey, I'm so desperate. I have been trying to apply picture with transparent background on another picture, but all what I am getting is picture with white background. I am pretty sure such a great tool as Affinity allows to work with transparent background, but I have no idea how and I am so lost. Please someone heeelp. Many thanks, Josef (iPad user)
 -
 For some reason the steps taken to make transparent text on the iOS version does not work. Just try to emulate one of the many affinity photo tutorials for advanced text editing, such as transparent text. I purchased this to make Facebook banners, posters, and other graphical work for the non profit that I work for.
 -
I have followed several tutorials on YouTube regarding creating transparent text images using Affinity photo desktop version. But I cannot seem to do the same on the ipad version. For example how can one make a selection using the text layer? I imagine that the majority of users would like to make imagery with text (perhaps for their business) rather than only spicing up photos.
-
 I've tried to search this on the forums with limited response. I want to know how to remove a black or dark background from white or colored lettering to reveal transparency. Generally this is for text logos etc. I'm some cases the text has graphics inside it that the selection tool struggles with. Would like this to be one click! Thanks!
 -
 I have a PNG file with a transparent background which I use to overlay my images with my logo...when I open the PNG file, it opens with a white background...How do I open the file and maintain transparency.
 -
 Transparent PNG export used to be trivial with Paintshop Pro 9 - PNG export asked what colour I wanted to be transparent, and that was sorted. But I'm struggling with Affinity Photo (and Designer - I have and use both). Example: I have a JPG snippet of music score - black notes on white background. I simply want to invert to white notes, and export a PNG where the resultant (black) background is clear, for use as an overlay image in a video project. I start with document option for transparent background checked. I can apply an Invert adjustment to get white notes on black background, but where do I go from there? I cannot find any blend options that turn the black clear, and there is no 'this colour will be transparent' option in any PNG export dialogue, as far as I can see. This is such a fundamental procedure that I'm sure it must be explained somewhere but, for the life of me, I can't find it. Any ideas? Thanks! Alan
 -
 Hi I have problem with correct printing with transparent elements. On a page are embedded pdf logo and few embedded psd with transparency and shadow fx. Printing on PS color laser printer without "Clip Transparency" I got a rectangle (lighter/darker) around each object and no shadow effect! Sample attached - print1.png = pdf logo Then print with selected "Clip Transparency". Is better. Although still poorly you will see a rectangle around the object and no shadow effect! Sample attached - print2.png, print3.png and corresponding - screenshot.png I find that the best way is to export to pdf and print pdf, however can I print without boxes around objects and with visible shadow effect? WIN 10
-
 Hello. Has any one else had this problem with imported photoshop brushes... They only work in Pixel persona... But more importantly, they are all about 80% transparent. - Opacity 100% - Flow 100% - Hardness 100% - Blend mode normal No matter which PSD brush set, all the same transparency issue. Thanks for any ideas. Cheers.
 -
 Question is in topic title. After image straightening there is transparent space near the borders. I tried clip canvas but it doesn't work. Is is possible to automatically trim the transparent pixels after straighten?
- 6 replies
-
- 1
-

-
- Trim
- Transparent
- (and 2 more)
-
 Hi, I have been browsing the forums for about two hours now attempting to solve the low quality export of vectors (with transparency) I'm experiencing. I adjusted to bicubic and lanczos in the export window, I've tried resizing the vector. Attached below are rasterized transparent png and gifs, plus a pdf of the original vector, exactly how AD exported them. On a side note, I'm not exactly sure why this is so difficult to accomplish: to create a smooth realized export of a vector image for the web. Super easy and intuitive in very old versions of adobe illustrator (back in 2004). What am I missing/not understanding?? GIF PNG PDF clipart.pdf
-
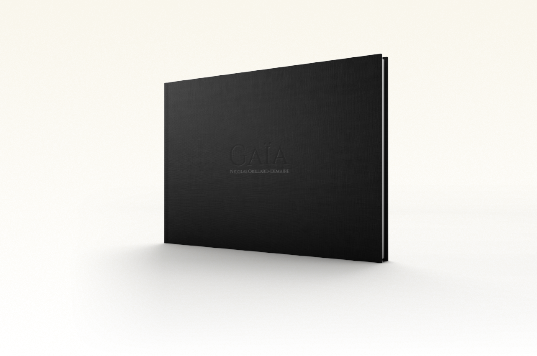
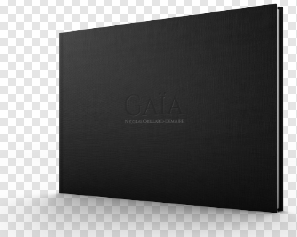
 Good morning everyone, I'm actually intensively using Affinity Photo/Designer for a web project. My design include many embedded documents for a greater flexibility. But here's my problem: I like to set my embedded documents with a canvas much bigger than the element I need in my final composition For instance, the following illustration is my embedded document (vastly unzoomed). Its canvas is bigger than what I need on my final design. In fact, I basically just need the book and its shadows. But having a bigger canvas, allows me to better "view" the book in an "environnement". When I'm done, I just deactivate the background and move around my layer, scale it (a lot) etc. into my final composition. Then, comes the time of exporting the book image so I can include it in my html. At this point, I —need— my book to be cropped to it's minimum. I need to clip all transparents pixels. Sadly, on the export persona, if I select my embedded document and create a slice from it, the slice is obviously surrounding the exact bounding box of the document. Of course, I understand this, but I would love to be able to check an export option "clip transparent pixels" and ends up with something like this automatically:
-
Hello All. I wanted to use Affinity Photo (AP) to replicate watermarking images in the following style: http://photoshop-tutorial.org/photo-effects/watermark-your-photos/ My reasons for wanting to use this particular style of watermark are because it is a less intrusive method for the viewer because it permits the image under the watermark to be seen and also it is not that easy for the casual observer to remove the watermark. Method: 1. Select and open the image to be watermarked in AP 2. Press ⌘J to duplicate the background layer 3. Type the desired copyright text in black using the Artistic text tool 4. Resize and move the text to the desired location 5. Open the layer effects dialogue box with the text layer selected 6. Tick the Bevel/Emboss checkbox 7. Select Emboss in the Type drop down box at the top of the dialogue box 8. Click on the link symbol between radius and depth value to make setting the depth possible 9. Click in the profile box (empty) to select your profile from the four visible at the bottom of the dialogue box 10. Tick scale with object box and reduce fill opacity to 0% A bonus is that you can edit the text and change its style until you flatten the image. Layers effects dialogue box image and example watermarked image attached for clarity. layer fx dialogue box.pdf watermarked image .pdf
-
 Im struggling a bit with a piece of text; I just want the outline with a transparent centre. If I just set a stroke, the stroke goes 'inside' the letters. If I set an 'outline' in fx, then remove the fill, it removes the outline itself. I have tried making another 'punch out' image and using geometry, but it axes all of the letters, not just the centres. The only way I can think of to do it is rasterise the image and then 'erase' the centre, but this would be messy and inefficient. I know this should be straightforward, but appear to be pretty well stuck now. I assume this is something real simple that I am missing. Can anyone enlighten me? Thanks Jim
-
 Is there a way to use the transparency tool to only apply on the fill or just the stroke of the object… I cannot seem to find a checkbox or setting for this to only affect a particular attribute. Thanks!
 -
 Hi, I hope I'm not creating an unnecessary topic, but I couldn't find what I was looking for in past threads. Would be good to have the forums separated by AF Photo and AF Designer as well. I'm trying to find out if AF Photo's crop tool has the following features; 1) Crop canvas based on transparent pixels - I come from using Adobe for the past 15-20 years and their crop feature of being able to crop an image based on transparent pixels is extremely useful when trimming images. Is this hidden somewhere in the menus? Being able to do a hard crop and soft crop would be great too (destructive and non-destructive. 2) Because I was unable to find the feature above, I resorted to manually cropping. When using the manual crop tool ©, is there a way to lock the ratio, and also have equal scaling? For example, in PS you can use a number of modifier keys when scaling, transforming, or cropping. The modifiers allow scaling from the center, or keeping the ratio when dragging a corner. Any help on this would be greatly appreciated. And great product! I'm very happy with it. :)
 -
 Since you don't offer a normal support and I don't have much time, I will try to get a response here. I have made a file with some objects on a transparent background and I export it as an eps-file for export, but when I open it, it opens with a white background. What is this and how do I avoid it? I hope someone can give me a response asap and I also hope you can offer some normal tech support some day. And when I open the exported file in AD it is rasterized and not a vector-file. I am sorry, but this is really a disappointment then. Perhaps it is me who don't understand vector and only thought I did, since AD was so easy and intuitive to use, but it was probably just and illusion. The design should be simple. I use a logo I have made earlier which is also a vector-file, add a line to it, which I thought would be vector - and then some numbers and letters which definitely should be vector. No effects or gradients or anything. Now I tried to export setting rasterizing to Nothing and that created a file worse than anything. The nice line around turned into a thick line and the whole image was turned into a chaotic jumble with white squares all over. So, if this is not a bug, it seems like it isn't as easy as it seemed to be to create vector-stuff in AD at all. And what to do with this now? I add the actual file, but when I export it I deselect the blue background. OK, so now I took out the encircling line and drew it again, as it seems like it had been converted into a rasterised layer and the same thing with one of the logo-files embedded, which is an eps-file, probably because I used the eraser on it. Now I opened the original eps-file and modified it and exported it as a new eps-file and imported it to the design again. Now it became more transparent, but with white squares behind the two logo-layers - which, again, are eps-files but obviously are being converted into rasterised files by AD. How do I avoid that? I thought vector stayed vector. And if I allow rasterizing it all turn out with a white background. Why? The two files added are vector-files (eps) and the line should be vector as far as I understand, and so are the numbers and letters. So why doesn't it export as a transparent vector? And where is support when you need it? GGklistrmerke.afdesign