Search the Community
Showing results for tags 'transform'.
-
 I discovered a trick to export an .Affinity file into .PSD while maintaining the possibility of editing text. Lets go. It's quite simple: 1. Save your file in PDF (for export) 2. Open in Illustrator and export to PSD (while retaining text editing) Ready! Simple right? Here's a video showing you step by step. It is worth remembering that some things can get lost but if you simplify the Affinity file it will get easier to turn it into PDF and then PSD and keep all fonts editable. In my tests I had a group of texts inside a layer with opacity and this was lost, but if I take this text from the layers it is possible to keep editing (the video shows some tests) https://www.youtube.com/watch?v=f-p3J1umYIg
 -
 Hi i am a long term Lightroom user but new to Affinity photo. I use a anamorphic lenses 1.5x and 2.0x squeeze factor, shoot RAW format only on 16x9 or 3:2 aspect ratio. What i would like to create is a sort of template (or other easy way) where i squeeze my photo's in height 1.5 and 2.0x times (depending on the lens used) so i do not have to do the transform proces over and over again for each photo. (Squeeze the height 1.5 or 2.0 times, width stays the same) Is this possible within Affinity photo? Thanks for your help.
 -
 I have been reading your manual looking for how to do a free transform on the iPad pro affinity app? I can only find the sheer transform? Is there a way to do a free transform or a perspective transform?
 -
 It just struck me how handy it would be to be able to set a transparency or gradient vector on an object, and then go to the Transform window to specify the angle and position of the vector. Could be especially interesting when Ctrl-J'ing (new phrase :) )
 -
Please, the ability to select nodes and transform them individually is much needed.
-
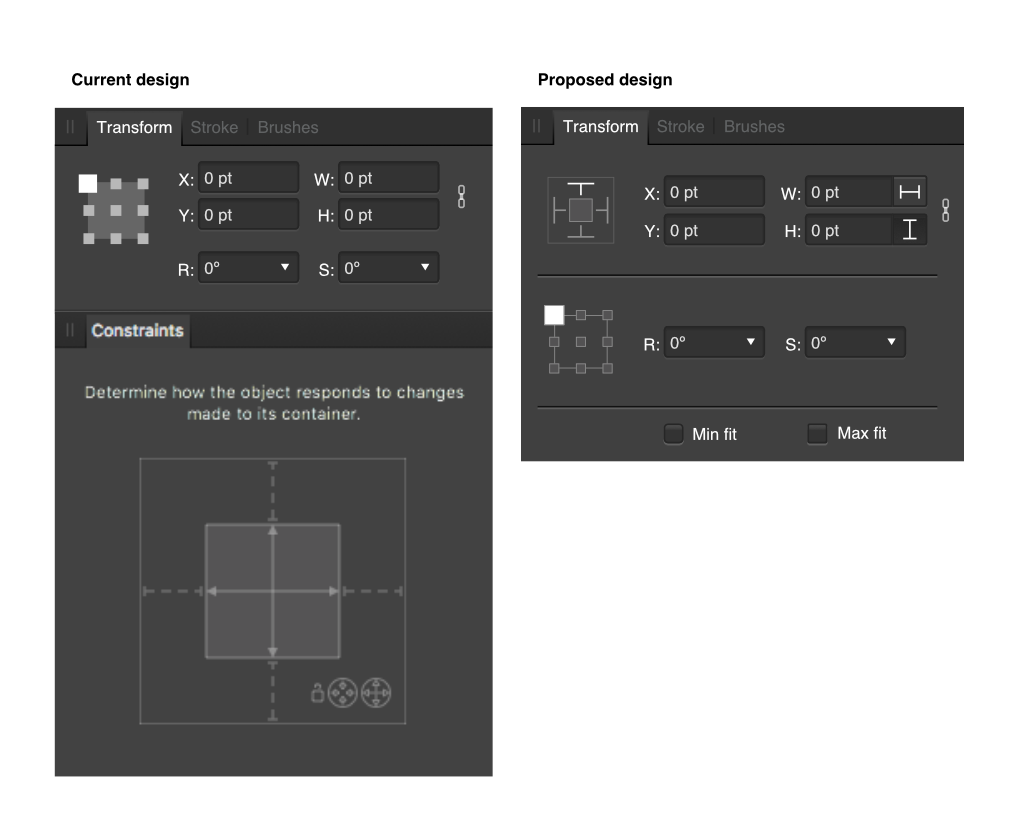
 I love the constraints feature in Affinity. But I see three major issues that make its use a little more difficult than it should be: 1. Constraints panel is too big and takes too much space on the screen. 2. Constraints panel is not related to the transform panel, which is a little odd if you take in consideration that constraints are relevant to object's size and position. 3. The "Min fit" and "Max fit" icons are not clear about what they are supposed to do (even watching the constraints tutorial, I found it very hard to understand how they behave, and what are the practical applications for them) So I've drafted this redesign proposal merging Transform panel with Constraints panel. What do you think? I'd love to see something like this on Designer 1.7 :D
-
 Hi, I am new to affinity photo and just switched over from photoshop. I open an image in affinity photo, then I create new document of size I want to work with like I used to do in photoshop. I want to move the image into the new document and be able to move the image around without moving the canvas. the image is bigger than the canvas and I want to transform image to make it smaller but not exact size of canvas because I was to crop some of it off but be able to move image around to get it in right spot. It's hard to explain, but I want to move the image layer separate from actual canvas/document size like I do in photoshop, but it won't let me. does anyone know what I mean? Thank you
 -
 I have been experimenting with general methods of creating radially symmetric circular designs with an arbitrary number of planes of symmetry, particularly with ones that are not evenly divisible into 360°. My method is explained in detail below but the general idea is to enter fractions in the rotate field in the Transform panel to rotate elements of the design as precisely as possible. The problem is this leaves tiny gaps between the rotated objects unless I add a thin stroke to them. Experimentally, about a 0.2 to 0.3 px stroke width seems to be enough to fill the gaps, but this may vary depending on the canvas size. I assume this is due to the inability of the app to work with irrational numbers to a sufficiently high degree of precision, but I sometimes see this even with rational numbers entered as fractions, like 360/9. Is there any way to avoid this? --------- My method ----------- 1. I start by creating a vertical line with the Pen tool in Line Mode with snapping enabled so it begins at the exact center of the canvas. 2. I duplicate it with CMD-J, set the the lower right anchor point in the Transform panel, & enter (for example 360/7) in the rotate field. 3. I select both lines with the Node tool & use Join Curves & Close Curves to create a closed, pie slice shaped curve. 4. I duplicate that, & use the same method to rotate it in the Transform panel, again entering the same fraction as in step 2. 5. I then power duplicate to complete the design. Attached is an example of the result (history included), showing the gaps for a 7 way symmetric design. EDIT: I know about using various multisided shapes as templates for this sort of work but my question is about precision in angular text entry fields. radial symetry issue.afdesign
 -
 I've tried manually dragging them apart and back to their original locations, as well as searching the 'View' and other main menus but haven't yet found how to uncouple them. Additionally, when I select something from the Color-panel...it 'leaps' in front of the now combination Layer/Transform-panel. I'd love to know the 'How & Why' to this as it may come in handy in the future. But for now, I'd like to return the 'studio' to its original default panel set. *AD 1.5.4 on a MacBook Pro* Would someone please enlighten me? Thanks much, -Christo
 -
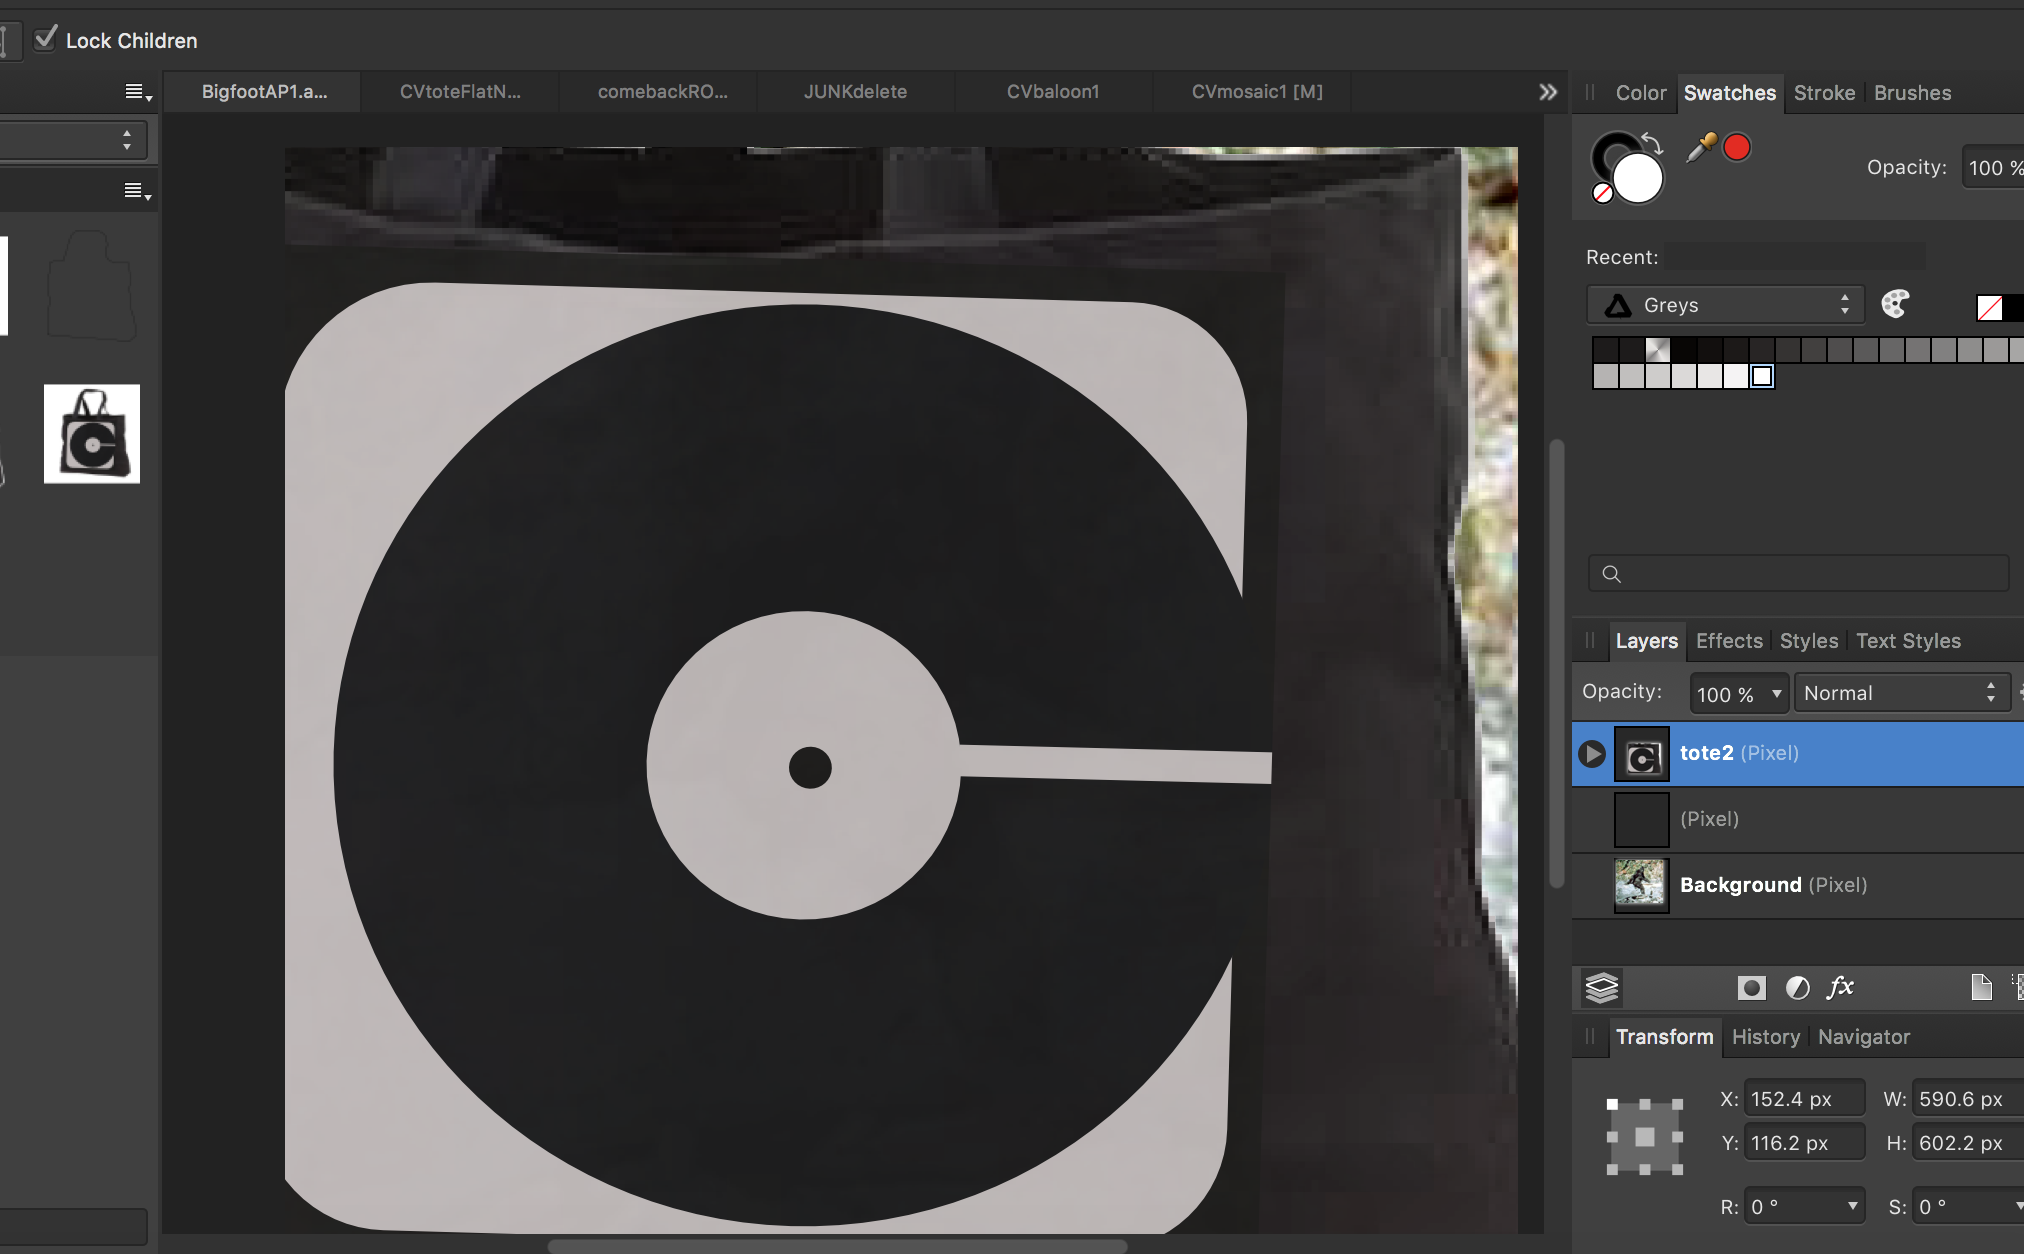
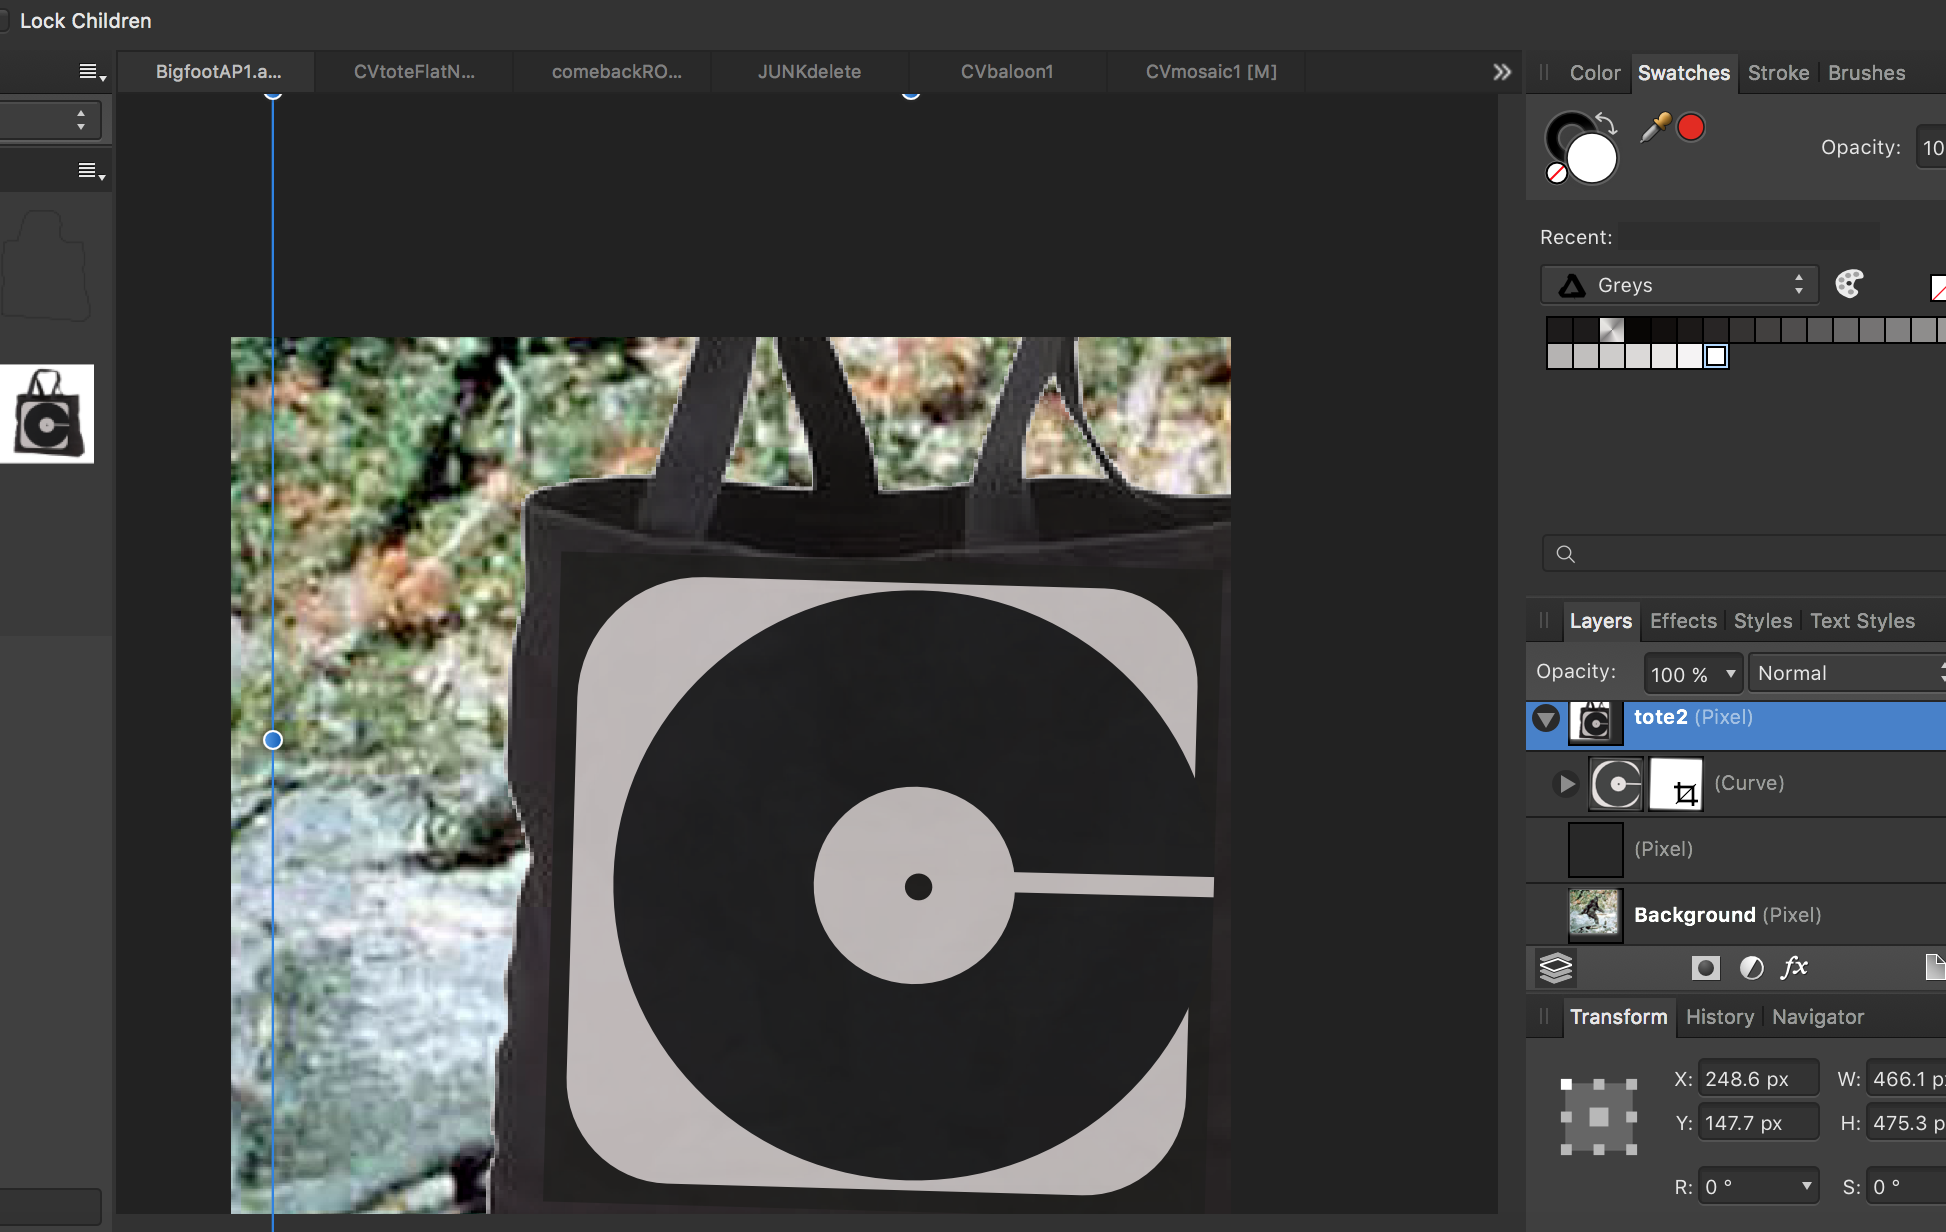
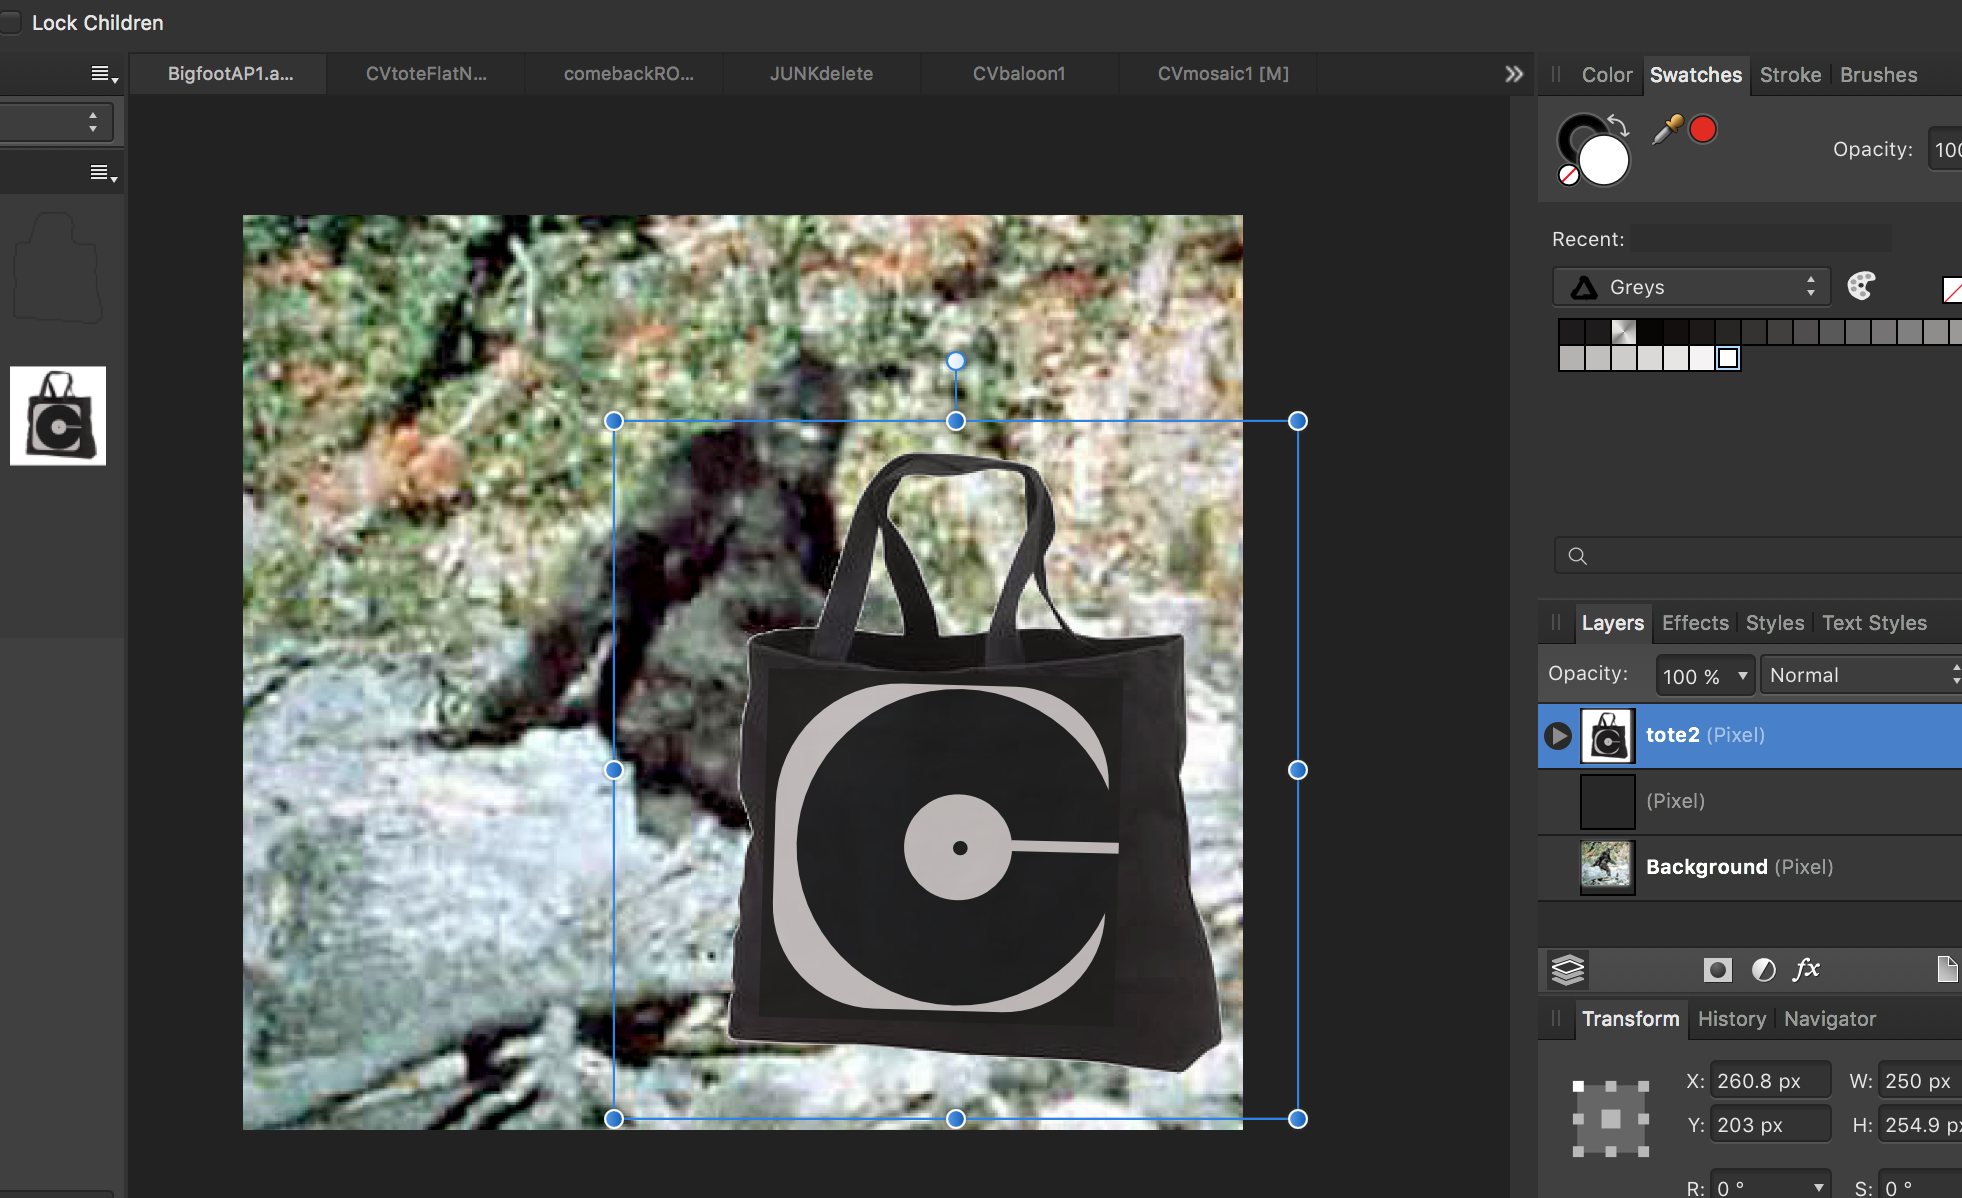
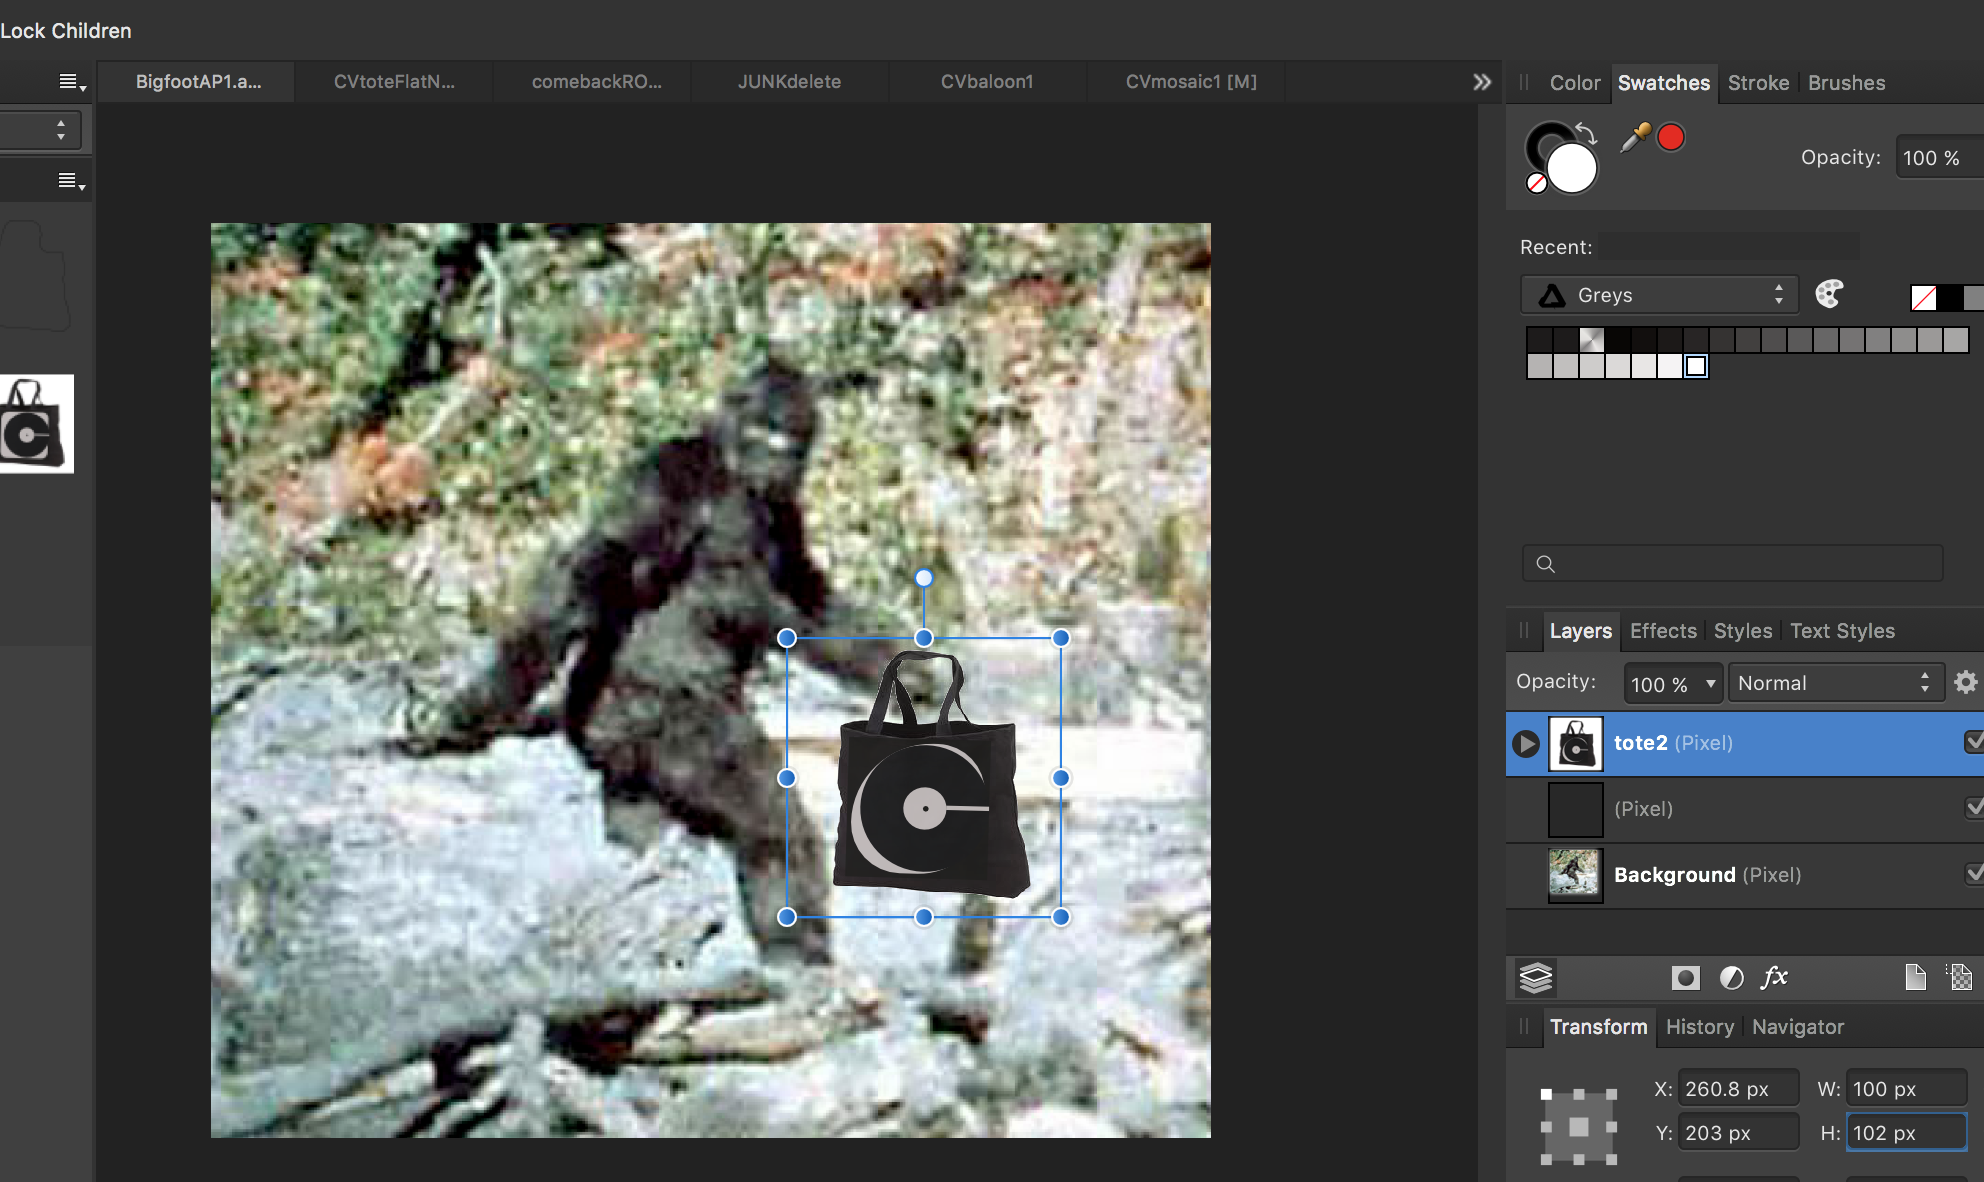
No doubt again something simple, again probably a simple fix, but I've already conceded my infant level AD knowledge - help please. How do y'all explain the following behavior upon my reducing the image size in AD, on a 3 month old MacBook Pro running AD 1.5? I've attached 4 thumbnails below to help illustrate. I drag a me-made asset (that stupid black tote bag) onto a photographic image of Bigfoot in an attempt create a crude image of him carrying a black tote bag with a logo on it. Obviously, the scale of the tote is way too large so I begin to reduce it's size. I used both the Transform Panel (W+H) as well as constraining via Shift/Drag. In both cases, the smaller I reduce, the more I see proportional changes in certain layers in the logo (which are grouped). I did NOT have the 'Loch Children' box ticked - would this have bearing on the effect I'm getting? Most obvious IMO is the change in the curvature around the black 'C'...just saying. Thanks for any help! (I love playing with this program - can't wait 'til i have a better grasp of it all) -Christo
-
Hi guys and girls, great products, congrats! Maybe an anchor point would be more useful than the current rotation center. It should work for both rotation and resizing, and in the transform panel you could use the Anchor point selector's midlle point to use your custom anchor point for the transformations. It could also turn e.g. red for better visibility.
-
I would like to hold a key down with a selected object and be able to rotate and size using the trackpad gestures. Need to get away from using this handlebar nonsense! Another great feature would be to use Force Touch to set a pivot/transform point in relation to the object. For example, I often want to rotate an element with the pivot point in on the side, not the center. Supporting holding down a keyboard button to constrain to preset amounts (e.g. 45º for rotation, 10px for transform) should still work too.
-
 I noticed that the very useful expressions for sizing and positioning content using the Transform panel only work for pages and not for artboards. Can variables like artboardwidth, artboardheight etc. be added as well? Thanks in advance!
 -
 Dear Forum Member, I want to mirror a isometric Shape (picture) in 30° Axis (red line). The usual Mirror function only works Horizontal and Vertical. Know anyone how to do that? Thanks for help. Matthias
 -
 Hello everyone! When I change the height or width of a path In the transform tab, Designer will round the values to .x. I am using millimeters and when I enter something like 5.695mm, I will end up with 5.7mm. Is there a way of doing things more accurately? Best wishes, Shu
 -
 Hello everyone, I've used the Affinity Photo for Windows beta version during the last few weeks and the feature I'm mostly missing (which gives me a unpleasing feeling when thinking about buying Affinity Photo for Windows now) is the possibility to transform objects or selections with a custom resample mode. I know there is the document resize tool which gives me bilinear, nearest neighbour and what not as resampe options but I'm used to do those actions on a selection base not document-wise (which feels like an odd workaround to me when copying stuff to an empty document do the resizing and paste it back). Based on the options available for document resize I assume that the implementation details are already done and the only thing missing is providing a UI and apply the resampling to each transform action. Perhaps I'm a bit spoiled using Photoshop but that is one of the essential features for me I'm missing and keeps me from throwing my money at you (actually it does not really prevents me to do so as I like the idea of a useful tool and alternative to adobe products I could get rid of Adobe much faster and a happy smile on my face when such a feature would be available) Last but not least I might have missed an option, shortcut or preferences to set to achieve what I described so any hint on how to achieve it (not some workaround like I've mentioned) is appreciated =). Best Regards
 -
Hi there. The ability to distribute objects is really useful, but I would really love to be able to arrange Nodes using several alignment and distribute commands. I would also like to be able to transform a current selection of nodes- Scale, rotate etc.
-
 attached file is the free transform tool from Adobe Illustrator. Is this on the roadmap of AD?
-
The icon "Lock aspect ratio" (Transform Studio) doesn't change when I click it to unlock. It changes only when I move the cursor. This confuse me because sometimes I think that I didn't click correctly. This problem is only on clicking to unlock. If I click it to lock the icon changes directly without moving the cursor. I notice the same problem in Affinity Designer.
-
There is a shortcut to toggle the transform panel. But somehow it doesn't make the transform panel active. I would expect that it does. Because it would allow us to make transform changes directly from the keyboard without having to click on the transform panel first. There are a few other issues with the transform panel. When using the tab key, a field is selected as expected, but if I want to preform simple math on the value I can't position the cursor before or behind the value using the keyboard: using the left or right arrow keys increases the value! Strange indeed. Adding nudge distance in this panel would be a great timesaver as the preferences is not a good place to store something some of us change quite a lot. I also wonder why moving a duplicate with the nudge distance is not used in Power duplicate? Cheers, Wim
-
 I tried all of the copy and paste possibilities, but nothing helped. How to copy and paste from one layer to another transform values? Appreciate any help! :)
-
 Hello, new user here. I love the program - many of things that I took many steps to do in AI I can do in just a few in AD! I'm loving it! One feature that stands out is mirroring. If you could please add mirroring around - say the centerpoint of a shape. That way one can be sure that the mirrored object is equidistant from a "horizon" point! Much appreicated!
 -
 Hi, this is the issue, i align my stuff, place the objects wherever i want and so far so good, but, sometimes when i select an object it moves slightly to any direction, and i have to undo that transform since i didn't ask for that, it happens randomly and in all the documents i've worked so far.
 -
 Hello togehter, in the transform tab of an object, I can click on the abbreviation letter of the transform parameters and drag the values with the mouse in a horizontal move. But this does not work for the position parameter "Y". see: https://youtu.be/pcxtqCp3yFA thanks for another fix....
 -
 The lock aspect ratio (AR) function works fine if you type numbers into the W: and H: boxes... whichever you change, the other changes to maintain the AR. However, dragging a handle on the object itself does not maintain the AR - pressing Shift does lock the AR as expected. If I've locked the AR, I don't want it to change without my taking a direct action to do so. I think it would make more sense to lock the AR when dragging if the AR lock is set and flip the sense of the Shift key to allow distorted changes. Another entry on the forum describes how the Shift key function operates in this "flipped" mode "natural AR" objects such as bitmaps, so this wouldn't be out of step. Steve