Search the Community
Showing results for tags 'texture'.
-
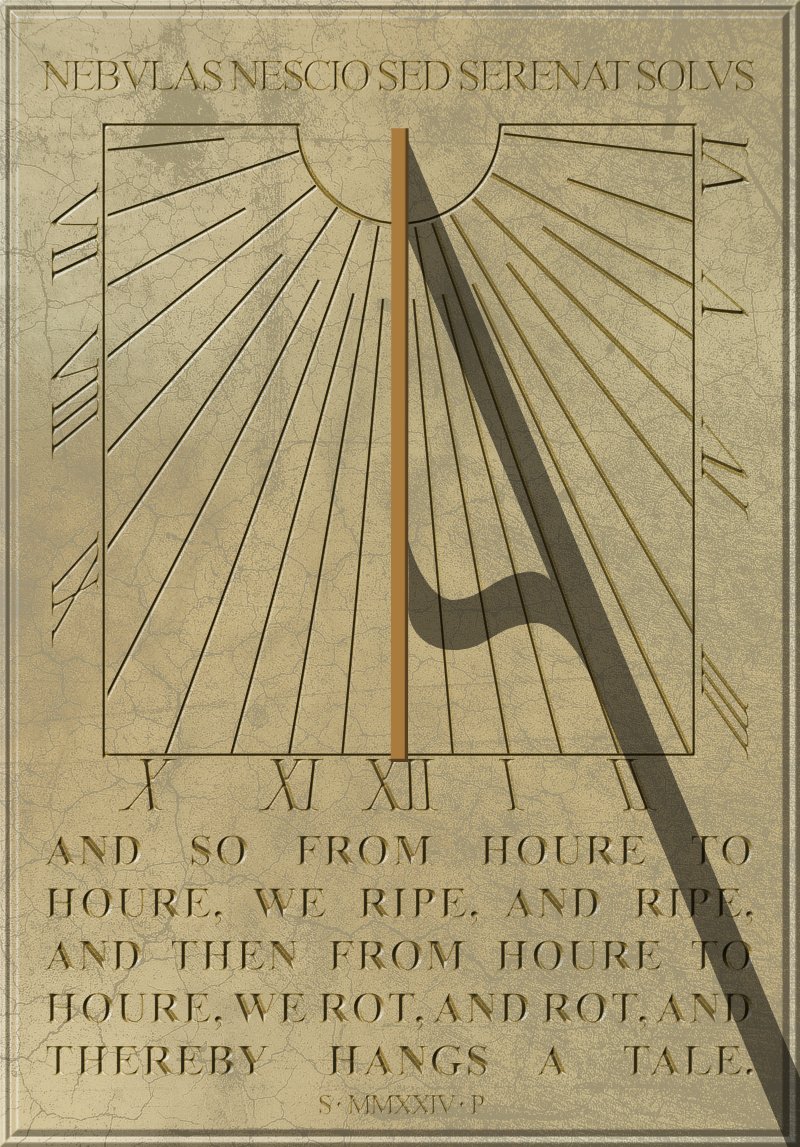
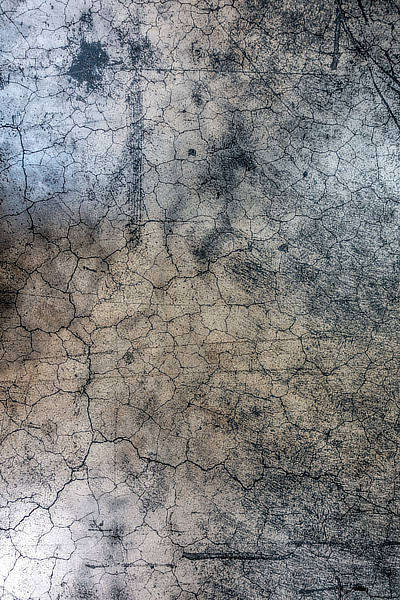
I found a pic of a wall-mounted sundial at Norbury Manor in Derbyshire in my old photos. (It's a National Trust property, and open to visitors from time to time.) It was erected as a memorial to (I think) the former owner, who died in 1987. I've changed all the inscriptions in the foolish hope of looking clever. The base colour is 45/38/71 in HSL . . . and I found a grungy texture in my collection (this is a reduced copy) . . . and after some playing about, I found an opacity or 25% and a blend mode Colour Burn gave me a pleasing marble-like effect. For the incised text, I darkened the fill slightly and applied an Inner Bevel/Emboss FX using the first (triangular) profile, inverted. I adjusted the radius till the bevels met in the middle, making the letters look as though they'd been carved.

-
 I know how to change the complete color so that you can see the texture, but I want to do it with a gradient, which I can't manage somehow. Look at the picture below. The blue one still has texture, and the one with the gradient didn't.
-
 Hello, I would like to invite you to watch an amazing tutorial on how to create vector hair. During this tutorial, we will discover together the methods that you can use today to create hair easily and effectively, even if you have no drawing experience. Click 👇 🔴LINK HERE You will learn a step-by-step process that will help you develop incredible design skills right now. So, if you are looking to improve your design skills or just want to create amazing hair for your projects, this tutorial is for you. See you there, enjoy!😍
-
- 4
-

-
- affinity designer
- vector
- (and 2 more)
-
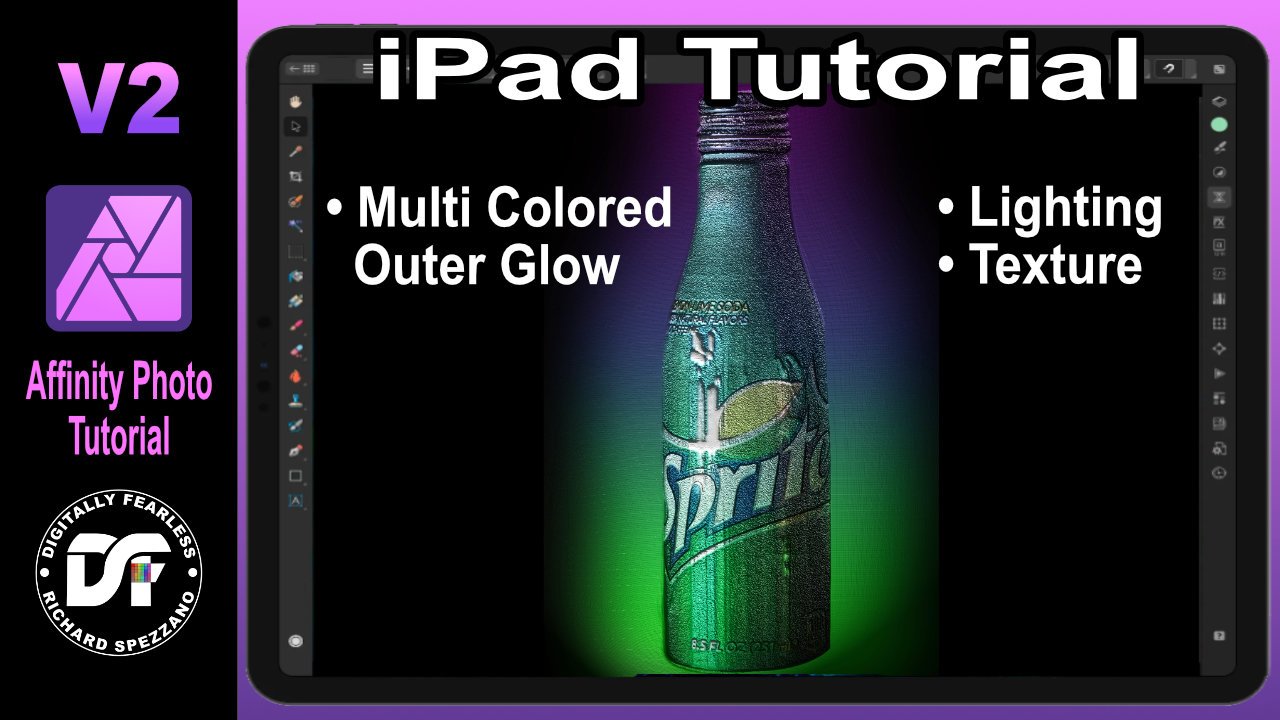
 In this Affinity Photo V2 tutorial Desktop version, I use show how to create multi colored outer glows plus add texture and lighting https://youtu.be/sTxKHA7Grpo Note that I also have an iPad version of this tutorial
-
- 1
-
-
- multi colored outer glow
- texture
- (and 6 more)
-
 I still see the workflow for RBGBA channel packing for game texture is still a nightmare and hasn't improved since v1, I thought this would be improved in v2 especially with the UI improvements. Please could you make it simple as photoshop where you can copy/paste from black and white layers into one of the RGB channels. Its soo much simpler to work with and selection of the channel was so much easier.
 -
 Hi All. Thanks for this moment. Can I create a texture brush that does not override/thicken previous strokes. One example: I want to create a curly-haired teddy bear, but with all of my current texture brushes if I touch a previous stroke it doubles the texture and darkens it. I just want one mass texture and to deal with the shading and highlights on other layers. Any thoughts? Cheers, John.
 -
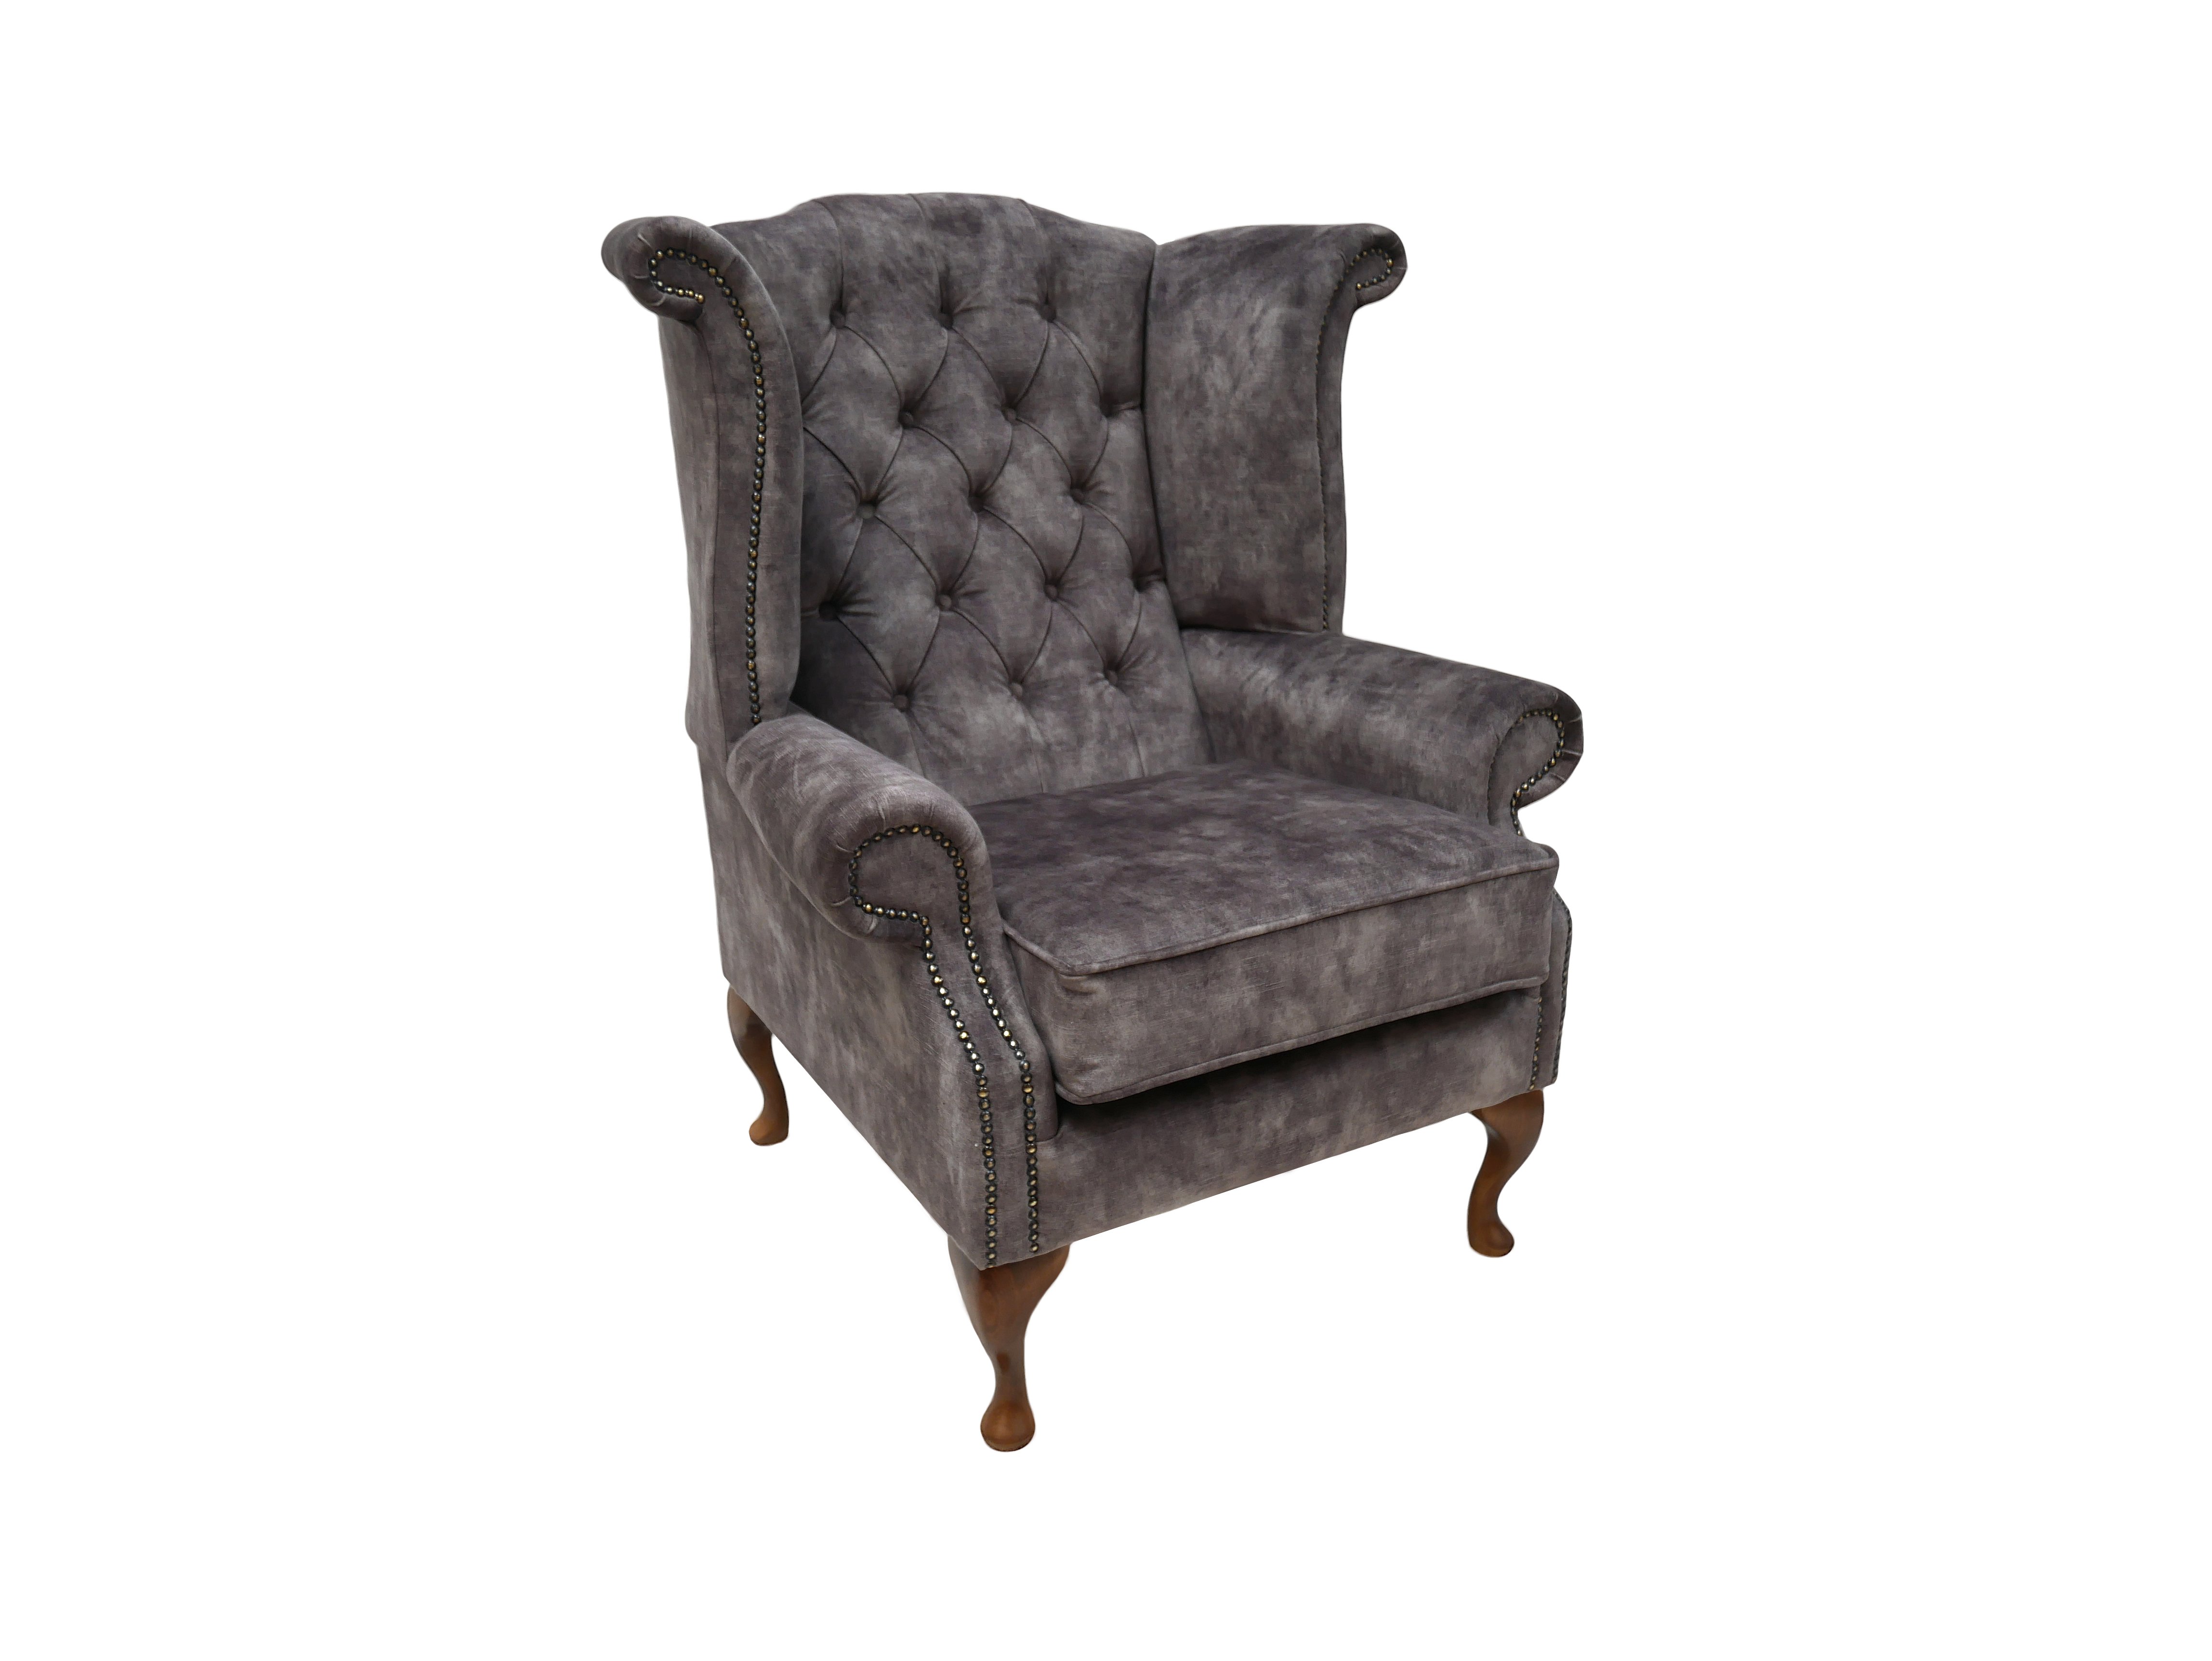
 How do I smooth the crushed velvet fabric in this chair without losing too much detail in the back? I've tried frequency separation and it keeps all the texture, just makes the image lighter (lighter image attached to this thread). Really not sure how to approach this, some help would be greatly appreciated please!
-
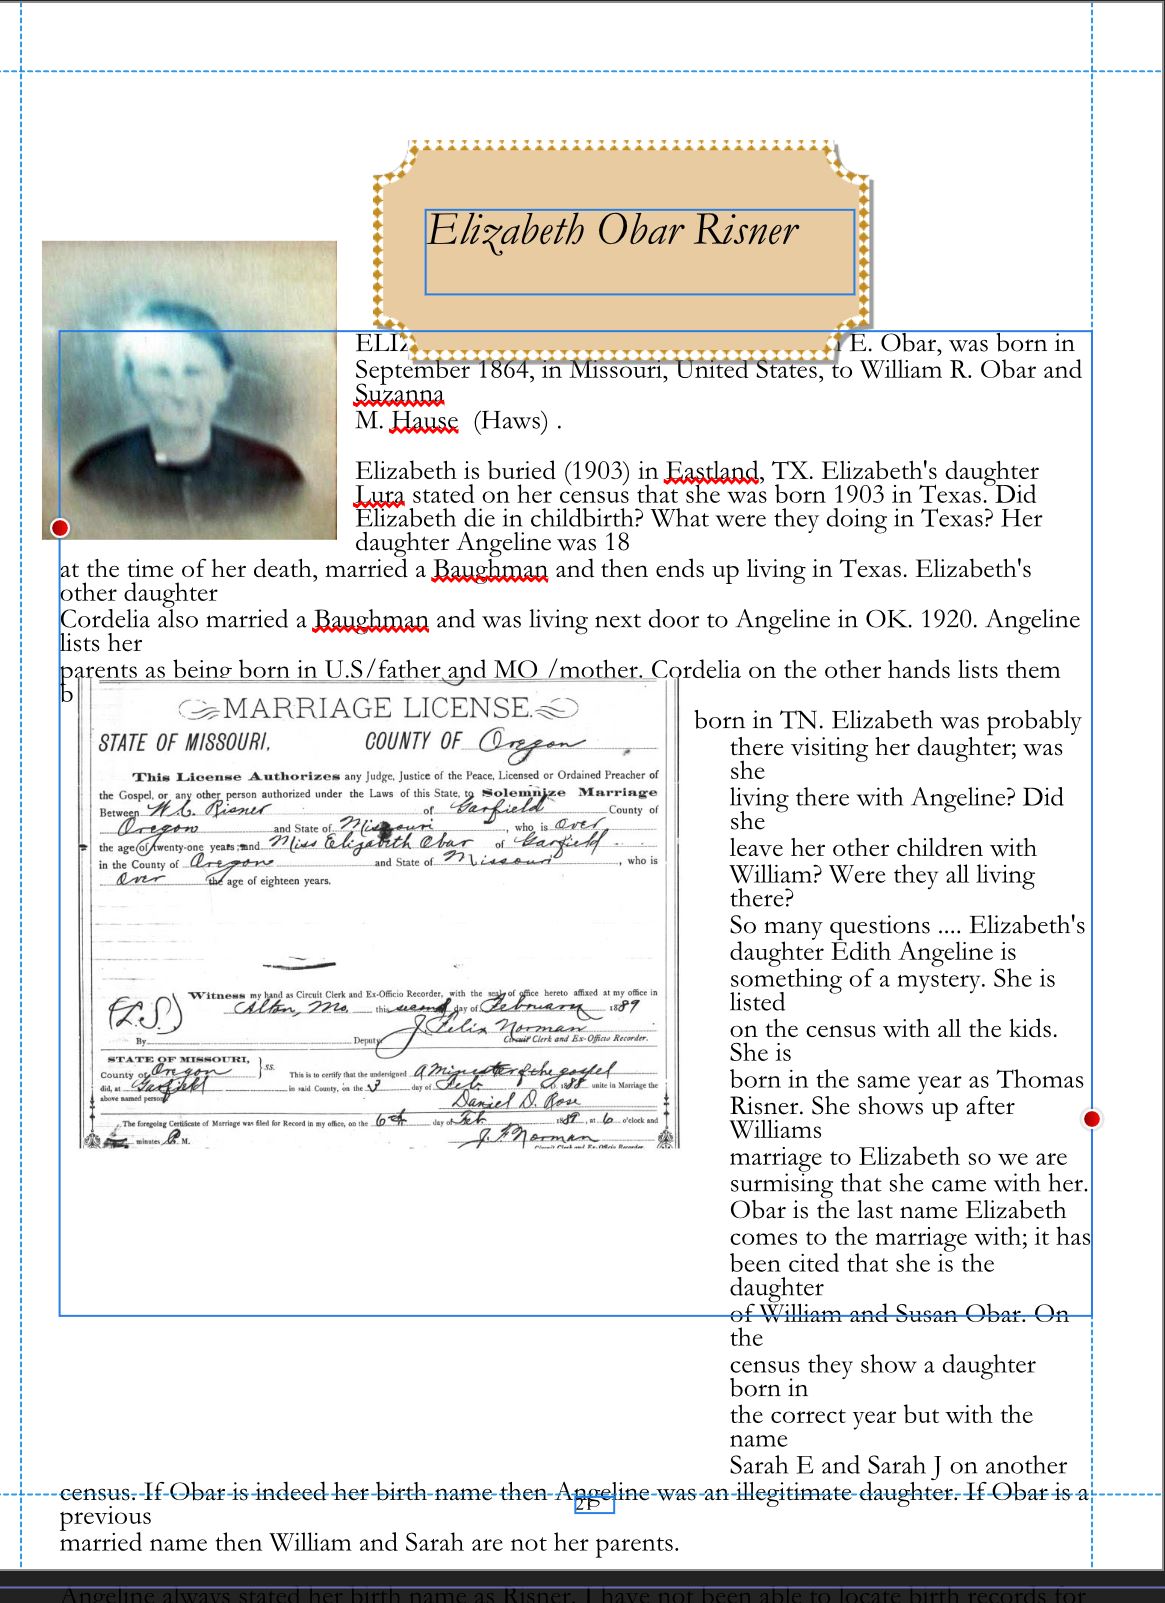
 I opened a PDF file that I created long ago; it is a family history project. It opened great BUT I need to be able to really edit this and the text is stuck in the formation around the images. I want to enlarge, move etc some of the images and the text is not re-flowing. Is there a work around for this
-
 We need to convert logo into different kinds of 2D and 3D embroidery texture look. Like straight stitch, satin stitch and fill stitch. Are there any way this is possible to do in Affinity Designer or Affinity Photo?
 -
Create texture using Voronoi. This is an Affinity Photo beginners tutorial and number 23 of the Digitally Fearless Power tools of Affinity Photo playlist. https://youtu.be/DJvrszzygzk
-
 I don't want to put a whole lot more effort into this, but just off the top of your head, what effects do you think I could make to some of these layers which will make an improvement to this picture? Such as applying textures here and there. P.S. The doctor is a royalty free png that I copied and pasted, and not broken into layers
-
 Hey, 1. I want to make a brush of three different images, lets say smileys (one happy, one very happy and one sad). The images do exist. Now when i paint with the brush the appearing smiley should be random how do i do it? 2. Now i want a more complex brush a brush of garden gnomes but this time i want them to differ in thei features randomly. So i have three mouths, 2 beardstyles and 5 hats they should not differ in any other way. Can i get a brush maybe with the subbrush menu that paints a garden gnome with a random combination of these features? All that without me having to create a picture of a gnome for every possible combination first. Do you know whether it is possible in a different program ? Kindest regards and a big thx for your explanations.
 -
 This may be already requested by somebody before. But just in case, texture & pattern overlay effect won't be imported when opening a psd.
 -
 I'm looking for input building a library of texture styles that are easy to apply to your design. And that don't make the files size too big. So I'm using small tiling (repeating) bitmap fills. There are 2 ways to build and apply the style library, can you tell me which you prefer? I recorded a video to show you the difference: https://vimeo.com/513749138. What do you think?
-
 Hello all, I've created a batch of brushes in Photoshop that have textures applied to them in the Brush Settings panel. I made the textures by hand, scanned them, then made them into pattern textures in Photoshop. I exported these brushes as an ABR file and tried to import them into Affinity Photo, but the textures haven't translated across. I've attached one of the brushes for your reference. I don't really want to have to create these texture brushes from scratch in Affinity, so does anyone know if importing texture brushes is supported by Affinity? If so, how do I do this? Any thoughts would be much appreciated! Thanks very much Tom's Texture Brush(1).abr
 -
Made from this excellent tutorial:
-
 Hi Im going to make album art and want it to have that old vinyl record look. Anybody know where i can find background paper texture for this purpose?
 -
Post prosessing with Affinity Photo, added lighting, texture, LUT.
-
Hi, Channel packing method in Affinity photo is a bit hacky please make it easier to implement (i.e. copy and paste mask directly into the channel). Also, I cant seem to export a tga file with an alpha channel. I use channel packing heavily for creating RGBA masks/textures for UE4. Thanks, Iby
-
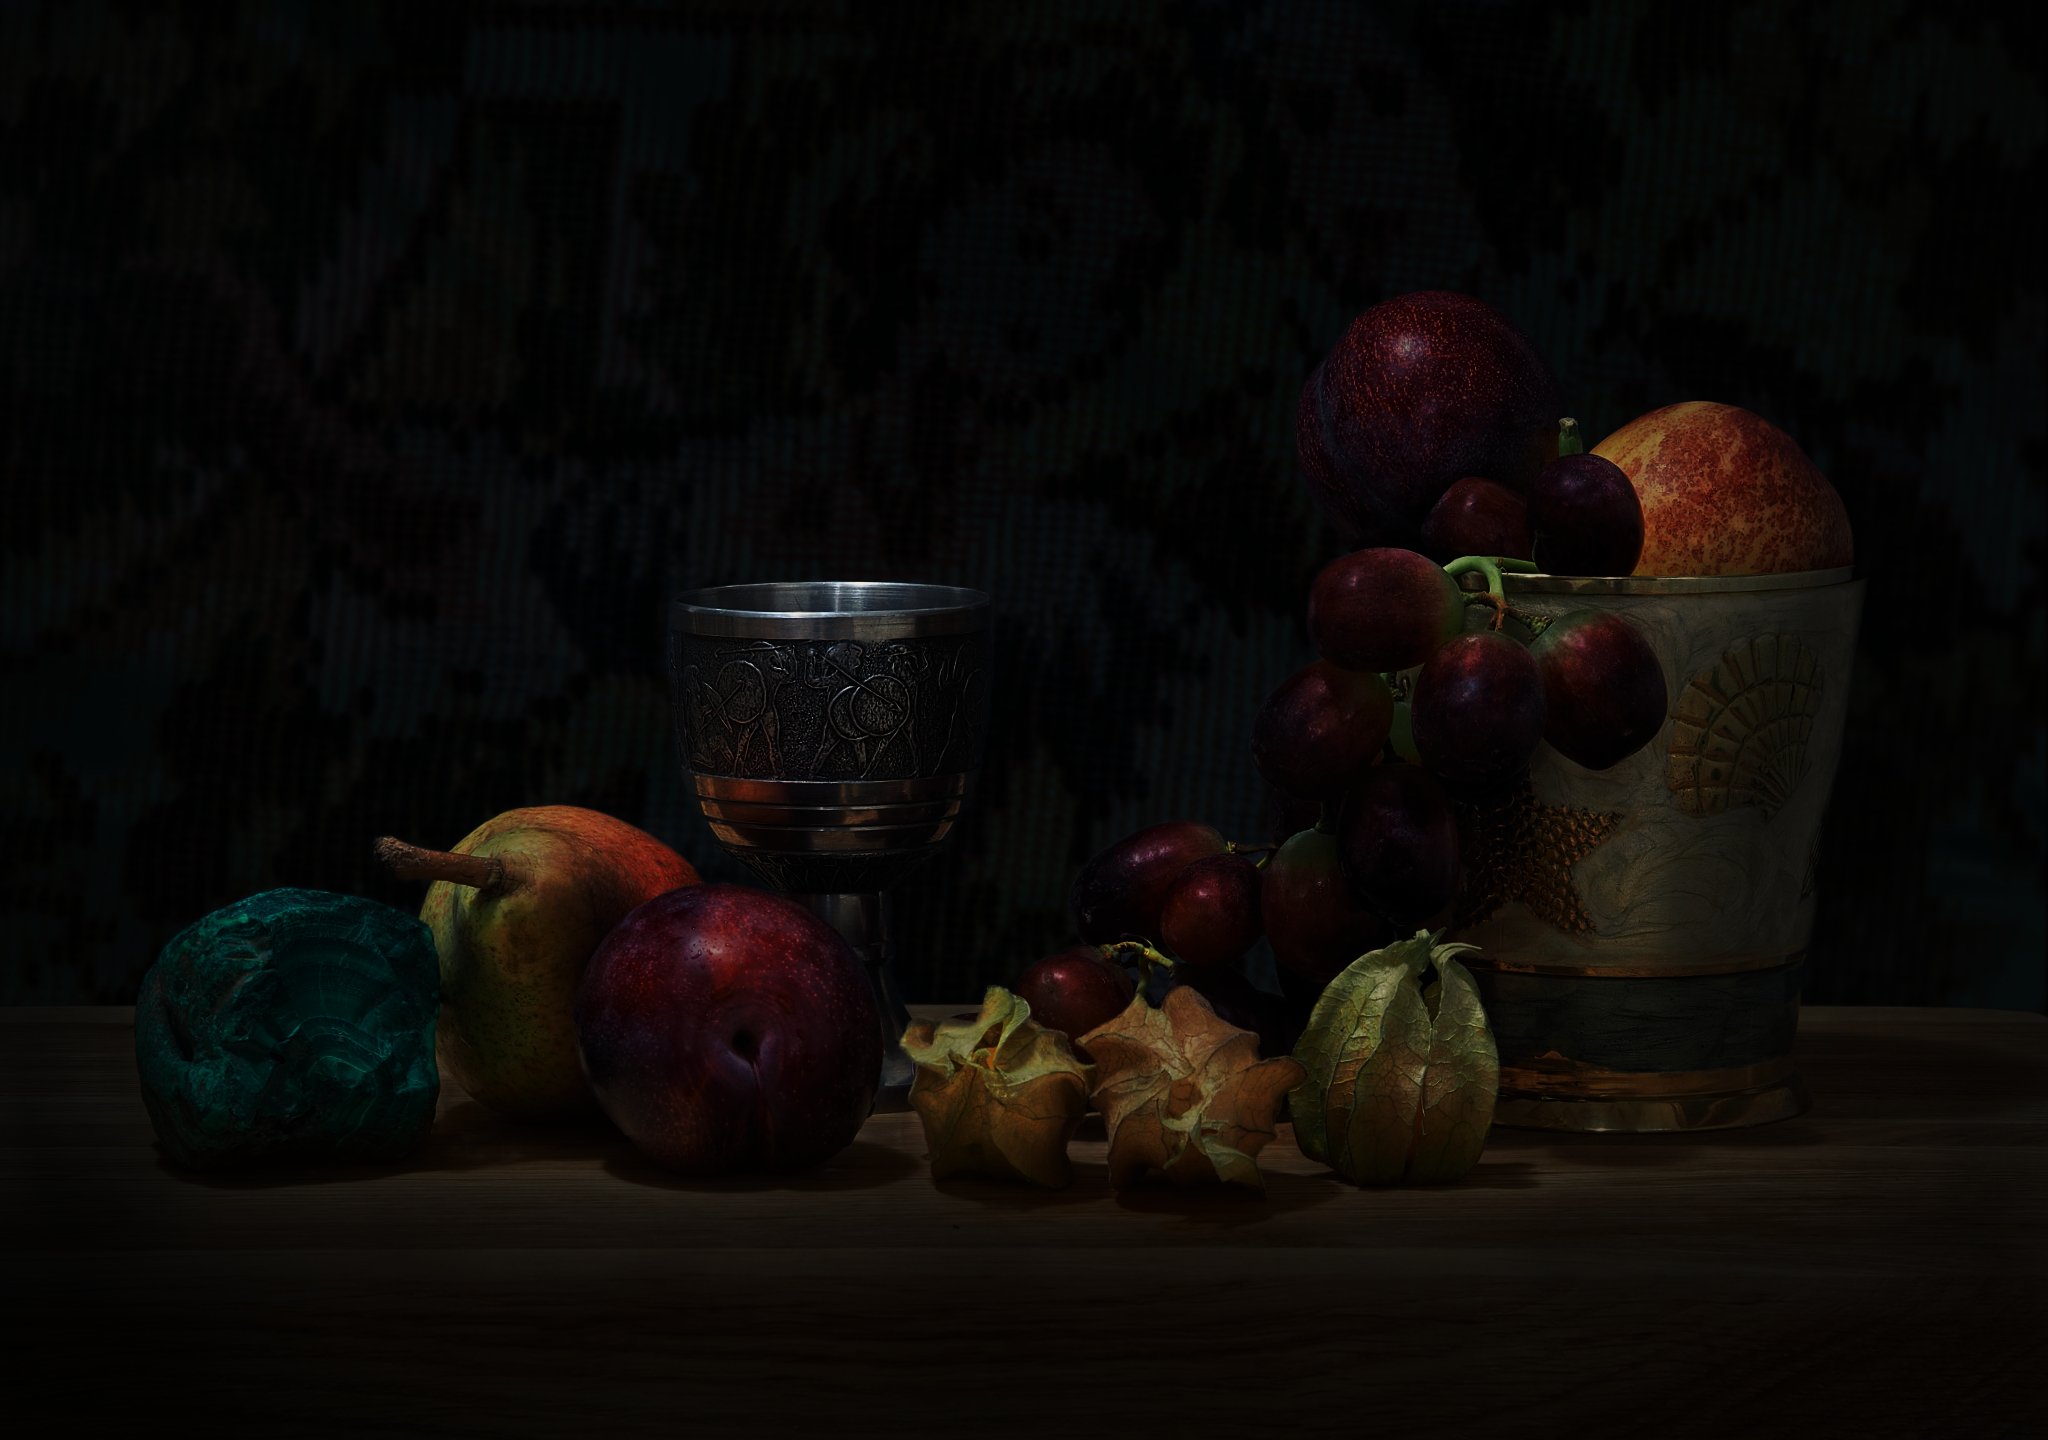
Changed background, added textures and lighting effect, dodging and burning locally, some cleaning. I was looking for some old dutch school feeling. Comments please! Mft
- 10 replies
-
- 8
-
-
- still life
- dutch
- (and 4 more)
-
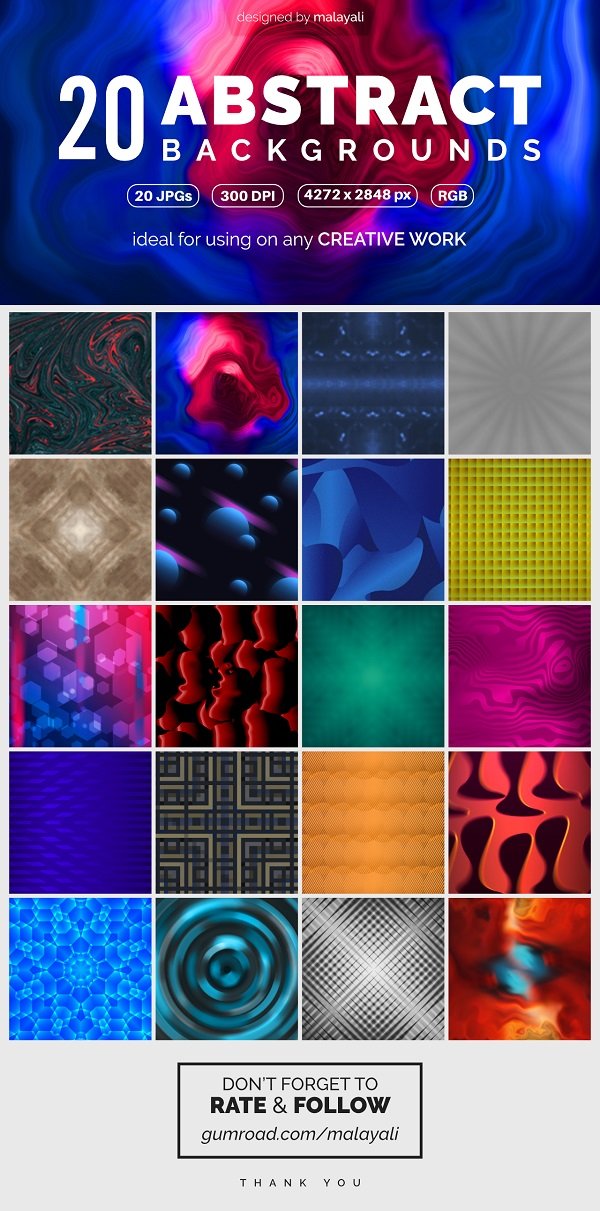
Hello everyone! I've created a pack of 20 Abstract Backgrounds using the Affinity Photo, that can be used for any creative purpose, and made it available for purchase from Gumroad. Feel free to check it out. You can use the code affinity for getting a 10% DISCOUNT! Thank you.
-
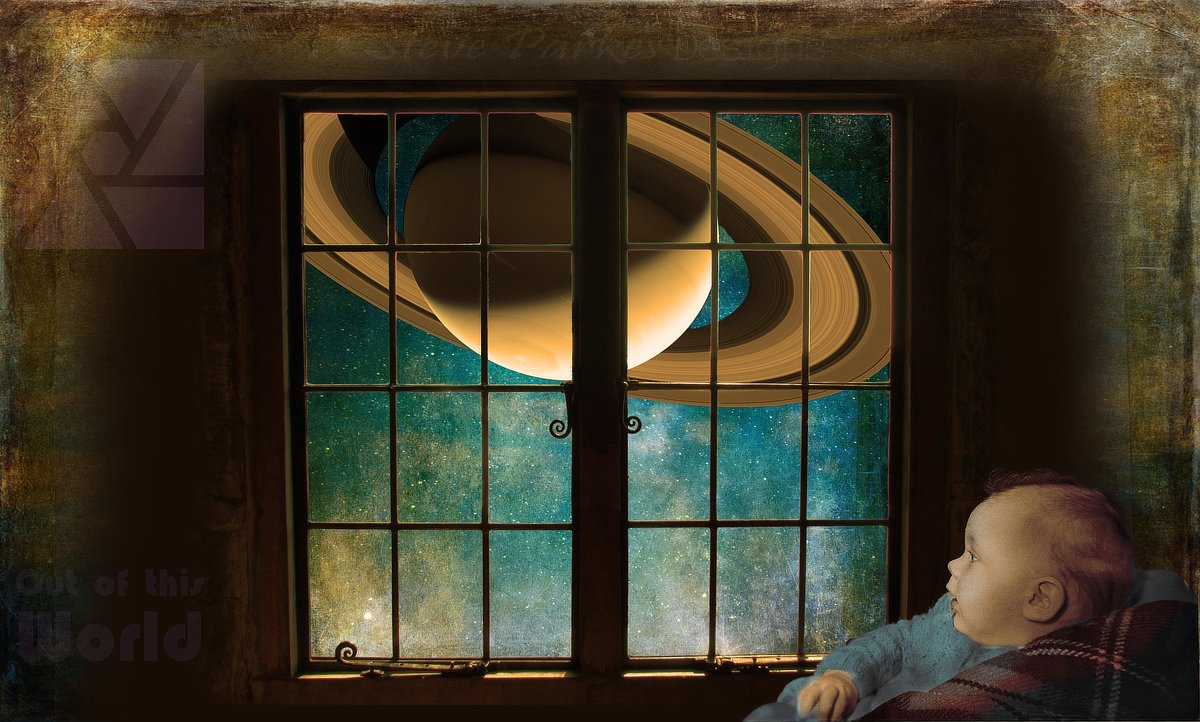
How tedious! I keep getting ads on social media telling me the creative world runs on a certain photo editor. Ours runs on a different one.Saturn photo from NASA/Cassini, starry background and merged texture from magazine freebies, stately home window from my own photos and my (hand-tinted) baby brother (many years ago!) from my late father's photos; lots of masking, clipping, a bit of dodging & burning ...
-
 Please add the ability to add pure vector based vector brushes based on vector objects for texture instead of PNGs. For now we can only add pixel based vector brushes. Being able to add pure vector brushes based on vector objects would allow us to create vector based textures and designs, which would be much easier to handle for any kind of (print) production. For example I tried to separate the colours to a spot colour PDF for screen print from this awesome work by Pierre Kleinhouse made for the Affinity Work from home series https://youtu.be/lL6gc8Oi2uw .afdesign file on DropBox: https://affin.co/LD2020PierreKleinhouse It was sort of a nightmare. I couldn't find a way to create a vector based spray texture within the Affinity Suite like in the second screen shot with the chimney. Expand stroke, working with spot colours, working with boolean operations ... a lot would be easier.
- 9 replies
-
- 9
-
-

-
- texture
- vector brushes
- (and 8 more)
-
 I would like to be able to search my own photos of textures held on a local drive on my W10 PC in a similar way that one can view and use stock photos. I have searched the Forum and training vids but can't see how to do it. The Library and Asset functions in Studio don't seems relevant here. In Photoshop one could have then in a panel just like the Stock photos are in AP and then drag and drop them onto the work area as a layer. Is there anything similar in AP that would allow this drag and drop approach?