Search the Community
Showing results for tags 'text'.
-
 Affinity Designer on Mac: When pasting text from a word document into a text field in affinity designer, it does keep most of the formatting. However, when line breaks in the word document are not denoted by "enter", but instead by the size of the page, they are seen in affinity as an infinitely long line and will be pasted as such. Is there any way to paste text into a text field, in such a way that either, the original formatting is completely kept, or such that the horizontal size of the textfield is respected, and not just extended into infinity? Or is the easiest way to achieve this for me, by manually assigning line breaks by "enter" in the original file? Cheers.
 -
 I have seen a warped text I would like to re-create but every time I search I can't locate any tutorial of how to do this. Can anyone point me to where I can find out how to do it. This is what I would like to do.
-
 Hi! I just did a search of the group for this and nothing came up, so forgive me if this has been brought up before. I am wondering how you keep text layers editable editable after your document has been saved ... ? I have tried saving documents as PNG, PSD and .aphoto, but none of these formats seem to allow text layers to be editable once the document has been saved and then loaded back in to Affinity Photo afterward. Is this something that Affinity simply won't do, or should I used another format? Any information on how to do this would be helpful. Thanks!
 -
 Hi guys, here's a new video about how to create a 3D text in Affinity Photo. I hope you enjoy this video, thank you!
 -

-
 Hello all! Currently working on some ID cards for work, and the printers have asked for a file with editable text. I have succeeded in making an editable PDF in Publisher, however when I reopen the file in Publisher to test it, when I go to replace the text (which the printers will do) the dimensions of the text box are not the same; any text that would go beyond the border, will automatically create a new line - instead of extending the text box. In the original file, the text box is spread to the margin line (48mmX2.7mm), however when re-opened the text boxes are shrunk to fit the text. I am assuming that the printers will use Photoshop or Illustrator, I was wondering if anyone could reassure me that my file will work the way I need it to in the Adobe softwares or if there's any way to fix the text dimensions so that they don't adjust? (Side note- I noticed Publisher can export into .PSD, if there's a way to keep the file editable while keeping the text boxes fixed then that would be absolutely lush). I hope this all makes sense, I can attach the file if people need to mess around with it. Thanks all - look forward to learning!
 -
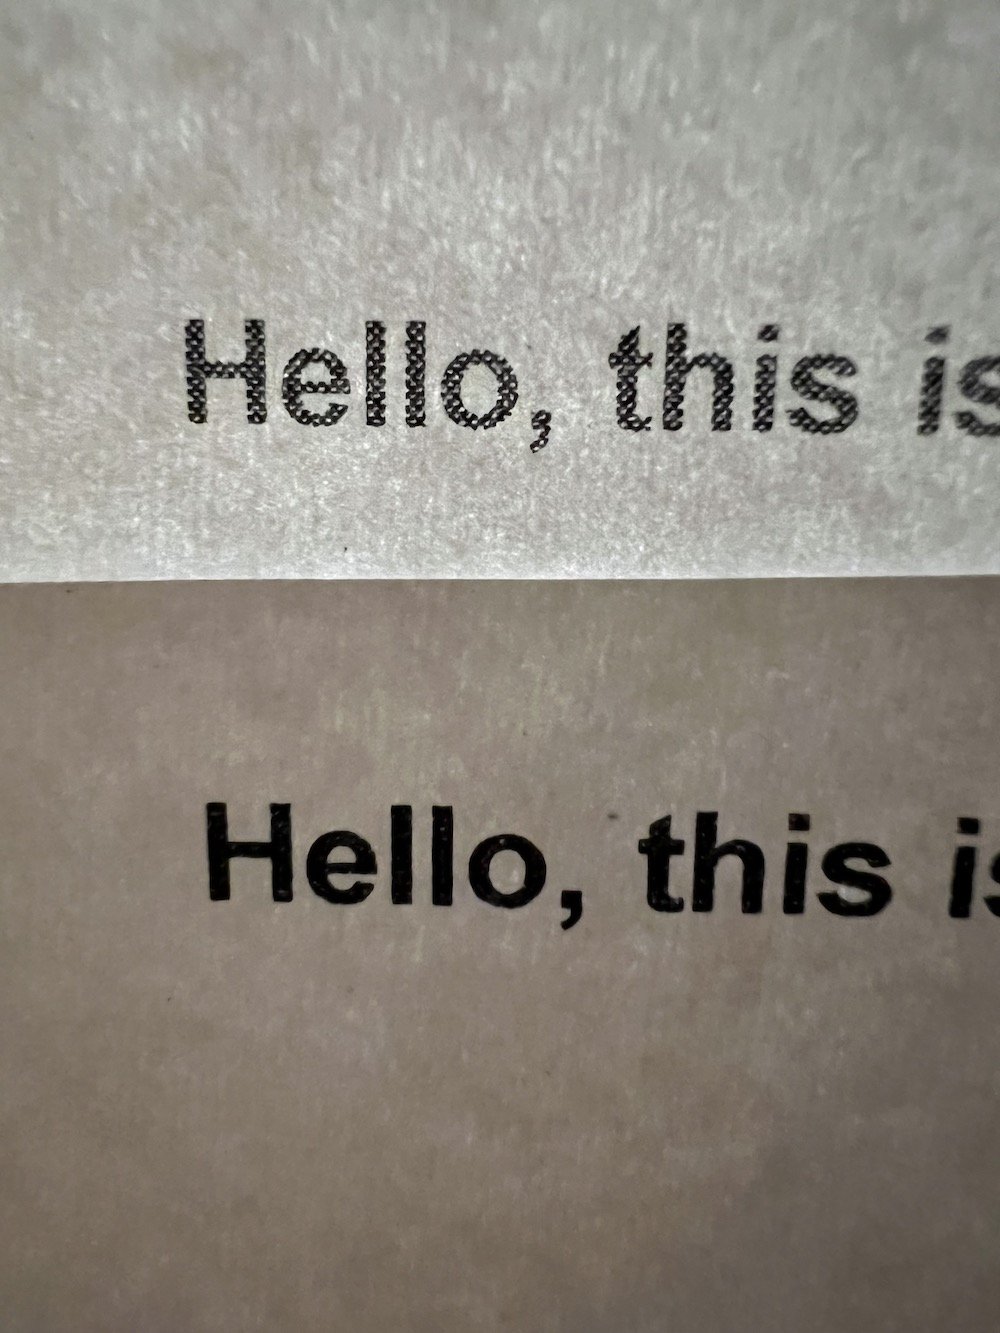
 I recently noticed that none of the "black" text in my document was actually printing on my laser printer as black. I created the attached simple Affinity Publisher document to demonstrate the problem. This document accepts all the default settings for a new "Press Ready" letter sized document, which includes the CMYK/8 color format and U.S. Web Coated (SWOP) v2 color profile. I changed nothing, added a single line of text, and printed the document. The text on the printed document is noticeably dithered. I tried exporting a PDF (also attached) and find that when I try to print it, the text is exactly the same, dithered a bit. I have confirmed that the document has (by default) chosen the proper C0 M0 Y0 K100 color of black for the body text. Note that I can use the same laser printer to print a similar simple test from Apple's Pages software and the text appears crisp and fully black. What am I doing wrong with Affinity Publisher? How can I be sure that when I export my PDF for the printer, it will export with proper black text when I cannot confirm this myself before sending it off? I'd like to be able to print decent proofs in my office, it is extremely frustrating that everything I print comes out looking pixellated (see the photograph, Affinity Publisher sample on top, Pages sample below). test-black.afpub test-black.pdf pages-black.pdf
-
 After attempting to lay out some body text without reaching for my Mac I became furious with the process in Designer. This has been the case through my last 4 or 5 months with this tool. Here are a few thoughts on how it could be improved. When tapping into a text box, the interface attempts to keep the cursor in view at all times in the most jarring manner. When the on screen keyboard is up, this results in unintended jumps that make it confusing to pan and scroll the art board while editing. I would prefer that the interface either doesn’t move at all when editing the contents of a text box, or opens a content editor that takes you out of the layout completely while editing. The OS-default editing cursor doesn’t exist. This means if I want to go back, select a word, edit a word, or select a whole paragraph I need to use a confusing combination of hip-shooting exactly where I want the cursor to go with my giant fingers and selecting text without being able to control the beginning and end of the selection. Adapting to the OS-default would be great. Controls for resizing the text box and panning are still available when editing text. From a UX perspective, I would appreciate text editing being a completely isolated process especially on a device that invites fingery clumsiness. Tap the box to edit, all you can do is edit. Tap a done button, you’re back to the layout. (I’m experiencing way more ease writing this post in your little WSYWIG editor on my iPad than in Affinity D) Affinity is a great tool for comping up design ideas right on the iPad and I love it for that. But I DREAD when I have to put some text in there. Please consider these comments! Love Dan
 -
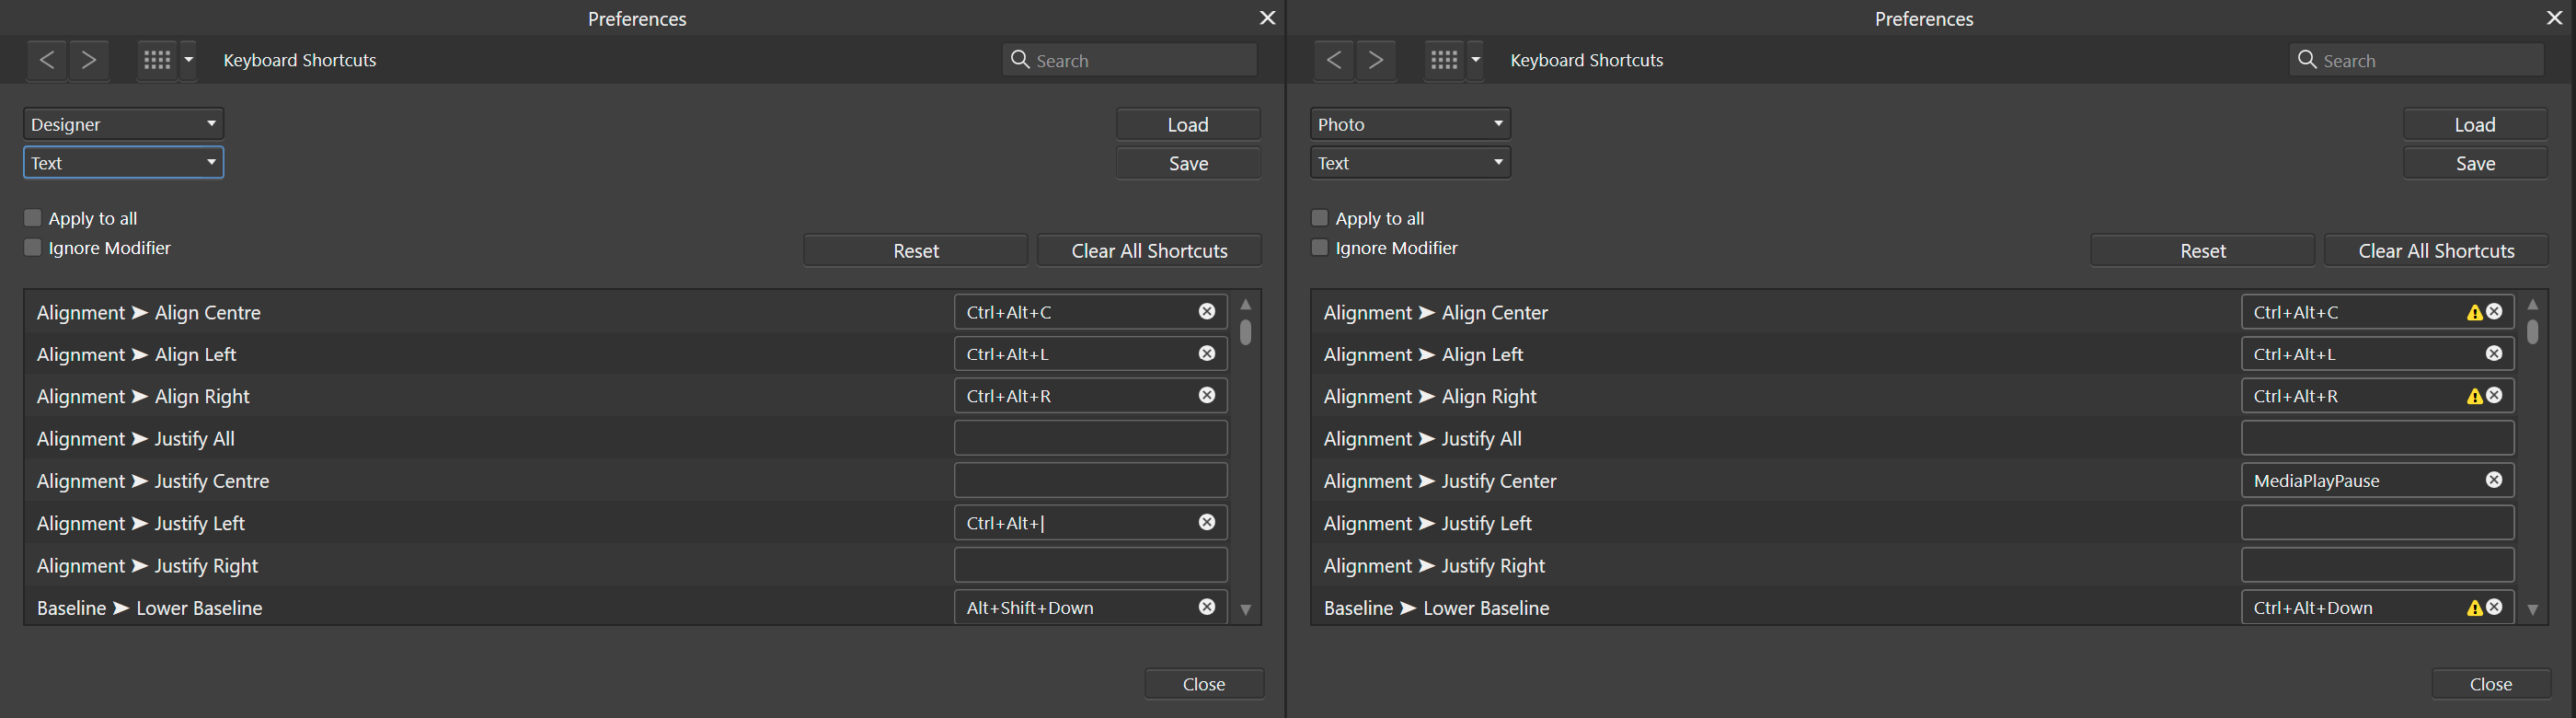
 When customising the shortcuts for Affinity Photo (right) compared to Affinity Designer (left), I noticed many shortcuts were already taken by other functions, meaning that I could not mirror the shortcuts from Affinity Designer. After some testing I can confirm that Ctrl+Alt+L and Ctrl+Alt+R (also assigned to refine edges) work with the text frame selected, whereas Ctrl+Alt+C does not (Resize canvas). So to me it is unclear which commands may and which commands may not execute due to them being overruled by other commands. Would it be possible to introduce context sensitve hotkeys to the apps, meaning that, if I have a text frame selected or when I am working with text, keyboard shortcuts within this context overrule other shortcuts. Instead of being prompted with Resize Canvas, I would be able to align my text to the centre, something that is more in-line with the current selection/ working context. The other way around, if I am not working with text, the same shortcut would execute the resize canvas command. This helps for creating both efficient (double key usage) and memorable shortcut schemes. Current behaviour when editing text or with the text frame selected (using the Move tool): Context sensitive hotkeys.mp4
-
 Hi. I'm trying to figure out why I'm getting an undesirable border of lighter pixels around the edges of text in Affinity Photo. I've attached an image of example text to show what I mean. It is NOT a text decoration or effects border - neither of those are active - and the 'border' of pixels remains when rasterised and/or exported. I've recreated exactly the same test text in Affinity Designer and there is no border on the text. I have ALSO literally copied and pasted the text frame from Photo to Designer and the border of pixels have gone. However, if I open the actual original AfPhoto document in Designer, then the light pixelated border remains. Is there something at the document level I'm not aware of that I need to set, or if not, what is the solution? Or is this a bug? Help and insight would be appreciated. Thank you.
-
 Honest! I did a search before creating this post; but didn't find anything related. Just wondering, with all the various text editor apps, which ones produce text which requires the least amount of corrections, modifications, adaptations, consistency, etc, when taken into Publisher. Just thinking, "if" there is a difference between the text produced in the various sources, and how much time is spent in layout and all the other adjustments, it might be a considerable time-saver if it be knownst to everyone. (Maybe there aren't any differences; and that would be good to know as well.) Just a thought, .... Thanks in advance.
 -
 I have a text layer that is super-bold and setup with an 11pt black outline/stroke and white fill/swatch. I also have an SVG layer. When I drag the text layer onto the SVG layer, making the text layer a child to the parent SVG layer, I get the desired affect of the SVG filling the text. However, I loose the stroke that the text previously displayed. I'm brand new to Affinity and desktop publishing software. Could someone please tell me what I'm doing wrong, and point me in the direction of what I should do, to retain the text stroke, whilst also having the SVG fill the text? Many thanks!
 -
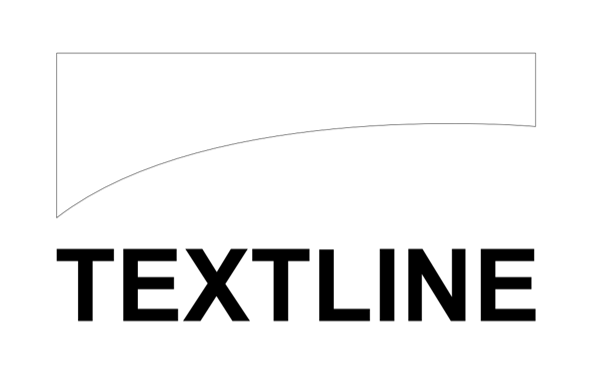
 Hello all, I have created a shape in Designer. Now I want a text to adapt to this shape. I have not found a way to do this, not even via Google. Here is the primitive example, shape and text: So I want the text to flatten from the bottom left to the top right and take the bottom curve of the shape. Thanks for any tips! I've also attached the sample file in case anyone wants to use it. Regards, Felix text-to-shape.afdesign
-
 I found a YouTube tutorial using the Contour Tool on text. When they use it, there's a smooth transition around all the letters. When I apply it, the outline distorts. I can fix it by either changing the view or select Bake Appearance. Is there a preference setting I'm missing?
-
Can you enable mouse drag to resize selected text/font in the character menu, similar to character tracking, kerning and scaling functions.
-
 Dear Affinities, I try to make simple thumbnails for my videos posted on bilibili.com 😁 So far I have done things like this: Unfortunately, I don't know Mandarin 😭 That's why I use a translator... This process is so crazy 😜 The problem is that when I copy and paste text into Affinity I can't change the fonts even though I have installed some new ones. Only some parameters change, and to a limited extent. I have installed a Chinese keyboard on my PC but I can't type 😔 Is there any simple method of using different fonts but only if I can copy text from the translator? I would be very grateful for your help! Thank you! 👍
-
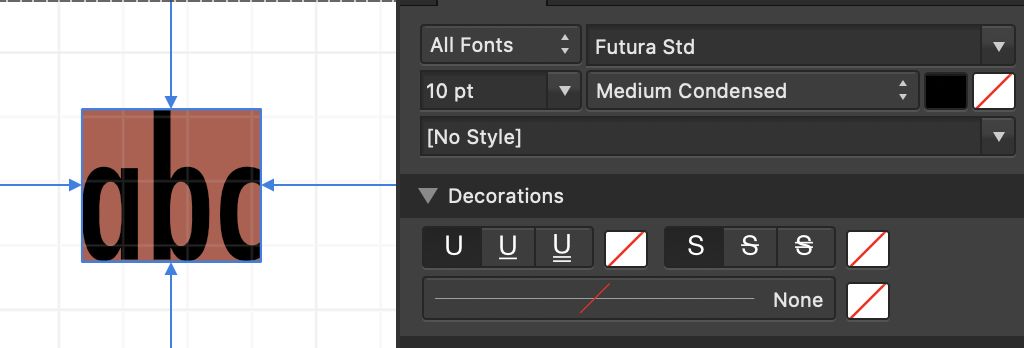
 All new text, artistic text, or text frames all have a brown/red background when I create them. The background color is set to transparent. While I can set them to a different color, I can not set them to transparent. Is it some setting I overlook?
-
 Hello, I use AP and AD only for simple work and don't have so much time for practice. Now I would create a card like shown in 25.png Using the PenTool and ArtisticText I became like shown in Try.png, but how can I achive the text marked with the red arrows. I found it very difficult to create curved lines, attach the text and the text fit's perfect. Is there an easy way to create? Thanks in advance Guenter
-
 I think this is better in an own thread. All the best, Chris
 -
I don’t think it’s a bug because it has been around as long as I can remember. See the attachment to see it in action. When working with text, if the cursor leaves the center of the screen, the document zooms to what I believe it thinks is the place that the text should be focused. It is never in a place that is helpful and is in fact quite disruptive to workflow as I then have to reposition the screen to continue working. This also happens when zooming on a text box. This is VERY frustrating. Any advice would be greatly appreciated. Thanks IMG_0017.MP4
-
 I am having trouble editing text once it's created. I've tried everything. I can easily do this on the iPad app but on the desktop whenever I selet the text tool (Either artistic or frame) it only opens a new text option and refuses to select the previous text. File was created in Affinity designer. It is the default file type. Text layer isn't rasterised. Is this a feature that isn't yet available on desktp? I am editing a recipe post and I definitely need editable text.
 -
 Hello It would be a super helpful feature if you could place texts in a shape like in Photoshop (Warp feature). It's cool that you can orient the text on the path, the just mentioned would be even better. Greetings Till
 -
Weird behavior on the iPad with Designer. Not sure how to describe it but it’s so annoying when you want to pan to another part of a design it snaps you back to the last object selected or a current selection. Anyone else getting this issue? Video attached. IMG_1708.MOV
-
 These tutorials are really helpful, and well done. I've looked but cannot find a tutorial on how to wrap horizontal text around the corner of a building. Can someone helop me out? Thanks! Phil
 -
 I'm new to Affinity and this forum so apologies if this has been covered before. I'm trying to add text to a photo using the ellipse and frame text tools in Photo. However, when I drag the frame text tool into the ellipse and click left, the fill colour disappears. How do you retain the fill colour? Thanks in advance..