Search the Community
Showing results for tags 'stroke'.
-
 I feel it’s not possible in AD, but just to be sure, is there a way I can apply a gradient to the stroke width? I mean, I know I can apply a gradient to the length of a stroke, but can I do it also to the width, so that gradient would follow the path of the stroke? My first thought that it maybe could be done via layer effects, but I couldn’t figure it out.
 -
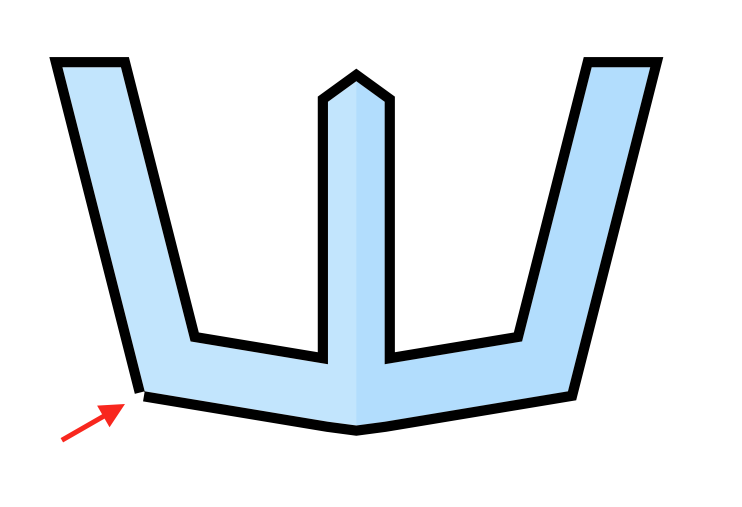
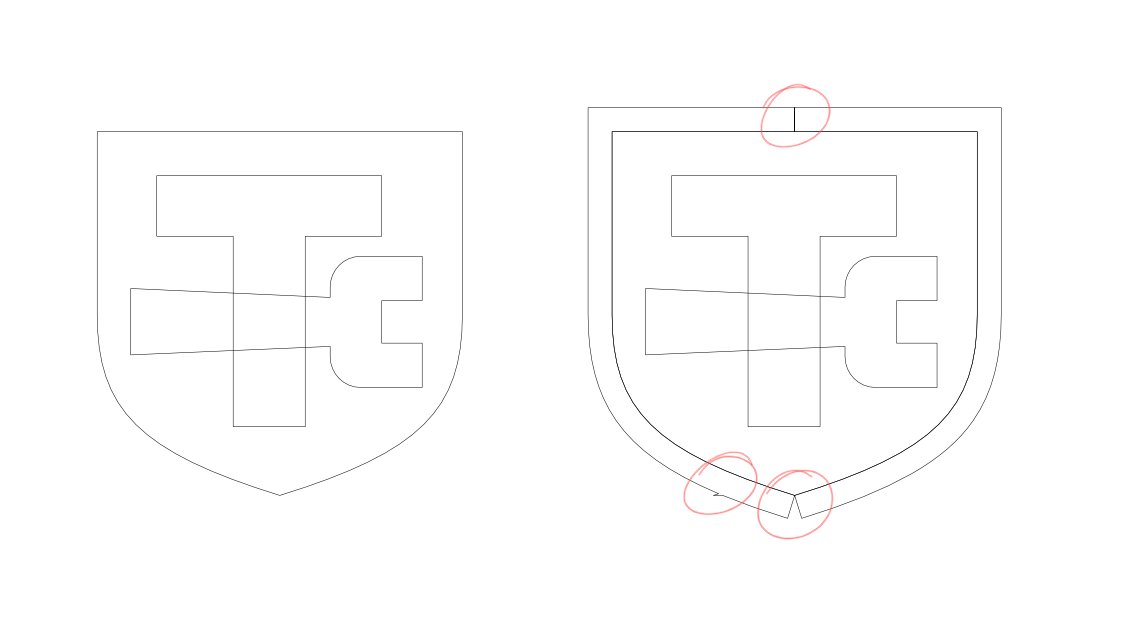
 When expanding the stroke of my drawing, one of the corners break. I've attached images. The first image is before the stroke is expanded, the second one is after. Why is this happening?
-
 Hi, I cannot add a second style with the same fill and stroke colour to the 'styles'. I'm trying to save some styles to the styles menu. They have the same fill and stroke colours but they have a different dash length/pattern. So when I try to add a second one to the styles menu, it doesn't let me do that. I think AD sees this as a duplicate and therefor doesn't let me add it. Only when I change the the colour of it. Anyone out there who can help me out? Thanks
-
 I noticed that when the stroke of an object is set to inline that the fill color of that object is clearly bleeding through behind the stroke. I don't think that's supposed to be as it would mean the stroke is not aligned properly with the border of the object. As you can see this also transfers to exports and is not just a visual glitch. In my example image I have a simple circle, filled with black and on top of that a smaller circle with a white fill and a black stroke set to inline. You can clearly see the white bleed on the border of the inner circle. The bleed also changes with the color of the inner circle's fill. Is there any settings I might have wrong to fix this or is this a bug?
-
 Hello all, So I have to send the print file to the printing house and need an art brush stroke I created to be only 1 color. The brush preset has all sorts of tints and the printing house returned it and told me they need it 1 color only. I only need it for it's rough edges. I tried expanding the stroke so that I can fill it with only one color but that's not possible in AD. I made the stroke normal and expanded it but I cannot apply a roughen edges effect to it now because it does not exist. Please Affinity... Anyone have a workaround to my problem? ! Attached is a zoom on the brush.
-
 Hello Is this possible in Affinity Designer? I can't find any settings. Thank you.
 -
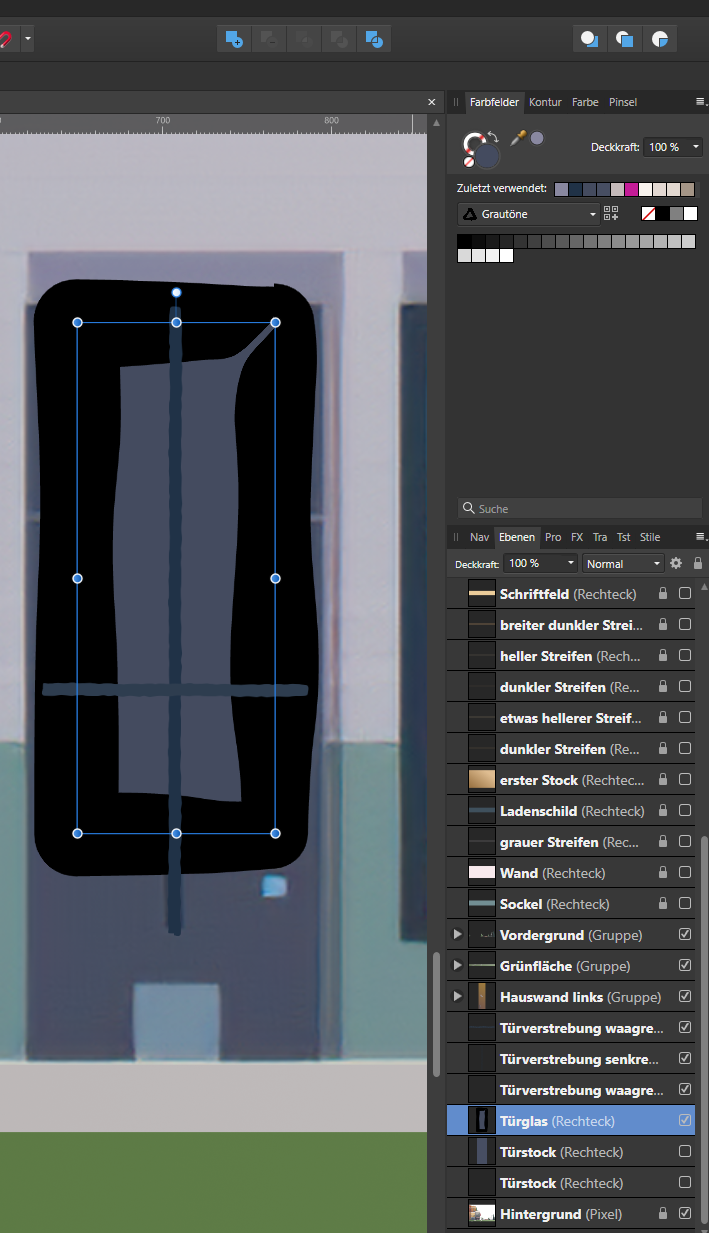
Die aktuelle Version vom Affinity Designer 1.8.4.693 unter Win10 Pro, aktuelle Updates, ist die fehlerbehaftetste seit langer Zeit. Es funktionieren das Subtrahieren von 2 Formen sehr oft falsch, nach einem Neustart verschwindet der Fehler. Es werden übereinanderliegende Ebenen falsch verdeckt angezeigt, und, dafür habe ich einen hübschen Screenshot, nicht vorhandene Konturen angezeigt. Ich hoffe, dass es sehr, sehr bald ein Update gibt. Bis dahin werde ich sicherlich die vorige Version installieren, denn mit der 1.8.4.693 macht die Arbeit keinen Sinn. The current version of Affinity Designer 1.8.4.693 on Win10 Pro, latest updates, is the most buggy version in a long time. Very often the subtraction of 2 forms works wrong, after a restart the error disappears. Layers on top of each other are displayed incorrectly hidden, and, I have a nice screenshot for this, non-existent contours are displayed. I hope that there will be an update very, very soon. Until then I will certainly install the previous version, because with 1.8.4.693 the work makes no sense.
-
 Hey guys, I'm not quite sure how to achieve this. I'd like an objects fill to be transparent, but remove all the intersecting paths/lines behind where the fill of the front objects would otherwise cover up. You can see below (attached image), the desired outcome is on the left, but when I make the fill transparent, you get the result on the right. This is probably simple but I can't think of the right tool or technique to use. So I'd like to keep the strokes shown on the left but have the fill transparent without any strokes behind appearing. Any help is much appreciated!
- 6 replies
-
- 1
-

-
- affinity designer
- fill
- (and 1 more)
-
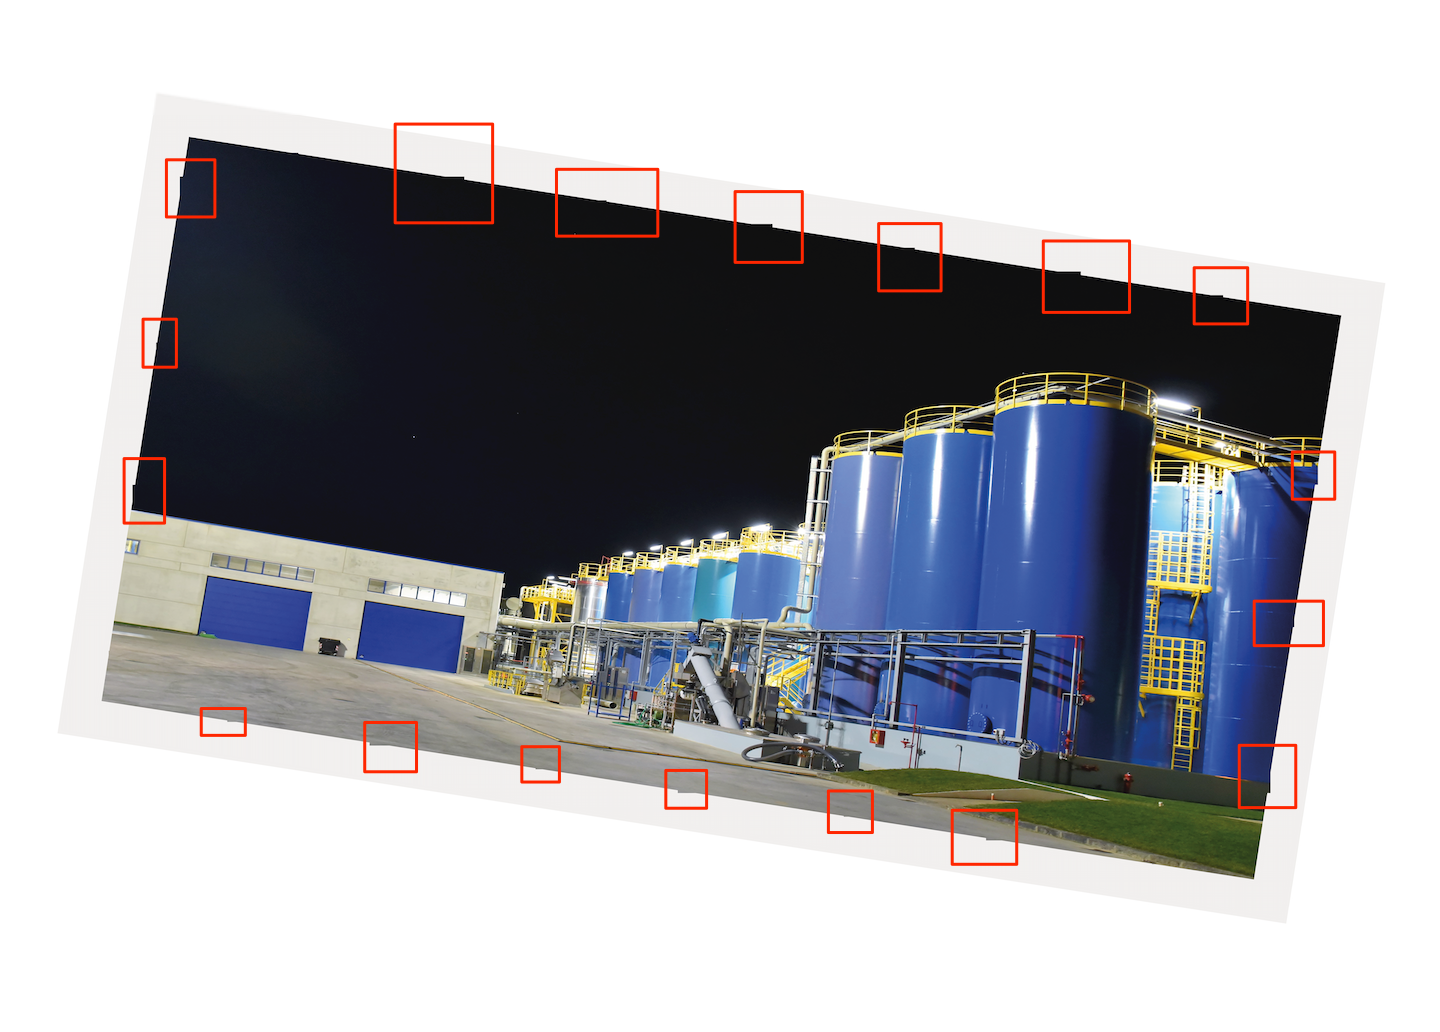
 Hi, I'm experiencing this issue: I have an image clipped inside a rectangle (mask), and the rectangle also have a stroke set. When exporting, or rasterizing the layer artifacts appear on the image edge, it looks like there is some computation error in the subdivision. To reproduce just open the attached Test.affinity and export in Tiff with default settings. Additional info, the issue happens when the clipping mask stroke is set to be inside, see stroke setting pic. Affinity Photo version 1.7.2 release, issue reproduces both on macOS and iPadOS Test.afdesign Test.tiff
-
 There should be a way to switch the way strokes react with the font as an object. Whether it recognizes the letter or the whole word/ phrase as a single object. I heavily dislike that when i increase the stroke size it covers the letters and they overlap instead of just increasing the stroke of the word/phrase as a whole. To get a similar Effect for logos and such i have to physically outline the words and create a solid filled object. This would also be good to stroke multiple objects together. Like a liquid type response, the closer the objects get the two strokes could like “melt” together. AGAIN, i don’t mean for this to be the only way it works, (i see the potential uses for the current application) but i just wish there was a way to select an object(font/word/phrase/letter)and switch how it reacts with other objects(font/word/phrase/letter) around it concerning stroke. *this being the ipad version, i have not dealt with the desktop app yet*
-
This applies to both Publisher and Designer. Publisher 1.8.3.641 on Win 10. If I add a stroke outline to text, weird things happen as I increase the stroke weight. The outline/halo ends up with lots of holes in it, particularly at high stroke widths. Interestingly this only happens for "solid" stroke style. Some fonts are worse than others. If I change to "dotted" stroke with curved end caps then I get a solid outline, i.e. what you would expect from "solid" stroke style. Sometimes the holes in the outline disappear on PDF export, sometimes not. textoutlinetest.afpub
-
 How do I combine these text letters into one shape/object and keep the stroke size intact? I converted the text to curves, I then "add" the shapes. And what happens is that I loose the stroke size, and the inner white areas are filled in. Thank you to anyone for helping solve this issue.
-
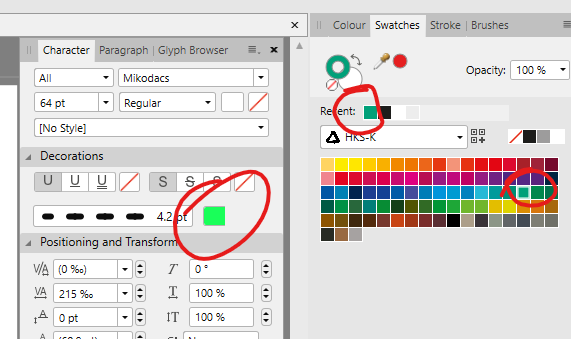
Colours in Character panel in light mode are wrong. See the example below. Both greens are the same, but should look like the one in Swatches panel. 1.8.3.641
-
 After upgrading to Affinity Photo 1.7 I can now no longer find where or how to set the stroke width of font elements. I create a font and write a text and i have found I can use the alternative colour on the colour palette to make a stroke colour on the font, but I can not find any way of editing the width of this stroke. This previously used to be an option from the Font sub menu bar. Where has it gone?
 -
 In Affinity Photo 1.8.3.641, if you are creating vector shapes with a transparent color as the foreground and then switch to the Paint Brush Tool, the transparent primary color in the inkwell icon will switch to white, but the brush will retain the transparency from the previous mode, so when you try to paint, the brush will not paint white but be "off". You have to click on the small Transparency circle in the bottom left corner of the inkwell tool for it to display correctly. Display error is consistent on both the Tools Panel 2-column inkwell icon and the one in the Color Studio. Examples of the inkwell icon/tool:
- 1 reply
-
- 1
-

-
- primary color
- seconadary color
- (and 7 more)
-
I have a very very big and annoying issue with Affinity Designer when im using appearence (Expand Stroke) feature !!! Its keep completely freezing up and pop out Affinity Designer stop responding on my macbook everytime im trying to make a offset "ouline" or multiple its freeze up and pop put non responding etc... Does any of you experiment this issue ?
-
Howdy, I have encountered some unexpected behavior when exporting a project into PDF. Went for 1.6, rasterize unsupported features. Not a great issue, as I can currently expand strokes and merge objects, but in case these were smaller objects that I could not spot being badly exported, I could be a problem. Two objects have strokes that also have some elements with raster effects in background. They are either curves or a shape. 1) In case of calendar icon, the transparency of group is lost when exported to PDF and the elements overlapping display higher opacity. When exported to JPG, it looks fine. 2) In case of location icon, the group is changed, one object gets fill. Designer view to the left and exported PDF to the right. Files are in uploads - afdesign and pdf for comparison. As you will observe, exporting the same elements on blank background produces proper results. faulty-export-pdf.afdesign faulty-export-pdf.pdf
-
I'm experiencing problems when expanding strokes. Please see the attached examples. I accidentally posted on the Windows Bugs thread earlier, so I'm reposting here.
-
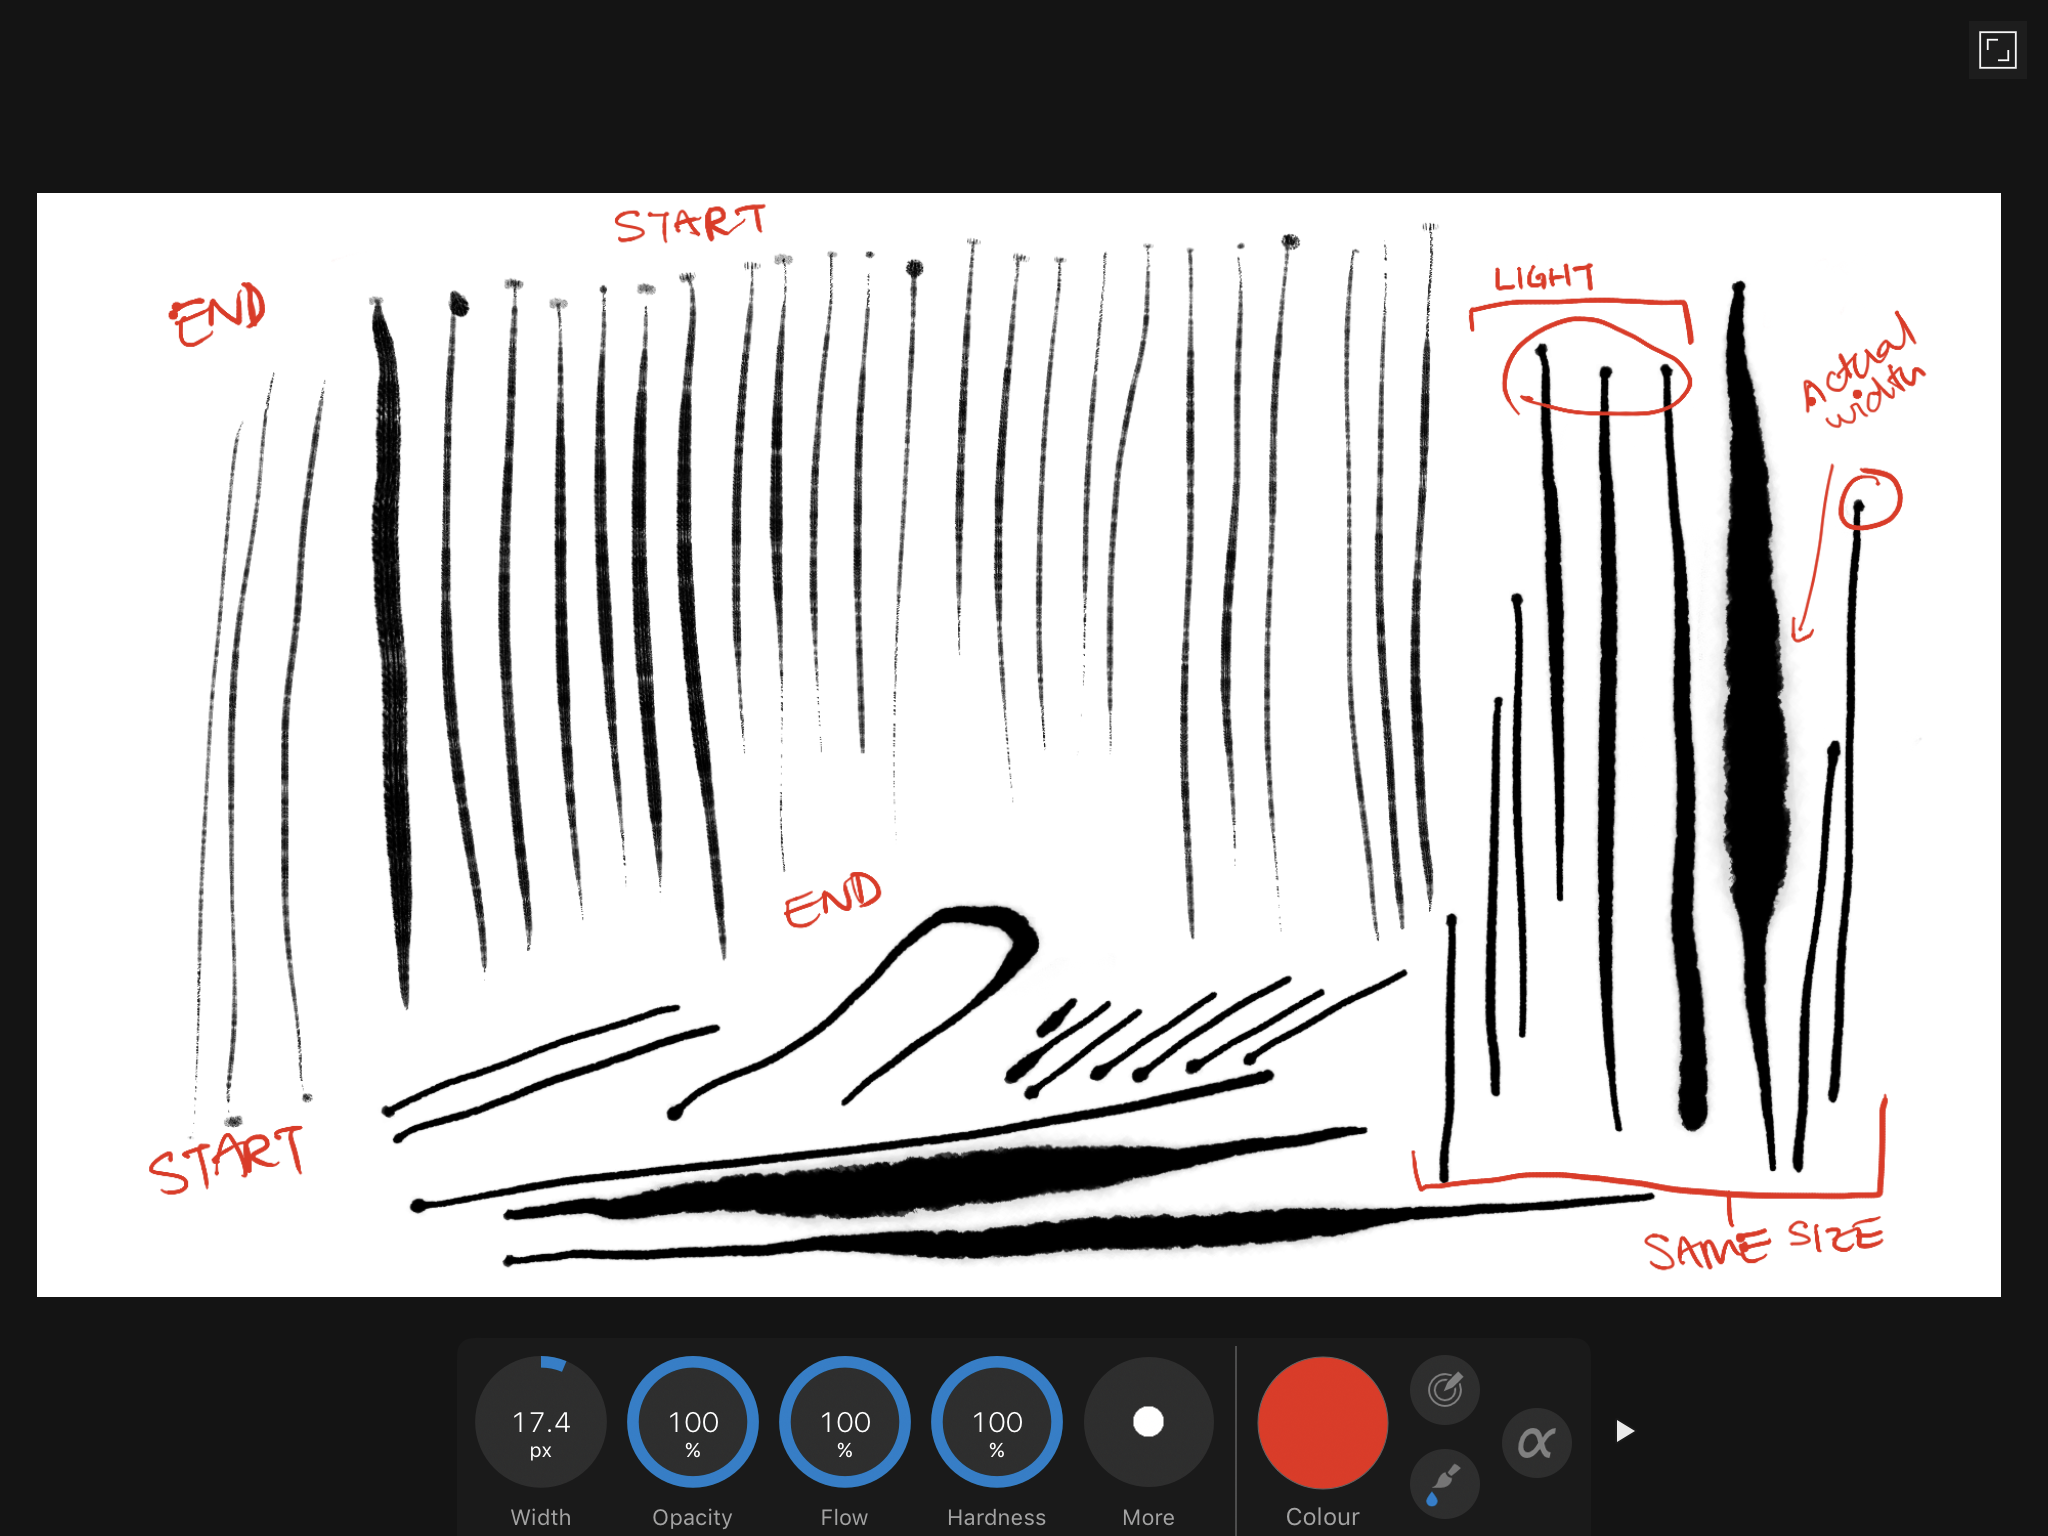
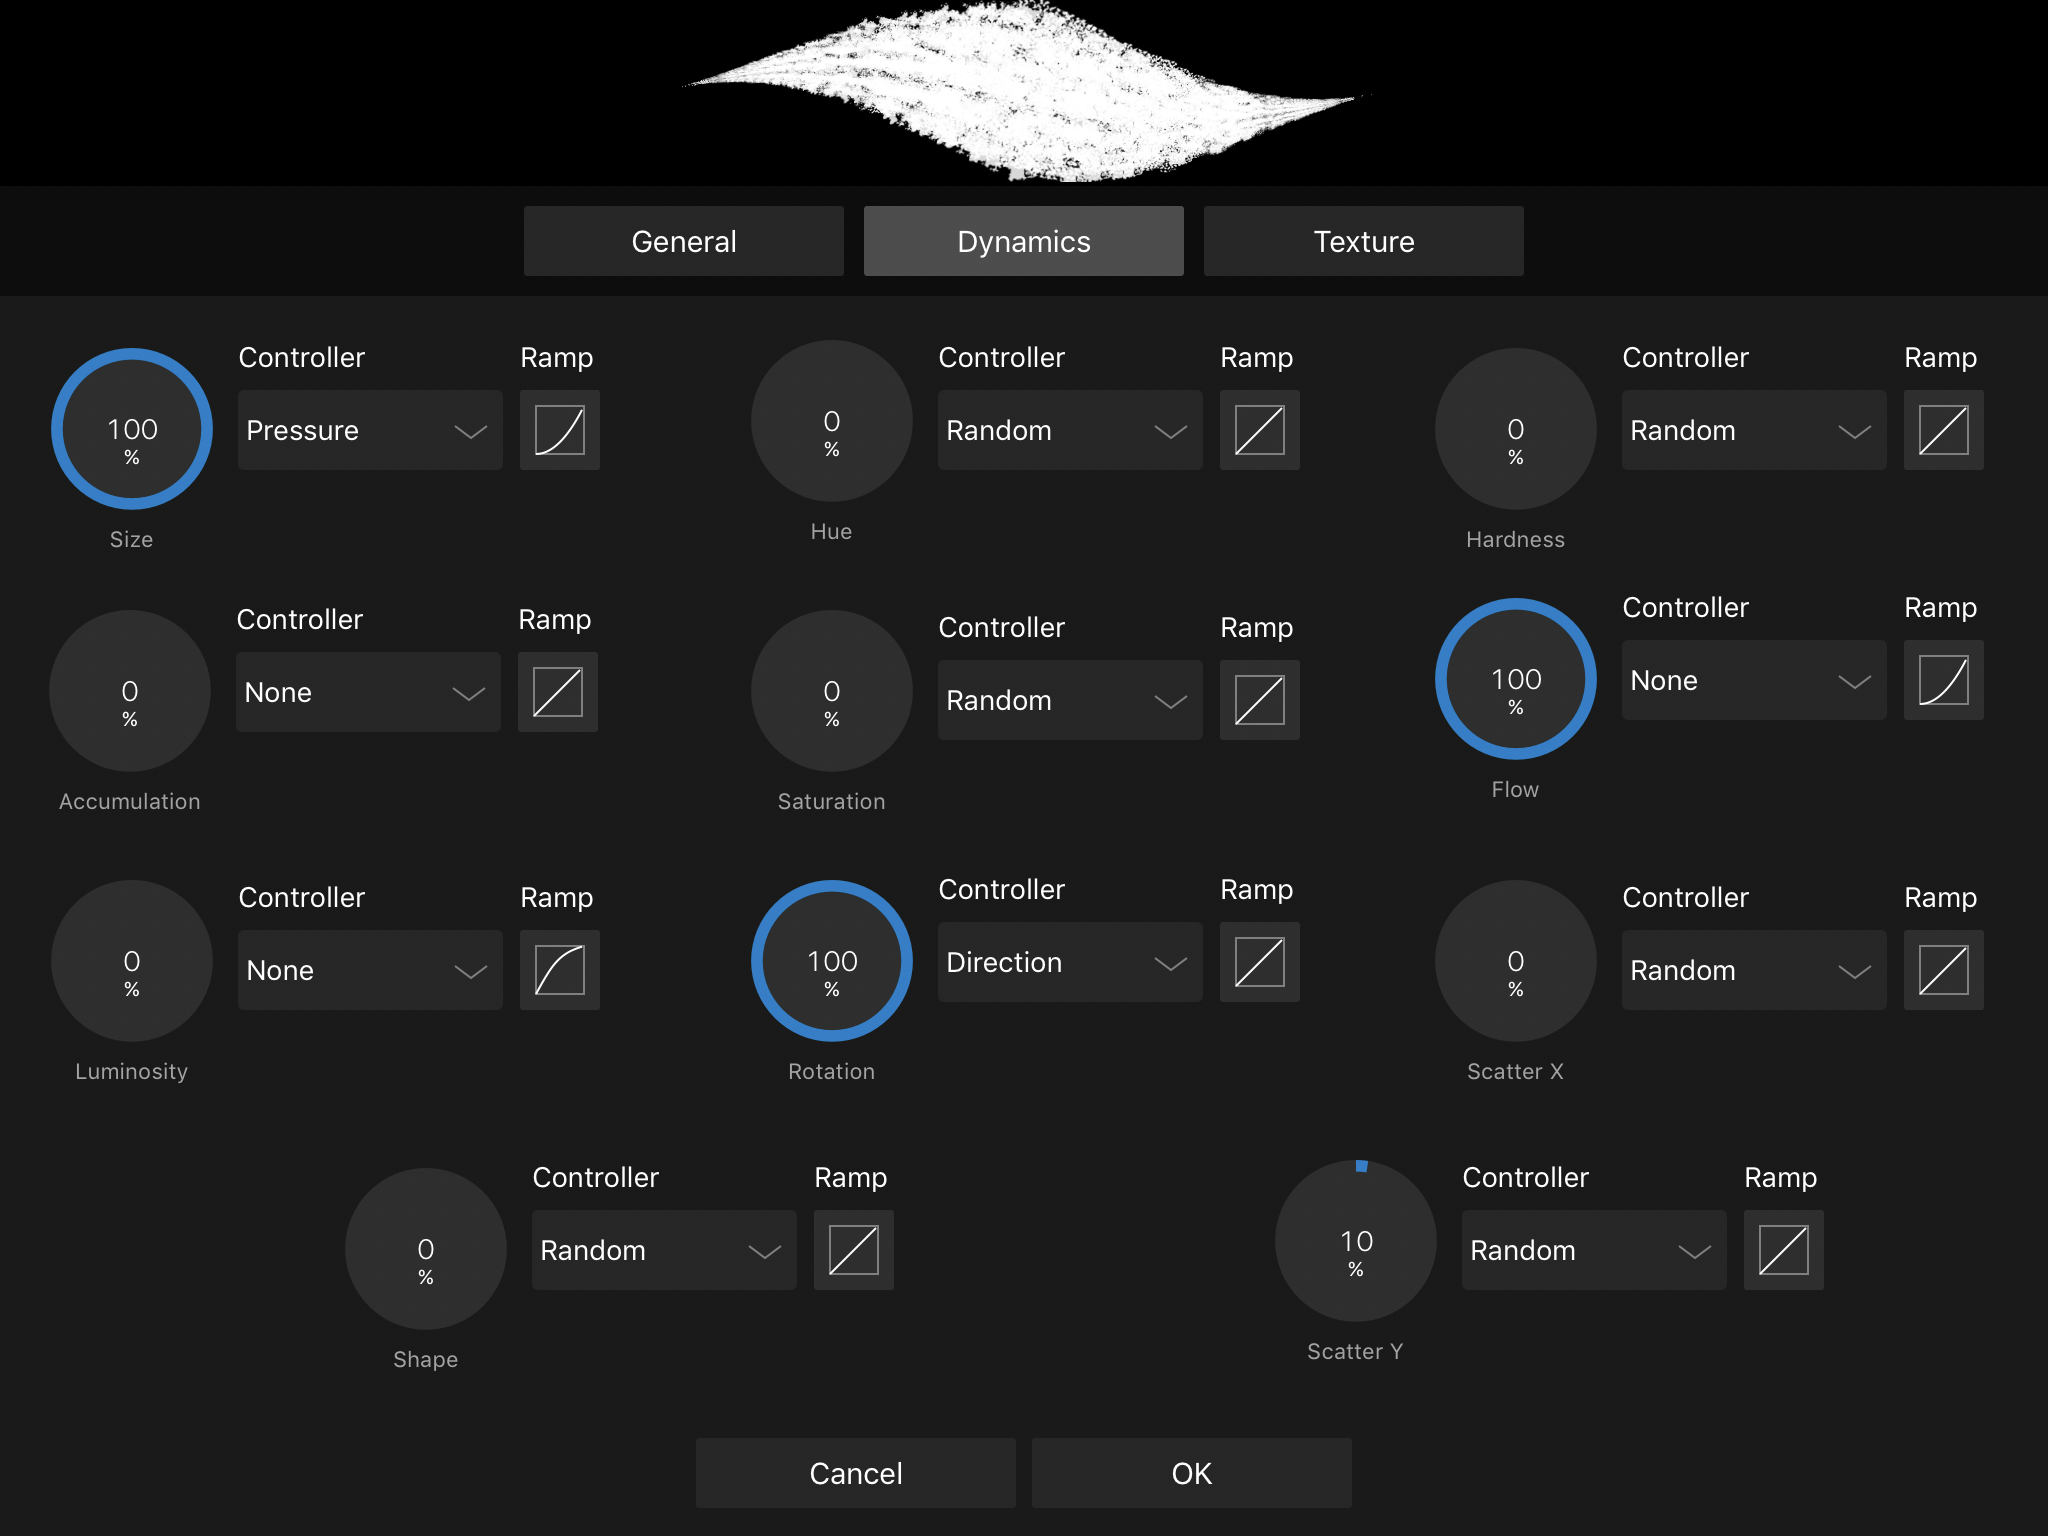
 Hi all, a new affinity photo user here. I just got the app on the ipad, and have not used this at all, so it's all still a tad foreign. I tired looking up some information on my issues, but found it slightly difficult to locate answers to my questions. So hoping some people can help me out here/ direct me towards the right place. 1. First issue regarding importing photoshop .abr files, I've tried with an .abr file with just one brush, and that seem to work. However when I tried to import a larger .abr file containing multiple brushes (around 700mb) the app would crash. The brushes are from photoshop cs5- cs6 so I'm not entirely sure if it's just a really large .abr file or it can only be one brush at a time? 2. Brush group adjustments, by default, there are multiple brush groups, with different kinds of brushes eg dry brush, drawing...etc. However it doesn't seem like you can edit / move / duplicate the brushes around between these groups? Or I just haven't figured it out. If anyone can clarify that, it would be great. The only thing you seemed to be able to do is edit settings, rename the brush, and delete the brush. 3. Having then tried to adjust some setting on the brushes, I've noticed that when I set brush size to 100% regardless of curve adjusts there is always this initial spot from the brush at a larger size as if I was apply a lot of pressure, however I would only be pressing extremely lightly, it was then jump to presumably what the size should be for that pressure, and then the rest of the stroke is fine. Attached are some images of some of the strokes, and settings which I've adjusted it to, again I'm not entirely familiar with how all the settings work, but I cannot figure out how to change the setting to have just a nice smooth line tapering properly. Hopefully someone will be able to enlighten me on my current situation. Thanks!
-
Would be nice if you cloud add Pencil style preset feature that can save and switch stroke style quickly like vector brush.
-
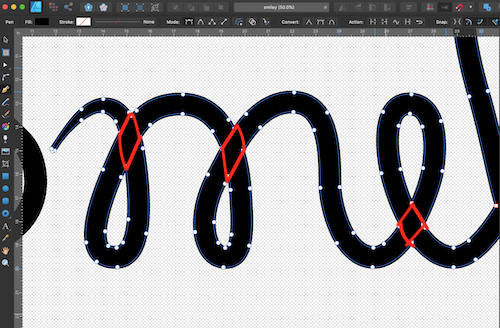
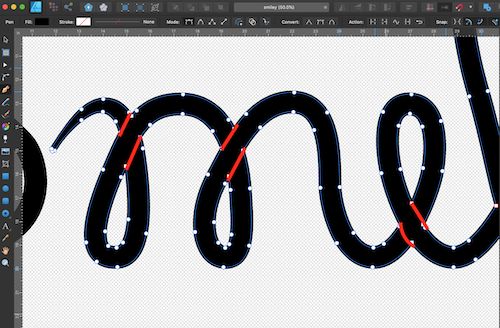
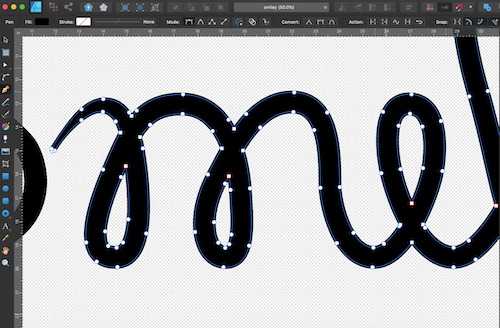
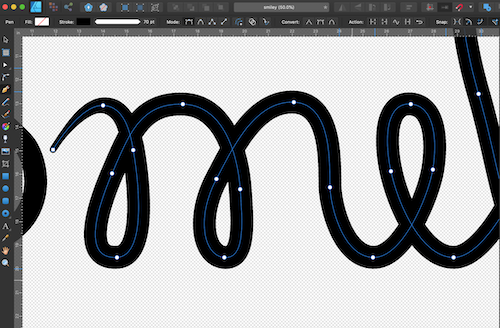
 I have a single stroke making a word in cursive. The sections of lines that overlap merge into a single flattened shape when I expand. I would like for the stroke to be expanded as just the path or in sections so I can make the stroke appear to be weaving. (Images: 1.Stroke, 2.Expanded Stroke, 3.Output if stroke were consistent with path, 4.Output if stroke expanded in sections)
-
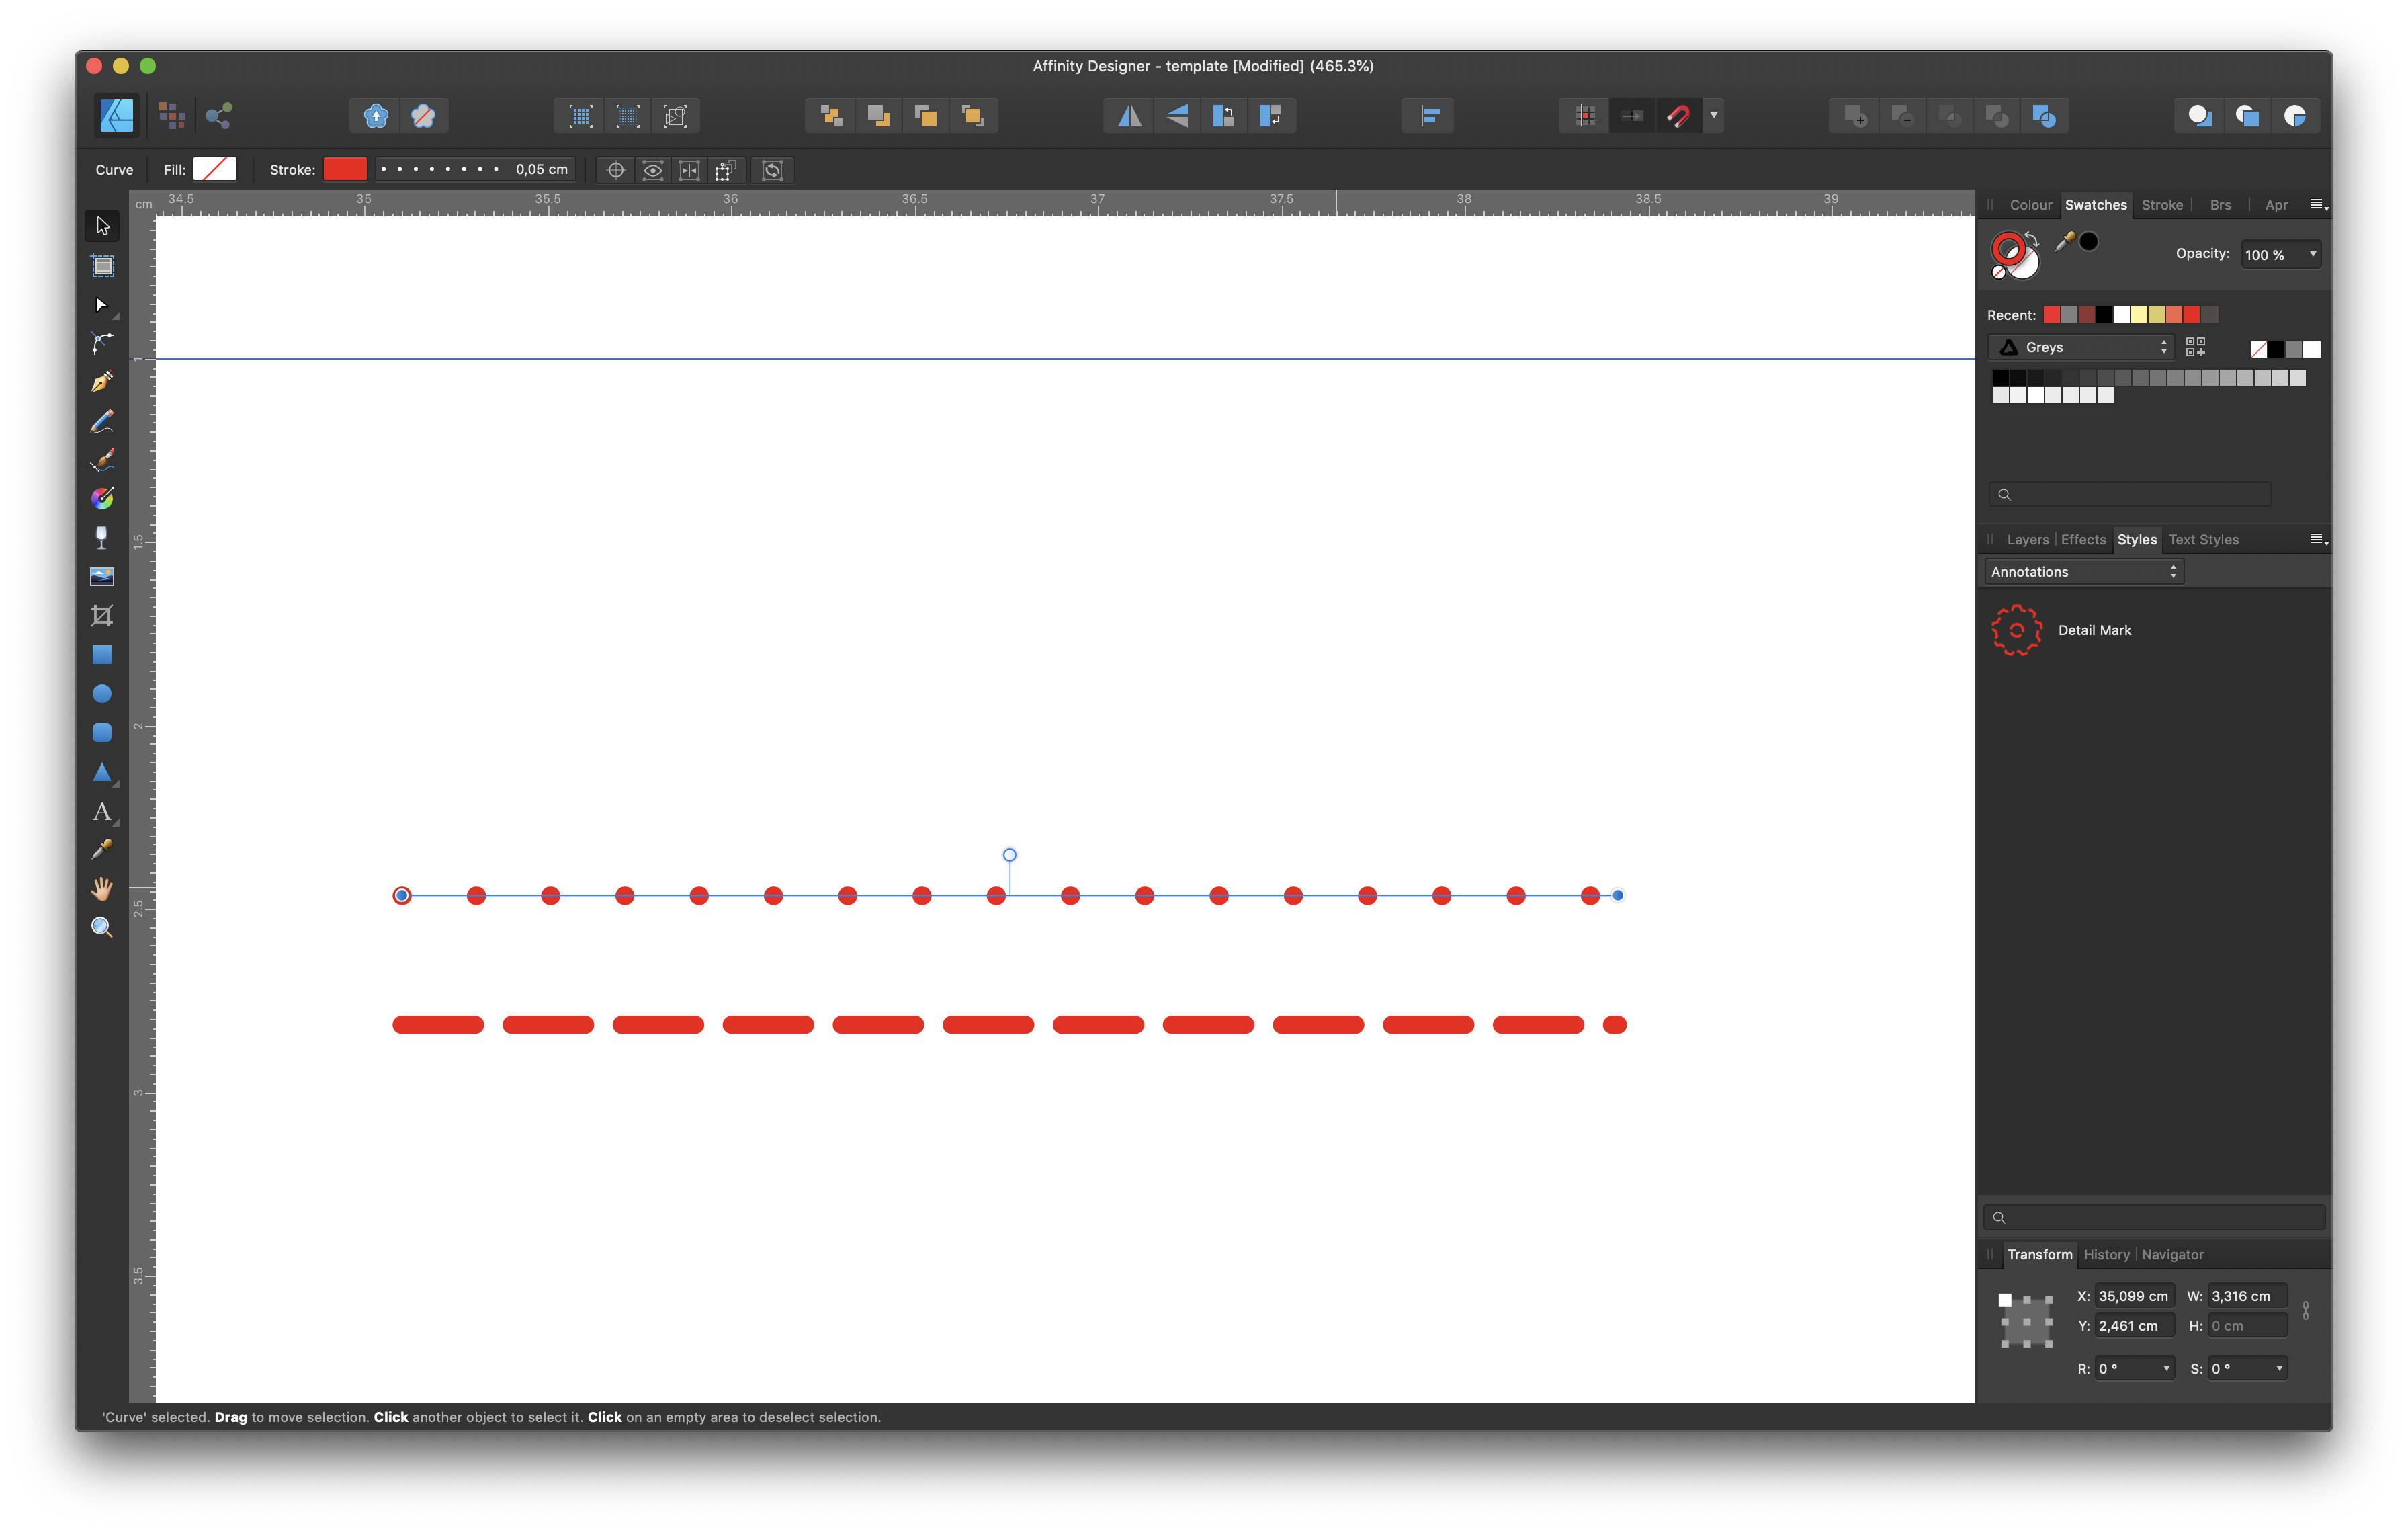
 Hello world, Does anyone know how to align a these circles on a path or stroke ? Thank you
-
 How can one create a border - either in a straight line or in a dashed line - like the one you can create with the “stroke” function in photoshop?
 -
 I am fairly new to the three affinity products on a desktop. I have run into a problem In trying to use publisher to set up a grid (template) to overprint S/A labels. The attached file does not print on my HP Laserjet 700 M712 monochrome printer nor if I try to print directly to PDF (Microsoft print to PDF). I can, however, export to PDF and get to print the file that way. Admittedly is is a fairly nonstandard paper size (B6) but this does not cause a problem with the printer. Have I missed something fundamental in my set up? teststroke.afpub
 -
 IU'm converting from Photoshop and struggling to understand something - In the colour panel, there are 2 colour circles which appear to correspond to a 'fill' colour, and a 'stroke' colour - whereas in Photoshop they relate to Foreground and Background colours. Does Affinity Photo have a concept of Foreground and Background colour or not? In Photoshop I can create a gradient from the foreground colour to the background colour - how do I do the equilavent in Affinity Photo? I used the colour dropper tool to select 2 colours in a photo, but as soon as I switch to the gradient tool I don't seem to be able to use the colours I picked, as a white gradient fills the entire layer and I cannot find an option to go from Fill to Stroke colour.