Search the Community
Showing results for tags 'smudge'.
Found 4 results
-
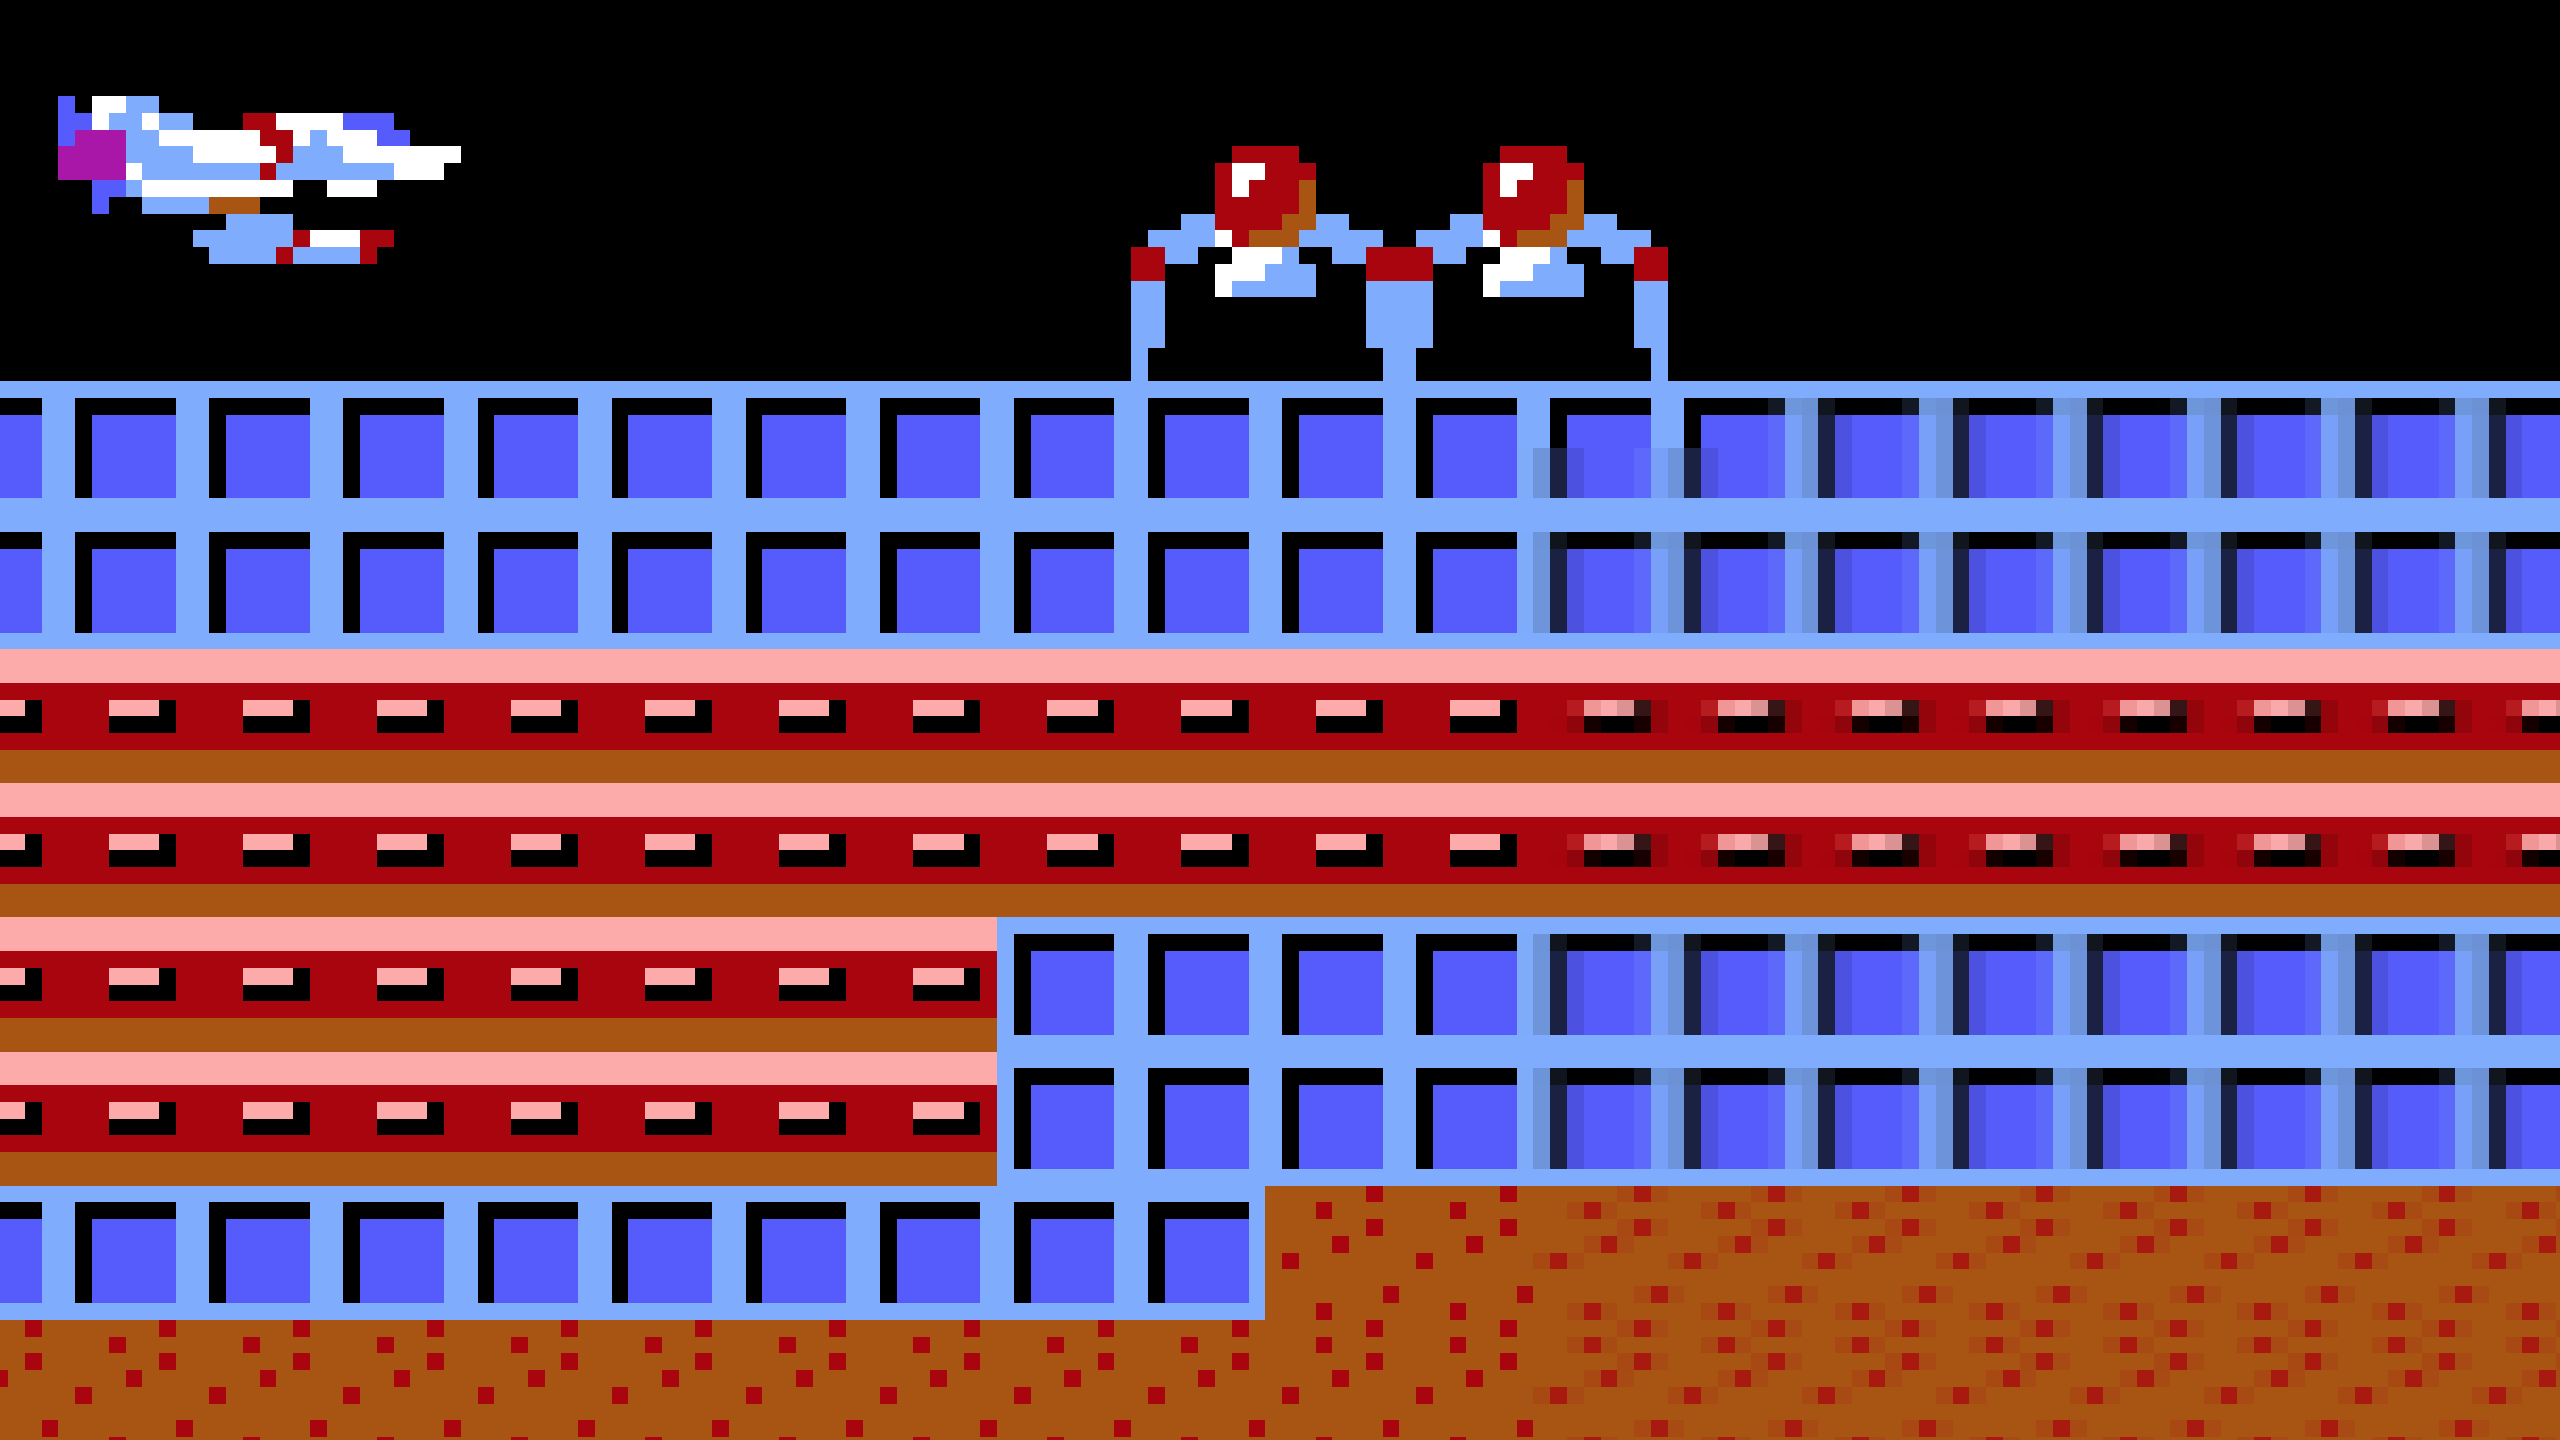
 I've been piecing together a large image of the first level of the Sierra/GameArts video game "Thexder" from many screenshots. I open each screenshot PNG in Photo, crop off the bottom game UI, copy the image, close it, and paste that copied content into my main document. As I paste these shots into my primary document, the sharp solid colors in the image start to degrade at their edges, in ways you would see if you resampled an image to scale it. I am NOT scaling anything. Sometimes it's REALLY bad upon pasting a new chunk of image into the main document. In THIS specific case, it seems that undoing the paste, zooming WAY out in the document, and pasting again results in a correct paste (this time it pastes in at the top left corner of my document, where as before it pasted where I was working). Moving layers around shows the color shifts happening as part of rendering the layers on screen, but merging down, etc, will eventually start to show that the edges of hard color borders are "smudged" with slight color shifts. Anyone who plans to use Affinity Photo to create pixel art should beware. This could be especially problematic when changing between set palettes and full-color. It also has me wondering how much degradation is going on all the time. How much blur is Affinity Photo adding to everyone's images while they're working on them, unsuspectingly? I only noticed this because of working at the pixel level, zoomed in at them, and knowing the explicit limit of 16-colors in these screenshots (the game only shows 16 colors from an MCGA palette). My main document is a regular Affinity Photo document. I am importing PNG images from Boxer (DOSBox shell in Mac OS) which are 320x200. I've attached an image showing what's happening. I have zoomed way in so that you can see the individual pixels (very important with pixel art). The left side of the image shows sharper content while the right side has areas that have been through layer movement and merging down. One edge even turned partially transparent. EDIT: It seems to be getting progressively worse as I extend my canvas to the right and downward, as the older content to the upper left does not seem degraded.
-
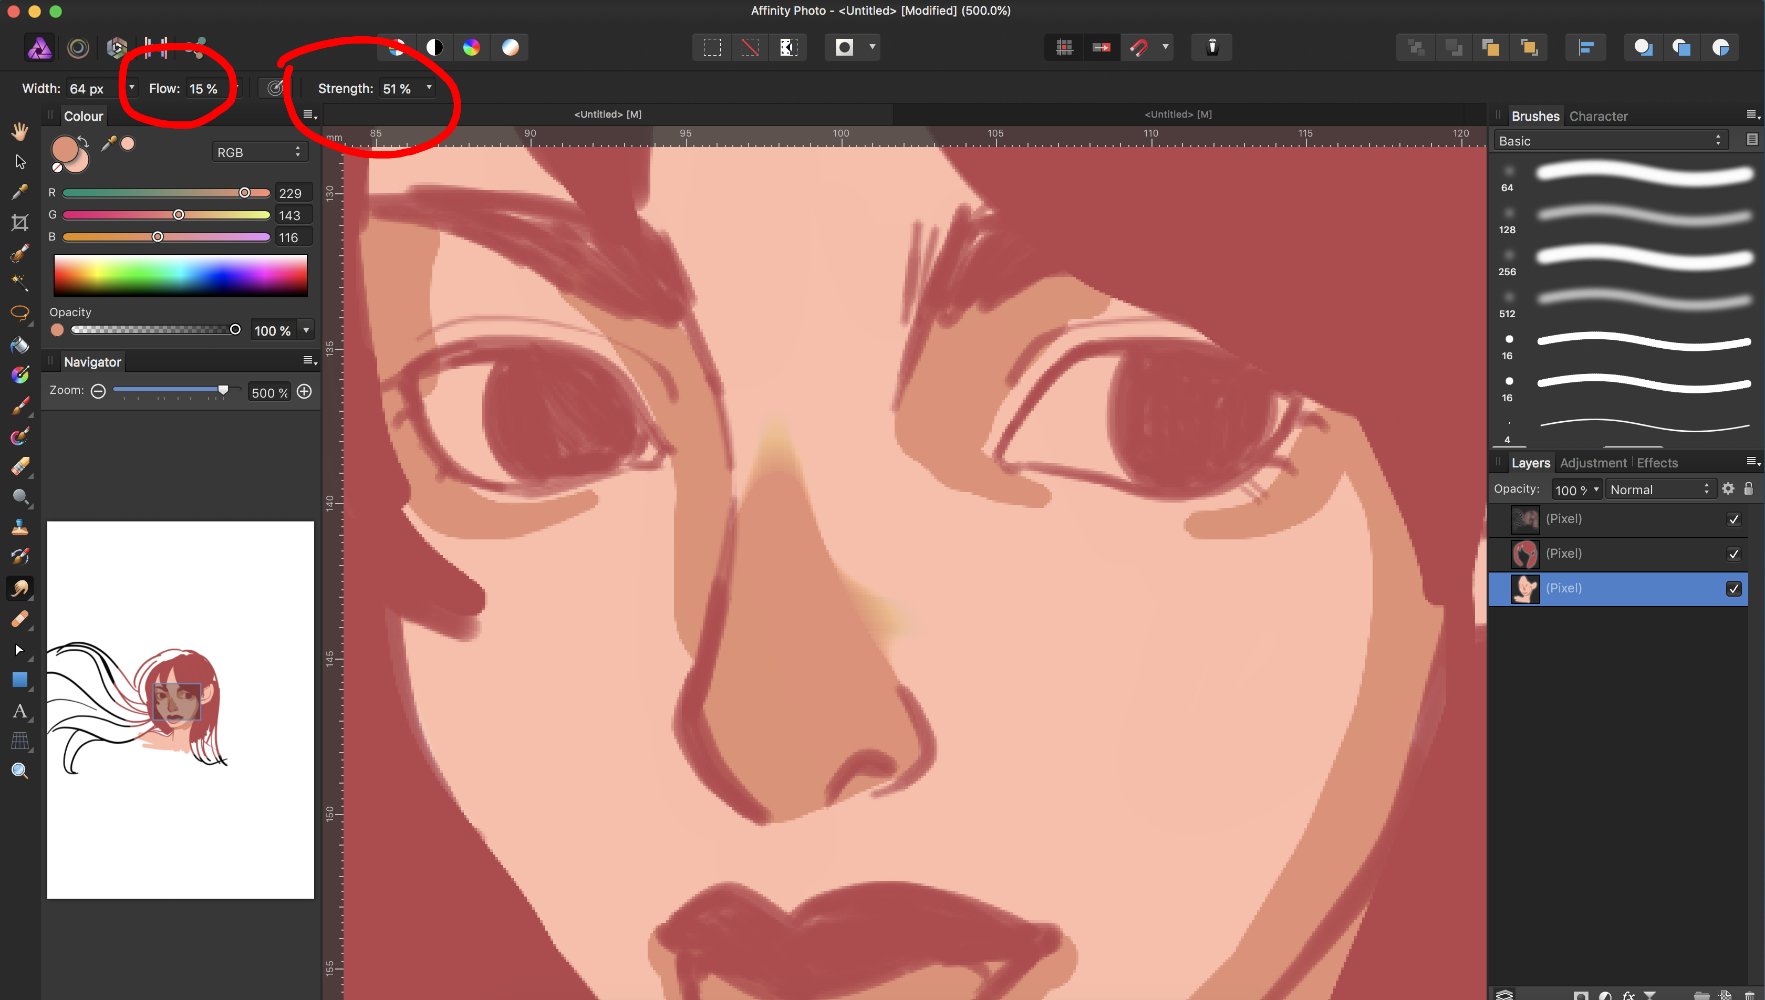
 Hello everyone, I have a huge issue with the Smudge brush tool in Affinity Photo (Mac). When I use it to blend between two colours, it messes them up completely. I tried a lot of settings, even tried the smudge pre-set from DAUB brushes library but they all do the same. Please see below screenshots of the setting used and some tweaks with flow and strength. Can anyone help me out??
-
 Okay, a preamble before I tell you what I have found. I use blending a lot in my artwork and what I previously found is that the AP smudge tool does a relatively OK job on large areas of blending but doesn't do well on any blending with a brush size smaller that 75-08 pixels. ( which I need) After receiving a response back to my forum posting about getting a better AP blending tool, I revisited AP and its smudge tool with the hope of uncovering something I missed. What I found holding back the performance of the smudge tool was the type of brush it was set to. Any brush setting with a texture or/and grain produced an OK blend for large areas but fell short of anything acceptable for smaller blend areas , if the smudge brush was less than 75 pixels. The solution, I found, was to make sure that the smudge tool was using a brush that had no built in texture or grain.. ie. use the basic set of brushes. For the IPAD version of AP: I found that the Basic> large Round Brush works the best For the Desktop version of AP: I found that the Basic> Round light brush works best. Of course you have to you have to play with width, flow and strength settings. So there you have it.. Buried within the AP toolset is a wonderful Blender for digital painting! Now the smudge tool works perfectly and can stand next to Procreate's blender. The first image is something I did in AP on the Ipad, with the basic >large round brush as the blending tool. ( okay, I got carried away by the fun of using my newly found AP blender) The second image done on the Mac desktop using the AP round light brushes. If there is enough interest in seeing this blending technique in action, I could create a video of the process. Enjoy! Gregory Clarke-Johnsen
- 6 replies
-
- 2
-

-
- blending tool
- smudge
- (and 1 more)
-
 I'm a graphic artist who has worked with PS in its various iterations for years. Unhappy about paying thirty bucks a month for a professional subscription with a lot more bells and whistles than I actually wind up using, and seeing a lot of buzz about Affinity as a genuine alternative. (No, thank you, Gimp and Corel, I'm too old a dog to learn your new tricks...) So, I'm checking out Affinity on the ten-day trial right now. At first glance I'm impressed. At second, actually loading and playing inside the program, it seems to have a simple workflow with all the shortcuts and quickbuttons I'm used to, enhancing the learning curve... BUT immediately upon importing a project and trying to work with it as I would normally, I notice some aspects missing that I'd consider absolute essentials for a minimum standard of design and editing, and some peculiar responses that feel like glitches. a) There is no easy way to merge or delete layers en masse - ridiculous. The 'merge visible' or 'delete hidden' control is crucial for getting through blends quickly and efficiently.b) Where is my clone brush? One hard-edge, one soft-edge: so vital for making basic repairs to any pixel-based image. c) copying over multiple layers from one project to another seems to produce uneven results, edges misaligned or showing up in strange ways. C&P should be exact, not approximate.d) Switching from one tool to another should not also switch you into a different layer. You can really foul up your project by drawing or erasing on the wrong layer, especially if it already contains pixels which you are 'painting over' or images you are enhancing. At the very minimum, you lose the work you've done if you've, say, traced directly on your reference image rather than the layer above it, as a simple example.e) This might be me missing something, but the 'flood fill' doesn't seem to have an opacity control with it, just a boundary sensitivity. I tried adjusting it in the colour panel on the right with no results, and then tried 'fill opacity' under the Effects tab, which made my entire original image opaquing, but had no effect on the actual level of fill. Sometime you just want a subtle blush of colour added to an object, not the crude spraycan of MS Paint. (The 'smudge' also has a very different feel, like trying to use my fist instead of my finger to blend. Maybe I just need to fiddle with settings and get used to it.) If I could get a clone brush and a layer merge, I'd pay the fifty bucks for this program so fast Adobe wouldn't see my dust. Can someone give me some workarounds, or are there pro solutions coming to these issues? With appreciation - Bard Judith (http://graphictional.weebly.com)