Search the Community
Showing results for tags 'sharp'.
Found 15 results
-
When typing text in a Photoshop document, there is a popup available that displays the following anti-aliasing options: None Sharp Crisp Strong Smooth The addition of these would make Affinity Photo's type handling even more powerful. Thanks.
-

Text & Logo pixelated
carlcengiz posted a topic in Affinity on Desktop Questions (macOS and Windows)
Hey folks, I have a problem:) I created a Christmas card with affinity designer. In affinity, everything looks fine. If I export the file (png or jpg) the text is not sharp. I tried almost everything I found on google, but it doesn't work. Attached the jpg. Can anybody help me out. Thanks Carl
-
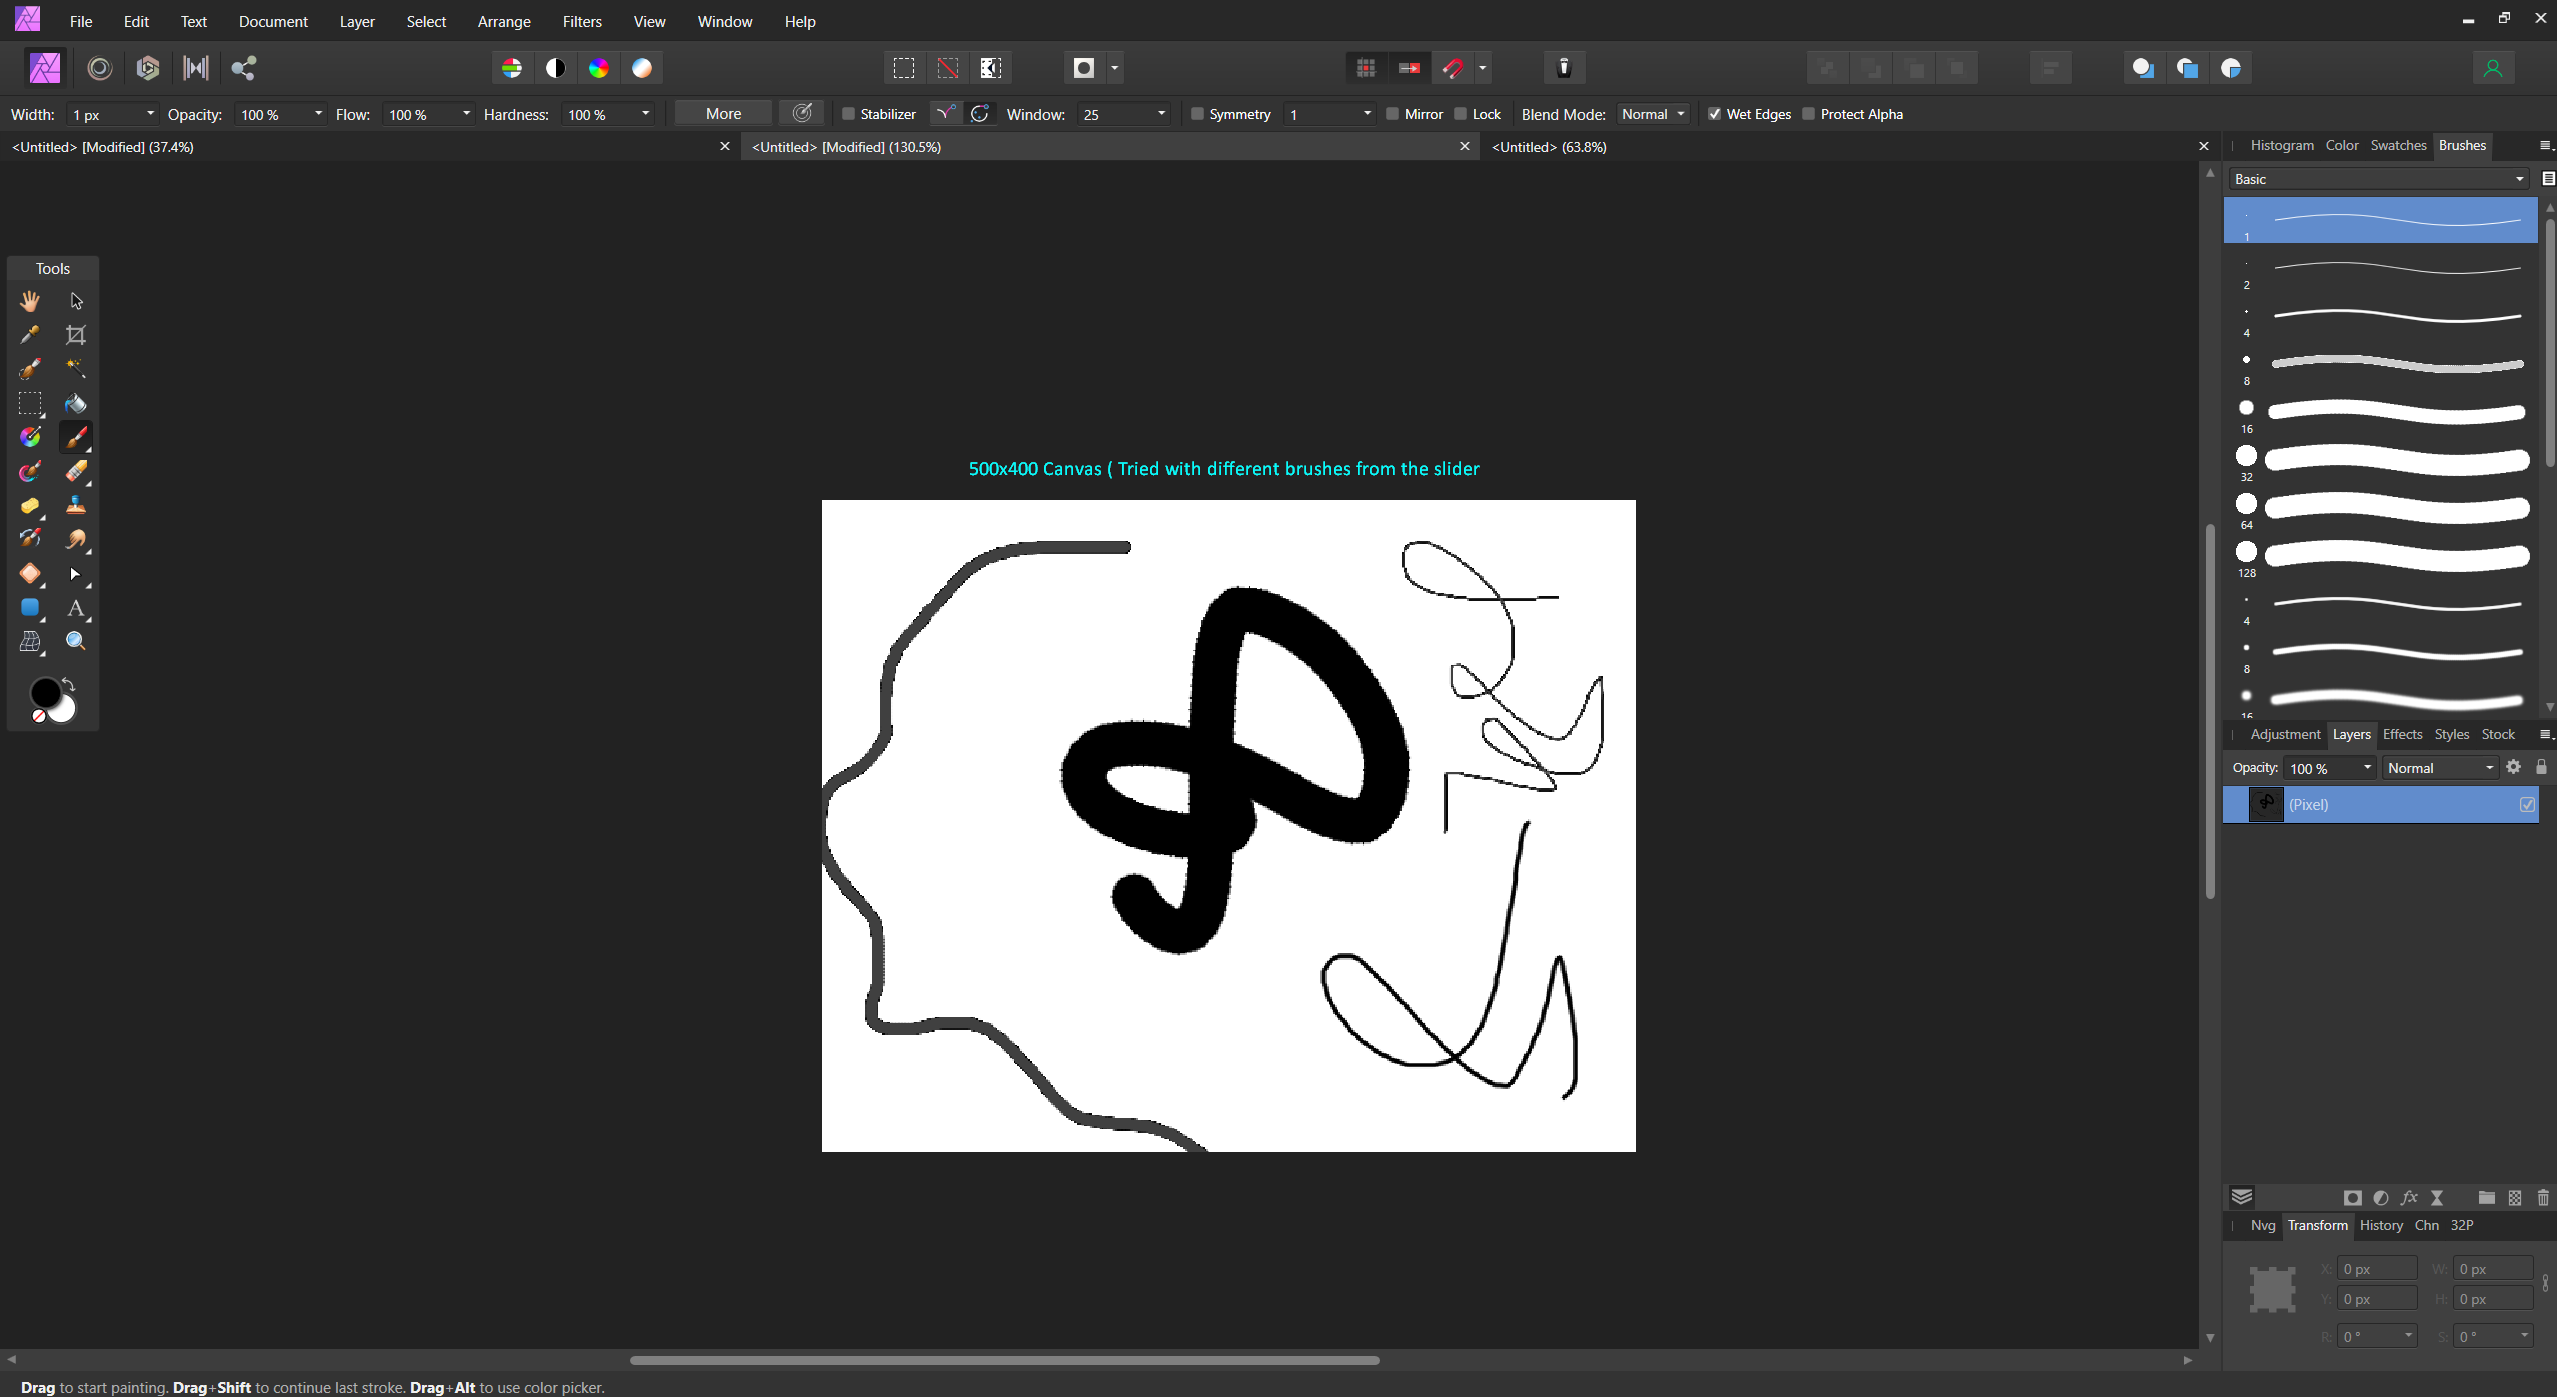
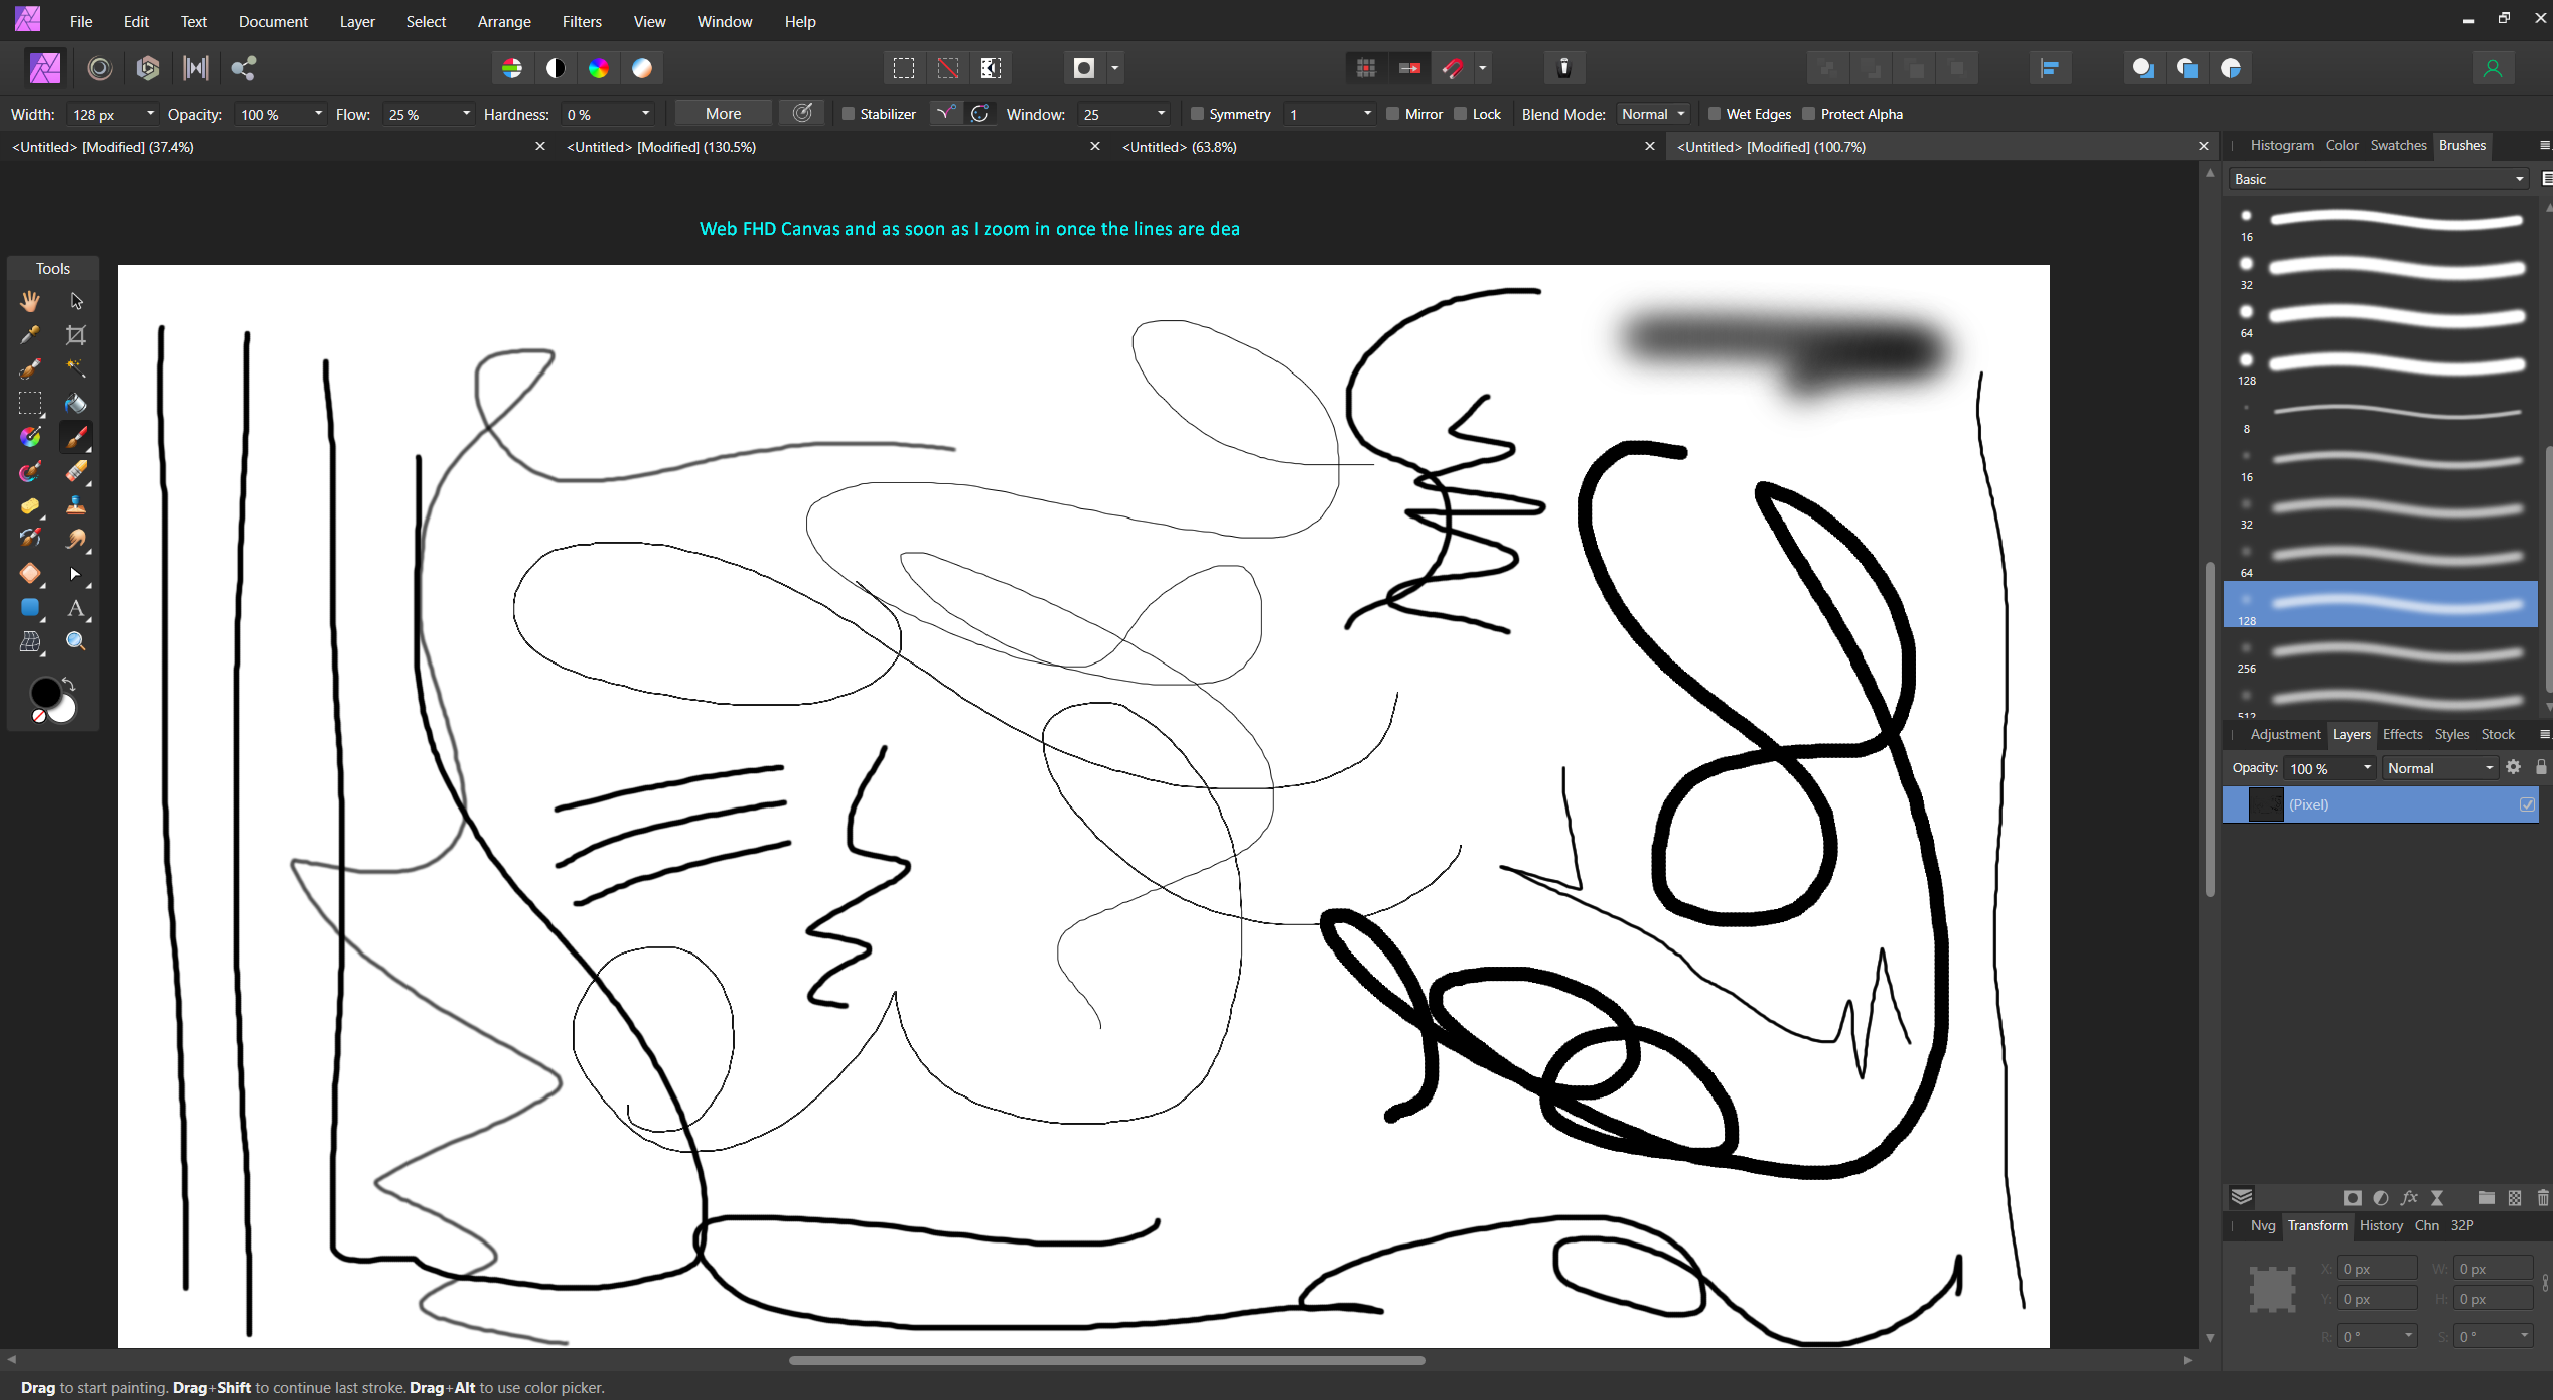
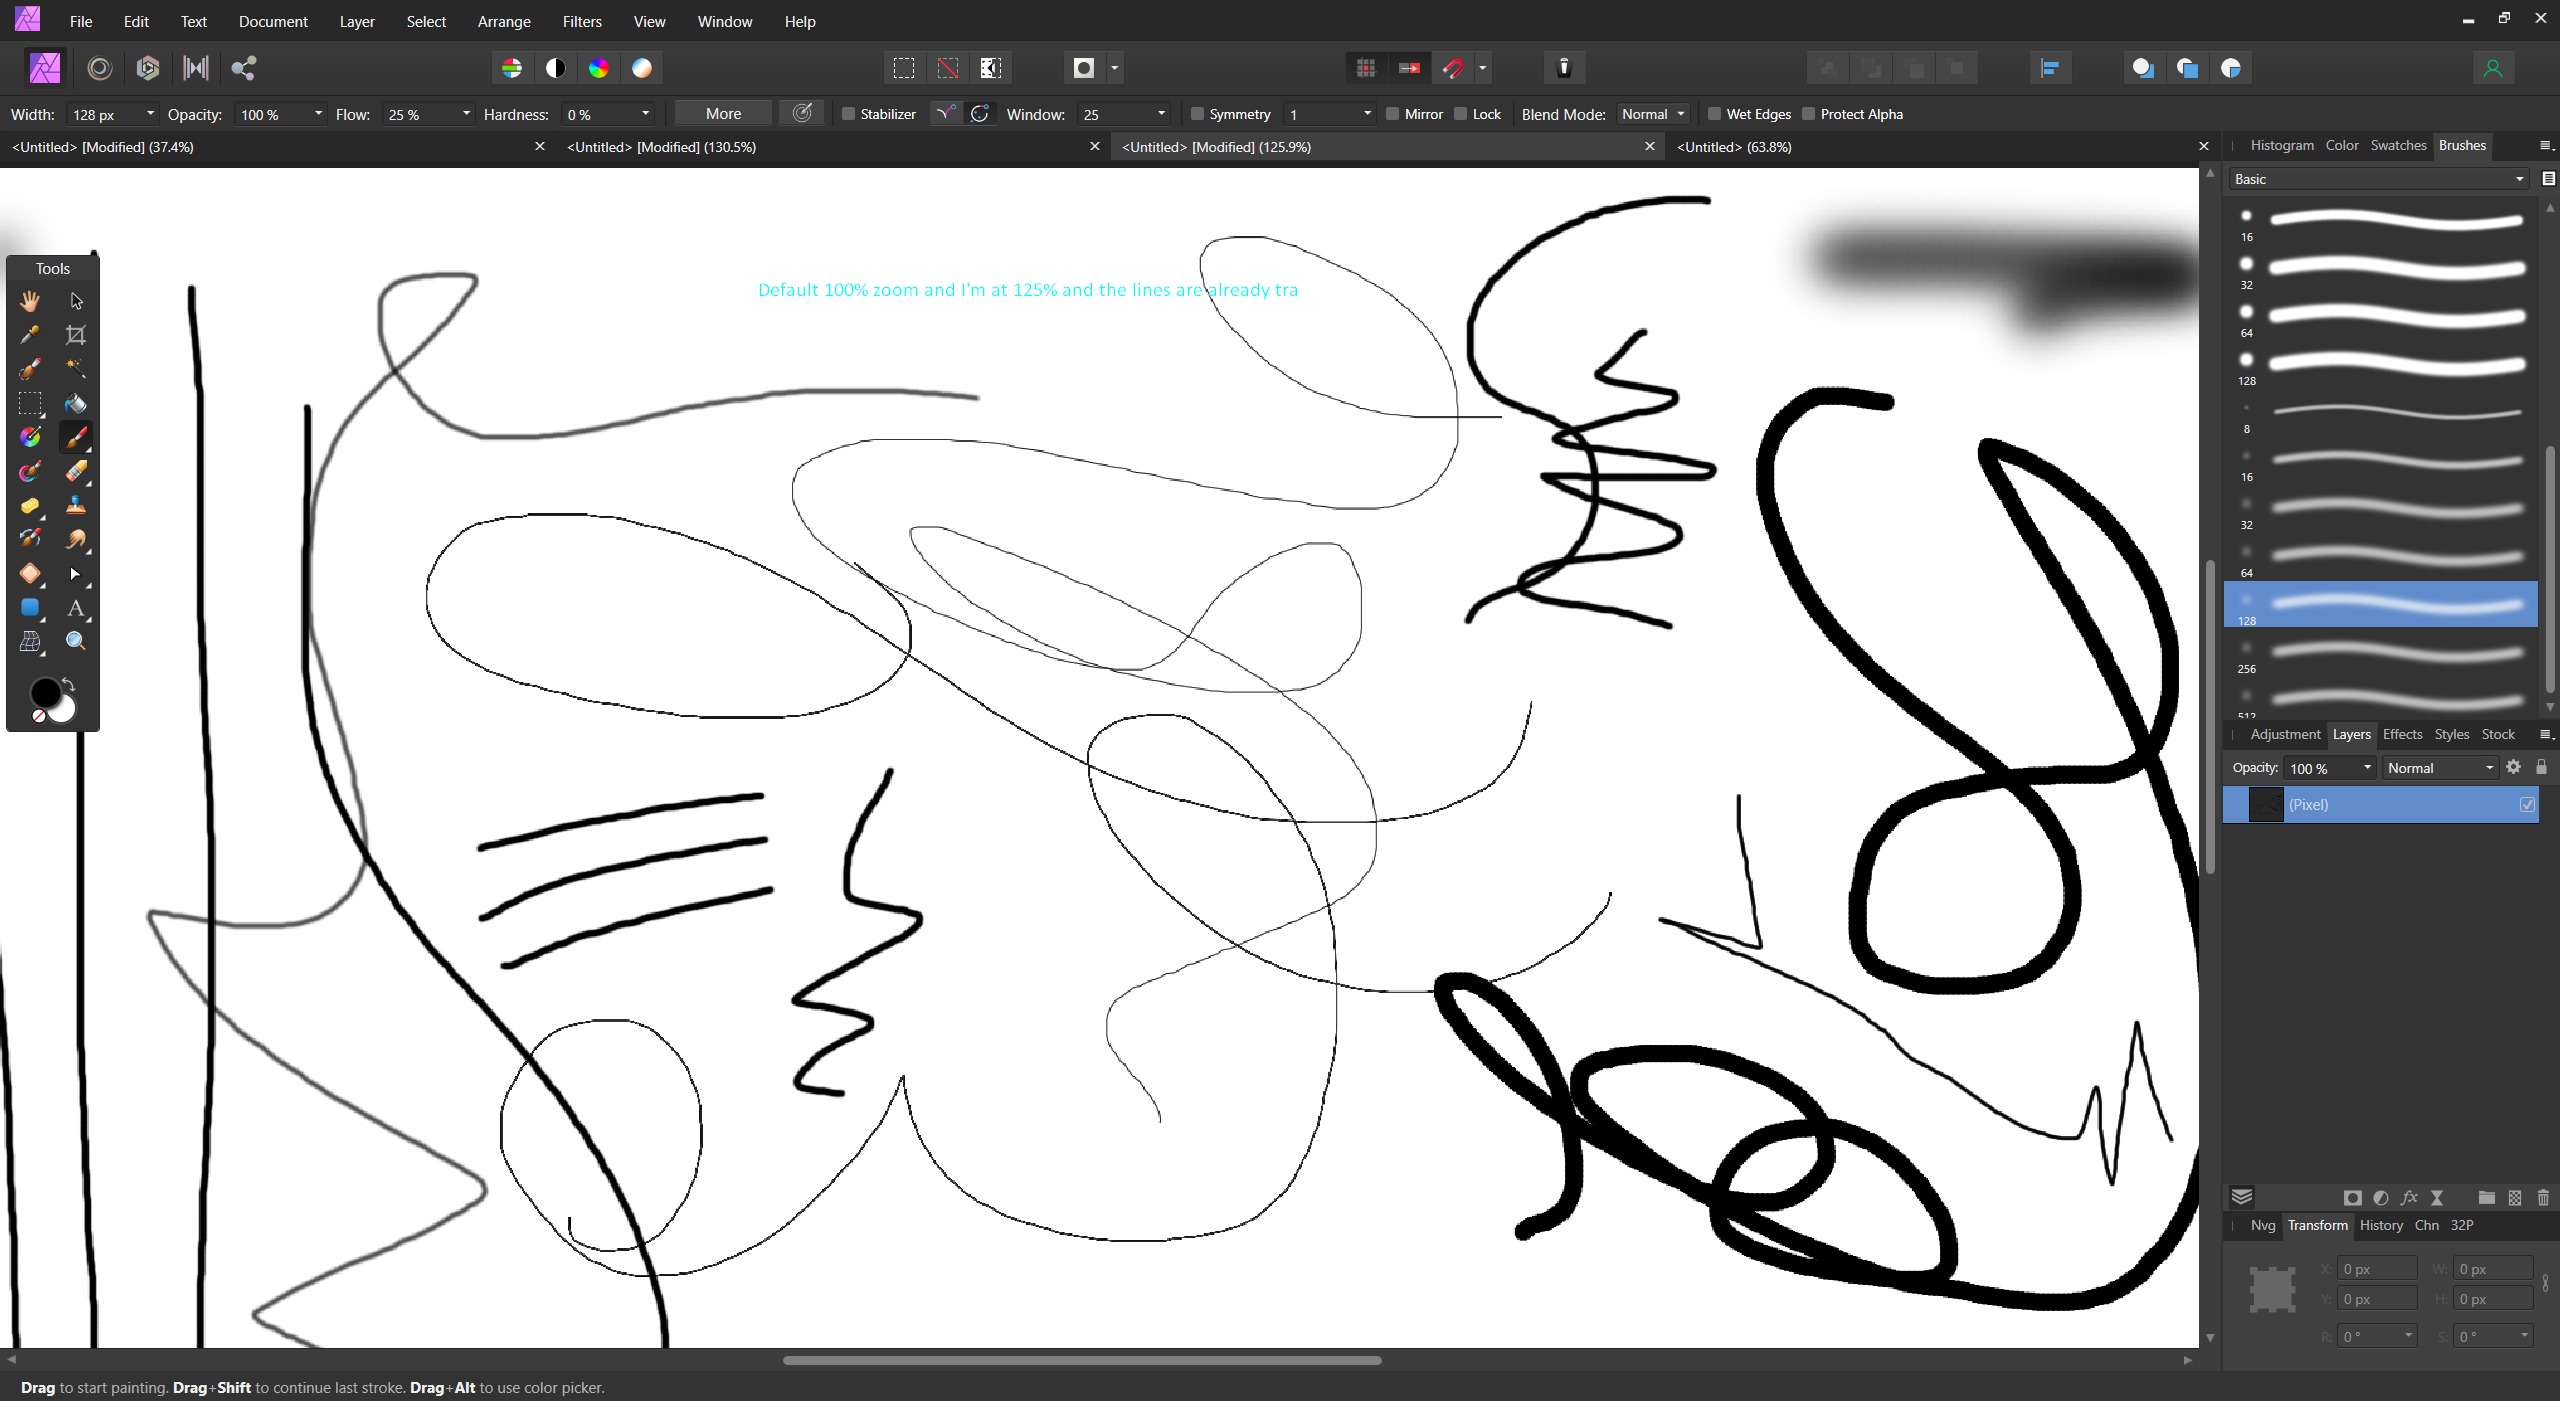
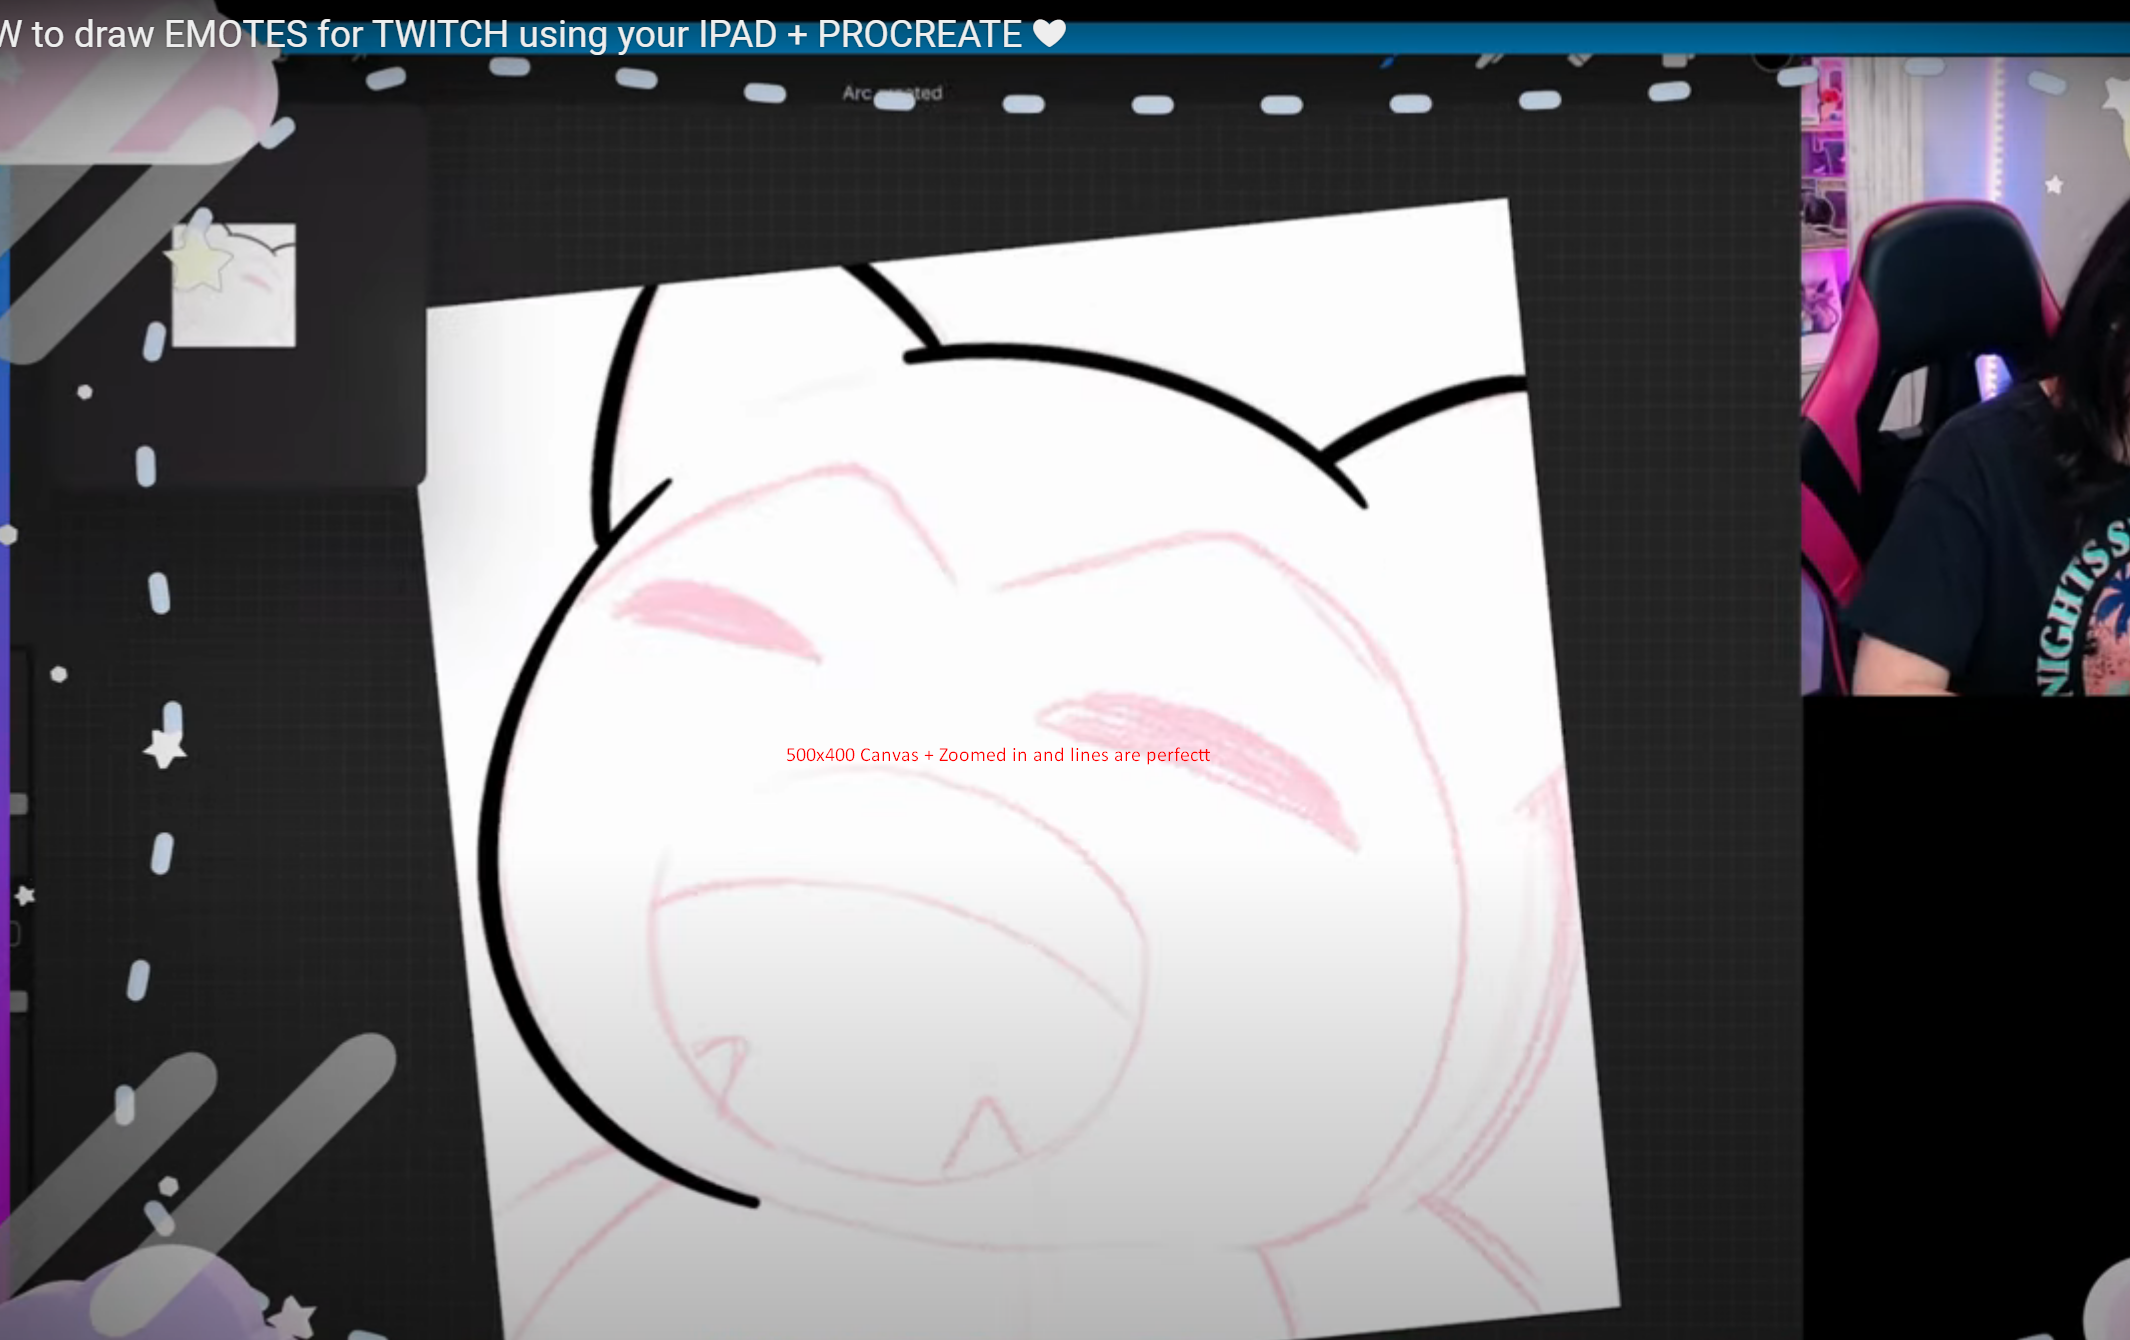
 First of all I want to say hi and thanks to each one of you who decided to waste 2 minutes of their time to read my thread and possible helping me out. As the title states the issue I have a problem in Affinity Photo with the brushes. I'll provide a couple screenshots below, so you can get the idea of what I'm talking about. Pretty sure this isn't as rera as I think it is but I literally did not find any information that could help me out on google, here on the forum, reddit and different sites including youtube videos. I bought the program around 2 days ago since I bought a drawing tablet mainly because I decided to try out with the digital art. Anyway... I'm trying to make some twitch icons, sub badges, logos etc. or even discord emojis but the low resolution of the brushes is killing me. Things I already tried: 1. I've contacted the support and still waiting for an answer. 2. I've tried different brushes ( big - small - meduim ) size and they're all the same. 3. Tried to play with the brush settings and that didn't help either. 4. Tried to play with the flow and hardness of the brush and nothing.... 5. A milion times I made sure that I'm using the "Paint Brush Tool" and not something else. 6. Tried to use different style of brushes etc. and didn't solve anything. 7. Uninstalled the app then installing it again didn't help. 8. Tried different settings when creating a new canvas ( including size ). ( The main settings that I'm normally trying to use are: DPI: 300-400 / Page Width: 500 / Page Height: 400 / Pixels / RGB/8 / sRGB IEC61966-2.1 ). The only way to get a nice looking brush is to make the canvas 5000x5000px but then when I save the image it's too big to be uploaded on discord or twitch. PC Specs: Intel-Core i7-9700 nVidia RTX 2070 (8GB) RAM 16GB DDR4 I'm 100% sure it's not from the tablet, since it's the same when I use the mouse but the tablet is GAOMON M106K PRO. Also the brushes I'm using are the "default basic" ones. P.S: Check if there's a red text on the screenshots, if there is a red text it means that the screenshots is an example taken from a youtube video.
-
The way for resizing and sharpening on the batch job need to be improved. It's the most common task. Resizing image with macro end up strange aspect ratio when all source images do not have the same aspect ratio. But using the resize option on the Batch Job window make sharping with macro useless because macros are applied before resizing. So I think the option for improvement will be: - add an order option to the macros to see if they should be applied before or after resizing. - add the sharpen filer option directly on the Batch Job window. - improve macro functionality to keep resizing the same aspect ratio for all images that have different aspect ratio.
-
 I'm a web dev & photographer. Affinity Photo's 1.) automatic masking to remove white backgrounds, and 2.) "Erase White Paper", are INCREDIBLE! They work PERFECTLY, including inside holes in a product. Much better than I've seen elsewhere. But it is extremely tedious work to do this manually for all photos. I'd love to automate Erase White Paper at the server level (like we do for resize & trim currently)--to enforce consistency for ALL our images. Then Affinity is used for creative tasks. Feature request: I'd LOVE to see Affinity create an open source tool on Github for 'Erase White Paper'! Or to contribute it to libvps, which is used by Sharp. It would win HUGE goodwill among the open source community to see this contributed by Affinity--because it's not something Adobe would do--& it's a key thing missing from Sharp. Thanks!
 -
 Hey guys, i'm trying to fix a pdf for print (Amazon KDP) and need to get a PDF with sharp line art. the original files (images in the affinity document) are high res and sharp. they's 600 dpi and have been converted to bitmap in past so sharp edges no greys etc. but i've spent the last 6 hours trying every variation of PDF in the drop down menu (print, flatten, export, and variations of each, altering all dpi, rastorization settings, compression etc. ) and once exported and opened the images when zoomed in all the way still have soft edges, and in some settings, slight variations in tone (white pixels, Black, and some grey) i've already submitted files and have gotten author proofs back from amazon of the novel and some of the images printed are pixelated. I think this 'soft PDF' line art is the problem and I'm trying to get a sharp PDF to try resubmitting again. Thx for taking the time to read! Adam
 -
 How are we able to get this very sharp lines and edges? I have tried expand stroke function but I believe that there is a lot more efficient way to achieve this. Additionally, how are we able to remove or delete excess lines (and intersecting lines) without using the erase tool in the pixel persona? Thanks in advance.😁
-
Hi, I'm having a problems with live filter perspective. After I made few live filters perspective there is a quality problem while I zoom/export/move etc. Even the same files are different in export. So it is not a problem of linked (placed) file. I hope you can see this video and it is helpful: https://drive.google.com/open?id=1AJB719uyg9oW_iKr2D9oPxRvHijTW9sg
-
Hi I haven't been able to figure out how to create a sharp corner with the Pen Tool. (See picture). Can you guys help me out: What are the settings for the Pen for making such a corner? Thanks! -M
-
 Copying scanned linework from one document to another. Just copy paste a few times, and then merging the layers down. The image gets blurred more and more each time I merge the layer down. Is there something I can do to prevent this from happening? I work with black & white pencil drawings a lot, and need to preserve the gritty feel of the lines.
-
 Hello! I'm an interior designer and I make renders using V-Ray Next. My problem is that my renders look kind of "glossy" and "wet" compared to renders made by 3D artists which look "dry" and clean. Is it something that can be achieved in post production only? Where should I look for the solution? Denoise? Sharpening? Any advice is greatly appreciated! /1st image is my render, the 2nd one is the look what I would like to achieve./
-
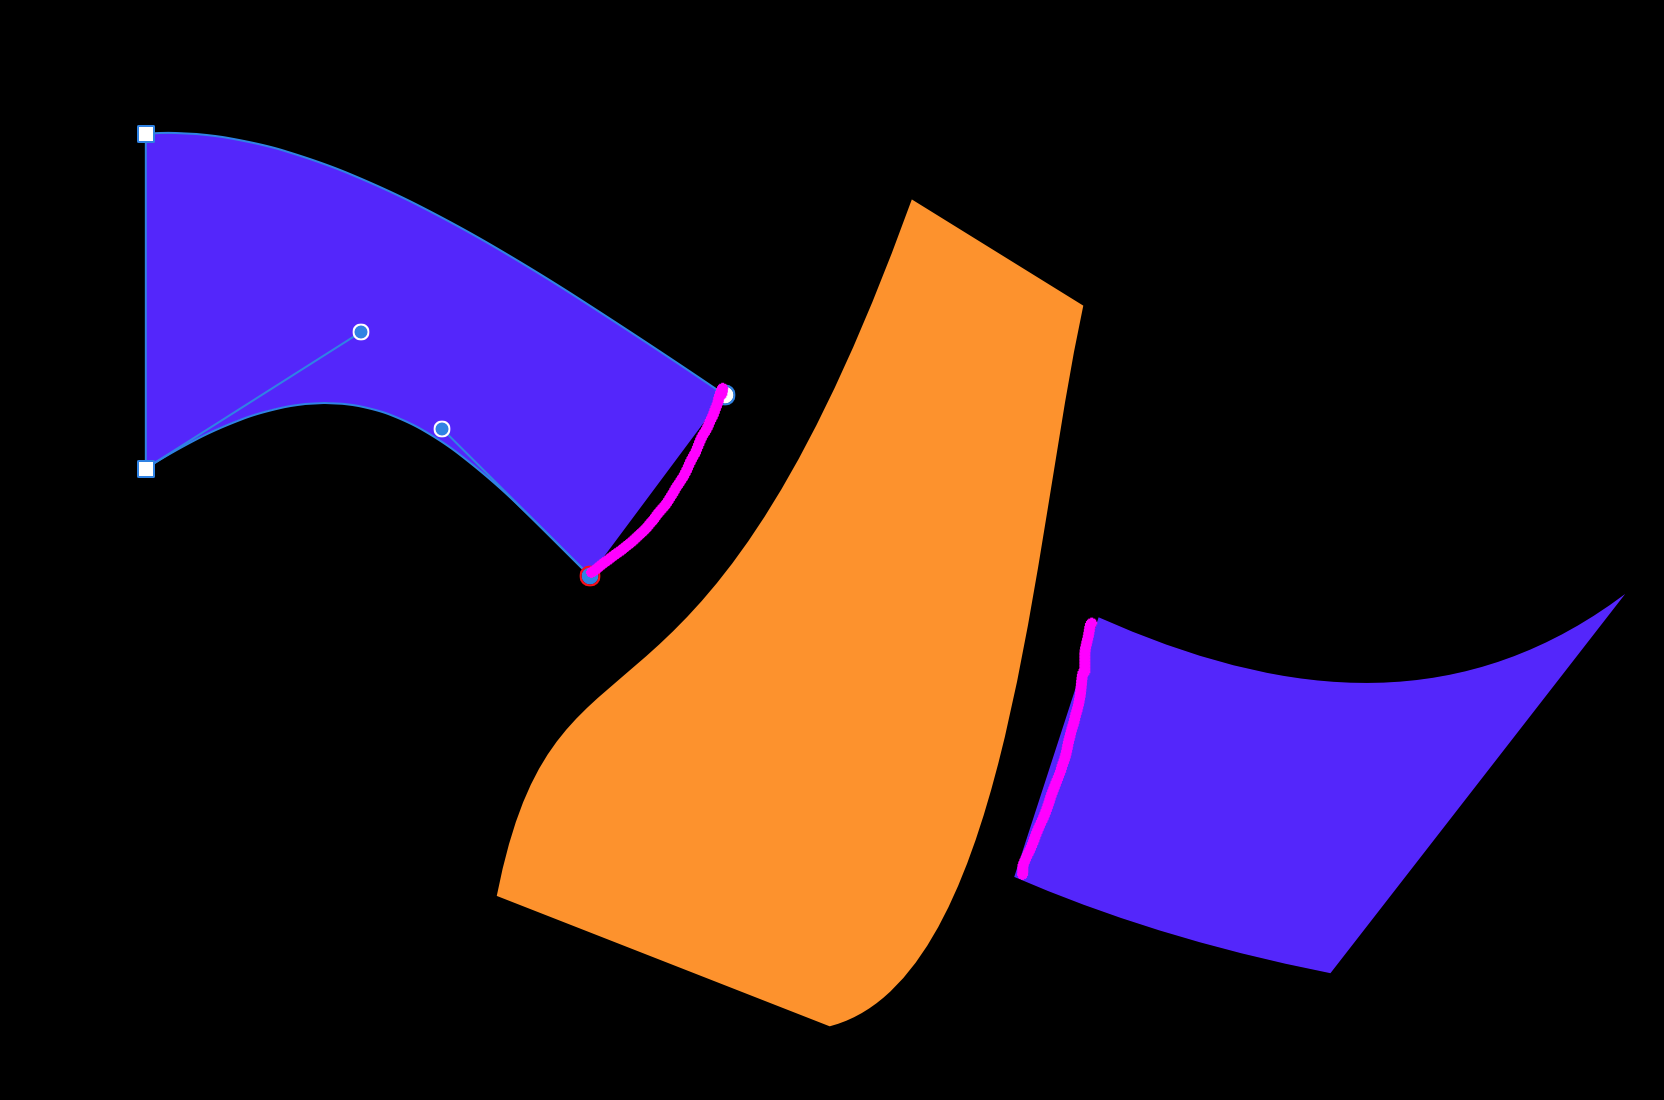
 Hey everyone! Sometimes, curve operations will create sharp edges on one side of a node and a smooth or smart line on the other side, resulting in only one handle being there. Do you know if there is a way to add a second handle to a node without affecting the one that is already there? I could convert the node to "Smooth" or "Smart", but this will result in changes of the handle that's already present. Best wishes, Shu EDIT: Added a file and image to show the problem. test.afdesign: The original blue shape was drawn over the orange one, so I made nodes close to the orange shape, selected them and clicked "Action" -> "Break Curve", resulting in the four new blue curves (two can be deleted, which I disabled in the file). However, those curves are missing the handles that are required to make the adjustments shown in image.png (pink lines are supposed to be the adjusted outlines of the blue shapes). test.afdesign
-
Hi! Could anyone help me, where is the sharping and vignetting tools? Thanks, Valter
-
 MODS: I'm not sure where this falls under so please feel free to move this thread. I come from working in Sketch. After doing tuts and trying out both Affinity Designer and Illustrator, I chose Designer because it felt easier to pick up. For a beginner, it's not as intuitive as Sketch but still feels better than Illustrator (great job!). I do have one huge gripe though and that's the Pen Tool. I can't change node functions between a Smooth Node to Sharp Node on the fly as I'm drawing. If I created a curve and need a immediate sharp point, I must backtrack and alt click. In Sketch, it's simply holding the command key and clicking. Even Adobe Illustrator is much better in this regard. This video starting at the 3:50 mark illustrates what I'm talking about. There's a lot of back tracking work if you look closely. Is there anyway to improve on this workflow? The pen tool kinda feels like an engineer built it for an engineer to use. (Do please educate me if I'm wrong!) https://youtu.be/UDVuI0BPFgo?t=229
 -
Hi, I'm currently testing out the Windows Beta coming from Inkscape (and Illustrator at the office) and what I'm missing a bit are the handlers for sharp control points. Inkscape does it brilliantly and it really makes it much easier to control a curve. Would love to see this kind of feature in AD. That's how it looks like in action: http://i.imgur.com/5iIRXG8.png