Search the Community
Showing results for tags 'settings'.
-
 Is it an idea to add a button or a checkbox that remembers the exportsettings. I will give an example. My original document is 1200x800 pixels. When i do an export to, let's say 300 pixels. Then i have to change the settings with every export to the desired 300 pixels. If i could 'freeze' the setting, then i would make a no errors on export. I would love it. So my original material is due no harm, but my exports are all te same with the frozen settings. If i uncheck it. Then the situation is normal. I use it to make a order of more frames with litle changes. And know i have to change the export settin every time. Perhaps more people would like it. Thanks.
 -
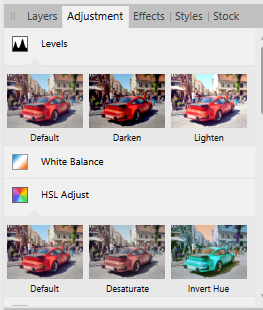
 Hi I am trying to use the adjustments in affinity photo for Windows 1.6 desktop. When I click on the adjustments I seem to get 3 options rather than the panel with the adjustments. For example when I click HSL adjustment I get default, desaturate and invert hue, but not the panel with the sliders. It is the same with Levels-instead of the sliders for levels I get default, darken or lighten. I can't see where to alter this setting. Any help much appreciated. Thanks in advance
-
 Today I learned that pasting elements between Designer documents with different resolution results on different object size. This is a normal behavior on bitmap software, like Photo or Photoshop, because they work with pure pixels and must adapt to the number of pixels the pasted image has upon the resolution, but is a complete hassle on vector apps like Designer, where the key is that you usually design on physical objet size, independently of resolution. This is specially hard when you are working with exact measures, like packaging or any technical illustration. I suggest three possible solutions A: Document or application setting to allow users to select their preference on copy pasting. B: Let the app auto select the pasting behavior based on the measure unit for the documents. (Preference to resolution if pixels unit, or preference to real size if a measure unit is selected) C: Special paste command for "paste preserving size" Hope I'm not the only one finding this important on his workflow. cheers!
 -
Sometimes it's the little things that show some real world thought went into software. Here are some of the nice OEM items I've found and some things that I've managed to work around to make it all fit my personal comfort zone a little better. ------------------------------------------------------------------------------------------------------------------------------------------------------------------------------------------------------------------------------- * Set the Mouse Wheel to expand or shrink your image on screen. So easy and feels so natural. Find it in EDIT - PREFERENCES - TOOLS - "use mouse wheel to zoom" ......Click it. * Dividing lines for the left side Tools Panel allow arranging the tools into logical categories, making them easier to find. The VIEW - CUSTOMIZE TOOLS opens up all of the available tools. Way down at bottom, the very last entry is an almost invisible separator bar. Drag and drop them liberally onto the Tool Panel and then add and sort all of your commonly used tools between, them as desired. * While you're in the customize tools menu...... if you divide the tool panel into 2 or more columns and you get the added bonus of a second "foreground /background color" selector location at the bottom left side of the screen. I'm currently using 4 columns here. It lets me group my tools laterally for much easier visual location. All my selection tools are now side by side, in two rows, while all of my repair tools are all in two rows, below a separator bar. Rinse and repeat for all the different tool categories. * The Library Panel felt a bit crowded to me (OK.... maybe I'm a little OCD). I created several empty categories named "------------------------------" and then I moved them around so they nestled nicely between the real categories, functioning as separators. Less crowding and they give me immediate and easy to see visual cues as to where my macros end and the next category begins. * When creating a macro, there are currently no provisions for making annotations normally used to share with other users any required values or settings. When I'm working, I label my Layers with any needed information. Something like: "Super Focusing Layer - 50% OPACITY (adjustable) Blend = OVERLAY" You can't see all of that on the layer panel tab, but hover the mouse over a layer and its all right there for you. It also adds the information to the macro recording, should you want to explore exactly how things went down. ------------------------------------------------------------------------------------------------------------------------------------------------------------------------------------------------------------------------------- I'll be making some suggestions for the Macro tools, in the near future. It already works "OK" but a couple of small functionality changes could make it far more user frendly. Steve
-
 It is an inadmissible waste of time that when exporting a file, for example tif, always appears 8 bit, when I always export 16bit and have to display the list and change it each and every time. How can I make my default file format appear first in the list? Thank you
 -
Since I'm trying to work with AP and AD nearly on a daily base I'd like to point out one of the (from my working experience) most anoying and down-slowing topics of AD and AP. It's the lacking ability to save hardly ANY (user defined) setting within the program! Mainly when it comes to content of dialogs, standard presets, program or document relateds setting ... hardly anything is saved and can be recalled in any way so one hast to start all over and over again entering the same values. What a constant waste of time you are requesting from your users! Setting the gaussian blur values for each photo again and again, changing from a bilinear sample method to bicubic, an unsharp mask filter that always and unchangeable starts with unsuitable initial values ... this list is nearly as long as the featurelist of the programs. And sadly enough the standard setting in many ways are completely useless! I'm very aware that there is quite some programming effort involved to change this ... settings can be document depending, session depending or a general setting. It may lead to changes in document format and program setting (what is obviously something developers try to avaoid). But please tell AP and AD users, that you are aware of this problem and you're trying to fix it! Cheers, Timo
-
 Hello, guys at Serif. For example, every time I resize a photo, I'd rather use Lanczos 3 non separable. But Affinity defaults to bilinear every time I do Ctrl+Alt+I. This is frustrating and tedious. I cited this case as an example, only. There are many things in which the program could memorize the user's way of being. Make the program smarter. The default for Artistic text tool is Arial 12 align left. Always and always and always... This is horrible. The program need to memorize my last use of each tool! What I do in Photoshop in a few clicks, or in a single click, I need to do in Affinity with many clicks. This is frustrating, irritating, tedious ... The Edit / Preferences menu has few options. This is very poor in options for the user. There could be many more options like default font preference when using the artistic text tool tool, choose my preferred export preset, etc, etc, etc. There is a need to extend user preference options at least 10 times. I already posted this on another topic, but no one paid attention! Another thing I've been reporting for a long time, the error of copying / pasting effects giving different values to the target. How long this will continue? Please, Affinity team, stop making deaf ears. Pay attention to the needs of your customers, at least this time.
 -
Hello lovely ones! I am curious if I have missed a button and/or an entry in the manual which points me to some grid settings? I wanted to set up an isometric grid. But I couldn't find anything. [insert sad face here]
-
 When exporting the document to SVG, no matter what settings I change I consistantly get one of two outcomes. 1.) --- The SVG becomes a rastered image when the export settings are set to rasterise unsupported properties. Helen's_Bike.svg 2.) --- The SVG becomes broken, Helen's_Bike_0.svg (Only the mask for the handlebars seems to work. All Shadow shapes display unmasked and the shapes used as masks seem to be released. Them being released also means that they are a layer above the Shadow layers) There are no effects on any layers, although there were previously. I had been experimenting with adding a stroke to the outside of the primary NewBike group. I have read multiple other threads that I thought might solve my solution, however nothing is working. Here is the working file Helen's_Bike.afdesign --- I appreciate any help. My only other option is paying a month for Creative Cloud to trace a PNG of the work I've done so far. And I seriously don't want to have to considering I just purchased this. I have a Windows machine and my version is a stable release. I believe version 1.5. this was downloaded half a week ago.
 -
Hi there, Just wondering why I always get a beige/creme artboard and not a clear white artboard? I cannot find anywhere in the settings or preferences to change this and i am sure other people have probably had the same issue. Could someone please advise me how to correct this please? I am running a Windows 10 PC 64bit Thank you,
-
Would like to see ANGLE jitter and ROUNDNESS jitter added to the brush engine. It would make photoshop brushes import identically.
- 1 reply
-
- 1
-

-
- brush settings
- brushes
- (and 4 more)
-
 I am having a terrible time solving what seems to be a color discrepancy between what I am seeing on my monitors within the Affinity Designer & Photo applications and what I am printing out via my office printer as well as outside print services. While Affinity Designer & Photo display bright, crips images within the monitor itself, my print jobs from any file format appear very dark and dull, even when printed through third party print shops. I have had no issues in the past with other programs and their settings. I am wondering if there might be a color setting that I need to change internally to help your program accurately display on screen what my (and outside) printers will produce. If you have any other suggestions, they would be much appreciated.
 -
 HI, I noticed that there were no plugins anymore. I use NIK and some macphun plugins. Checking my settings in the preferences/plugins I saw nothing was set anymore. But when I clicked the fields they could be selected but nothing was in them not even the front slash????? I tried alt+cmd for throwing away preferences but this doesn't work. Any ideas? Cheers Marco
 -
 Most (if not all) RAW processing software I have worked with so far have ways to remember settings and later continue the RAW processing with these settings or perform adjustments to these settings if the final outcome (e.g. final JPG image) proved to be not perfect. There are two aspects here which imho need improvement to make this iterating process less frustrating: 1. Saving photo-specific RAW settings (e.g. to sidecar files) Currently Affinity Photo has only one rather cumbersome way to achieve this: You have to create a Preset for each tab where you changed settings and if you re-open the RAW file later you have to load all these presets again. (Affinity Photo shows them selected, but this is irritating since they have not actually been applied. Only after switching to another preset and then back are the changes taking effect. - A small bug I'd say.) Most other RAW processing software either automatically stores or optionally allows to store a small sidecar file together with the (unaltered) RAW file so that if the RAW is later opened again, the user can continue where it left off. An alternative is Affinity keeping an internal database about the settings of each RAW file, but this approach usually fails if images are moved to a different folder or archived (which happens to all my images after processing) and Affinity doesn't know about this. 2. Allow switching back to real RAW processing from Photo persona Also when I developed a photo and then switched back to the Develop persona (without doing any edits inbetween, I should note), I found myself not editing the original RAW file, but applying further edits on the already processed image. This was a big disappointment, as it defies the benefits of working on the RAW file. This means for example that If I found out I applied too strong noise reduction or too strong highlights clipping then switching to Develop again does not help, because what is lost in the developed image cannot be recovered. Please offer the user an easy possibility to apply changes to the originally processed image afterwards. (Which means, that the application must remember the RAW settings at the time the image was last developed). Matthias
 -
 Leading on from another feature request (path persistence), here is a feature requests feature request :). Is it maybe an idea to create ONE sticky thread in which we start collecting the things that could do with persistence in use, between tabs or even between sessions? I have seen quite a few feature requests that ask for data to be preserved between operations, tabs and sessions so I figured it would make sense to maybe gather them under one topic and maybe make it sticky. That parks it all in one place so it's easier to gather and act on it where that makes sense in the scheme of things. The hope is that increased efficiency could help other projects such as DAM and DTP progress (cheeky nudge :rolleyes: ).. Cheers!
 -
 I've noticed that when I increase my brush size to fill a canvas (aiming to create textured backgrounds prior to creating my work), there is a severe lag when I make strokes. Often times, when I make several passes with a large brush, I'm left waiting for AP to catch up. FYI, I have a 1 TB SSD & 16 GB of RAM, and an i5 processor on a mid-2012 Macbook Pro. Idk if that information will help in diagnosing the problem or not. Is there any way to tinker with the performance setting to resolve this issue, while still maintaining hi-res quality of the brushes? Thanks.
 -
I recently downloaded an .abr brush pack created by Andrea Koroveshi (http://andikoroveshi.blogspot.al/). However, I do not use PS (I don't want to sell my soul when there are good, and potentially better options, such as Affinity Photo & Designer). Based on my limited understanding, PS brushes imported into AP do not fully transfer textures. Rather, you only get the brush "tip" or "nozzle." I was curious as to whether anyone has a work-around for this issue. I have pretty much all the AP & AD brushes created by Paolo Limoncelli (which are excellent, btw), but I really want to make use of the many wonderful brushes available from other sources (such as Andrea Koroveshi & Kyle's Brushes). I've discovered that the PS brushes I import act more like "stamps" as opposed to brushes. While I'm sure tinkering with the settings will help- I'm not sure where to really begin, so any advice I can get would be great. Thanks!
-
 Hi, When I freehand sketch ('Draw Persona'), Designer makes certain choices when interpreting my Vector Brush-ed or Pencil-ed lines into vectors. ¿¿ Is there a preference or settings dialog to control how accurate the resulting sketched path is?? Like: many nodes for 'Accurate', fewer nodes for 'Simplified, etc.? thanks, - pbass
 -
 Hey there, I always forget to check the "Save History File with Document" after creating a new one. I understand, that not everybody wants to save the history by default, because it would make a lot of files a lot larger (I guess so?). But for others it would be nice to have a Checkbox in the (User-)Settings to get the history saved with the document by default when saving a document. Perhaps it would even be possible, to have a "per document"-exception-setting. Greetings, Johannes
 -
 I've tried manually dragging them apart and back to their original locations, as well as searching the 'View' and other main menus but haven't yet found how to uncouple them. Additionally, when I select something from the Color-panel...it 'leaps' in front of the now combination Layer/Transform-panel. I'd love to know the 'How & Why' to this as it may come in handy in the future. But for now, I'd like to return the 'studio' to its original default panel set. *AD 1.5.4 on a MacBook Pro* Would someone please enlighten me? Thanks much, -Christo
 -
When exporting, you can only tick the box for bleed to be included. On an ongoing project, I need to export different formats with different bleed options, i.e. 1mm vs. 3mm bleed. I was used to set a global bleed of 3mm in Illustrator and change the value to my liking when exporting to PDF. With Designer I need to fumble with the document’s bleed in order to change to and fro with 1mm and 3mm. Allowing for setting a bleed size in export settings would save me time again, and make Designer a little niftier than it already is :) .
-
 I miss some toolbar settings like: 1. Icon size small, medium, large (because its very depending on the monitor and its resolution) 2. More Icons for commands like Undo, Redo and lots more,. Best would be if you could choose free out of all commands. 3. Two or three rows for the toolbar. Until now just one row is possible.
 -
Hello, guys at Serif. Please, make Affinity Photo and Designer remember my last settings, for example, If I choose Lanczos instead Bilinear, please, remember this choice in the next time. If I do Effects/Bevel and Emboss, please, let me reuse my last settings. Is not useful "pillow" 5px every time! The ideal is a option "save as default" for each effect, like Photoshop do. Please, set LANCZOS for defalt for everything! Please, SET by default export do PDF with JPEG 100% instead JPEG 85% PLEASE, let me choose if I want to export to PDF with layers or not!
-
 Hello everyone! Do you know if there is a way to record changes made to brushes? It would be nice to be able to just click on a macro to set, for example, 120px, 25% opaque, 100% flow, 50% hardness. Best wishes, Shu
 -
 Hi, how can I change in APh the unit of measure from the ruler of pixels also generally to mm? If this is not possible at the moment, please register as a requirement. I e.g. Always use the unit mm. The settings of the units of the ruler should be storable. Thanks Dieter