Search the Community
Showing results for tags 'ratio'.
Found 8 results
-
 Dear Community! Shooting RAW files in cropped format (e.g. 4:3 instead of the default 3:2) can be very helpful for framing (knowing that one needs a ration of 4:3 later on anyway). Even though a non-standard aspect ratio (i.e. other than 3:2) has been set, the raw files will always be stored in full resolution of 6000x4000px, ratio 3:2. Opening DNG-files in Adobe Bridge will show the images as expected in the cropped ratio, the way I framed it and the way I want to export my edits as well. (The standard aspect ratio and image resolution, of course, do depend on one's camera model.) --> Question: Is it possible to apply the cropped aspect ratio according to the file's metadata in the "Develop Persona"? When opening Affinity Photo and loading the DNG file into the Develop Persona, the full RAW image of 3:2 with 6000x4000px will be shown, instead of the desired 4:3 with 5328x4000px. So far I was not able to find this option somewhere in the "Crop Tool [C]" or else where! Thanks in advance for any tips/links/hints/help!
 -
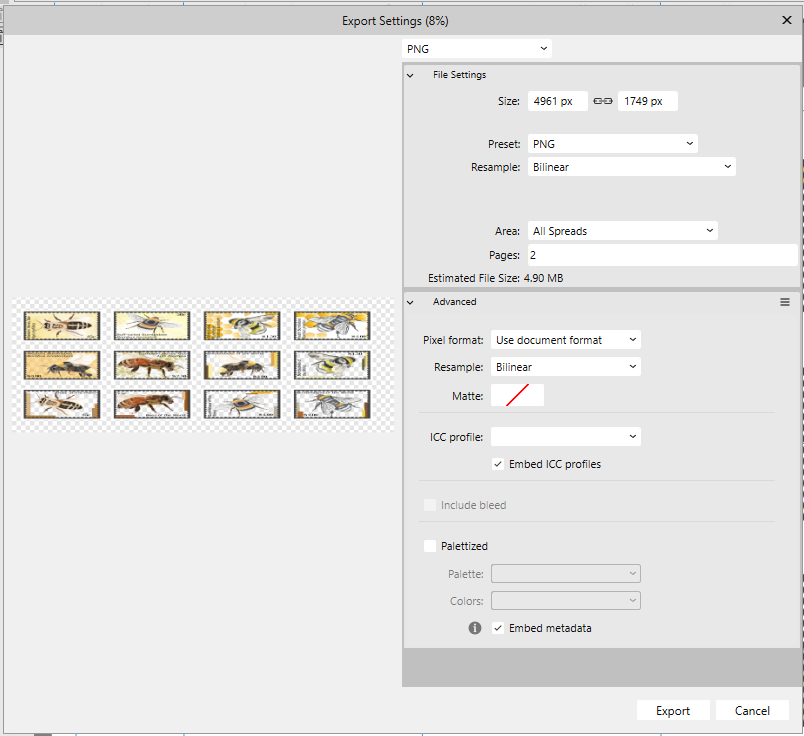
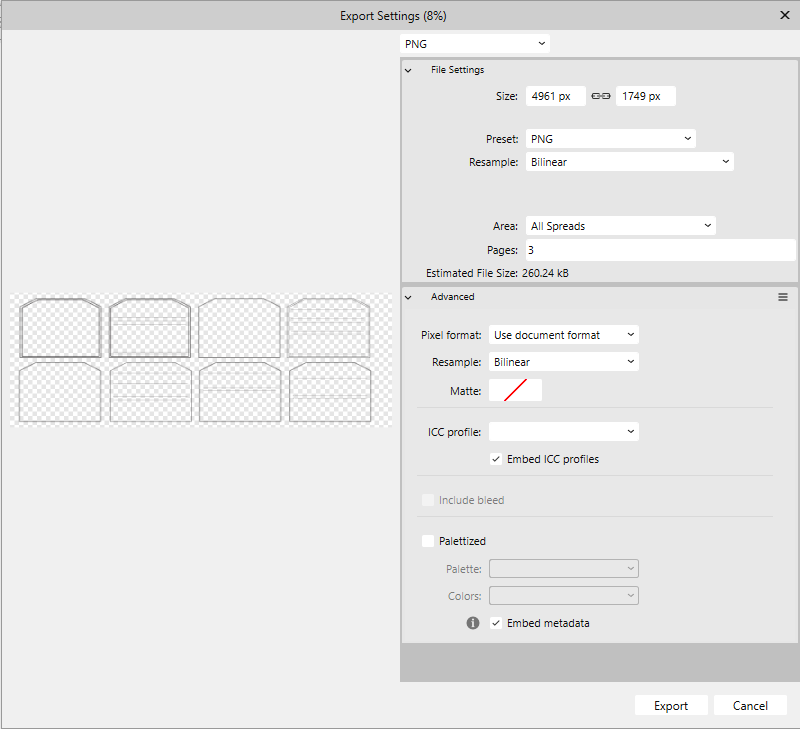
 I have looked and found no other info regarding my problem. I am creating a six page document of A5 size. I am placing (on separate layers) text, images, background and borders (for printing). The first page has no issues and works when exporting to png. The second and third appear squashed and the background is not visible. I am unsure what I am doing wrong as none of the page settings have changed from the first page. I saved & exited. The second page worked, I did a little extra on page 3, came back to 2 and it was squashed again. I figure it surely cannot be something I am doing wrong (I hope) since it worked once then reverted back again. I don't know where to start to try and fix and issue that isn't consistent.
-
One thing that I have seen mentioned on facebook groups is the crop tool. Most seem to agree that either 'crop to original ratio' be set as default or the the user be allowed to set the option that fits their workflow best. For me it is original ratio as I rarely use any other setting. Can this be added to the relevant programs?
-
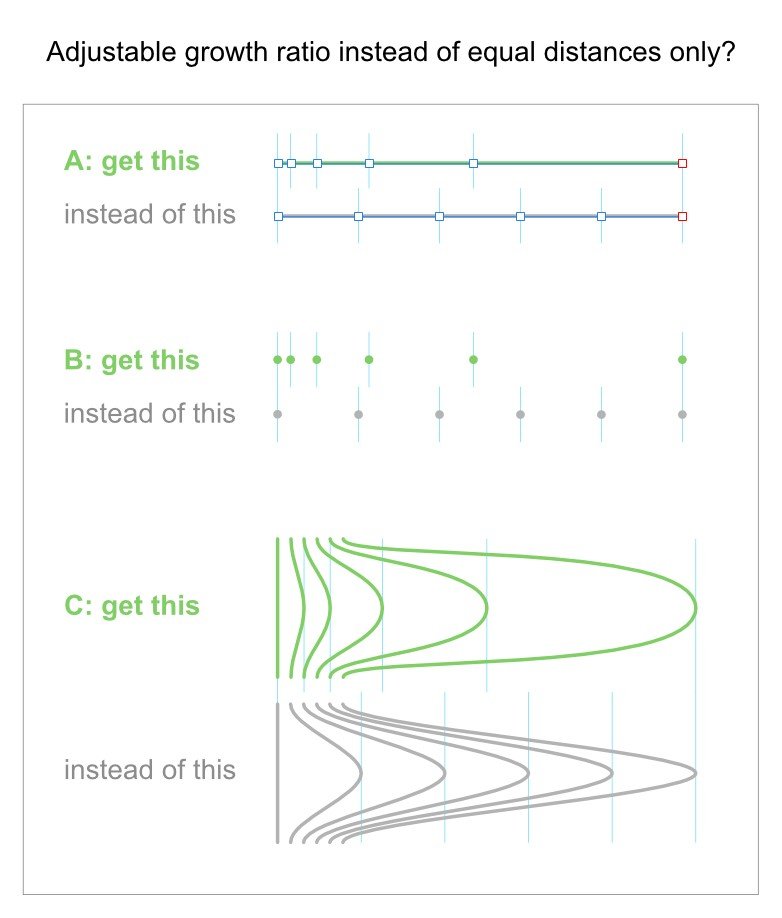
 Is this somehow elegantly possible? To distribute selected objects or nodes with an adjustable growth ratio instead of equal distances between them? Of course we can use numerical positioning of single objects or construct special geometries to orientate ourselves, but do we have a more simple or direct solution, I don't know yet? If not, then please see this as a suggestion: It could be a small tool with a slider that we can use to define the growth ratio. And it could also be part of an extended power duplicate. The ideal solution, and a bit different, would probably be something more similar to the blending/morphing tool found in other vector apps. The progressive distance change would just be a part of such a tool.
-
 Hi there. Just upgraded to Affinity Photo 1.7.0.367 and found that the crop tool doesn't work as it did in previous versions. I need to create an "actual size" image of a 600 x 600px section of a larger image at 300dpi. This is to help show online customers who are buying prints of the image the kind of detail and resolution they can expect in the real world. Say the original image is 3000 x 9000px. In v1.7, when I set the Absolute Size to 600 x 600px, I'm just presented with a square crop, the full width of the image. This isn't an absolute size crop of 600 x 600px - it's just a 600:600 ratio. It then crops the section and resizes it to 600 x 600px, regardless of the size of the area selected on the original image. So if I select an area less than 600 x 600px on the original image, it then scales it up and interpolates it. All this means there's no apparent difference between using Absolute Size and using those dimensions as a crop ratio. As a result, I can no longer show the detail or quality of prints with any accuracy at all. Please can we have Absolute Size back? Thanks. Rob
 -
 I'd like to be able to set the ratio when drawing a rectangle so could be 4:3 or 16:9 or 16:3 or whatever. Is this possible? if so where do I find this option? Additionally I'd like to be able to create a fix sized shape. So when the shape tool is selected I could set the width/height and then just place the shape exactly with those dimensions. Again is this posisble? if so how do I do this?
 -
 When opening an original photo with a ratio of 2:3 and I select the crop tool. Having forgotten about this unlucky standard setting of unproportional rezising I change the ratio to something unwanted other than 2:3. Switching the crop mode now to "original ratio" does not switch back to the original picture dimension of 2:3 ratio but just keeps this mistakenly edited crop dimension from the step before and fixes it. Is this a bug or a feature? This way one has to rollback protocol until point of mistakenly changed crop or one need to know the exact doc ratio of the original file to enter ratio manually (great!). Next issue: custom presets do not work! They can be edited but except the first new entry they can not be selected. If selected the dimensions are not executed. The whole individual preset stuff seems to be screwed. I entered a couple of standard new ratios to the panel. Watch the video and see how the mode setting does whatever it likes to afterwards: https://youtu.be/w2CSFy1hTkE Cheers, Timo
 -
 Hi, I hope I'm not creating an unnecessary topic, but I couldn't find what I was looking for in past threads. Would be good to have the forums separated by AF Photo and AF Designer as well. I'm trying to find out if AF Photo's crop tool has the following features; 1) Crop canvas based on transparent pixels - I come from using Adobe for the past 15-20 years and their crop feature of being able to crop an image based on transparent pixels is extremely useful when trimming images. Is this hidden somewhere in the menus? Being able to do a hard crop and soft crop would be great too (destructive and non-destructive. 2) Because I was unable to find the feature above, I resorted to manually cropping. When using the manual crop tool ©, is there a way to lock the ratio, and also have equal scaling? For example, in PS you can use a number of modifier keys when scaling, transforming, or cropping. The modifiers allow scaling from the center, or keeping the ratio when dragging a corner. Any help on this would be greatly appreciated. And great product! I'm very happy with it. :)