Search the Community
Showing results for tags 'rasterize'.
-
Dear developers, I have a little problem with background rasterize: if I no use Picture box, just place an image, and I use bleed, then rasterize function not working correctly: image will rasterize to cropped size, not to bleed. Need rasterize to real size + bleed, because after crop base, leave a line, if cropping not exactly.
-
 AD stops working after rasterizing any picture on windows pc
 -
 I was trying to select a circular part of my image and copy and paste it as a a layer. With help from previous posts, I created a mask and once I rasterized the photo I had pasted, I could then copy the selection and paste as a layer. I just want to know what Rasterize is for? I entered a photo and thought it would be a raster by default, but apparently it is treated as Vector graphics? Thanks in advance as I am new to Affinity today.
 -
 After rasterizing an image all the part of the image out of the Artboard has been cut off and the bleed area which has been setup for the document has been ignored - I have no image parts visible out of the Artboard anymore. This of course is not acceptable as I need that part of the image outside of the Arboard to fill the bleed area - that's for the bleed is for. How to solve this? I have special situation where I need image to be rasterized together with some overlay text elements to get the desired output (for some reason what I see is not what I get after print export, so I only get the desired result after rasterizing the visible elements. Less important but a bit strange to see - The command for Rasterize in Affinity Design is written as Rasterise (with S instead of Z).
 -
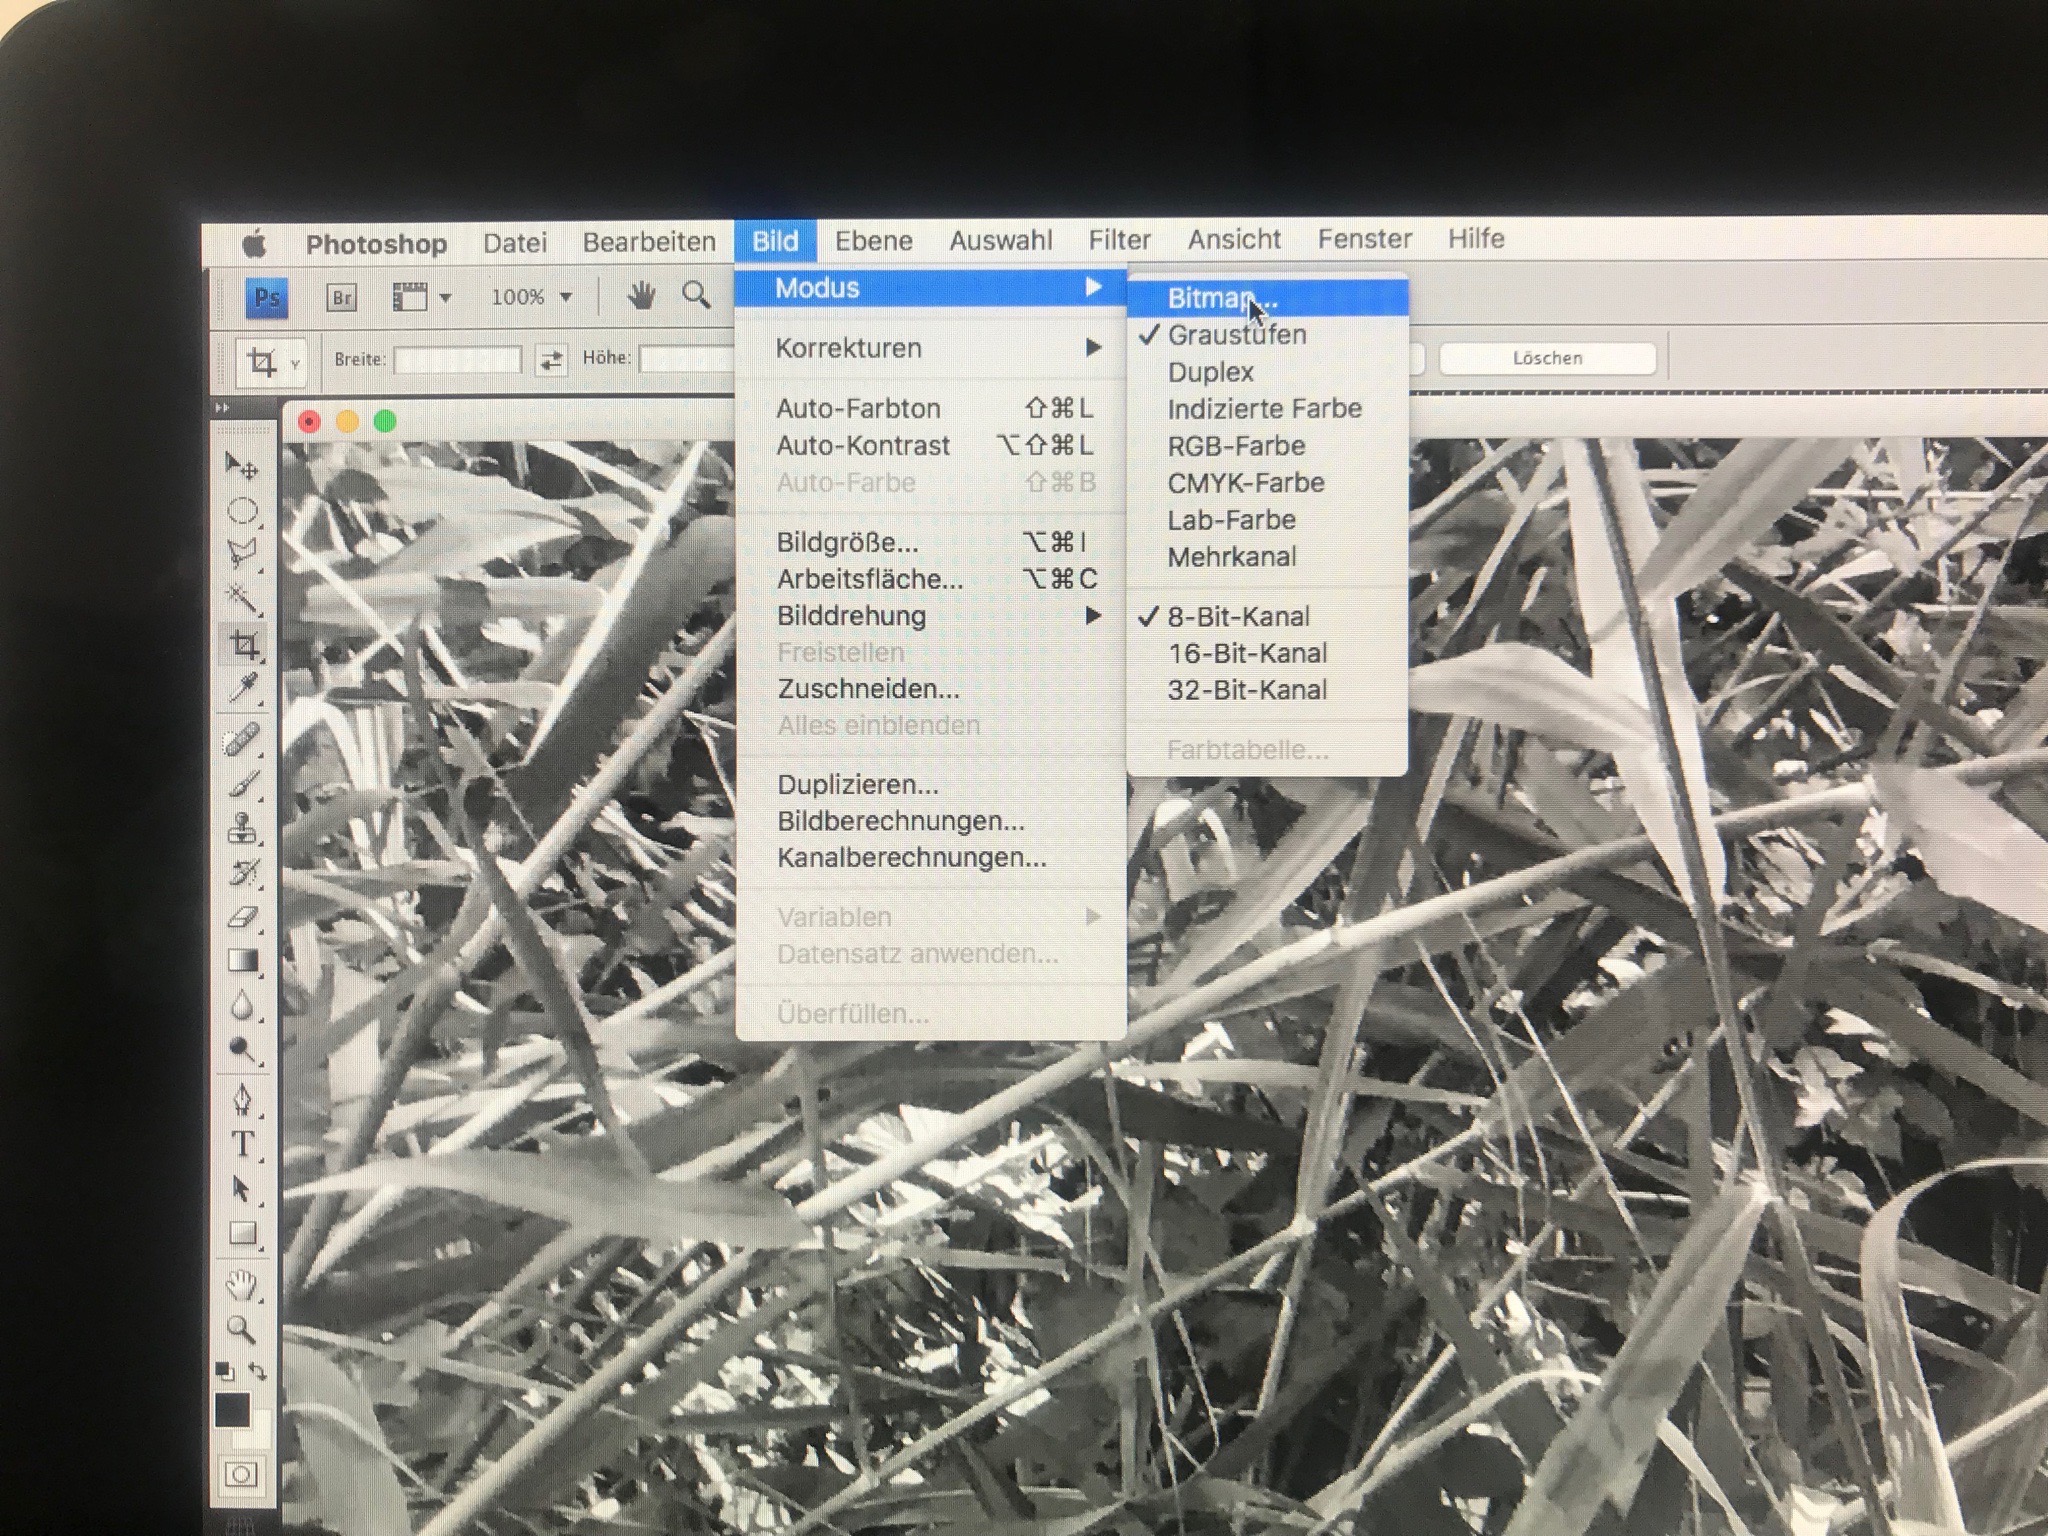
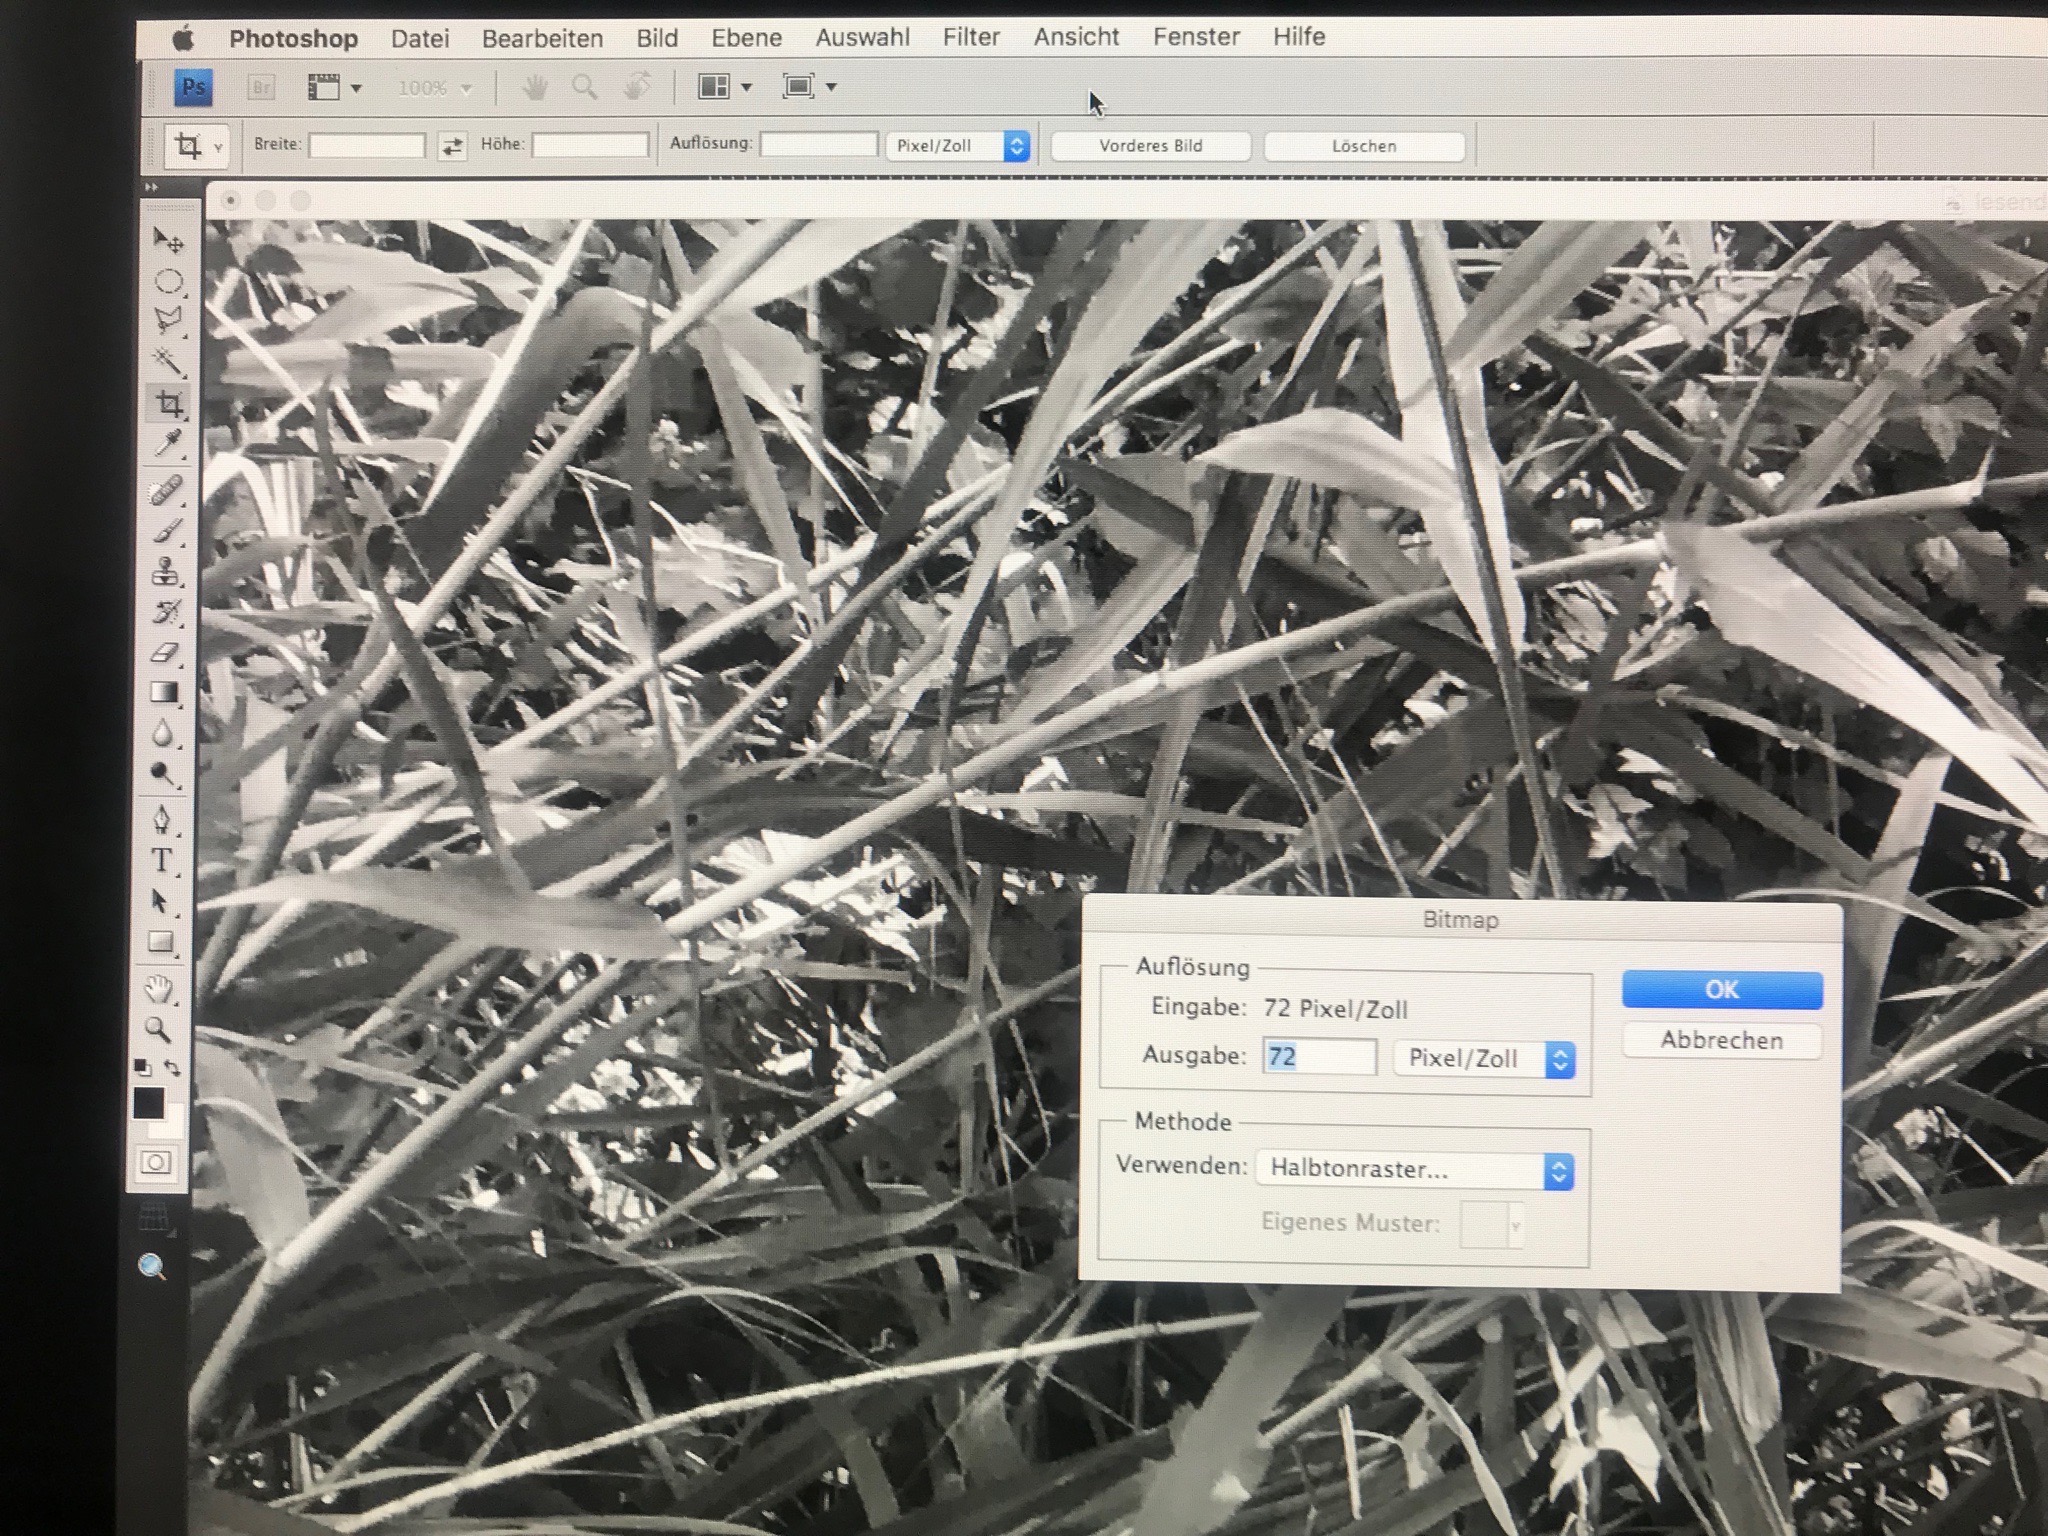
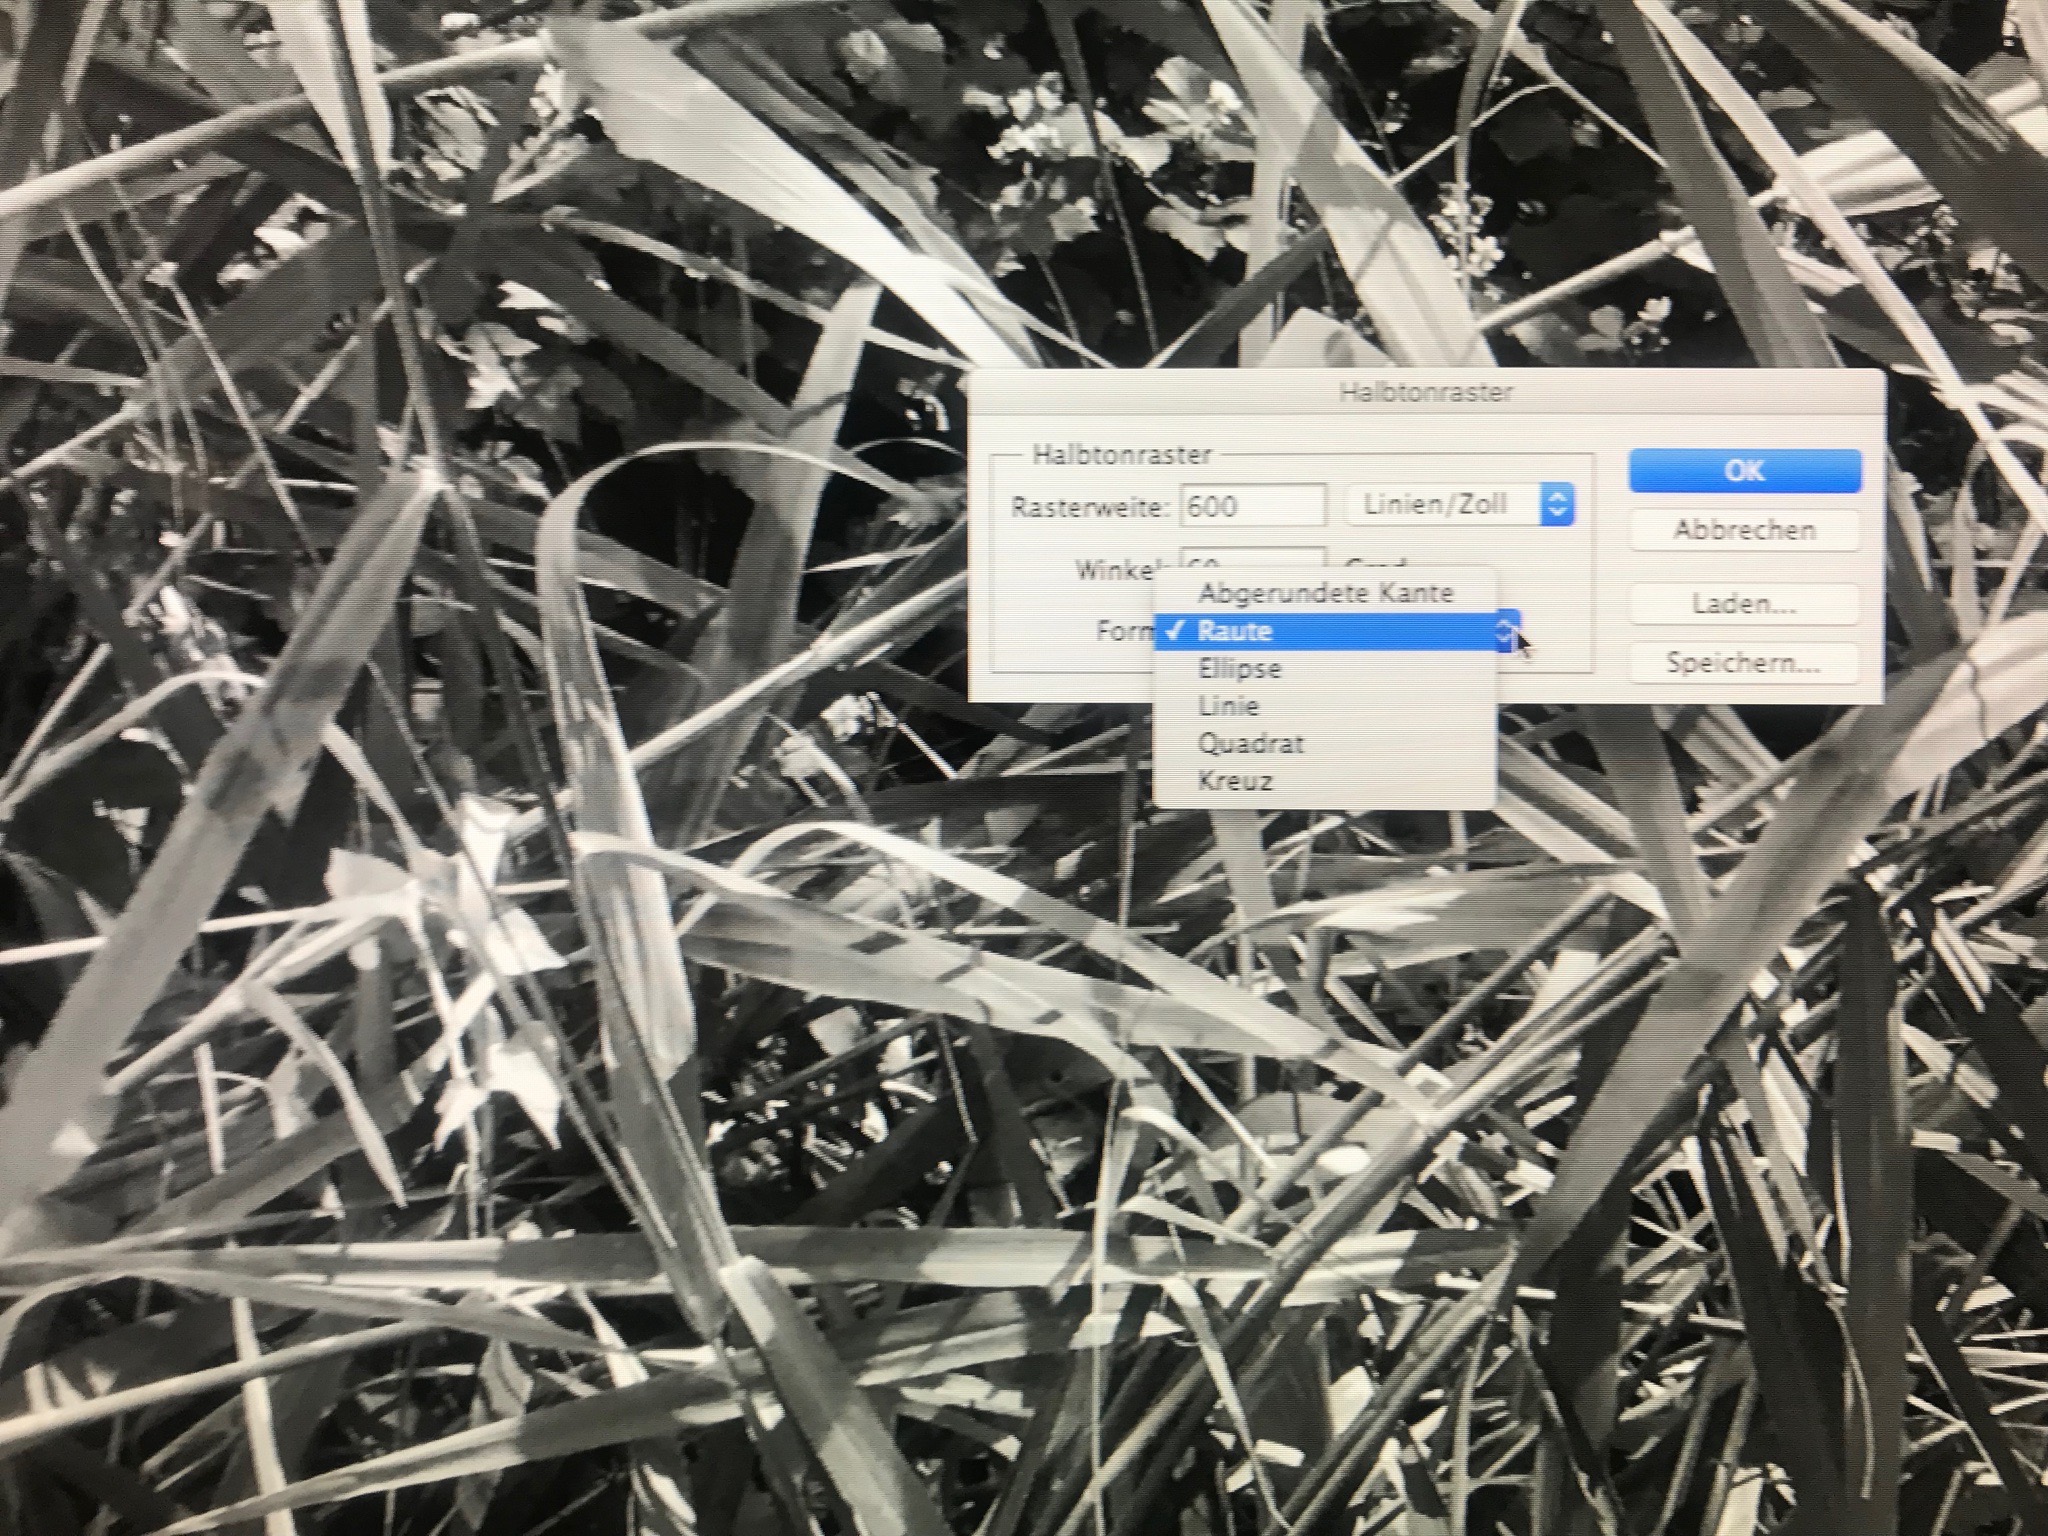
Hi everybody, I'm an artist and working with printing screens for etching printing. In photoshop, there's a quite easy way to transform a bw picture into a bitmap and get it rasterized, in affinity photo can't find this feature. I don't need the visual effect of a raster like in pop art, I need a real fine printing screen like used in offset printing... How can I do this with Affinity Photo? I really love the app, especially the slim design so I can use it quite comfortably even on my old Mac mini :-) Thanks, Christian

-
Hey everyone! I am working a lot on patterns (literally hundreds) that I want to repeat on both x and y later on. For doing so, it would be very useful to be able to offset and repeat (wrap) curves and groups using Affine and being able to access Affine in Designer. Right now, it only seems accessible in Photo and trying to Affine curves or groups will rasterize them. Best wishes, Shu
-
Missing in Photo: more options for output format in export (important for TIFF - more compatibility with old software) BMP export on/off dither for rasterizing tolerance option for "Selection brush tool" user presets for all filters snapping for "Crop tool" circle overlay in "Crop tool" "Mesh warp tool" for curves (without rasterizing) "Warp text" like in Photoshop "Invert mask" function base RGB adjustment (3 trackbars with range -255 - + 255 (in 8 bit)) adjustment presets in DESIGNER Thanks for considering proposals.
-
 File size matters ! I use designer for web-design. As long as you work with pure vector and text, designer is a quite handy tool (despite some annoying bugs). But as soon, as you place images (typical workflow for webdesign) in your layout, it becomes really inconvenient. The filesize of the layout document EXPLODES and becomes really unpredictable. The size of a designer layout document becomes far bigger than the sum file sizes of the placed original compressed JPG or PNG images. I read somewhere in the forums, designer and photo store placed bitmaps uncompressed with the layout file - to speed up document loading? However, in my opinion this behaviour is not practicable. Some people may say: disk space is cheap, so why be so miserly? But first of all, all documents have to be backuped. And when it comes to data transfer it's a big difference if i can send e.g. a 20 MB file as email attachment or have to upload a huge 200 MB file to some document cloud. Filesize also means waste of time and other resources. We know the problem of Photoshop local smart objects. But PS stores/attaches the underlying bitmap data in it's original compressed format (JPG, TIFF, PNG etc.) and only points to it when rerendering an instace. I guess this is the correct method. If i have to transform the smart object instance later (e.g. design changes by customer), PS can allways rely on the original high resolution pixel data. But the PS document size increases only for the amount of the rendered instance layer + original bitmap attachment. It's even possible, to edit the smart object in place (isolation mode) and reduce the original bitmap resolution (destructive scale) without touching the instance position and size. In essence the filesize of the whole PS document is far smaller than a comparable AD document and approximately predictable. In essence: placed/imported images should either NOT be stored within the document. OR if stored within the document, then in it's original file format and compression. Placed images should not blow up the overall document size in the way they do now. Designer workaround - the rasterize dilema The only way i found to minimize document filesize is, to rasterize placed images, so they become a local pixel layer. This reduces overall filesize but the result is stil unpredictable. Sometimes the document becomes soon very small after rasterizing a high resolution image layer and saving the document again. Sometimes it becomes even bigger - later it becomes smaller again. So it seems, that redundant pixel data is not cleaned up at every save procedure? The bad thing: the document becomes smaller at the end, but now i loose everey connection between the bitmap layer and the orginal placed image. AND i loose every layer effects! I even don't know what was the original scaled size of my old bitmap. If i have to do design changes lateron (we all know our customers...) i have to spend extra time to search the orginal image, place it in its actual size, rebuild layer effects (hopefully made some notes in the layer label). After that extra work i can do the actual design changes. Much, much extra time spent! To prevent this, next time i leave the original image in the document and have - yes a huge file again :-( Another impractical point of rasterizing is the lack of control over pixel density. I'm talking about real count of pixels in the bitmap NOT the relative dpi (document settings). There is an ellipsis beneath the menu item "Layer -> Rasterize..." that meant to show an additional settings dialogue before rasterization is done. But there are no raster options to set. The document dpi has no effect on how the layer is rendered - to say how many pixels are created from the layer. And the rasterized quality is only moderate - seems to be 72dpi with method bilinear? There should be precise settings for the rasterize command: - absolute resolution: means, how many pixels are rendered per inch/cm (presets or explicit manual setting). - relative dpi (relevant for print) - render method: there should be an option for high quality rasterization of layers - e.g. bicubic andd so on. Simply compare this to the slice settings in the export persona.
 -
situation - 1. two artboards A4, side by side, with some space between. 2. you place image on the right one, bigger than A4 3. make cropping layer, bigger than A4 on all sides -> mask to below 4. rasterize the layer. The bleeding will be rasterized only on side next to first A4, on top, right, bottom will be cropped exactly to the artboard, not by bigger cropping layer. If you add empty artboard on top, right bottom, it will work as intended.....
-
 Please, help. How to rasterize layer so that parts of the layer outside the canvas were not removed ? It's very uncomfortable during work. is it possible?
 -
Hi, When cropping a document, the pixel content removed is only hidden and not removed. One needs to click on rasterize on each pixel layer to actually remove the cropped pixels. This is already pretty painful, and not clear what to do with pixel layers with adjustment child layers when you would like to keep the child layer, but remove cropped image area. Rasterize also bakes in the adjustment. However Spare Channels do not even have the rasterize option, so if you had any Spare Channels before cropping they retain hidden but stored pixels outside of your canvas. One problem is that these continue to consume memory and file size, but I have encountered another issue as well, as described below: I had a sky with some electric wires to inpaint. I made a selection of the wires and saved to spare channel. I have cropped the image and rasterized the pixel layer. I returned to removing the wires by loading the spare channel to selection. This resulted in a selection partially outside of the canvas, which was not obvious at all, as the marching ants are only drawn inside of the canvas. When using inpaint with such a selection silly things happen, such as inpaint making the pixels transparent. I see three alternate solutions to make the working of cropping consistent: - Make crop have an option to remove the cropped content (preferred solution) - Have a separate function in menu to remove all content (pixel, masks, embedded mask and spare channel content) that was cropped earlier. - Have a context menu entry for spare channels to remove the cropped content (identical to rasterize for pixel layers)
-
I often use geometry layer to mask (clip) other layers. Unfortunately there seems to be no possibility to mask/clip everything inside the geometry. It would be great to be able to invert geometry layers without rasterizing them.
-
Hi, I'm unable to find a simple way to rasterise a group of layers? 'rasterise' flattens the whole document 'rasterize selected' has no effect when you have the group selected The only way I've managed to even do it is by hiding every other layer and then choosing 'merge visible' That's fair enough, I suppose, since I only have a few layers, but it certainly wouldn't be fair enough if I had any more than 10 layers on the go! Anyone else found a legit way to flatten a group? Thanks Wayne
-
 I've made a nice world map with AD and applied a gradient to it. When I export this as a pdf file, it will be rasterized. However, other shapes on that world map such as an arrow (line) won't be rasterized on export. I changed the filling to a solid color and exported again. Now my map won't be rasterized anymore, but I've lost my gradient. How can I export a shape filled with a gradient without rasterizing it?
 -
 Take a square but instead of filling the square with black, I want to fill it with dots. I must be able to choose the size of the dots. I think that is named rasterize. How can I do this in AD? Thanks for helping me
 -
 Thanks in advance friends... ...when flattening into a single pixel layer, do I first need to rasterize the grouped layers? Not sure how to do this, i.e, I'm unclear on the steps involved, and the proper order in which to perform them. A brief walk-thru would be greatly appreciated. FYI - I am wanting to manipulate the Flat image (bend, curve around a cylindrical surface such as a large barrel or a utility pole, alter perspective and/or viewing angle, stretch by pulling/moving nodes independently of each other, etc). greateful for your help, -Christo
 -
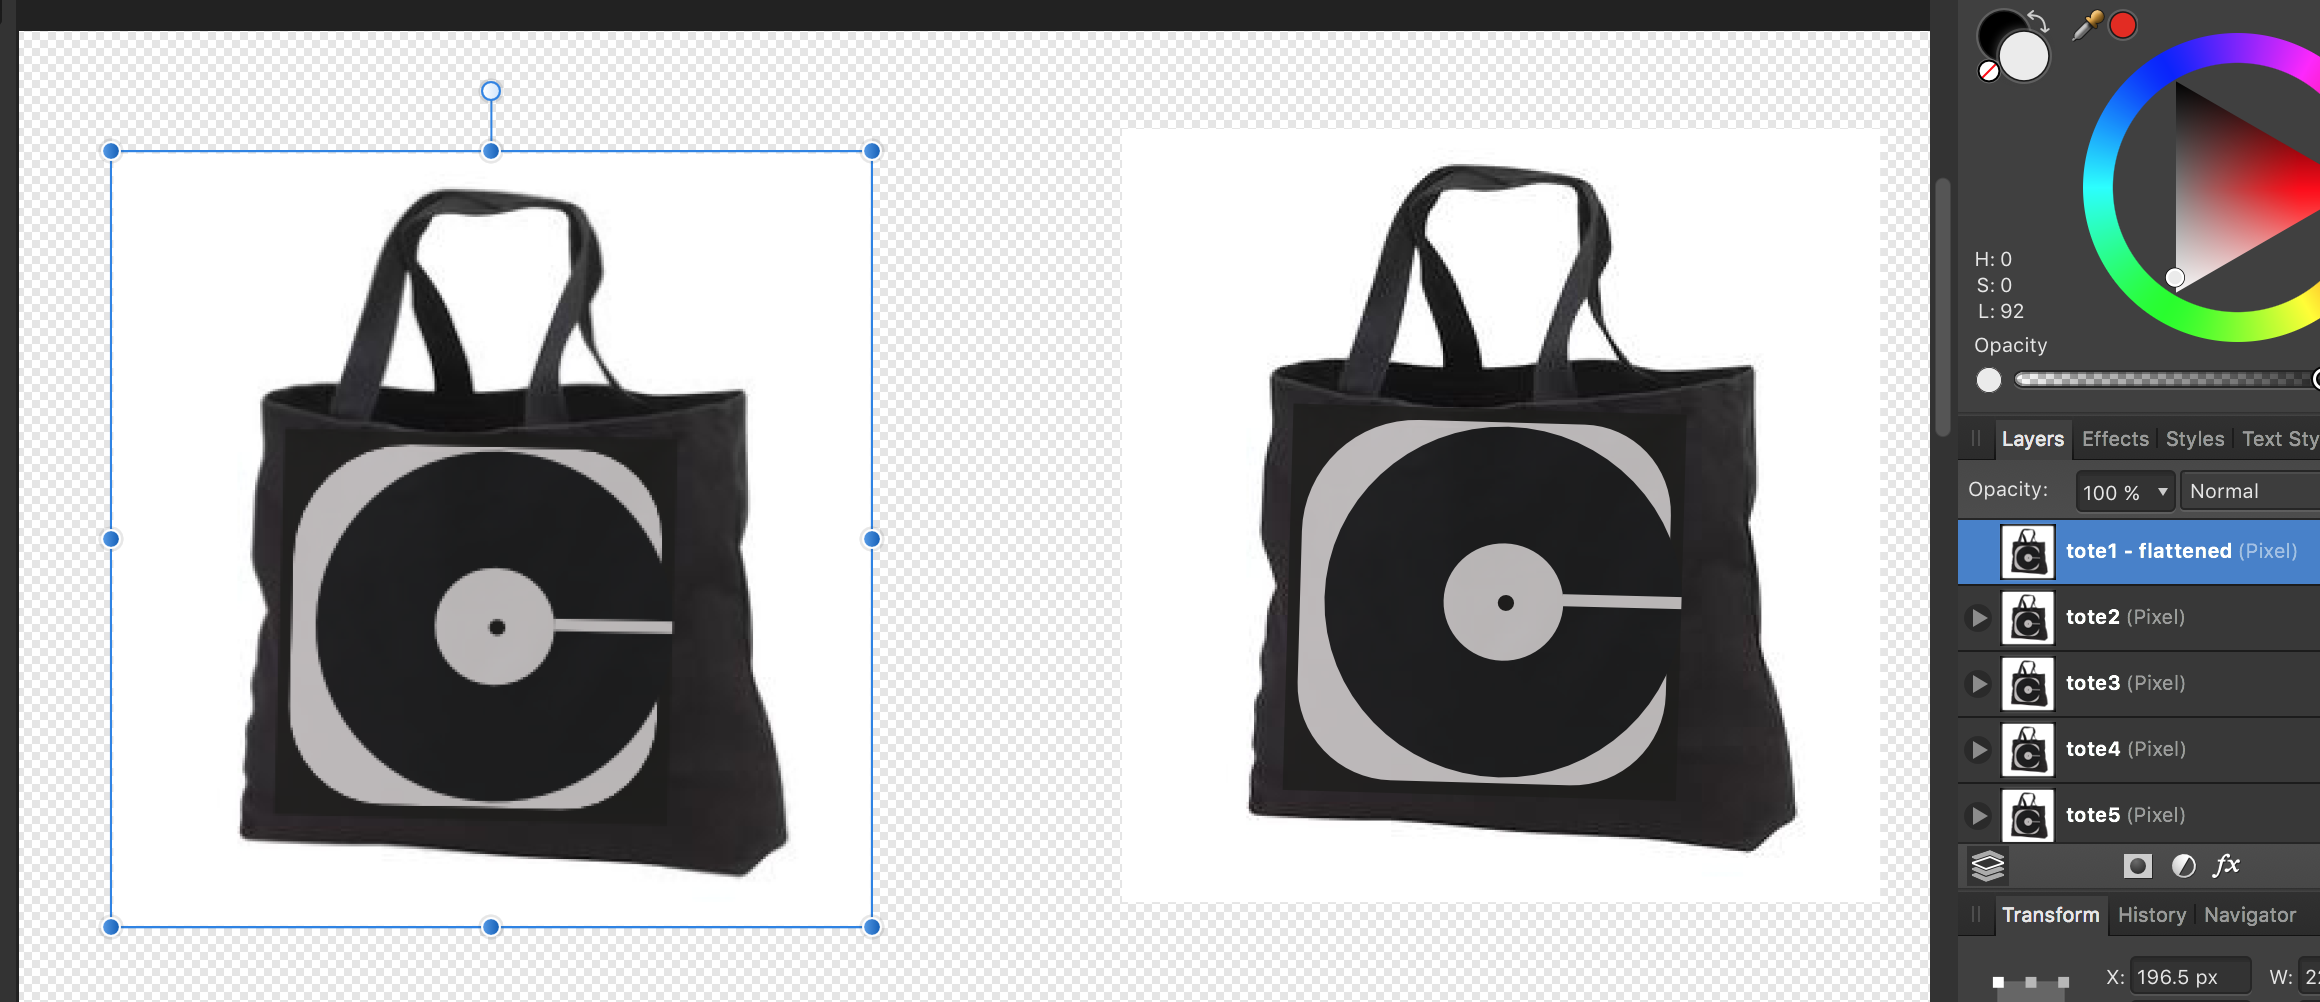
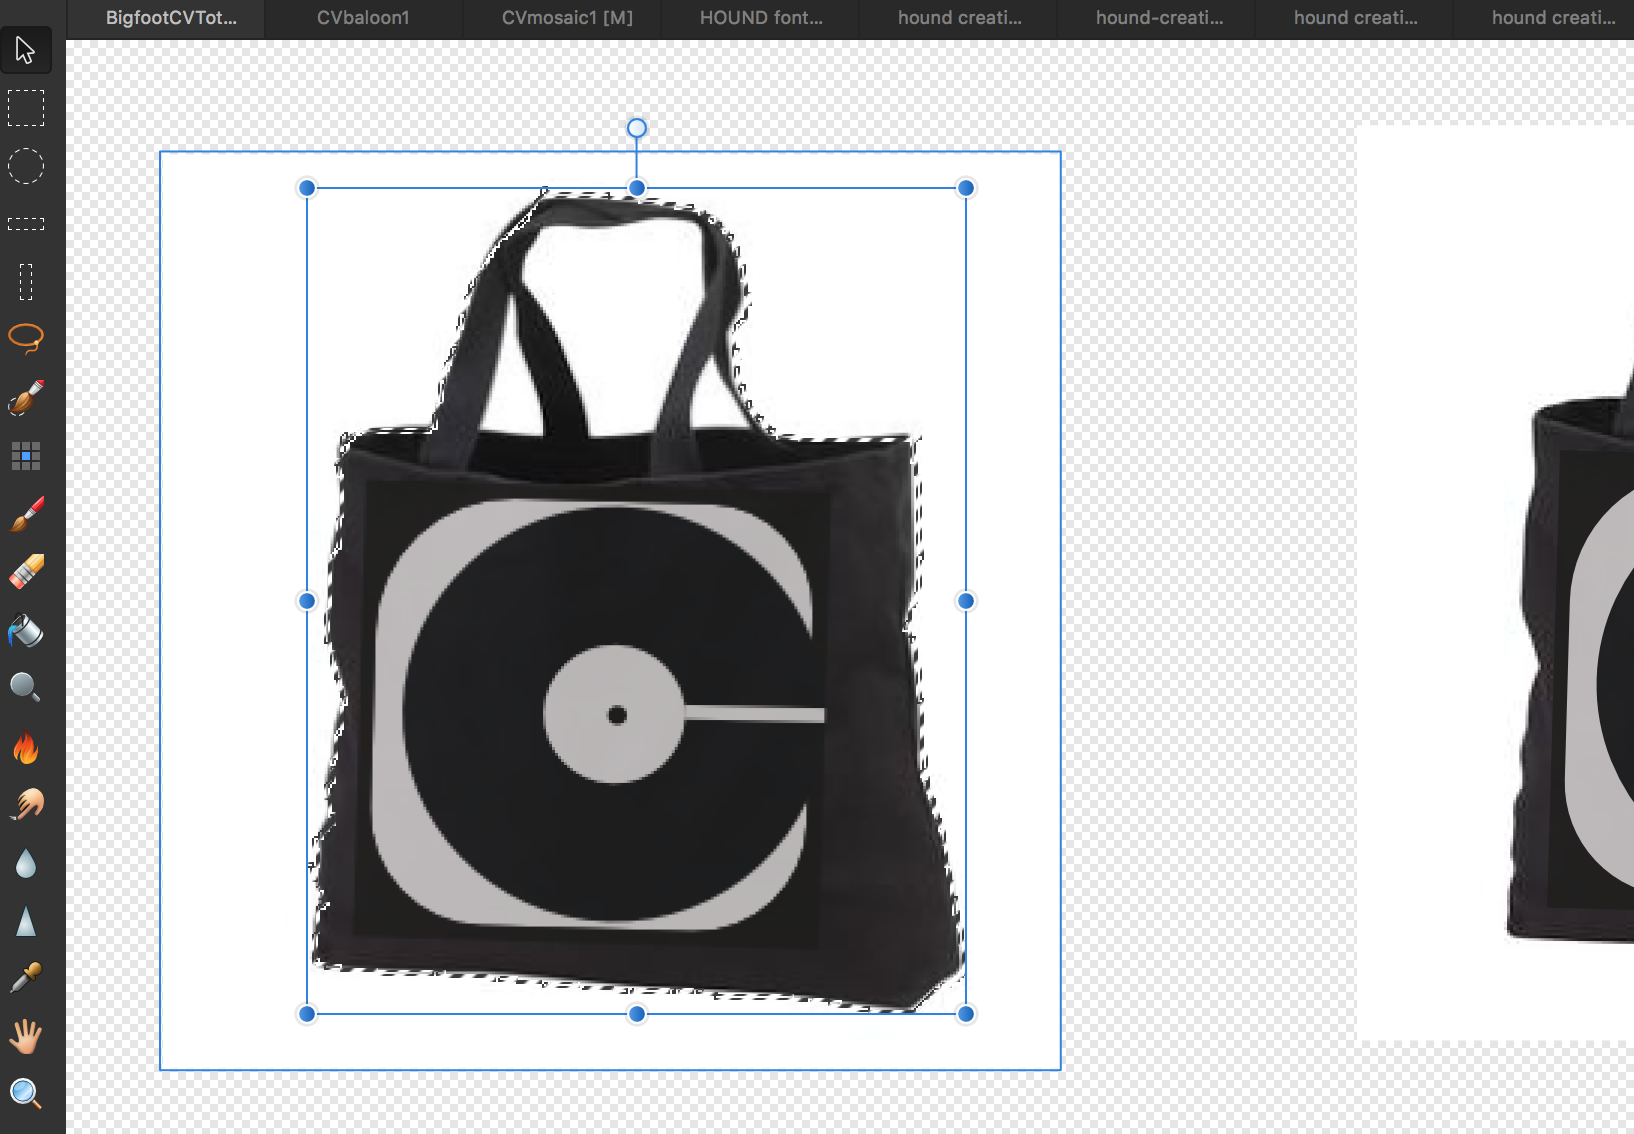
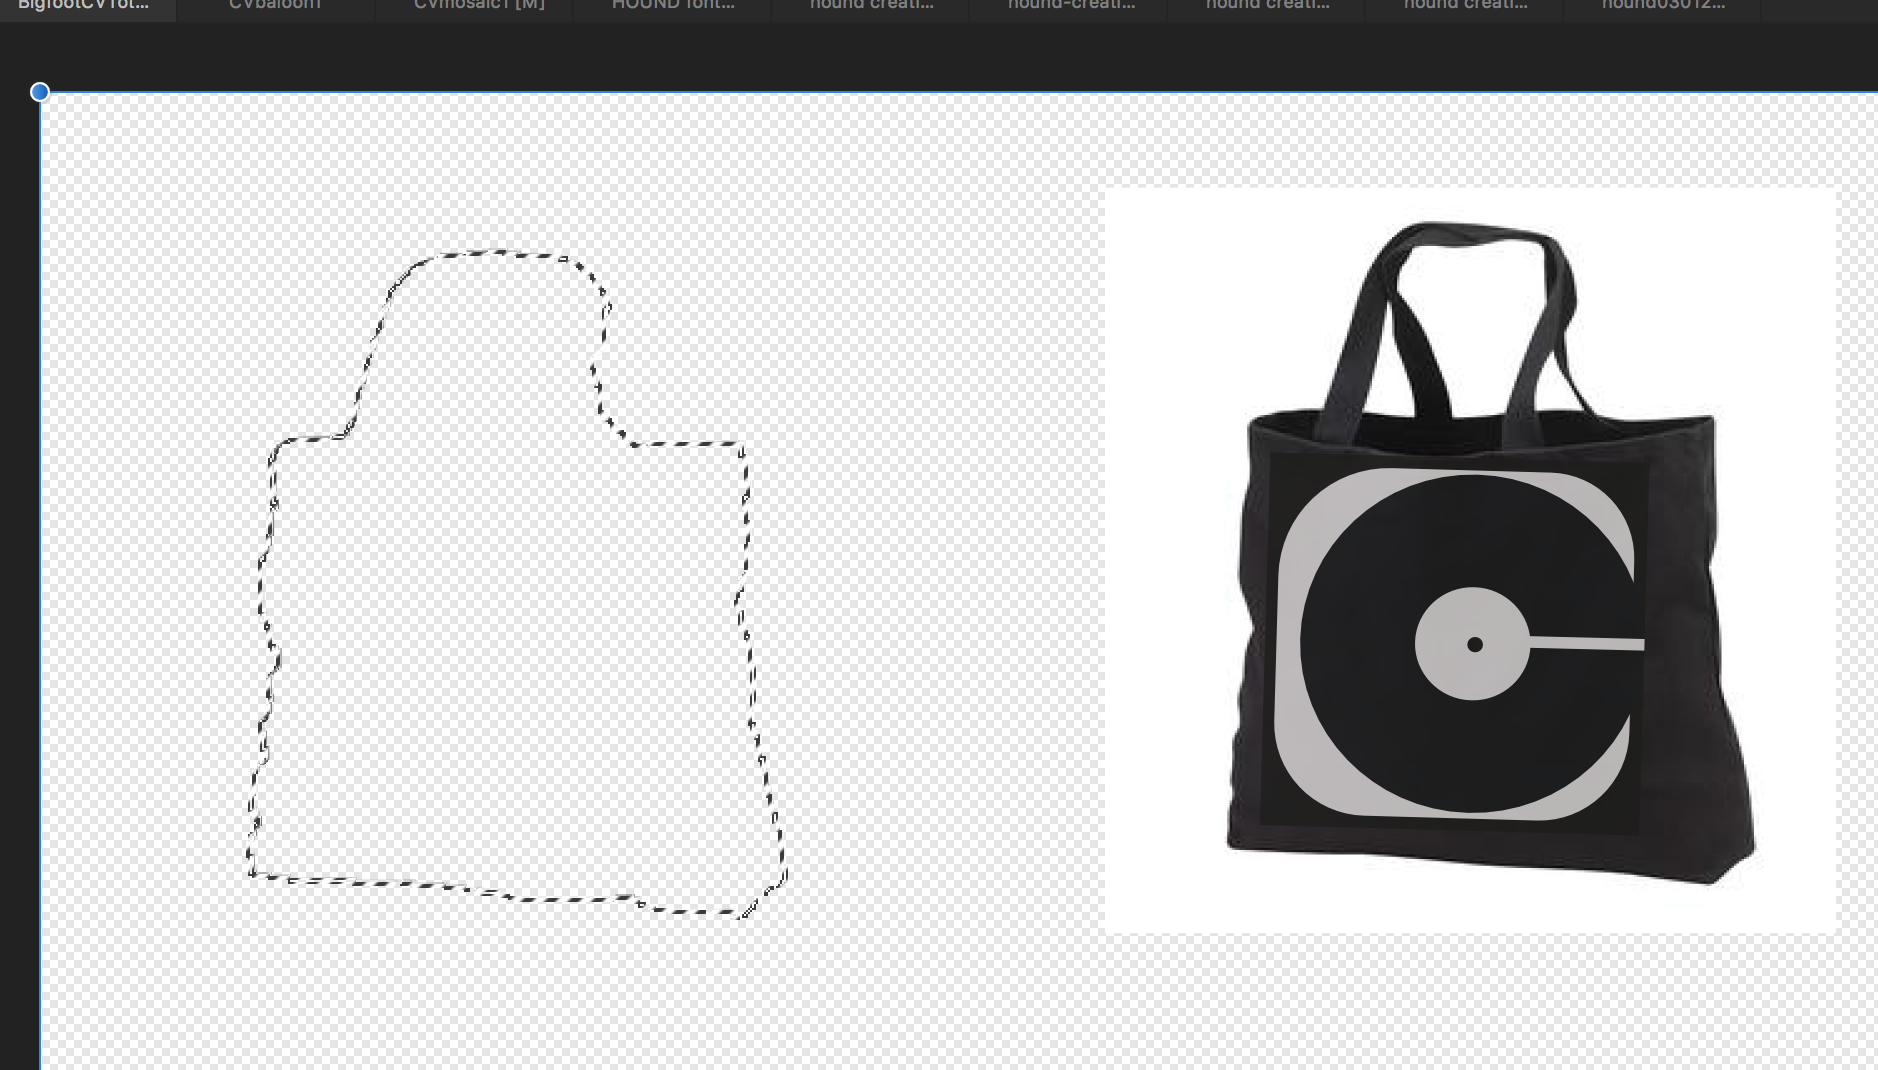
Dudes/Dudettes, a little help please... Missing something obvious and simple again, I'm sure - and I've sincerely tried to research the forums myself, doing my own leg-work but am just stuck on this one. This time I brought along some visual aides. Working on a MacBook Pro with AD 1.5, all I am trying to do is remove the white background behind this black tote back (see images below). After surveying the forums, I understood that in order to accomplish this I needed to do the following (please point out my error): 1) add new Pixel layer over image 2) outline the image wanting to kept using Selection tools (I used the Brush selection tool)...pardon the crudely traced selection line, I'm just practicing 3) Invert the Pixel selection (I used the Ctrl+Shift+I keyboard shortcut)... **this is where I'm stuck - a post in the forum says to now 'paint in the selected area'. Would I not used the In-Fill tool by selecting a color then clicking on the selected area? This is what I tried, yet was unable to paint-in the selection. Feel like a major dork here guys - what am I missing? -Thanks as always AD Fam, --Christo
-
 Is there any way to choose the DPI used for rasterization in AD? I am working on a large, multi-artboard document and want to rasterize some vector art to reduce the file size of the PDF I'll eventually export. But I still want the document's viewers to be able to zoom in and inspect the art at a reasonably crisp resolution. Changing the DPI of the document doesn't seem to work, as it doesn't rescale my artboards. How can I fix this? Thanks!
 -
When the Paint Brush Tool is used on an Image layer, the target layer is automatically rasterized to convert it to a Pixel layer because the tool only works on layers of that type. The Inpainting Brush Tool and the Selection Brush Tool also only produce a result on Pixel layers, so the same automatic rasterization should be invoked when they are used.
- 4 replies
-
- 1
-

-
- Affinity Photo
- rasterize
- (and 1 more)
-
 EDIT: The post mentioned below has been moved to the feature request forum, so this topic is not needed anymore. Can a moderator delete it? Improving the PDF output so that objects filled with gradients can remain as vectors. Currently they are rasterized or converted to non-native art. As discussed in this topic: https://forum.affinity.serif.com/index.php?/topic/35820-some-areas-will-be-rasterized-until-when/ Thanks!
 -
 I've got a B&W layer mask that I want to create a new pixel layer from. How can I do this? I tried duplicating the mask and then right click -> Rasterize... but that does nothing. It still stays as a mask layer.
 -
Guys congrats on the 1.5 launch, amazing and incredible improvements, Affinity is changing the landscape, very exciting times! Here's suggestion for improving the way AP handles AP>PSD exporting, along with another issue I've posted about where AP crops layers it rasterizes — don't crop my layers even if you need to rasterize them! :) Anyway, it would be great to have an app preference to allow more granularity when rasterizing unsupported layers from AP into PSD from the point of view of non-destructive editing. The current behavior rasterizes both the source layer and any associated Live Filters/etc not supported by PSD format. This obviously destroys the original source layer as it has to be rasterzied. In the interest of preserving a non-destructive workflow, what I'm proposing would do the same thing, but leave the original source layer in the layer stack, either deactivated under the newly rasterized layer and renamed original layer name - rasterized, or group the newly rasterized layer and source layer in a folder on the stack while leaving the source layer turned off, and name the group original layer name - rasterized and the other layers appropriately. In this way, one retain some editablity of the rasterized layer in relation to it's original state – for example I can control it's opacity and be able to scale back the no-longer-editable live effect, and of course I have access to the original layer in case I want to try something else in PSD... Thanks for your consideration and thank you for your amazing efforts!
-
 Hi, Just purchasing the software, i really like it. but unfortunately i faced this issue, after exporting to psd or eps files all texts got rasterize!! anyone can help with that, anyway to export it without any rasterize layers?. thanks. Rashad
 -
 Please forgive a newbie question. I have little experience with graphics programs such as this. I want to crop a photo. I load a JPG. When I click on the crop tool and try to move the 'grab handles' all that happens is that I move the photo in the window. The cursor remains looking like the crop tool during this, it does not change when I hover over the grab handles. After some experimentation I find that if I 'rasterize" my photo the grab handles work as expected, and I move the edges of the photo in to only show the section. But, I don't seem to be able to finalize my crop. I press enter expecting the part of the image that is showing to be come the entire image. But nothing seems to work. While I am no photo manipulating expert, I have cropped photos in the past with other programs and it is all very straightforward. What am I missing ? What does 'rasterize" mean ?
 -
 1. New document 2. Draw a shape with a coloured fill 3. Add 100% noise 4. Rasterize the shape Observed: The fill of the rasterized object has much less noise Expected: Object looks the same as it did before rasterizing