Search the Community
Showing results for tags 'raster'.
-
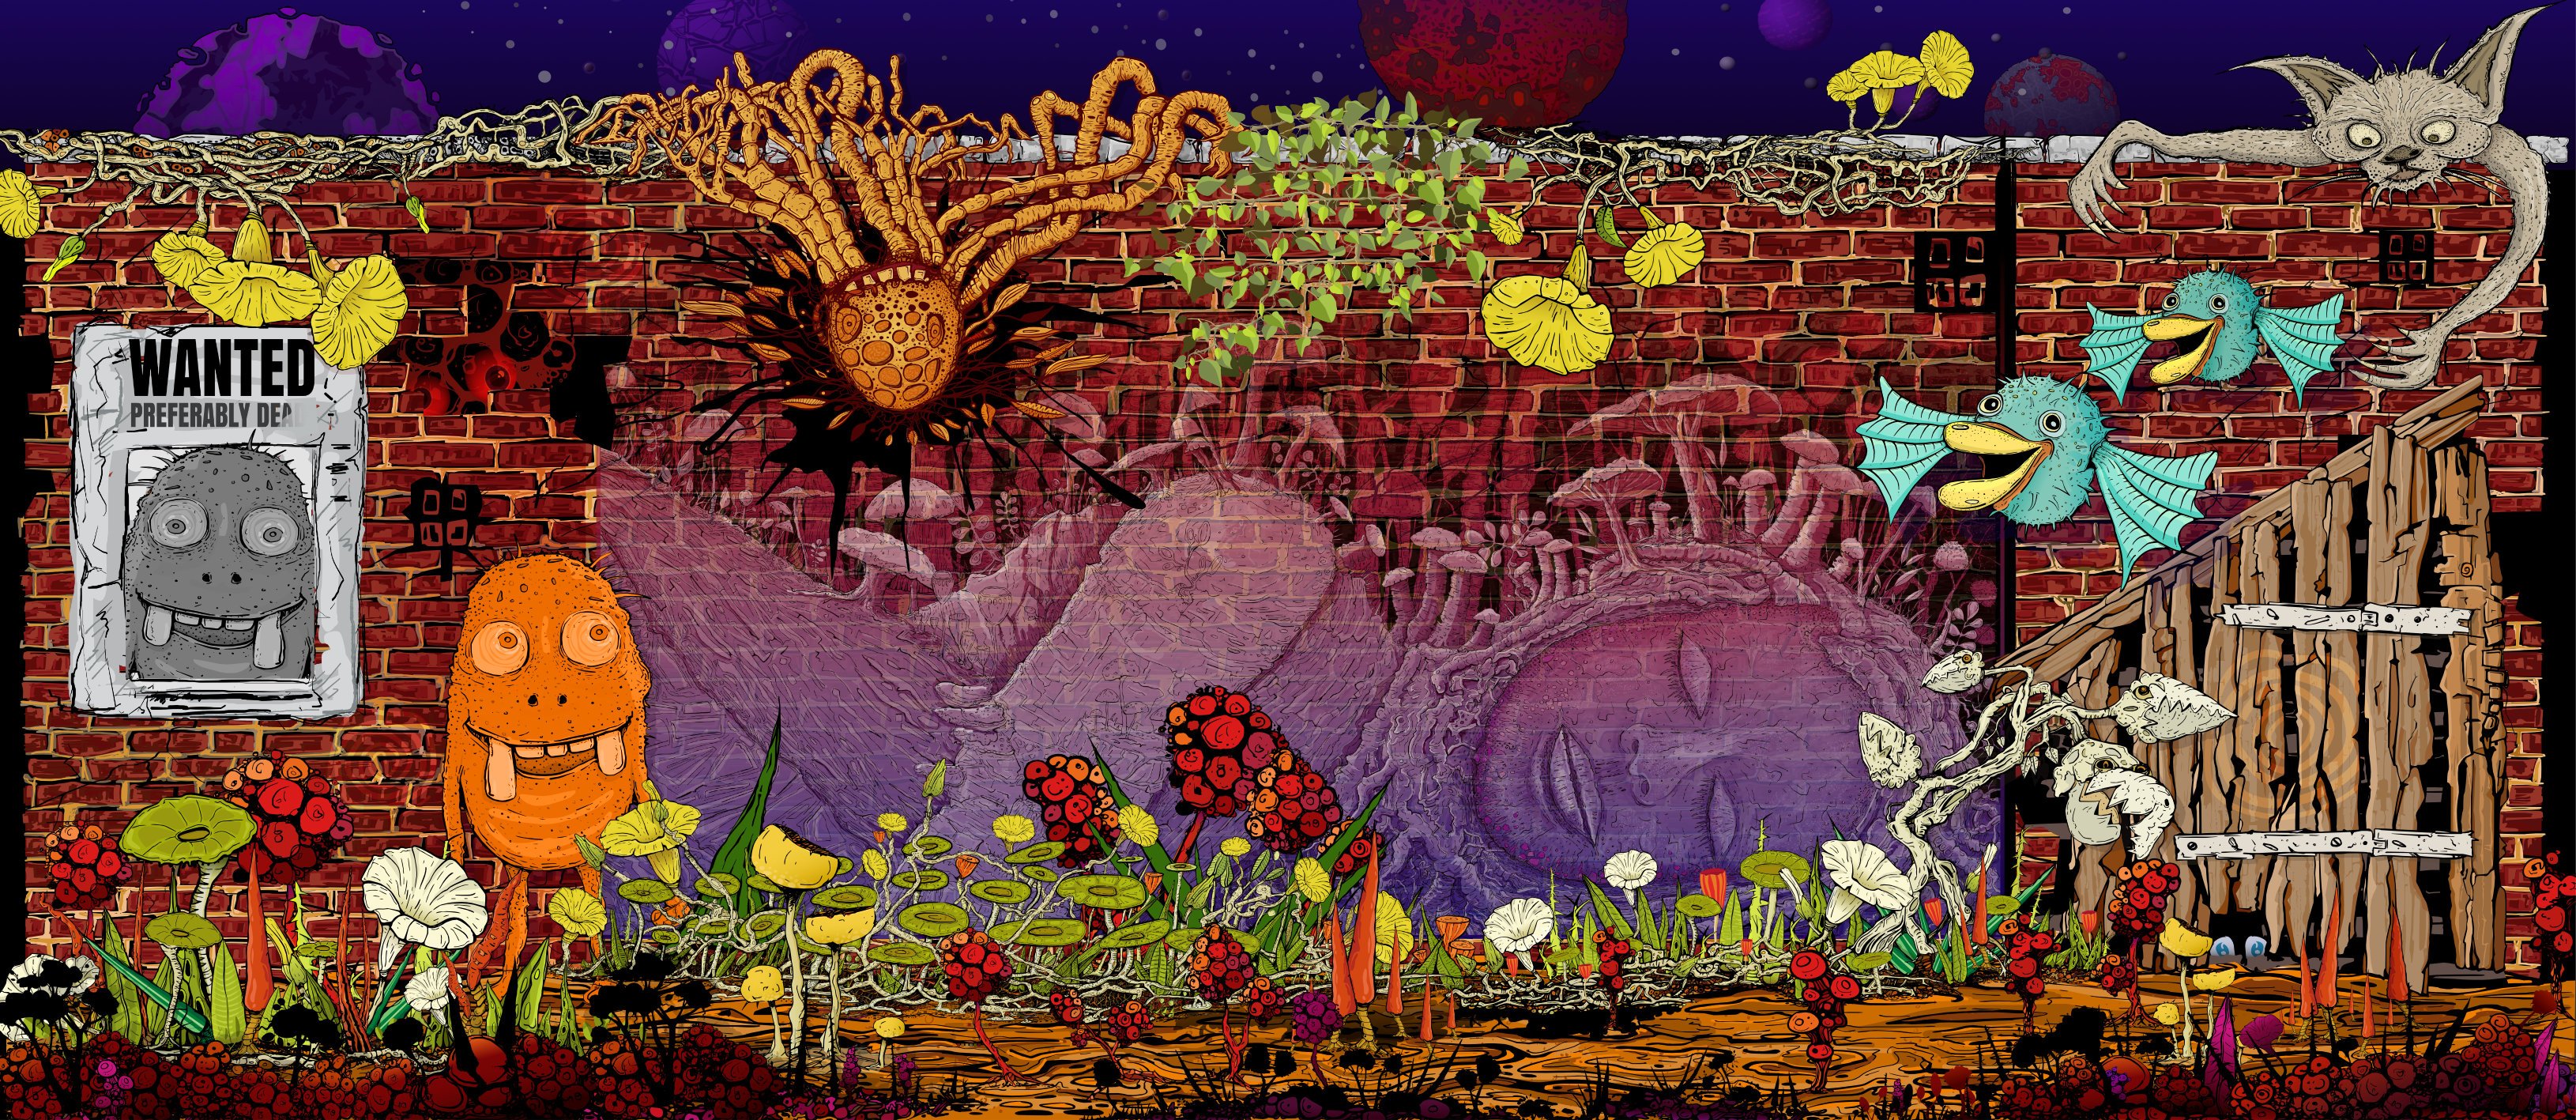
The Wall Affinity Designer | 1840 x 800mm 300dpi | Mixed raster and vector but mostly vector! Used Untamed: 'Planetary Toolkit' of for the Sky

-
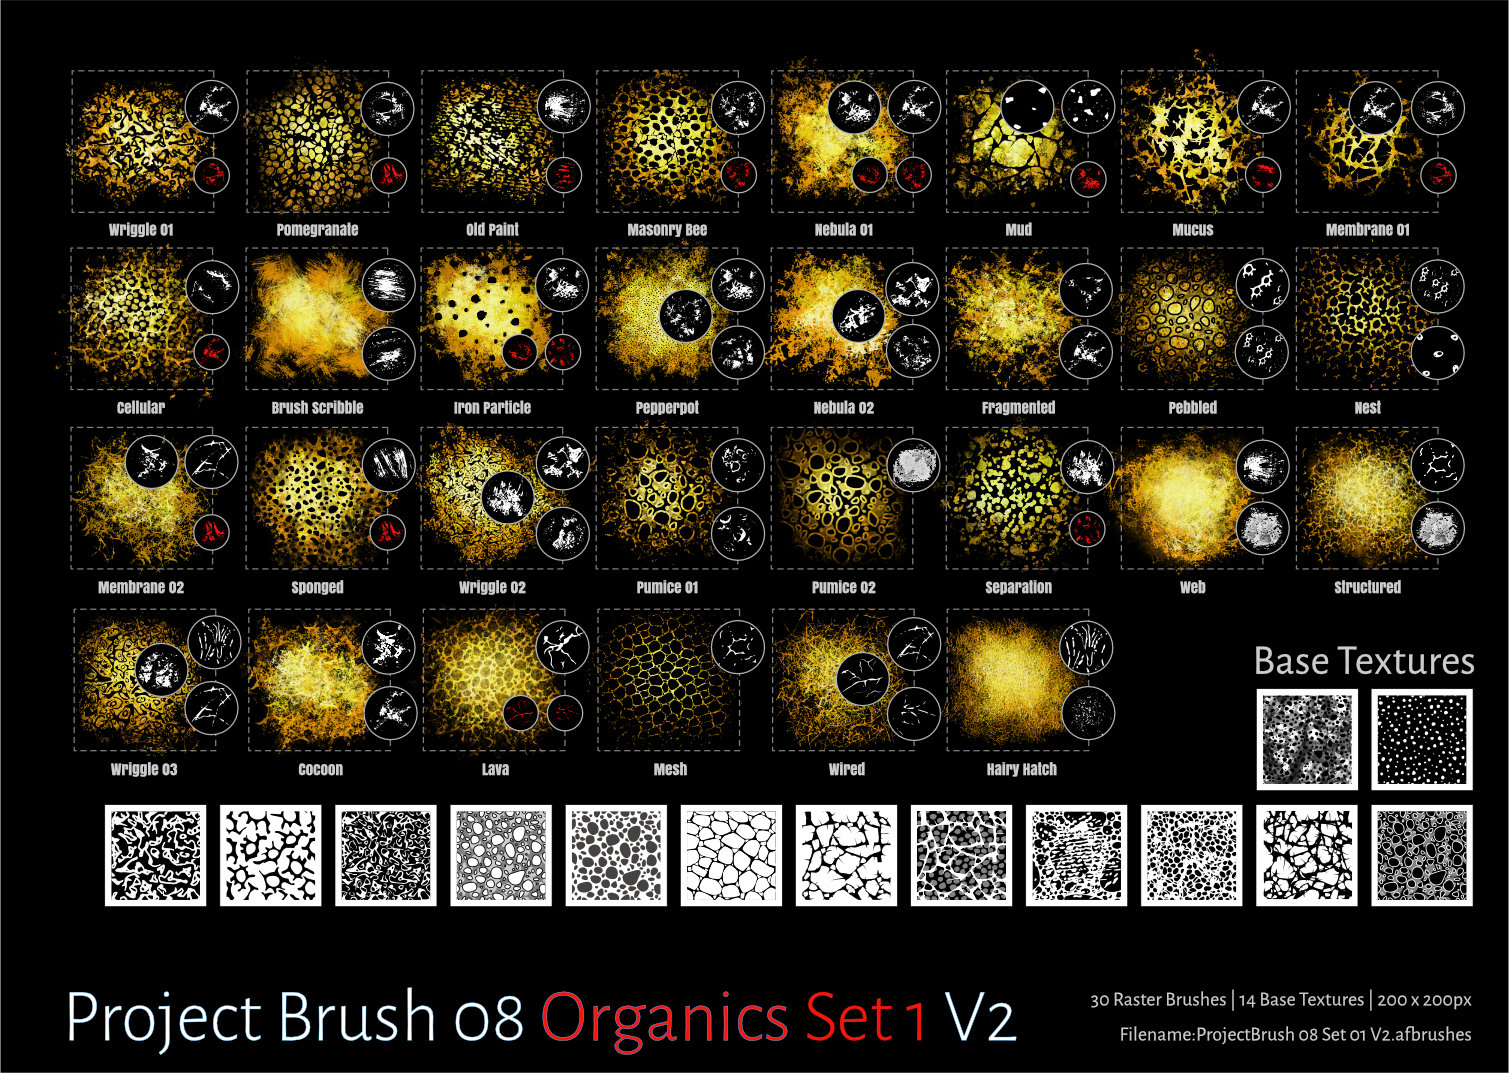
Project Brush Set 08 Organics Used as brush set to supplement Camouflage III Project Updated the brush set to version 2 Should work much better now! Changes/improvements as below Version 2.0 1. Removed old versions redundant now.. 2. Made significant changes to the brush dynamics and nozzles. All nozzles are now vector based replacing previous raster versions (as much as possible) 3. There is a significant number of new nozzles for the brushes Which means they are not like original sets.. 4. Made use of the 1.7/1.8.2 brush engine in AD/AP using subBrushes. 5. The old brush set was appearing darker and less intense with 1.7/1.8 update...I have fixed that with this version! 6. Updated the Sample sheets to newer (latest) layout..Sub brushes are displayed in red. 7. Introduced a lot of new base textures 8. Organics Set 01 replaces the original Project Brush 08 set. There are 3 x 30 in the full project Archived the Older Brush set and updated Library information Raster Brushes ProjectBrush 08 - Organics Set 01 V2.zip
-
 Introduction I'm "kicking the tires" of the Affinity Publisher, Designer, Photo V2.40 suite this week and wondered if anyone else has also been thinking of or are using it as a Swiss Army Knife program suite for all document related work like notes, letters, reports, papers, books, websites rather than just traditional "desktop publishing", to replace Microsoft OneNote, Word, Adobe Indesign, Illustrator, and Photoshop totally. I've been wanting such a suite for 34 years and after just 4 days of experimenting, I'm already dreaming of a world where the Affinity Publisher, Designer, Photo suite is dominant in all these areas. We are only allowed one main question, so what additions to the Affinity Publisher, Designer, Photo suite would be required for my vision of the future? Version 2.40 now has almost all the things that critics claimed were missing in version 1.0 as a desktop publishing program. The present plague I got my first "real"computer 34 years ago in 1990 and within 1 year I was already trying to import AutoCAD drawings into Microsoft Word for a steel pole manufacturing company user manual. Most of you know that Microsoft Word has never displayed vector illustrations properly and likely never will. I asked the secretary of the company to print out a few pages I had made with filler text and the drawings I had imported, to check the quality of the lines which looked horrible on the monitor. The secretary was horrified at the filler text thinking this was the final draft and notified all the head people in the company and soon I was confronted by an angry mob in the lobby where the head accountant put me in a choke hold and tried to strangle me to death. After this I experimented with Ventura Publisher which only displayed thumbnails in the image boxes, then Page Maker, Frame Maker, and finally Indesign, Illustrator, Photoshop where I discovered how huge those Adobe files are and so would only be suitable for the largest of projects. The file size problem Smallest Microsoft Word version 2016 docx files are 12 K, Adobe Indesign version 2.0 indd files are 144 K, but Affinity Publisher V2.40 files are only 10 K. So Adobe Indesign documents are not typically going to be used in any corporate or home office for small items. Below are minimum file sizes for different documents. Affinity Publisher 10 K, no thumbnail on save Affinity Designer 9 K, no thumbnail on save Affinity Photo 8 K, no thumbnail on save, 22x20 mm stamp size image Adobe Indesign 144 K, compression, no ICC, no pdf editing Adobe Illustrator 273 K, compression, no ICC, no pdf editing Adobe Photoshop 685 K, 22x20 mm image, CMYK, 8 bit Writing everything directly in the desktop publishing program Most people think that writing should be done in a word processor and later inserted by a professional into a desktop publishing program if required. We all know how many times documents are edited, so in the end the "finished" document spends more time being edited than the original write, and it only makes sense for the author to do the editing in the desktop publishing program. So everyone in a company should be using the Affinity Publisher, Designer, Photo suite. The desktop publishing experts would be used to set up the documents and help people with the editing, illustrations, and photos? Program suites Visual documents filled with illustrations and photos are much more compelling but also are often required. A long document text, vector, raster suite of programs developed by the same company is required for this to work seamlessly. There are only 2 companies now in the world selling reasonably popular, reliable, and easy to use suites that do this, Adobe with Creative Suite and Serif with Affinity Suite. Alludo (Corel) decided to drop Ventura Publisher, and Microsoft decided to focus on text and ignore complex graphics. File sizes of Adobe documents are too big and the subscription fees too high for wide use. This leaves only Serif to fill that void for the mass markets. And just like QuarkXPress lost their domination, Adobe Creative Suite could lose it's title of being most popular by missing on the mass market end if my vision of the future becomes reality. Even note taking could be done by Affinity Publisher There are likely over 100 different note taking programs available. Everyone of them has the same problem, not being able to draw or edit quality (Bezier) vector illustrations or add vector text to raster images. The original Zettelkasten note system was using 3x5 inch stiff paper cards, were widely used by academics for text, charts, diagrams, but present computer note programs focus on text only. But what is also required is a proper note making program. I work in the field of science and engineering and we make a lot of research and design notes. So instead of copying something from the Internet, we have to make our own drawings, tables, and formulas. And these are often quite formal with quality drawings and illustrations, as orderliness, precision, and attention to detail results in better conclusions. None of the present note taking programs will do this, they are more for fleeting notes. So am considering using Affinity Publisher to generate these permanent note and invention files. The actress Joan Rivers was reported to have one million cards in her Zettelkasten system. This is why small file size is so important. Because digital documents can be text searched, I am proposing to use longer notes than what was used in the original Zettelkasten system, might be up to 20 pages if there is one main idea, with individual digital files for notes instead of a single huge file like in present programs. This allows addition of different file types like document, database, spreadsheet, presentation, drawing, and image. A descriptive file name is typically used in computer filing systems and complex coding could be used, but also tags would be required for searching. Presently l can't find any tags that can be added in Affinity Publisher that can be found with the advanced search in Windows Explorer?
 -
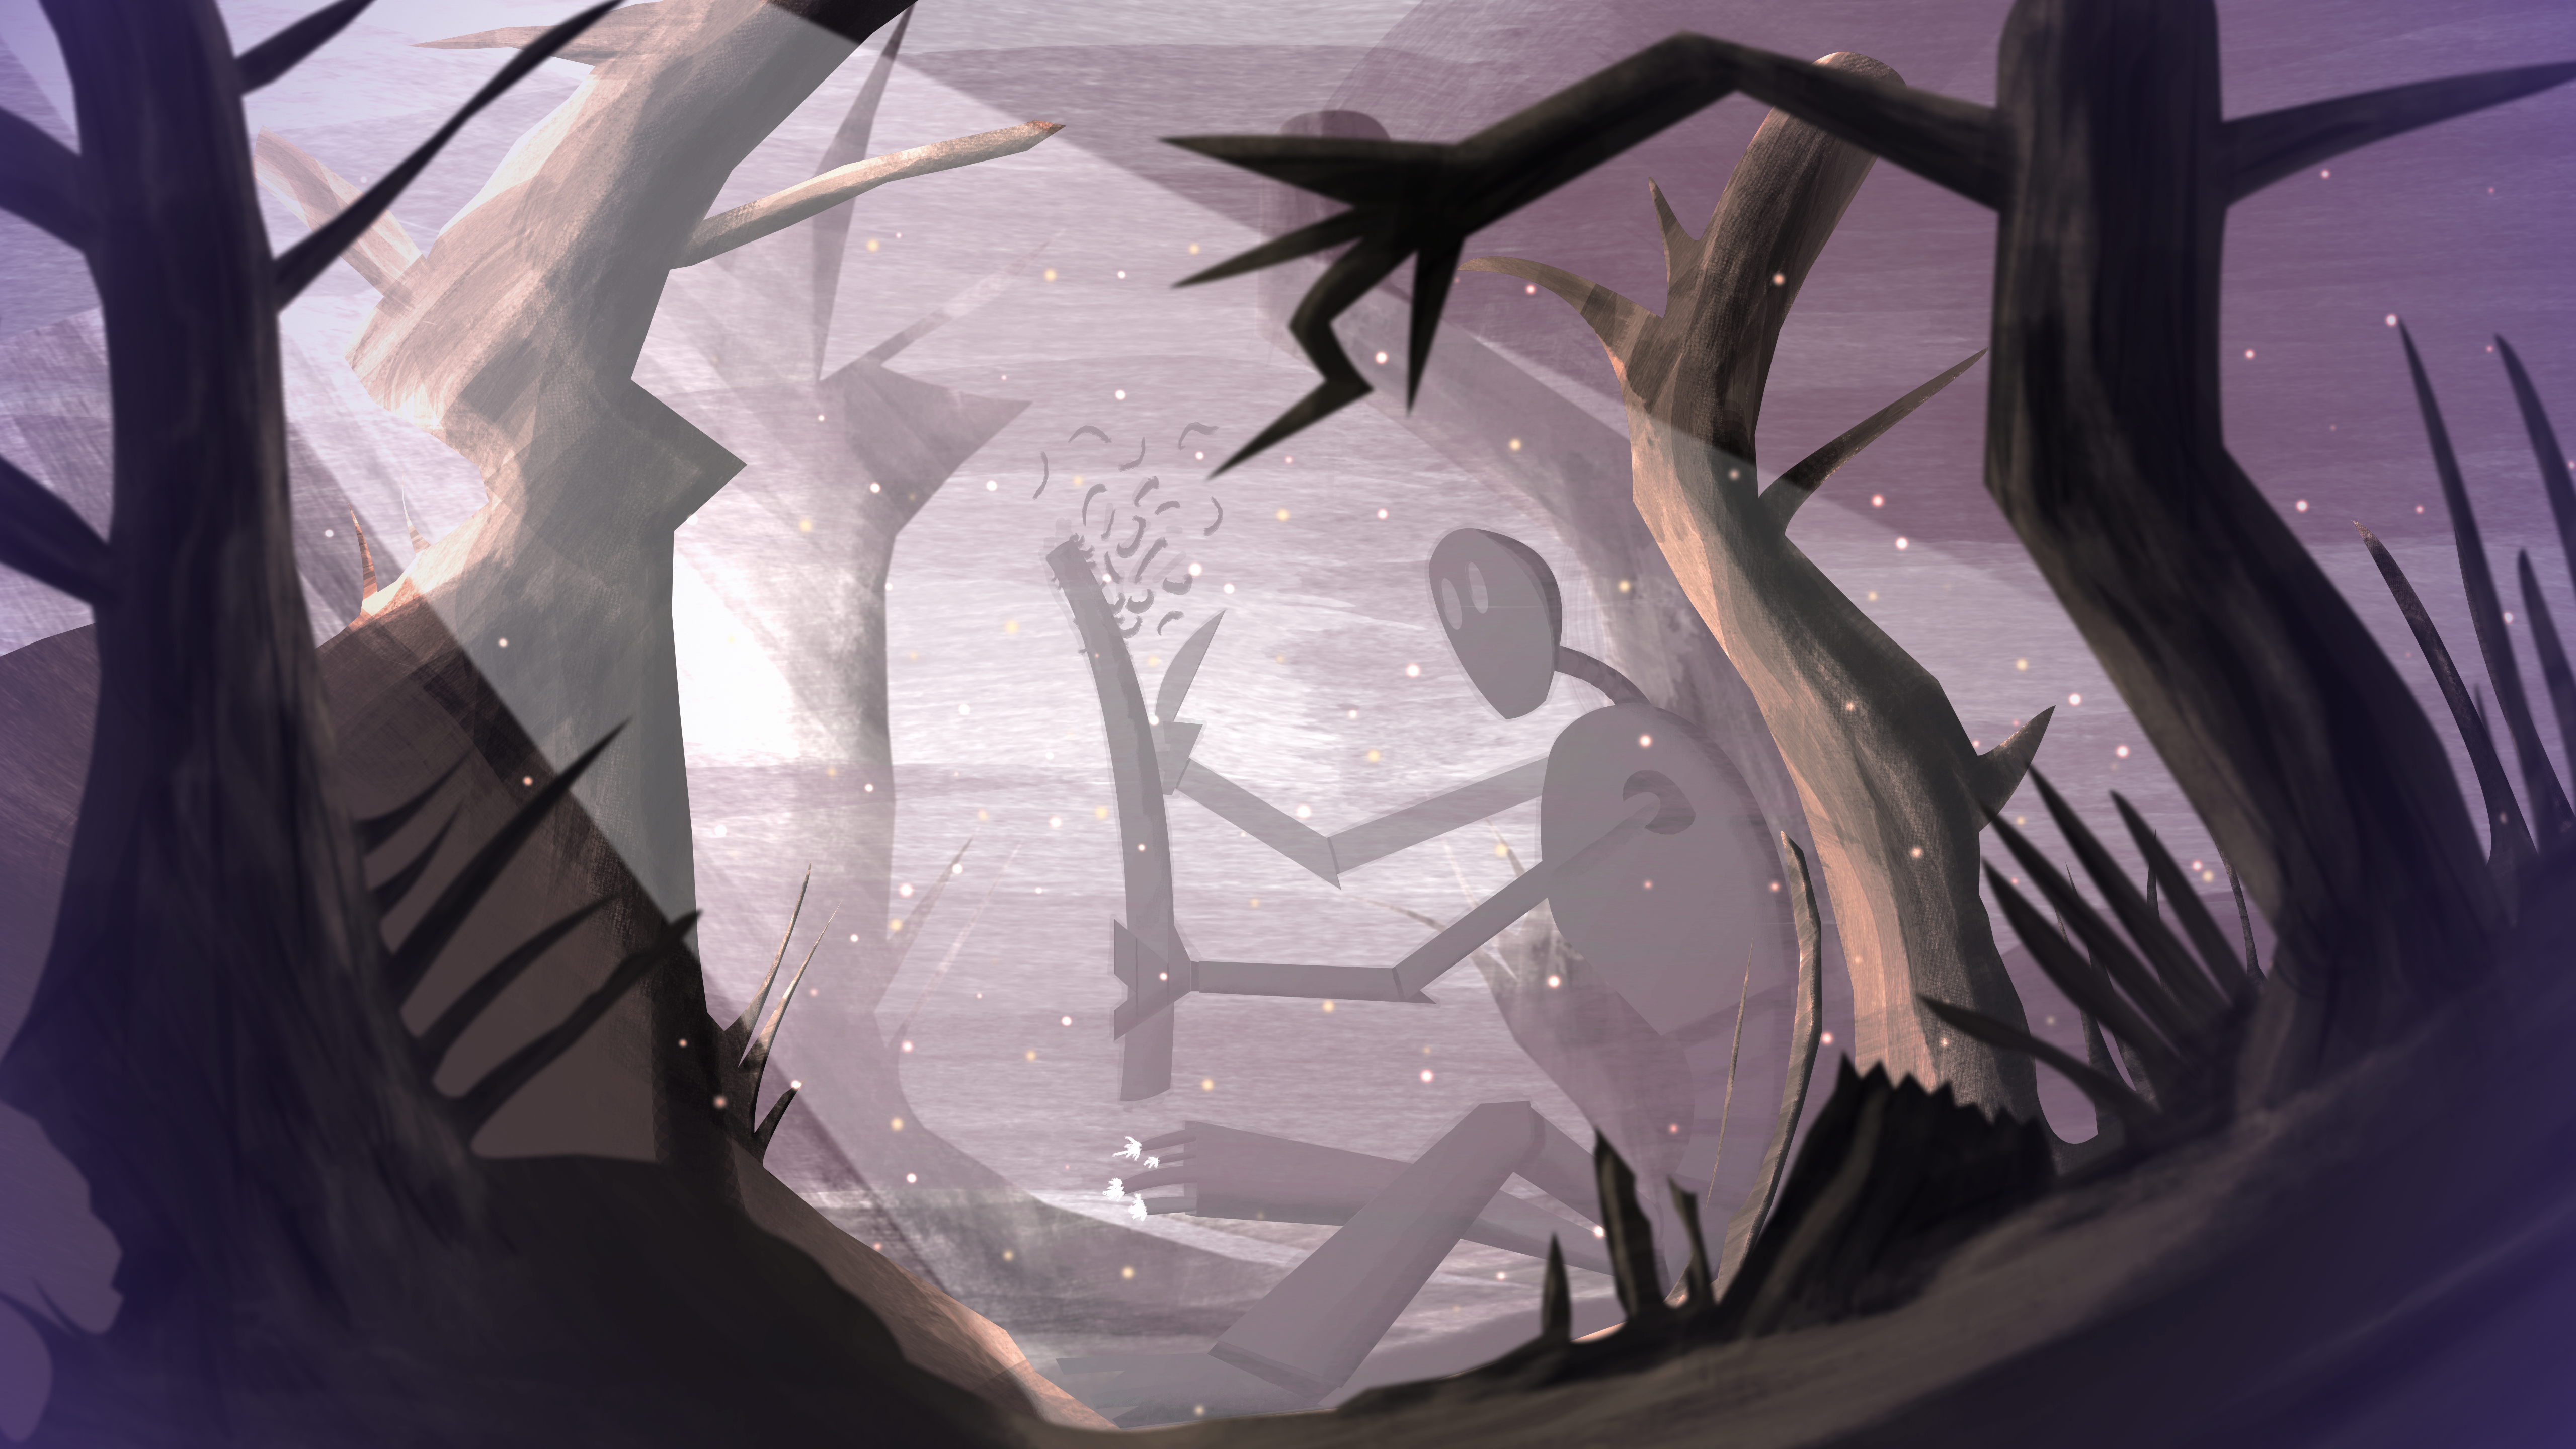
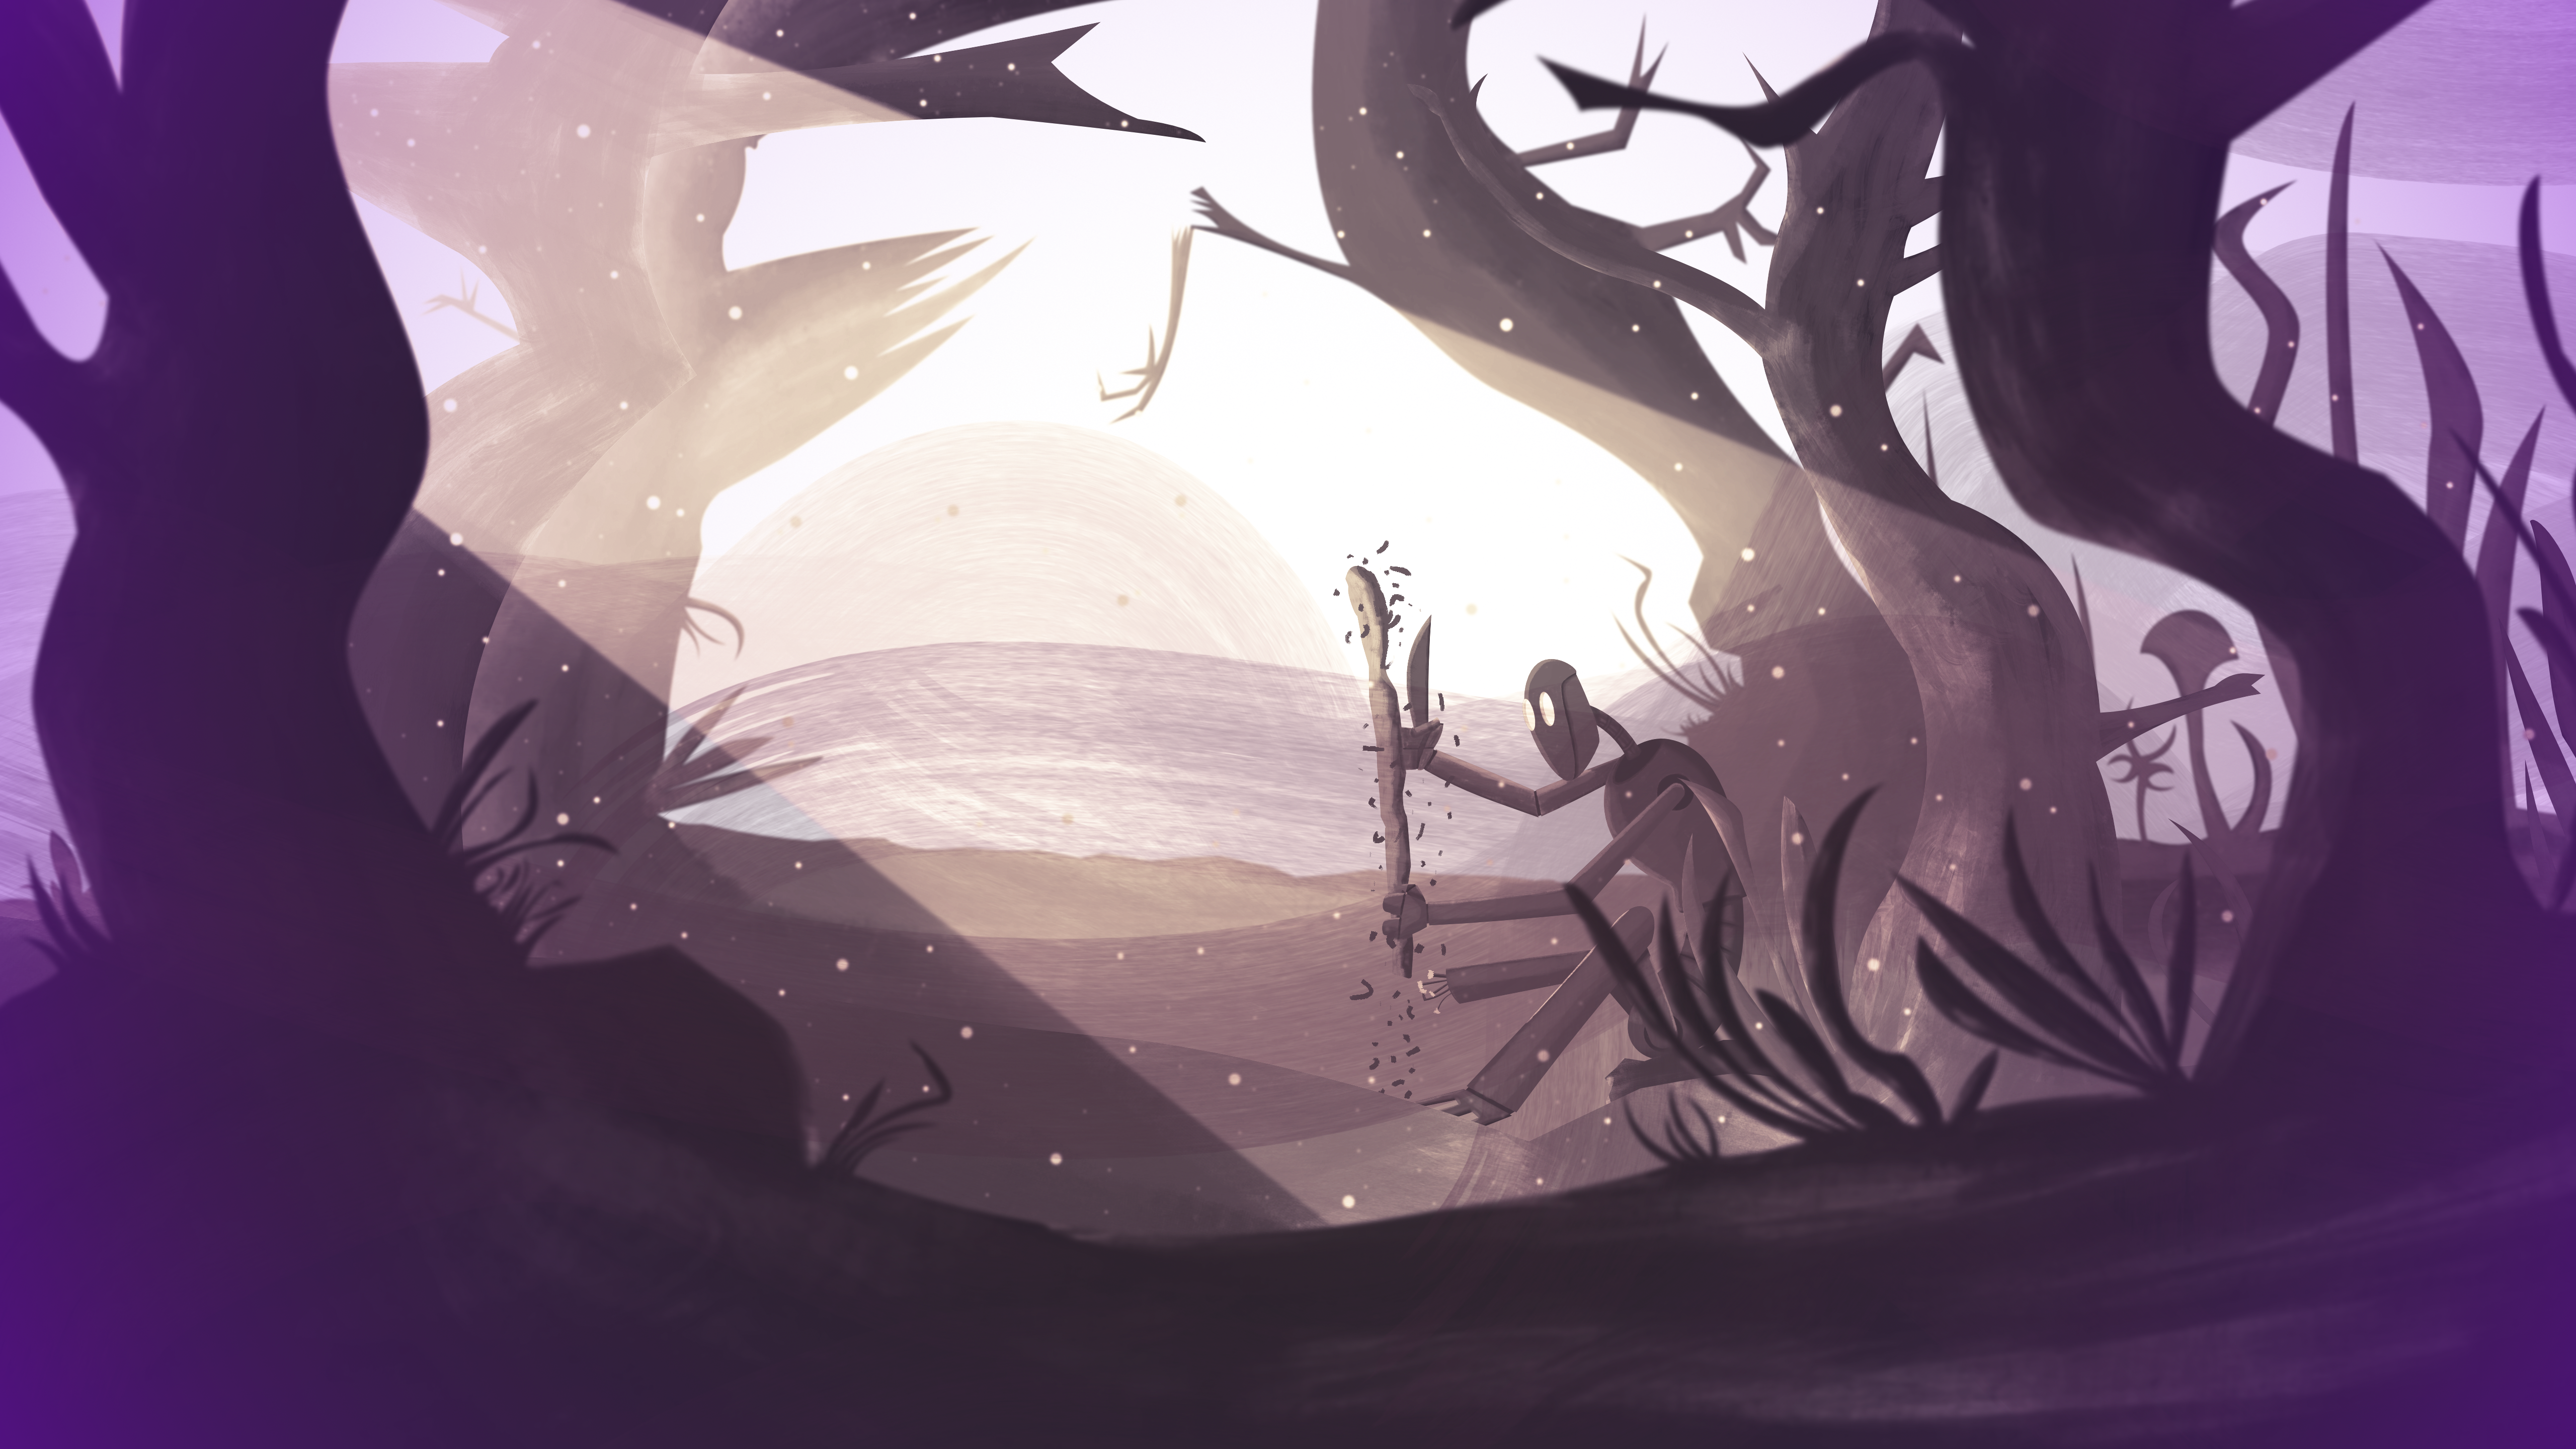
Here are my two attempts at "The Whittler" illustration project from the Affinity Designer Workbook. I forgot to mention in my "Reflected Skyline" post is that every upload that contains two images from the workbooks are years apart. The V1s were done on a low-budget laptop I had since college which still works to this day! The V2s were completed on a much better system. I must admit that I could've put a bit more effort into V2, especially with the robot's neck but hopefully that'll be done if I ever decide to tackle it again V1: V2:
-
- 6
-

-
- affinity v1
- affinity designer workbook
- (and 7 more)
-
 I've recently created several vector only designs in Affinity Designer. When I go to export them as SVG instead of being vector svg files they are svgs that contain raster pngs embedded in them and hence don't scale properly. This is not what I want. 😢 Is there any way to tell affinity designer to export the vector design as only a vector svg not png embedded in svg? Are there features of the software that force the design to export embedded pngs, and if so is there a refence to which ones so they can be avoided and alternate methods employed? I've noticed specifically that outer shadow fx seems to trigger this, i'd really like to know which other features trigger this behavior so that i can make svg vector safe resizable designs. Anyone know a reference to this aspect of Affinity Designer? Many Thanks. ❤️
 -
 So I want to make pixel art and I see the pixel persona being used for that but I don't want it to be raster I'd like to export my pixel art as an SVG (with no raster) so I was wondering if that was possible with something made in pixel persona. If not is there some sort of pixel tool for the normal designer persona? All I saw there was the rectangle tool and that'd be a pain to use for pixel art.
 -
Bindweed 500 x 750 mm | 300dpi Affinity Designer Part of the 'Untamed Project' and a mix of Raster and Vector drawing Raster Outlines with Vector Backgrounds Coloured Version with Texture Overlay using the new 2.1 Asset to Fill Feature Tinted Version using Hue Overlay and without dot texture
-
It's that time again!... Year 6! Using the new brush sets this year 1. Project Brush 19 Inker (2 sets Inker and Pattern) 2. Project Brush 21 Scribble and Scratch 3. Project Brush 25 Outline Inkers Set 2(Fine Liner Set!) and my new favourites!... 4. Project Brush 26 Distressed Erase and Distressed Pattern Image Palettes Added image palettes palettes.zip Inker Brush set Resources 01 Crystal Original: 500mm x 500mm 300dpi raster Upload: 1772 x 1772 px
- 60 replies
-
- 20
-
-
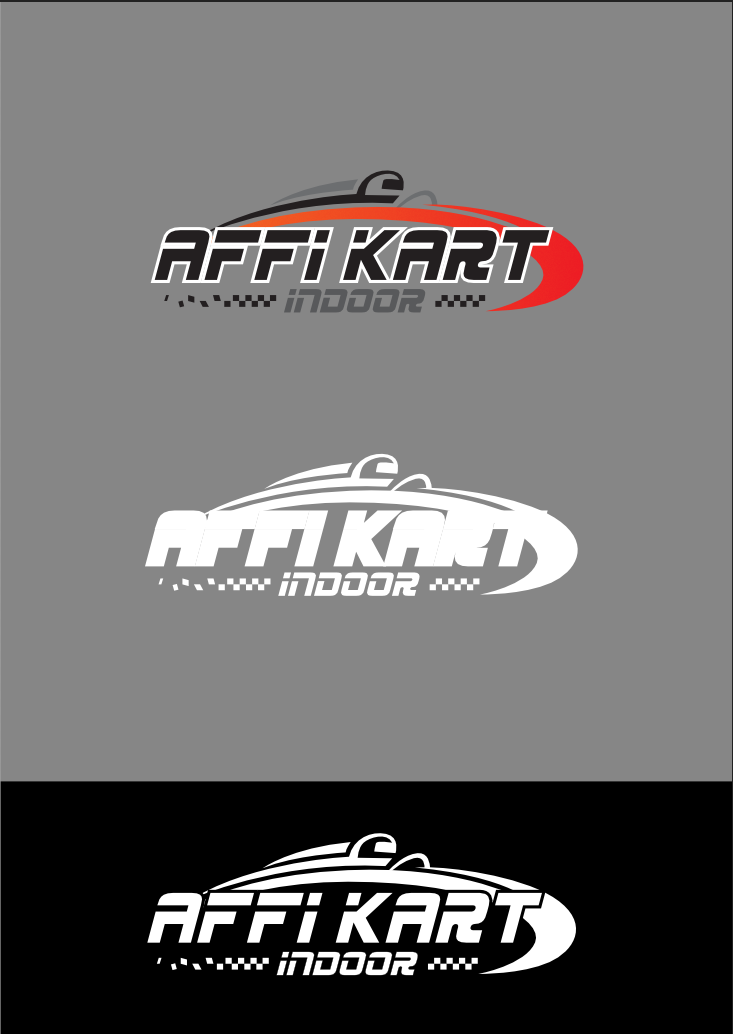
 Hi, I am trying to design a negative (white/black) version of a coloured logo. The text "Affi kart" is composed of the actual two words in black plus an outline curve in white. The issue is that when I set the black "Affi kart" text to white, as it should be, the separation between the text and the sweeping curve disappears (see picture below). Of course, I could just paint the white outline black. However, that only works on coloured backgrounds and I actually need to print this logo as a transfer sticker. Another way to do it would be to set the blend mode of the outline to "erase", but that only works in a raster file and I would like to keep everything as a vector, if possible. Is there a way to cut/erase the white outline from the sweeping curve? Thanks for any help anyone can offer. AFFI KART.pdf
-
 Hey all, Is this behaviour intentional and if so, why is there no difference between the content types? Scenario: I'm working on a design I started in Designer with multiple artboards. I decided to add some pizzazz with a raster brushes on a designated pixel layer – either in Designer's Pixel Persona or via File → Edit in Photo (either works, behaviour is the same). I add a pixel layer and draw something. I realise that I have made a mistake and want to clear the layer and start again. I usually do this with a short succession of shortcuts: ⌘+A (in the History palette this is called »Raster select all«) to marquee the whole (visible) canvas and backspace or delete/⌦. Expected Result: The (visible) content of the pixel layer is removed. Issue: In my case, for some reason, the shortcut ignores the fact that I am currently working on a pixel layer, and instead of creating a marquee selection of its contents and deleting it, it selects the parent pixel layer itself and deletes it. Now this might not be a big deal if it's a single layer, and you might argue »Why don't I just delete the layer and create a new pixel layer (⌘+⇧+N)?« And I'd say »Sure, that might work for single, regular layers.« The real problem is that this also works (or rather doesn't work) for linked pixel layers. If a single linked layer is deleted, it's not so easy to fix afterwards and involves copying, pasting, positioning if you've placed them in several different groups, shapes and so on – a bit of a PIA. I also considered »Invert Pixel Selection« (Select → Invert Pixel Selection or ⌘+⇧+I) as a different approach, as this works with photo documents. But to no avail. But I've noticed that this behaviour works for new documents, so I'm not sure why it doesn't work for my existing document. Any help with this? Am I doing something wrong? Is the document somehow corrupt? I’ve attached my document, feel free to try the scenario, try to select the whole pixel layer content and delete it with the designated shortcuts while maintaining the linked layer/s itself. Cheers Dennis Raster_select_all_bug.afdesign
- 5 replies
-
- 1
-
-
- affinity photo
- affinity designer
- (and 6 more)
-
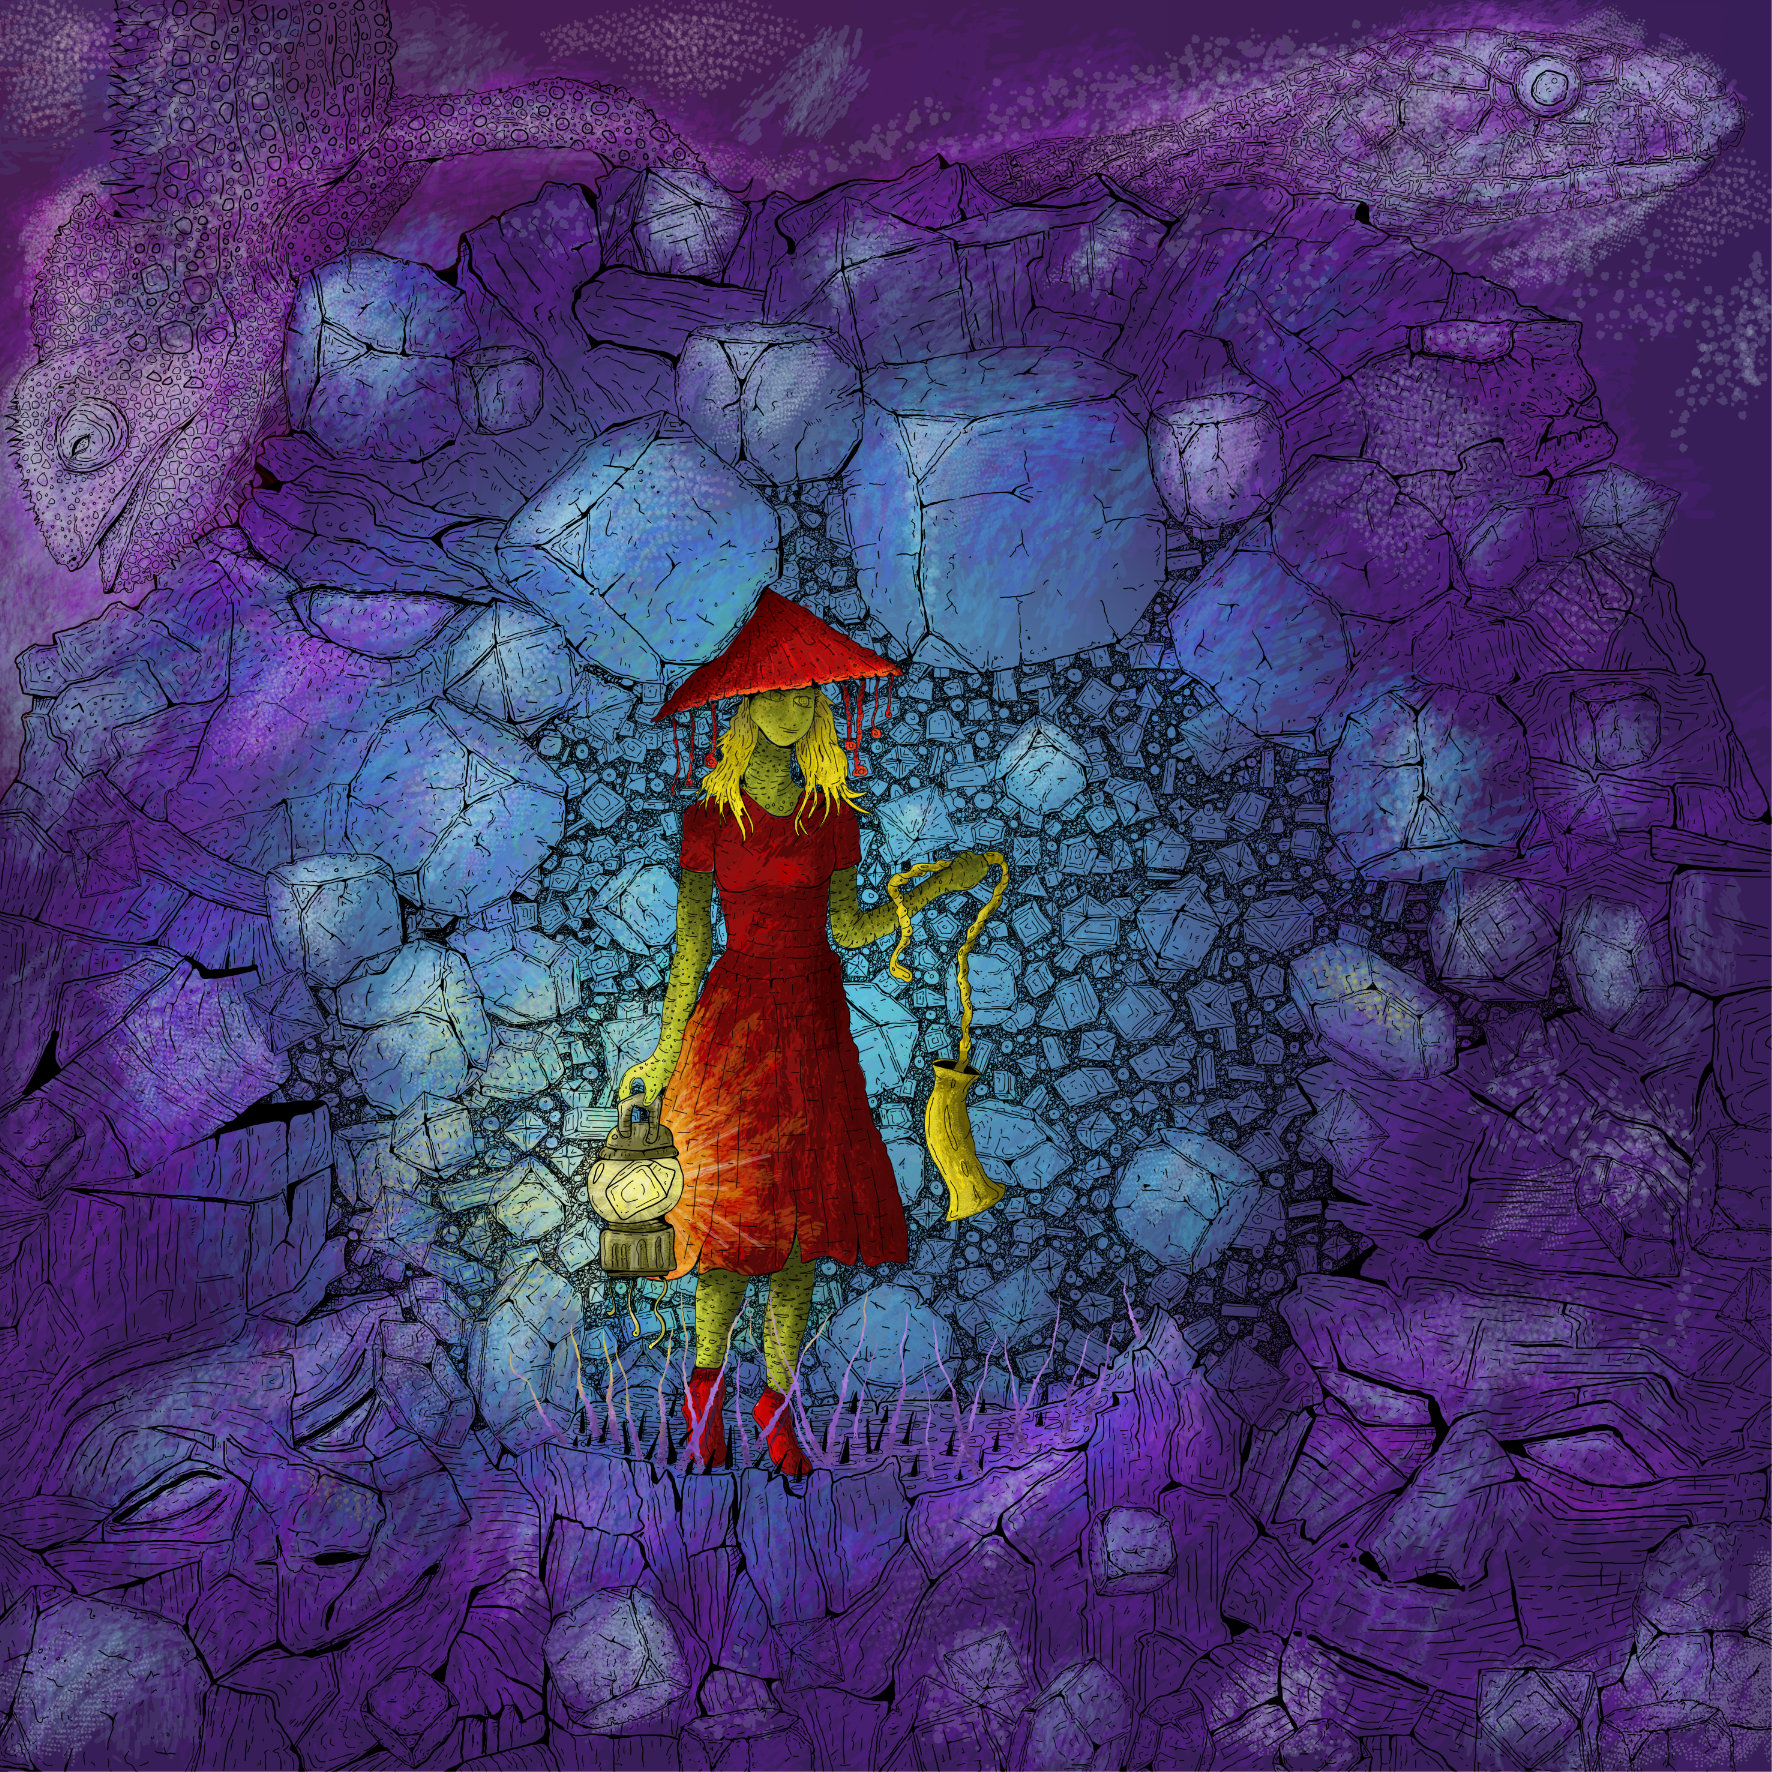
Untamed Untamed: 'When Animals Ruled the world' Challenge contribution Could not participate directly in this challenge as it directly conflicted with Inktober but done one anyway.... Original size:1000mm x 500mm Raster 300dpi (not submission size) upload 2362 x 1181 px
-
For anyone else wearing out their graphics tablet in October... Brush Sets: Inkers: Project Brush 19 'Inker' Patterns: Project Brush 19 'Pattern Toolkit' 01 Gargoyle 500 x500 mm 300 dpi Affinity Designer
-
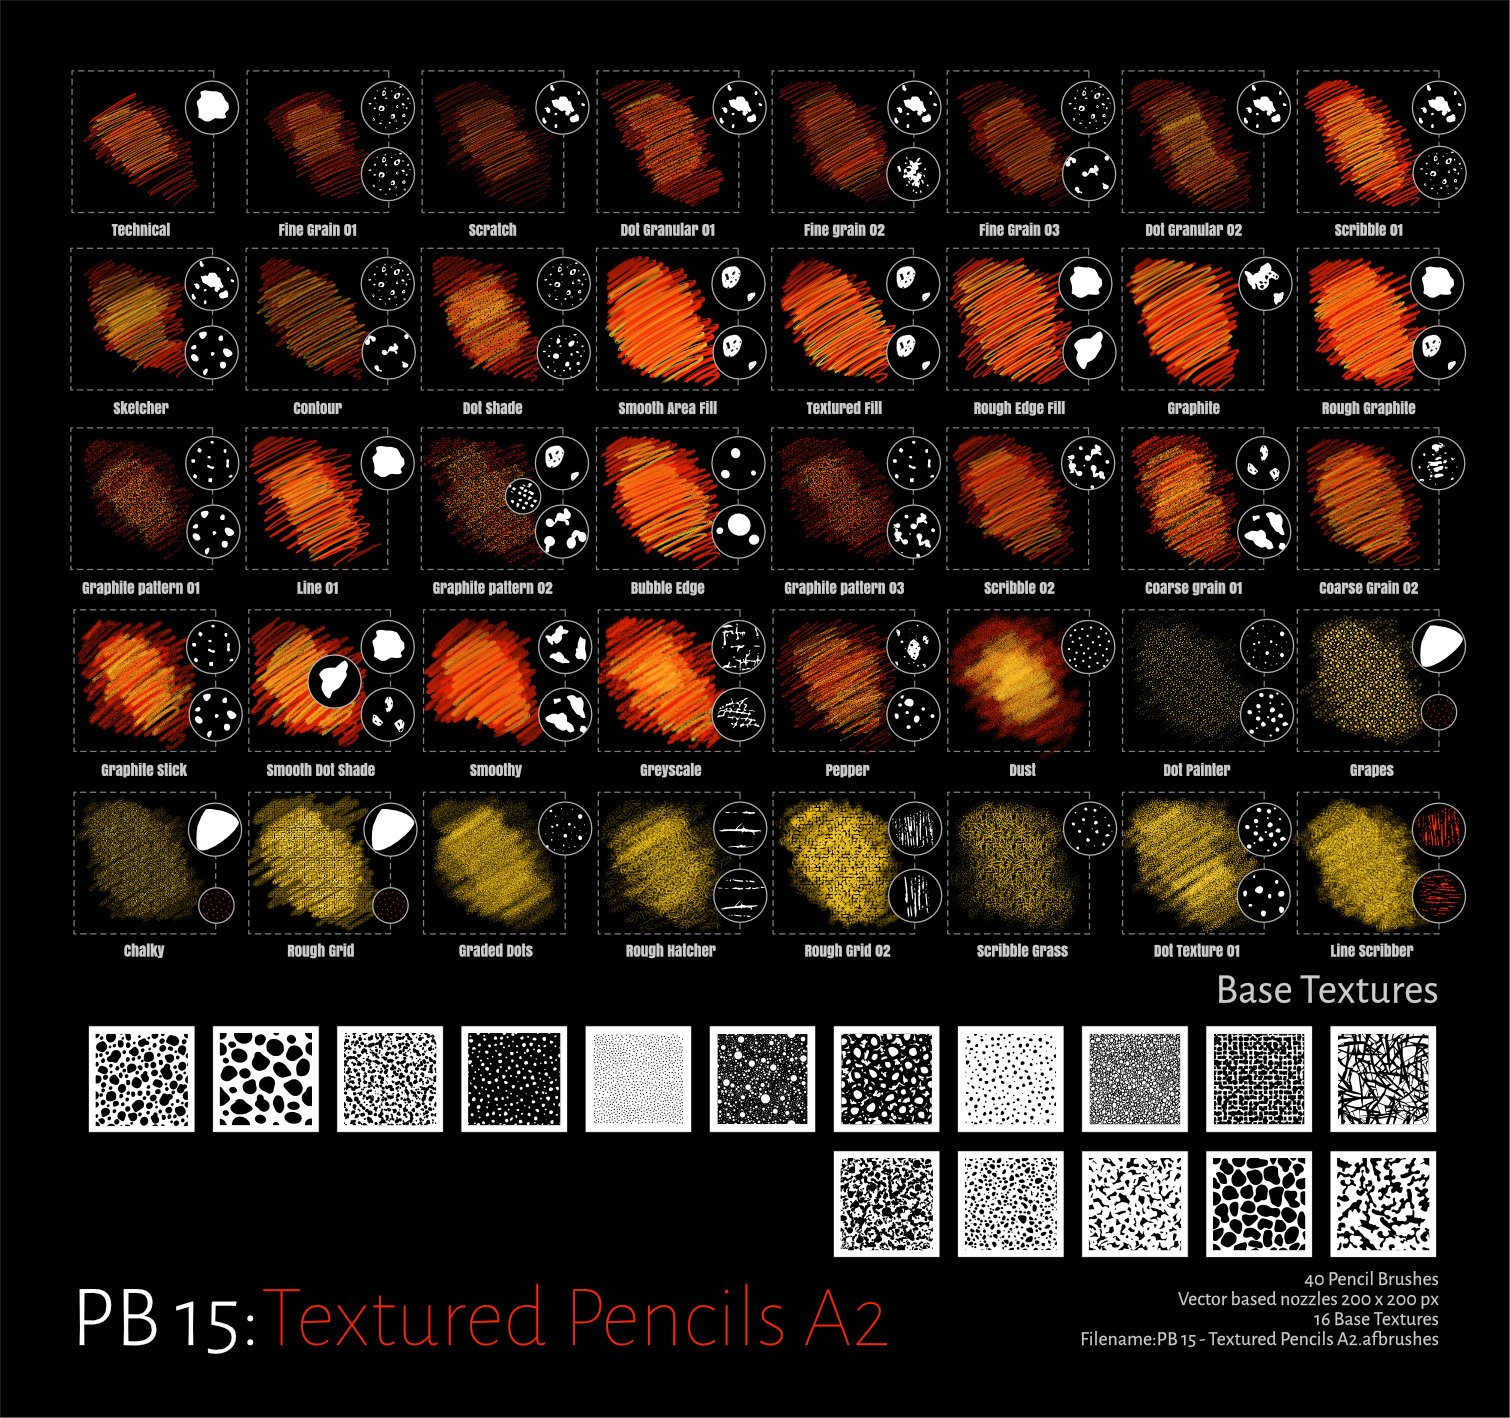
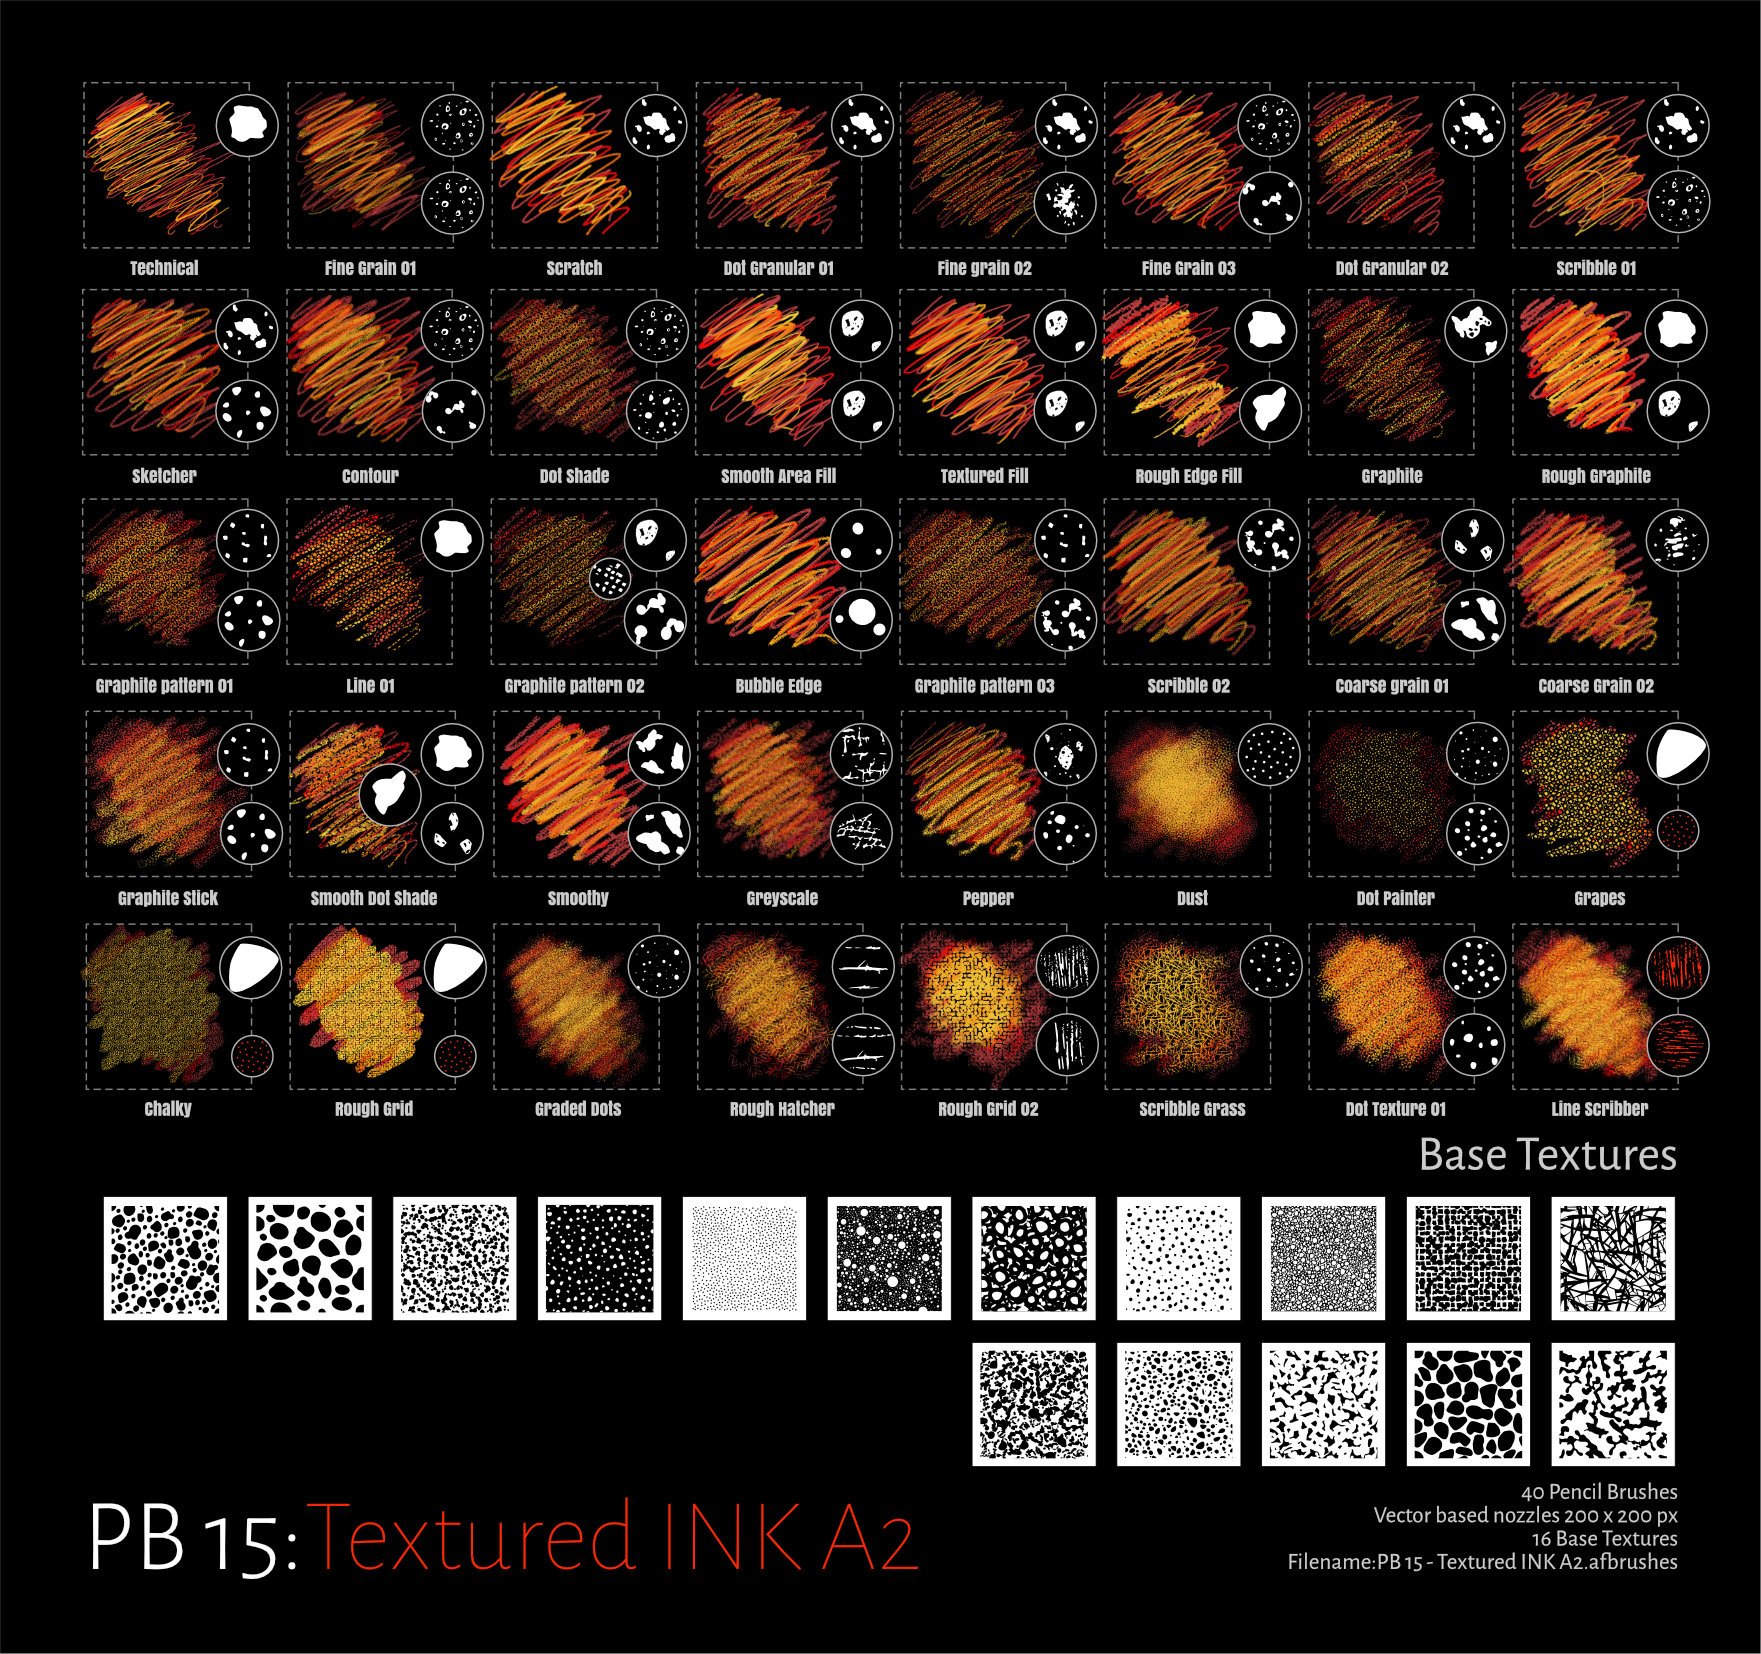
 Textured Pencils Added a set of 30 Textured Pencil Raster Brushes to Resources Sample set as displayed Updated for Affinity 2 but retained version 1 brush set Affinity 01Affinity 01: Original Brush set (Sample sheet removed)Affinity 02Affinity 02: Updated version 2 set with adjustment to dynamics to include Distance and Interpolate (Sample sheet as below). Replaced Linear Paint 01 with better nozzles! These Brushes are a bit different from my usual offering. 1. They are small 2. Rely largely on setting the blend mode to Average (something I learnt from Sketchbook Pro!) 3. Resize as you wish 4. Updated to consider Affinity 02 Brush Dynamics 5. Included samples of Base Textures Sample Sheet Enjoy! Affinity 01 Project Brush - Textured Pencil.zip Affinity 02 PB 15 - Textured Pencils A2.zip Ink Sketch Brushes Added a new set to supplement these brushes from the Project Brush 13:Ink Painter Set (which is now complete)..a bit out of sync as I started them quite a while ago! A set of 35 Ink Sketching Raster Brushes to Resources Sample set as displayed 1. These are essentially the same as the Pencil Brushes but with adjustments to the brush dynamics and less texture..There are 2 other sets that supplement these in the InkPainter Project set (Ink & Linear) 2. Similar to brushes produced by Jake Parker for initial Inktober Project 2016 3. If you need textures/Patterns There is a set available Camouflage assets (here) ...which is also out of sync...and maybe in the wrong place! Sample Sheet Affinity 01 inkPainter - Sketching.zip Affinity 02 PB 15 - Textured INK A2.zip
- 17 replies
-
- 19
-
-

-
 Hi! Just found out that some custom brushes are missign on the iPad version of both, Photo and Designer. For example, this is how a custom set looks in Affinity Photo on a Mac. Nothing wrong here: And this is how the same set looks in Affinity Photo V2 on the iPad (same happens to Designer): At the beginning I though this was only affecting dual brushes, but nope, it happens randomly without a clear pattern, at least for me. And, this is not only a visual thing, missing brushes aren't displayed correclty while painting, either they won't paint anything at all. I'm not sure if the developers are aware of this issue already, but I wanted to post it here for the record. Thanks, Enrique
-
 I was hoping that V2 would bring some of the features from Affinity Photo (e.g. links, layer states) over to Designer. As it stands, users are encouraged to use publisher for a Designer - Photo integration (or edit the file in the other program). To me it would be much more useful if I could use Affinity Photo through studiolink, the way Publisher does this. I mean, if I have paid for both Designer and Photo, it makes sense to me that I get both program's main persona at my fingertips in Designer. Again, the reason I am asking for this is so that I can setup my workspace in Publisher for publishing and presentation work, whereas I can use Designer for my actual Design work. For image manipulation I would of course use Photo. Both Publisher and Photo are in-line with this workflow, but Designer is dropping the ball here imo.
-
- 2
-
-
- pixel persona
- raster
- (and 2 more)
-
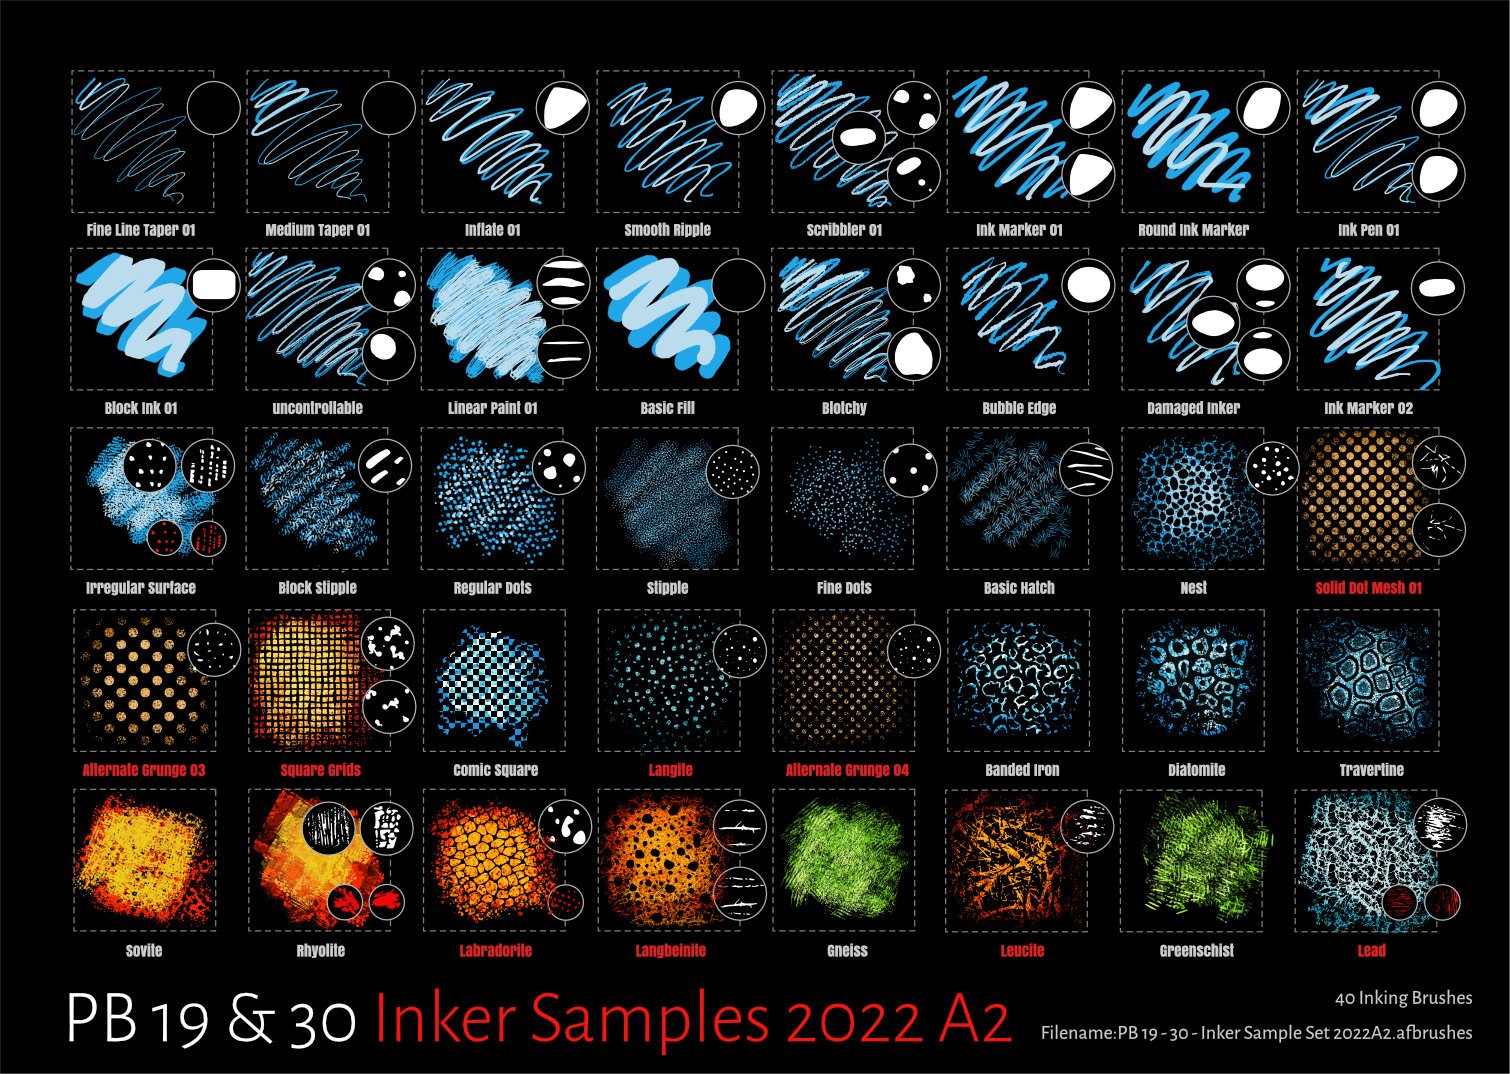
Project Brushes 19 & 30 mixed sample set A2 Uploaded a sample set of the latest brush offerings used for #Inktober 2022. Attempted to improve the brush set with the addition of PB 30 Comic Grunge and PB 19 Inker Texture samples Still Consists of 40 Raster brushes but extracted from 7 inker Brush sets. Updated for Affinity 2 but retained version 1 brush set Affinity 01 Affinity 01: Original Brush set (Sample sheet removed) Affinity 02 Affinity 02: Updated version 2 set with adjustment to dynamics to include Distance and Interpolate (Sample sheet as below). Replaced Linear Paint 01 with better nozzles! Extracted Brushes 1. PB Inker 19 (Used in 2020) from collection of 60...about to modify to version 3 so will be archived! 2. PB 19 Inker pattern (2020) 3. PB 26 Distressed Pattern (6) Blue 4. PB 26 Distressed Eraser (4) Orange 5. PB 26 Distressed Paint (4) Green 6. PB 19 Inker Texture (2022) 7. PB 30 Comic Grunge (2022) New Brushes highlighted in red! Updated using new Affinity 2 brush dynamics Samples as below: Affinity 01 PB 19 - 30 - Inker Sample Set 2022.zip Affinity 02 PB 19 - 30 - Inker Sample Set 2022 A2.zip
- 12 replies
-
- 20
-
-
-
- inktober inkers
- inktober
- (and 3 more)
-
This bug reproduces reliably on all Affinity products (Publisher/Designer/Photo) on Windows as well as Designer for iPad. Prior discussion: Demo: out.mp4 nested layer pixel bounds.afpub
-
Hi, I just placed a bunch of vector PDF files in Designer (and linked them in the resource manager). It appears that these layers all come in as raster images. Is there a way to link (pdf) files as vector? https://affinity.help/publisher/en-US.lproj/index.html?page=pages/Media/placeImages.html?title=Placing content The manual also states DPI settings for linked files, which is what I am also seeing as part of the rasterisation:
-
Enjoy!
-
 Inspired by this Photoshop-tutorial I found the following workflow for what I call „Pseudo Halftones“. Not really Halftones, but a nice raster effect, I think. Maybe someone likes it too. 1. At first I created a pattern for the halftone raster. It is only a radial gradient from opaque black in the center of a square document, to transparent black (0%) on the edge of the document. Then I duplicated the layer four times and placed each duplicate on the four corners of the document. Finally I exported the document (you find the result attached to this thread and also some line patterns). 2. Then I created a New Round Brush. I opened the panel for the Brush Settings and adjusted the brush „Size“ under „General“ and the „Size Jitter“ under „Dynamics“. Under „Texture“ I added my pattern as „Base Texture“. You can adjust its size with the „Scale“ slider, if necessary. The „Mode“ should be set to „Final“ (you find the resulting brushes as attachments to this thread). 3. I loaded an image into Photo. Then I clicked „Add Pixel Layer“ on the bottom right of the „Layers“ panel and filled the layer with white. Then I applied the blend mode "Colour Dodge" to the white layer. After that, I painted with my new brush on that white layer. The result is nearly the halftone effect we wanted. But we should finish with adjusting the „Brightness and Contrast“ (or „Levels“ or „Curves“, if you like), to get clearer and sharper dots. So I dragged the „Brightness“ slider to the left and the „Contrast“ to the right, to get more contrast. Check it out to find the values you like. This contrast adjustment will only work if the layer has a white background. That is why I filled it. Pseudo-Halftone-Dots. Vertical lines. Dots and diagonal lines in combination. With a grungy texture from Texture Labs. patterns.zip Halftones.afbrushes
-
 Hi, Whenever I export this file with either of the adjustment layers on, I get this blocky chunk that shouldn't be there. Notice it around the cheekbone in the afdesign file. I only see it when exported into a PDF. It's just a hard straight vertical line. This file is for print, and I'd really like the adjustment layers to work for it, because otherwise it doesn't look as good. Operating system and Affinity Designer versions Using Windows 10, latest update Affinity Designer 1.10.4.1198 Export settings File format: PDF Rasterize: Unsupported properties Downsample images: off Resample: Lanczos 3 Non-Seperable Use DPI: 350 Allow JPEG compression: off Compatibility: PDF 1.7 Color space: CMYK ICC Profile: GRACoL2006_Coated1v2.icc Embed ICC profile: on Convert color space: off Honor spot colors: on Overprint black: on Include layers: on Include bleed: on Embed fonts: all fonts, and subset fonts on Allow advanced features: on Everything else is off problems with rasterized images.afdesign
-
 The ability to bring in a raster image and trace into vector would be a good feature. This is something I often use in Illustrator and would love to see in Affinity, ideally with more control. While switching tools between personas is great, only being able to rasterize a vector and not the reverse is troublesome.
 -
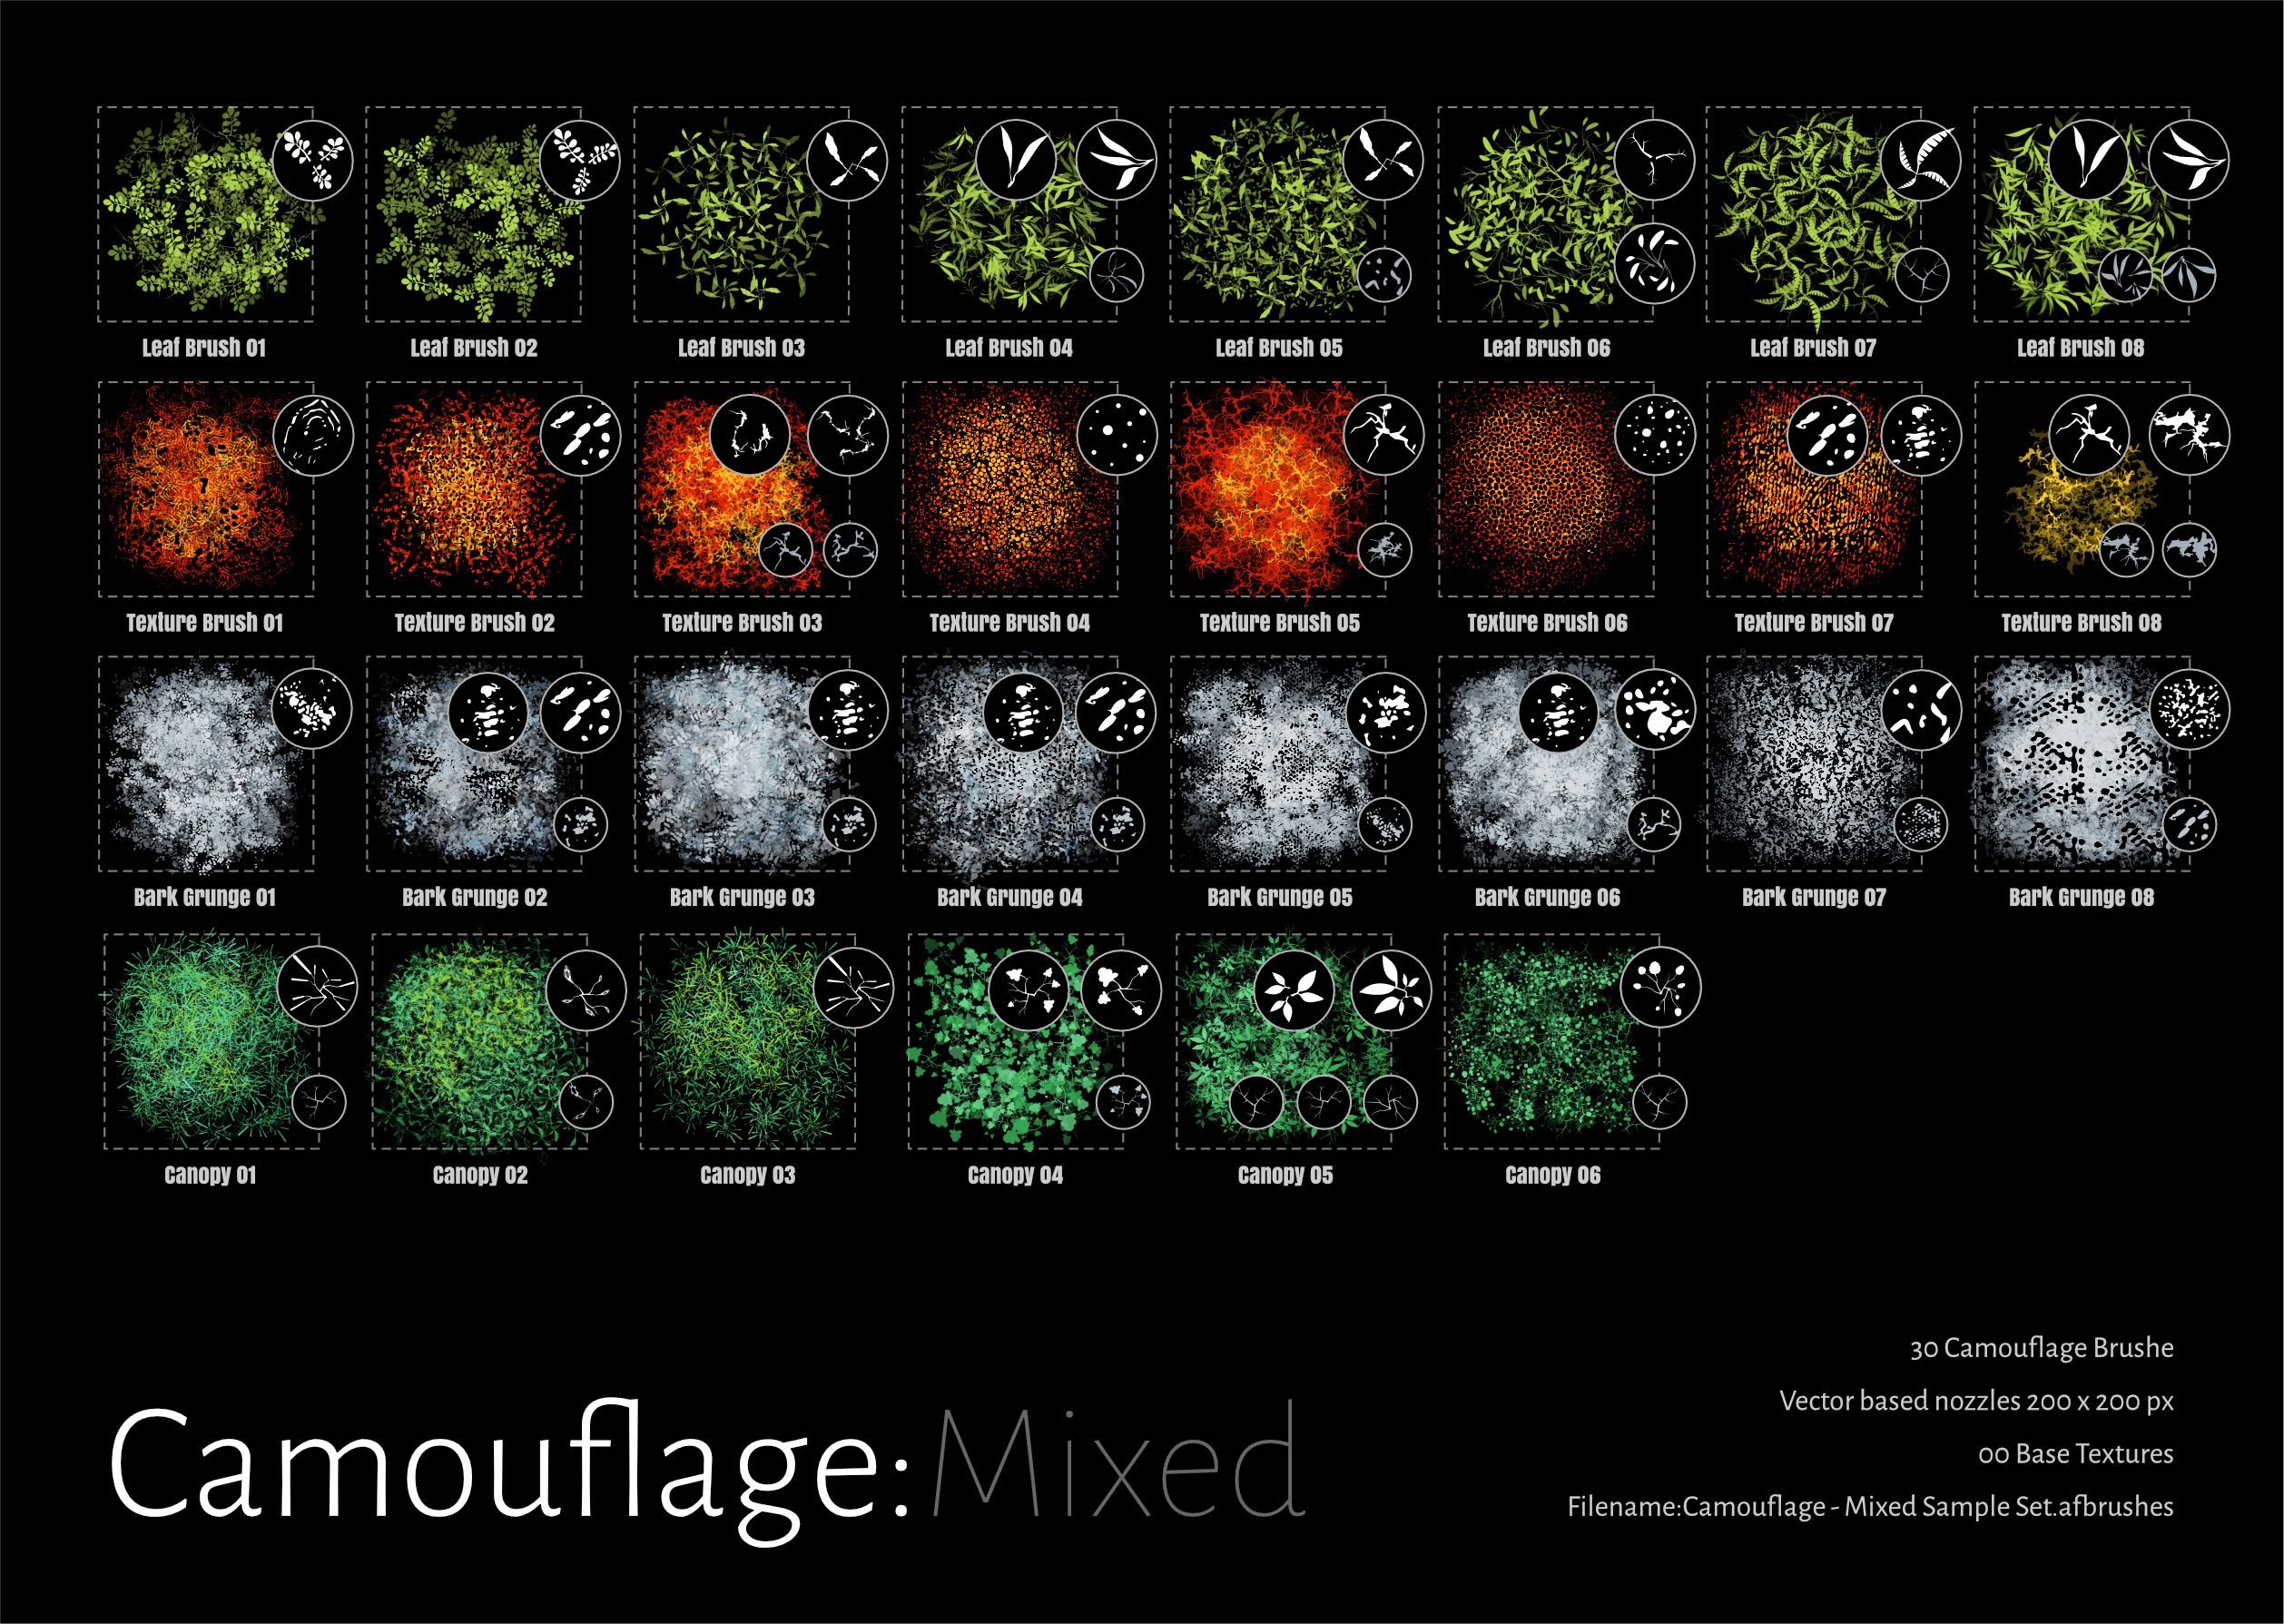
Project Brush Camouflage Set 11 Added new Brush set based on the vectors of Camouflage I 30 New Raster Brushes First sample Set combining 4 brush sets [Leaves , Texture, Bark Grunge and Canopy] Samples as below and 30 brushes in .zip file Enjoy! Camouflage - Mixed Sample Set.zip
-
 Dopo l'acquisto di Affinity Photo e Designer versione 1.8, scoprii che entrami non prevedevano la vettorizzazione automatica delle foto a colori. Ora che esistono le versioni 1.10 sapete se è stata inserita questa possibilità di vettorizzare le foto? · Grazie ·
 -
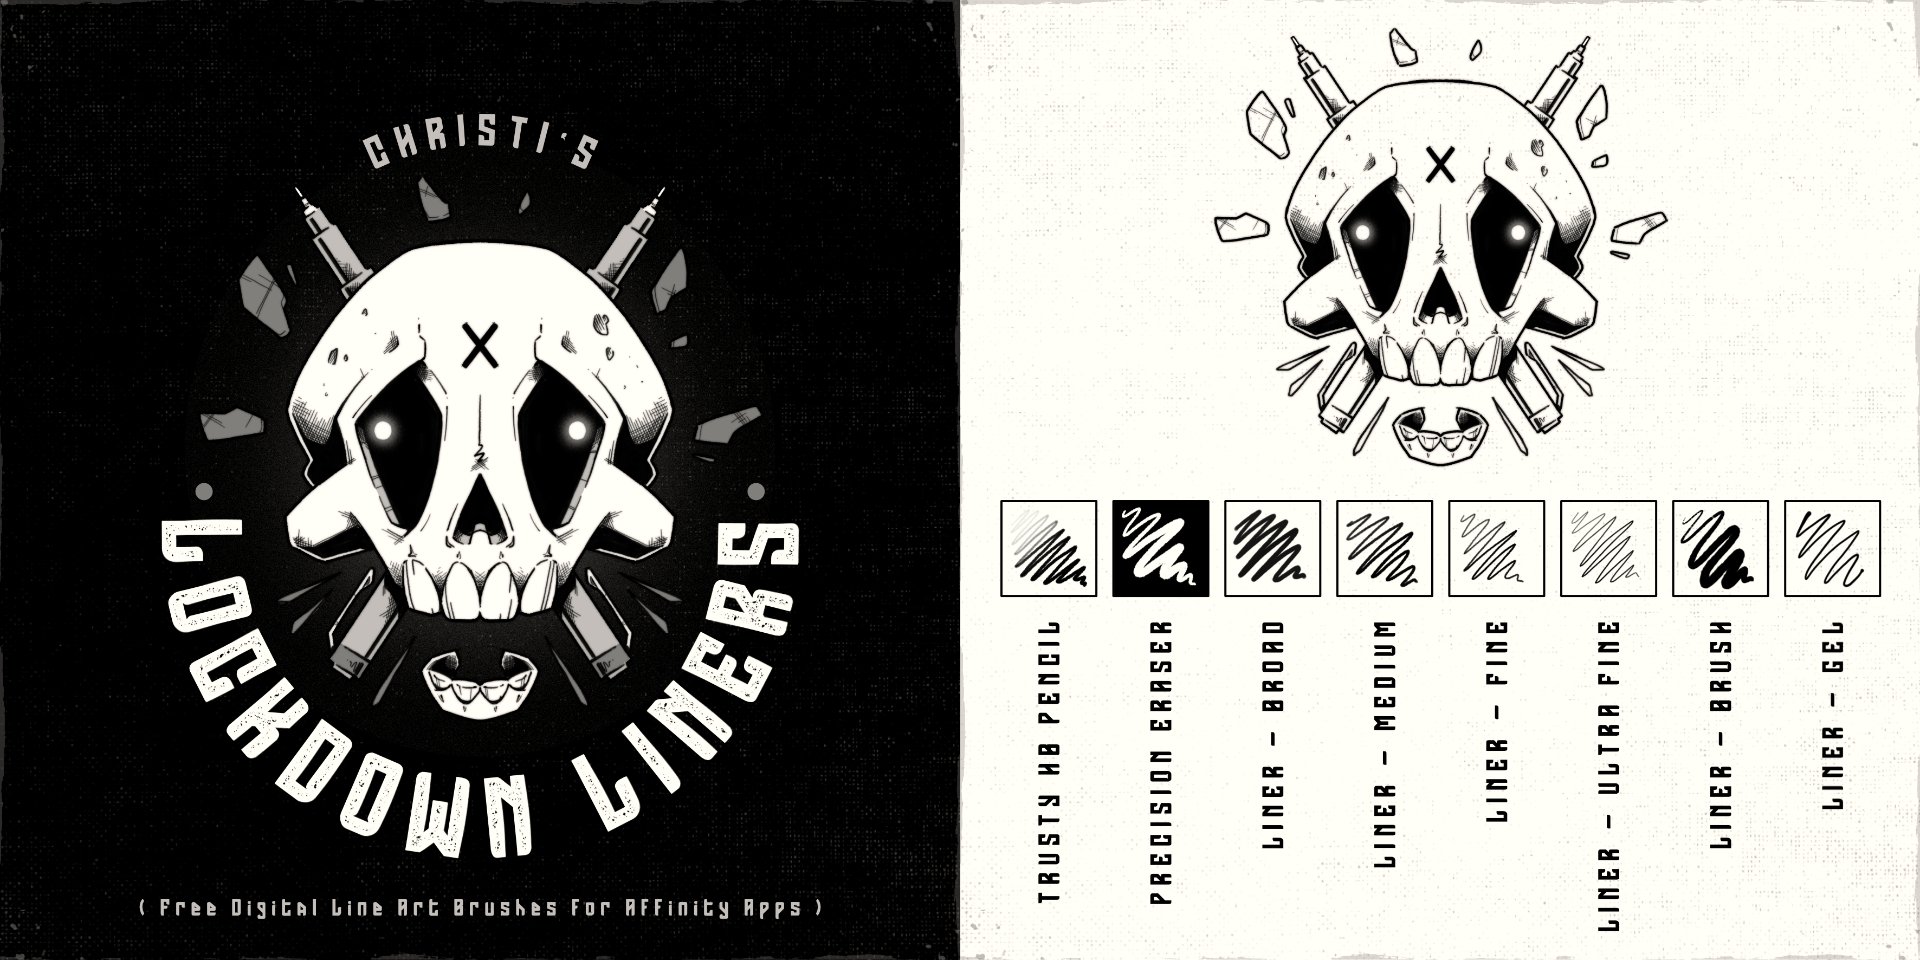
Hiya folks! 🖖 I'm sure we're all dealing with the same stresses and frustrations brought on by the COVID-19 chaos (my country has been on full lockdown for a while now). It's important to stay busy to stop the cabin fever from kicking in, so I decided to create a little custom raster/pixel brush pack for Affinity apps - free for all! The brushes are not too complex, mimicking some traditional inking tools we all know and love, such as brush pens and fineliners. Perfect for those 'run-and-gun' illustrations where you just want to get to work and avoid the option-paralysis brought on by having to go through hundreds of custom brushes first. Included in the "Lockdown Liners" brush pack you'll find: 1 x HB Pencil (inspired by the Palomino Blackwing 602 pencil) 1 x Precision Eraser (inspired by the Tombow Mono eraser) 4 x Fineliners in Broad, Medium, Fine, and Ultra Fine (inspired by Pigma Micron technical pens) 1 x Brush Pen (inspired by the Tombow Fudenosuke Hard Tip brush pen) 1 x Gel Pen (inspired by the Sakura Gelly Roll) Fully compatible with Affinity Photo for desktop and iPad, and Designer's Pixel Persona for desktop and iPad. *Best used with a drawing tablet or iPad with Apple Pencil to take full advantage of the pressure sensitivity that the brushes offer. I'll likely make a few tweaks to the pack as I go along, but I'll be sure to update it on Gumroad when I do so that everyone who has already downloaded it can be notified. Hopefully you can create some cool work with the brushes to help pass the time while we're all stuck indoors - if you do, be sure to tag me on Instagram, http://www.instagram.com/christidutoit, I'd love to see what you make! Here's the download link to the brushes on Gumroad: http://www.gum.co/lockdownliners As mentioned, these brushes are totally free to download and use, just type $0 in the price tab and click "I Want This!". Stay safe out there! - Christi. ☠️
- 1 reply
-
- 14
-
-
-
- brushes
- affinity photo
- (and 4 more)


.PNG.ef3287ff79b161d9cde8ee742cc0a83b.PNG)
.PNG.0fce3b361ccb6486fe9e7142d68bc572.PNG)
.PNG.ee122db9507debc701644c4d3b22304d.PNG)