Search the Community
Showing results for tags 'publisher'.
-
 Can I make a dust jacket with Publisher? That is, a front cover, spine, back cover, and flips on both front and back. If yes, how? Is there any template that includes five sections mentioned above? My book content is based on A4 paper. I understand the hard cover and dust jacket will be slightly larger. I wouldn't know the exact measurements but it would be better if I could play around with photos and words and design the jacket, at least.
 -
 Hello again guys! How are you? This time I wanted to tell you about a silly but important problem I have to solve. I'm trying to insert the page numbering using the master My document is a coloring book, so it has the following structure 1 [Blank page] 2 [Coloring image 1] >> (I want to have the numbering here: Page 1) 3 [Blank page] 4 [Coloring image 2] >> (I want to have the numbering here: Page 2) .... And so on until you reach about 100 Structure in image: What do I want to do? Number each page where the image is, (and I should ignore the blank pages). But the problem is that using the master in affinity, when I insert the pagination in the even pages, affinity starts counting all the pages, even the odd ones (in my case the pages that are blank). Is there any way from affinity to start the count only with the odd pages? The only solution I found was to do it with a python script, but I'm sure it would be very easy to integrate this in a function directly from affinity. I should mention that some users on telegram told me they had had this problem and found no solution. I would like you to help me with some automated solution, I don't want to depend on python to do this, besides it is important for my coloring books to integrate this numbering methodology. Could please help me? Thank u very much guys !!
-
Hi guys, how are you? I have a dilemma that I have not been able to solve, could someone give me a little help, I asked some people on youtube but I think they could not understand me xD. For example I have 100 pages in affinity publisher, each one has an image that I put manually (I mean, I didn't even use a guide of Master, at that time I didn't know it existed, I'm a newbie in this). The thing is that I want to insert an automatic numbering for the pages (with the master), everything so far so good, but the problem comes here: When I put the numbering, the master is below all the layers of the pages, and as I have full screen images, the numbers are not seen. I have to go layer by layer moving up (in each page, and are 100pages xDDD) the hierarchy to the master. Check this example: The master is inserted ON BUTTOM of layer, and I need it ON TOP Is there any way I can get affinity to insert the master on top of all the layers I have? Or is there any way I can pull all the master layers up in the 100 pages? Thank you very much !
-
 Using Windows 10, Affinity Publisher v2.4 Is it still possible in v2.4 to place a PDF and then edit that PDF in place? Thank you very much for any help. Kelly
 -

RE: A4 Document Folder
GunnerJnr posted a topic in Affinity on Desktop Questions (macOS and Windows)
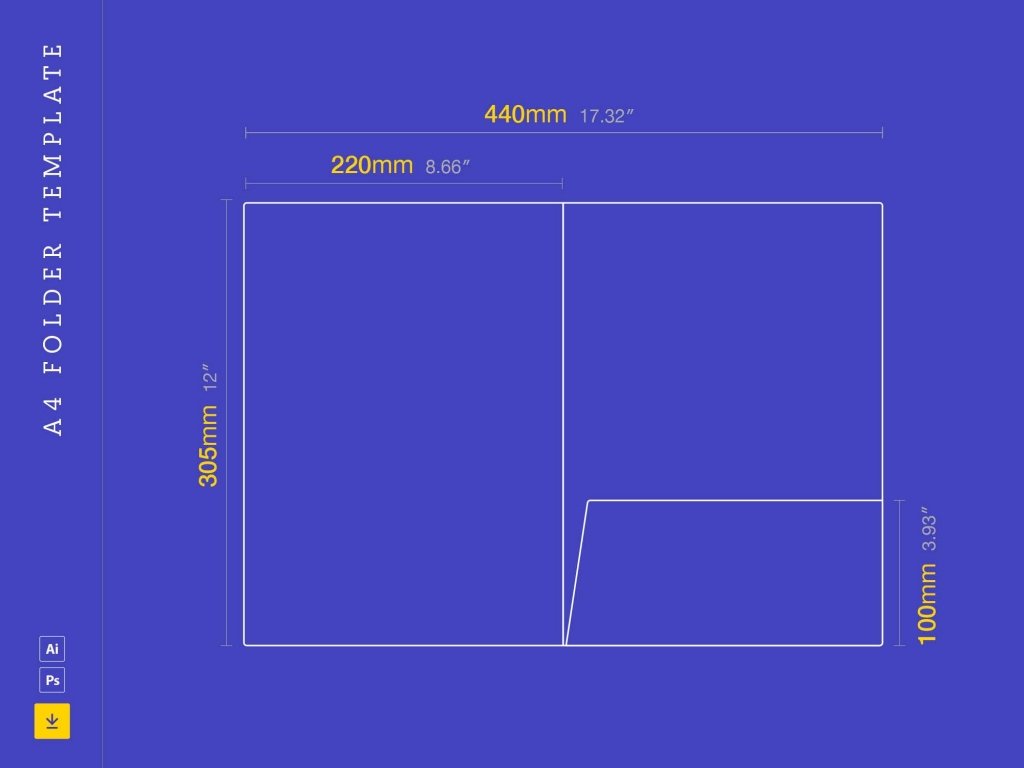
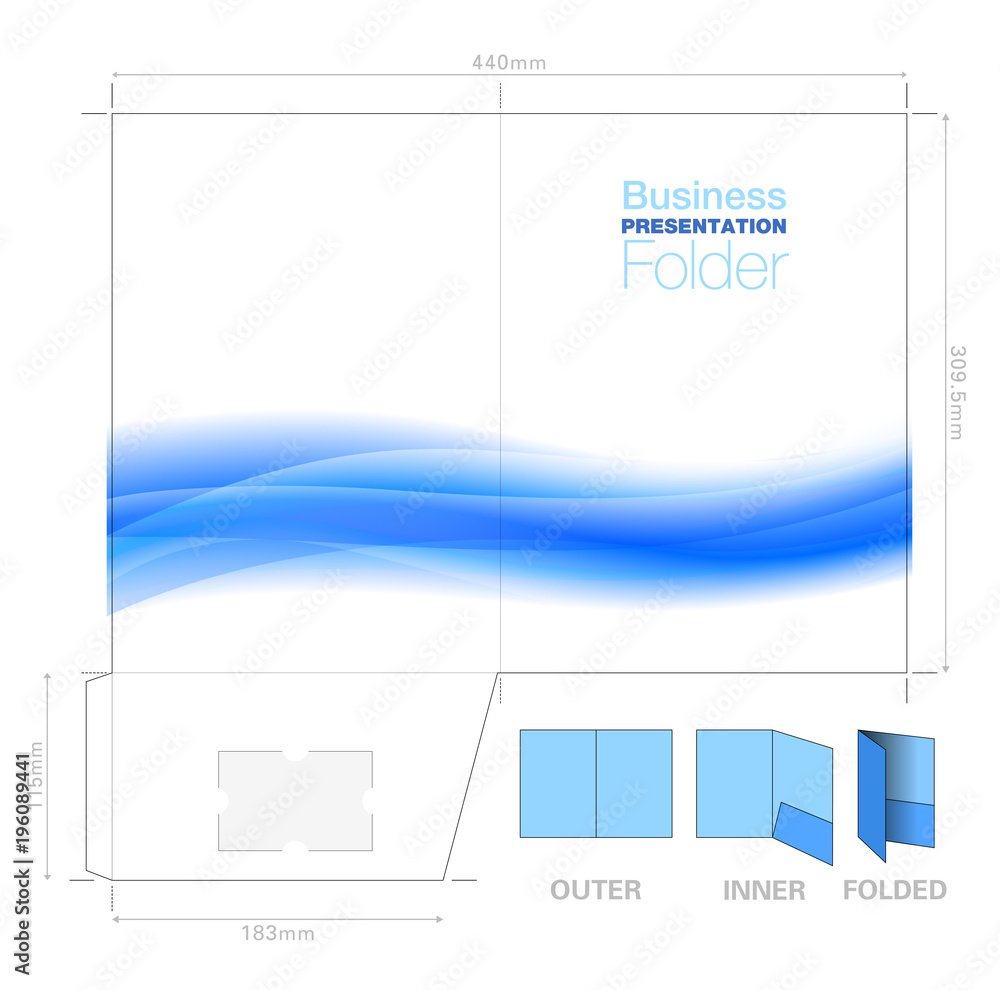
Hi all, I am pretty new to Affinity altogether. I would like to know if it is possible to replicate the attached design template for an A4 folder concept. Or, if at all possible, if I can import the template itself to use? Also, would Publisher or Designer be best? (or does it not really matter?) I did try importing it, but it only imported it as a whole image, which I am guessing isn't quite what I want, as I need to separate it into the following pages: Front Cover Left Inner Right Inner Back Cover Obviously, the inners will be the reverse side of the front and back. I gather that I could have likely just created the pages at the same dimensions as stated on the template. Still, I can see when creating a new file, I can choose A4 and set the 'x' number of pages, which I assume I could use as a front, a back, and the two inner pages. I am able to select between starting from left or right, but the part I am unsure about is the fold-up piece at the bottom of the right-inner/back cover page. Is there a way I can create this? Would I create a smaller page using distorted dimensions for one edge? The idea behind it is to provide a folder that can hold some documents as a sort of leave-behind after a company meeting; the extra fold-out part on the inner in question will have a cut-out of sorts to attach a business card and provide some additional contact information, so its imperative that it has it. You can see the design of the business card cut-out concept in the AdobeStock Preview image (which is essentially the same folder design but in the reverse view of how I want to achieve it). Sorry if this seems dumb, but as stated, I am brand new to this software, so any advice, tips, tricks and hints would be greatly appreciated. Note: The images for the A4 folder template are available for download from Unblast (free) - https://unblast.com/a4-folder-template/ Adobe (paid) - https://stock.adobe.com/uk/images/presentation-folder-a4-template-with-flow-background-graphic-cutter-guide-with-standard-business-card-slot-prints-from-a-sra2-sheet/196089441? Kind regards, GunnerJnr
-
 Hi, I'm using Publisher 2.3.1, and I've just run into a reproducible crash that appears to be related to the spellcheck process. This crash initially occurred in a 40-page document file that uses the "English (United Kingdom)" spellcheck dictionary. When I opened the document tonight, I had fixed all of the Preflight spellcheck "errors" with the exception of three instances of the word "aluminum", which were flagged as not being spelled "aluminium", as I checked with my editor to determine which version of English (UK or US) was to be used. Informed that UK English would be used, I successfully changed the first instance of "aluminum", and Publisher crashed when I right-clicked on the second instance. Upon restart, Preflight now showed a large number of spellcheck "errors", which was consistent with Publisher having "forgotten" all of the words that weren't actually misspellings, but were just proper names that weren't in the spellcheck dictionary, forcing me to go through them all once more, and specifying "Ignore Spelling" for each of them. When I tried this, though, the first "Ignore Spelling" setting seemed to work, but the second caused Publisher to crash again. I managed to trim the file down to a very "bare bones" version (attached here) that still exhibits the crash error. Steps to reproduce are: Open the file. In the Preflight section of the left sidebar, click the "Check Now" button. This should reveal two spelling errors, "Davvidson" and "sales@zzvid.org". Double-click the "Davvidson" entry in Preflight, which will select it in the document. In the document, right-click the selected "Davvidson" and select "Ignore Spelling" from the dropdown. This appears to work correctly. Double-click the "sales@zzvid.org" entry in Preflight, which will select it in the document. In the document, right-click the selected "sales@zzvid.org", which will cause Publisher to immediately crash and exit, with no warning. I'm wondering if this might be caused by some sort of local corruption of the retained collection of "Ignore Spelling" words. If this is the case, then I'd expect that you won't be able to reproduce the error that I'm seeing, and if this is the case, I'd appreciate any suggestions as to how I can fix this on my end. If you are able to reproduce the error, then this would appear to be some sort of bug. Thanks, Ken PublisherSpellcheckCrash_v3_27Feb24.afpub
 -
 I am designing a book with chapters etc in Affinity Publisher 2.3.1. I want to use vertical justification but the last page of each chapter has a problem in that the lines of text get stretched to full height even if there's only a few lines. Is there any way to set an "edge tolerance" factor for the justification so that if it beyond the distance of a certain amount (e.g. a leading line), then it doesn't justify but treats it as top aligned? This seems like an obvious feature for book publishing. Is there a workaround? Like do I have to have another master page spread just to change the vertical justification to top aligned?
 -
 New Publisher 2 user here, and I'm thoroughly impressed by it and especially its ability to open IDML files so accurately. One thing, though, is making it a bit difficult to move completely to Publisher: keyboard shortcuts. I've been using InDesign since version 1.0 and the keyboard shortcuts are now a part of my DNA. I've been able to customize them as much as possible, but there is still a number of shortcuts that I use a lot in ID that aren't available in Publisher.
 -
 Hi - I am planning to publish a book using Lulu's print service using APub V1 and I am trying to figure out how to satisfy their print requirement for landscape books. The requirements specified here are that "Pages should be set up as portrait orientation (if you choose to make a landscape book, the pages should still be oriented as portrait and the page size should be adjusted accordingly)." I am assuming that what this means is that when I create the press ready PDF each page (which I have setup in APub to have a landscape orientation) should be rotated through 90' so that when I view the resulting PDF each page has a portrait orientation with text running vertically (I'm hoping that Lulu is going to somehow figure out that I'm not giving them a portrait book and that I want the binding on the short edge - but that's probably another story). This seems a bizarre requirement because I'm sure it's a no-brainer for modern printing machines to orientate incoming pages in the optimum way for how they want to print. Nevertheless.... I've asked Lulu support how to accomplish this but all I got was a regurgitation of the printing requirements. So after a lot of fruitless Googling I finally found this post here on the forum that seems to offer a solution. Since I am a newcomer to APub the terminology there didn't immediately make sense but after a lot of experimenting what I am doing is this: I create a new document with a master page that has the same dimensions as my book but in portrait orientation and have the necessary bleed because images in my book extend into the bleed area. I then File->Place... my book .afpub onto the master page and rotate it through 90'. I start creating pages using the master page and for each page I: Detach the master. Click the placed document and select the right spread from the original book for the current page in the new book. I do this for both the left and right pages of a spread. I keep doing (3) above until I have all the pages from my original book in my new book. The above seems rather tedious, ie having to edit every page in the new book (is there a better way?), but it seems to work. That is, when I export the new book I have a PDF with all the pages rotated through 90' which I am assuming is what Lulu wants. The only remaining problem is that the bleeds from the original book are not propagated to the new book. The page dimensions on the PDF file are oversized by the bleed but there is nothing there, just white space on those pages where in the original book the image has extened into the bleed area. When I look at these pages in the afpub doc for the new book, sure enough, the bleed in the placed book is not carrying over. So I have a couple of question for you APub experts: Do Lulu's printing requirements make sense, or am I overthinking it? Does the method I outlined above to create a book with landscape rotated into portait pages the right/optimum way (have I missed some subtlety?). Why are my bleeds not propagating - how can I fix this? Many thanks
 -
 Using Publisher 2.3.1. I'm pretty much a beginner. I've written the text I will be laying into my Publisher document in MS Word 2019. I can format it quite quickly in Word. Functioinally, i.e. with the least amount of thereafter editing, I'm wondering if it is better to lay it all in/flow it, all in one style and then format headers etc; or, if it's better to format in Word and then lay it in. Just hoping to save a few hours of uninformed production time. Thanks in advance.
 -
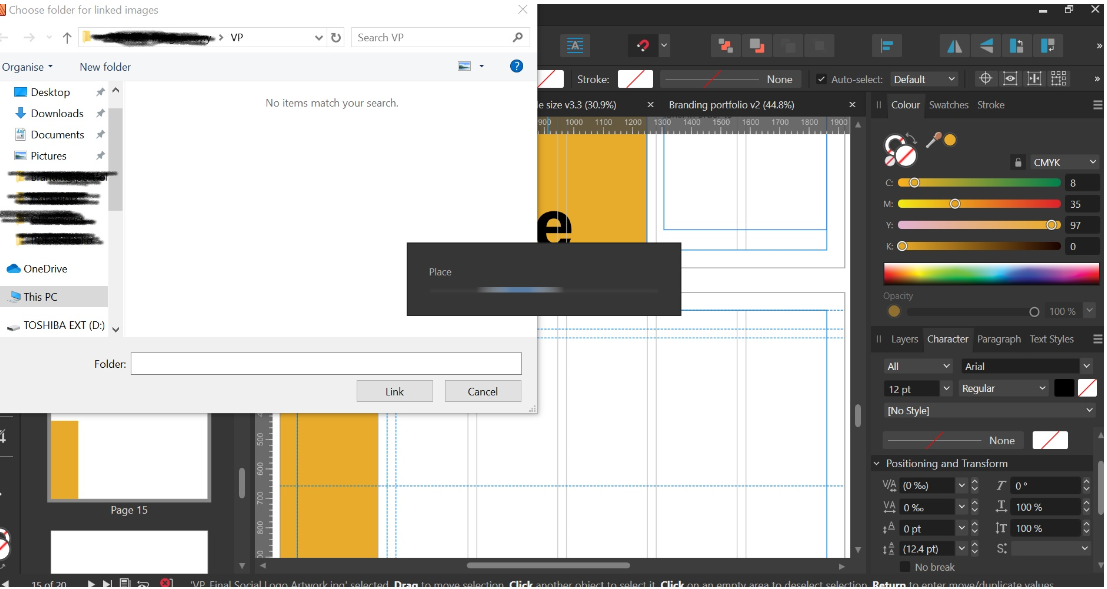
 Heya everyone, would really appreciate some help with this one, I'm starting to get very frustrated with this. Whenever I try to place an image onto my document, whether its a massive PDF or a tiny JPEG, the place function takes absolutely ages, in fact I've never been able to wait long enough for it to work. I've just tried to place a 350kb JPEG, and its been around 15 minutes; all that's happened is the place 'loading' bar has come up and has been running this whole time. Previously I thought it was because I was trying to place a large file so I sat down and knitted, it had been 45 mins and it still hadn't worked so I restarted the program and got the same result again. I've only been able to 'fix' it by force quitting the program and copy/pasting all my content onto the document (which as you can expect is massive because of this). Would really appreciate if anyone knows whats going on and how I can fix it thanks!
-
 I am having difficulty adding a rectangle as a background in Publisher. It appears to be impossible. I have checked the settings, but something seems to be amiss. The white background behind the text is preventing me from seeing what is behind it. There might be a bug causing this issue. This situation is quite frustrating. CleanShot 2023-12-19 at 08.40.28.mp4
 -
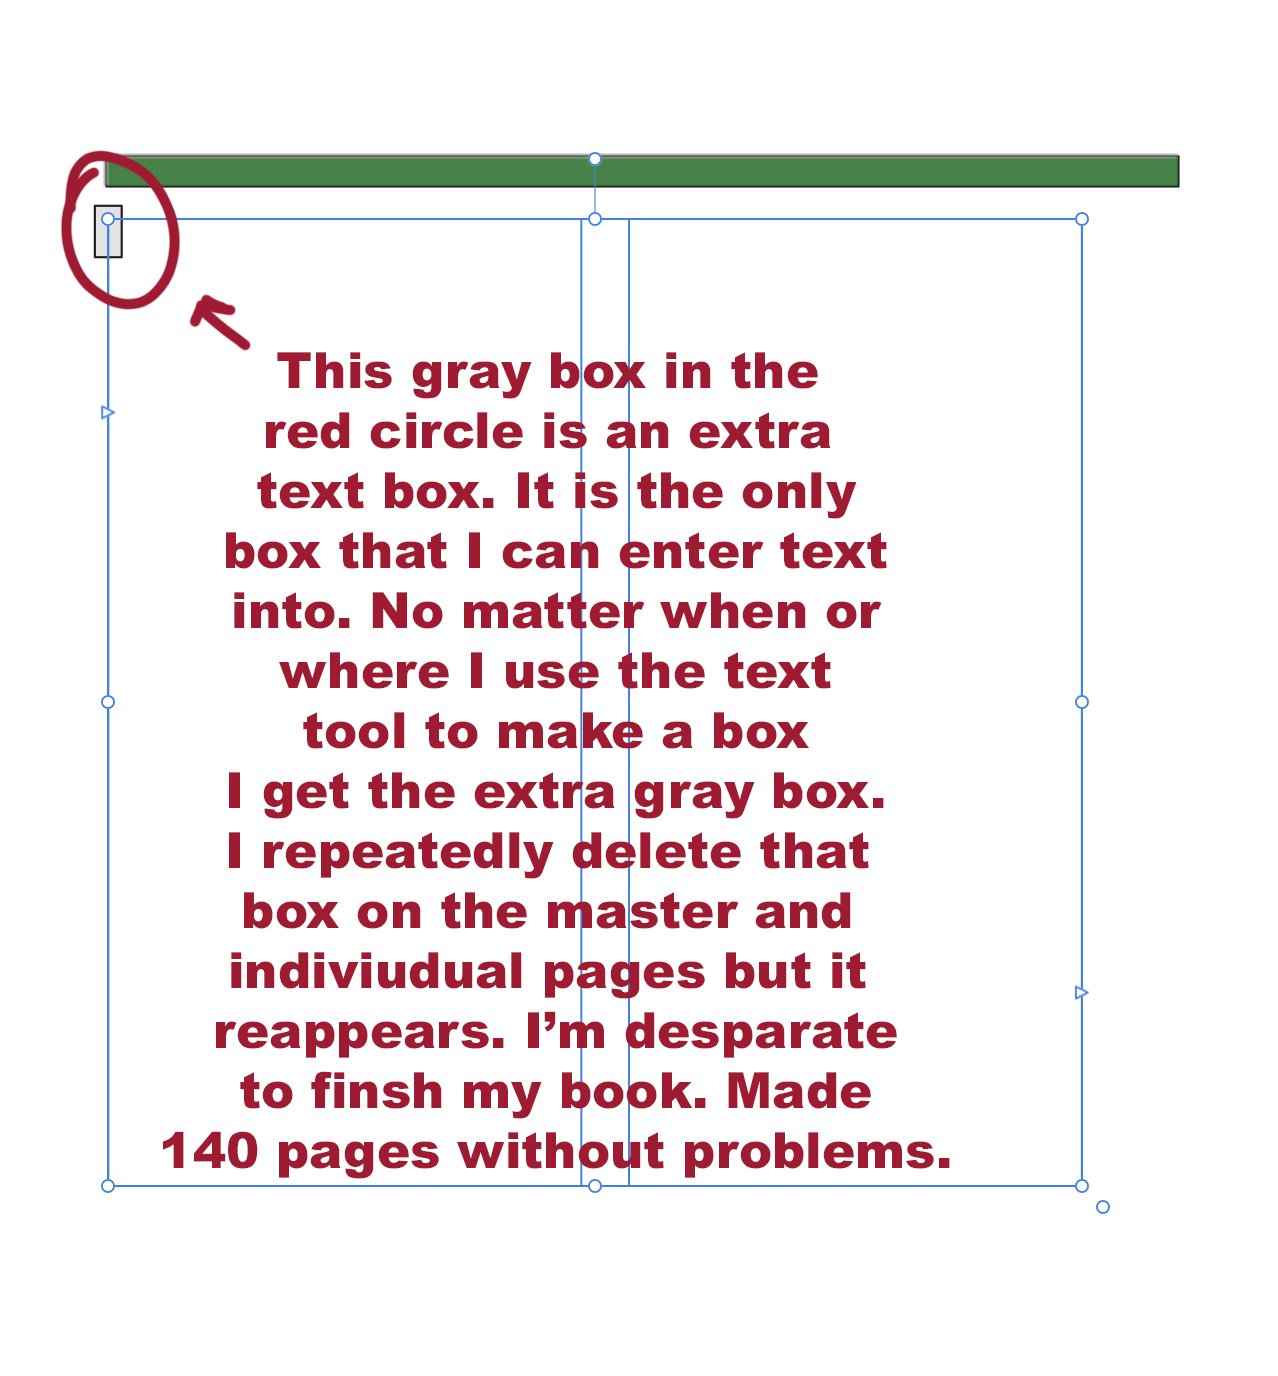
 I have made 140 pages in an illustrated book that I've been working on for two years with little problems from publisher. I recently upgraded to affinity publisher 2.2.1 and now I am having a horrible time and am under a deadline. I am on a mac pro oS vs. 12.7.1 Every time I select the Text box to draw my columns on a page I get an extra small grey text box and that's the only place I can enter text. I also can fill the gray box with filler text, but I can't type into the regular columns for text. No matter when or where I try to draw a text box, I get the extra gray box. (See enclosed screen shot.) I also drew rectangles and converted them to text boxes and the dreaded gray box still appears. I have deleted the small gray box on the master and on individual pages repeatedly in the layers panel and it still comes back. The unwanted box also appears on pages I completed months ago. I've quit the app and restarted my computer many times and I can't get rid of it. I'm assuming that calling you directly would be very expensive for me. There is no place in my pull down menu to select that I'm de-linking this unwanted text box. Please, please help me, Kind regards, Dr. Akin
-
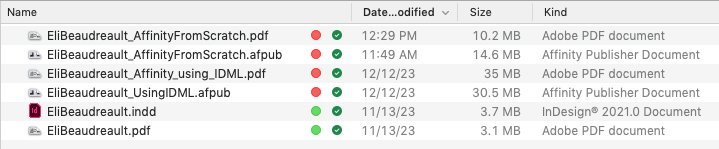
 StrixCZ posted a similar question a year ago, but got no response. So, here I go. The file sizes created by Affinity 1.10.8 are ridiculous, and will most likely prevent me from saying goodbye to Adobe Cloud! I've spent hours trying to figure out why an InDesign document is 3.7 MB (with a 17 x 11 PSD placed for the image) and the exact document created from scratch in Publisher is 14.6 MB (using a jpeg NOT the PSD file. The PDFs created by Publisher are also incredibly HUGE. I first imported the IDML; Publisher file created was 30.5 MB. Then, I imported the PDF created using InDesign, that file is 27.4 MB. I am glad I have not upgraded to Affinity suite 2.0, as it looks like ther is no way I can use Publisher with my workflow. All CMYK. I publish a 12" x 24" calendar, and the PDF created by Publisher is 221 MB, yet the PDF created by InDesign is 60 MB! So unhappy about this, but those file sizes make it impossible to use the Affinity suite for the amount of work I do - I also create a digital magazine, and the .AFPUB files are much much larger than my .INDD files.
-
 Hallo, Ich habe im Publisher einen Anschnittbereich festgelegt. Wie man auf den Bild sehen kann, sehe ich in diesem Bereich leider keinen Inhalt. Nach langem Suchen habe ich aufgegeben. Ich b in mir sicher, dass es nur ein kleiner Schalter ist, aber welcher ???? Hat wre einen Tipp für mich? Vielen Dank
-
 Hello I create regularily a photobook with > 300 Pictures in Affinity Publisher. I arrange these photos -- sometimes up to 10 pictures per page -- on the pages of that photobook. Whenever I paste these images from another tool (Luminar -- unfortunately still waiting for a Lightroom competitor / killer from Serif) the pictures will be added to my page in different scales based on their resolution, oftenly they are much to big to fit into the page. Is there any way to automatically with in the drop process scale them down to a size that fits into the page directly without touching every picture separately. In my workflow I drag them over, mark all of them and scale them down manually. Afterwards I bring them into frames to be able to adapt the image focus, scale and fit into my arrangement, the grid, etc... Many thanks for any ideas, hints etc..
 -
 Assign Keyboard Shortcut to Text Style Open Settings Assign same Shortcut to any feature No warning about shortcut already being used shown Result: Shortcut for Text Style has higher priority Shortcut does not work for feature when the same Shortcut is applied to a Text Style Possible Solution: A warning could be shown in Text Style window, if a shortcut is already in use by the system (same as with shortcuts that are already in use for a different text style)
 -
 Currently it is not possible to adjust the word kerning on a line per line basis. It is only possible to apply it on a whole paragraph by selecting a justified text block and adjusting the settings in the paragraph section of the style panel. This task is common in editorial design work, when you want fine control on a text block. InDesign supports this kind of control. Keep up the good work!
 -
Hi, I am currently working on an A4 sized document and the printer has gven me precise specifications on how the need the pages. They a very specific page size of 226.6 x 311.4 mm (total size including bleed and crop marks). The export with crop marks from Publisher is a bit larger, so I could crop it if I had Acrobat — ideally though, I would like to set this page size as export size so I don‘t have to edit the exported PDF. Any idea on how to set this up? P.S. — Please don‘t try to convince me that the page size doesn‘t matter as long as the content is centered and crop marks fit. The printer insists on getting pages of this exact size and there is nothing I can do about it.
-
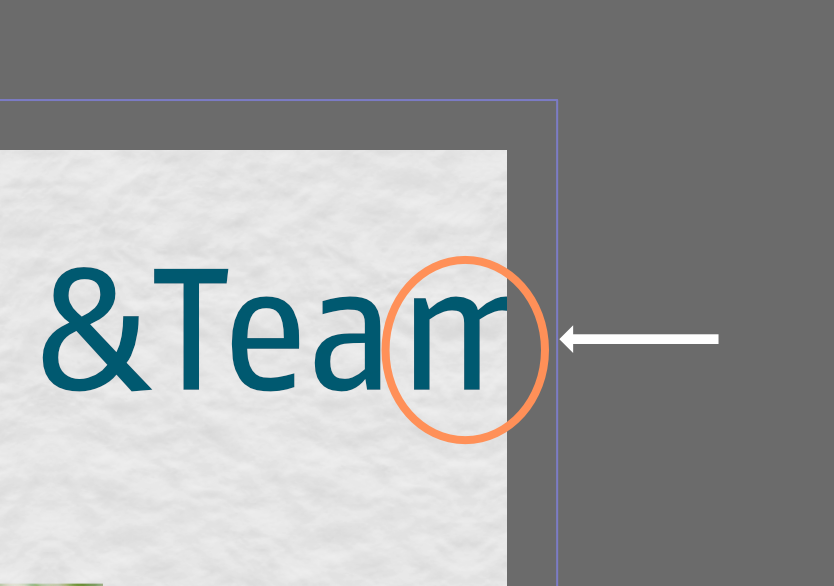
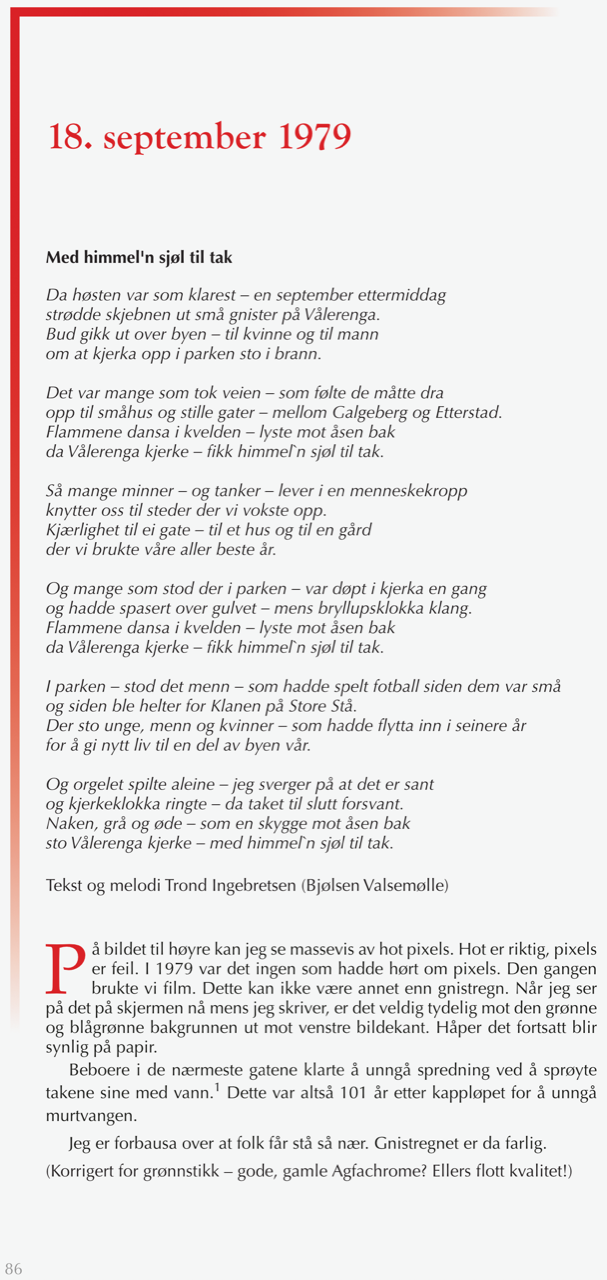
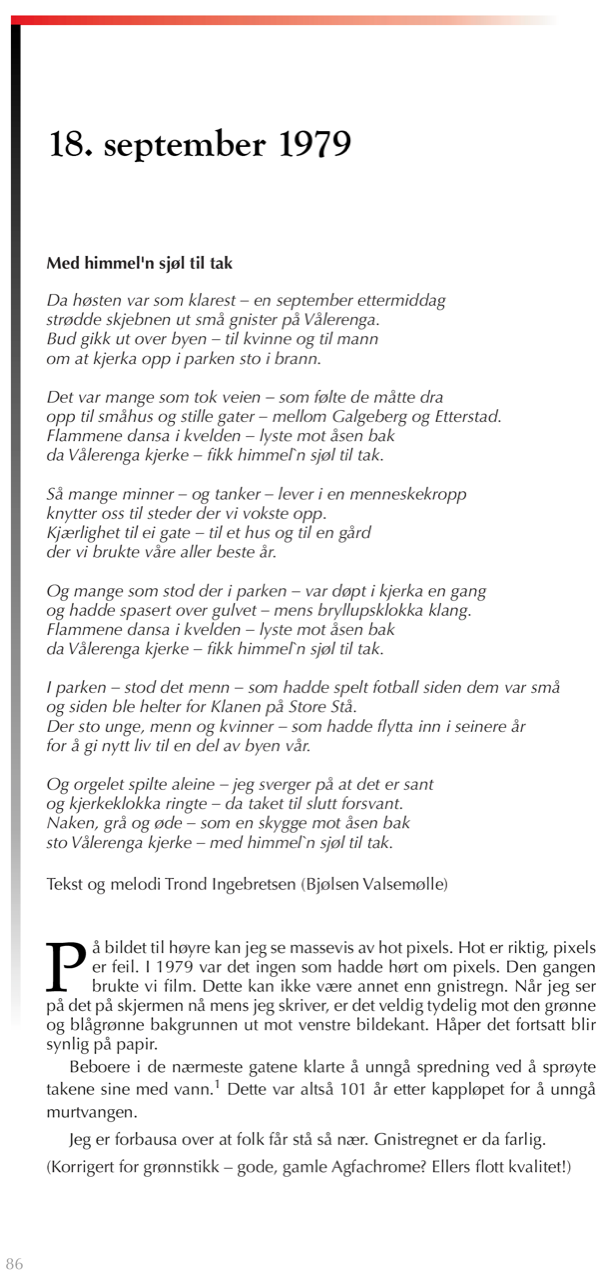
 Mac mini 2018 (Intel), 32 GB Memory, 3 x 2 TB SSD, no storage capacity challenges MacOS Ventura 14.5.2 AMD Radeon RX 580: Chipset Model: AMD Radeon RX 580 Type: External GPU Bus: PCIe PCIe Lane Width: x4 VRAM (Total): 8 GB Vendor: AMD (0x1002) Device ID: 0x67df Revision ID: 0x00e7 Metal Support: Metal 3 GPU is Removable: Yes Displays: LG HDR 4K: Resolution: 6016 x 3384 UI Looks like: 3008 x 1692 @ 60.00Hz Framebuffer Depth: 30-Bit Colour (ARGB2101010) Main Display: Yes Mirror: Off Online: Yes Rotation: Supported Connection Type: Thunderbolt/DisplayPort LG HDR 4K: Resolution: 6016 x 3384 UI Looks like: 3008 x 1692 @ 60.00Hz Framebuffer Depth: 30-Bit Colour (ARGB2101010) Mirror: Off Online: Yes Rotation: Supported Connection Type: Thunderbolt/DisplayPort The project is a book of approximately 170 pages. I use a repeating pattern containing a coloured angled shape and a dropcap, both with the same colour, as seen in the first image. There are 17 occurences of these, out of which 16 convert perfectly ok. #9 fails, as seen on the second image. The failing page is No 86. The colour is missing from both the vertical fat line and the dropcap. When bulk deleting pages (to create the tiniest possible file) ahead of the failing page, the Export almost always cahnges to successful. And the same happens when bulk removing pages following behind. So there is something about the environment of the failing page. The enclosed two files (Publisher and PDF) are the results of careful pruning where the Export still fails. And I discovered this when I arrived home from the printer with the finished results… AFP Vålerenga 2023-10-10 Bug crop 9.afpub AFP Vålerenga 2023-10-10 Bug crop 9.pdf
-
 Hey, thanks for clicking. I'm wondering if there's anything I can do to get a layer to adjust itself according to another layer. For example I have 1 layer that I might make taller, or some text makes the text frame taller etc., and then I have another layer below, as in Y coordinate, that just automatically adjusts its own position according to the layer above it. If you have used Framer, I'm looking for the equivalent to Stacks, and if you have used Figma I'm looking for the equivalent to auto-layout grouping. Thanks /
 -
 Hello. I'm using windows and affinity publisher. Attempting to print some business card artwork and when I use file/print it results in a "fax" window popping up asking me for details of what I want to say in my fax. Am a bit baffled.
 -
 Today I added some pages to my Publisher document. I did this by choosing 'add pages' and then indicating after which page I wanted the new pages to start. As a result of doing this, Publisher created a new section in the document which I did not want. I can't find any way to delete that section or to make those new pages part of the first section. I've looked at tutorials and searched on the web, to no avail. So, is there is way to add pages without creating a new section? And how do you delete an unwanted section? Thanks
 -
I just tried to change the font size of text within a text box in a Publsher file, and when I did, the program crashed. I tried doing this 4 different times with the same result. Any suggestions for how to remedy this? Thank you.
-
 Updated for Publisher 2.4 (February 2024) This free in-depth manual is filled with steps, tips, and recommendations for: Documents, Pages, Master Pages, Sections, and Baseline Grid Character and Paragraph Formatting Text Styles (paragraph and character) Text Frames, Text Flow, and Stories Images and Picture Frames Books and Chapters Cross-References, Table of Contents, and Index Notes - including Footnotes, Sidenotes, and Endnotes Fields - including Page Numbering, Running Headers, and Custom Variables Anchors and Hyperlinks Printing and Exporting Settings This manual does not cover objects, drawing, photo editing, or the other artistic features. Download: Publisher Manual Feb 26 2024.pdf Q&A Is this really free? Yes, I'm making it available free of charge. It's copyrighted to prevent others from publishing it as their own. Is there a longer manual I can purchase? No, this is it. Is there an iPad version? No, the steps and screenshots are for the macOS and Windows versions. Is there a version for Designer or Photo? No, but many of the features are the same so you should still find it useful. Why does it use a print layout if it's a PDF? It's a demonstration of how to use the features it describes to create a print book. Previous version for 2.3: Publisher Manual Nov 29 2023.pdf