Search the Community
Showing results for tags 'print'.
-
 Since getting a new pc running Windows 10 I had to duno Photoshop 5 and buy x8. On v5, to print multiple pics on one page was simple. Using the one image already in use, select file, print multiple then slot the multiple layout you want, slot the image in the with one click load up more picks and slide each one onto the page and print. easypeasy. In x8, having loaded print studio and selected a multiple print layout (but not my favourite 3x2 eight to a page) when I slide a pic onto the page every time I try to fit it into a slot or rotate it I get a dialogue box telling me to insert a number. But what number and where??? Now all the other buttons are dead and I can't get rid of the damn dialoge box Is it x8 or my age (73) or that a stroke killed me and the right side of my brain
 -
Hi I am a very happy user of Affinity Designer and Photo and very much looking forward to Affinity Publisher. Would it not be a good idea (for what it's worth) to complement that excellent Affinity Suite with something like a PDF Creator with Affinity typical Workspace, tools and bags of userfriendly features ? I would definitely be the first in line to buy.
-
 Hi, I'm using Affinity Designer and Affinity Photo at my MacBook. I want to print a detail section of my paper in Affinity Designer. I noticed, that my origin print menu ist missing! As I open: "Menu" - "Print", then open up my Mac only grey simple print options of Mac to choose printer, paper size, paper orientation and so on. There is no longer the black menu for detailed print options of Affinity Designer with adjustments of "Full Paper" or "Section of paper" or "print without backgound" or "resolution" and so on. (sorry to my bad translation, I don't no the english words. hope you know what I mean.) Recently, I updated to High Sierra. Is there any correlation? Can you help me how to get the black detailed print options of Affinity Desiger back? RegardsAnit
 -
 Is there a tutorial anywhere on using Affinity Photo to print the inkjet equivalent of darkroom test prints? That is, using a small sheet of paper to get print variations on a selected area of an image. I want to make some A2 prints on my Epson P800 printer. My tests so far have not been what I wanted, although my monitor is properly profiled and I’m using the correct ICC profile for the paper. So, rather than continue to waste ink and paper, I was hoping to use a key area of my image and print a strip series of variations on e.g. an A4 sheet to decide on my best settings. Thanks!
 -
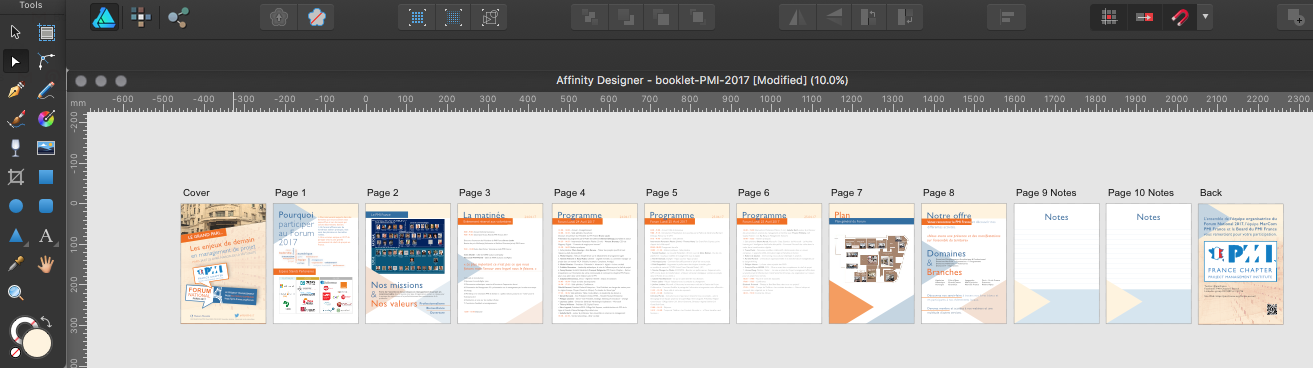
 Hello :) I have created a document containing multiple pages (12) in size A4, each page on its own art board. The print shop wants me to send a PDF (or the original file) in size A5. I have looked and looked... and still can't figure out how to either: - resize my original A4 document to a A5 - or export my original A4 document to an A5 - or export my original A4 document into a A5 PDF - or if there is another way... I thought that A5 is simply half an A4 and it would be easy for the printer to simply downsize, but apparently it doesn't work like that so... I need to send that file YESTERDAY so... help me please :) Thank you
-
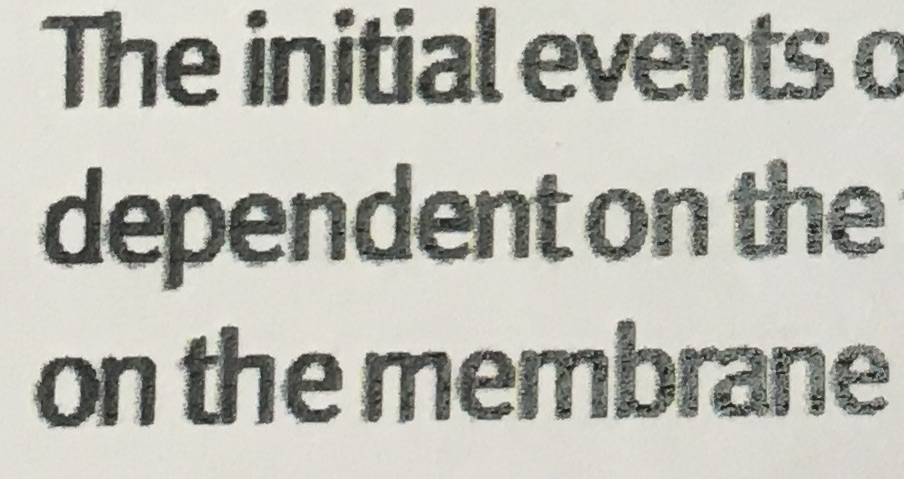
 Hello, I just tried to print something that I have prepared from the latest version of AD 1.6.1. While on the screen the design looks good, when I am printing it, the quality of the fonts is very poor. They look sort of "pixelised" or out of "focus" if I am allowed to say. When I am using to print from any other application, the quality of the same font, or any other fonts looks as it is expected to be. Definitely, it is not a printer problem. Am I missing something or is it a bug? Best regards, A. Ps. This is an image of the print page.
-
 Hello! As a Fine Art Printmaker who uses Computer Design tools to create prints for Screen Printing, Lithography, and Intaglio, CNC woodcut, it would be amazing if I could separate colors and control half tones size shape (line, dot, etc) and color. I imagine being able to work in CMYK layers and being able to apply color halftones to shapes based on percentages, or change the size and shape of the individual color channel half toning. It could be applied in any document setup really RGB document with a simulated color / spot process: Red, Yellow, Blue, Purple, Green, Turquoise, Grey and control the halftone percentage, size and shape. grey scale: black, 25% grey, 15% transparent white LAB would be fun, you could control the lightness darkness of the halftones maybe have an option to constrain the gamut inside of lab to a specific set of colors like CMYK but still have lightness control. In my imagination the possibilities are endless for options like this. "MOONSHOT" : to have RIP like printing control inside this program, where I wouldn't have to worry about the printer I am on to get circular halftones (this might be next to impossible but I am ignorant when it comes to the programming side of hardware interactions) this would be just insane and might require a new type of universal file format I have no idea but it's something I dream about, being able to go to Kinko's or some other local digital print shop and be able to print out my files without having to worry about the print shop getting the settings right in their computers and on their printers, the employees being inept, or any other stupid thing that happens because you don't have enough money to buy the hardware that you need. and finally "MOONSHOT": A new type of color selection palette based off of a Warm/Cool, light/dark, transparent/opaque warm adds red cool adds blue lightness adds white darkness adds black transparent/opaque self explanatory but the twist is you pick initial colors as a base and those colors become the colors you base rest of the interactions between the colors on like paint For example: Here is a shorthand RGB two way conversion to Paint/Ink color palette equivalent Red (Pantone Uncoated 032) Yellow (Pantone Uncoated 123) Blue (Pantone Uncoated 300) Purple (Pantone Purple) Green (Pantone Uncoated 354) Turquoise (Pantone Uncoated 312) Grey (Pantone Cool Grey 8) 100% opacity White 15% opacity White mixed or printers black (R 54, G 54, B 57) Black now imagine you have picked these colors as your initial palette and have set them inside of a grid each color has the same basic controls warm/cool: add red/add blue light/dark: add white/add printers black transparent/opaque: increase decrease transparency/opacity Now for example you activate the red, white, and yellow channels you now adjust warm/cool light/dark transparent/opaque sliders around to just work within the constraints of those colors selected from you base palette this gives you a sub palette of yellows oranges and reds based of your real world/RGB equivalents this would work for CMYK as well This would be a great tool to have I think Thank you for reading and for your consideration Nathan Henry
 -
 Any chance of incorporating the option to manage printing with icc profiles totally within the iPad app? E.g. when i use the print dialogue i am given the choice of printing as is and letting my printer do all color management or applying an icc color profile to my output and let the app control the colour output? Cheers in anticipation
 -
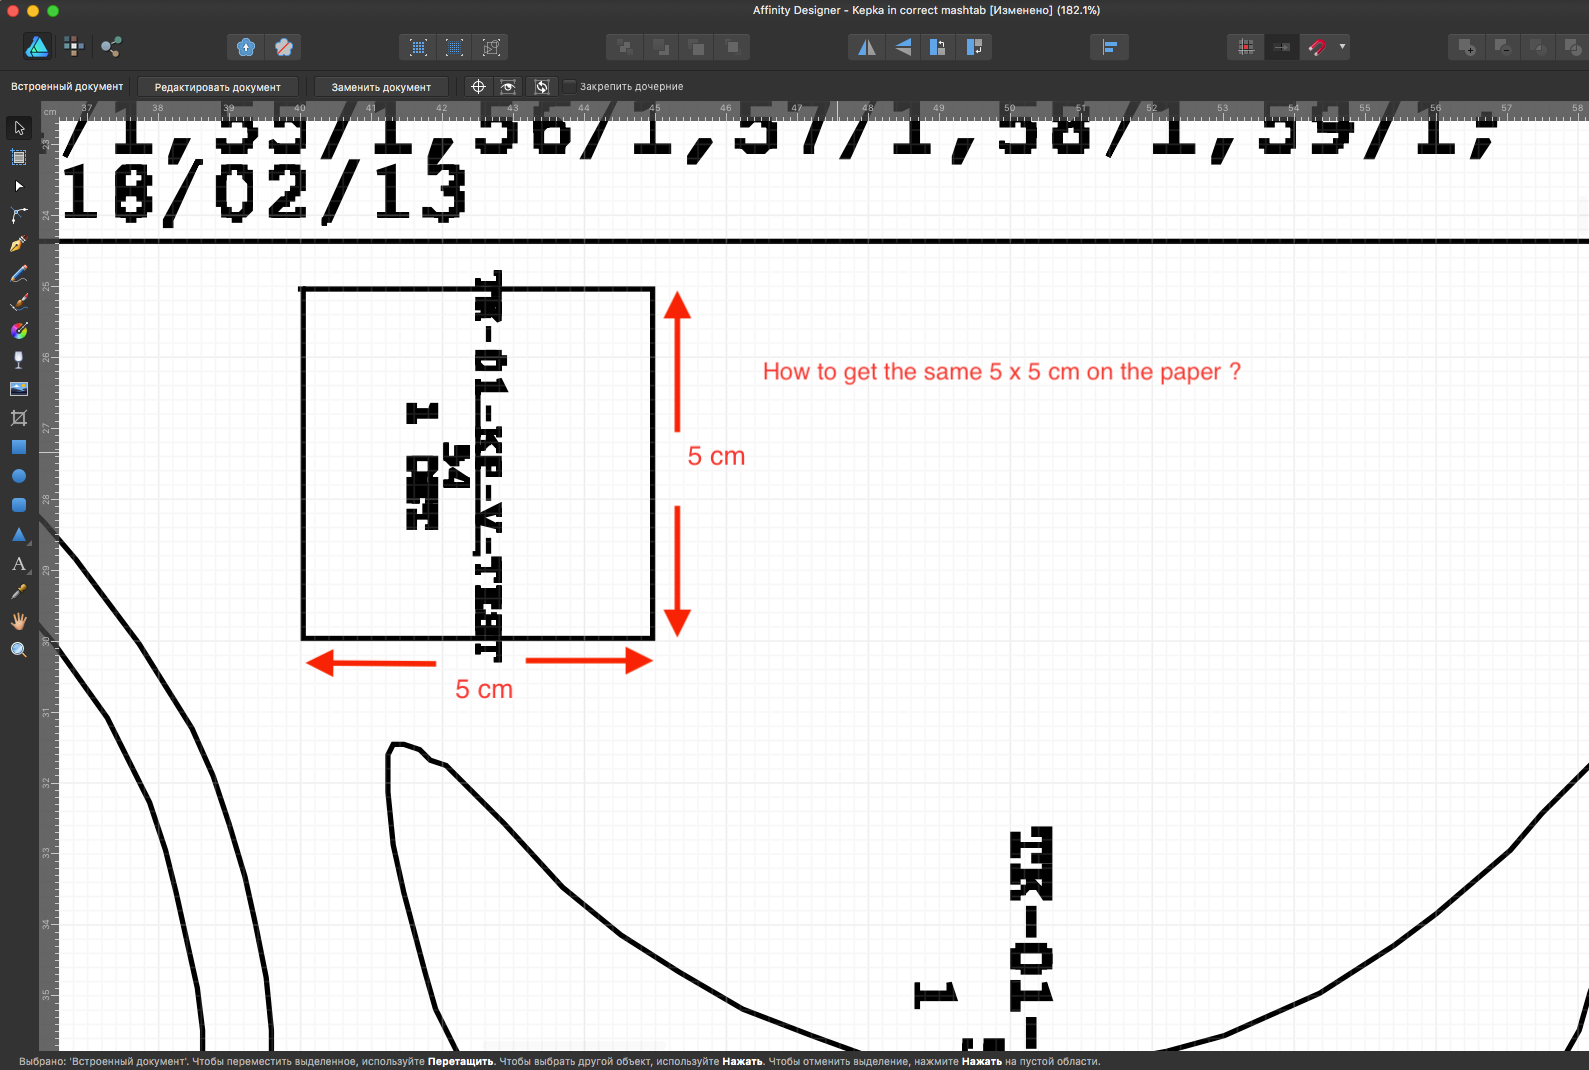
 Hello, I have .pdf file (which was converted from HP plotter's .plt format ) with one big vector image. I need to print this drawing to A4 papers and I need to get exact the same size. PDF-file is relatively big (about 150 x 200 mm) and probably it will takes about 15-20 pages in A4 format.. I've created empty Affinity Designer's file (150 x 200 mm) and dragged pdf to Affinity's window. Then, I've turned the Grid on and resized the image to get the size what I need. I have one test-square (5 x 5 cm) on the image which helped me to get the correct size in Affinity. Now I need to print it but I have 2 problems. 1. How to print this file with correct sizes, in order to get the same 5 x 5 cm square on the paper? (when I try to print I can see only one page which hold she whole document) 2. How to split this document into several pages and re-save it to multipage .pdf where each page will be the part of an original image but in A4 format page? Many thanks. Probably Affinity Designer is not the best solution for this purpose but it was the only software which I have where I was able to resize the image properly.
-
 Hello, Is there a way to export a document (book cover - 3 artboards), with bleed (5mm)? The only thing I have found is this: ...and it does not work for me. Either this method neither normal method (jus exporting PDF with print marks checked in options does not work. AD exports image to the exact size of documents, no graphics in bleed area. The impossibility of exporting my work with bleeds for print is a disaster for me. Please help, P.
 -
 Is it possible to create a shape from an outline in Affinity Designer? For example if I have a straight line with a set stroke width of 12px which isn't a "closed shape" like it's needed for certain printing techniques: is there some way to create a closed shape from a line with stroke, in this simple case 2 points (line from A to B), to have a shape without outline, with 4 points and a width of 12px? Without doing that completely manually? Edit: Ok, forget it. Found the option in the layer settings via the upper menu. At first I looked in the context menu of the layer, which didn't help much.
 -
 I have a document that has grayscale images and when I export it as a PDF X/4 the images are CMYK. I open it in Acrobat and preview the images to see this. I have a black spot color set and the vector object are just black. What is a solution to this problem?
 -
 Today I went through Affinity Designer scouring for pre-press tools, there were none. No separations, no channel view. Only the workaround to freeze all layers in Affinity Photo and export each CMYK+ channel separately. Bit of a surprise. But since there's nothing there, here's what I wished were there. That and a decent printing dialogue. For the print simulation, I used to recommend Substance Designer (setup) + Marmoset Toolbag (presentation) for a while now. Not anymore though because I always end up doing the work. -_- Scope: A new persona for all apps to address basic pre-press that are currently unaddressed. Views: Toggle between several views for dedicated control options on each task. Some views can be combined to get a better idea about the end result. Noted with [separate] when one stands alone. Overprint Check View Show realistic rendering of how the overprint will look based on selected profiles for ink, printer (optional, based on PPD) and paper. Tools: Range Selector: Like a mix of UPoint + drag and move, for fixing and optimising ink trapping (live dilate/erode on vector and bitmaps). Coverage meter: Show where the ink coverage exceeds or meets 100% with a heat map overlay. A range selector then can be used to lower the ink as: lower total, lower c/m/y/k/+. Buttons could be used to control that: e.g.: [c] [m] [y] [k] for working on magenta and yellow at the same time. Output Image: Render the simulation output of a whole document to an image (or PDF for multi-page) Font Trapper: Local overrides on font trappings that didn't turn out as planned in the style and colour settings. Print Simulation A simple simulation for base paper types and the ability to create custom ones (folder with absorption values, reflectance and a texture image for example) would be great to give clients a feel for it before someone has to spend money. Tools: Moveable light source: (useful for checking special inks, embossing/debossing, foil stamping and UV coats) Review light: Choose between a set of standard review lights (e.g. Just Normlicht LED proofstation) to judge the print under various lighting conditions and help avoid ambiguous colour situations (like that dress). Output Image: Render the simulation output of a whole document to an image (or PDF for multi-page) Separation View [separate] View all separations in a gallery view with an option to overlay them to check whether they can be optimised further or whether they work as planned (how is the yellow faring with the black? Did the overprints turn out as desired in the OC view? Are all special ink channels present correctly?) Tools: Drag overlay: Drag a sheet onto another to see their interaction in the printing context. Print separations: Print dialog allowing output of separations on a standard laser printer. This allows for a final manual check and also is of sufficient quality for a lot of silk screen printers out there. Export to PDF: Save all/active/selected artboards/pages in separations to a multipage PDF ready for lightjet ripping
 -
 Color not right on print I know this is a big topc so let let me calarify a litle first When printing from Affinity (making minor adjustment in RAW) hitting develop and send to print, the color is way off on paper. Doing the same thing in Canon DPP the final print looks close to what you see on monitor. I have not assign any ICC or color profile to the software. It's set to software manage color Monitor is color calibrated Paper is color calibrated on printer In the preferenses the RGB Color Profile is set to sRGB IEC61966-2.1 32bit RGB is set to sRGB IEC61966-2.1(Linear) CMYK Color Profile is US Web Coated(SWOP)v2 Rendering Intent to Perceptual Blackpoint compensation is marked So the question is way is the color way off when using Affinity but looks ok when print from Canon DPP, do anyone know what to do to get good print from affinity
 -
 Hi, maybe you have read my other post regarding the distressed logo. My printer only guarantees lines and details down to 0.7 mm in size (narrower lines and smaller details may still be visible). Is there a way to easily check if all elements are "thick" enough? I saw such a tool on an other design tool... moving over the lines showed the "thickness" in pixels/cm/inch. Thanks, NBG
-
 Hi guys, If I start a new document, and I choose WEB from the prohect type, and I start it, if I later go back to the Document Setup I notice that Document Type is actually set to Print, even though I chose WEB when creating it. Does anyone know why that might happen? Is there a disadvantage to my document if I keep PRINT instead of WEB? I see that the color is RGB (the way I chose it), not CMYK, so it's not really for print. Thanks, Chris
 -
 My co worker produced an AI file for a 3mtr x3mtr poster and sent it to me as a pdf, The size was 50mb. I made some edits but when I exported the file back as pdf, the size was less than 6mb so clearly something is missing. In face I can see that there are some deficiencies in my output. Can I export the file back in the approximate size it was first sent in? Thanks
 -
 Hello everyone! Could, anyone outhere, explain to me how can I do my print test with the appropiate ICC used in diferents papers... And also, dou you remember which was the built-in-house CMYKB valor in Affinity Photo? I changed it and I absolutely forgot which one it was... Thanks in advance. Best regards!
 -
 [new user] What is the best/easiest to specify the print size and margins? I'm used to a print dialog that lets me specify the size and each margin. For instance, I want to print my image 4"x5" with 1/2" border top and left on letter size paper. Later I'll print the same image with other dimensions. Thanks,
 -
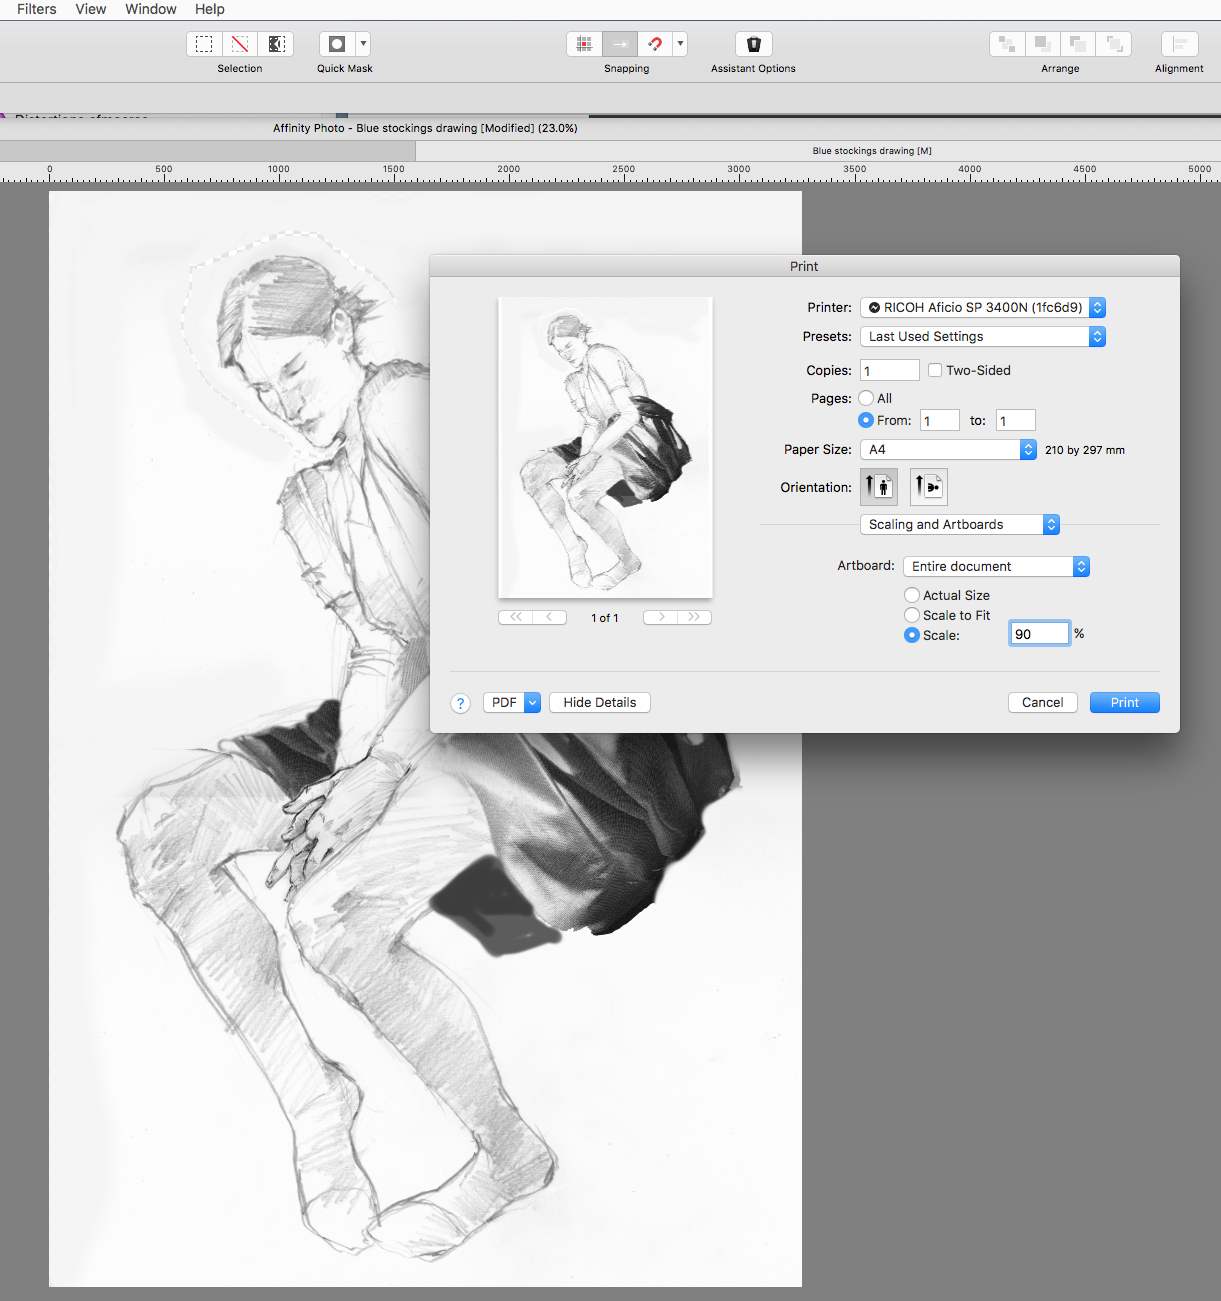
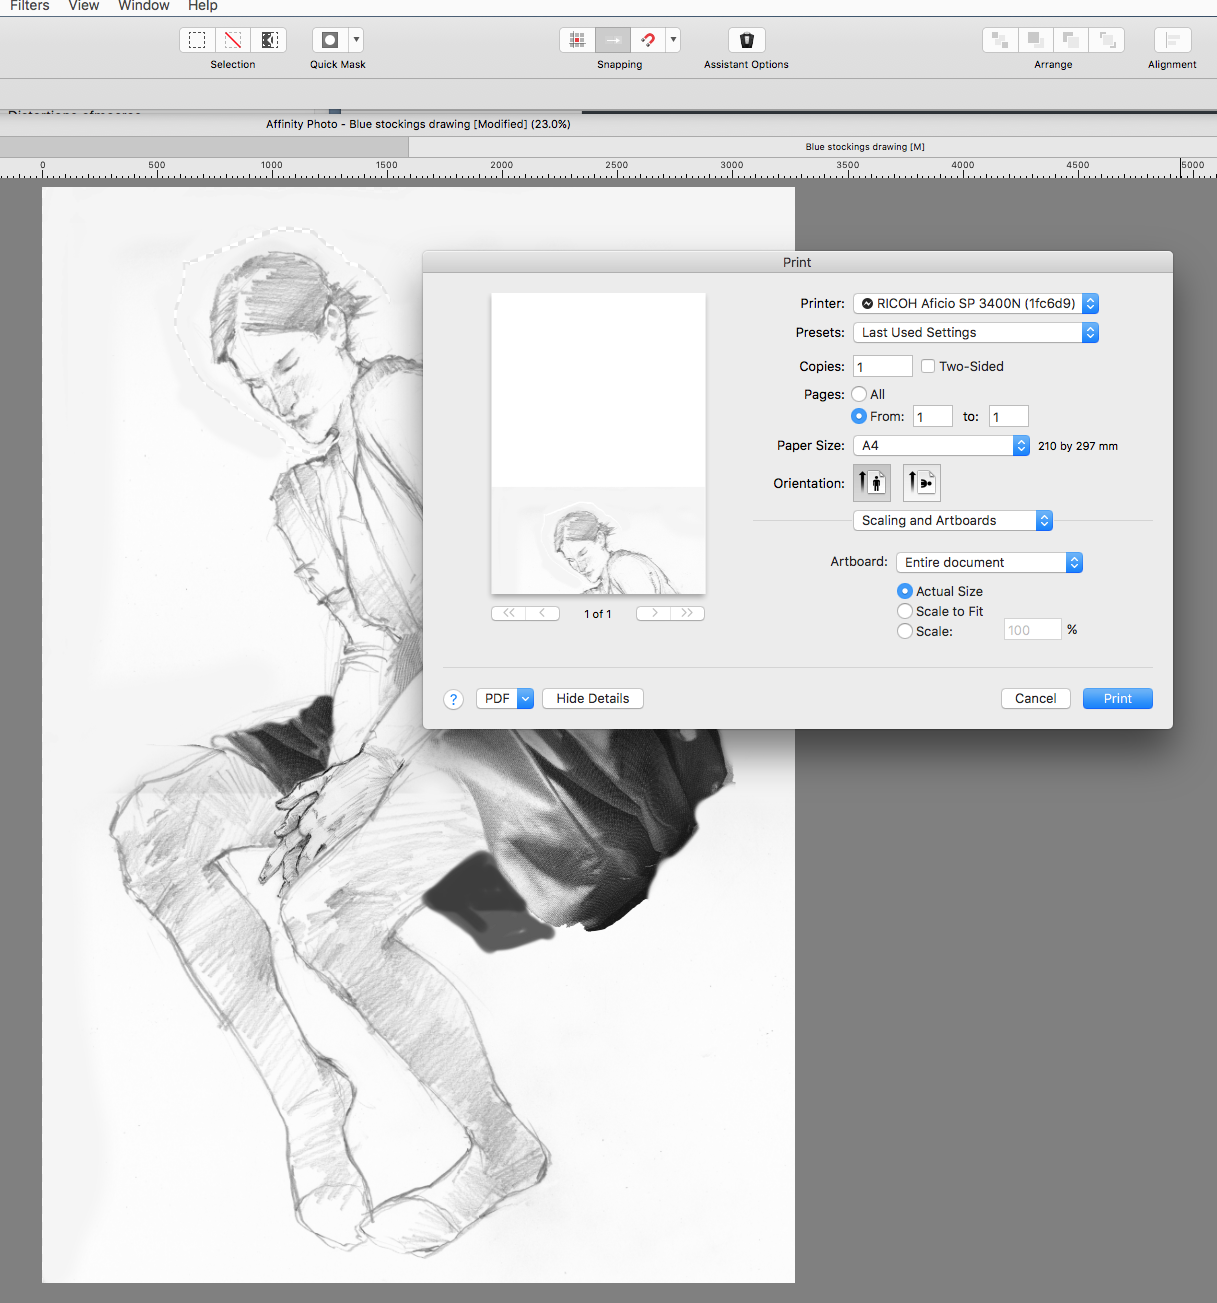
As an artist I have used Photoshop for over 25 years and in the print dialog you are able to adjust the size of the print or part of the print on the fly. In Affinity Photo I cannot get it to show the change of size at all, or move it around in the thumbnail to get the position I want. It also seems to show an artboard that is far larger then the document. I want to print only sections of the drawing shown on the attached image, doing this on the actual document is time consuming as I do not always know what size is best until I have printed it and matched it to the original drawing, the Affinity print dialog is not as intuitive as I want. I am impressed with Affinity and desperately want to leave Adobe and its greedy price structures, but this facility is essential to how I work. Am I doing something wrong or is the print dialog really this primitive. See attached images.
-
 When printing a fine art image from, I say, your catalogue (targeting sales at a gallery etc.), you need to make the same size as mentioned in the catalogue. That is, if the artwork is mentionwd as 26.4 x 34.7 cm, you must print it only in this size. In Photoshop, its print manager manifests both per cent of the image scale and also the physical size of the scaled image. That is, for example: typing 26.4 cm in the Photoshop print manager, we get the desired size of the printed artwork. It is impossible to do in the cirrent version of Affinity photo :-( Yes, Affinity Photo print manager provides the possibility of scaling percentage. But no one person even a mathematics genius can guess how many per cents shoild be typed therein to produce, I say, the desired 35.7 cm or 21.4 cm. I maybe missed something important in Affinity Photo print manager, but it sems that the said above is unfortunately true :-( This is a serious gap in Affinity photo from the viewpoint of a professional. We print not travel photos at a Kodak Express, but photo-artworks targeting collectionners who like pay many hundreds of Pounds for each of the offprints (also, reproductions of Medieval engravings are considered). So, the printed size should match the same size as mentioned in the catalogue of artworks made by Duerer or Bruegel or a contemporary fine art photographer. I sure that this gap should be imprived in Affinity Photo print manager as soon as ppssible in the next release. Otherwise, those who migrated to Affinity Photo from Photoshop (migration to Affinity Photo is a very popular among professionals) may go back to Photoshop due to the impossibility of printing exact size from Affinity Photo. Thank you for your time. I hope on your help.
 -
 AP. I'm currently in the process of designing book covers for a clients project. 13 in total and then some. I've just finalised the first 3 but the printing company have come back asking for a file indicating where all the gold is to be printed (gold text and some gold frames on the covers). I'm assuming they are actually printing gold foil like you see on fancy wedding invitations. I have absolutely no idea what they are asking for here. I have tried a quick lmgtfy but it came up with nothing of much help (its a difficult question to pose to google). Has anyone had any experience with printing gold foil on any sort of project who may be able to shed some light on what the printer company are requesting? As of yet, I am only in talks with the client and have no direct conversation with the printers. Plus, to exacerbate things, my client is Norwegian so comms is difficult as it is. Any help much appreciated.
 -
 Hi all, I'm new to Affinity Designer, and I'm having trouble properly exporting my design to PDF. I've created a 2.625'' x 2.625'' square design with 300dpi, and I'm trying to export it at this resolution as a print-ready PDF to send of for printing. But every time I export the files they end up being a strange, low resolution (189px x 189px). I've tried exporting from the Export Persona as well as the Export dialog in the File menu, with no luck. Could someone help me understand why my exports are getting downsized so drastically every time? Thanks! -Cody
 -
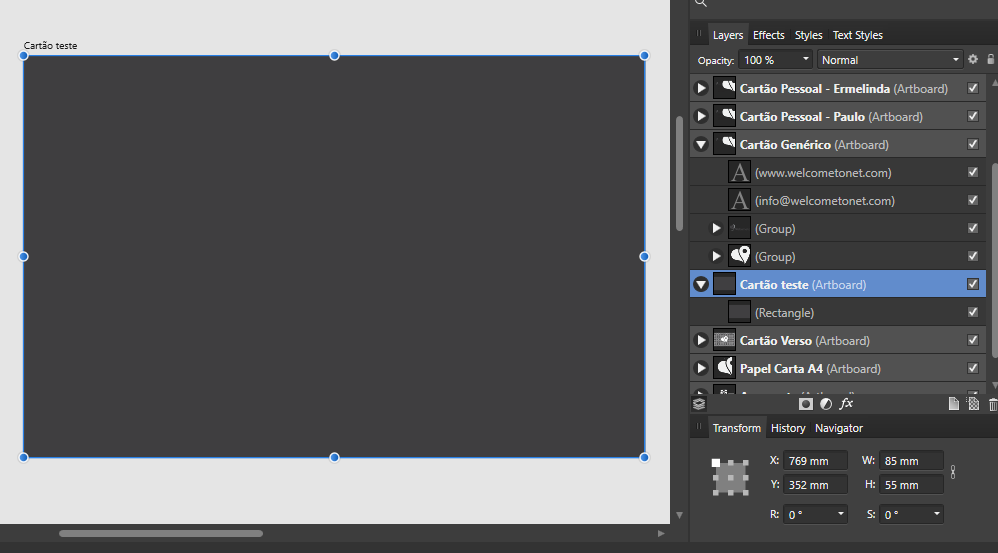
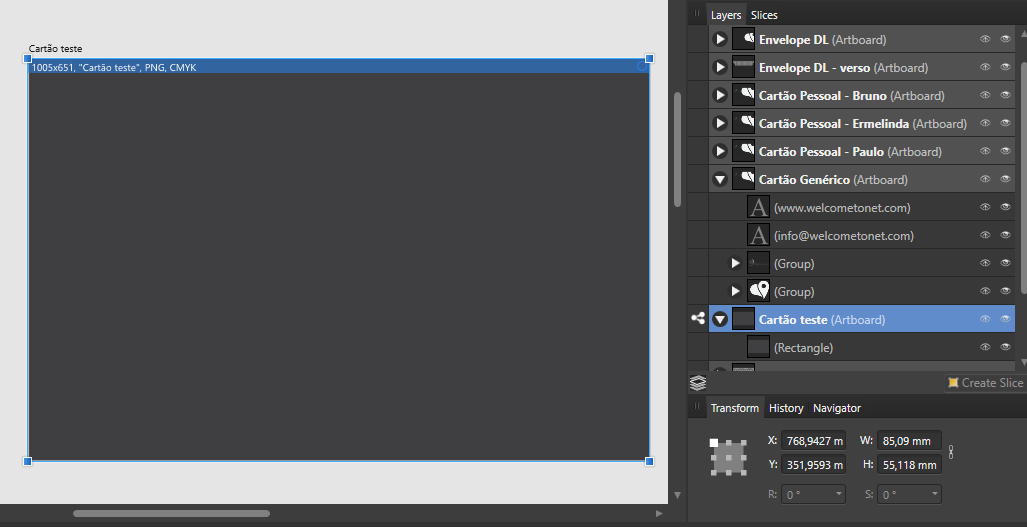
 Hi, I'm using AD mainly for webdesign, which works great. At the moment I'm on a print project and I've been struggling with export tools: slices sizes and position. I created a test business card and the slices don't match with the artboard. The resulting PDF shows white lines (TestCard.pdf), I assume, corresponding to the positioning and size error between slice and artboard. Based on an answer by MEB the position and size were done whole numbers (Capturar-1.PNG). But on Export Persona, size and position changes (Capturar-2.PNG). Surely there must be a way to avoid this... --- While writing this, it occurred to me that maybe the slices uses px as units and not mm, which means the conversion from mm to px, results in decimal numbers. Is this it??? If so, how to work around it? This is for an online digital printing service, so, no bleeding. --- Thanks, Pedro TestCard.pdf
-
[newbie] I get the image to look how I want in the app but the printed output is much different. Darker and less contrast. How do I calibrate my app, display and/or printer to get them to look more alike. What would be an effective web search to find docs and tutorials on the subject? BTW, I've got a Epson SC-P400 and have all the ICC profiles if they are involved.