Search the Community
Showing results for tags 'pot'.
Found 1 result
-
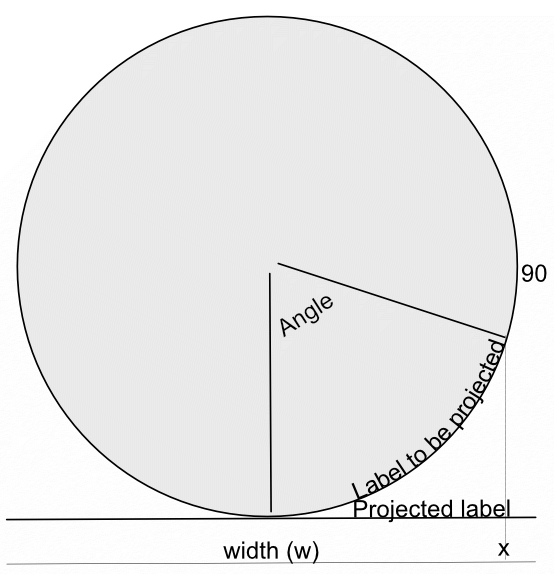
 In a recent post in Questions, @Maxxxworld asked how he could warp an image to apparently wrap it around a bottle. I posted a solution to his problem there, which I expand upon here. Consider the facing semicircle of the bottle as seen in this diagram: The visible part of the label extends from -90 degrees (on the left, not shown) to 90 degrees on the right. This will correspond to the width of the original image. This will project onto the final width of the image (the line below). The final width is less than the original width by a factor of pi/2. A bit of trigonometry shows that the sine of the Angle indicated is given by (x-halfwidth)/halfwidth, where halfwidth is both the label and the final image. Putting this together and re-arranging a bit gives us an Equation: x=(asin(2*x/w-1)*w/180)*pi/2+w/2 A bottle is typically viewed from above, so that the label has a curve, typically with a dip in the middle.This can easily be simulated using equations, using: y=y-Const*x*(w-x)/w/w The Constant determines the depth and direction of the curve. I have used the expression w*(0.5-a) as a scaling factor, where a is a parameter chosen at runtime. This will change the curve from negative (curving down) at the default a=1 to positive at a=0. Inserting this into the equation gives: y=y+(0.5-a)*x*(w-x)/w Note that the w in the numerator and denominator cancel out. The value of (0.5-a) determines the curvature as described above. As an example, here is the Great West Window of Chester Cathedral. I chose this because it has lots of verticals to see how the filter affects it. (It has verticals once I had put it through the Mesh Warp.) And here is the image after the filter: Before filtering I cropped it close to the sides of the window and then Rasterized it to remove the invisible sides. I then added space at the top and bottom to allow room for the curvature part to operate. I then followed this by Clip Canvas to remove surplus transparent ends. The calculations for this filter are complicated by the algorithm that Affinity uses to effect these equations, which I explain in this Tutorial here. I have created a macro that effects the filter, and then uses Clip Canvas. By clicking on the cogwheel, you can alter the degree and direction of curvature. EDIT: I have discovered that this macro will only perform once (per Affinity Photo session). I add here a version recorded in version 1.8 which does work properly in Photo 1.8: WrapAround1.8.afmacro I alos onclude here the original macro, recorded in version 1.7: WrapAround.afmacro John
- 20 replies
-
- 14
-

-