Search the Community
Showing results for tags 'position'.
Found 20 results
-
 Hello, I'm looking for option in Affinity Photo to select some area with light texture and clone stamp it to wide area but I don't want source to be moving when I paint. Is this possible to lock that position somehow or use other tool trick to solve that goal? Maybe option to create brush from that? Greetings.
 -
 I am working on a scanned pdf document, which is much easier to add in Publisher than in Acrobat Pro (which I used to recognise text from the scan), but if I want to get rid of certain pieces of text from a text frame (e.g. the titles on a text page) I cannot easily copy and paste it back in its original position. 2022-12-03 20-22-40.mp4
 -
 Direct delete and position feedback while editing (the proposal would be of interest to Affinity Photo and Affinity Publisher alike). A. You right-click on a guide and a new context menu appears. There you can select delete or edit. An alternative to a right-click could be a double click. B. The editor that opens would be the same as currently, BUT three new features would exist: If you have opened the editor via the context menu of a guide, then the corresponding guide is highlighted in the editor list. At the same time, the guide would also be highlighted in the workspace. E.g. it could be pink instead of blue. Great feedback when there are many guides. As soon as you select another guide in the editor guide lists, the same thing would happen, the corresponding guide would also be highlighted in your workspace. So you always know exactly what you are doing.
-
- 1
-

-
- affinity designer
- affinity photo
- (and 6 more)
-
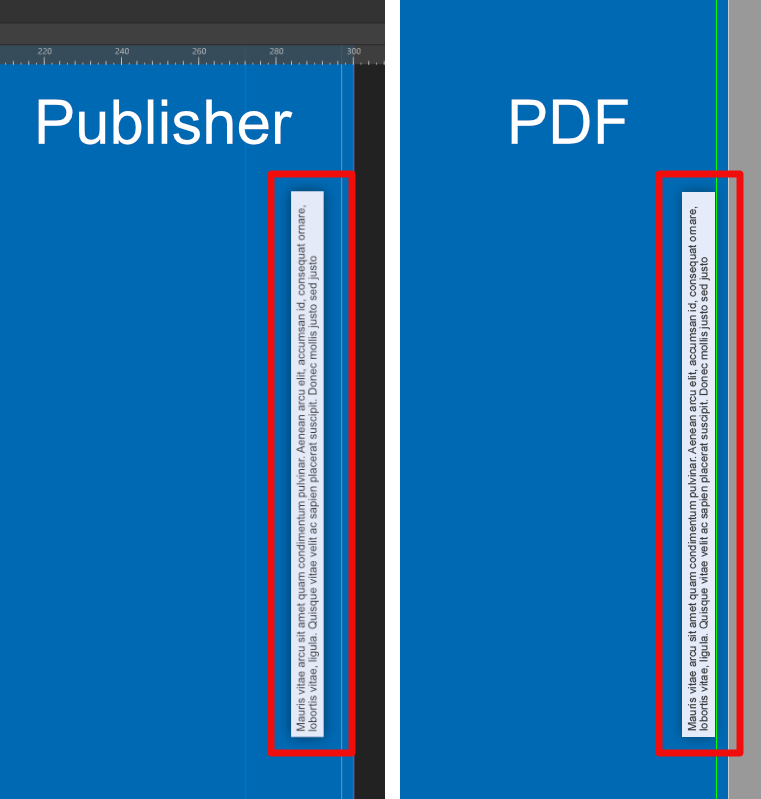
 Hello all, I have created a Publisher document in A4 format and then placed and scaled it in an A3 document. The page box is "Bleedbox". On the right outer side there is a rotated text frame, which is about 4.5 mm from the right document edge in the Publisher document. If I export this document as a PDF, this text frame is suddenly directly at the edge of the page, right at the bleed. Here is a screenshot: I have attached the two documents. I would be very interested to know what is happening here, because I don't have a solution for this. Thank you all very much! Regards, Felix A3_Upscaling.afpub A3 Upscaling.pdf
-
 Designer 1.8.5.703 on Windows 10 Home. If you watch the video you can see that: 1. Moving the Transform Origin seems to be fine except when the layer is also moved (maybe because snapping is ‘revoked’?); 2. There are redraw issues when the user presses and releases the right mouse button while moving the Transform Origin. Note: I looked for other reports but couldn’t find any that mentioned these issues. Apologies if this is a duplicate. 2020-08-30 12-49-26.mp4
 -
 Latest build of Affinity Photo Beta (1.8.3.641) for Window OS Windows 10 on Wacom Mobile Studio Pro 13. So ... Every time I launch Affinity Photo it appears on the wrong monitor (I have two monitors connected), and I have to drag the main window and all the palettes across to the correct monitor. It does not rememeber where it was when I closed it. Does this require a coding fix or is there a setting somewhere to sort this out please? tia xx
 -
Hi folks! Fantastic new updates that the team surprised us with! Preflight in Publisher, the Resource Collect feature and Embedded Documents – aka Smart Objects and thus the possibility to finally make use most stationary mock-ups – in Photo are my overall favourites! Buuut … I've got a question or rather a pretty annoying bug since day one I've been using Publisher (which literally is the case since the release): When I right-click on a layer in the Layers panel, the contextual drop-down menu appears in the upper left corner of my screen instead of directly at the Layers Panel and I have to move the mouse pointer there from the bottom right – somewhat inconvenient when working with master pages and want to make separate changes on different pages. Strangely enough, if I don't or just barely move my mouse and right-click a second time, the menu opens right under the mouse pointer. Has anyone else had this experience? Any idea what could cause this? 🤔 Q: Does this occur only when right clicking the Layers or whenever you use the right click? A: Just the layers panel. Q: If you reposition the main window does this effect the right click position? A: No change in behaviour. I already considered the right-aligned taskbar as the reason for the perhaps different coordinates for the context menu or whatever, but it makes no difference. Here's a short demonstration: Right-Click_Layers_Panel.mp4 Cheers and have a great Sunday MrDoodlezz
-
AFPUB 1.7.3, OS X 10.13.6. This is more of a visual nuisance than anything else, except when you need to be accurate when you "point and click". I've noted that there are a number of situations where the cursor should change based on its position, but it does not. Not clicking, just moving. For example, you might be using the Frame Text Tool so your cursor is a cross-hair with a "T" and if you move the cursor over to the "Tools" menu (left side, usually) the cursor might not change to a pointer. This seems to be fairly rare and random. Usually, if you click somewhere, the cursor will change to an appropriate type depending on where you click. But the simple movement of the cursor over the entire window can cause the wrong cursor to be displayed in certain places. I have seen just now the special cursor that displays when you hover over an edge of a window - usually to move that window's edge left-right or up-down. It "jammed" with that cursor while I was hovering over the swatches to add one to the global. The cursor isn't included in a screen shot (full screen) so not sure it can be captured. However, I did take a photo of the cursor hovering on the Pages panel while showing that special "move the window edge" cursor instead of a pointer. I had to attempt to get that cursor about eight times before the system obliged. I guess it's just the timing, maybe how fast the cursor is moving or some other positioning algorithm that's misbehaving.
-
Dear all, since the update to version 1.7 the panels don´t remain the way I arranged them. Each time you start Affinity Photo or switch between the personas the position and size of the panels changed, though they were docked to each other. My system: Windows, Office 10 Pro (64 bit), two monitors (I apologize for my english - no native speaker)
-
Hi, AD 1.7, I think it's a new bug for me as I don't recall seeing this before. Couple of layers [also have 4 artboards]. The layer being dragged is set to erase. Dragging the layer on the canvas with the move tool makes the layer jump up in the layers palette. Have attached a movie that illustrates this. Watch the layer in the layers palette jump position. Bert AD_1.7_layer_drag.mp4
-
 The Color Chooser dialog does not remember its position between closing and re-opening it. It always appears in the dead center of the screen. Considering how helpful position-memory is, and how the Layer Effects dialog *does* remember its position, I think it's reasonable to request that the Color Chooser do so as well. I'm trying out Designer with the hope that it can replace Illustrator. The software has been wonderful so far, but it's incredibly annoying that the Color Chooser plasters itself over the middle of my work every time I open it.
 -
 Affinity Designer question pertinent to scaled technical drawings (and other purposes): I'm trying to do a mock-up of a garden fence extension I'm building. I've drawn fence posts to scale. I have the pen tool selected and I'm trying to initiate (via initial mouse click) a perpendicular pen line a specific distance from the top of the fence post (which I've depicted with a simple rectangle). A green vertical highlight line shows up over the rectangle's left side when I hover over the left side of the rectangle, and a green dot appears on that line that follows the cursor as I move it up and down vertically on that line. But I don't see a way to determine the relative coordinates of that sliding dot to the upper corner of that object (or preferably any vertex or corner), which makes life harder. Is there some way to easily see (in realtime), the numeric coordinates relative to an object vertex, as the cursor moves along some highlighted vector of an object? Otherwise, I have to try to figure out how to create and calibrate rulers and guides aligned some point of reference germane to any object I want to measure. And even with that, it seems like I have to do math to determine the intra-object coordinates. The app is internally keeping track of positions and calculating coordinates for numerous reasons so seems like it would be fairly trivial to add an a coordinate display to menu bar or an info pane showing precise realtime coordinates of the the aforementioned relative positions. I believe it would be of enormous benefit to alll who do technical drawings with Designer. If there isn't already a feature like this, one way I can envision to do it, that would quick, intuitive and convenient for end-users, from UI perspective: If the horizontal and vertical rulers could be 'scrolled' (like pulling out a builder's measuring tape, sort of) to move each respective ruler's zero-point (as opposed to how it is now, where the rulers' (0, 0) is permanently affixed to the left corner of the canvas). Then, as the cursor moved, the virtual crosshair makers that track the cursor along the rulers could be quickly pre-calibrated to determine cursor's relative position to any object-in-focus (e.g. where ruler center's were aligned), without the user having doing math to figure out object-relative positions. A numeric coordinate display would show the precise values in the selected unit-of-measure. While calibrating the ruler's 0-point, the app would highlight object sides, distances, relative positions, as it does already when moving the cursor around the page. This would make it easy to calibrate the ruler center positions to any object(s) on the page, and be a very flexible way to let users measure anything on the canvas, any way they want to.. There may be other ways to accomplish that already with the product (but not sure how easily). I'm pretty new to using Designer, and isn't obvious to me how to do what I want, even through searching through menus and tabbed panels.
 -
When i want to swap object position, i need to open notepad, copy the x y coordinate, twice. It would be elpful if i can just select 2 object, RMB, and there is a button that let me swap them easily.
-
 Thanks to the Affinity team for having very clean and configurable SVG export! One thing I noticed when not flattening transforms is that some very near zero values are exported inside affine transformation matrices which are no doubt just rounding errors in computations of positions. I've attached an SVG file that shows these, an example of which is: <g transform="matrix(1,-1.22465e-16,-1.22465e-16,-1,288,228)"> I was wondering if an option could be added to clamp these values to zero? Any value below the clamp value forces the value to zero, for example a clamp value of 2e-16 on the above would produce this output: <g transform="matrix(1,0,0,-1,288,228)"> If the rounding error is not from computing the SVG export then another option that could work would be to add a cleanup option that would clamp values in the internal representation Affinity is using. scream-schematic.svg
 -
 Can anyone help me how to randomize a bunch of object's position and scale for instance i wanna do a starred background with various position rotation and scale. In AI there is transform each command and you can randomize transform applied on objects. Thank you.
 -
I have a group of masked adjustment layers. When I try to move the hole group to position it, the borders of the group don't represent the borders of the sum of the masks inside the group. In fact the handles are far outside the image and the group "area" is very small. (see attached sample)group borders.afphoto
-
This would be awfully useful for anyone that uses AD for design work. Especially web and UI designers that work together with developers and need to give them the full detail of the design.
-
 Hi al, it just happened that I had to changed my document size by adding pixels to the LEFT side of the canvas. What I realized later, was that all slices went to the "wrong position" caused by the canvas modification. At least a warning / hint / dialog would have been nice at the point of altering the document size. A file dialog that in case of having slices (which are constrained to canvas size) that offers to: 1) just ignore slice positions and 2) calculate the new positions + alter them automatically would be very nice here ;) Thanks for thinking about it, Stefan.
 -
 When using AD in Separated Mode, I can't get a previously saved document's window--that I've sized and positioned on the screen in the exact position I want it located relative to the Studio panels--to reopen in either the same position relative to the panels it was previously or at the same size that it was. Only the panels reappear in their former position (as I'm guessing their location information is attached to the application rather than a particular document). The first image below is what I want the screen setup to look like; the second shows what happens after quitting and reopening the document: How can I maintain the document window's identical position and size in the Separated view each time I reopen it?
-
 Hi! Sorry if this has been requested before. I did a search, but couldn't find anything. The Open File Dialog (and Save As... Dialog) should remember it's size and position. The Save As... Dialog in Separated Mode works as it should (at least in Full Screen). Best Wishes Kristian Bredin