Search the Community
Showing results for tags 'png'.
-
 Hi, why when exporting as .png does it export at such a poor quality?
 -
I used to be able to delete (erase) a background on any image and save it to my photo album with a transparent background. I can no longer do this with any of my photo editing / illustrating software - on any of my devices... Regardless, I am asking for help with how to do this on my iPad Pro 12.9 using Affinity Photo - I have tried, and it continuously saves with a white background no matter what settings I adjust/change etc. (So frustrated.) Your help with this will be greatly appreciated. Thank you!
-
Hello, I am facing a problem with exporting a project to transparent PNG. I noticed the problem is only with my smaller dimensions such as 851px x 315 px when i tried to export a bigger dimensions it worked fine. Yet i need the smaller dimension, whats the solution, as my client is waiting for the design.
-
 Hi, I created a new document and set the size to 1100 x 1100 pixels (~3.5" x 3.5") and resolution to 300 DPI. I created a few layers and printed the image and it looks great, the size is correct. When I export the *.afdesign file as a PNG and go to print the image it is much larger than 3.5" x 3.5". How do I maintain the same image size and resolution when I export the afdesign to a PNG? Please advise. Thank you, lai1
 -
I downloaded and installed the latest beta. I opened a png file (that had previously been saved from a Sony awr raw file). The image name at the top left identified it as a raw file (awr). I exported the image as a png file and repeated the process, and it is still labelled as a awr file. On each occasion, it opened in the Photo persona. John
-
 Greetings! Im a new bird to the whole picture editing black magic, so don't destroy me if something is too obvious. I'm a part of a small rugby team here in germany and because I'm curently unactive because of my injury i decided to help my team out by doing some PR and Comercial stuff. Now i got a task of converting an PNG and PDF image in to a vector based data so we can make our youngsters some new jerseys ,and i got stuck. Who would have thought the images are not of great quality. I already tryed it by marking the letters and, not with very much sucsess, croping them out but i always seem to get lost in the comands. Me and my team would be very gratefull if some of You could help us climb this stormy mountain.
 -
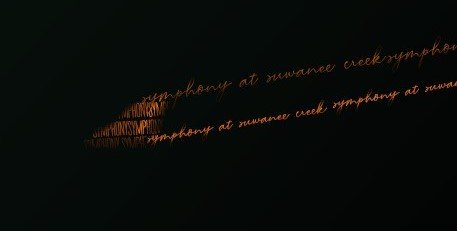
 Hello, can someone take a look at these files and let me know what would be the best way to export the file. The exported image detail is not as crisp when exporting and I'm not sure if there are any other settings that I can use to export. When viewing through Affinity Designer, it is showing the detail without any issues (see the bow in the .jpg file and compare to the screenshot directly from my screen). The curves are not showing crisp lines and blow out when exporting. Any ideas? Symphony_Campaign4b.afdesign
-
I am unable to find an option for exporting transparent PNGs Custom option does not give me an option to specify anything
-
 I've been trying to use transparent PNGs to add lightweight texture to my artwork. I've tried several different tutorials, and multiple different PNGs. When I overlay them on to my artwork and change the transparency to 'erase' it just turns the PNG texture white. I've tried using the color swatches and pickers to change the color to match the back ground paper, etc. and am still not able to get the desired affect. This is one of the tutorials I tried and best represents what I want to achieve. https://www.youtube.com/watch?v=CUi9KytBRLs I got the PNG files from Retro Supply Co, I've emailed them to see if I missed some portion of the instruction on how to use the textures. I haven't received a response.
 -
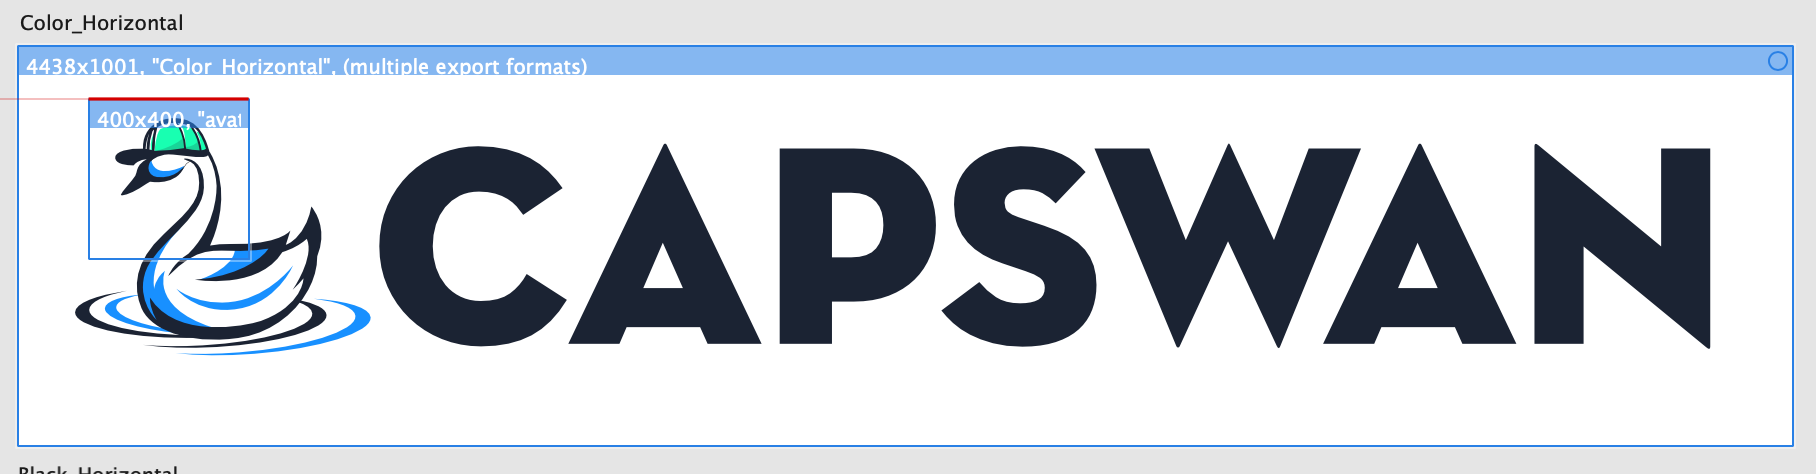
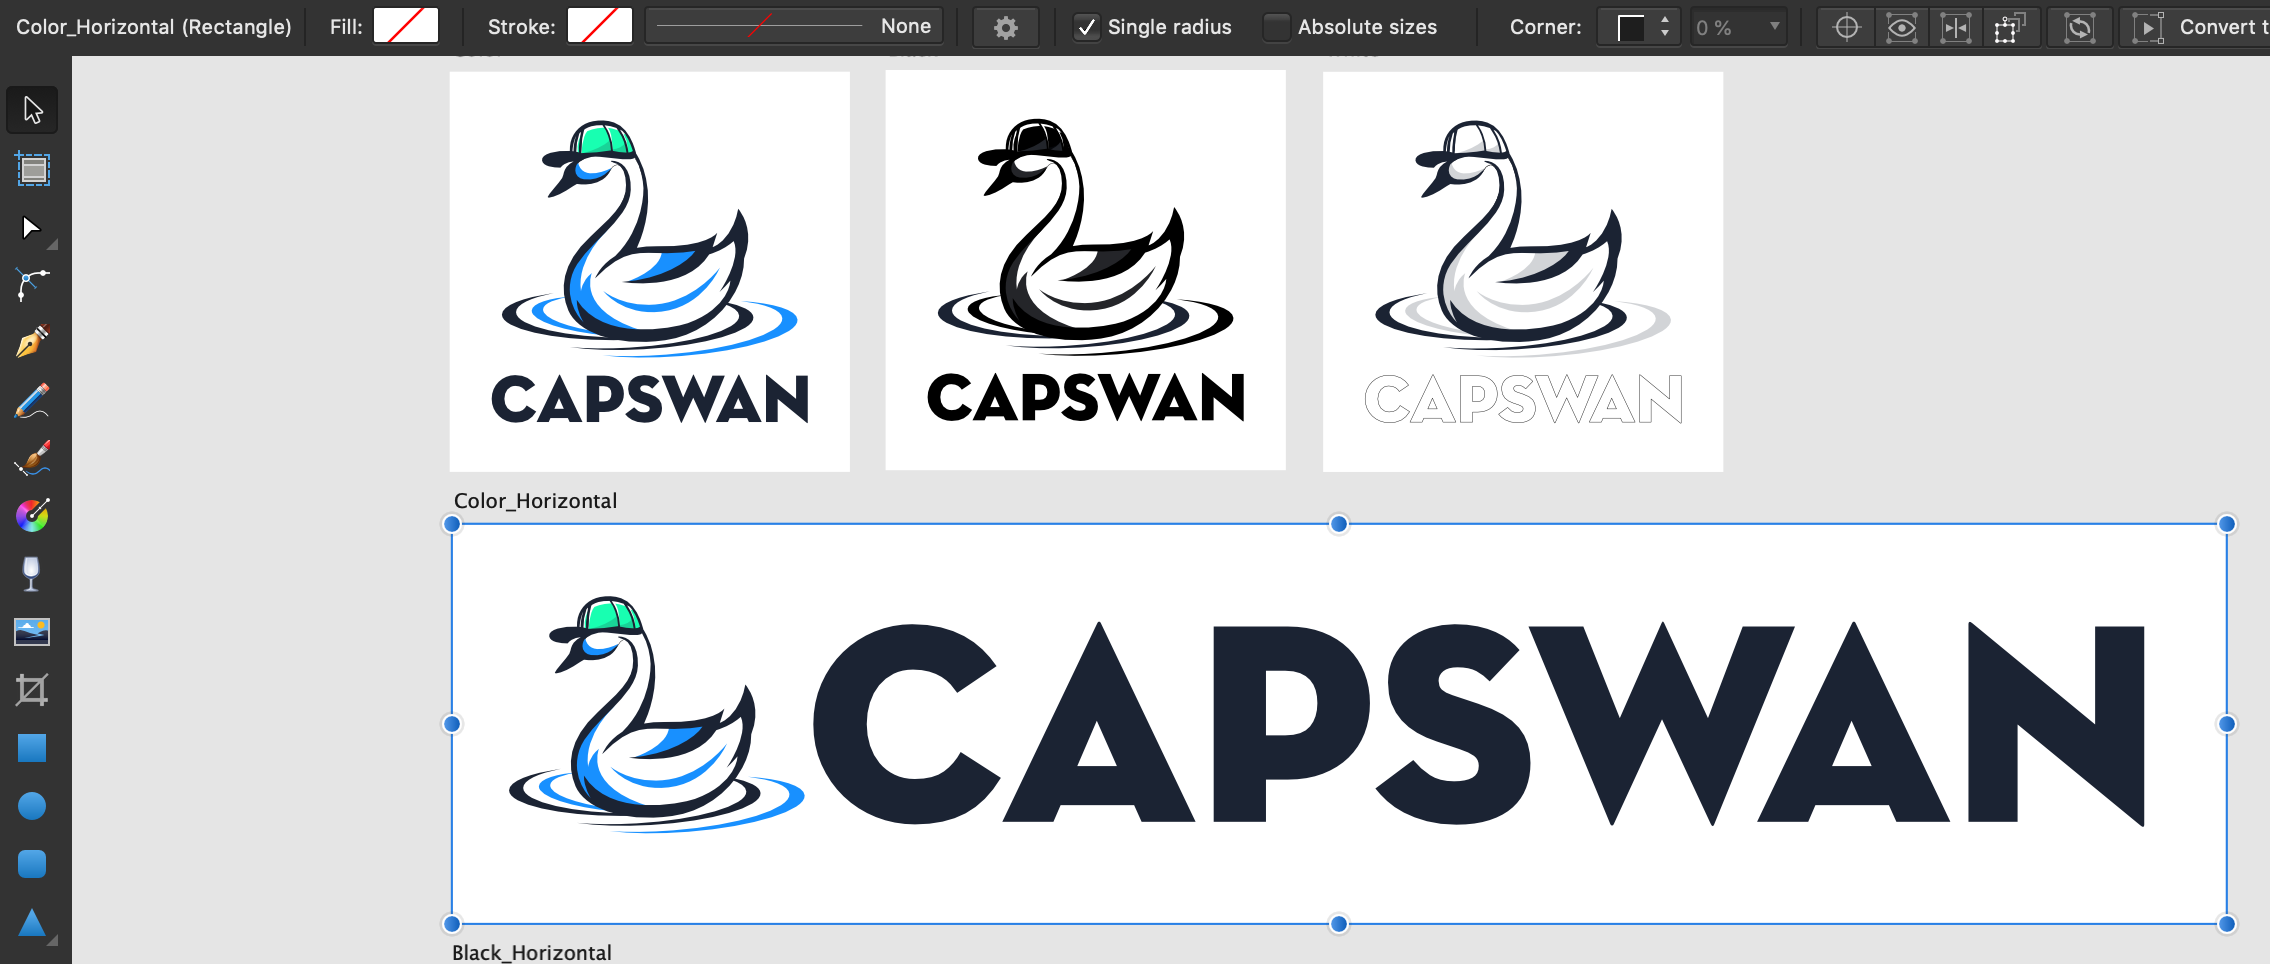
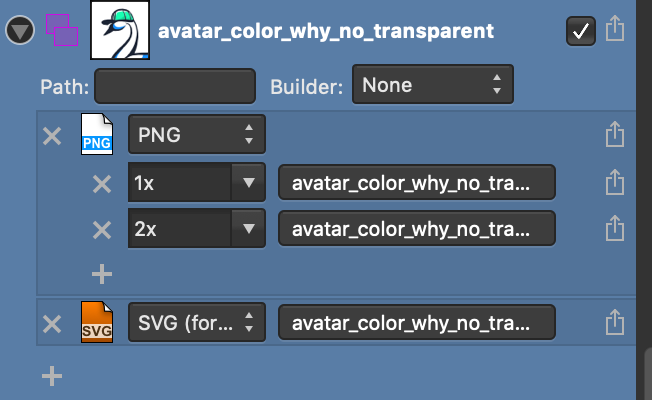
 macOS Mojave 10.14.6 Affinity Designer 1.7.3 --- First, here's how these exported PNGs render in the wild: These photos are exported from the *same* artboard: In case the screenshot of the first export doesn't have you convinced, here's the artboard fill & stroke: (note the fill & stroke, top left) Yes, the slice export options are the exact same: (also notice how you can see in the slice preview that Color Horizontal is transparent but the avatar_color_why_no_transparent clearly has a white background) I feel like this should be stupid-simple. What am I missing? Also here's an example of these files out of preview/affinity designer so it's evident that one's transparent and one has a white background:
-
I can not export an image with a transparant background to png. The background in the png is not transparant, but white. It occurs on the newest version of Photo and Designer on the iPad (both version 1.7.3 on iOs13). In previous versions of both the apps this was never an issue.
-
 Using the option "Brush Panel >> Menu >> New Intensity Brush" and selecting multiple PNGs will result in a single brush containing the selected png images as nozzels. If I want to import several PNG files as distinct brushes, the only way is to select each and every single PNG file and create a brush out of it. I would like to suggest the following: Change the option "New Intensity Brush" to "New Multi Nozzel Brush". Create a new option called "Create Intensity Brushes" and allow multiple pngs be imported as distinct brushes.
 -
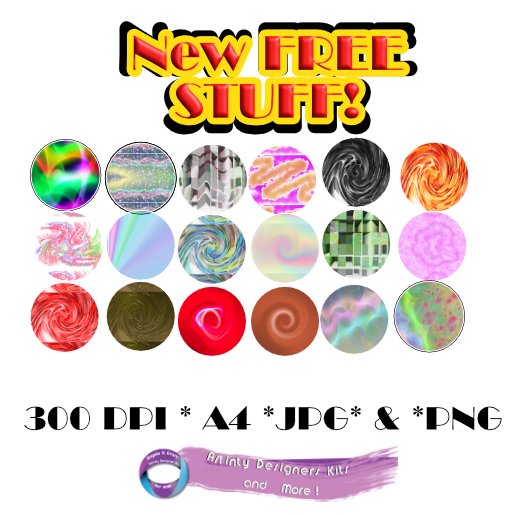
My latest set of FREEBIES! 300 DPI A4 sized PNG with Transparency JPG Commercial Use POD included All create in Photo only Enjoy! https://affinity.graphics/resources/65
-
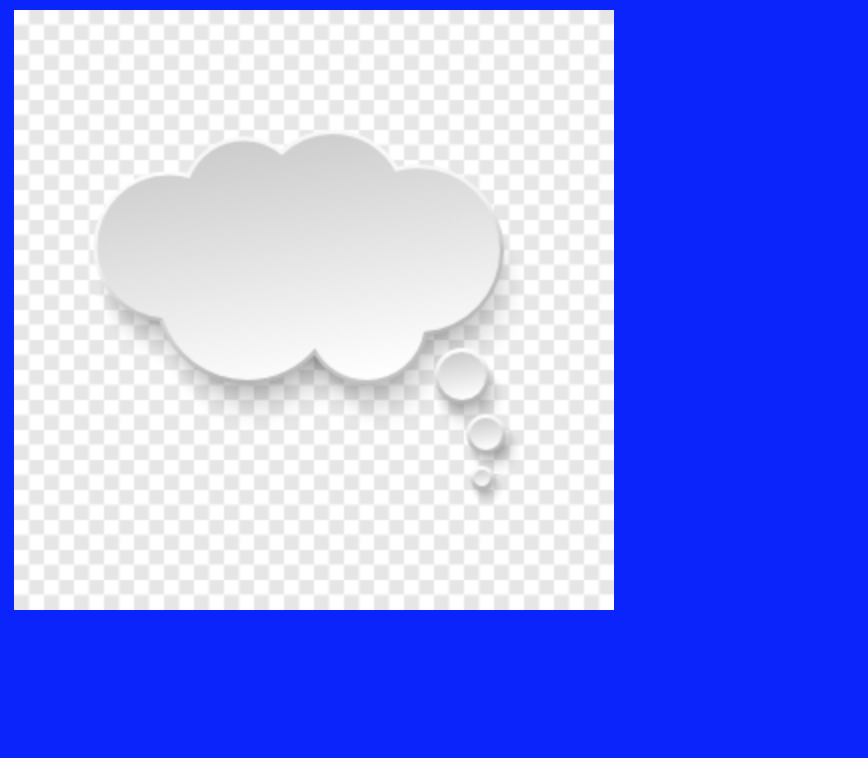
 Hi all. I'm having trouble getting a transparent background on an exported PNG. I'm using AD on ipad. Here's the scenario: I've imported a .ai file of a speech bubble and want to export 'as-is' as a transparent PNG. When I export the file, I'm seeing the bubble as a square image with a grid in in the background (see screenshot - blue background) Here's what I've tried. Each time, I get this grid in the background: 1. Gone to file -> Canvas -> set 'Transparent Canvas' 2. Deselected all. Export persona -> selected top level slice (whole page) -> selected PNG -> exported 3. Pixel persona -> Selected all -> Export -> select PNG -> Area: 'Whole Document" 4. Pixel persona -> Selected all -> Export -> select PNG -> Area: 'Selection without background" I'm really confused. I would have thought that the image has transparency by default. Why is AD adding this grid background (which in my limited, novice's understanding normally represents transparency)?? What am I doing wrong? Thanks in advance!
-
Here is cloudy sky background in A3 portrait format I created in Affinity Photo and PhotoZoom Pro 7. Useful as a textured background in Publisher, and I'm guessing Affinity Designer. It is at 300dpi and in PNG format stored in a 7z archive. I hope you find it useful. Cloudy Sky (resized).7z Smaller sample also included.
-
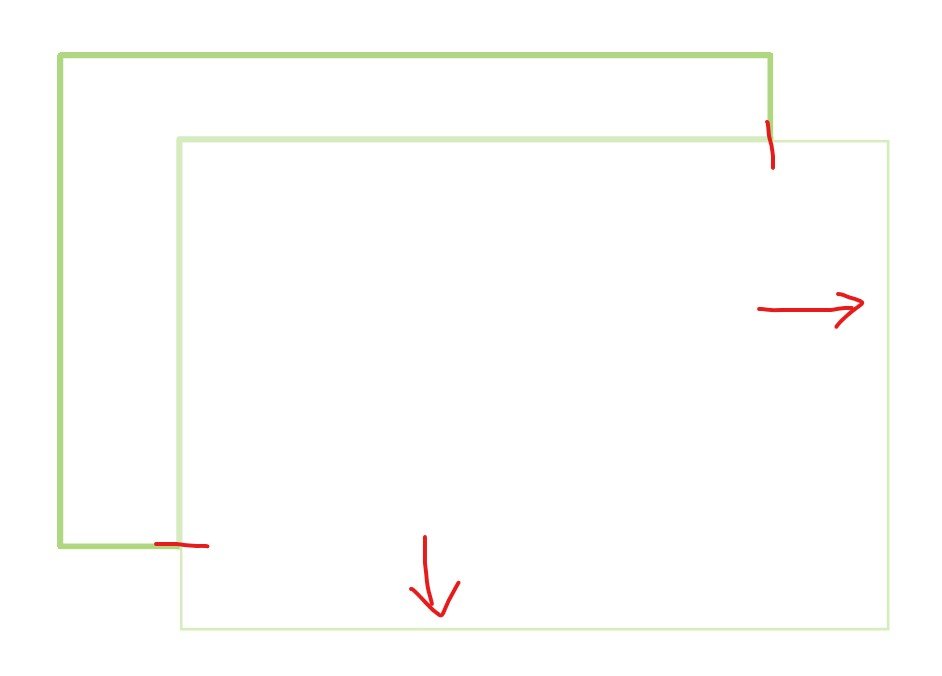
Hello, I found an issue when exporting a PNG file. If you set transparency to a stroke, that specific stroke will be thinner when exported to PNG. To reproduce this, try the following: - create two rectangles with "rectangle" tool - set the interior of the rectangles to white - set the stroke of the rectangles to green for example - put the rectangles one above the other as in attached image (one of them will serve as a "control" rectangle) - for the top rectangle set the stroke opacity to 50% (only for the stroke) - select both rectangles, go to - File - Export - PNG - Selection without background - the result should be as in the attached image From what I experienced, this issue appear only if you export "Selection without background" and only if that specific stroke is on the exterior of the artwork. I use Affinity Designer 1.7.1.404 on Windows 10.
-
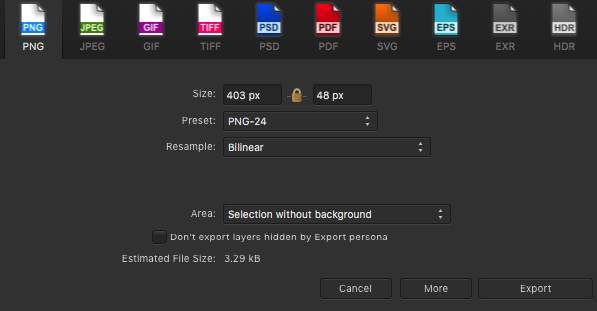
Hi, I'm having a problem similar to the one described in the thread here. I want to export my line art which is a vector (see screenshot ‘Before import’) from Affinity Designer to Affinity Photo in order to colour. I export in a PNG format, import into Affinity Photo, zoom in and that's when I notice the lines look really jagged (see screenshot ‘After export with colour’). I understand that the vector gets turned into pixels during export, but I want to make the lines look smoother. Before using Affinity Designer and Photo, I was working with Adobe Illustrator and Photoshop. My workflow back then was to export the vector from Illustrator as a PNG 'without background' to Photoshop. In Affinity Designer I have tried different PNG preset settings (see screenshot ‘Export settings’) including PNG-24 Bilinear, Bicubic, Lanczos 3 (separable), Lanczos 3 (non-separable) all ‘without background’ selected. But all resulted in the same jagged line. I tried the solutions mentioned in the thread above. However when I click ‘Force pixel alignment’ the quality in Affinity Photo doesn’t seem to change. Would someone on the support team know if I need to do something different in Affinity Designer so that when I import the vector in Affinity Photo there’s not a noticeable difference?
-
 Hi, i recently purchased Affinity Photo and i'm a user of Premiere Pro. I use a lot of text with transparent background and i´m having an issue when placing this file on Premiere. On the Corner Issue Example file attached is how it looks and i can't work with the file like that. I also tried with a Photoshop which i used before but not now and the result is as it should be, shown in second attach. So how can i manage this for Premiere to recognize the png file, what and where can i change this settings? I'm using latest version of Affinity Photo Thanks in advance Shivali And this are the png settings which i haven't changed from original
-
Hi Guys, I have been trying to export png's of icons for a website. These are pretty small but there's a lot of them as they are used in CSS sprites. Normally I would export these as a gif or png8, but your settings only allow export to be dithered and that gives me some real quality issues. I'd love it if we could have an option not to dither the png8 and gif exports. I've attached the following files so you can see the problem: - site-product-icons11-OLD - The original png8 file out of Photoshop, undithered - I have just added 1 icon to the bottom of this file site-product-icons11a128 - 128 export (dithered) out of Affinity Photo - you can see the problem in spots of colour on say the LR logo 900px down and the steel logo at 450px down site-product-icons11a256 - as above but more colours to see if that was the issue site-product-icons11 - png24 export not showing these issues (no surprise really), but is almost 3x the file size. Thanks
-
 When copying in png images the image is appearing with a black background. To resolve this I have to save the image and then import it as an image. It would be great if you could just copy in a PNG from the web or another source. Thanks Clyall90
-
 Is there a way to remove white background like in Photoshop to make an image with transparency and then save it as PNG?
 -
 Whenever I import a PNG file, colors are all off... at first I thought it had something to do with my color settings, but then I realized that if I imported the same image on JPG the colors were right.
-
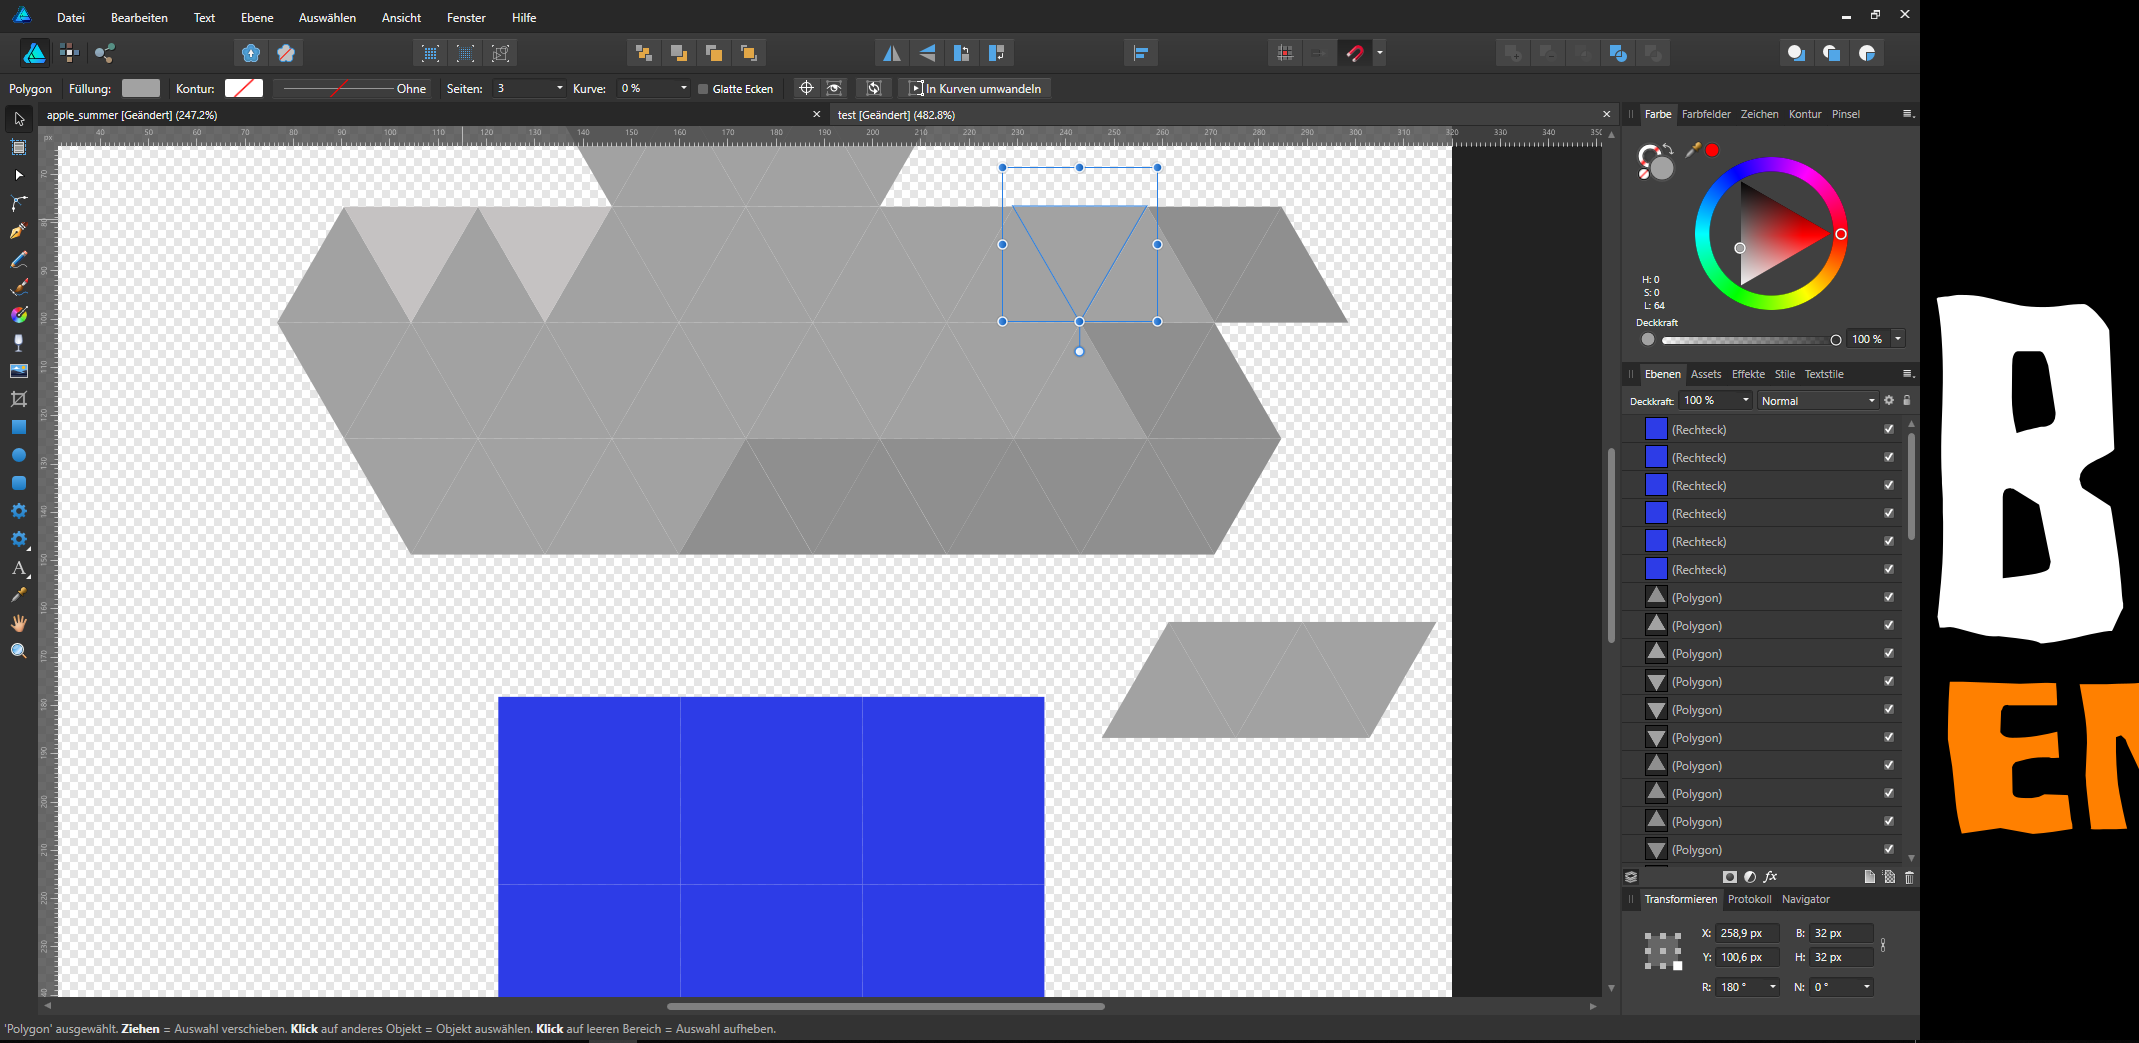
 Hey there. I am new to the designer. I have "Lines" between (snapped or not snapped) objects. I've drawn some triangles and snapped them together. In the edtior there are lines between them - like an outline. But there is no outline. If I Export it to PNG all the lines are already there. I've made a screenshot. Maybe someone can give a hint. Already tried to Position them by Hand etc. no Change checked in the color-box for outline etc. Nothing. Zoomed to max. objects fit.
-
 Hi guys, i have to report crashes not only in AP as i described in my other topic, but also in AD. When exporting to PNG and trying to save to Camera Roll the app crashes constantly. I have to report also a bug with “Import from Cloud”. When you navigate to a specific folder on the cloud service (webdav protocol) you cannot perform a Search because you won’t get any result or filtering in your list of files.
 -
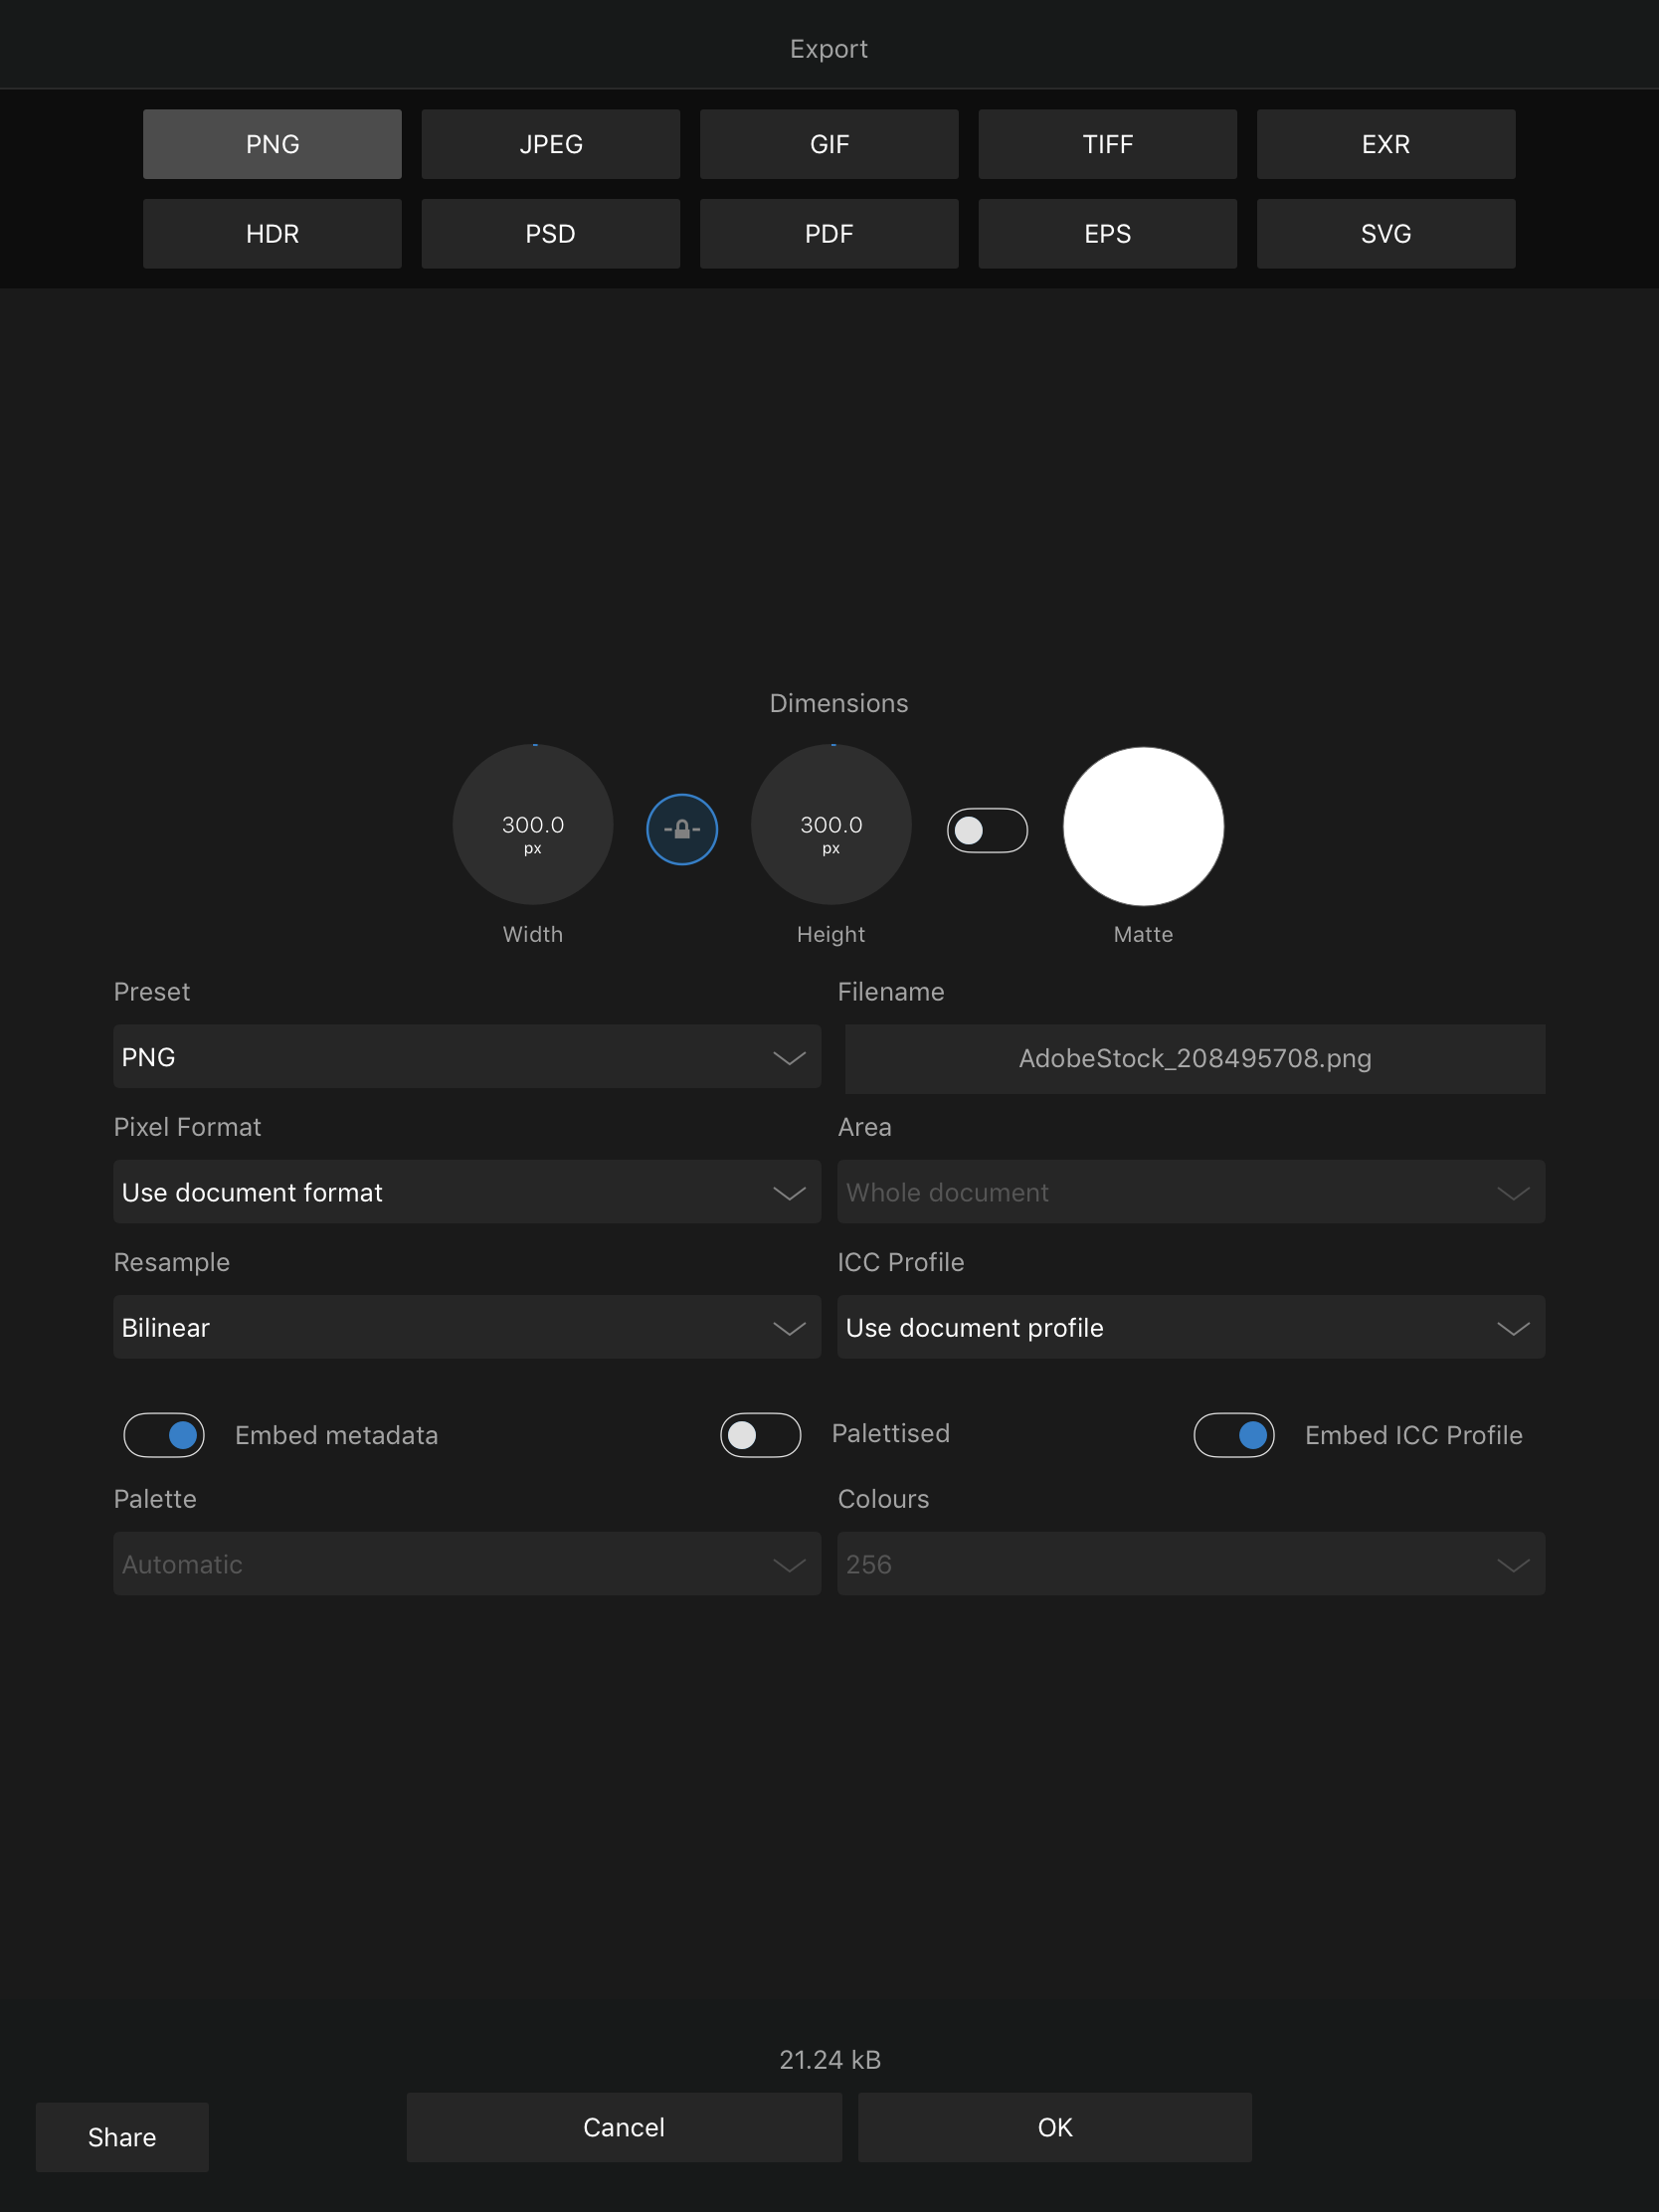
 I have a png with a transparent background that I’ve imported into Designer on my iPad Pro. Original dpi was 150. I need to upload it to an online vendor that only accepts 300 dpi files. (I know.) Changing the dpi in Designer only seems to work if I uncheck Embed Metadata in the Export screen — but when I do that and save as png, the resulting image has a white background. If I leave the setting checked, the background is transparent but the dpi remains listed as 150. Is it possible to change the dpi of the saved png to 300, but retain the transparency? edit: I’ve discovered that I can make this work if I first create a 300 dpi document and then use Place Image to add my image. I can then turn off embed metadata and retain transparency. Still not sure why I can’t start with an existing png, though.


(FILEminimizer).png.3766233e6c74225cf58c151610a5cd27.png)


-15_49_57.jpg.c9becd8b8c8287216183151c2986c7e6.jpg)
-15_50_00.jpg.ad49b8796936c6d7d517cd9d4bdfad80.jpg)