Search the Community
Showing results for tags 'photo'.
-
When I use the crop tool in photo 1.8.4, and only cropping one side, it adds the amount I am cropping to the opposite side. I have done this repeatedly on separate files. I have even rasterized and trimmed the photo and it still happens. I am on macOS Catalina 10.15.5.
-
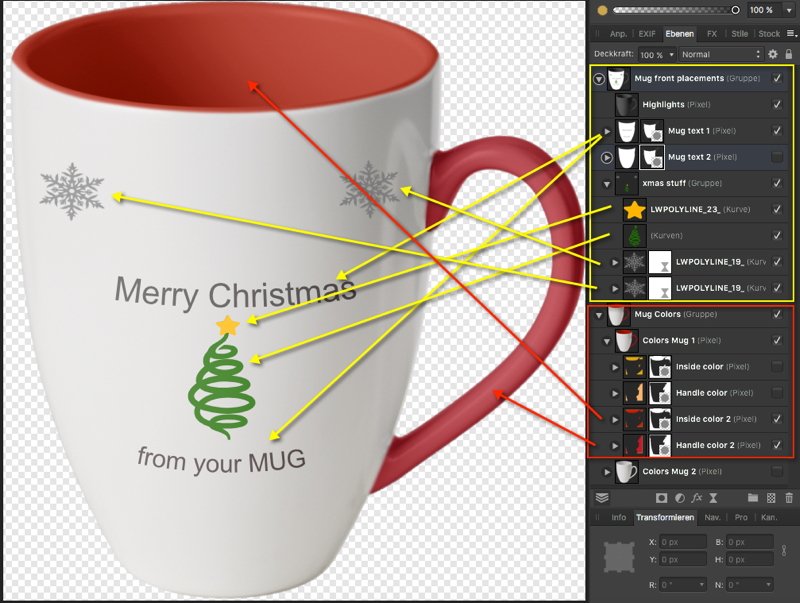
Here's an example mockup for playing around over Xmas, so to say your individual customizable xmas style coffee mug. This APhoto mockup example has been mainly done with bitmap layers and contains an embedded/places APhoto mug file on top of a common mug on wood bitmap. Where the embedded APhoto mug is the main customizable portion of this mockup and can be changed to individual needs in terms of coloring or the mug front text and object placements. The above image shows the selected embedded/placed in APhoto layer and how to open that in order to edit it. Once opened certain things can be changed/edited inside that embedded file ... ... some predefined placed items like example text and xmas silhouettes have been placed as vectors instead (for easier modification). Note however that the main mug shapes and masks are bitmaps though, so the mug colors have to be changed with bitmap/raster color tools. The corresponding sample mockup file: xmas_mug_mockup.afphoto Have a nice Xmas time!

-
I made these using black & white photos found on the internet as guides. Although I usually work in Photo, I did a lot of the vector work in Designer, as I find it easier to switch between the Pen and he Node tools; then again, some things are easier or only available in Photo.She wasn't just a comic dancer: she was a decorated war hero of the French resistance, and set up and funded a number of philanthropic projects, as well as championing civil rights back in the US.And she really did have a pet Leopard named Chiquita. This first one was made entirely from vectors with flat fills and no outline (apart from the text, of course). For this one, I got a little more ambitious. It's made with Vector shapes, gradients and brush shading. I had the style of Gaspar Camps in mind, but it's a lot simpler than his work. Still., I'm learning! More ambitious still! Made the same way as the previous pic, but with a lot more brush shading and gradients. Here I was thinking of Alphonse Mucha; see previous comment!I made two image brushes for the leopard's rosettes (spots to you and me). The 'leaves' are supposed to be feathers! I've tried out a couple of alternative colours with HSL adjustments, but I can't make up my mind which I like best..For the shadow, I created a new pixel layer in Photo with 'Merge visible', converted it to black (Levels), stretched it with the Move tool (and a little adjustment to the feet with the Mesh Warp tool). I then applied a gradient and a Box Blur live filter, also with a gradient to make it lighter and more blurred further up the image.
-
 Hi Tried installing 1.8 and got message Setup Failed. Tried both Photo & Publisher with same result. Tried switching to native Windows Administrator account, same issue. I've seen other threads and have attached 3xsetupui.log files and screen grabs after trying publisher install Any help appreciated. Process I followed Rebooted Created restore point Ram Photo install and received Setup Failed message. Product no longer active. Ran restore and all AOK on previous version again Rebooted and logged in to Windows Native Administrator account, did same as above and failed again. Ran restore and tried with Publisher, same result just tried on user account Didn't try with Designer as assumed it would be the same issue. SetupUI.log SetupUI.log SetupUI.log
-
 Let’s see if I can explain what I’m trying to do in Affinity Photo. I have some photos which I got using a scanner app on the iPhone. Some of them ended up distorted, becoming too narrow. What I want to do is to correct that manually, not by guessing what the correct width should be and inserting digits, but simply to be able to grab a handle/node and stretch the photo until it looks right. You can do that with shapes if you convert them to curves, at least in Designer, but so far I haven’t found how to do it in Photo, manually, by just stretching the photo until the width looks right. is there a way to do it?
 -
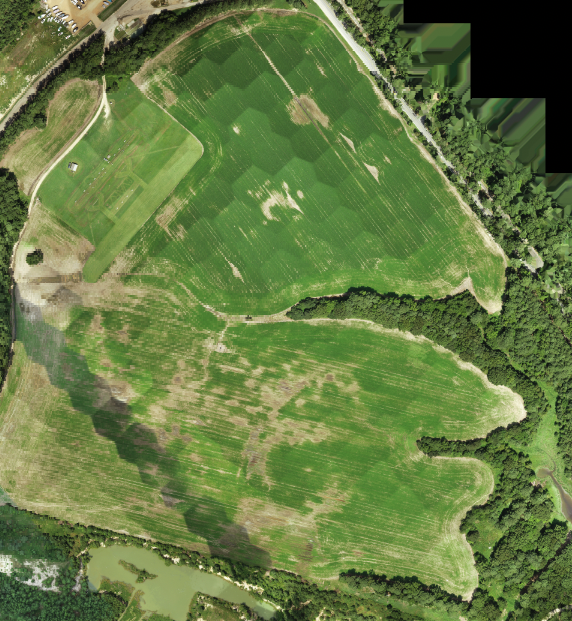
 I am trying to smooth out the honeycomb pattern from this aerial photo and am at a loss as to how to fix it. Is this even possible? I've tried Smudge Tool, Blur Tool, etc. Please let me know what you all think and what tools/processes would be best to use. Thanks!
-
When using Affinity Photo (or Designer) for illustration or digital painting, there are two features that I use super often - the brush moodier shortcut (ctrl+alt+drag left/right) and canvas rotation. The issue is that the direction of the shortcut changes to the rotation angle of the canvas, meaning I keep accidentally changing the hardness of the brush instead of thew size while working. It would be great to have this shortcut act independently and irrespective of the angle of the canvas, so that dragging left or right still affects the size of the brush, regardless of how much my canvas is rotated. As an example, if I've rotated my canvas by 90 degrees, dragging left/right changes the hardness instead of the size as it usually would when the canvas isn't rotated. When working fast, it's incredibly difficult to keep track of how much the canvas is rotated to be able to use the shortcut properly. *PS. A dedicated rotation tool for freely rotating the canvas would be an amazing addition to Affinity! 😉
-
 I could do this in Photoshop with the gradient tool, but I can't find a way to do it in AP. I want to have a photo in a full-page ad at the top of a page to gradually fade into the copy block below it. In Photoshop, I could apply a gradient affect that would melt into transparent space at its bottom edge (or any age, for that matter). It was great for doing collages. Anyone been able to do this in AP?
 -
I mainly like to work on a surface for photo editing thanks to the great screen, pen input and touchscreen. I think a lot of people also like surface as a photo editing machine. After seeing the Ipad version of Affinity photo it left me a bit wanting of the traditional desktop UI on devices like the surface however. It is a great UI experience when using the device in laptop/desktop mode, but when you want the paint with the pen for example, the experience turns bad quickly. I allready struggled with the fact that touch input is seen as the same as a mouse click instead of panning the canvas, so using the touchscreen as a main navigation tool is not that intuïtive, but after seeing the Ipad version, a lot more things pop out to me like "damn that's a good idea, I wish my surface could do that". I was wondering if Windows 10's tablet mode could be more integrated with the application, like switching to the Ipads UI when tablet mode is activated, so that editing on a device like the surface is a lot more comfortable. This would mean that someone could just flip the keyboard and work in the document with a UI tailored for tablets, and flip it back to tablet mode when wants a more desktop like experience. Are there plans to implement such features into the desktop app? Or is there a touch based UWP app in the works? I was really blown away in how good the Ipad UI actually is, and I really think a more integrated experience into Windows' built in tablet mode will help a lot of people in their workflow.
-
For several builds now clicking on the HSL layer adjustment has been causing Photo to crash
-
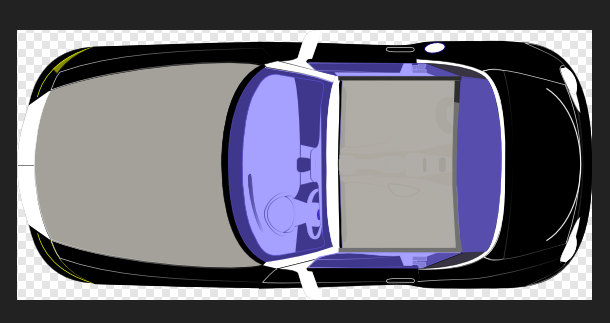
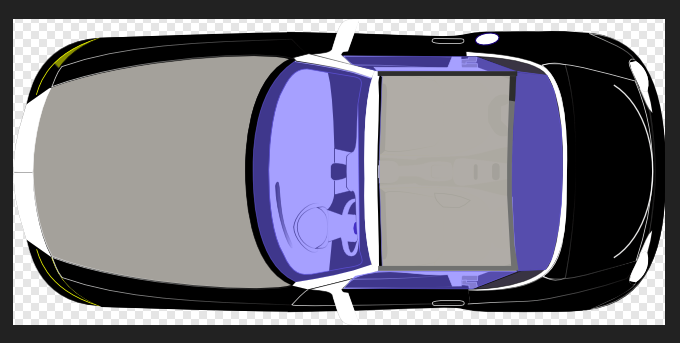
 Windows 10 Home 1903, Photo 1.7.1.404 and Designer 1.7.1.404. As part of an experiment I (fairly randomly) found an SVG https://pixabay.com/vectors/car-black-vehicle-transport-travel-311713/ that I wanted to use but upon opening it in Photo and Designer (haven’t bothered trying Publisher) I see that it hasn’t been imported correctly. A lot of the detail is missing and there are bigger issues – see attached snapshots from Designer and Photo. It’s not a big problem for me as I can use the raster version instead but I thought I’d mention it so someone can look into it (there’s a chance that the original SVG is to blame so it might not be an Affinity problem).
-
 I have not used my laptop for some time, so I allowed it to update my Windows 10 system to ver 10240. I then downloaded the latest versions of Affinity Photo and Designer. In each of these I got the message "Supported Windows Version not found. Checking with the system dialogue, It tells me I have a 64-bit operating system on a 64-bit processor. Both the old versions of Photo and Designer still work OK, but invite me to update, which I did. John
 -
Some time ago I created a set of macros to resize an image to a fixed maximum size, as described here. Recently @DanThePhotoMan asked about resizing to a fixed minumum size here. I have revisited these macros and created two sets, one resizing to fixed maximum size and the others to a fixed minimum size. They are all based on the following sequence for the maximum set: Layer > Unlock Layer > Rasterize and TrimFilter > Distort > Equations Enter the following in the x and y fields, substituting your own maximum size, then Apply (x/MAXSIZE)*max(h,w) (y/MAXSIZE)*max(h,w)Document > Clip Canvas Layer > RasterizeSelect > Alpha Range > Select Partially Transparent Edit > Fill> Inpainting Select > Deselect Where MAXSIZE is from the following pixel sizes: 640, 800, 1000, 1280, 1600, 2000. The set to resize to minimum is similar except that it uses min(w,h) instead of max(w,h) in step 3 (Equations). There is also a pair of macros to resize to an arbitrary size (up to 4000px). This macro pauses to allow you to enter a parameter a. It is convenient to enter this parameter in the form of MAXSIZE/4000, where MAXSIZE is the maximum (or minimum) required size. For example, if you wanted to resize to 3000px, you would enter 3000/4000, which evaluates to 0.75. (You could enter 0.75 if you wanted.) Note that the resizing algorithm in the Equations process is not defined. Here are the macros as a library (.afmacros) file. Resize.afmacros John @Traveler @Gnobelix @affwin @firstdefence
-
 I am having the same issue some photos are fine others gets too much contrast when I open them into Develop persona
 -
 When working with photos/images in Affinity Designer, (with Affinity Photo installed), there should be an easy way to launch Affinity Photo (or another chosen bitmap editor) from within Affinity Designer to edit bitmap images (beyond the photo editing capability integrated into Affinity Designer). This should be available both from the right mouse context menu and the context aware bar across the top when a bitmap image is selected. With such excellent Affinity application interoperability I am surprised this has not yet been implemented. This type of integration should also be incorporated into Affinity Publisher. Another possible interface enhancement, could be to (optionally - in preferences?) replace the Affinity Designer Pixel Persona with the Affinity Photo 'Photo Persona'. If this capability were implemented, it would still be useful to include the ability to launch Affinity Photo as a bitmap editor from within Affinity Designer, as Affinity Photo provides further capability (i.e. Liquify Persona and Tone Mapping Persona). I would love the integration of the Affinity Photo 'Photo Persona' with Affinity Designer when editing bitmap images within Affinity Designer. (Considering how these applications are designed I wouldn't be shocked if such integration were technically feasible.)
 -
 For example, View-> Roted Left is repeated 6 times and the canvas is rotated 90 degrees to the left. When you drag the canvas up with the View Tool, the vertical scroll bar moves down. This is no problem. However, if you move the vertical scroll bar down, the canvas moves to the left. The same applies to Photo and Publisher.
 -
 I would like to : • draw an ellipse outline over a photo (no fill in the ellipse) • select the pixels under (within) the ellipse • invert the selected pixels • darken the inverted pixels • Or, copy the pixels under the ellipse (or any other selection) and paste them on a new layer. I've been doing this for 30 years in Photoshop and GIMP but cannot do it in AFF Photo. The photograph is a pixel layer. In fact, I cannot even copy what's under the ellipse and paste in on a new layer. What's the secret?
 -
 Hi there, Newbie here. I'm curious as to why my Mac is giving me the error beep whenever I try to load or infer a LUT on my photo. The layer will get created but it will not allow me to actually load or infer a LUT from existing photos. Any help or explanation would be appreciated!
 -
 i've tried to install the Seamless Textures Plugin for PS CS6 in Affinity Photo. But it won't work. I've downloaded a .zxp file. is there any posibillity to install this kind of plugin file in affinity photo ? Thanks for your Help !!!
 -
 Just want to add myself to the list of recent crashes. Using Affinity Photo 1.8.3.641, and reloading an image to continue working, as I go back through the history slider, the whole app crashes, no matter how many times I reload that same file I get the same problem. If I start from scratch and repeat the same actions I don't have a problem. Somewhere along the work process of the problem file I seem to have introduced a bug? I don't know not the expert here. I have the same issue when I start to load a new file, a few times the app will totally crash, no warning so no crash report. I'm not saying that this a problem with affinity's software, but it only seems to occur with this app. Personally I think it could just be a microsoft glitch which shuts but as I said I'm no expert. As there are so many user of Microsoft it could be a common denominator...all guesswork. So hoping you can help please? Thanks
 -
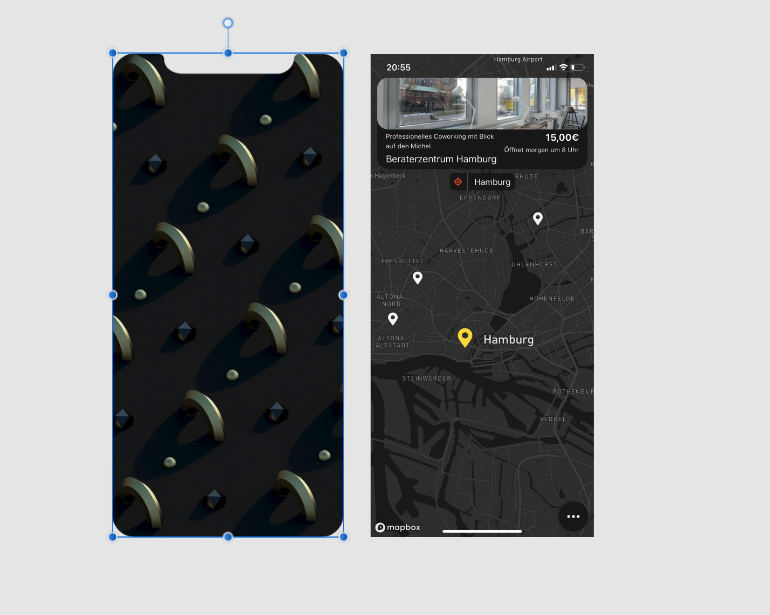
 Hi everyone, I'm new to affinity designer and have a question, that may have been answered before, but bec. I don't know the right terminology couldn't find. What is the most effective and easy way to shape the right picture like the left one? Thank you so much for your help! - Julius
-
 howdy :) is this a 'feature' or a #bug? with more than one photograph open, & i select & try to edit the selected image with let's say text, the edit does not occur on the selected document instead a non-selected document becomes selected & the one which is suppose to take the edit deselects. this behaviour forces affinity to not be able to work with multiple images opened at one time. is this a feature or a bug? to reiterate, with multiple photographs open, a selected photograph never takes an adjustment, instead an unselected photo (document window under selection) becomes selected to take the edit. (an unselected photograph — not the intended one — becomes selected.) any ideas? thank you in advance macos 10.13.x affinity photo 1.8.3
 -
 Hi, what I want to achieve is to remove all three palettes ("colors", "grays" and "gradients") from all three apps and create a new one which will contain only global colors. I could remove all of them only in Designer. In Photo and Publisher I was able to remove only "gradients" palette. Why? Now, back to Designer. I created a new application palette and renamed it to "global colors". I chose "add global color" from burger menu, created the color, clicked on "add" and Designer created a new palette named "document" and put the global color there, instead in mine "global colors". Why? Also, the button "add the current color to palette as a global color" is active only with "document" palette, not with mine "global colors". Why? Please, name the colors with their color values "C5 M5 Y0, K0), not with "Global color 1" or such.
 -
Hi, I was pleasantly surprised when I noticed that text styles are added into "paragraph" and "character" palettes. Maybe they were there from the beggining, but I noticed them recently. So, it would be very kind of you if you add a way to manage them within these palettes it would be one palette (text styles) less to occupy our precious working space. You can join "color" and "swatches" palettes, too.
-
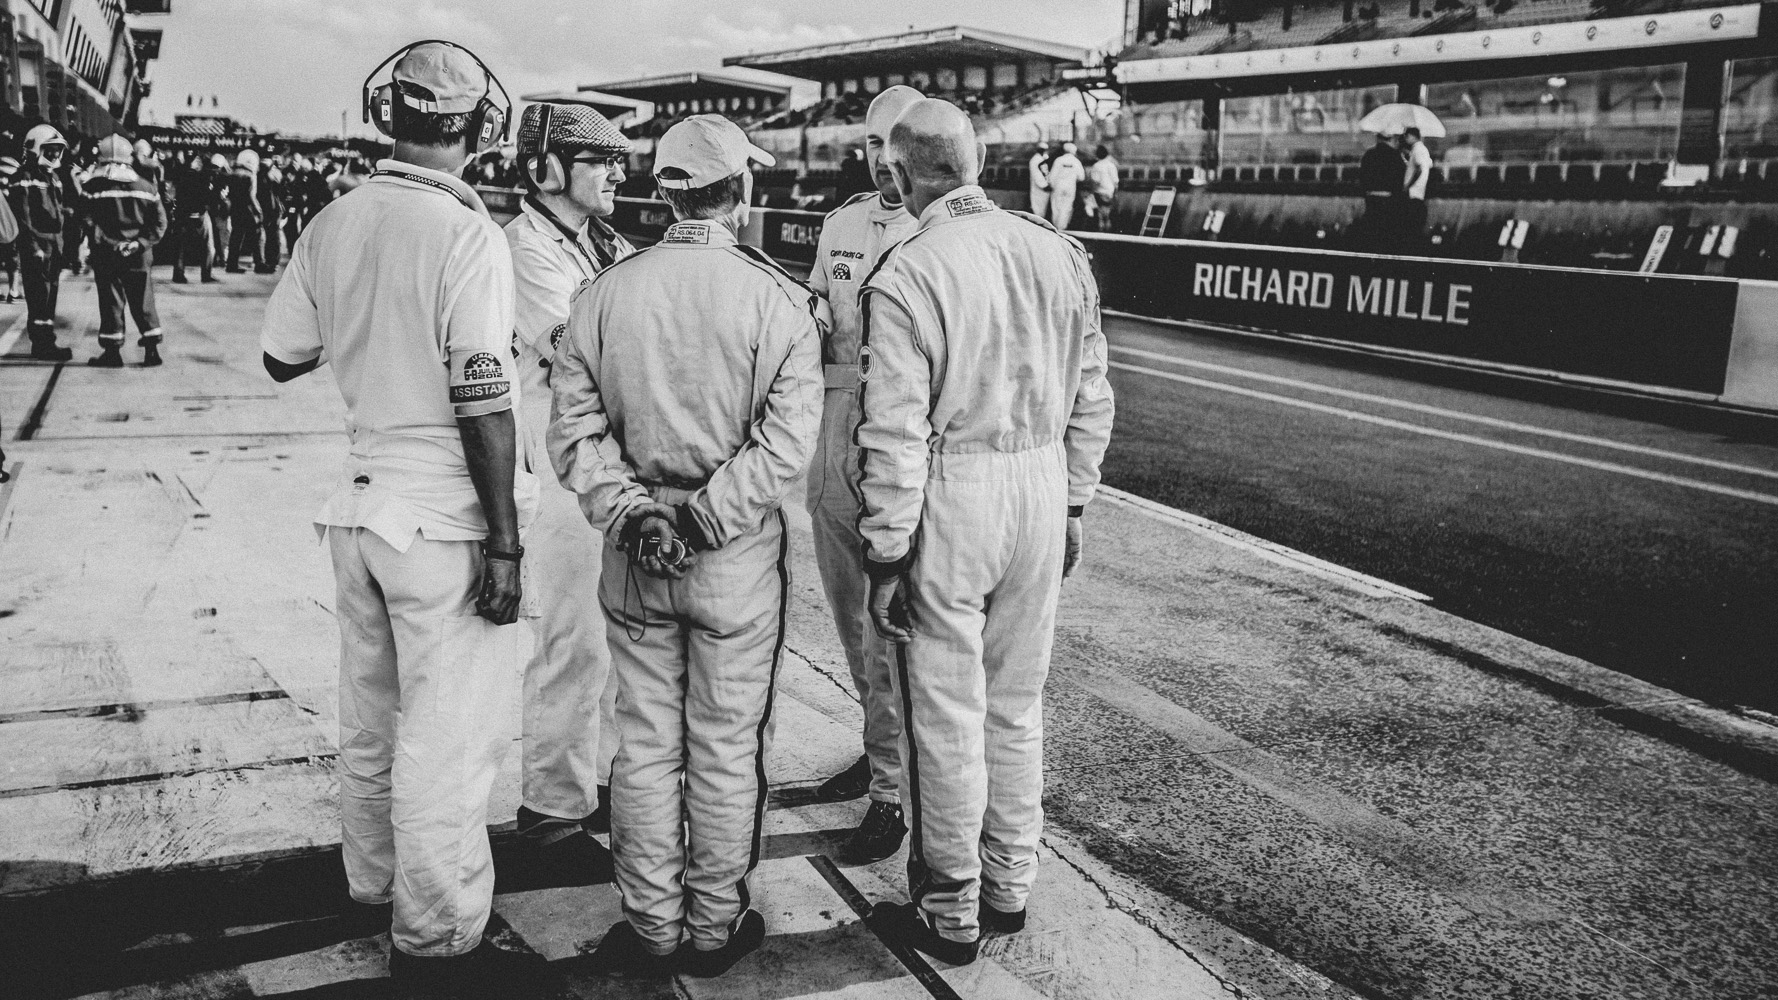
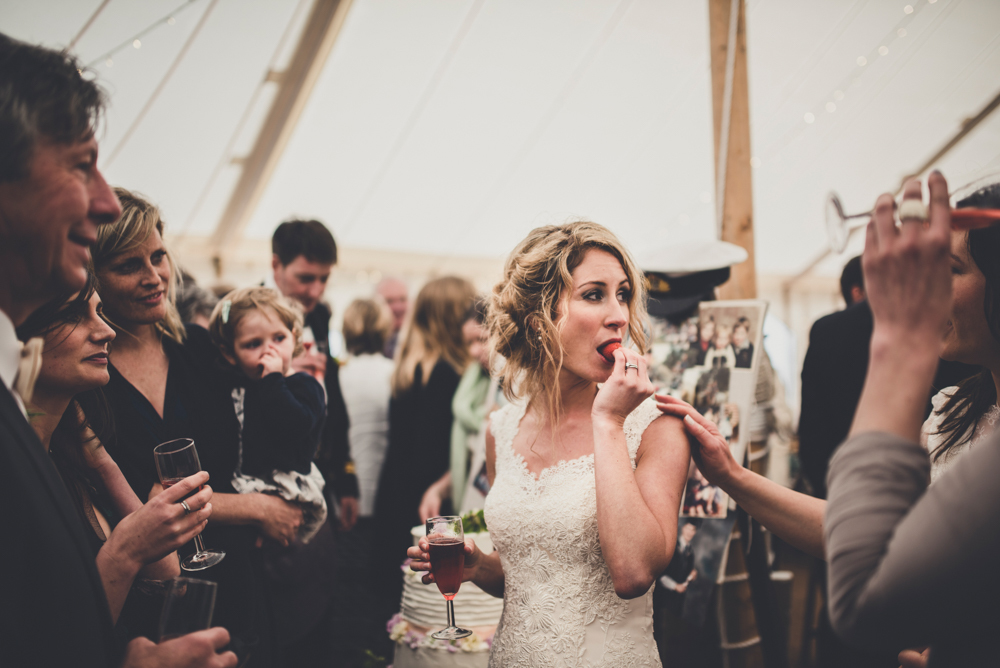
 Hi Folks, I'm after some help again.... So I really admire two very very good automotive photographers... Amy Shore and Laurent Nivalle. Both have a similar(ish) style and this extends to their editing process. I have read numerous interviews with both of them and they both mainly use Photoshop (Sorry to swear!) rather than lightroom and I am very keen to try and re-caprture their respective styles but by using Affinity Photo. I have attached two files which are photos from both Laurent and Amy respectively. Can anyone out there point me in the right direction to try and obtain the same style? Obviously I don't want to be copying their styles out right as that is not what photography is all about but I am very curious as to how to achieve this. Thanks folks, hope you can help. Regards Mark All credit for the attached two images go to Amy and Laurent.