Search the Community
Showing results for tags 'pdf'.
-
 Our customer has notified us that some images on the latest pdfs have noticeable jpg noise on the edges of the image. This noise is very noticeable because the images have white background. After researching and testing, we have found that this only happens on images that has been cropped and rotated, and only when the pdf is exported to RGB (with the document being made on CMYK), so the "noise" is generated on colour conversion on the cropped image on export. Attached image shows the noise, which is more noticeable the lower the resolution of the exported pdf. Steps to reproduce: Place an image (with white background for better view of the issue) on CMYK document. Crop the image (in our case, to reduce excessive white area) Rotate the image Export to PDF in cmyk, high res (X1A): image has no issues Export to PDF in RGB, any resolution: image has jpg noise in borders of the crop area We checked and it also happens converting to Gray and limitless RGB, and the noise disappears when there is no pdf color conversion. A stopgap solution is to rasterize the image, but this results in an embedded image, unlinking the original, and also doing it on a 4000 image catalogue is a no-no. Exporting in higher resolution and less compression mitigates the issue, but it is still there. In our workflow, this is an issue, because we made the design for printing and later export a digital rgb version from the same document for web publishing. PUBLISHER 2.3.1 MAC OS Sonoma 14.2.1 (23C71) Checked and reproduced on different computers.
-
 At work I open a lot of PDF files having tables inside. Unfortunately these tables are not really tables when you open them and here is Serif not to blame. Maybe Serif proves me wrong, but here is what I strongly believe: 1) Open a PDF with 300 dpi (you can test this with the attached one) with options as you like. 2) Create a table in this document. 3) Select a word with the text cursor and drag it into a table cell. Result: The dragged word in the table cell is now with a factor of about 4,17 smaller than the orginal word. Divide 300 by 4,17 and the result would be about 72. MY conclusion: The opened PDF is somewhere "flagged" by APu to be treated as a 300 dpi, but the content is still 72 dpi. This could be the explanation why linking text frames in opened PDF lead to different font sizes in different text frames. wotever.pdf
 -
 Hello, forgive me if I'm raising this subject in the wrong forum, but I found it challenging to find the correct one. This issue has bothered me for a while. If I'm creating a document specifically for publication in print form and it's in colour, I absolutely understand that it must be set up in CMYK, and exported to PDF also in CMYK. But what is the absolute correct setting when exporting a document intended for print that is in black & white. I have one printing company that I use that says it too should be exported in CMYK, and another that says it should be exported in greyscale. Admittedly, when I've chosen the advice of the former, the finished result (physical copy) is that there is not a rich black appearance; rather it comes out more on the 'brown' side. And exporting in greyscale has produced a better result. But now I'm confused, because in Affinity 2, when I hgo to set up a new document in greyscale and try to export it, I'm getting the pre-flight warning of 'Document colour profile not suitable for PDF/X'. This is suggesting to me that it's not correct to have even set up the document in greyscale. I'm really hoping to resolve this issue that seems to be so divided. For Black & White publications what is the best setting recommended in colour profile for both: 1. Document set up 2. Exporting to PDF Thank you in advance, Peter
 -
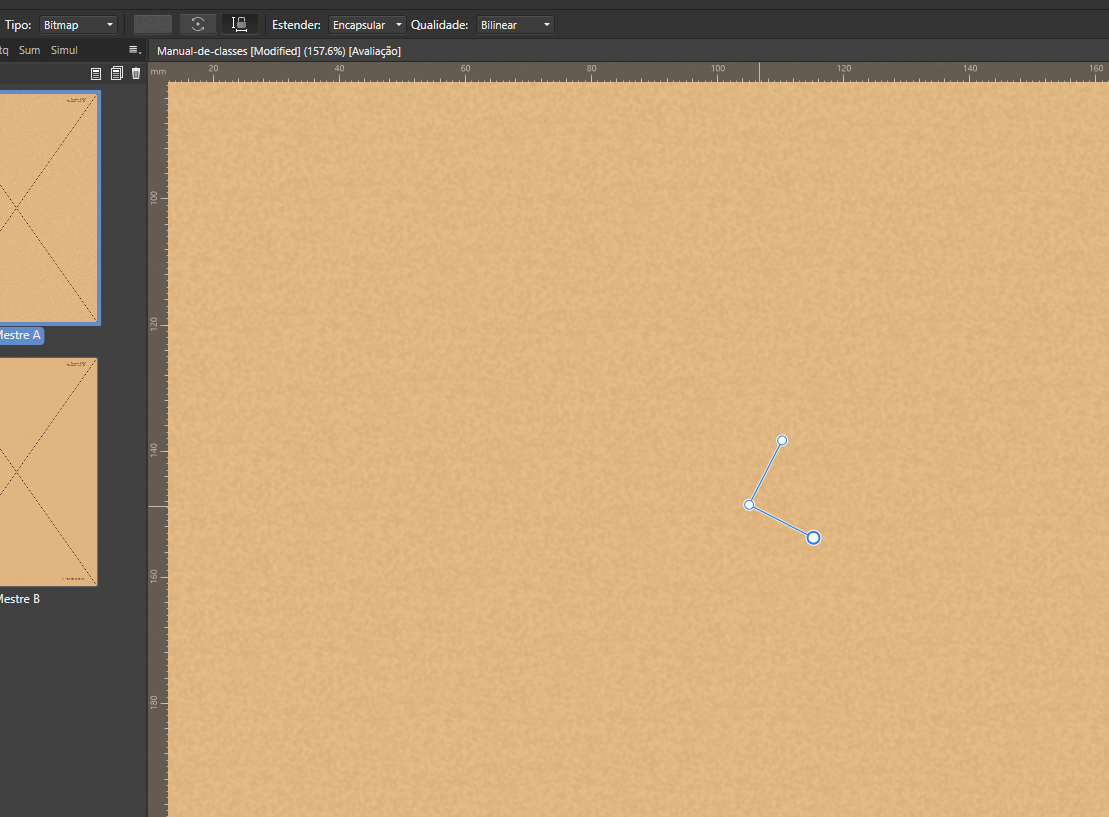
 Hello guys. I've created a background in a master page with fill tool using a png image of a noise (ruido-pergaminho.png). The real size: In the document editor, it was applied correctly, as shown below But, when i export it to pdf, digital high quality, it doesn't fill the page, only shows the original png in the center of page. I don't know if it's a bug or a miss configuration by me, can you help me?
-
 Designer 2.3 I'm trying to export my artwork to a PDF file including layers. Even if I check this option in to the export tab, the created PDF doesn't include layers viewed by any PDF reader. They only appear in Designer. Is there a way to export layers even for PDF viewers? Regards
 -
 I've had this issue many times in recent months. Here's my workflow. 1. Copy an existing document and rename it, both in Finder. 2. Edit the contents and save. 3. Export to "PDF Print" This gets me a 3 page PDF file — exactly what I expect. 4. Close the document. A short time later, after some proofreading of the PDF... 5. Re-open the document. 6. Make a minor edit and save. 7. Export to "PDF Print" I now get a 1 page PDF. I cannot make it output all 3 pages. The document comprises of: Page 1: Native Publisher content — multiple text frames and tables with text and some small images. All the images are embedded. Page 2: An embedded page from another Publisher 2 document. Page 3: Another embedded page from the same Publisher 2 document. While recreating the steps for this forum post, I discovered how to get it working again. 8. Select the last page. 9. Export "Current page". 10. Export "All pages". That final export does include all 3 pages. I have changed nothing about the document since step 6 so I know it's not me!
 -
 When I try exporting my current book project to PDF, I get an error: "An error occurred while exporting to: [location]". Searching these forums, I've tried cleaning up hyperlinks (made sure none were broken, made sure URLs didn't have spaces and the like). I also tried to narrow down where the issue is in the document by exporting chunks. I can now successful export the document in two halves without any error (pages 1-176 in one half, and 177-353 in the other), but when I try to export the entire thing, I get the error. I previously didn't have this trouble exporting this document. It's only after expanding it with more content and adding an Index that I'm seeing the problem.
 -
 I checked the specs of this new version of Publisher. There are many nice features in there. What seems to be missing is the export of a tagged and accessible PDF (PDF/UA). Also I don't see how I could publish a digital book (EPUB3) with this app. I really hoped for some competition for Adobe InDesign which is capable of such output. Even Word produces such accessible PDFs and EPUB (with WordToEpub plugin). With the output of Publisher still focused on print only I don't have many reasons to use it. All digital documents for governmental institutions and, within a few years in the EU, for many commercial companies as well, need to be accessible. Besides, I don't want to exclude anyone from using my documents. I don't mind if I need to do some extra work with a tool like Adobe Acrobat for PDF or Sigil, Calibre, Ace by Daisy for EPUB3, but now I need Word, InDesign or some other app to create the document or book when I really would have liked to use Affinity Publisher.
- 35 replies
-
- 9
-

-
- affinity publisher
- accessiblity
- (and 4 more)
-
Hi, Examples attached: "Original PDF and as opened in Affinity Designer 1.PDF" is as the original CAD export and opens as expected in Affinity Designer 1 "Same file as opened in Affinity Designer 2.pdf" - same image as above opened and exported out from Affinity Designer 2. It is mangled on screen and as exported. Red lines and red hatched square have changed position in the element stack order hiding them. Affinity Designer 2.3.0 Mac OSX10.15.7 Original PDF and as opened in Affinity Designer 1.pdf Same file as opened in Affinity Designer 2.pdf
-
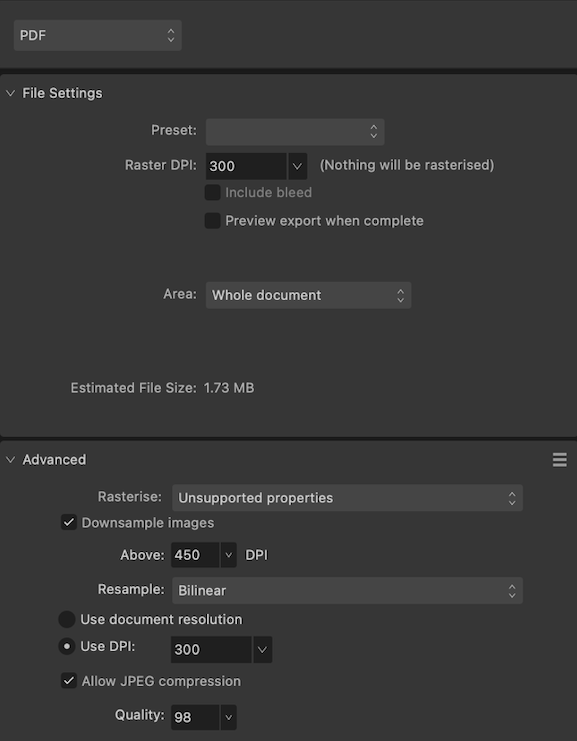
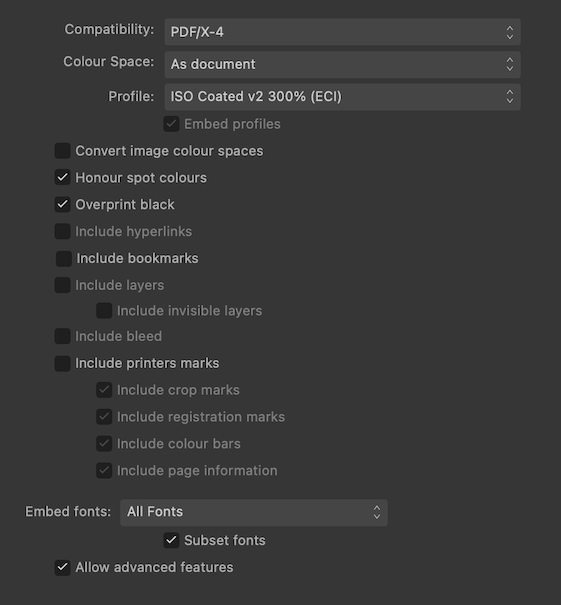
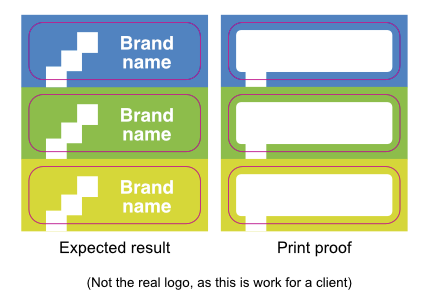
 I’m having trouble exporting a PDF because following the instructions from Flyeralarm led to a misprint. Here’s what happened: Last week, I ordered proof prints for contour cut stickers from Flyeralarm. Unfortunately, each sticker on that proof shows a white, rounded rectangle that shouldn’t be there. This rectangle is on all sides approx. 2mm smaller than the cut contour shape (magenta). [EDIT: I corrected the diagram. Now, it shows the cut contour line on top, as it should.] The sticker design is 100% vector and consists of coloured backgrounds with a white logo on top. All magenta lines form a single path; this is the cut contour for the stickers. I contacted Flyeralarm, and they informed me that something went wrong during flattening and advised me to do the following: Save my document as one layer. Add the cutting contour paths. Export as PDF/X-4:2010. When I asked what they meant with the first instruction, they wrote I should either rasterise my document as a high-quality JPEG or make a ‘PDF with a single layer’. Then, continue with steps 2 and 3. Fair enough, let’s try them both. I’m going to order two additional proof prints. Here's what I have in mind (I really hope there is a better solution): Proof print A: Rasterise the entire design (except the cut contour path) Choose the export preset PDF(flatten) with PDF/X-4 compatibility. Rasterise everything with an exceptionally high resolution to retain the crispness of the fine print (7pt). Flyeralarm agreed with using a high resolution, but didn’t specify the optimal ppi for tiny print. I intend to use at least 1200 ppi.* Place the rasterised pdf into a new file. Add the cut contours. Export as PDF/X-4, as required by Flyeralarm. * Because of this high resolution, I can’t rasterise the images directly from the layers panel or through the Photo persona, as 400 ppi is the maximum setting in the Document Setup panel. Proof print B: Flatten the design while retaining vector shapes. Publisher 2.2.1 doesn’t seem to have an option to flatten a design while preserving vector shapes. Manually flattening the design is also tricky. For instance, I can’t join all logos into a single path with Boolean operations (or using Layer > Geometry > Merge Curves). These tools grey out when you select two placed .afdesign files. So here’s what I think would be feasible: Option 1: Use Designer to flatten the logo + brand name (letter contours) into a single path using Boolean add operations to reduce complexity. Back in Publisher, update the layout from the Resource Manager panel. Export the vector graphics as PDF/X-3 because this standard supposedly doesn’t support transparencies (is that correct?). Note: I got a warning about transparencies when uploading the document (see below under Additional Information). Create a new file. Place the PDF in passthrough mode (does Publisher retain the PDF/X-3 standard during export, or re-render the placed PDF as PDF/X-4 ?) Add the cut contour path. Export the whole as PDF/X-4. Option B: Instead of placing the logo in Publisher, I could copy/paste it in. Then, I can use a Boolean divide operation to cut out each logo from its coloured background. That way, I’ll end up with a single, coloured path (the negative shape of the logo). Take the same steps (c–g) from option A. That’s the plan, but I don’t know if it makes sense. Again, I’m trying to jump through all these hoops because following FlyerAlarm’s instructions led to a misprint. I sincerely hope there's a simple solution that I completely overlooked. Any help is appreciated! Additional information These are the export settings I used for the misprint: And here are Flyeralarm's general instructions for exporting a PDF (These are in German): https://www.flyeralarm.com/blog/de/affinity-publisher-tutorial-druckfaehige-pdfs-erstellen The last time I sent a Publisher-generated PDF to Flyeralarm with these settings, it went smoothly. And it contained more complex shapes, such as an image clipped by a path. So, I guess the problem concerns PDF/X-4 or the transparency warning (see below). This is the instruction sheet for the contour-cut stickers, they require PDF/X-4: https://www.flyeralarm.com/sheets/en/etikett_bogen_cut.pdf I used Flyeralarm’s automated premium file check service to check my PDF. It generated a JPEG preview that looked immaculate, but the checker also warned me about transparencies: Note: transparencies are used We automatically convert transparencies for you. Under certain circumstances, conversion can lead to undesirable effects. Please use PDF/X-3:2002. Flyeralarm assured me the PDF was okay and that I shouldn’t worry about this. I could ignore the PDF/X-3 suggestion. So, the PDF went in print production without any changes. Also, all paths and shapes in my document are fully opaque. So I don't quite understand why I got that warning. The unwanted rectangles are approximately 2 mm smaller (on all sides) than the contour paths and have rounded corners. These rounded corners gave me the idea that a shape somewhere in my design causes trouble. So I’ve checked my files three times over, but I can assure you, that shape is not there. Note that a small part of the logo is visible on each sticker. Possibly, the logo renders correctly under the white rectangle. Flyeralarm mentioned that my file contains layers, but whether they meant layers in the document or PDF layers (Optional Content Group or OCG) is unclear. My .afpub file contains no actual layer (the kind you'll get when you click ‘Add Layer’ in the layers panel). Instead, it's just paths and (nested) groups. When I open the exported PDF in the latest version of Acrobat Reader, it doesn’t show any layers. However, when I add an actual layer, it does. That’s why I think the exported PDF doesn’t contain OCG layers. Then, there’s a suggestion from forum user @lacerto in a different thread: during export, you can select PDF/X-4 and then change the PDF version to 1.6. That way, you can turn off the Layers option in the export panel. But as I said above, I haven’t used any ‘real’ layers in this design, only groups. So, I'm not sure if this is relevant: The cut contour path is a spot colour with overprint (CMYK 0 100 0 0). I'm using version 2.2.1 of all apps on macOS 13.6.1
-
 I would like you to make exporting Outline FX as a separate element possible. Some FX can be exported as a separate element such as Outer Glow or Outer Shadow. Outline can be done the same I think. So the object itself that has Outline FX won't be rasterized and it could be more useful.
 -
 Hi, I am currently working on an A4 sized document and the printer has gven me precise specifications on how the need the pages. They a very specific page size of 226.6 x 311.4 mm (total size including bleed and crop marks). The export with crop marks from Publisher is a bit larger, so I could crop it if I had Acrobat — ideally though, I would like to set this page size as export size so I don‘t have to edit the exported PDF. Any idea on how to set this up? P.S. — Please don‘t try to convince me that the page size doesn‘t matter as long as the content is centered and crop marks fit. The printer insists on getting pages of this exact size and there is nothing I can do about it.
 -
 Dear fellow designers, just recently I tried to export a PDF from a Publisher document – a book cover design with an embedded .tif. I tried several job options to create a press ready PDF file, but the CMYK values of the embedded PDF always turned out different from the original file. That's quite an issue, especially if you work on a corporate design for a long running book edition, were precise color rendition is a must. To meet the deadline I had to switch back to InDesign and rebuild the whole design. As I would like to keep using Publisher in the future I am sure there must be a solution for this problem. Do you have a suggestion? Thank you very much in advance! Best, Hans
 -
 When a manual is in .PDF form, I can simply read one page after another, till I get to the end, and know I have read the entire manual. HTML-based manuals force me to navigate a maze of links, hoping beyond hope that I have successfully found every page. Even with a navigation bar on the side, one cannot be sure that every single page is linked to in said navigation bar. Many, many HTML-based manuals end up with sub-pages that can only be found via an obscure link, buried in a paragraph somewhere. So, you are forced to click every link you see, out of fear of missing out. This makes reading a manual kind of exhausting. In a .PDF, I can annotate the document as I see fit. I can highlight important parts. I can insert any questions I may have while reading (even when away from my main computer). Then, I can go back and try to answer those questions when I am either at my main computer or when I am online. Plus, sometimes you just want to insert a question and then keep reading. With HTML-based help, you have to use a separate method to keep track of all these notes and questions. It then becomes extra tedious to keep track of which note or question is about which part of the manual. I can synchronize a .PDF manual (along with all those annotations) between different devices, simply by storing it in some cloud-based service. Yes, I can sometimes save "favorites" or "bookmarks" in an HTML-based help system, but those can never be synchronized between all my devices. So, if I want to make use of that feature, I am forced to always read said help on a single device. Without these abilities, reading HTML-based help can become extremely frustrating. Especially when said "help" glosses over most of the actual detail of how to use the program. As a former network manager, and a former technical writer, with a degree in Computer Science and Education, I can definitely tell the difference between me simply not being able to understand something and just poor documentation. I do have the tools available to convert existing HTML-based manuals to PDF. But it can be a tedious and error prone process. And the whole process must be repeated each time the HTML-based manual is updated. It is always far better to just start from the source files and use a reliable utility to produce the .PDF version of the document. Usually, the same tool that generated the HTML-based manual has a feature to generate a .PDF file as well. So there is often no real excuse for a company to neglect doing this. Sometimes it feels as if software companies rely solely on HTML-based documentation just so they never have to worry about users working from an outdated copy of the manual. But I also feel that this is a bit of a cop-out.
 -
 Using version 2.0 on MacOS Ventura (latest version). The issue is consistently reproducible. I occurs in new documents. A collection of sample documents are attached. Description of the issue: When creating objects that are black (K=100 or GREY=0 or RGB=0,0,0) in a Publisher document, then printing it, cause these object to output in various shades of grey. This cause the objects to be rasterised. Exporting a PDF X:1a and then printing that PDF from Preview correctly renders the objects with the colour K=100 as full black, and thus without raster. This is the expected output. I’m using an HP LaserJet P2015 set to highest quality and in-printer colour management. (This setting works in InDesign FYI). The HP printer is a mono laser. all_the_logos_4C_X1-a.pdf all_the_logos_4C.afpub logo_RGB=0,0,0.eps logo_RGB=0,0,0.pdf logo_RGB=0,0,0.afdesign logo_GREY=0.pdf logo_GREY=0.eps logo_GREY=0.afdesign logo_K=100.eps logo_K=100.pdf logo_K=100.afdesign
-
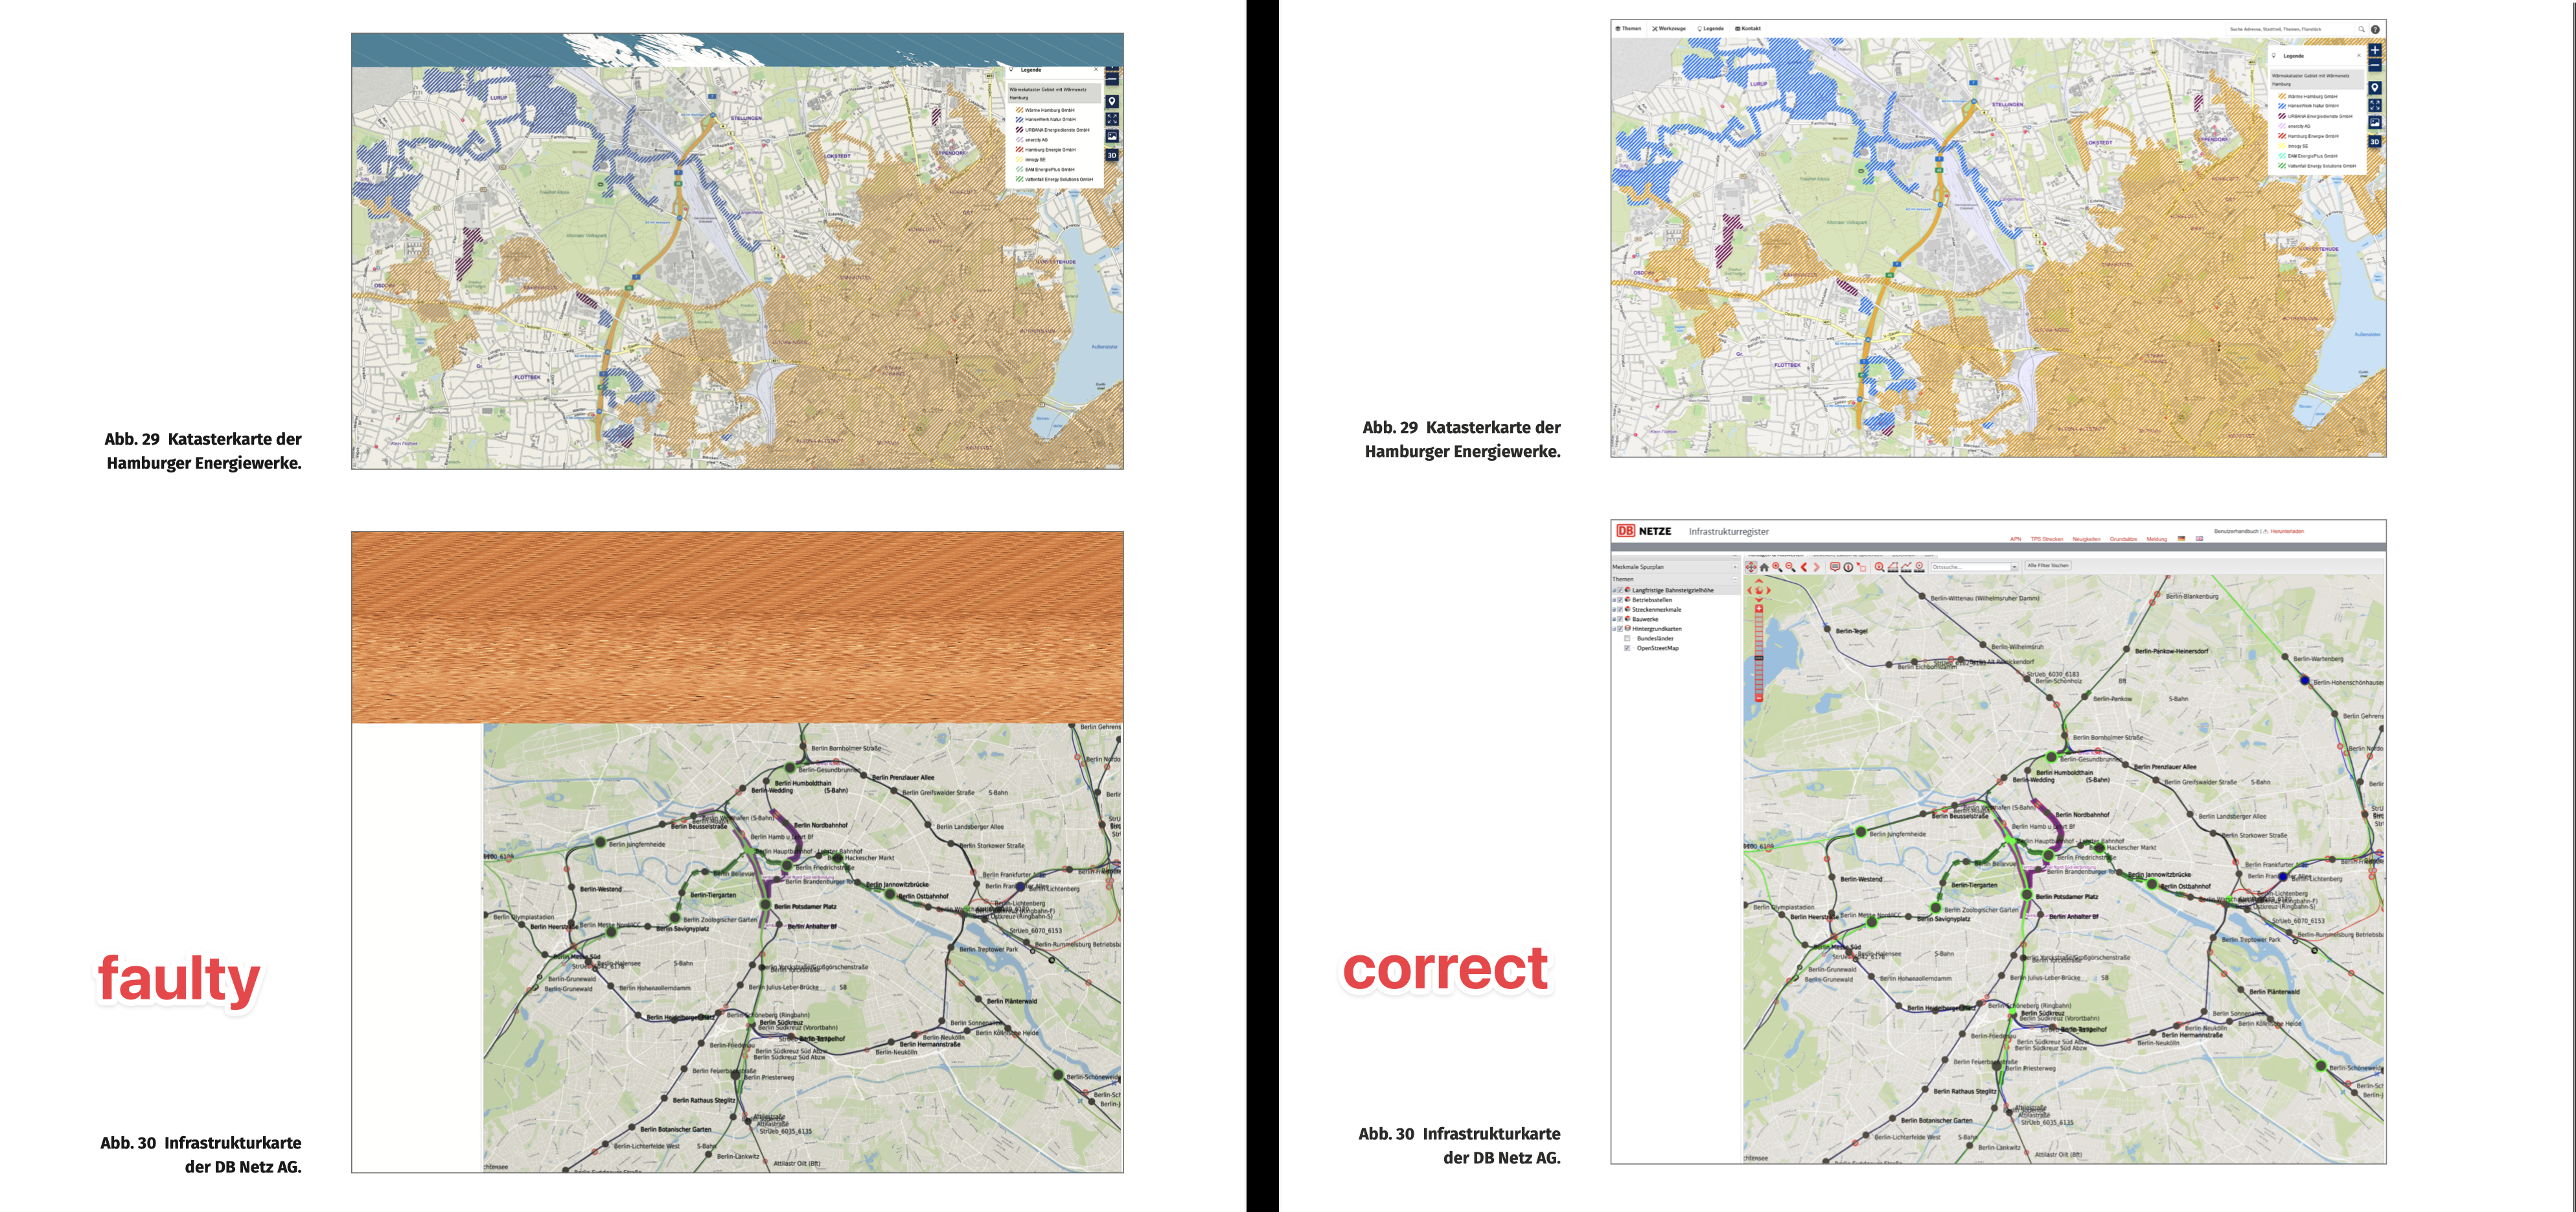
 Hello everyone, I have a problem with Affinity Publisher’s PDF export that makes it virtually impossible to generate print-ready PDFs. The images in my exported PDFs often—though not always—appear “glitched”, with distorted or black bars appearing mostly in the upper half of the image. I have included a comparison screenshot that shows you the faulty result of the PDF export vs. how it should look like. I have also attached both the faulty and correct PDF. I do not know exactly what causes this problem to happen, but here is everything you might need to know about it: I only encounter this problem on my Macbook Pro (2021) with M1 Max. When I export the same document through Intel-based Macs or Windows machines, the problem does not occur. I’m running the latest version of macOS and Publisher 2.2.1. However, I’ve had this problem ever since I got this Macbook in late 2021, meaning this problem also existed in Publisher 1.x (I finally got around to posting this here 🫠) Not all images are affected. On some documents, none are affected at all. I played around with the PDF export settings quite a bit and different settings do lead to different results. Exporting a PDF for screens, for example, made the problem go away … but only on one document that I tested. Weird. My guess would be that this problem is caused by PDFlib, which to my understanding is the library used by Publisher to generate PDFs on macOS. Maybe there is a bug related to PDFlib on certain Apple Silicon machines? Though the problem might be something completely different and this may just be a shot in the dark. Any help on this is greatly appreciated! Right now, I have to export any PDF that I need to have printed through my secondary Windows machine, which is obviously far from ideal. Thank you, Niklas correct.pdf faulty.pdf
-
 Since the last days I am losing all my printing (directly to my L14150 EPSON printer or "Windows Print to PDF"). All imagens with transparence backgraound started to lose the transparence or bright changing, as shown below: There is no filter, transformation, FX, mask (...) applied. Just a PNG over other image. Everything was working fine untill few days ago. What is happening? If I do the same art using Corel, the correct result os obtained: I am using Affinity V 2.0.4 and tryed to chance de color profile several times. Its an Affinity bug, definitely. Is anyone having the same bug?
-
HI there, One feature Photoshop has which I really miss in Affinity Photo is the ability to extract the images from a PDF. Often clients supply a PDF, which contains images that you might want to use without the text over the top, or cropped differently. If you could import the original image, it will be more usable in other projects. Thanks Andy
-
 Hey! I hope it reaches someone from Serif. My point is that for a lot of us who exclusively use the Affinity Suite, there are such small things that when you need them, they seem like a pain in the ass. Today's example is the option to hyperlink text in Affinity Designer. It bothers specially since I've found other people asking for it even in 2016! So that'd be my request... That we do not end 2020 without the option to be able to hyperlink text in AD. Thanks.
 -
I am having a serious issue with the PDF output from Affinity Publisher v2.2. The images all appear too dark and the fonts are fuzzy. This only happens when the printing company prints the publication. I have printed this on my colour inkjet and on a colour laser printer and they turn out as expected...good. I have experimented with numerous settings but the basic profile is using CMYK and Print Ready. The previous publication printed fine and was under V2.1. I have gone through a process of elimination: Checked and compared settings from the last magazine and found them to be the same. Experimented with a number of settings for the PDF output. Tried different CMYK settings Flattened the PDF Compared the PDFs output on the screen and as my display has a P3 colour profile (very accurate display), they not only look perfect but are not the way that they have printed by the printing company. I have not tested this yet but I am wondering of the settings for publications are saved with the file or does it just pick up the settings from the last document edited? Has anyone else come across this issue and if so, how was it resolved?
-
 Hi When I place PDF-Documents into Publisher (Windows-Version), it complains about missing fonts, although the fonts are embedded in the PDF. I don't want to edit the PDF, so I don't need the fonts to be installed on my system. Greetings max1josef
 -
 I am creating a hyperlinked pdf intended for digital use, It consists of several weeks each week has several templates that are hyperlinked within the same week, I made each week's file seperately and when I try to merge weeks, each hyperlink points to the page within the same week in which was created but when I export it all hyperlinks point to the templates of the first week. I'm using anchors, and each week have different anchor names and they are added seperately to the same file to create the merged file. I checked those hyperlinks in hyperlinks section in affinity publisher and everything is correct but whenever I try to export the file, they get messed up !! I'm honestly a little bit disappointed because I'm launching new products in my business, I have deadlines and this surprise really ruined it all, I worked with V1 before and I didn't encounter a similar issue that's why I kept working on the project without checking in in the first place and now my 3 month work is ruined. You can find attached below afpub and pdf files Operating system : Windows 11 Software : Affinity publisher 2 SUNDAY-WEEK2.afpub SUNDAY-WEEK2.pdf
 -
Hello, Using Publisher V2.1.1, I have encountered multiple transparency glitches that are only apparent after exporting to PDF. The two attached instances involve an FX drop shadow. My first three or so exports were fine. Then "first page glitch" happened. I added the workaround you can see in "second page glitch" and the export was fine a few times. (Client revisions: RIP). Then "second page glitch" appeared, so I added the same type of workaround for it. The longer I edited and exported the file within Publisher, the more glitches developed on export. (There was another somewhat different glitch later, but my workaround proved better than my initial technique, so I didn't bother saving that glitched version.) I've attached the working files and their corresponding PDFs. "Second page glitch" is the original file that was created in AD and then opened in AP early on. I wondered if the app switch was part of the issue (even though the glitches appeared after several successful exports in AP), so I saved a version of the file in AP. Then I undid my workaround (box of the same size with Gaussian blur applied) and reapplied the desired drop shadow FX with the same glitched result. (The client picked the colors.... </3) OS: macOS Ventura 13.5 and 13.5.1 (Updated after glitches occurred, hoping that would solve it. It did not.) hardware acceleration: on Thanks! first page glitch.afpub first page glitch.pdf second page glitch.afdesign second page glitch.pdf
-
 I'd love to see Affinity Publisher support tagged and accessible PDFs from the ground up, ideally with full support for PDF/UA. Many institutions and government bodies require this for public documents, and making it part of the program's logic could be a major selling point. I am not convinced that the way in which InDesign implements this in is the best way of going about it; it tends to create a lot of extra work that most people don't bother with. Instead, it should be possible to use this structural information to make document creation more efficient and improve a print/Web workflow.
 -
Please have Affinity export K only PDF from gray mode documents if the color space is set to CMYK in the export options.