Search the Community
Showing results for tags 'overlay'.
-
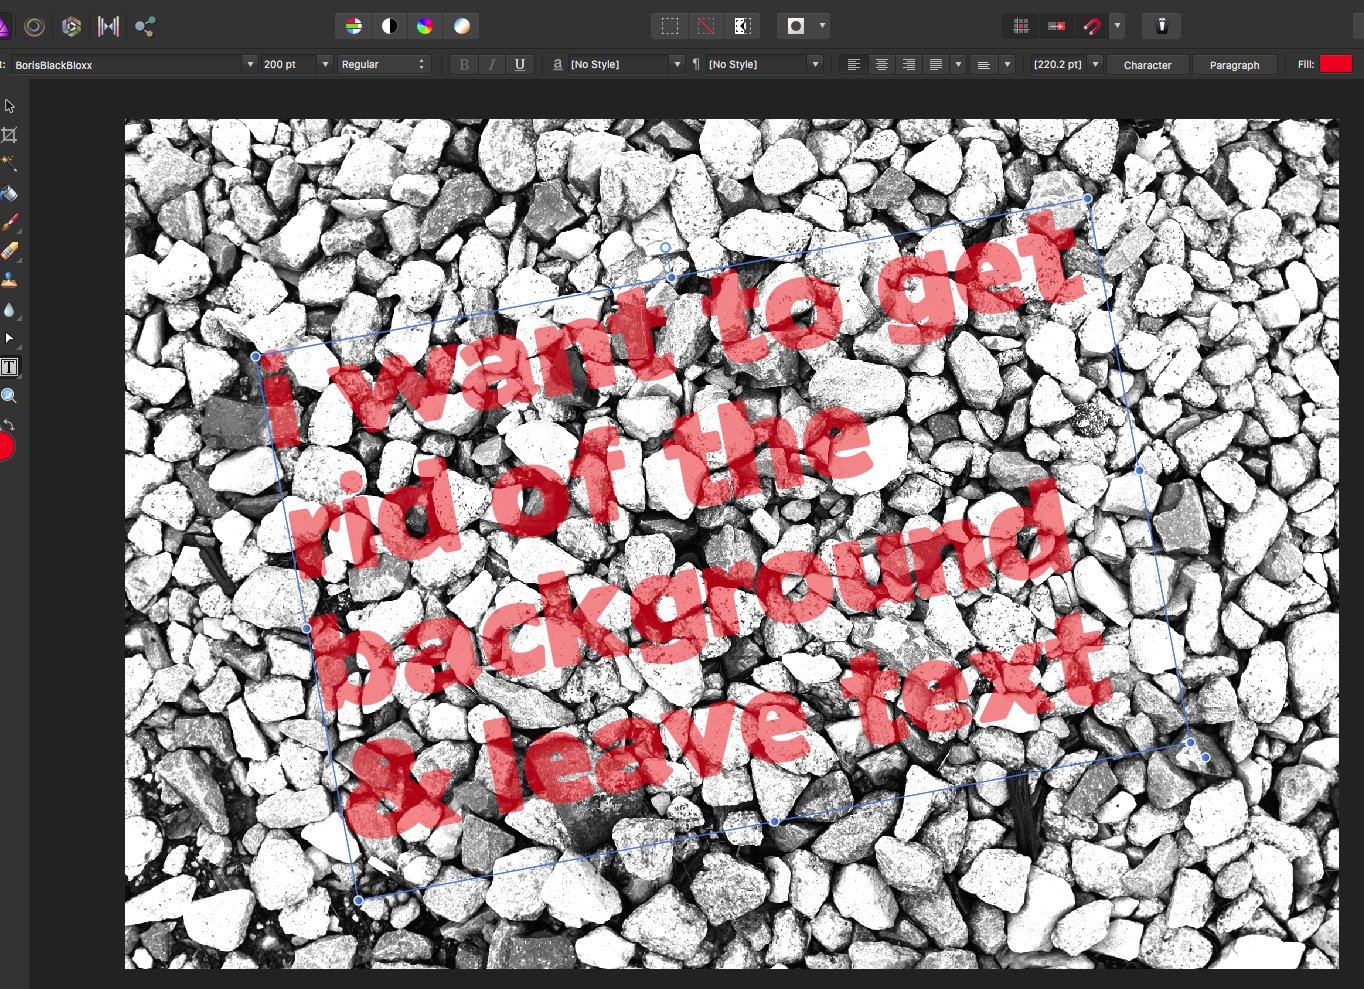
 Hi, I'm floundering here. I've watched the masking videos but I must be missing the answer. I have created text, applied a background using Place, reduced opacity so I can see the background through the text ... but I now want to get rid of the non text background to leave myself with lettering on a transparent background. I can't find a video that deals with this. Guidance welcome.
-
 Hey guys, I am a relatively inexperienced user and am looking for some advice on how to achieve an effect. So I want to create a gradient overlay from the top of my document to the bottom to affect several layers however these layers need to be at different depths. The couple of ways I know of to do this don't really feel like they fit: 1. Using the Gradient Overlay effect Recreating the effect each time I want to apply it to a new object is obviously super time consuming Gradient is scaled based on the size of the object where I want it to apply across the whole document. 2. Creating a Gradient Object and using blending to apply it to other layers Doesn't respect which layers it should be applied to so can't render the visual hierarchy in the order that I want for overlapping elements. 3. Applying the gradient as a mask layer Can't move elements without repositioning the mask layer. Duplicating the mask layer for each element I want this effect applied to seems inefficient. Below is an example of the kind of effect I want to achieve (Although I will want more directly overlapping elements that intersect each other): Does anyone have any ideas on the best way to achieve this?
-
 Hi, I'm trying to draw on a photo. I'm sure there are a dozen ways to do this but the Overlay Paint Tool in the Develop module seems to be one. How do I use it? I can draw ok with the tool but this creates an Overlay layer under the Master layer. I can't change the opacity of the master layer so the drawing is only visible when I select that Overlay. I can't see any way to move the layers or to flatten the layers so my brush strokes are invisible under a 100% opacity master layer and vanish as soon as I move to the Photo persona. Help! Thanks, John
 -
 Hi! Does anyone know how to create a Phi Grid (based on the Golden Ratio) overlay in Affinity Photo? (The Golden Ratio is divides the frame into sections resulting in a grid that is 1:0.618:1). I want to use that overlay for composition and cropping. I know we already have a Golden Spiral, but I like the Phi Grid for landscapes and other types of images. For more basic info on the Golden Ratio you can check this article, specifically for photography: https://www.apogeephoto.com/how-to-use-the-golden-ratio-to-improve-your-photography/ Thanks!
 -
 Hey, I want to overlay an image on my business logo. I know how to overlay images on text but how do I do it on a logo? I tried doing it the same way as I do on text, by dragging the image layer that I want to overlay to the text layer. But the image didn't appear on my logo. It just turned a different colour. Can anyone help? Thanks!
 -
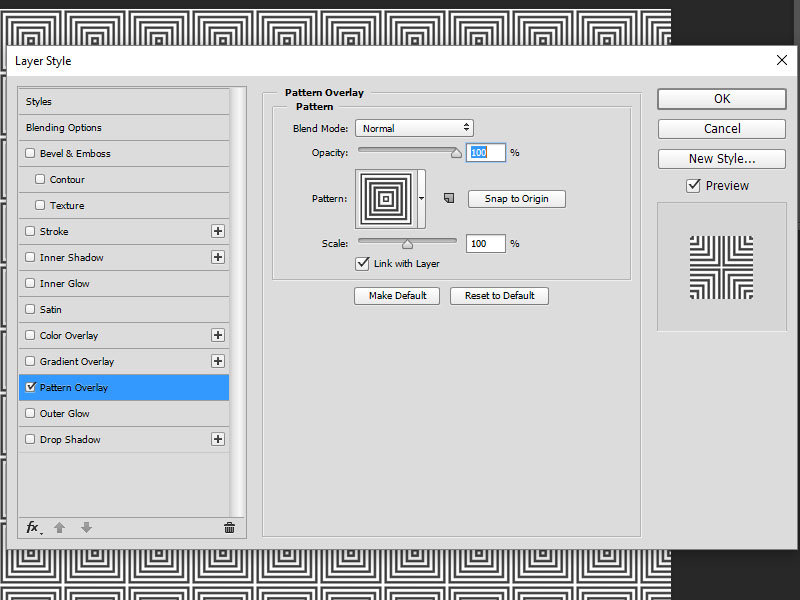
Hello, I can't find it so I assume I am the first to request it but it would be nice to have an effect added to the Fx list "pattern overlay": which would work pretty much like a colour or gradient overlay. For the moment I am using the Fill tool set to "bitmap", and import a pattern I have made myself (they are either distressed texture patterns - seamless - that I create in photoshop) or halftone patterns. I am sure there would be plenty of uses (that's one of the tools I am using most in photoshop when I am doing mock-ups) The fill tool options are a bit short for me, as I can't tweak the scale precisely (with numbers in %) I would also add the possibility to change the guides colours (like the grids) but I am not sure it's a missing feature or if it's just me who can't find it Many thanks!
-
 When using the overlay brush in develop i have to repeatedly go over the area to achieve 100% opacity. I have tried setting brush attributes that work for other brushes but this does not work on the overlay brush, plus I have tried using a tablet & pen and a mouse. Where can I change the attributes for this brush?
 -
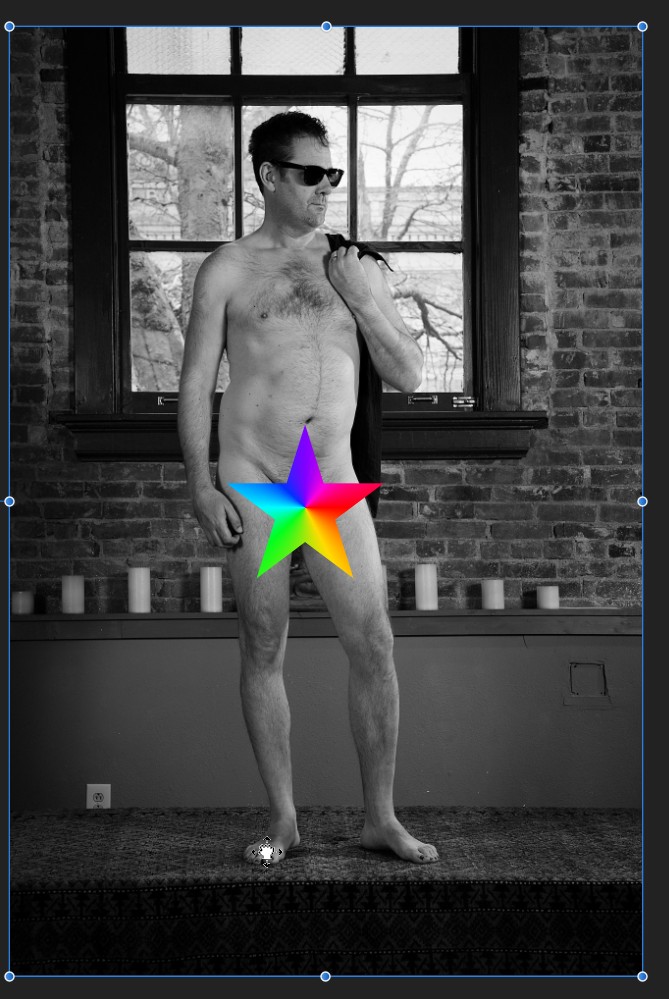
 Hi all, I have this self portrait as sadly-not-up-to-snuff Michelangelo's David and I want to overlay a marble finish on it. I think I could make this happen in Photoshop but I can't work out how to do it in Affinity and I ain't going back to Adobe. As you will see, I have added a layer with marble but I can't make it cover just my body whilst also leaving all the detail in the body. Does that make sense? If anyone has any help to offer I would be very grateful and I hope no one is horribly offended by my image! I have a STAR!! If this is beyond the pale let me know and I'll delete that image since hopefully it might make sense without it. Phil
-
 By default, Affinity seems to have the Rule of Thirds and the Golden Spiral - is there a way to add or turn on a Phi grid overlay?
 -
 Dear Affinity Staff, I am very happy with my purchase. Here’s a little thing that might make it better, more non-destructive in spirit. Right now, I can crop, and then unclip canvas if I change my mind. I often get some dead space around the pixel layers but I’m sure you will work that out eventually. But how cool would it be if I didn’t have to crop in the first place? The slices principle of the export persona appears to be perfectly suited for this, but I find it inconvenient to use at the moment. I would like an option to force ratio (2:3, 4:5, etc. ) and an option for showing the overlays (rule of thirds, golden spiral etc). That way, if my parents or in-laws neglect to tell me the aspect ratio of their picture frame, I can quickly and conveniently export a range of perfectly composited slices of pictures of their grandchildren! I know a modifier key will constrain the ratio but then I have hit the 4:5 ratio perfectly somehow at some point.... thanks for reading. Wouter
 -
 I'm a brand new potential user who's currently trialling Affinity Photo. I like a lot of what I see, but have two key features I am looking for. I've done some online research, but cannot find clear answers. Is there any way to have a layer mask displayed as an overlay (e.g. semi-transparent red). I know I can use the quick mask feature, but would love to be able to just paint directly onto a blank layer mask and then check for missed patches using a red overlay. Can this be done? I have seen some references to brush size and hardness being adjustable using CTRL+ALT and then dragging the mouse, but I can't replicate this with either left click (goes to colour picker) or right click (does nothing). I know I can adjust the brush size with [ and ], but really like the size and hardness adjustment to be in the same motion. Is this possible? I'm really hoping to move from Photoshop to Affinity Photo, but would need to find a good workaround for the above to not have it significantly affect my efficiency.
 -
 Hello, regarding overlays in the "Develop" persona, i have some questions and would like to get clarification (sorry, coming from non-English version): 1. I cannot use some functions for overlays. It seems that i cannot use any sharpening, denoising, curves and clarity. I *can* use "Exposure", "Saturation", "White Balance" etc. So there's no *local* sharpening or noise reduction on raw file editingin "Develop". Right? 2. Regarding the Overlays panel: To activate a specific overlay, i have to click them in the Overlays panel. There aren't "pins" in the image. 3. Regarding the Overlays panel 2: If i have 2 or 5 overlays, they all appear alike as "Brush Overlay" in the Overlays panel. It's difficult to know which "Overlay" entry refers to which image area, because in the panel the overlays aren't numbered or clarified by a mask thumbnail. Or do i miss something? (Same applies seemingly to "Graduated Overlays" – if you have 2 or more graduated overlays, they all appear alike as "Graduated Overlay" in the Overlays panel. But here, upon clicking "Overlay", you see the red mask and the marquee, which makes recognition easier than with Brush Overlays where upon clicking, nothing in the image display changes.) Thanks!
 -
 Hi all, I just want to apply a color filter to an image with Affinity Photo to get something like this: : I´ve watched this video but I don´t know neither how to change the color of the filter nor this is the right approach to do it: Many thanks in advanced! Pedro
 -
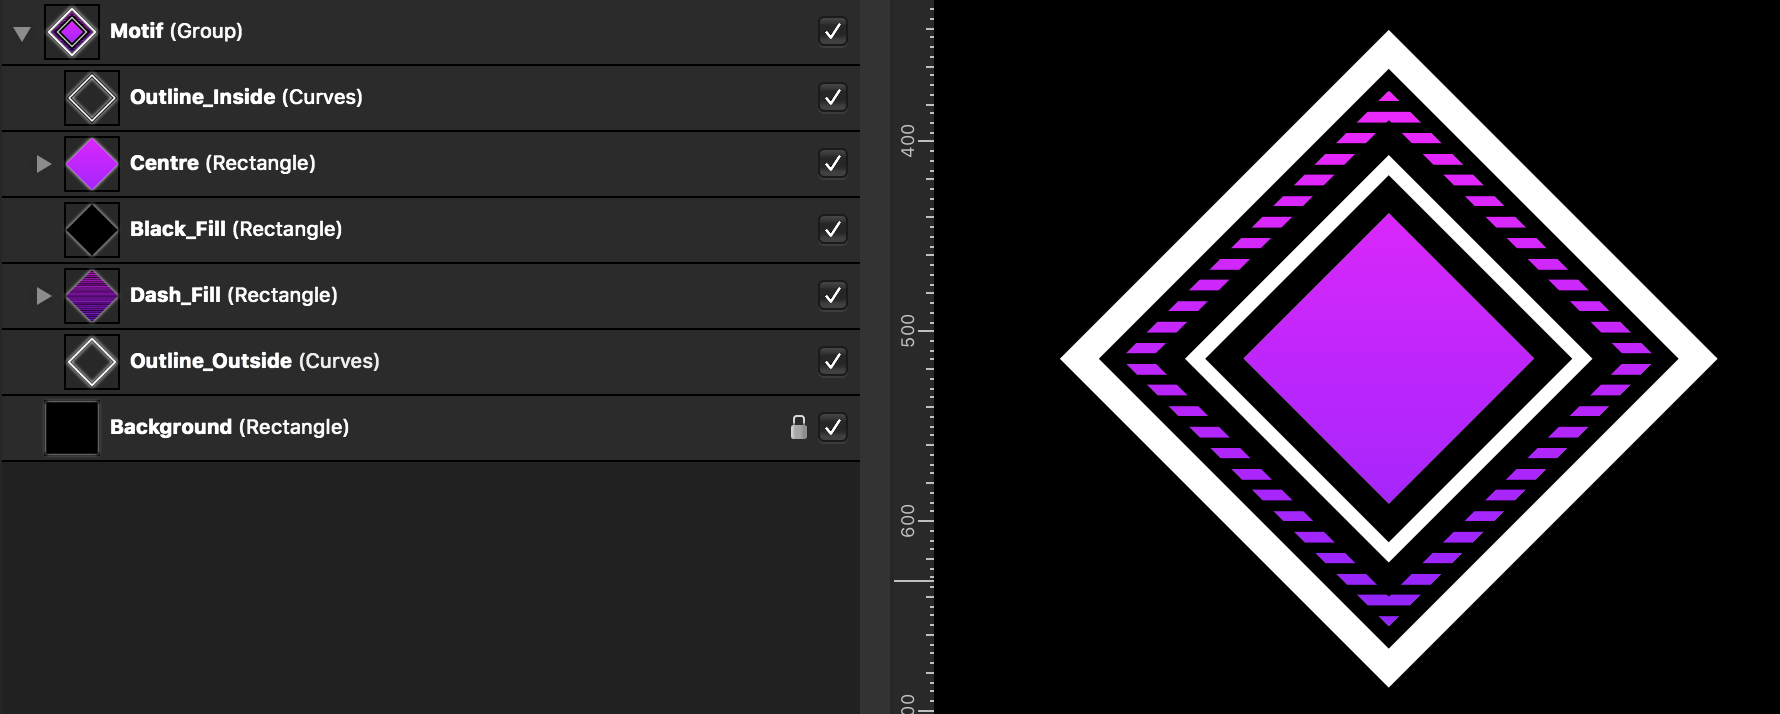
Hi ! I think it might be interesting to be able to change de name of the brush overlay (All them are named as brush overlay). When we manage many, rename them give us a reference of the area in the picture. Many thanks !
-
 I would like to be able to use the Compositional Overlays when designing as well as when cropping. Additionally, is there a way to flip the Golden Spiral both horizontally and vertically?
 -
(sorry for the english) Hi, one of the tools I use most on photoshop is the Pattern overlay, to do this kind of work (attached). Would be great to have this on af Photo. I tried to use the one that already have on the software, but I couldn't achieve the same result as the pattern overlay in photoshop
-
Moved to beta thread
-
 Hi. I'm fairly new to the forums, so if this has been mentioned before then I apologise! I'm an illustrator and would really like to make the transition from PS CC to Affinity but there's a couple of things that Designer/Photo don't have atm: Pattern Overlay with the ability to import .pat files and also the ability to import .tpl files (I use a lot of Kyle Webster's brushes). Could you add these features in the future please? Thanks.
 -
 Could anyone tell me how I would go about taking typical 2D images and presenting them in a similar fashion as shown below? Kinda lost on this one. Thanks!
-
 Hi, In the develop persona there is a tool called overlay gradient tool. Does this tool not exist in photo persona? The reason I am asking is because some of my scans are in monochrome (no RGB), and the develop persona is not able to handle none RGB files. Which reminds me... is it possible to converse color profiles? Cheers Peter
 -
 So, here we go again. This was originally created over a year, thanks to Supervolting on here for bringing it back to my attention. I have reworked the tutorial and it's less than 5 now and simplified. It's a really cool way to show of your videos or pictures and a great way to see how you can work with other apps in your workflow by starting in Affinity... Enjoy... (and click subscribe) ;) Creating a Mask Overlay Tutorial Allan
 -
 I have a basic image with a layer over top of it which is a solid color and I've set it to "Overlay". Everytime I try to save or export the image...it changes the look of the image to something really ugly that I don't want... Simply by clicking on the layer sets the image back to what I want. Here is a quick video in case I haven't explained it correctly http://screencast.com/t/xw6jwEsGwu1Y Thank you!!!! Tracy
 -
 I am a novice. I have been using the File, Place tool to place fairy wing overlay document png type (invisible background layer) files over background images, and then using the erase brush tool to clean up (erase the overlay) from the face and chest area. Its worked beautifully for days, but today it does not work for me, and I can't figure out why its changed? I did notice the assistant started coming on, with notes about rasterising the layer, but I selected to undo the action, and the assistant is disabled. I thought this would stop my issue. I think I want to be able to erase from a vector layer freely.... So, my process has been to open my picture, place my png overlay, and erase any "interference" over the subject's face... in PS I learned only briefly to use the paint brush tool to paint the overly in black over the overlay to "reveal" the area underneath, but that technique is not working either.... Thanks, OnTheWander
 -
 I'm hoping I'll have more luck with this question regarding Affinity Photo. Has anyone tried refining a selection after you've added a B&W layer to your photo? Looks like the red overlay becomes B&W too and to my eyes it's hard to tell where the mask begins and ends. I try to disable the B&W layer, but then the mask disappears. I have to exit refine selection and click again on Refine on the top toolbar and then I get my red overlay back. To the developers - 1. Was this the intended behaviour - at least the part where overlay also becomes B&W? 2. Are you able to recreate the disappearing overlay issue when you switch off the B&W layer? This surely must be a bug.
 -
I would like to be able to toggle the overlays like masks on and off individually and also deactivate all to see a comparison.