Search the Community
Showing results for tags 'outline'.
-
Hello, I have been wondering and trying to get a constant Blur around the sharp edges of a photo. I found tutorials for Photoshop but I couldn't figure out how to apply that on Affinity Photo. It used to be that the live filter layers could be edited by creating a mask but that worked really bad to not anyway and I am wondering if there is a way to have the outlines of a photo extremely blurred, so that it fades away? Thanks.
-
Affinity Publisher newbie here. After working in Publisher with an image that had changed from "image" to "pixel", I found I was no longer able to draw a thin rule around it in the way it can be done with a text frame or image frame. There's always the Outline layer effect, but it does the job only partway. With Outline there don't seem to be controls for how the corners are drawn—they are always rounded. But is there a way to alter the corners using some other controls in the program?
- 12 replies
-
Hey, first post here, as i could not find any solution to this. I am trying to put a text into this bear shape so that it will fill the shape inside, just like the one on the left. I feel like it should be straightforward, but I can't seem to work it out. Since it stems from a picture, I was unable to convert it to text frame in designer. I have all 3 programs available.
-
Hi, I have create this illustration with both vector and pixel layers. I want to add a black / white outline to it. So far I tried to look for a way I could offset the path but I could not find anything. I also tried to united/add all items but that options is not even available.
- 2 replies
-
- ad
- affinity designer
-
(and 2 more)
Tagged with:
-
Hello, There seems to be a glitch with the inner glow effect (edit: and with the outline effect). This glitch seems to at least specifically affect shapes with lower opacity. By viewing the 8 snapshots below, you will see that setting even only 0.1 radius to the effect results in changes to the whole shape instead of affecting only its borders. This happens no matter the blend mode, and no matter the intensity (although the effect is more pronounced with higher intensity. (Pictures 1,2,3,4 are in Multiply blend mode ; Pictures 5,6,7,8 are ine Normal blend mode). I am working on a macbook pro. This happened while following the fisherman tutorial in the AD workbook. r
- 4 replies
-
- inner glow
- glitch
-
(and 1 more)
Tagged with:
-
Hello, I have been asking for this option for years, it is something so basic in vectorization software, but here it simply is not. I will leave my link from here in the community where I originally requested it years ago, there is even video right there and some explanations, thanks.
-
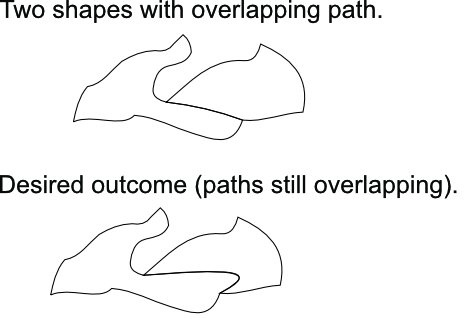
Hello. I am working on a large file which contains many shapes which share their borders. Only the outline will be printed (there is no fill to any of the shapes). It is very important that two shapes sharing path overlap precisely otherwise printed stroke will not have the same thickness/shape. How can I shape the path of two elements at the same time (so the path stays overlapping)? I know I could break the path of one shape, remove overlapping piece and only modify the remaining path of the second shape. This however takes many steps to accomplish (not a problem for a small piece but could take ages with large files; imagine jigsaw puzzles cut pattern"). How can I somehow "glue" both shapes and modify mutual path with simple drag method typical for single paths? Thank you in advance for your help! Best regards, Marcin
-
Hi! I am having a problem while trying to separate (remove) the background from the photo. After masking the subject and replacing a transparent (black in masking) background with a fill layer my selection (in this case me) seems to have a white glowing outline. In the picture below you can see it around the black coat and it is really visible when putting a black solid fill under the masked selection. You can see that in the refine section window the "glowing outline" is not visible, only once the mask is applied. Do you know how to fix/remove this issue? I haven't had it with my previous photos, it only started like 2-3 days ago. The glowing outline around me doesn't look good and therefore I would like to get rid of it. Thank you in advance for the help :) P.S. see the attached photos in full resolution to see the glowing outline problem.
-
Hello I attach a screenshot of what happens now using Tone Mapping. There has been a tendency for this kind of halo over several versions but it seems to have become emphasisied with the latest update. It makes the Tone Mapping facility almost unusable because there seems no way of avoiding or correcting it. Apart from this and some minor quirks the latest version is a joy to use Michae
-
As title says - when object is selected, then it's boundaries are highlighted with blue outline. But sometimes, especially when working with small objects or fine outlines it's impossible to see what's going on. Is there a way to disable it, so selected object is indicated only by handles? If not can you make it a feature request?
-
Hi guys, Affinity Designer ( Latest Version ) Macbook pro 2018. So I am making labels for a meat factory in Iceland. I noticed a problem when i exported the project ( PDF for print ) The outlines go missing. The print factory head designer called me and told me that he just got boxes instead of perfectly shaped outlines. I have pictures that show, The project how it looks and with "outline view mode". and a photo after export and with "outline view mode" The printing factory wants to see the outlines to make sure that the printers will not make mistakes. I have tried all the things I know, exporting with different settings, making everything as curves, and blablabla. Please tell me how to fix this :) Thanks, -Geir.
-
Hi! I've performed the acquire image to take a scan of a drawing into Affinity Photo. Then using the selection tool created a mask so that I only have the illustration of the giraffe with no background. I've then embedded the giraffe illustration into Affinity designer so that I can print 4 coasters on to different solid coloured backgrounds. The issue is you can see a white edge around the giraffe embedded document layer and this is being printed which then shows on the sublimated coaster. Please does anyone know what I'm doing wrong? Or if you can point me to a better explanation of layers? I haven't used Adobe products and am new to Affinity products. I have tried to find the answers in the help and on the forum but can't find anything and none of the videos seem to cover it. I have attached a screen shot of the image showing the white edge. And one of the coaster with the white line of the embedded document. Any help much appreciated Thanks Jo
-
Please add image trace it will make the affinity suite very awesome , adobe illustrator has image trace so it would be very cool if you could add the option
-
Hi, I am totally new to Affinity Designer and graphic design in general. I want to know how to make the outline of a text transparent to there will appear to be a space between the text an other objects. I tried adding an outline, converting it to a shape by Expand Stroke, and then using Subtract. It did not work because it's the fill that became transparent. Kindly see the attached sample. I had no luck searching the forums for alternative steps. Thanks for the help.
-
I have a freeformat logo (vector-based) and will produce a sticker from this. The producer of the sticker demands me to add an outline in 100% magenta and name that outline 'cutkontur' . The sticker will be cut along this line. I used Layer -> Layer Effects... -> Outline to add the outline. This works perfect, but I see no way on how to add a name to the outline. How can I name that outline? Affinity Designer 1.6.5.135, Win7 Enterprise x64
-
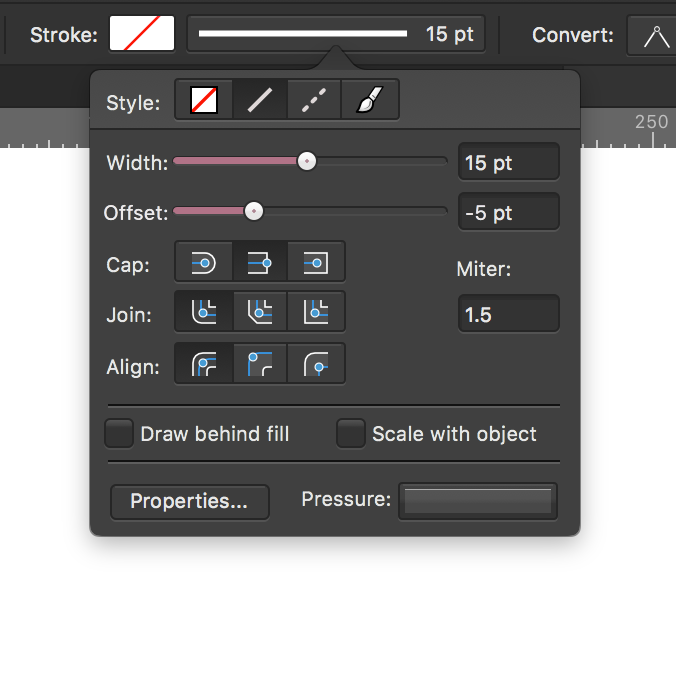
what i'm thinking is another slider on the stroke modal window that controls how much the stroke is offset. on closed curves it would read outwards on one side and inwards on the other, or something like that, and i'm not sure for open curves, but it would be leftwards along the normal vector when moved to the left and rightwards when moved to the right.
-
i can not get rid of the purple outlines around the shapes in designer on the ipad. only zooming in and out removing them but only till i work again Thanks in advance
-
Would it be possible to outline a font which is not available on your system but embedded in the PDF. Having the option of being able to outline if you want regardless. Kind Regards
-
Using Affinity Photo trial 1.6.4.104. Edit : In Windows 7, Wacom Intuos Pro 4, XL. The problem: Specially with custom brushes, the outline ends up covering the area you are painting, when using medium or big size brushes (common for many painters, illustrators, even comic colorists, and 2D/3D texturing artists). Even the basic brush, round brush shape and outline (a brush which indeed is enough for high quality digital painting, with proper settings by the user, and expertise), is very productive to be able to disable it at options (due to some motion blur effect, and just for an outline's nature, it is too distracting). You can disable this in most applications (of course, I do not expect A. Photo to be like any other application. But is a common ground that this is more than desirable, as an optional setting ) and leave instead the existing crosshair, or even add options (not needed) as small cursor, big dot, triangle cursor, etc. Proposed solution : Quite some artists just completely disable the outline in other applications, and choose instead some sort of cursor (our current nice crosshair). We already have a good and efficient crosshair cursor. It is not too small and not too big, and visible enough, which is very important, too. So, just being able to disable the outline, in preferences, (completely fine if it would be not a default setting), it would perfectly do it. ( Together with the issue/feature request with the color selector-magnifier which I just posted, is the other thing that is actually stopping me from purchasing A.Photo (got Designer long ago) and actually probably moving all of my workflows, in each and every field, to Affinity Photo. I have been able to sort any other obstacle with this trial, already. ) Edit : It seems there was at least one other request about this, previous to mine. There are some differences, but there is important info about the matter that might help developers, in both threads, so, I am linking it here, as well, as could be useful for them, once arrived the moment : https://forum.affinity.serif.com/index.php?/topic/52572-preferences-add option-to-removehide-brush-outline/
-
When trying to add a shadow / outline or something from effects on to a layered or grouped item the outline lets say turns green instead of red. Why would this be? I can't for the life of me work it out. P.s. I am a newbie to Affinity products and the forum. Thank you Andrew Windsor. bowling1.afdesign
-
Is there a way to hide the outlined brush tip? I guess some people might like it, but for me it is totally disturbing, especially with complex brushes. The outline hides faint brushstrokes and makes it very hard to judge if they are correct, especially with large brushes, low opacity and short strokes. I prefer just a dot, or nothing, as I see the tip of the Wacom pen anyway.


