Search the Community
Showing results for tags 'noise'.
-
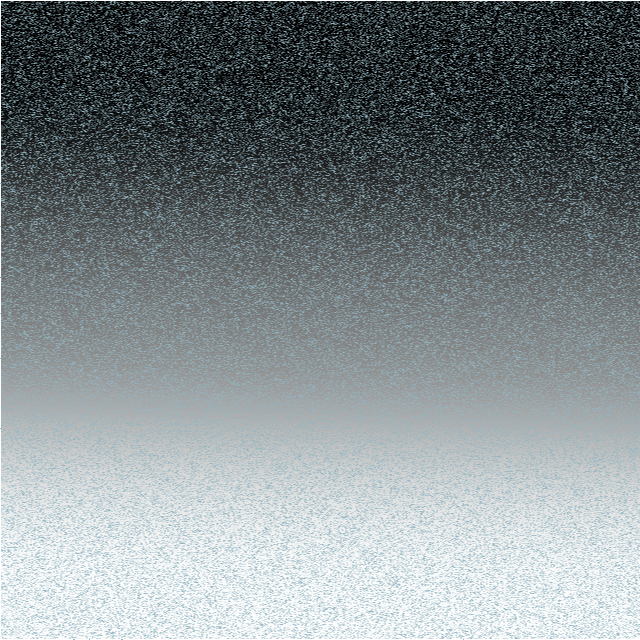
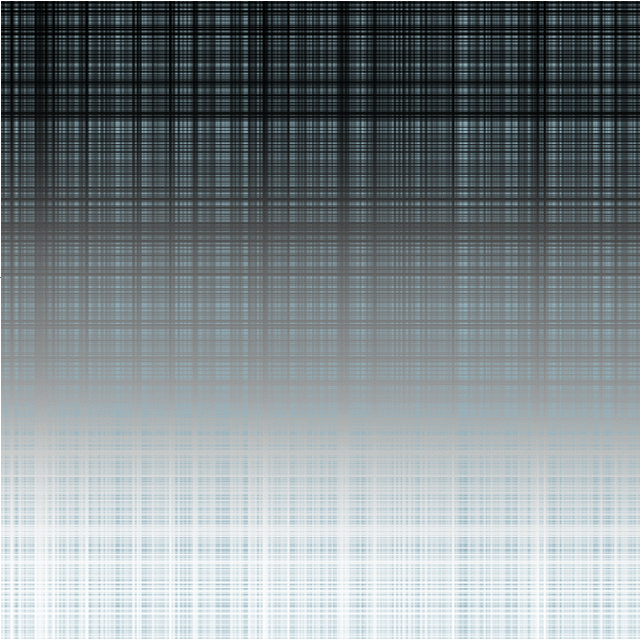
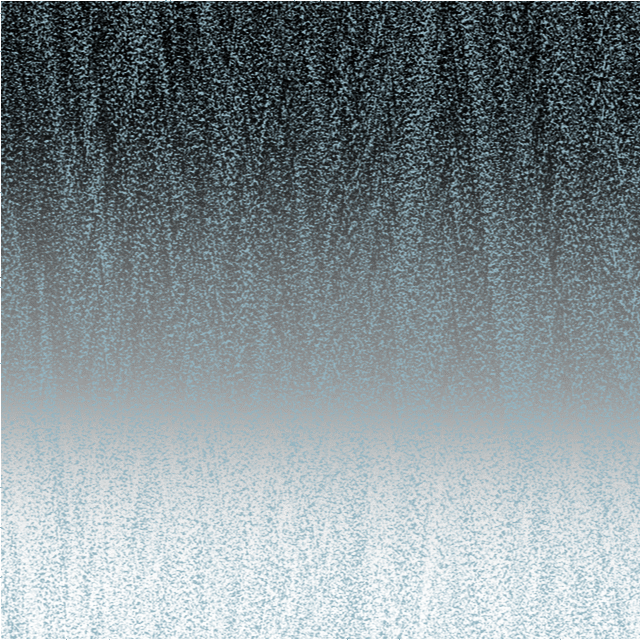
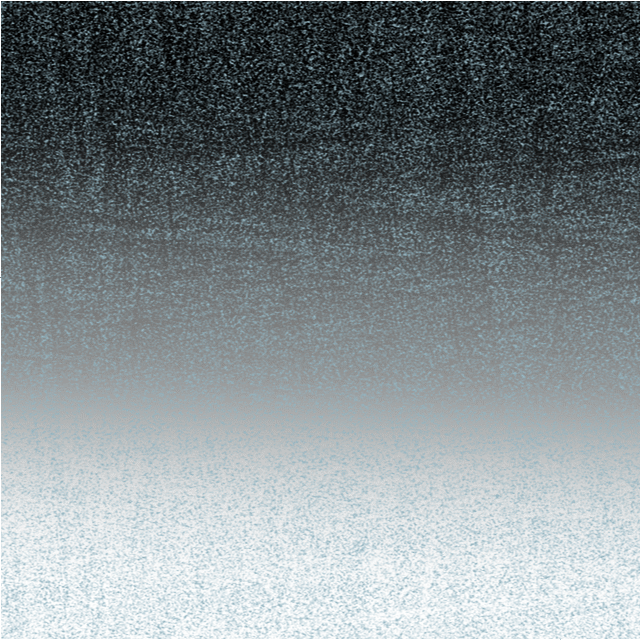
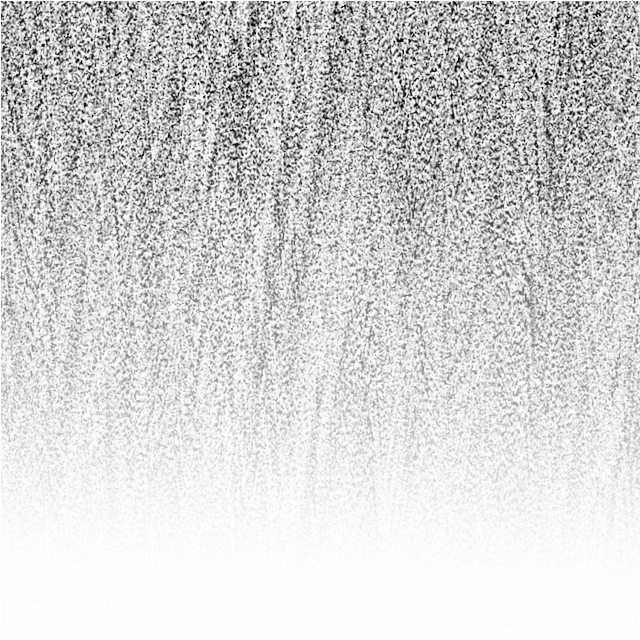
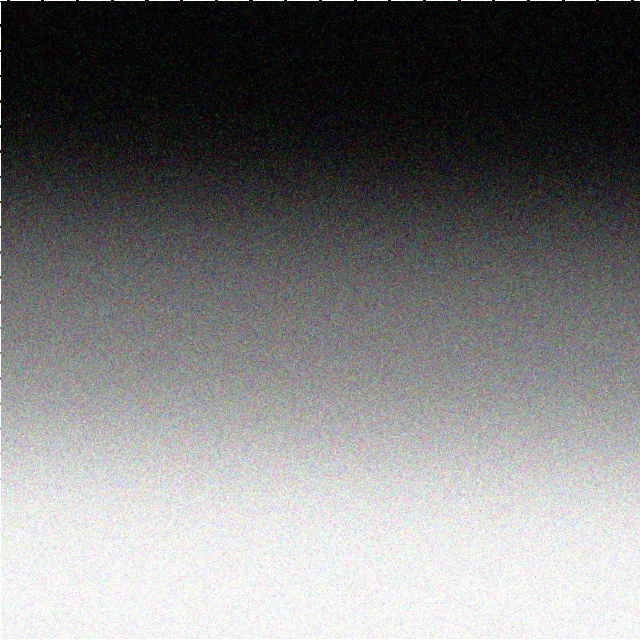
 WARNING: for the technically-minded only! The Noise functions in the Filters > Distort> Equations facility are supposed to add (unspecified) noise to an image. The only description I can find of this is in the video by James Ritson. He first duplcates the layer and then uses either noise(x*y)*a or noise4(x*y)*a in his equation. This produces a grain-like effect over his image. The documentation for equations is limited. There is the Expressions for field input in the Help system which gives, under : Noise(seed/x,y), an explanation: Generate 1D noise either from a seed or based on X/Y input with similar definitions for noise2, noise3 and noise4. James uses both the noise and the noise4 functions. In his video he is using the single seed parameter x*y, with the magnitude controlled by the a parameter. I have been experimenting with these noise functions and present here my findings Although the Expressions for field input names the functions Noise ... Noise4, with a capital letter, these will not work. You need to use a lower case n for noise. The function noise2 has no effect. The functions noise, noise3 and noise4 seem to produce identical visible results. The histograms are also identical. Using a single parameter, either a simple number, or an expression such as x*y, has no visible effect unless the Full option is selected in the Extend Mode at the bottom. When using two parameters, they need to be different in the x and y axes to produce any visible result. Multiplying the parameters by a number, such as noise(10x,10y), has no visible effect. I show here the effect of varying these parameters on a simple gradient field: Here is the effect of x=noise(x,y) and y=noise(y,x): The results for noise3 and noise4 are identical, as are noise(3x,3y) etc as are the histograms. If the parameters are the same, say x=noise(x,x) and y=noise(y,y) You get a very different effect: Almost like a tartan effect. If the noise functions are the same in both x and y such as x=noise(x,y) and y=noise(x,y), it works OK, but if you use x=noise(y,x) and y=noise(y,x) there is no visible effect unless you select Full: The difference between using Zero and Full in the Extend Mode at the bottom is subtle. Using Full seems to convert the image into a monochrome effect with the background invisible. However, the noise is based on the luminance of the background. Just for comparison, I append here the effect of the effect of the Add Noise filter (Filter > Noise > Add Noise...): You can control the intensity of the noise here, which is more than you can in any of the noise functions I have described. In conclusion, I would recommend that if you want noise, then use the Filter > Noise > Add Noise... option above until such time as the devs at Serif come up with a more understandable noise function in Equations. Having said that I am not holding my breath on this. Using noise in equations is probably a minority pursuit amongst users and the Add Noise filter is much easier. John
-
 Hi, there. I would like advice from those who have already had professional experience with printing from Affinity. I'm working with the noise effect/filter on Affinity, on a file at 300dpi for a 1:1 print scale. What is the lowest value of the noise that I can use to be visible in print? And, vice versa, is there a very high value that disturbs printing? Thanks so much!
 -
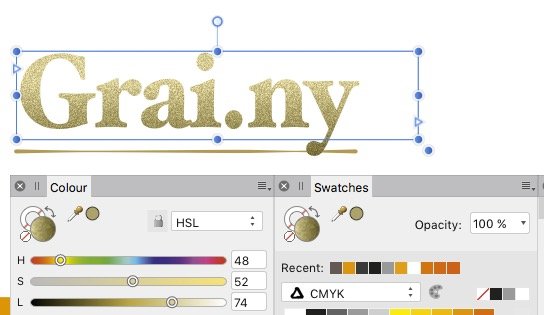
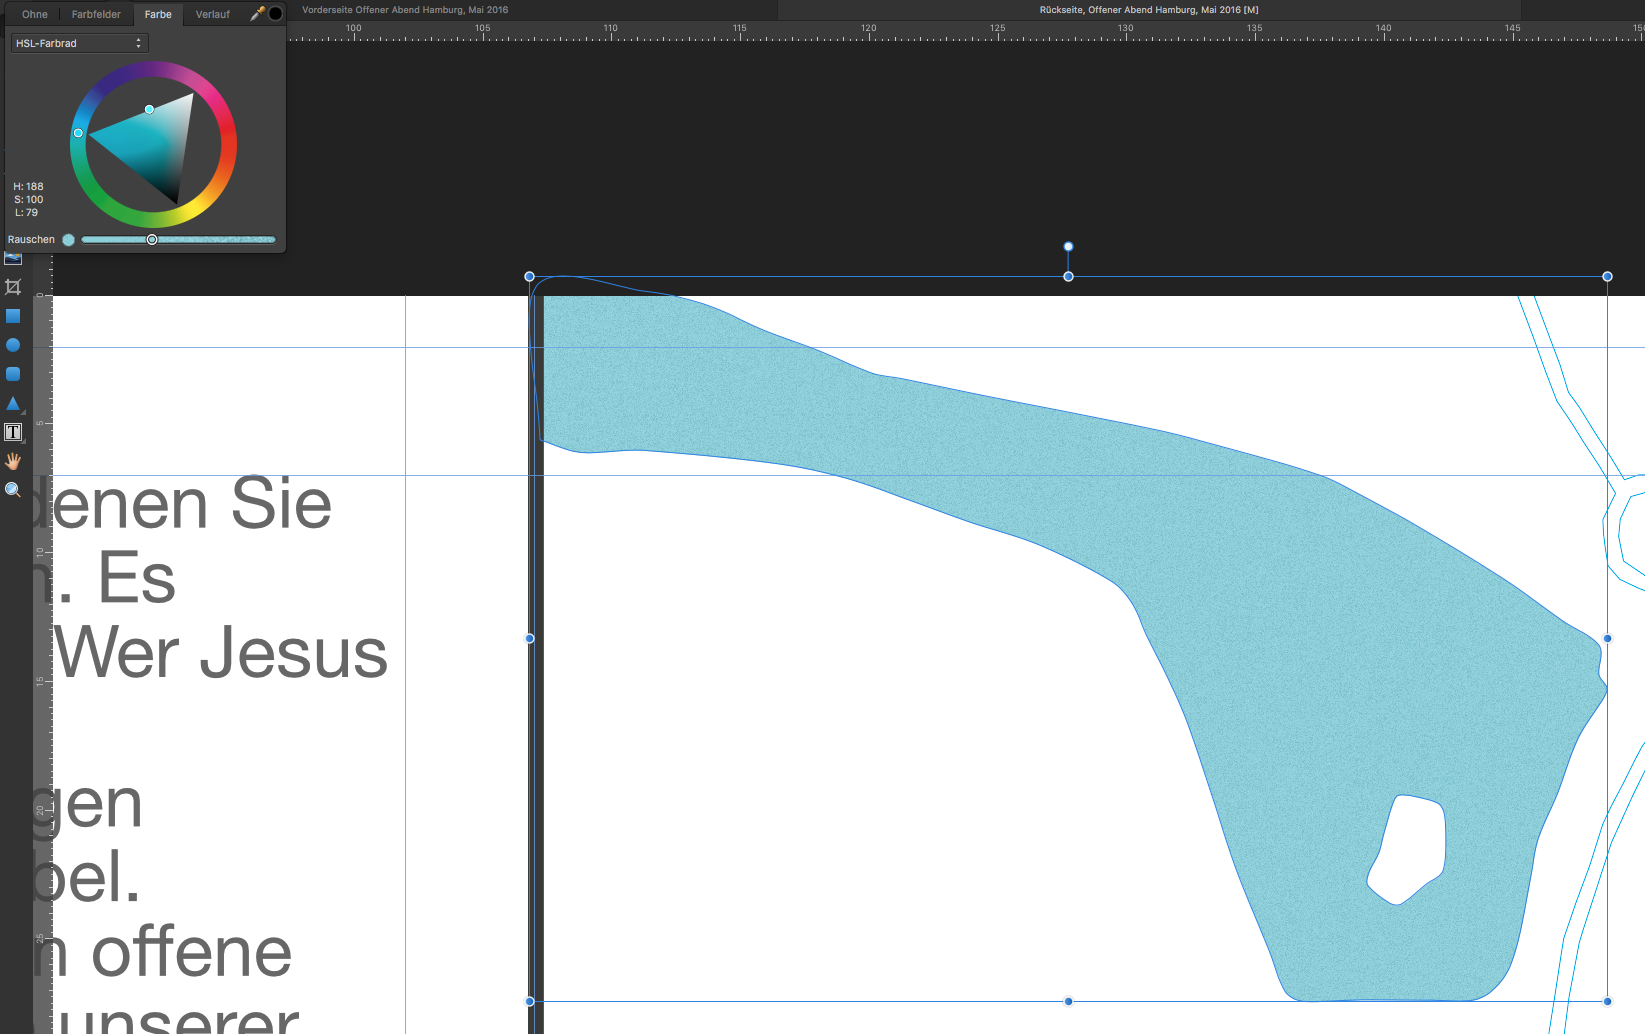
I apply an object style to a text frame. To get rid of it, I disable all layer effects* – all gone except for a grainy gradient, which also appears in the circled color and swatches previews, with HSL sliders in color palette. This structure appears to be resolution-independent: when I zoom in it is more detailed. – Great! When I now in the color pane move a slider, or switch from HSL to CMYK, both the texture and the gradient disappear, leaving an average color. No gradient, no structure. – Where is this structure defined? – Can I access the grainy structure seperately? * is there a shorter way to remove an object style than unselecting its layer-effects one by one?
-
It would be great to be able to select the order of FX on shapes. Oftentimes I want to blur the shape of a vector object, but not necessarily the noise setting in its color. Perhaps adding Checkbox to the Blur FX panel to bypass blurring the Noise attribute? Thanks for your consideration and all you do
-
 Hi' all ! I'm trying to align photos in order to procced to a noise reduction. However, if I use the classic stacking method (File -> Open stack) the alignement is made on the foreground (or maybe the part of the image is the easiest to align ?) and I don't want to ! My photos are milky way photos. In order to reduce noise in the sky I would like to align multiple photo of the milky way on the stars and not on the foreground (moutains, people, ...). Is it possible to have a feature like this ? Align layers once we have applied a mask ? Thank you for your answer :)
 -
 I have been experimenting with using the perlin noise filter in Photo and it is very nice to have a perlin noise filter right within photo. However if it could be done as a live filter with a few improvements would be awesome. Add the ability to stretch the noise Add the ability to angle the noise Here is an example of an effect I did using the perlin filter, it was a bit complex and I would love to be able to go back in and just adjust the noise without having to completely re do the whole thing
-
 Please bring back the dedicated noise slider. I searched for hours finding the noise slider until I noticed it appears when you click the opacity slider. Why does Affinity not just show two sliders? Two sliders would be so much more user friendly and easier to find and use.
 -
 I'm trying to figure out the best way you can generate a fabric using Affinity Photo. I know you can use the noise filters to generate random static, but how would I combine this with a set pattern you would get in a fabric like cotton? I'm trying to design a retro sports kit, but I don't want a perfectly flat white background for it to sit against. I've been using Google Images to try and get a decent cotton texture, but I would rather create one from scratch.
 -
As much as I like the perlin-noise filter and its settings, the fact that the noise does not tile at 1:1 width and height is a little bit of a downer. I use the noise very often for gaming shaders. As far as I know perlin noise can be made to repeat. I can imagine that I am not the only one who would appreciate this option. Otherwise: great software!
-
Captain Noise character I originally came up with for Nottinghams NLC charity festival
-
 Hi, is it possible to add noise (destructively or non-destructively) to a layer mask? (this can be helpful to reduce banding when using smooth gradients inside a layer mask, in an 8 bit document). I did try it by selecting the mask and adding a Noise Live Filter Layer (and also adding Filters-Noise-Add Noise) but it didn't seem to work. Thanks!
 -
I was trying to follow a Photoshop tutorial on creating clouds and found that, in Affinity, Perlin Noise should do this for me. I created an empty file 800 by 800 px, RGB/8bit and set the foreground/background to black/white. I then duplicated it to create an editable layer. I then selected Filter>Noise>Perlin noise. No matter what I did to the parameters there was no effect on my image. It remained white. I did click on Apply! I have also tried to do the same with a 50% grey image, to no avail. What should I be doing?
-
 I am new to Affinity Photo and would like to know the best way to reduce moire' patterns in scanned images of printed materials (I.E. greeting cards). I have searched for some tutorials using Affinity and have some idea regarding an approach but am hoping for some suggestions.
 -
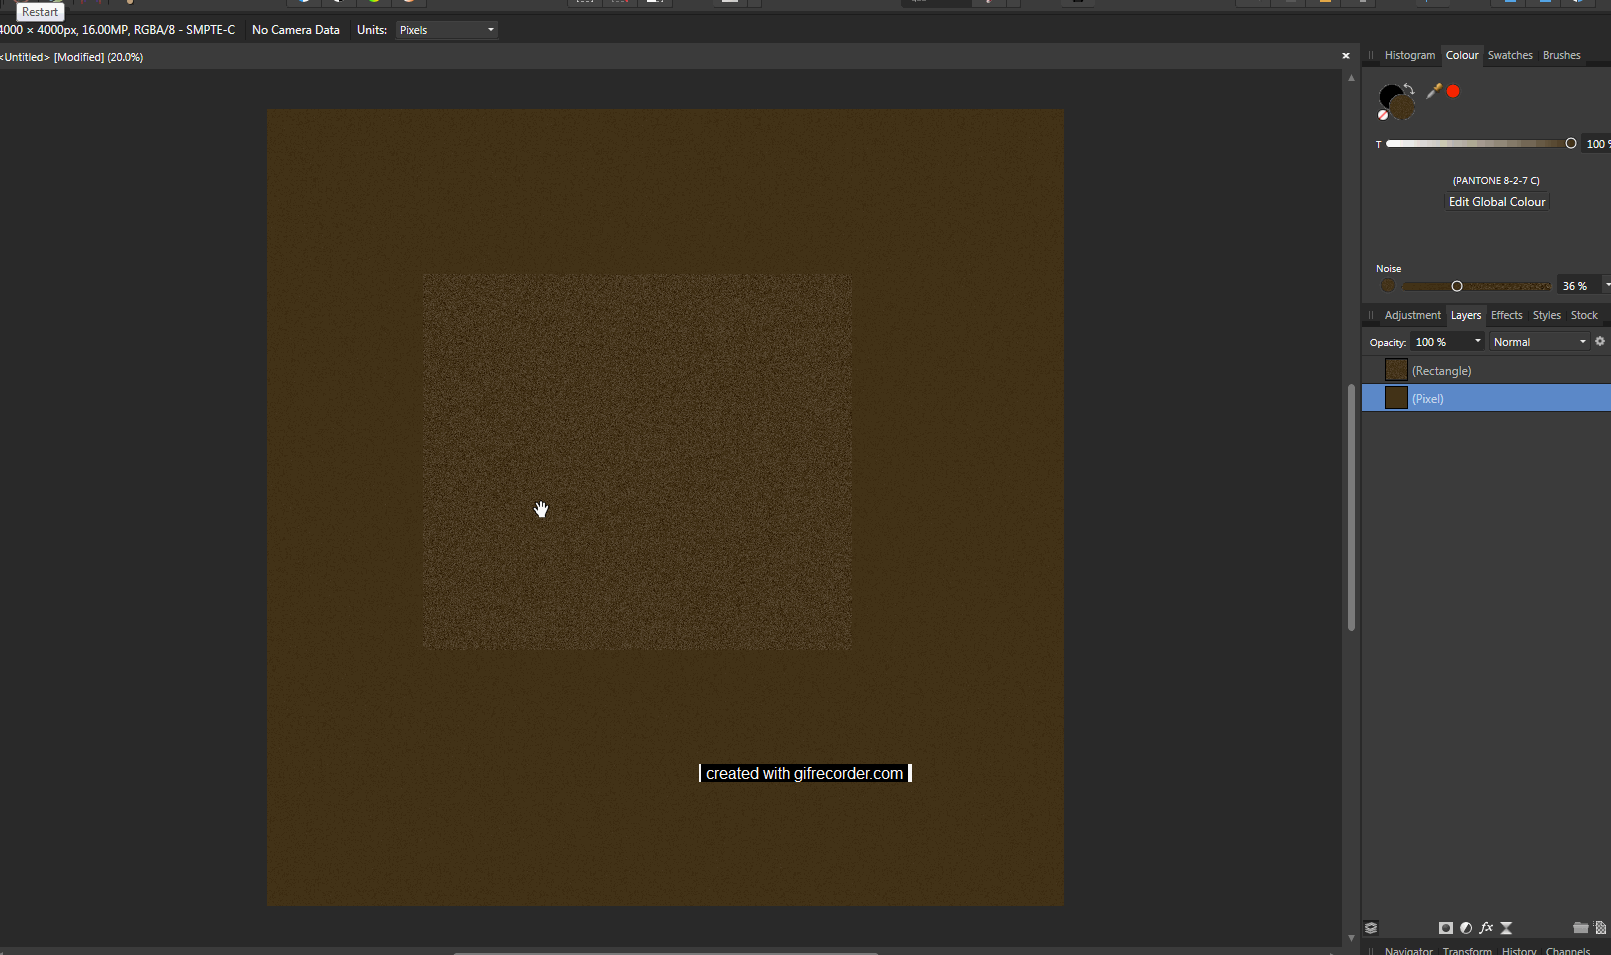
Hi, great program, great work, and I hope you can continue making it even better! I cannot seem to add noise to a pixel layer with a fill My Steps: Create document (I chose Web, custom, 4000x4000 pixels (but same with default web doc size)) Create pixel layer Choose fill tool Pick colour Click opacity/noise toggle Increase noise not possible Slider slides but resets back to zero. Other times it has moved and stayed in place but still does not change noise level. This is on both the top context menu or on the right fill menu tab. This works in the mac version of the released AF ver. 1.5.2, and but NOT in the Windows beta 1.6.0.75, OR released version for Windows 1.5.2.69 I can however, create a rectangle and add noise to the fill colour in this rectangle in Windows versions, just like Mac I hope the Windows version can operate like the mac version :) Further to this it seems that if I switch (Alt+tab) in and out of the program, then a certain level of noise appears. You might be able to see this slight noise on the doc in the animated attached gif, as it is there slightly, but once in the program, I cannot control it.
-
Hey. I have a shape in a document with a specific fill color (bright blue) with noise. In another document, I have a different document i have a shape that I would like to give the same fill color and also add noise. I filled the shape with the exact same color. Everything looks identical. However, as soon as I add noise, the color shifts towards green. Even if I drag the noise slider to zero again, the color shift stays. Any ideas? I am using Affinity Designer 1.4.1
-
Hello, fellow Affinity lovers! Recently I was working on a rather curious project. The main idea was to have an 'ordered disorder'. Everything, except for the first picture (had a photo to work with), was created from scratch. Nothing but Affinity Designer and Photo was used. — LINK TO THE BEHANCE PROJECT — Let me know what you think!
- 5 replies
-
- 2
-

-
- noise
- distortion
- (and 1 more)
-
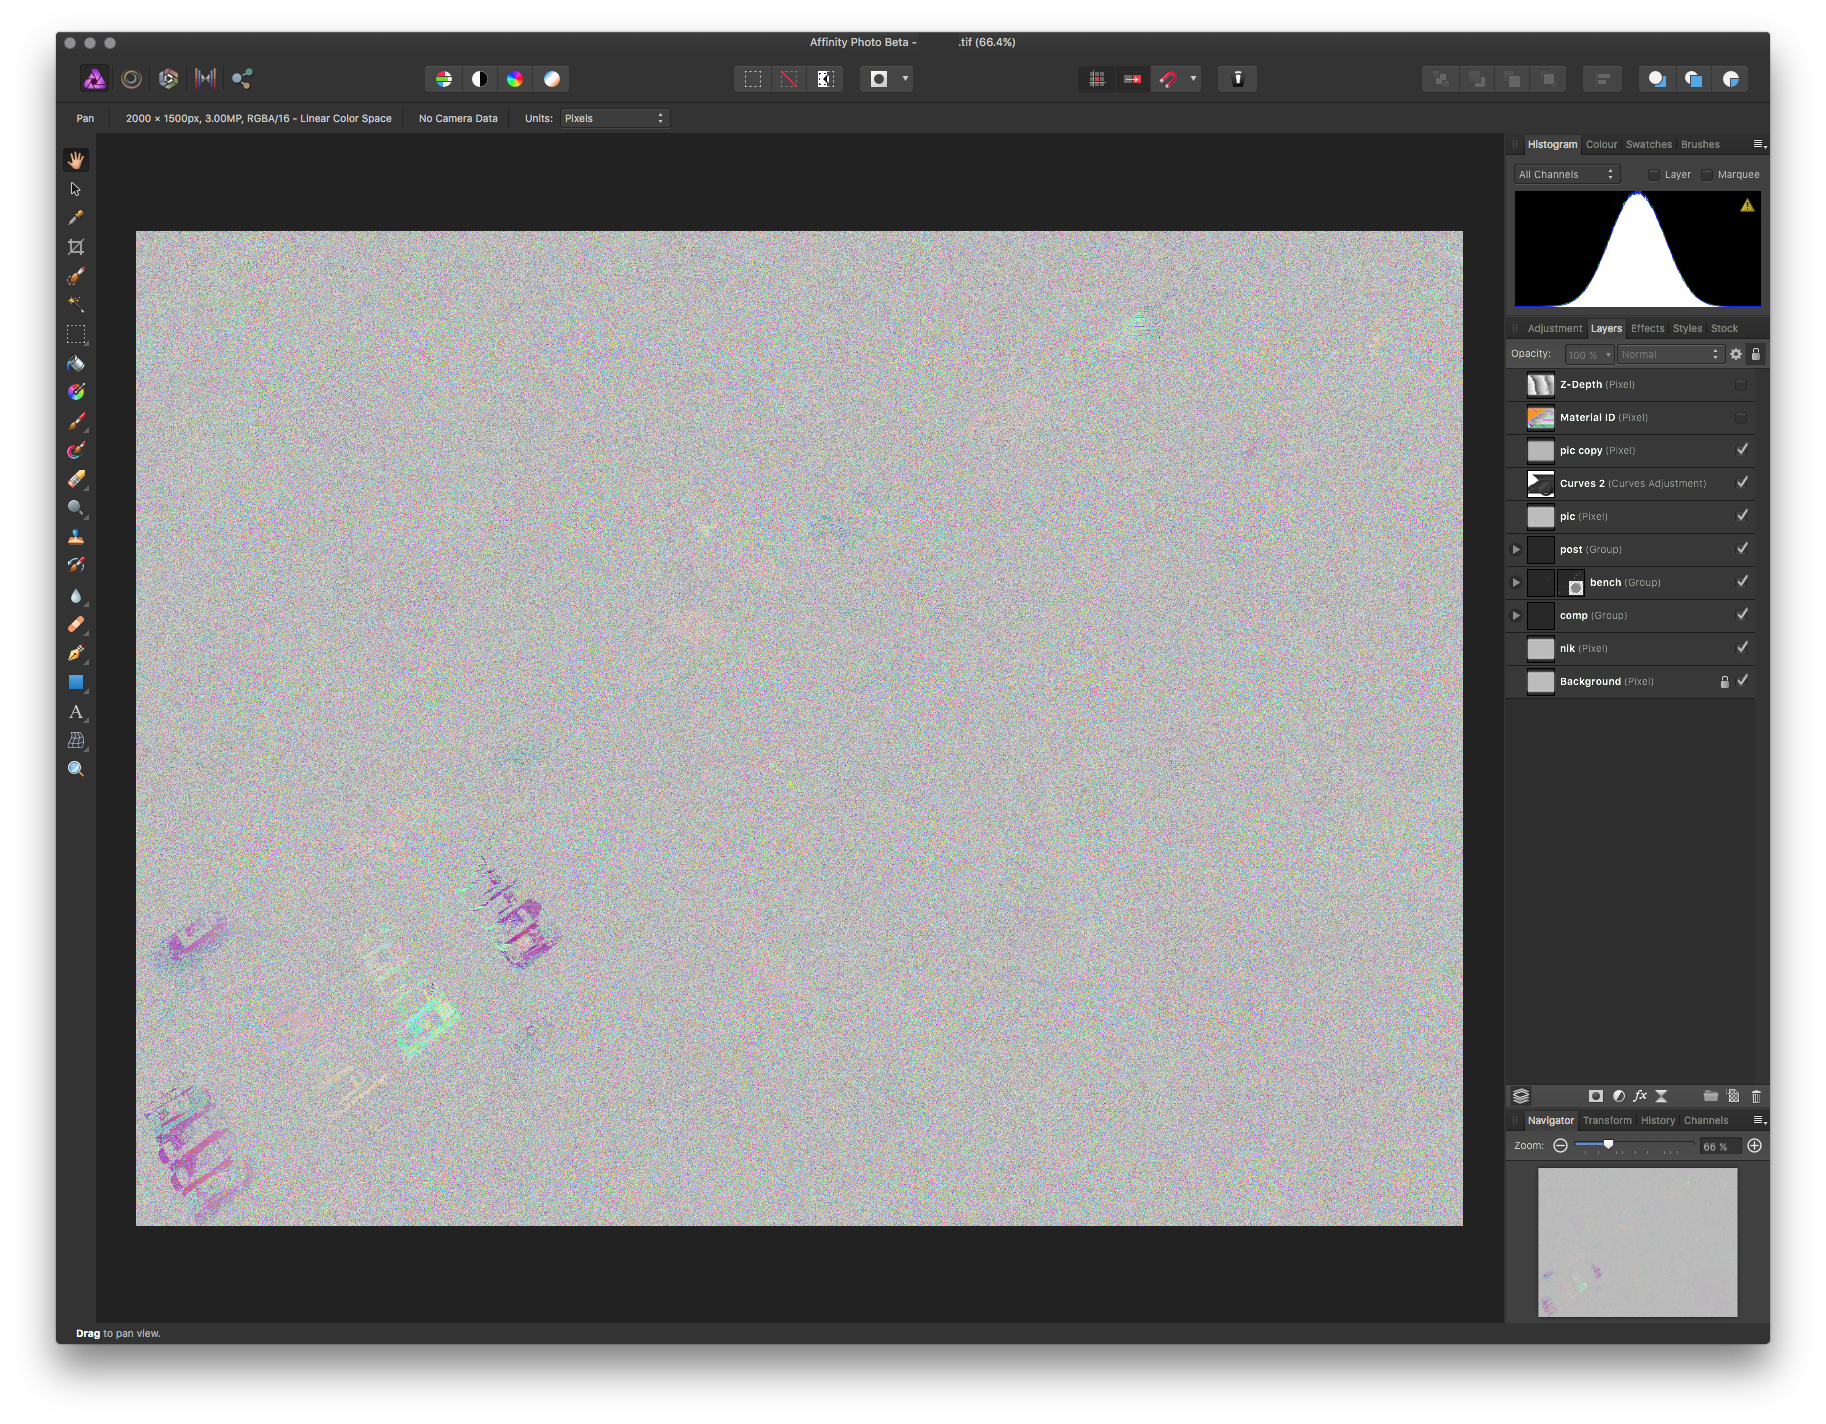
Hey guys, This is my first post here, so firstly I would like to express my gratitude towards the hard work you've put in this great software, it's quite a relief to be able to move away from the giants. I would use AP for postproduction work for renderings, and up to this point I saved out my renders as layered TIFFs (I cannot change that, since my main working software would not eat any other layered file types, nor .psd, nor .afphoto). In 1.4.3 I wasn't able to open my previous TIFFs, because they were flattened (although PS saw the layers perfectly). In 1.5 beta 5 I finally can see the layers, but every pciture looks like this: This is the PS version: Is there a way to fix this, or is this a known issue, that awaits fixing? Regards, Balazs
-
As far as I can tell, one cannot directly add noise when creating a global colour. There's a workaround, but it's a bit cumbersome: - Create an object and create/apply a noisy colour - In the swatches panel create a global colour, this will take you to a new colour creation wheel; create any colour you want - Select your noisy colour from 'recent' and drag it to your 'painter palette with a dot' icon - Delete the first global colour (if you don't have a use for it So the feature request is simply to have a noise slider in the global colour panel Thanks!
- 1 reply
-
- 1
-
-
- affinity designer
- noise
- (and 2 more)
-
Hi, I need a precise gradient in 32-bit mode, to go from left to right. (I use it as a texture in a game - the values control some math functions over time.) The "Noise" value is set to 0 (or so I guess, because there is no numerical input). Yet still there is a visible dither. I use version 1.5.0.35. Win 7 64-bit, NVidia GTX 760, newest drivers. Oskar gradient.afphoto
-
I may have posted this before, excuse me if I have, but this would be great to see in an upcoming beta. It would be awesome to have either/or app- and document-wide settings for Noise. It's tedious to remember to change the Noise setting in new colors, and in some of the studio fly-out Color panels (off the Context tool bar) the values are not displayed numerically or with a text input field, so one has to eyeball it or go to the Color studio panel - which is often hidden on my laptop screen to maximize real estate... (#1stworldproblems) It would be great to have a Noise setting somewhere in the General section of the Preferences (Tools or General?) Additionally it would be great to have a setting available in the New Document panel, for setting the Color Noise value in a new document, overriding the Default value set in the Preferences panel. It would also be great to be able to change ALL of the Noise values of color swatches via the Color studio panel or the Document Setup panel. Additionally, it might be interesting to consider whether the amount of noise applied is modulated by the app based on output resolution. Meaning in smaller or lower res files, one might desire less or more noise, since it may be exaggerated or minimized by the change in size. Not sure how this would be implemented, but I know visually it would be a beneficial thing to control based on output requirements.... Thanks for all the amazing work you do and for your consideration. :)
-
 Hello, I have been experiencing a problem with Affinity Photo adding an extreme amount of noise to a photo after developing a RAW image. I am using Affinity photo ver. 1.4.3 and a Mac with Sierra OS, camera is a Sony a6000 shooting RAW. It does not matter what the zoom level is on the photo in affinity, its just there, and I cant get rid of it even with the noise filter maxed out to extreme. Has anyone had this problem? Thanks Ryan
 -
I would like to have some control over how much noise I apply to an object. Currently I move the slider (which should be in the normal color panel as well, not just in the toolbar) as far as I want. But I don't know that value. If I have an other object and want to apply the same amount of noise, I have to move the noise slider to the point I think it was on the other object. Adding an actual number next to the slider would make it easier. I could enter a number (amount of noise), and I could copy that number and apply that exact same amount of noise to another object.
-
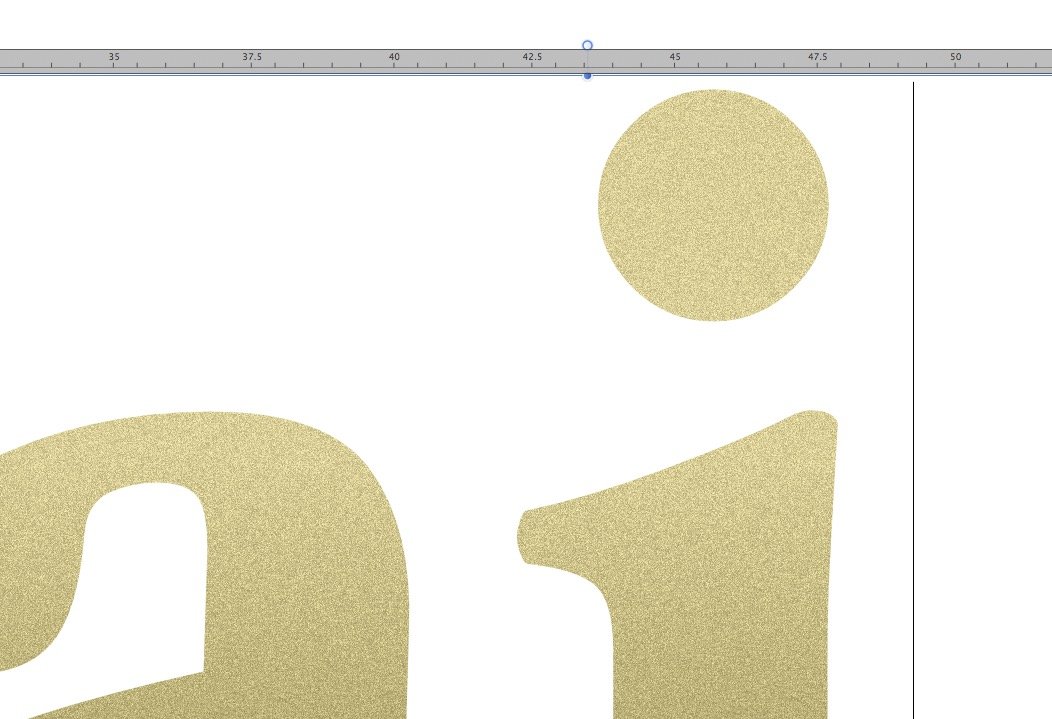
 The attached image shows the effect of applying the noise filter to two documents. In both cases the document was a single layer of 50% grey to which I have added noise. The only difference being that document no 1 was 600 x 400px and document no 2 was 6000 x 4000px. The attached image is a screen shot of the lower right corner. Each screenshot represents exactly the same area of the screen with viewed at 100%. In the smaller document the applied noise is (as one would hope and expect) the same as it's preview. However, in the large document the applied noise is completely different to it's preview. It seems to me there are two possible explanations. 1) Noise is generated with a pre-set absolute resolution irrespective of document size and resolution. If this is correct it is going to appear finer as document sizes get larger. Which may be what is happening here. If however this is the case then surely that should be reflected in the preview which it is not. 2) Noise is generated exactly as per preview but is not getting properly applied. Unless there is some other rational explanation here that I am completely missing, it would seem to me that, either way above, AP is not behaving as one would expect.
-
I just saw Kubo and I can't get over how amazing it was so I decided to create some fan art. This seemed like as good a time as any to try out the Noise option in AD to give a textural, paper-like feel. I absolutely love how noise is seamlessly integrated into this program. I've avoided texturing things like this in past programs because it was too cumbersome, time consuming, and CPU intensive. None of that frustration here. What a wonderful feature. Great job Affinity!
-
 1. New document 2. Draw a shape with a coloured fill 3. Add 100% noise 4. Rasterize the shape Observed: The fill of the rasterized object has much less noise Expected: Object looks the same as it did before rasterizing