Search the Community
Showing results for tags 'multi'.
-
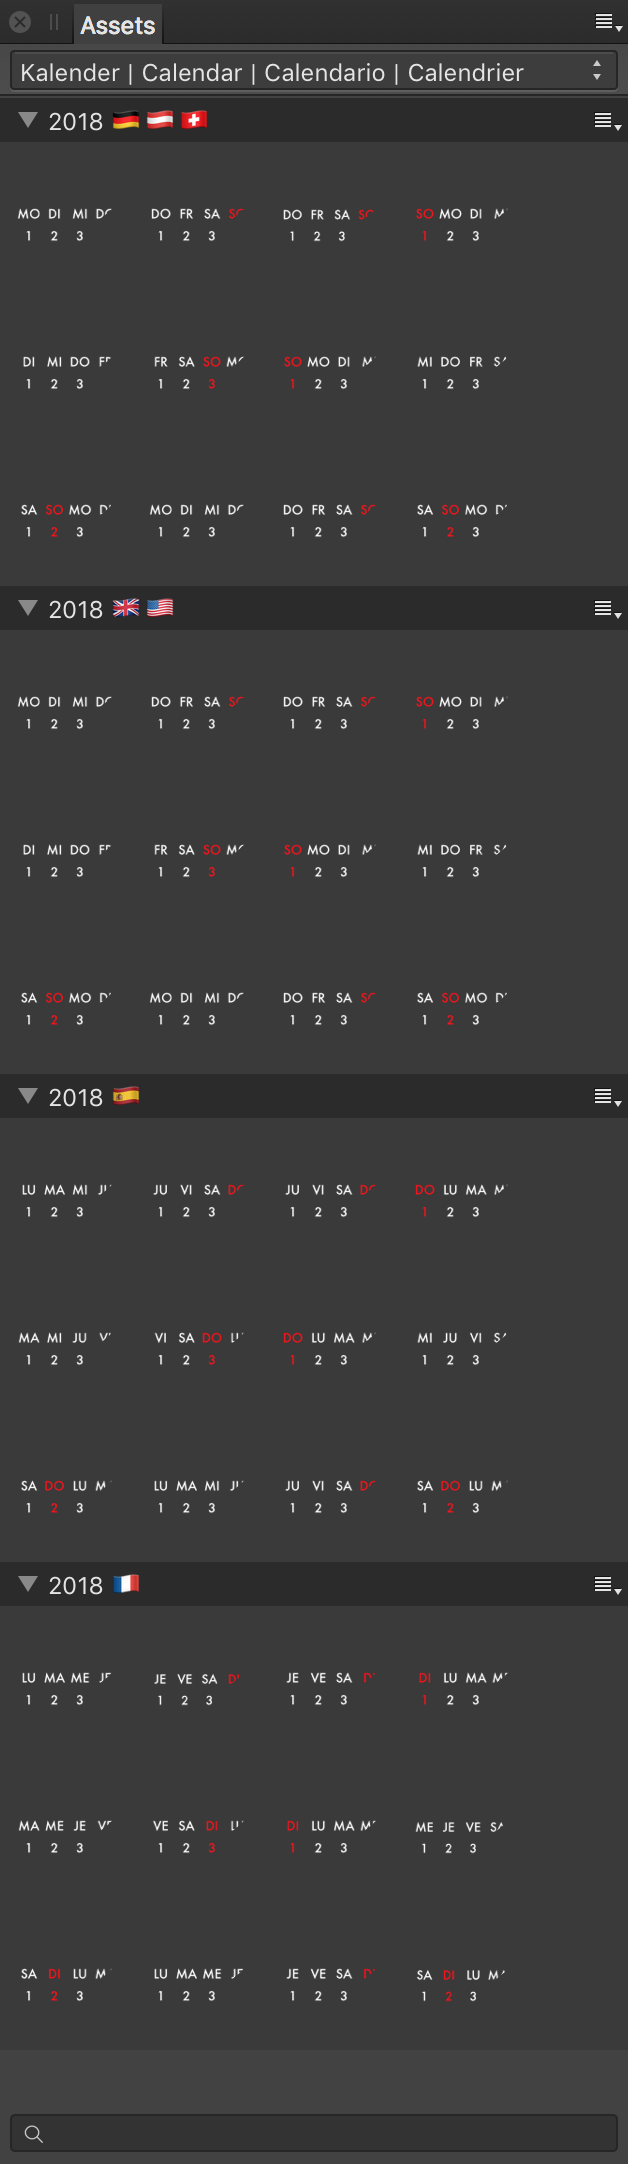
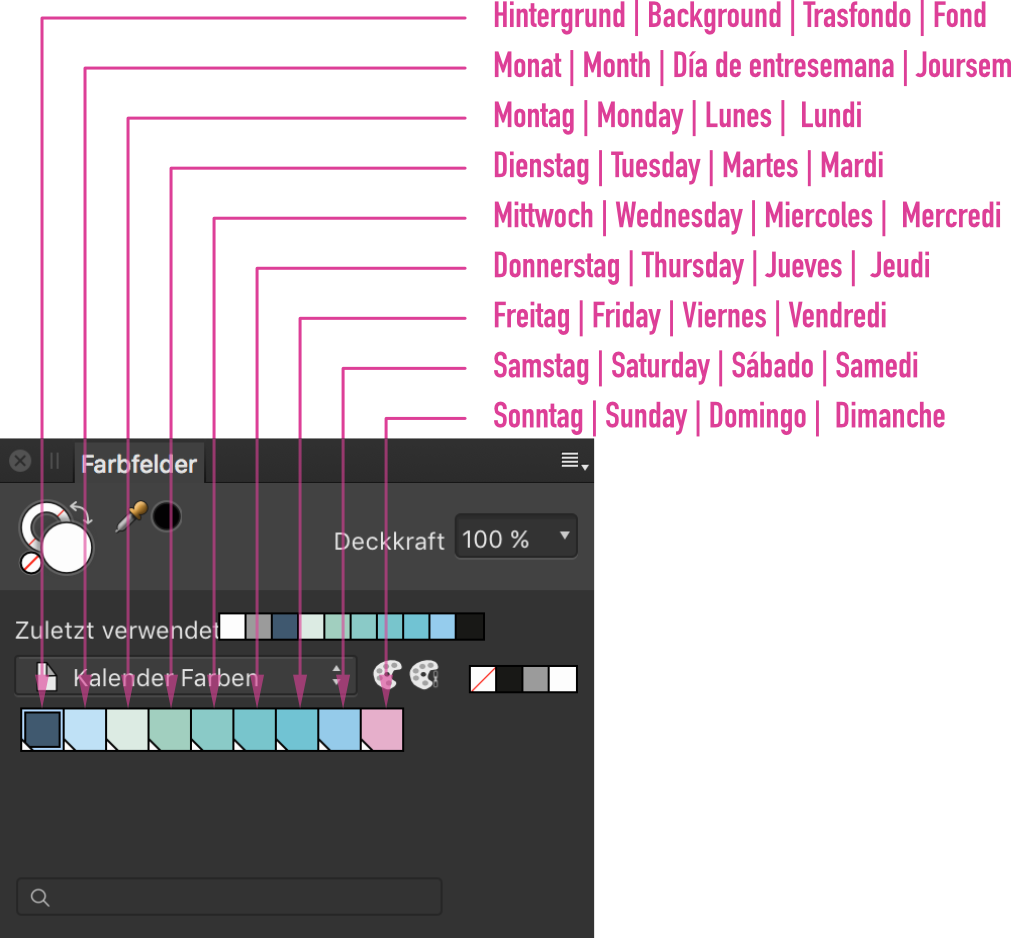
 If've created some calendar templates, assets (DE, EN, ES, FR) and a document color palette to create calendars for 2018. Content of the zip archive: ▾ Assets ◻︎ Kalender-2018-DE-AT-CH-EN-ES-FR.afassets ▾ Color palette ◻︎ Farbpalette | Color palette | paleta de colores | palette de couleurs.afpalette ▾ DE ◻︎ DE_Kalender-DIN-A2-Hochformat.afdesign ◻︎ DE_Kalender-DIN-A2-Querformat.afdesign ◻︎ DE_Kalender-DIN-A3-Hochformat.afdesign ◻︎ DE_Kalender-DIN-A3-Querformat.afdesign ◻︎ DE_Kalender-DIN-A4-Hochformat.afdesign ◻︎ DE_Kalender-DIN-A4-Querformat.afdesign ▾ EN ◻︎ EN_Kalender-DIN-A2-Landscape.afdesign (Endformat W x H: 594 mm x 420 mm) ◻︎ EN_Kalender-DIN-A2-Portrait.afdesign (Endformat W x H: 420 mm x 594 mm) ◻︎ EN_Kalender-DIN-A3-Landscape.afdesign (Endformat W x H: 420 mm x 297 mm) ◻︎ EN_Kalender-DIN-A3-Portrait.afdesign (Endformat W x H: 297 mm x 420 mm) ◻︎ EN_Kalender-DIN-A4-Landscape.afdesign (Endformat W x H: 297 mm x 210 mm) ◻︎ EN_Kalender-DIN-A4-Portrait.afdesign (Endformat W x H: 210 mm x 297 mm) ◻︎ Kalendarium-DE-AT-CH-EN-ES-FR.afdesign ◻︎ Kalendarium-DE-AT-CH-EN-ES-FR.pdf All afdesign files have a bleed of 3 mm and use the color profile ISO Coated v2 300% (ECI). Please contact your printing house before ordering and check the bleeds and color profile. You will find an instruction (GERMAN) on my YouTube channel: Hopefully these freebies are useful for you. Feel free to like and share... Keep on drawin' Norbert
-
- 4
-

-
- affinity designer
- affinity photo
- (and 3 more)
-
Greetings! I had to do a bit of study and homework in order to wrap my head around the clipping and masking operations in Designer and Photo. In the process, I developed a one-page infographic (attached), and it apparently has already helped some folks on the Affinity Designer and Photo Group in FaceBook: https://www.facebook.com/groups/AffinityDesignerPhotoPublisher/. I will be updating it shortly, but wanted share the first version here for comments and suggestions. Enjoy! Clipping vs Masking.pdf
-
I think that 25+ years of experience with DTP apps like PageMaker, FrameMaker, QuarkXPress, InDesign and DOA (Design Oriented Apps) like FreeHand, CorelDRAW, Illustrator, Xara, Photoshop, give me room to say my opinion about Publisher, Designer and Photo. And this is: Publisher should be free of DOA features. All these years I never ever used these kind of features in DTP apps. I always like everthing clean: DTP for finalizing/merging text with design and DOA for design. If you develop separate DOA you don’t need it’s tools in DTP app and vice versa. Quark needs it, but Publisher does not. Publisher file format should not be open in Designer or Photo. Could you open ID files in AI or PS? No? Why? Because it is not supposed to work that way. But opposite is quite OK. It must, which is normal. DTP features must be removed from DOA. Artboards are OK. But pages, text chain, character and paragraph styles... No. Local character and paragraph formating and text effects (warp text effects like in Photoshop?!) is OK. Text effects in PS instead in AI? Video editing in PS? Character and paragraph formating in AI and PS? Adobe totally lost it’s compass. Publisher and Designer. Only 2 apps instead of 3. Designer and Photo must be merged into one app because they share the same purpose, a lot of code and recently -- same bug fixes. It will be also a war against bloatware. As separate apps their instalation size is 500+ Mb and if they are merged I suppose it will be cca 300 Mb or less. Not to mention how much space they take on HD when installed. If you need ideas for another apps then you can make your own Math equation and Chemistry formulae editor(s) and a Music score app.
-
 Hey guys, Some months ago I saw a redesigned Apple Music, I liked the idea, so made my own. To check out all the story behinds it, I made a huge publication on medium, with images and screens all made on Affinity Designer and Photo. would love to you guys check it out! https://medium.com/@gustavoantoniogonalves/i-saw-a-redesigned-apple-music-so-i-kinda-redesigned-it-again-8b3dfb5c5abf?source=linkShare-92ff1568a988-1507110699
 -
 Hi there, I'd like to see a lighter/brighter mode for the whole UI. Sometimes it's much better to work in a lighter/brighter UI as in a dark mode (which I also like much!). I think your UI is a lil bit to dark. I like more the dark-look of the native Apple Pro Apps. It feels a lil bit better :)
- 232 replies
-
- 16
-
-
I create t-shirts and prints in my spare time from doing web design. Here are a few samples of my work. My typical workflow would be: 1) Sketch my idea up or bring in photo elements into Affinity Photo to create a mock-up. 2) Refine the mock-up in Affinity Designer, since I will need to scale the design for different sizes. 3) If I need to create a halftone, unfortunately I do this in a different program, but I will bring it back into Photo to create the mask I need. If I need convert a bitmap to a vector, I just use an online converter at http://www.autotracer.org (no affiliation) and I'll bring an SVG into Designer. There are still a few things I wish the programs had, but all-in-all I love the programs. The fur on the Panda was done completely in Designer and I think that's awesome!
- 4 replies
-
- 3
-
-
- affinity photo
- shirts
- (and 2 more)
-
Discovery You discover something that is very important to you. Sometimes it's like out of the blue, and you don't know much about it (Because you got used to something else, maybe). Later, you don't want to miss it anymore. Meine Inspiration zu dieser Arbeit war das Album Cover „Discovery“ von ELO. http://b-bertuleit.de/discovery/ I'm looking forward to feedbacks, thank you friends
- 7 replies
-
- 1
-
-
- affinity designer
- vector
- (and 1 more)
-
Just thought I would share this one Experimenting with a new set of brushes [fur and vegetation] and combining AD elements into AP Original Size A4 (300 dpi)
-
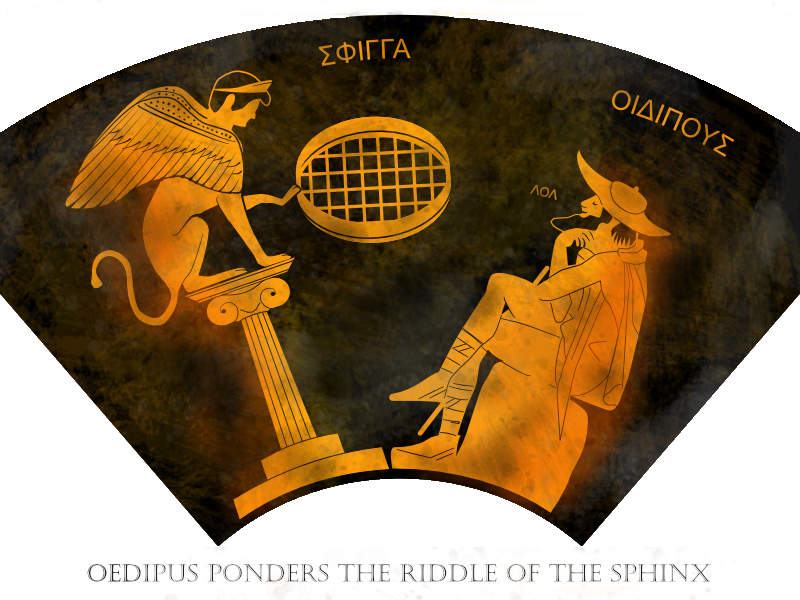
No matter how serious I try to be in my graphic work, my sense of humour keeps muscling in. Finally I gave way to two whims, and the results are below. If either (neither?) of these makes sense to you, don;t worry: my idea of what;s funny can be a little obscure. Oh, and make sure you're sitting down and not drinking anything. Just in case ... I can't claim any credit for the actual joke, but the artwork is all my own on this animated GIF: Both of these were made by tracing over a photo. The 'Greek' one was done in vectors in AD and then 'distressed' with a pixel layer, while the other was largely made with AP in pixels only; the finished images were imported into an elderly Animation Shop 3 for rendering.
-
These brushes have been updated into new and more comprehensive sets New versions are located here: Dots Hatching Old versions: 02 Texture Brush Pack.zip Texture Brush Pack 02_visual.afdesign
-
I made some channel mixer adjustments for AD and AP which I'd like to share with you. You can add them to your AP though opening the document, selecting each group, selecting the "channel mixer" adj, so that it's panel opens up, click "add preset". (I've made a feature request to make that easier) You can then access them by the "view > studio > adjustments" panel which is active by default (only available in AP) These are a bit "Instagram like" so please don't overdo it, blend modes, opacity and blend ranges can, and should be adjusted upon your needs for more information about such techniques you can have a look over here https://forum.affinity.serif.com/index.php?/topic/37125-ap-ad-beginner-amateur-pro/ cheers channel mix.afdesign PS: similar presets vor curves are available here PS: similar presets for "LUT" adj. are available here
-
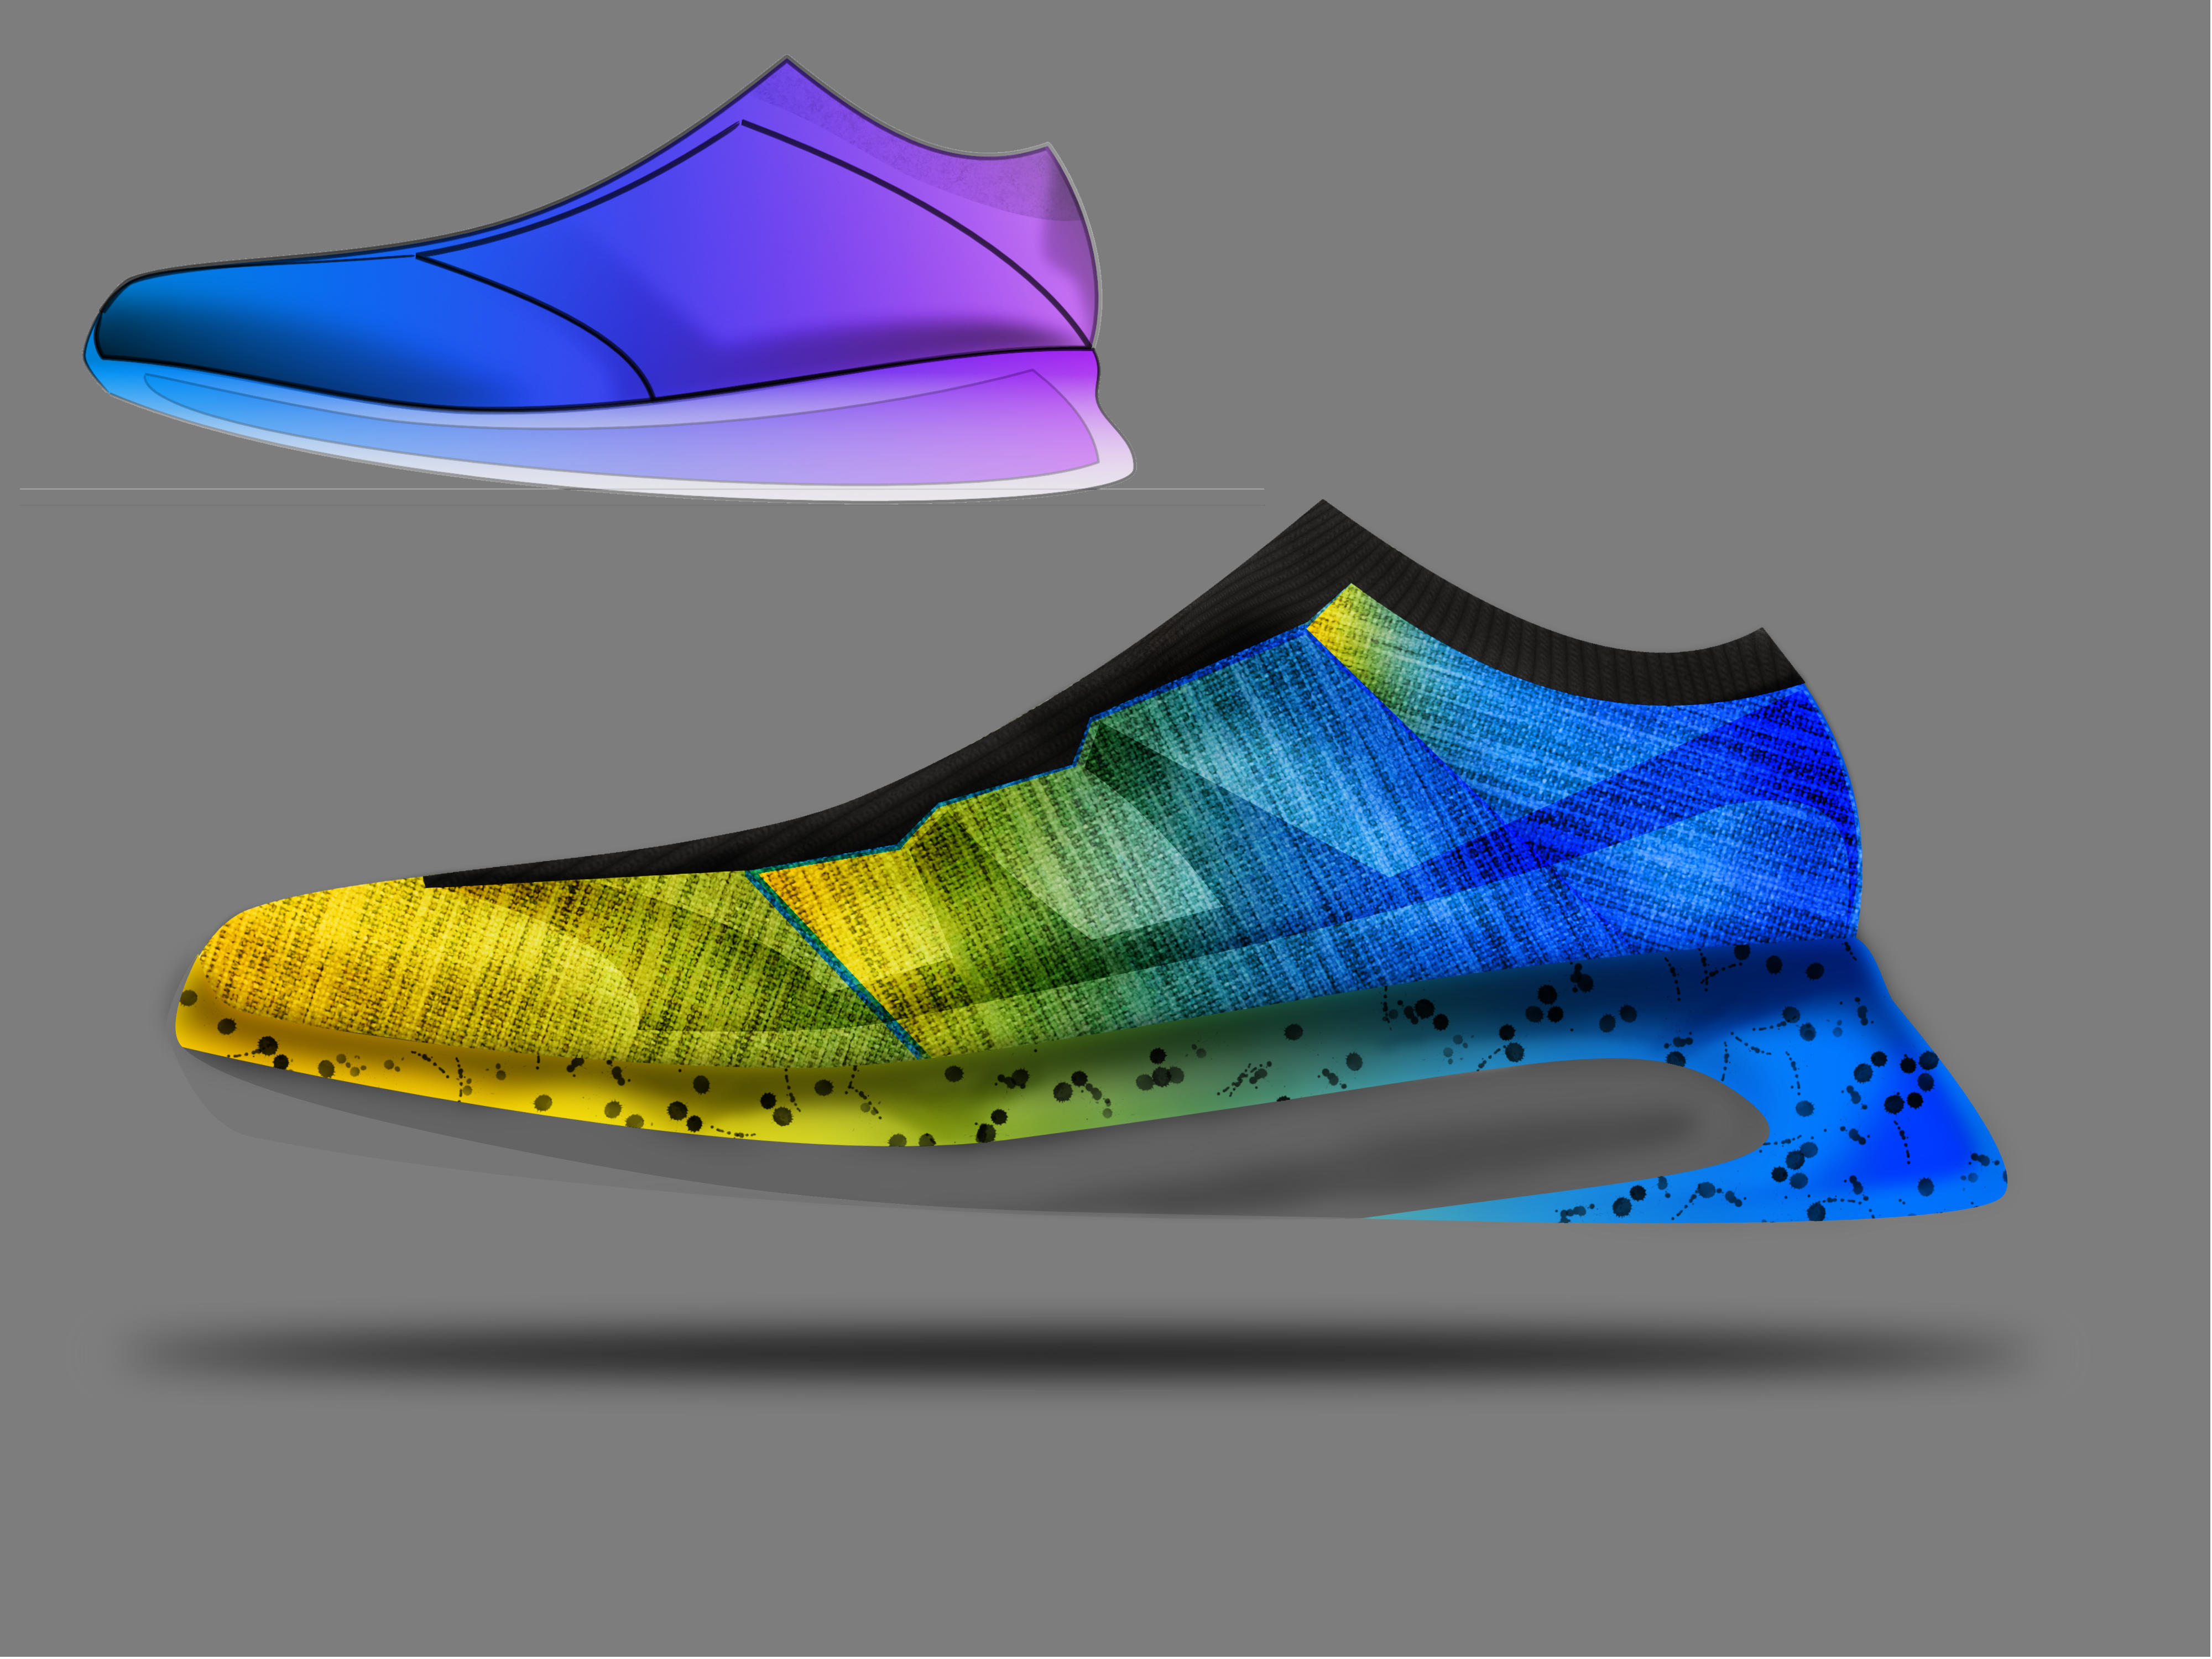
Hello, I present my first shoes. Project AD, and finalization with AP
- 5 replies
-
- 1
-
-
- affinity photo
- multi
- (and 1 more)
-
Hello, here is a link to my website, where I show some book cover designs (Print, ebook). All are created with aPhoto and aDesigner. For me, there are no better apps for this job. http://dein-buchcover.de/portfolio.html Looking forward to any feedback, thank you ;-)
- 1 reply
-
- 2
-
-
- book cover design
- buchcovergestaltung
- (and 5 more)
-
 Hello guys, My site is ready and online My goal is to make all future products completely free, but for now, I can not keep the site without the paid products, so, some products will be paid, it will be free, so, My license is different from other markets all products are free To create your own HTML themes. I plan on upload something new every week, On Friday, preferably I hope you like it, please, feel free to contact me at any time, And donations are always welcome https://affinitymarketui.com/ Best Regards Heli Herrera
 -
 I need it, quick. Took about 15 minutes of research and couldnt find a download
 -

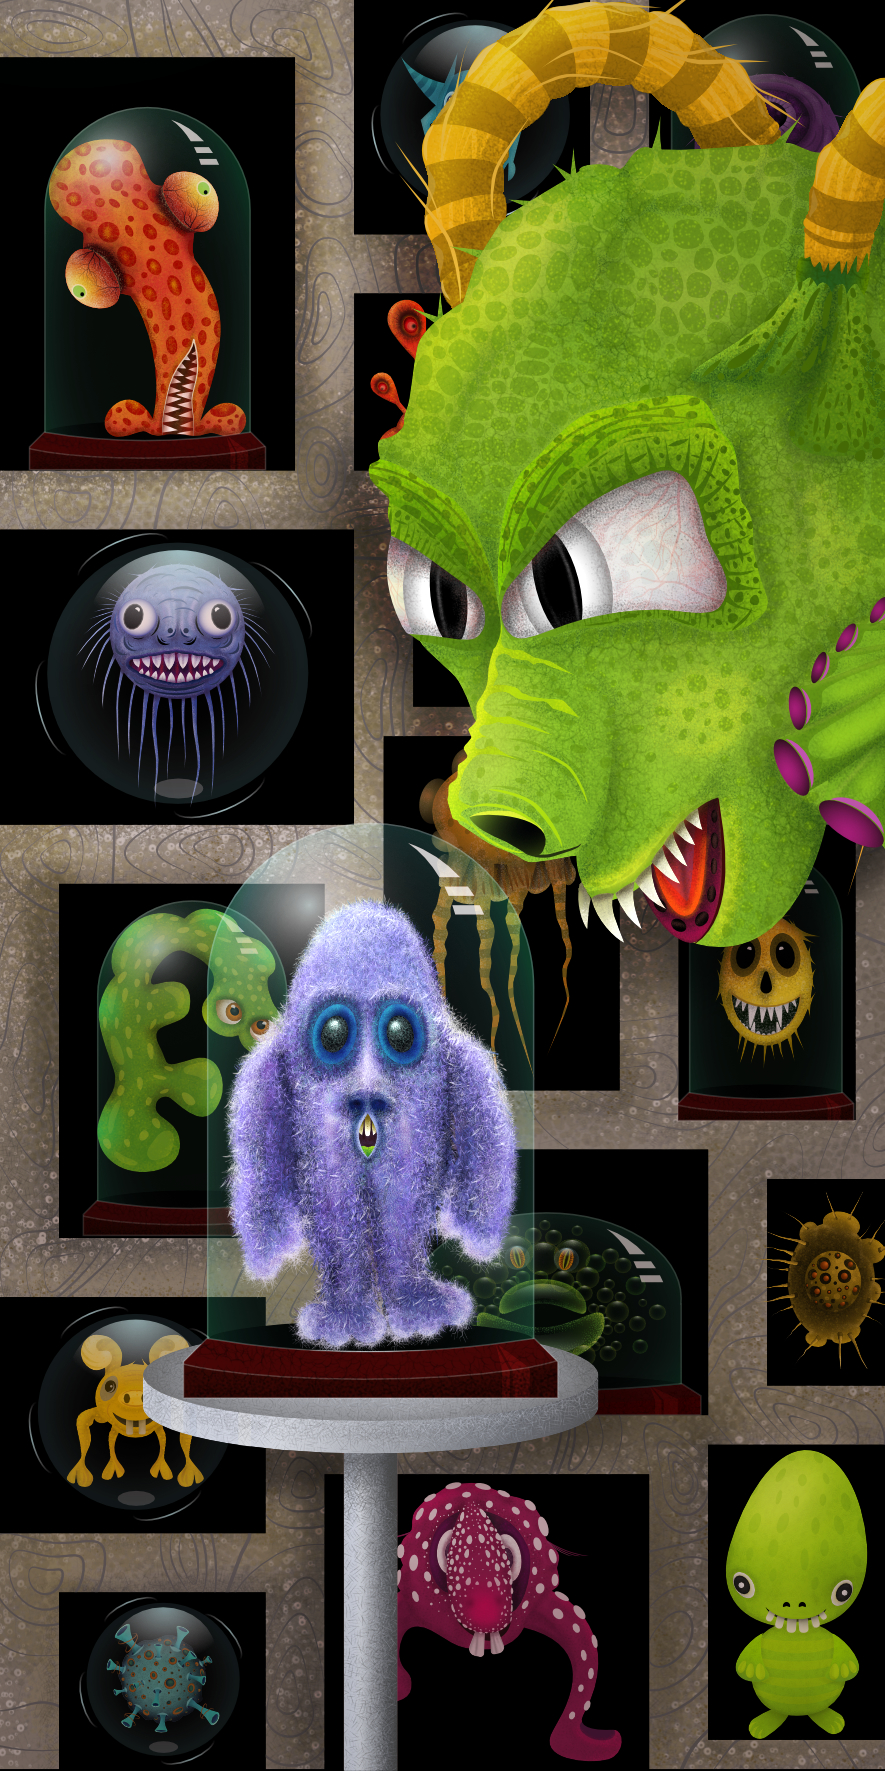
multi Metal work [experiments with primitives and brushes]
StuartRc posted a topic in Share your work
Just another long experiment in AD and AP to share I was really inspired by the tutorials uploaded to the Forum by (Frankentoon) and links to a fantastic website. Character Design Tutorial Brainstorming with primitives and other tutorials produced by Yulia Sokolova So I thought I would play around with ‘primitives’ and some of the new texture brushes recently created. 65 layers and 2 and an embedded Affinity Photo file with another 5 layers mixed with coffee and a couple of late nights ….and this is the crazy result…
-
 A bit of Fun and practice using Affinity to make an album cover. :) Album Covers: Here are the rules: 1 - Go to Wikipedia. Hit “random” or click http://en.wikipedia.org/wiki/Special:Random The first random Wikipedia article you get is the name of your band. 2 - Go to Quotations Page and select "random quotations" or click http://www.quotationspage.com/random.php3 The last four or five words of the very last quote on the page are the title of your album. 3 - Go to Rgbstock and click on “RANDOM” or click http://www.rgbstock.com/random The third picture, no matter what it is, will be your album cover. 4 - Use Affinity Designer/Photo to put it all together and share your results. I look forward to seeing your pictures. :) Unbelievably my random wiki article was actually a music page :o hence the band name "Ocean (B's song)" and my picture was a fisherman! Not so sure about the title though :)
-
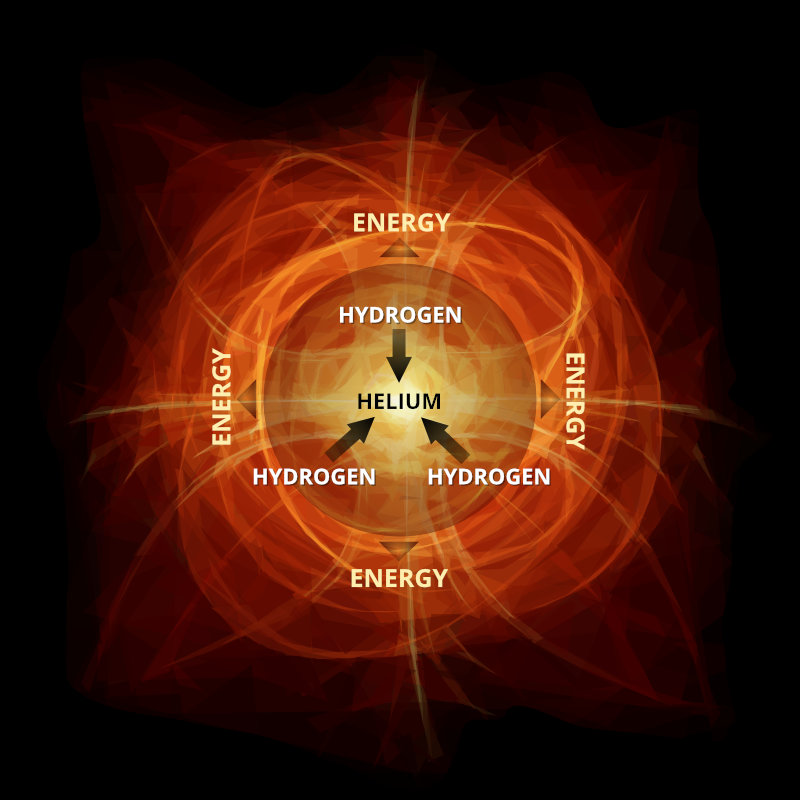
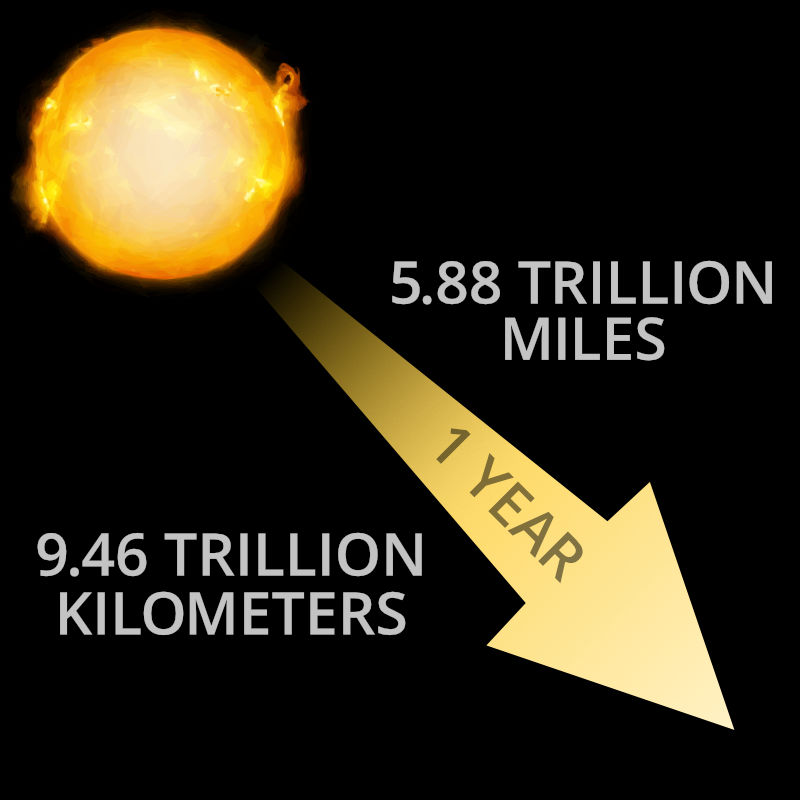
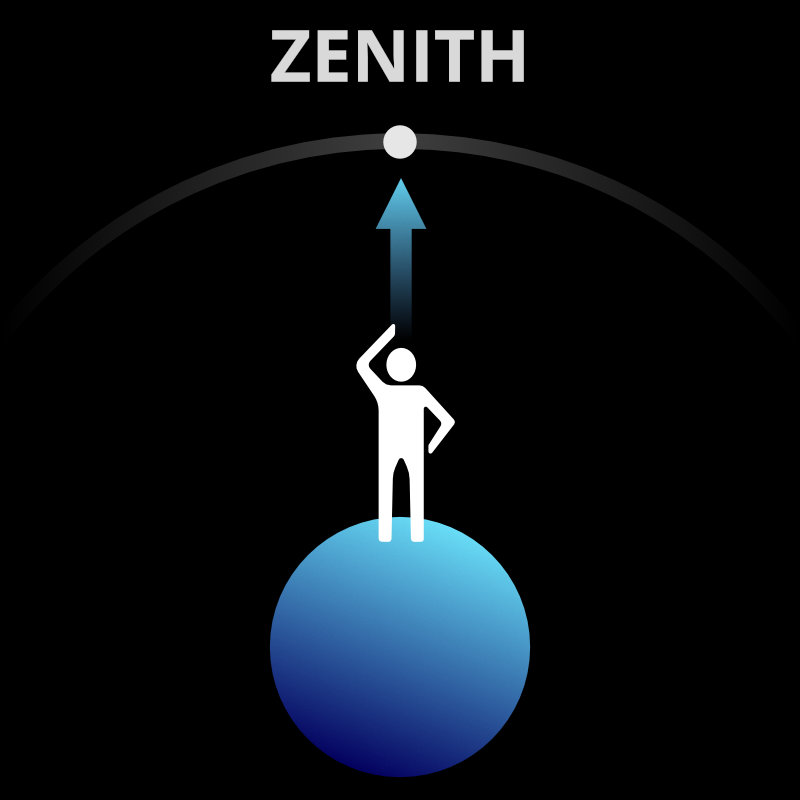
Here are a few of the illustration that I created for a site I just finished working on. All the final images were SVG files but many of them started with a photo reference or with original art created in Photo. There are a few that were all done in Designer as well. For some of the images (such as the quasar and the fusion image) I also used Flame Painter which is a fractal paint application and would then bring those elements into Photo to composite and adjust them to get the final art. I can go into more of the process if anyone is interested. Cheers! Jeff The Universe from A to Z
-
- 2
-
-
- affinity designer
- space
- (and 4 more)
-
I made some curves adjustments for AD and AP which I'd like to share with you. the attached Affinity file features embedded documents so that you can easily preview the effect of all curves on a single photo and then choose a curve that fits best/ gives you a good starting point/ idea. You can add them to your AP though opening the document, selecting each group, selecting the "curves" adj, so that it's panel opens up, click "add preset". (I've made a feature request to make that easier) You can then access them by the "view > studio > adjustments" panel which is active by default (only available in AP) please don't overdo it blend modes, opacity and blend ranges can, and should be adjusted upon your needs for more information about such techniques you can have a look over here https://affinity.ser...er-amateur-pro/ cheers PS: similar presets for the "channel mixer" are available here PS: similar presets for "LUT" adj. are available here PS: here is a great resource to really understand curves EDIT: just added some Black and White adjustments too FWIW >> curves mix.afdesign << >> BW mix.afdesign <<
-
(super)Quick intro: I've been using a.Photo and a.Designer for about 2 years and I'm in love with the apps. I am a web designer who can't draw a thing. I bought iPad Pro, Pencil, and (ordinary) paper, pencil and fine-liners (am I calling it right?) I've been fascinated by artists all around the world and I am diving into the process of learning and practicing my drawing skills. I call it.. (wait for it).. The Incredible Drawing Adventure Here's a quick video where I talk about software (with a timestamp for Affinity Photo), and yeah, if you feel like it — let's do it! https://youtu.be/h0kEFL5Ccps?t=1m20s
-
 Please scroll down to the end of this post to see the latest added tutorials. Thanks. Hello Everyone, In the last couple of weeks I shared in the Forum different topics related to video tutorials I upload to my YouTube channel. To make it more practical, I'm gonna share them and new ones in just this topic. Feel free to scroll down and find all the videos I already uploaded. If you want to know a bit more about me and what to expect, then keep reading. Photography (and design) is part of my life for more than twenty years. I began working in the advertising industry in the 90's and from there I covered many different areas from the creative process to production. Today I mainly do portrait photography, fine art, special assignments and some design projects. In the last years and as a certified trainer, I began to share what I've learned and continue to learn in workshops. I mainly cover Portrait Photography, Black & White, Digital Workflow and Retouching. For the love of sharing my passion about photography, I decided to start making video tutorials and this is the reason I end up here. The amazing software the Affinity Team made gave me the enthusiasm we normally have when we get a new toy. For me it's been a fantastic experience and discovery of new ways of doing the same things in a different, and many times better, way. And this experience is what I want to share with you. This is also the reason I'm going to cover more the Affinity apps in a photography scenario. But you can expect more, a lot more... I'll also be covering photographic tips and techniques and other software that I find relevant to my/our work. This is the case of Capture One Pro that will have also a special feature. Apart from this I'm also preparing some "extras" but that's for another time What to keep in mind: Every time I make a tutorial where I create a special resource, like a macro, a brush, a style, etc. I'll share it for free. You just need to follow the video tutorial or blog post to see the download links. Some tutorials also have a related post in my blog with more details. You can check it here: (available in Portuguese and English): http://blog.pedrosoares.photo/ The tutorials are made in Portuguese but they have English subtitles. Nevertheless I make them in a very easy to follow pace. For that reason they are suitable for both beginners and advanced users. The list I have for upcoming tutorials is long but if you have a specific topic you would like to be covered just let me know. You never know if your request is my next tutorial. This was the case of the Glow Effect video. I'm going to share them chronological so the new ones will be in the end of this topic. Finally my idea is to share tutorials on a regular basis so feel free to subscribe to my YouTube channel to be the first one to know about it: https://www.youtube.com/channel/UCxdrAaW4Zr9lYktQmt5O4VA You can also subscribe to my Blog where you can find other topics: http://blog.pedrosoares.photo/ Sorry if I made this introduction to long, but it was important for me to share this. I hope you'll find each tutorial a useful resource and also a source of inspiration. TUTORIALS How to Create "Good Looking" Snow | Affinity Photo Tutorial + Free Snow Brushes How to Combine Text and Imagery | Affinity Photo Tutorial How to Extract Detail | Affinity Photo Tutorial + Detail Extractor Macro How to Create a Glow Effect in Letters | Affinity Photo Tutorial How to Create a Winter Scene | Affinity Photo Tutorial How to Create an Anaglyph 3D Effect | Affinity Photo Tutorial + Anaglyph 3D Macro How to Create Light Rays | Affinity Photo Tutorial + Light Rays Style How to Make Amazing Bokeh | Affinity Photo Tutorial Mock-Up Design - Clothes & Shoes | Affinity Designer Tutorial Ribbed Glass Effect - The MDNA Cover | Affinity Designer & Photo Tutorial
- 9 replies
-
- 8
-
-
- instructionals
- affinity photo
- (and 6 more)
-
 The more I use this software the more I like it!! :D One silly thing - you can create multiple art boards but you can only print them one by one? The PDF workaround is ok but.... I can see how printing all art boards to one page would work for very small illustration comps but not for simply printing out A4 or letter size concepts to present.
 -
It was a challenge for me to execute a food packaging job on Affinity Designer. I did this job with lots of tricks in Affinity Designer and Affinity Photo. No any other software was used. Entire from Raw file conversion to photo-editing, photo-cutout was done on Affinity Photo. In Affinity Designer i first setup the size of the job and set all the objects in proper placing. This job is to be printed on a Gravure Printing Machine with combination of 4 Process colors + 1 Pantone + Logo Red Color. Now the trick part was to give the client variety in color yet should be cost effective and appealing. So we used a common Pantone color which we can change easily on the Printing machine by replacing the ink. So Black color was our savior because on every new job i was getting 4 color cylinders ready for the job. So i used Black color as a Changing element with text in reverse, so client gets a 5 color job at the Development of 4 color job. The job was processed on Art Pro for Cylinder Engraving. I am waiting for the print results to arrive. Once they are ready i will update you the result. Vishal Ambasana - DesignPreuner @ SA Graphic - (Rajkot) India.
- 4 replies
-
- 5
-
-
- pantone job
- vishal ambasana
- (and 7 more)
-
Hi All Yet another month of fun Finally! Completed the second artwork based on #Inktober 2016 (03 Collect). From a sketch produced in Sketchbook Pro but reworked with Affinity Designer/Photo I really like the embedded file options it can save you so much time when working with compiled images Original Size 300x600mm 300dpi
-
 I am experiencing a lot of lag in both Designer and Photo. My main machine is running Windows 10 on an i7 3770K, 16GB of RAM and an AMD 390X OC with 8GB VRAM. When comparing things like rotate, curve adjustment, scaling, perspective filter, etc. with Photoshop or Illustrator, I noticed a huge CPU spike on affinity to 100% together with some lagging fragments (squares in the selection that arent updated yet to the new configuration) while photoshop and illustrator could pull it off with smoother framerates as well as less CPU usage. It's like my 390X isn't used a lot in Affinity. This is really breaks my workflow when I am working with multiple layers or bigger documents and I can't work precise anymore. I wonder if I am the only one that notices this? Is there something wrong with my pc build or software configuration or is this just how Affinity is supposed to be working?