Search the Community
Showing results for tags 'method'.
Found 2 results
-
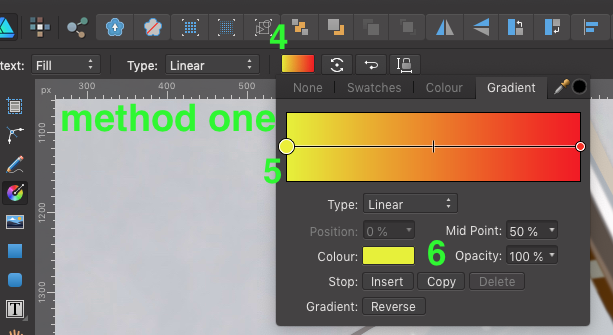
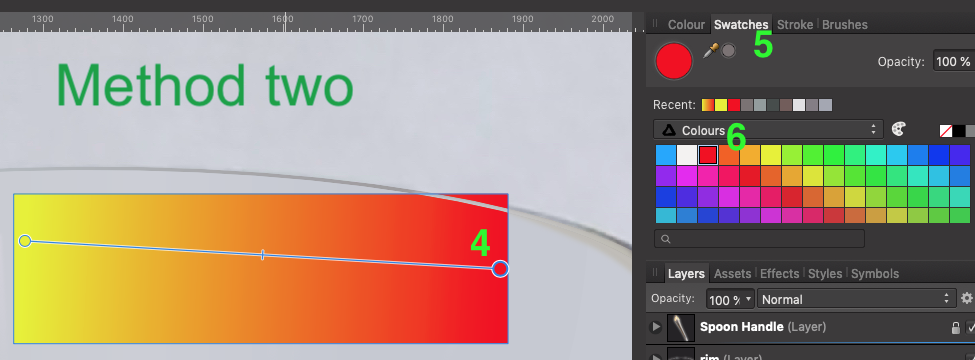
 I struggle to create gradient fills easily and efficiently. Here are the two methods that I use, and perhaps the only way. I'd be curious if someone out there has another method. Method one: Create object select "G" on the keyboard draw gradient Select the Gradient color box at the top toolbar make active a node on the gradient line select color from colour box Repeat steps 6 -7 for each node in the gradient line. Method two: Create object select "G" on the keyboard draw gradient Select the node in gradient bar Select Swatches tab in the docker on the right Select color in the Swatches pallet. Repeat steps 5 -6 for each node in the gradient line. Suggested Improvements: A) What I would like to see is the ability to double click on the color node on the object itself, not the node from the methods above, and by double click the node a swatches pallet opens for you to make your color selection. B) Another option would be to select color node, select the eyedropper in the tool bar and while holding the Shift key down select the color you want applied to that node. This method is great for sampling color from other drawings or reference images. I appoligize if there is another method alreay in place, I just haven't come across it yet. Thanks in advance. -Bill
-
Hello All. I wanted to use Affinity Photo (AP) to replicate watermarking images in the following style: http://photoshop-tutorial.org/photo-effects/watermark-your-photos/ My reasons for wanting to use this particular style of watermark are because it is a less intrusive method for the viewer because it permits the image under the watermark to be seen and also it is not that easy for the casual observer to remove the watermark. Method: 1. Select and open the image to be watermarked in AP 2. Press ⌘J to duplicate the background layer 3. Type the desired copyright text in black using the Artistic text tool 4. Resize and move the text to the desired location 5. Open the layer effects dialogue box with the text layer selected 6. Tick the Bevel/Emboss checkbox 7. Select Emboss in the Type drop down box at the top of the dialogue box 8. Click on the link symbol between radius and depth value to make setting the depth possible 9. Click in the profile box (empty) to select your profile from the four visible at the bottom of the dialogue box 10. Tick scale with object box and reduce fill opacity to 0% A bonus is that you can edit the text and change its style until you flatten the image. Layers effects dialogue box image and example watermarked image attached for clarity. layer fx dialogue box.pdf watermarked image .pdf