Search the Community
Showing results for tags 'masking'.
-
 I have been playing around with some luminosity masking tools and the way they worked made me a bit curious as to why much of this could not be done easily with B&W images. That is, I assume I should be able to take a color image, create a black and white image from it using the B&W layer adjustment, refine that to include what I want and convert that directly to a mask for the original image. That process works with Photoshop but I can not get it to work with Affinity Photo. I did some searching looking for phrases like "Affinity Photo convert B&W to mask" and other similar phrases, and found several links, but none of the instructions actually seemed to do what I wanted. One, on this forum, said I should create the B&W image, rasterize it to a mask and drag the layer to the original image layer until a vertical blue line appeared, but I could never get the vertical blue line and always ended up with the B&W image grouped with the original image, and never got a mask. I am completely sure I am just doing this wrong. The tutorials talked about creating masks from selections, but I wanted to create the mask directly from a B&W image. Can anyone tell me how to do that? Thanks.
 -
 So I only deal with vector art because I design t shirts and it needs to be vectorized. I don’t know what I’m doing wrong.. I’m trying to get an American flag to completely cover or ‘mask’ a figure that’s my original artwork for a Fourth of July design... I’ve tried the “mask to below method” but when I export as a pdf it still comes out rasterized which I can’t have... does anyone know what I’m doing wrong or could help me/ explain to me how add these layers together and have it come out vectorized? Thank you all so much!
 -
 Hello I want to use an image (grayscale with no alpha) as a mask. How can I do it? Thanks
 -
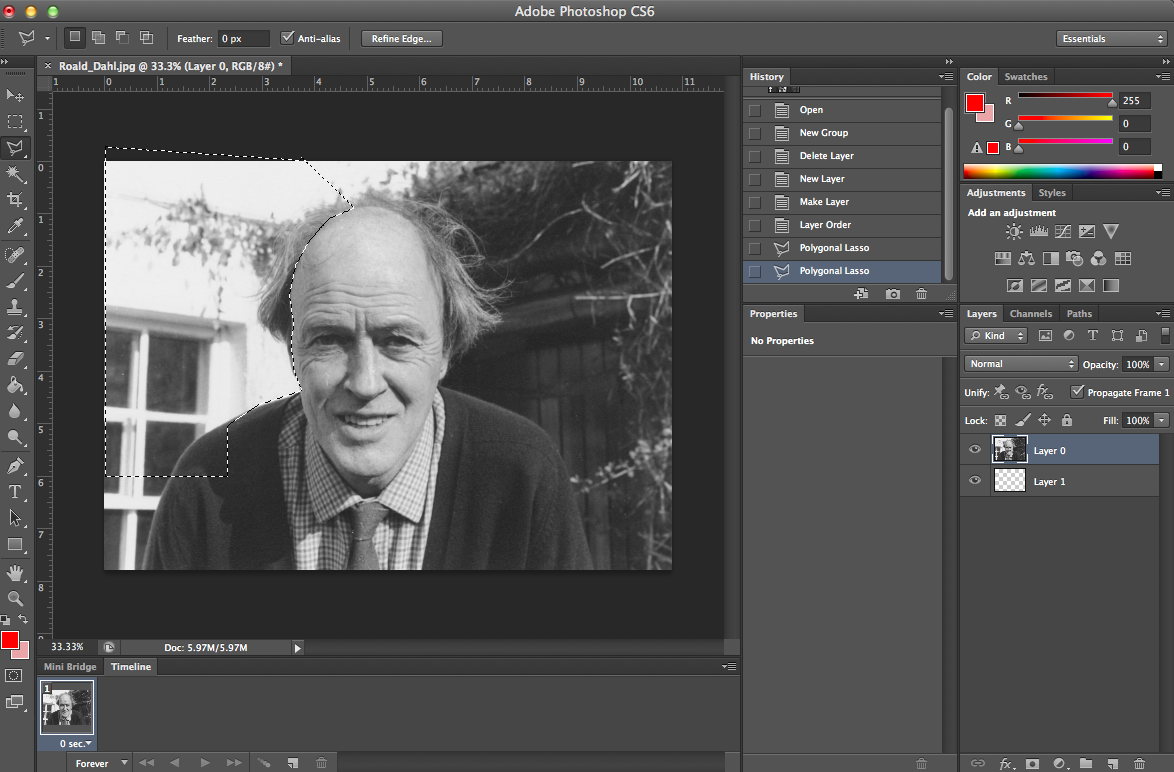
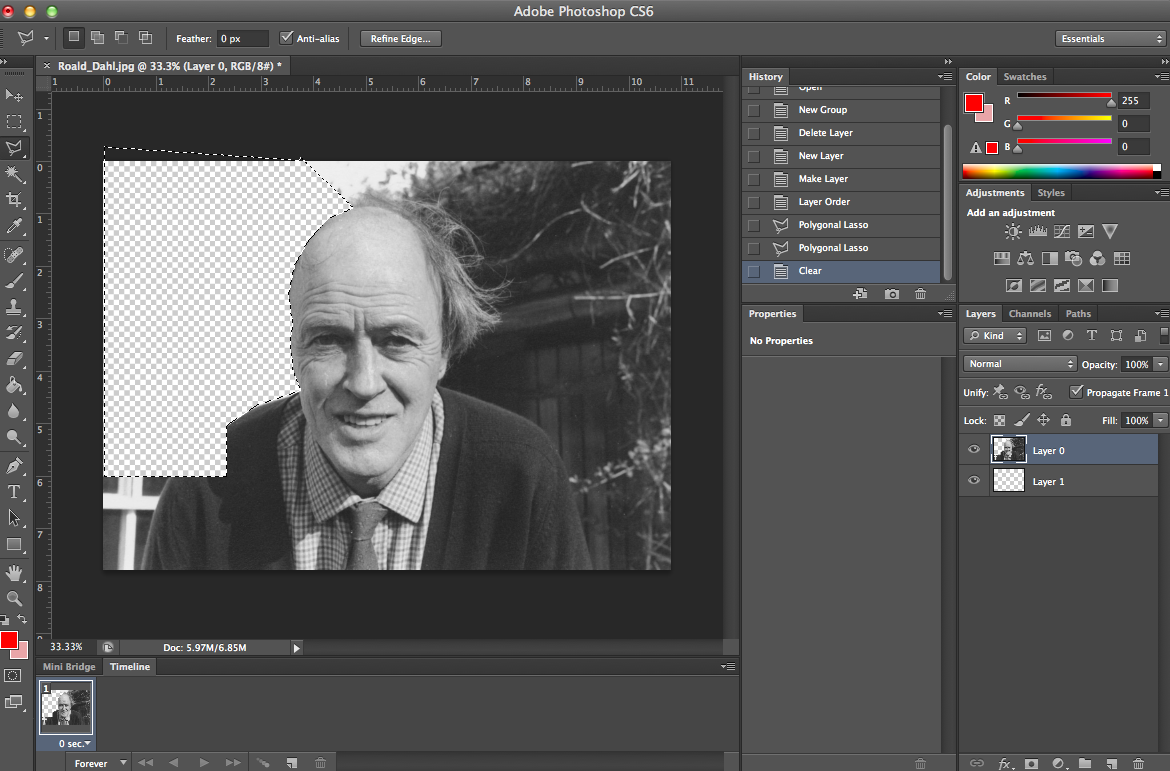
 have been a photoshop devotee for years and am trying to move my entire folio of work into Affinity. the one issue I am having is finding the equivalent of the polygonal lasso tool that is in Photoshop for trimming photos/layers? A lot of my work requires scanning in existing drawings and then trimming around them to give them a clean edge. I have been able to do this using the masking tools but cannot for the life of me figure out how to mask a clean, straight edge? I am probably being a bit thick but am really struggling to find a solution. Any tips would be appreciated. As I cannot seem to articulate what I am trying to say, I have taken some crude screenshots of what I mean and attached them,
-
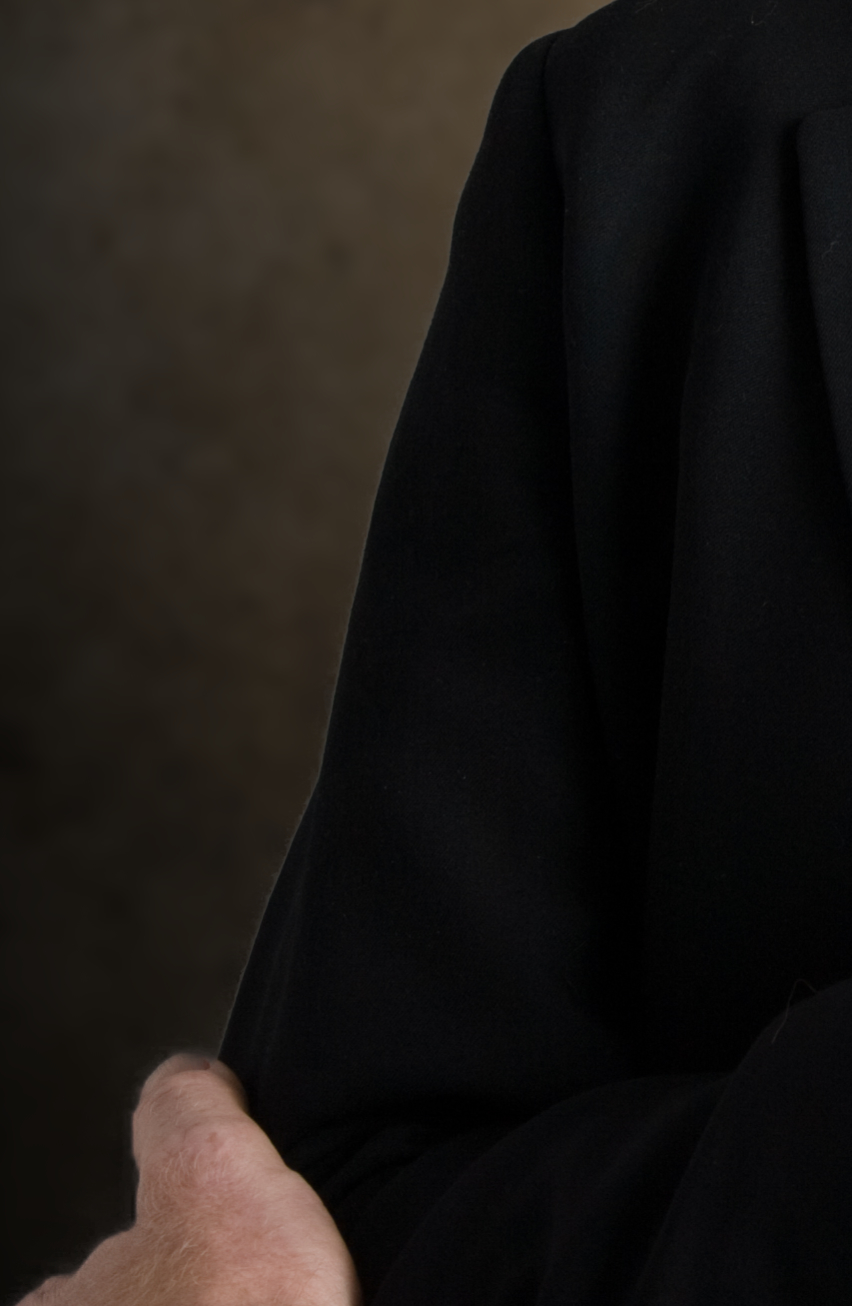
 Hi there, newbie here so please go easy on me! I have selected my foreground and refined the selection nice. I convert the selection to a masking layer. I add a background and place this under my foreground. All looks good except there is the thinnest line of pixels around parts of the foreground. In ps I would select the mask layer then select using the lasso tool an area that i wanted to correct and apply a levels correction just on the mask, very effective and quick. Is there an easy way to do something similar in Affinity on the ipad? I’ve attached a crop illustrating what I mean. cheers, g
-
 I have watched and re-watched the video Clipping vs Masking by James Ritson and am unable to select the mask (child layer) without the layer. Clicking one selects the other. (ditto for a clipped layer) That is not what I see happening on the video as is done at 2:07 min on YouTube video. https://www.youtube.com/watch?v=cKrQ2BEFWMs This is similar to another question in the forum but the difference is that I don't want to separate the child layer from the layer, I Just want to manipulate each separately. Here is a quote from the other post by webb, "I have a pixel layer (say, Background) and have added a child filter. I would now like to move that child filter up on the stack, but can't seem to select it without selecting the pixel layer as well--both parent and child layers are highlighted and stubbornly insist on staying that way. This doesn't happen all the time, but when it does happen, I don't know what to do."
 -
 How is it possible to cut out a shape from another in a non-destructive manner? I see that the "Subtract" shape in the toolbar does what I want it to do, but the result is not a compound or a mask, it becomes an edited shape. One work around I was thinking, is it possible to draw a shape with the pen tool, make it an active selection and perform an inverse selection and apply a mask to the shape?
 -
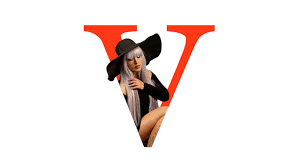
 Hi, Quick question, I'm a newbie to the Affinity Designer Software. I want to create a text portrait (see image example below) but I am not seeing any tutorials on Youtube. Any tips? And can it be done on Designer or do I need to purchase Affinity Photo? Thanks!
-
 Okay - I'm trying to accomplish something like this. I've got the basic shape - the colored circle in the background. I've got a black silhouette of the tree on a transparent background - here is my question: How do I burn the tree image through the circle all the way down to the dark blue background? I tried "Rasterize to Mask" but that just made everything disappear. I'm obviously not a pro graphic designer here, so please forgive my butchering of any industry terms - I'm just trying to learn how to accomplish this effect in as few steps as possible. If anyone can help I'd greatly appreciate it. Thanks.
 -
 A feature I'd love to see after working with some complex masking with AP on the iPad is an easier way to jump back and forth between black and white when using a brush on a mask. Having two color swatches in the brush bar at the bottom when working with brush would be extremely helpful. Thanks for an excellent program.
 -
 Hey, I regularly create non-destructive compound path. I then want to use these as masks and clip other layers to them. When I drag a layer onto a compound path, the path gets included into the calculation, rather than being clipped. How can I change this behavior and use the Compound Path as a clipping mask? Thanks!
 -
 I've created a vector mask, for a vector, to make the image look degraded. How do I then combine this mask/aged look effect, so I get one complete vector layer, so I can scale and resize with no loss? Am I missing something obvious? Edit: 'Distressed Look' Chapter in Affinity Workbook p.324 should help. Any more pointers though, do let me know.
 -

Marquis tool rotation and resizing
Sparkie Shock posted a topic in Older Feedback & Suggestion Posts
Hi, I'm new to Affinity and have jut starred using it for Post production on my artwork. I was using Pixlr until Autodesk pulled the dickish move ever by cancelling everyone's subscription and so I needed an alternative. Now let me explain WHY I used Pixlr for so long. Yes it's beautique program designed for applying pre made filters for phone photo's. BUT .. it did one thing that no other program (Photoshop, Paint, GIMP etc) still doesn't do .. I'll explain what this is. So in pixlr one could chose a mask brush that allowed you to draw, or sloppily paint on the area of an image you wanted to affect. You could erase par of this mask if you accidentally masked too much .. or add to it. VERY simple. And you could feather the edge so there's none of that hard edge crap that you need to then arse around with. Photoshop could really learn from this. The point is that with this mask you could then affect just that area, adding highlights to faces, or desaturating, or adding filters .. anything ... you you could invert the mask and affect everything except what you originally masked. It was perfect. And then they cancelled the program. Sure Pixlr still works .. but without the 'pro' features that I need to do effective post work. So after talking with the guys at apple they put me on to Affinity. Now I gotta say that Affinity is seriously AWESOME! I'm loving so much of it but there's a few things I don't know if it does .. or how to do it. For instance .. In trying to recreate my old technique of masking a certain area I use an elliptical mask .. feather the edge to about 350 px .. and then apply an adjustment layer to highlight people or objects. Alternatively I can invert the mask and lessen the surroundings .. but the selection is very rigid. There doesn't seem to be a way to rotate the elliptical selection (I'm just tonne call this a mask even though i know technically it's not ... it's just easier), or to squeeze it after the fact. Sure I can redraw it but not being able to affect it's orientation after it's on the page is kinda limiting. I have tried using actual layer masks and I have NO CLUE how to make them do anything. I select layer mask .. do stuff .. and all I get is a red mask that then does nothing ... how do I mask specific places and things? That's what I need. Once I'm done with Affinity I still have to import to Pixlr as I like to apply some of the filters which darken shadows but also smooth them and it makes for a really deep looking image. I REALLY wish Affinity had stuff like this built in .. or some way to be able to make them. It's a combination of a slight Blur, darkening shadows, smoothing highlights and adding a slight glow to things. I can't see a way to do this in Affinity (just like I can't do it in Photoshop either). Yes I understand I'm a bit of a pleb with photography .. desiring the help of pre-made lens effects etc. But what can I tell you .. it works for me. So, I hope I've explained myself to the point where you can see what I'm trying to achieve. I feel confident I'll be using Affinity for a while to come. But there needs to be a way for me to select a more precise area in my mask .. and still be able to feather edges and add and subtract from the mask if necessary. Would appreciate any thoughts. Great app. Sparkie -
 Hey guys, I am hobbyist user, so it's not a great deal if you cannot help me. I am trying to stack several photos, but to have the opposite of "object removal using stacks". I have four photos taken from the same point with my two friends sitting at the table and exchanging position between each shot. What I want to achieve is to have each of them several times in the final image. If I use Median stacking, then almost everything disappears from the photo with only table remaining and some ghosting. So I need to use masking, but that's where it gets a bit complicated. I tried Outlier stacking but that produces some artefacts and needs a bit refining, for which I also need some masking. For the stack I have live stacking checked. So I guess the question is how to most efficiently create masks from and for each stack layer? I figured I would select part of the one friend on one photo, e.g. hand, head and part of the body, and then I would apply the resulting mask to all other photos in the stack. But I would need to add all masks for all body parts to all photos... So that makes it a bit daunting. Not helping is that when I Alt-click on a layer and start selecting using Flood select tool that the selection outline is shifted several pixels to the left in comparison to photo itself. Also, I cannot get the tolerance to right amount; it always selects something from the background or not enough of what I need. Also, which blending mode would suit me the most? Do you have some other suggestion how to achieve what I want? Thanks! P.S. I've found that if I stack only two photos and then use Standard deviation as the stack operator that produces black areas where the photos are the same and some type of blending in the areas where there are differences. That seems like a good starting point for a mask. How to create a mask from such stack result?
 -
 It seems that masking is broken in the case of an unfilled mask (i.e. fill color: none) under 1.6.2 no fill masking bug.afdesign
-
 Hi, I would like to ask if there is an easy way to alternate between the Freeze and Thaw tools on the liquify persona. If there isn't, I would like to suggest the use of the "ALT" key for that purpose. Also I noticed that on the Liquify Persona's tool bar, there are the primary and secondary color pickers, and I wonder, what is the purpose of that? thanks and keep up with the terrific work! Gustavo
 -
Hi, I would like to be able to limit the effect of the Detail Refinement feature in Develop persona to relevant edges to avoid emphasizing noise in smooth areas. Please add option of edge detection with a slider to control edge strength in masking the sharpening effect. I understand something similar can be achieved in Photo persona with result of Detect Edges filter used as mask, but it requires Developing the image first (destructive step), and also the lots of steps required are cumbersome for a standard requirement against sharpening to avoid the noise.
-
 Semi-automatic masking / masking guide tool for Affinity Photo Here is best example i can find (youtube link) - Zephyr's Masquerade tool is semi-automatic masking tool, user paint guide lines which help algorithm to solve alpha channel. Its very fast, i don't know for sure how it works, but i would guess that those guide lines descrip to the algorithm textures and colors which are wanted (or/and unwanted) for mask. This come to my mind when i saw Adobe's new automatic subject selection demo, where user don't have any control, just some kind of lucky button, so i thought serif could make better, and i think this kind of tool would be much better with better flexibility and control. And it should be non-destructive, it could be based on editable splines/vector paths (like freehand pen tool, or affinity design's Pencil tool) for example? Maybe Affinity Photo should have "Mask persona" (all masking tools in same place, with lasso selection, mask bursh, guide brush, some procedural masking tools? vector tools, refine tools etc. with easy to use possibility control and edit multiple mask channels for same layer, if layer has multiple mask/alpha channels then mask persona would be great way to control the complexity, at least it would be nice to have way to control multiple alpha layers like separated hair mask, head mask, etc. for detailed and flexible workflow)
 -
 I'm trying to stack two photos one on top of the other and use a rectangle to mask a hole in the top photo to reveal the underneath photo. I am creating a rectangle above my top photo and dragging it down to create a mask on the top photo. but then I need to invert this so that the center is masked out and the top photo is visible around the edges. I have tried ctrl+i to invert and nothing happens I have tried to set the alpha channel and all I wind up doing is making the whole thing transparent
 -
 I am trying to create a digital collage using some of my original photographs. I have had some partial success but have gotten stuck, I think because I don't completely understand how to use masks and work with irregular shapes. I've watched some tutorial videos but they don't answer all my questions. I used Designer to create an outline of the shapes I wanted to use in my collage. I then brought that into Photo. Most of the shapes are rectangles but there are some irregular areas which is where I'm having trouble. I brought in various images using the Place command and clipped them to the rectangles. That worked fine. But at the bottom of the collage there is a dark area that extends into the bottom of the piece. I used a mask to paint away the part of the rectangle that was covering up the dark irregular area inside the design lines I'd created with the pen tool in Designer, but I painted out too much. I then tried switching the paint brush color from black to white but I wasn't able to paint back in the rest of the rectangular image where I had painted out too much. I'm not sure I was on the right layer though I tried working on several different layers, including the mask layer, with the same lack of result. I just wasn't clear what I should be doing to paint back in the rest of the rectangle that now shows as white. Also, on the top of the piece, I want to cut out some areas of the rectangles and create some irregular areas similar to the one at the bottom and fill those with a different image from the image that is filling the rectangle. I don't know how to do that either. I don't know if I have to create a selection in the rectangle and then somehow fill that selection with another image. I don't even know where to start on this part of the collage. I've attached a jpg of my image as well as a Photo file. If anyone can point me in the right direction, I would appreciate the help. Digital_Collage_Granite_.afphoto
-
Hello all, I did this halloween graphic to practice working with affinity. I am getting the hang of using a masking layer and creating effects with brushes
-
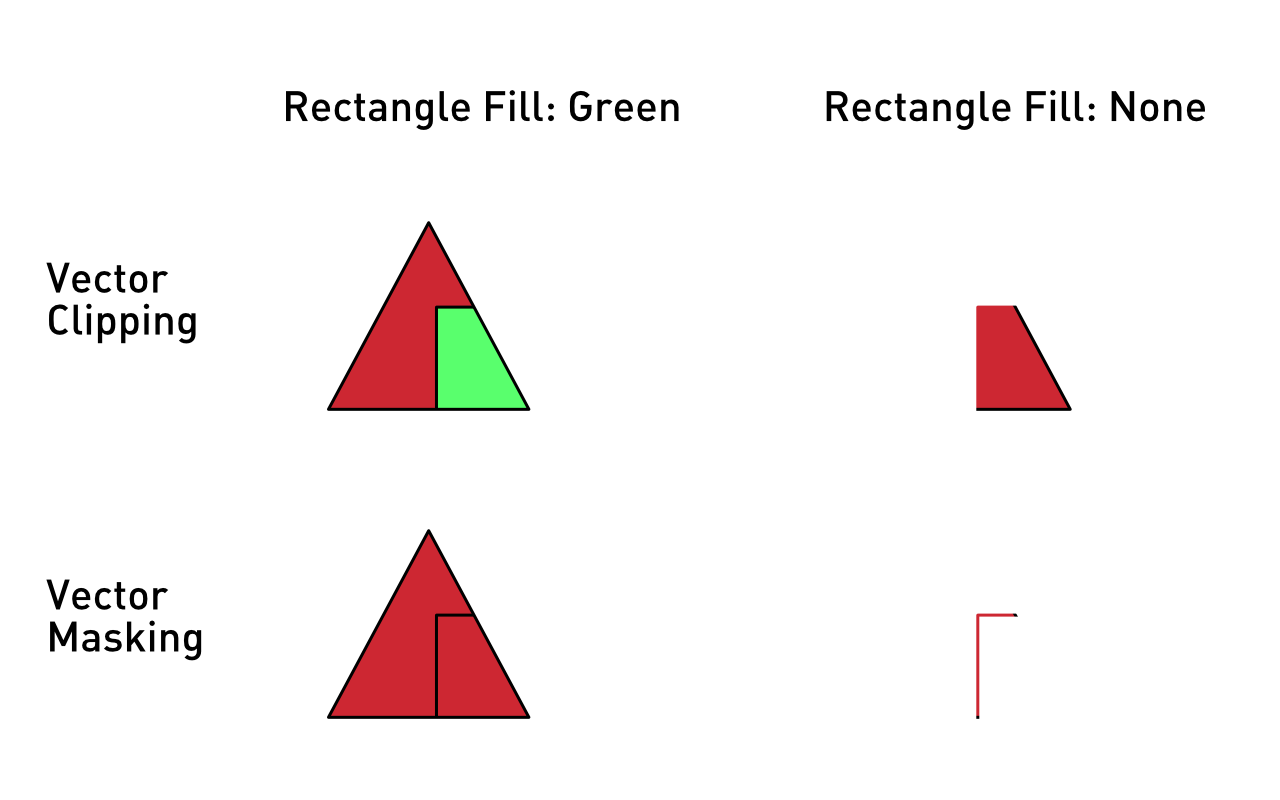
Greetings! I had to do a bit of study and homework in order to wrap my head around the clipping and masking operations in Designer and Photo. In the process, I developed a one-page infographic (attached), and it apparently has already helped some folks on the Affinity Designer and Photo Group in FaceBook: https://www.facebook.com/groups/AffinityDesignerPhotoPublisher/. I will be updating it shortly, but wanted share the first version here for comments and suggestions. Enjoy! Clipping vs Masking.pdf
-
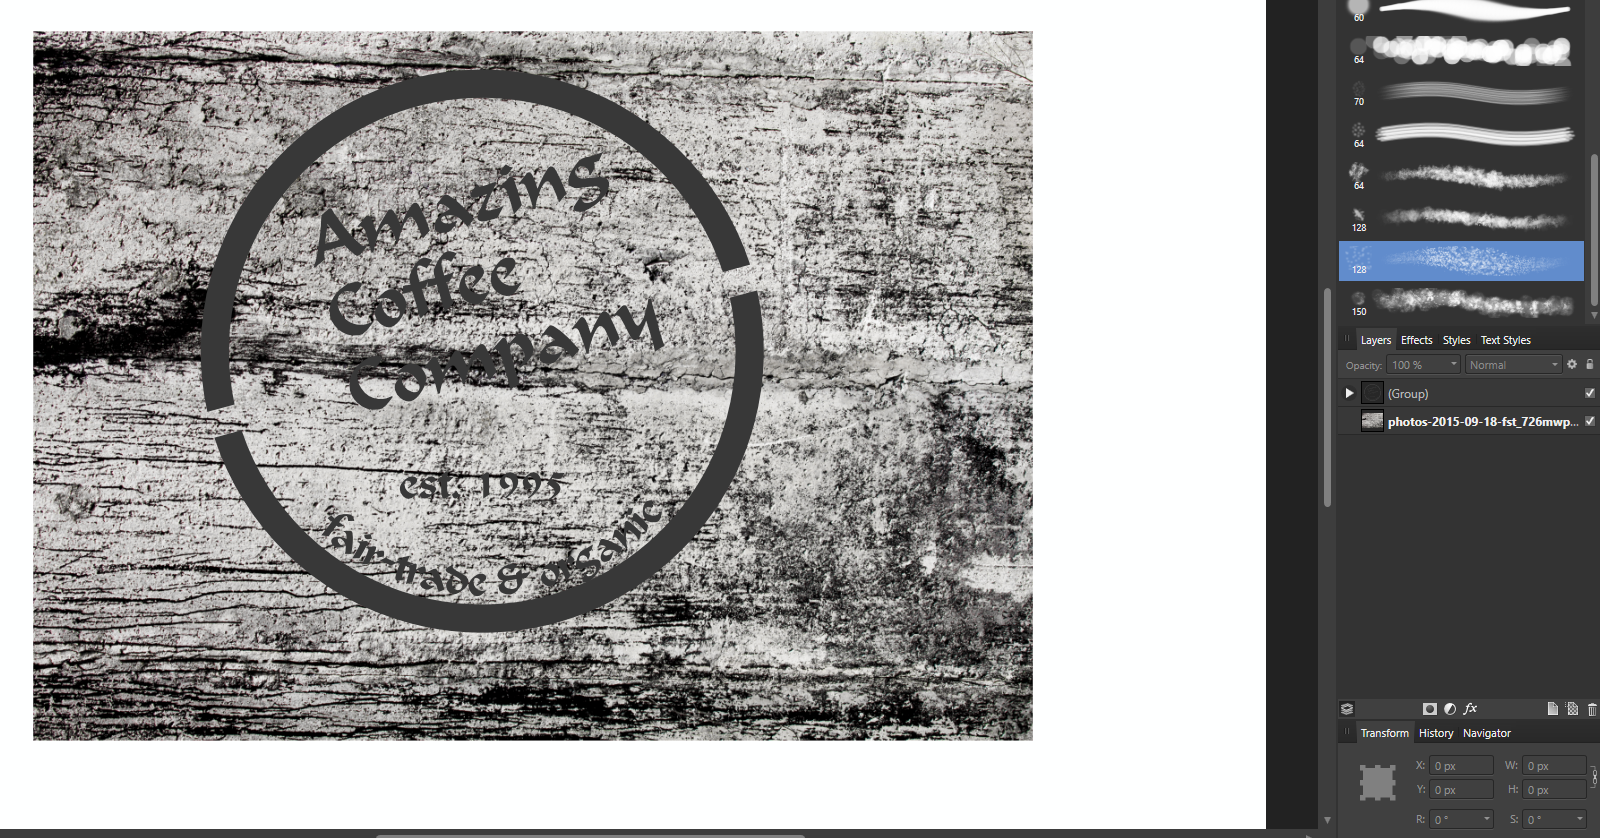
 I am trying to understand how masking works in Affinity Designer, but I just can't wrap my head around it. In the attached image, I have two things: a logo and a grunge image. I want to use the grunge to apply a distress effect on the logo. I know the way to do this has something to do with dragging one of them inside the other (not sure which one though), with a mask layer thrown in there somewhere.... Most things are pretty intuitive in AD, but how masking works just doesn't make sense to me. Can someone help me out, please?
-
 Photoshop has traditionally had the Select > Color Range command. There is also HSL keying inside the Hue/Saturation adjustment toolset, which, annoyingly cannot be used to create selections for use with other commands without clumsy workarounds (that I know much better than I would care to admit). What I am hoping to see is a non-destructive way to do masking based on luminance, HSL tools, as well as possibly more sophisticated keying algorithms that are found in video software (Primatte, Keylight, etc.). Most video-focussed color correction software (DaVinci Resolve, Speedgrade, Lustre, Baselight, FilmMaster, Assimilate Scratch) allows for non-destructive HSL keying already. The most elegant way I can imagine this working inside Photo is that similar to regular layer masks, a new procedural mask layer type for non-destructive HSL/Select Color Range masks with adjustable parameters would be available. Like an adjustment layer, except that the result would be a mask instead of an RGBA image, to be used just like regular layer masks. That way, it would be easy to adjust the selection parameters interactively after the fact, and, if need be, rasterize destructively to a regular raster mask layer. In additions to the keying in Luma, RGB, HSL, YUV and LAB, parameters for blurring the result, expanding/contracting the mask would be useful. The exact same functionality could then double as a vastly improved "Select Color Range" command as well.
- 12 replies
-
- 3
-

-
- Color Range
- Keyer
- (and 8 more)
-
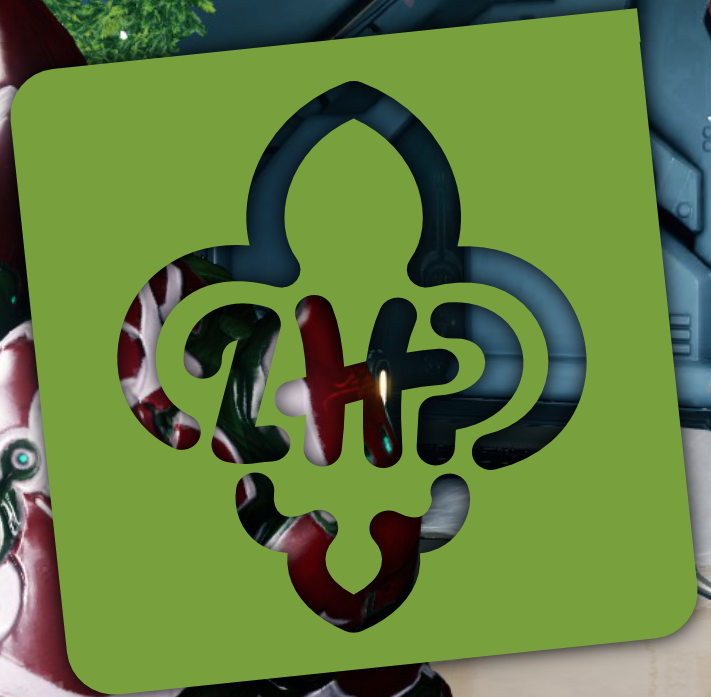
Hello guys! Is there any way to reverse mask (I don't know how to call that)? I mean to make effect like in this example below (to maked object inside object transparent just like this lily). EDIT Sorry I post it in wrong section.