Search the Community
Showing results for tags 'masking'.
-
Ok, Last one. I got to get some sleep! I gotta say though Affinity Photo is equally as much fun and addicting as Affinity Designer! I already thinking about how to cancel my plans tomorrow evening to tinker a bit more. lol
- 10 replies
-
- 8
-

-
- double exposure
- masking
- (and 2 more)
-
 It would be useful to be able to preview which areas are affected, essentially as if the blend curves were a regular alpha mask. I'm talking about offering the standard mask display options, like as a BW image, quick mask overlay, marching ants and so on. Another useful display mode for displaying masks, which is currently not supported, would be the content being masked composited on 50% gray, like most video color grading programs offer.
-
- 1
-
-
- blend curves
- blend if
- (and 2 more)
-
 Hello, I'm quite puzzled by this: I want to create luminosity selections/masks. 1) I Ctrl-Shift-click the Background layer thumbnail and save the selection as a separate Lights channel; then 2) I invert the created luminosity selection and save it as a separate Darks channel. Then I do a similar thing in Photoshop Elements and make masks from the selections to compare if I get the same thing in PSE and Photo. The Lights (luminosity) mask is the same, but the Darks masks are different -- Affinity makes it more muted, the inverted black patches are more muted/greyish, and 50% grey patches are considerably darker than in PS. Can anybody reproduce this? Is this a bug in the Invert selection command? When I compare the inversion of a normal pixel layer, the results are the same in both applications.
 -
As a long-time user of Photoshop (boo down with the cloud) and Corel painter, one key feature that Affinity designer would benefit from is the “lock layer transparency” tick box option. I have only played around with Affinity Designer for a day – there is probably a way of doing this with masks, however, I use lock transparency layer alll the time for blocking out silhouettes then paint within the layer. Also there is no support for TGA’s format – still widely used in the games Industry for texture creation.
-
 hi all, Interested in seeing any good double exposure tutorials you've come across out there - obviously created in Affinity Photo. Perhaps you have your own project you'd like to publish to the Share Your Work sub-forum? Have a good day.. :-) Andy Capstick
- 1 reply
-
- 1
-
-
- double exposure effects
- effects
- (and 3 more)
-
I did the same a few months back in PhotoPlus and decided to redo it this time with AP: Face by Dominique Krem, on Flickr
-
Photoshop has traditionally had the Select > Color Range command. There is also HSL keying inside the Hue/Saturation adjustment toolset, which, annoyingly cannot be used to create selections for use with other commands without clumsy workarounds (that I know much better than I would care to admit). What I am hoping to see is a non-destructive way to do masking based on luminance, HSL tools, as well as possibly more sophisticated keying algorithms that are found in video software (Primatte, Keylight, etc.). Most video-focussed color correction software (DaVinci Resolve, Speedgrade, Lustre, Baselight, FilmMaster, Assimilate Scratch) allows for non-destructive HSL keying already. The most elegant way I can imagine this working inside Photo is that similar to regular layer masks, a new procedural mask layer type for non-destructive HSL/Select Color Range masks with adjustable parameters would be available. Like an adjustment layer, except that the result would be a mask instead of an RGBA image, to be used just like regular layer masks. That way, it would be easy to adjust the selection parameters interactively after the fact, and, if need be, rasterize destructively to a regular raster mask layer. In additions to the keying in Luma, RGB, HSL, YUV and LAB, parameters for blurring the result, expanding/contracting the mask would be useful. The exact same functionality could then double as a vastly improved "Select Color Range" command as well.
- 12 replies
-
- 3
-
-
- Color Range
- Keyer
- (and 8 more)
-
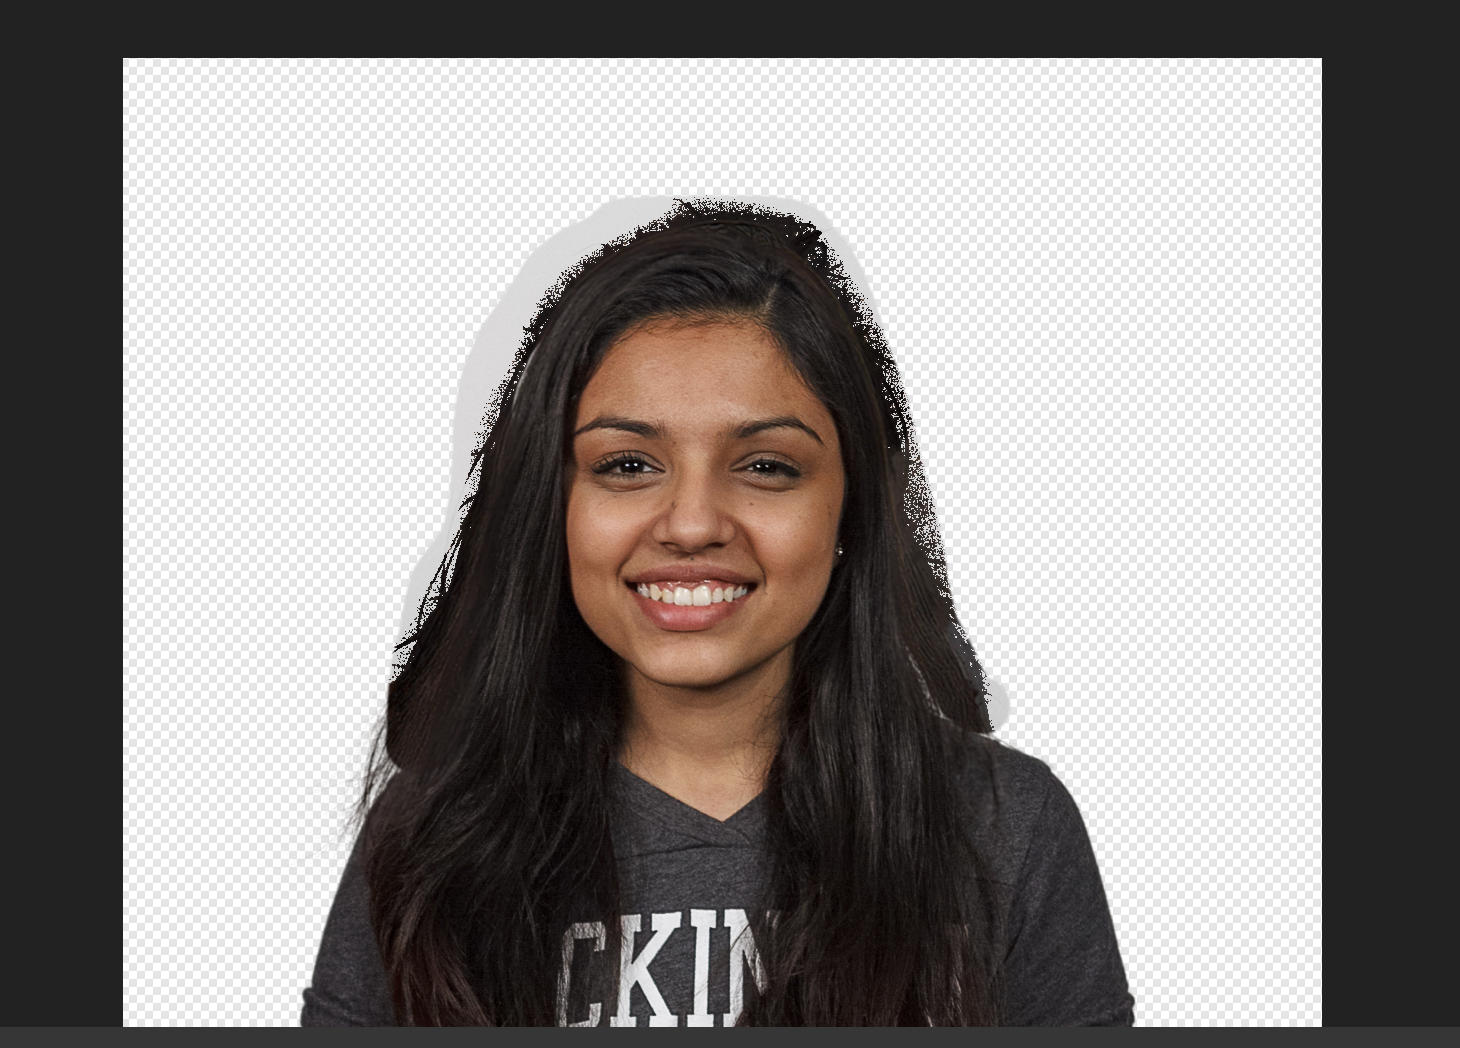
 I'm working on jewelry products. In photoshop I use to mask to remove the backgrounds (cut out) using either lasso tool or the pen tool. The usual workflow would be applying a mask to a layer, select the mask layer, make an area selection using a lasso or a pen path converting it into a selection with the specified feather radius & fill it with pure black to hide or white to reveal the masked areas. I'm not able to do that in Affinity Photo, is this possible with AP? Would really appreciate if you could kindly give an idea how to achieve this or would really appreciate adding the same feature too for easy masking of objects.
 -
 Being able to paste any layer into the mask to give it a custom look is a must honestly. Especially useful for photomanipulators that need to work flexibly.
 -
 I'm lost... i simply cannot figure this one out. I made this logo and i wanted to be able to make a shadow around the edge of the logo. But i can get the mask right. The issue is in order to make some of the shapes i have overlayed some lines with rounded ends with the same colour as the background.
-
 So, here we go again. This was originally created over a year, thanks to Supervolting on here for bringing it back to my attention. I have reworked the tutorial and it's less than 5 now and simplified. It's a really cool way to show of your videos or pictures and a great way to see how you can work with other apps in your workflow by starting in Affinity... Enjoy... (and click subscribe) ;) Creating a Mask Overlay Tutorial Allan
 -
I need help locating a tutorial. I watched a tutorial years ago by someone that I think once worked for Film4. The tutorial demonstrated making a vector mask in Affinity Designer, importing it into Apple Motion for some masked animation (videos in the background of text), then did scoring in Final Cut Pro. I can't find the tutorial, but it was supposed to demonstrate something like the Google Play Your Heart Out advertisements: https://youtu.be/lQIFVT80fbo?list=PLGc5GJ9a7RPXDjs8u1S5Vur_43ef4bwEj It might not have been Film4, but I remember the tutorial used scenes from Monster,Inc. and I think Spiderman. It was simple, yet clean and professional. The scoring went to I think Hudson Mohawks, Chimes; which Apple used for its Stickers commercial. The reason I'm bringing it up here is because I'm pretty sure I clicked on a link in this forum (again, years ago) when I discovered it, and I'm hoping someone also remembers it and can help me out. Here's to hoping...
-
 I wonder if any of you more experienced users could shed light on how I can achieve an inverted text effect using Affinity. Basically I want the same effect as the attached file. Thanks in advance, Benj
-
 Hi, I am new to Affinity photo and want to know if in version 1.4.1 a soft mask exists? What I need is that a mask has a certain transparency at it's border. How can I give a mask lets say a 10 pixel border with transparency changes from 0% to 100%? Something like this: https://rockymountaintraining.com/wp-content/uploads/2012/06/Photoshop_ss_006.jpg So I want to use the circular mask tool and set a smooth border of e.g. 10 pixels. How can I do that with Affinity photo? Thanks!
 -
 When i make a selection, refine the mask and than make a new layer with mask; than try retouch the mask with the brush I get what looks like corrupted data. Is this a bug or what. I have tired installing and reinstalling photo. I am using the trial, I was going to buy this program it looks great but not if this is right. I have attached a screen shot, can anyone help me out.
-
 Sometimes I wonder if channels created for highlights and midtones can be combined to affect an adjustment in AP? Or any combination. I noticed that there is a function in the channels section in the pull done menu to add to but haven't been able to use it. Would a quick tutorial be available for this if it is possible.
 -
 can i remove and save the name in this photo to use as pattern later
-
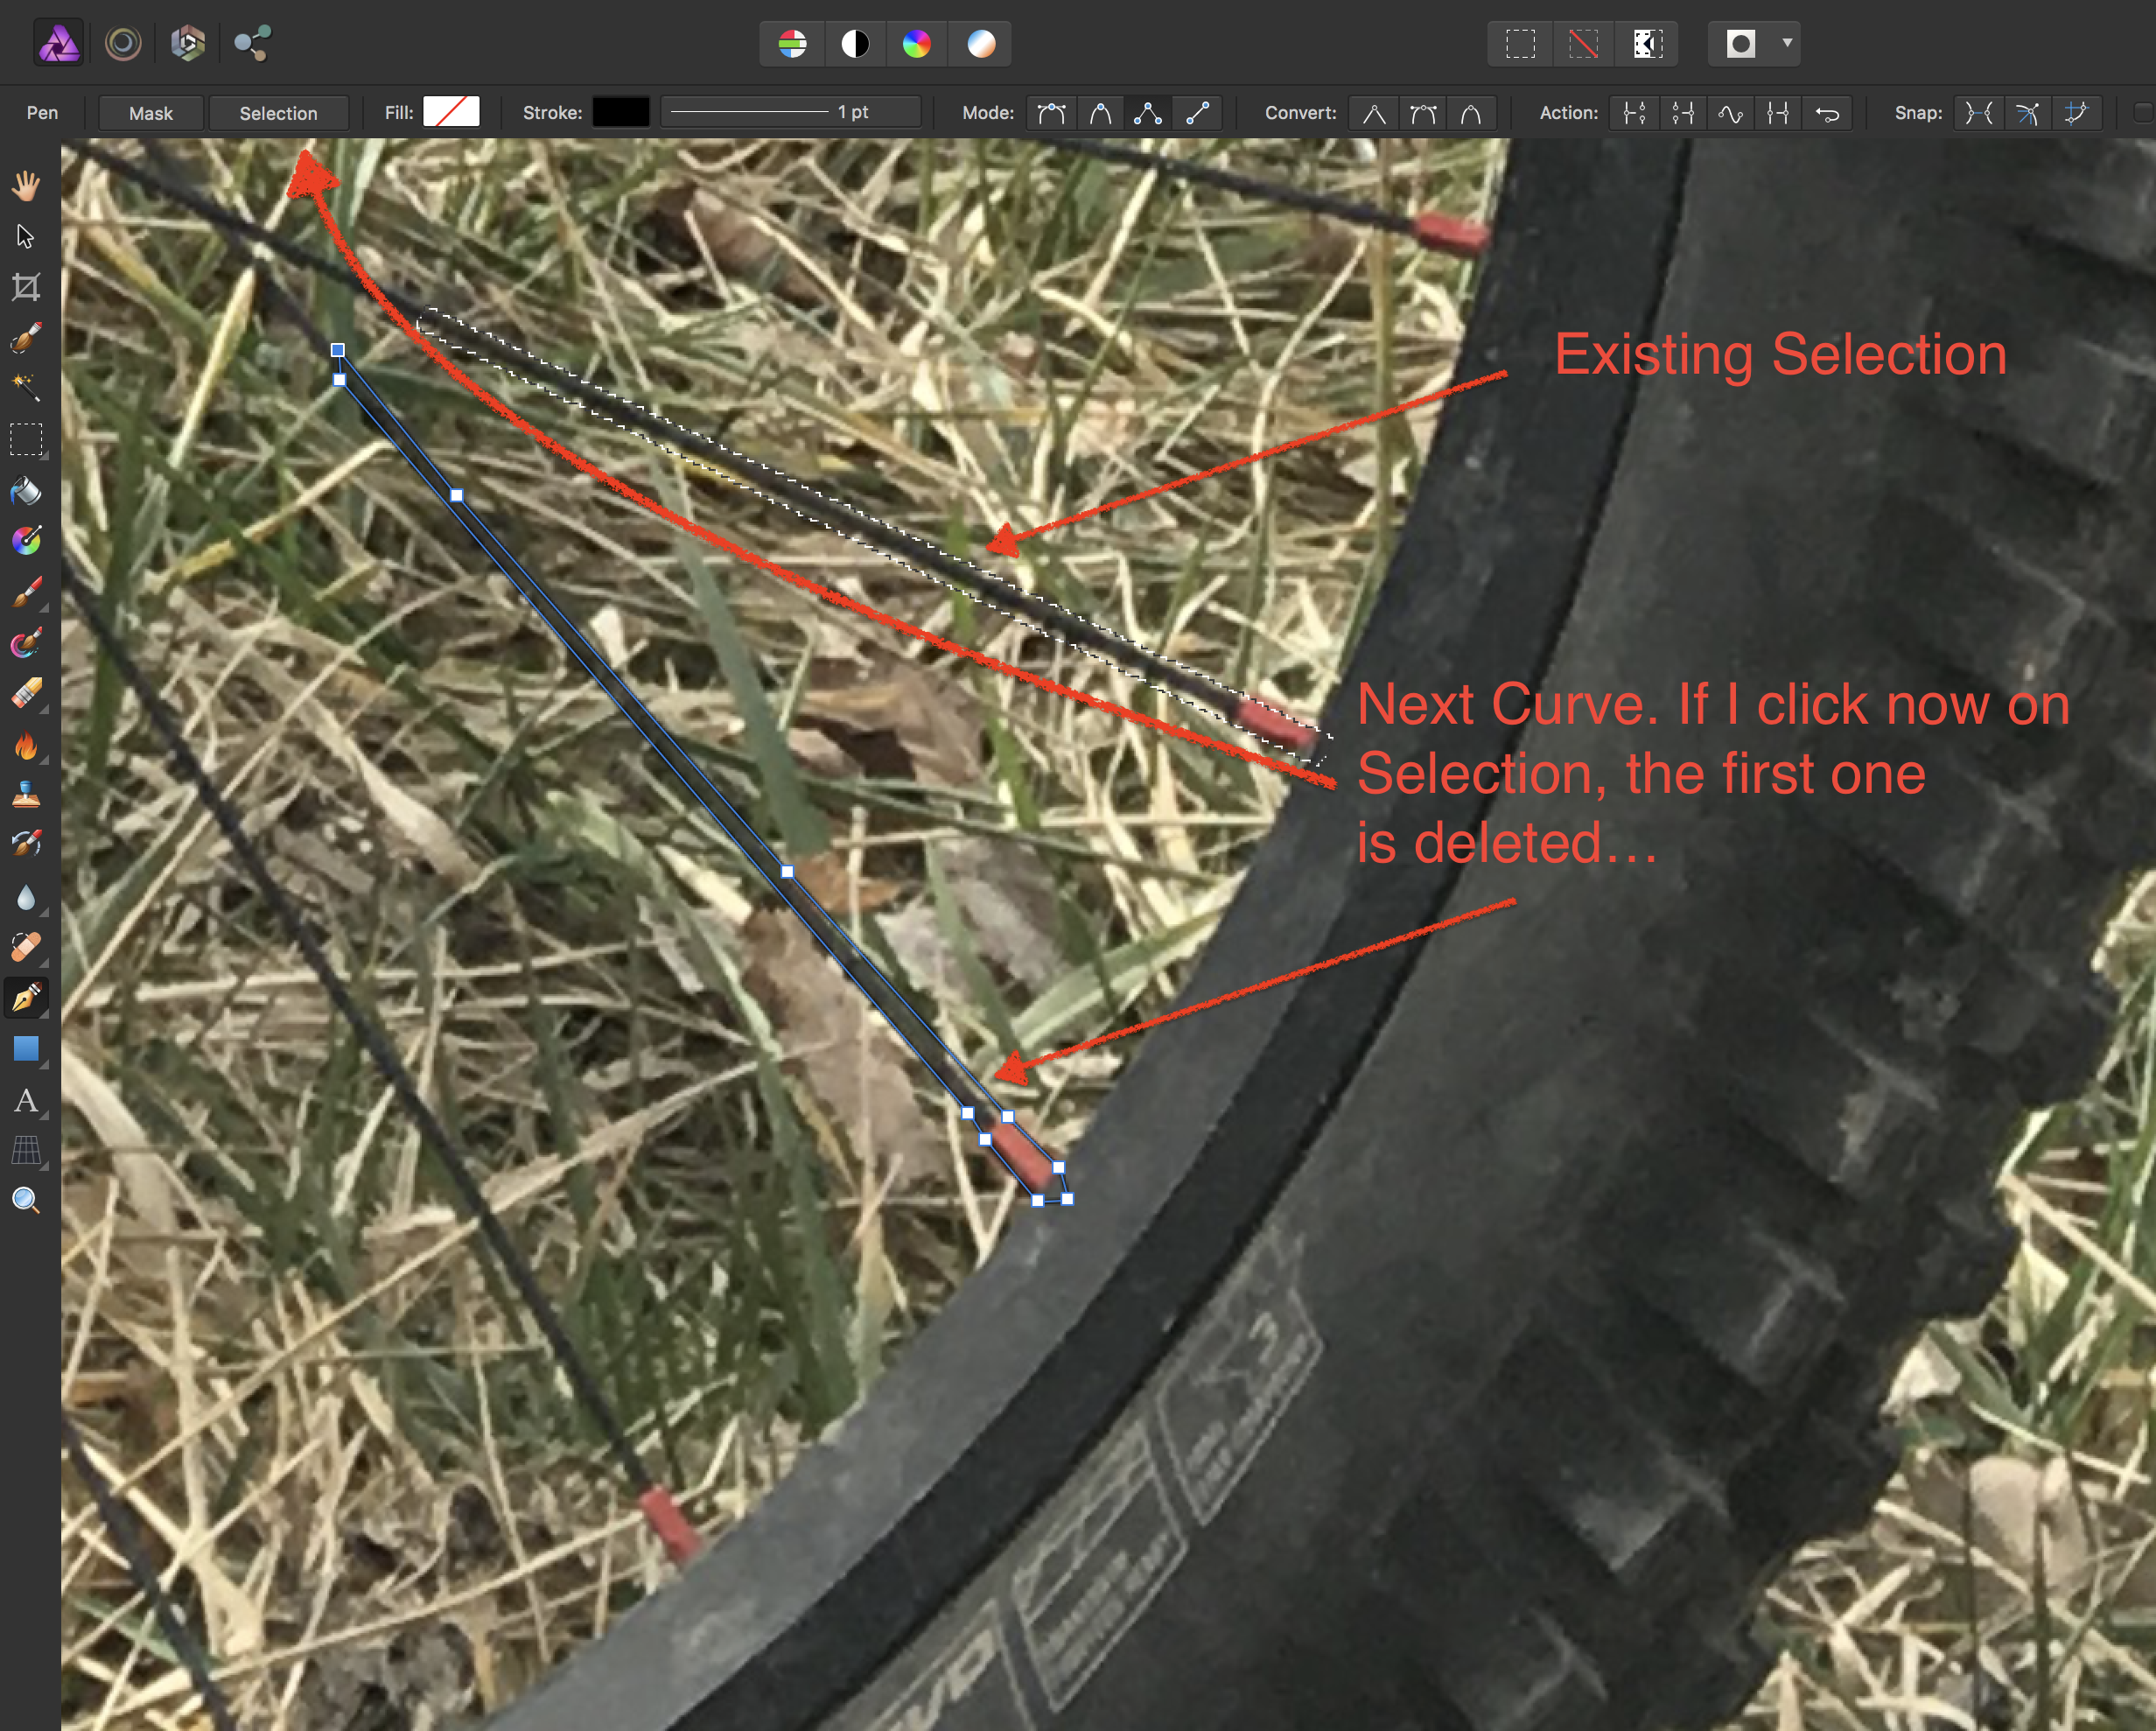
 I should mask a fine structure and it is only possible to select this lines properly by help of the pen. The problem: 1. As soon as I draw a second spoke, and click the Selection button, the 1st selection will be deleted. 2. If I do all my pen drawings and group them, the Selection button can not be used on the group. Is there a hidden function I didn't discover yet? I tried already Shift, Alt and Cmd + Selection button, unfortunately no one has an "Add" effect... With this background, it's impossible to use the existing selection tools for usable results. (Is it?) I really would appreciate any help. Cheers, Roland
-
 In AD, how do you convert a selection - marching ants - to mask a photo to become a pen tool path, so later I can have a better control?
 -
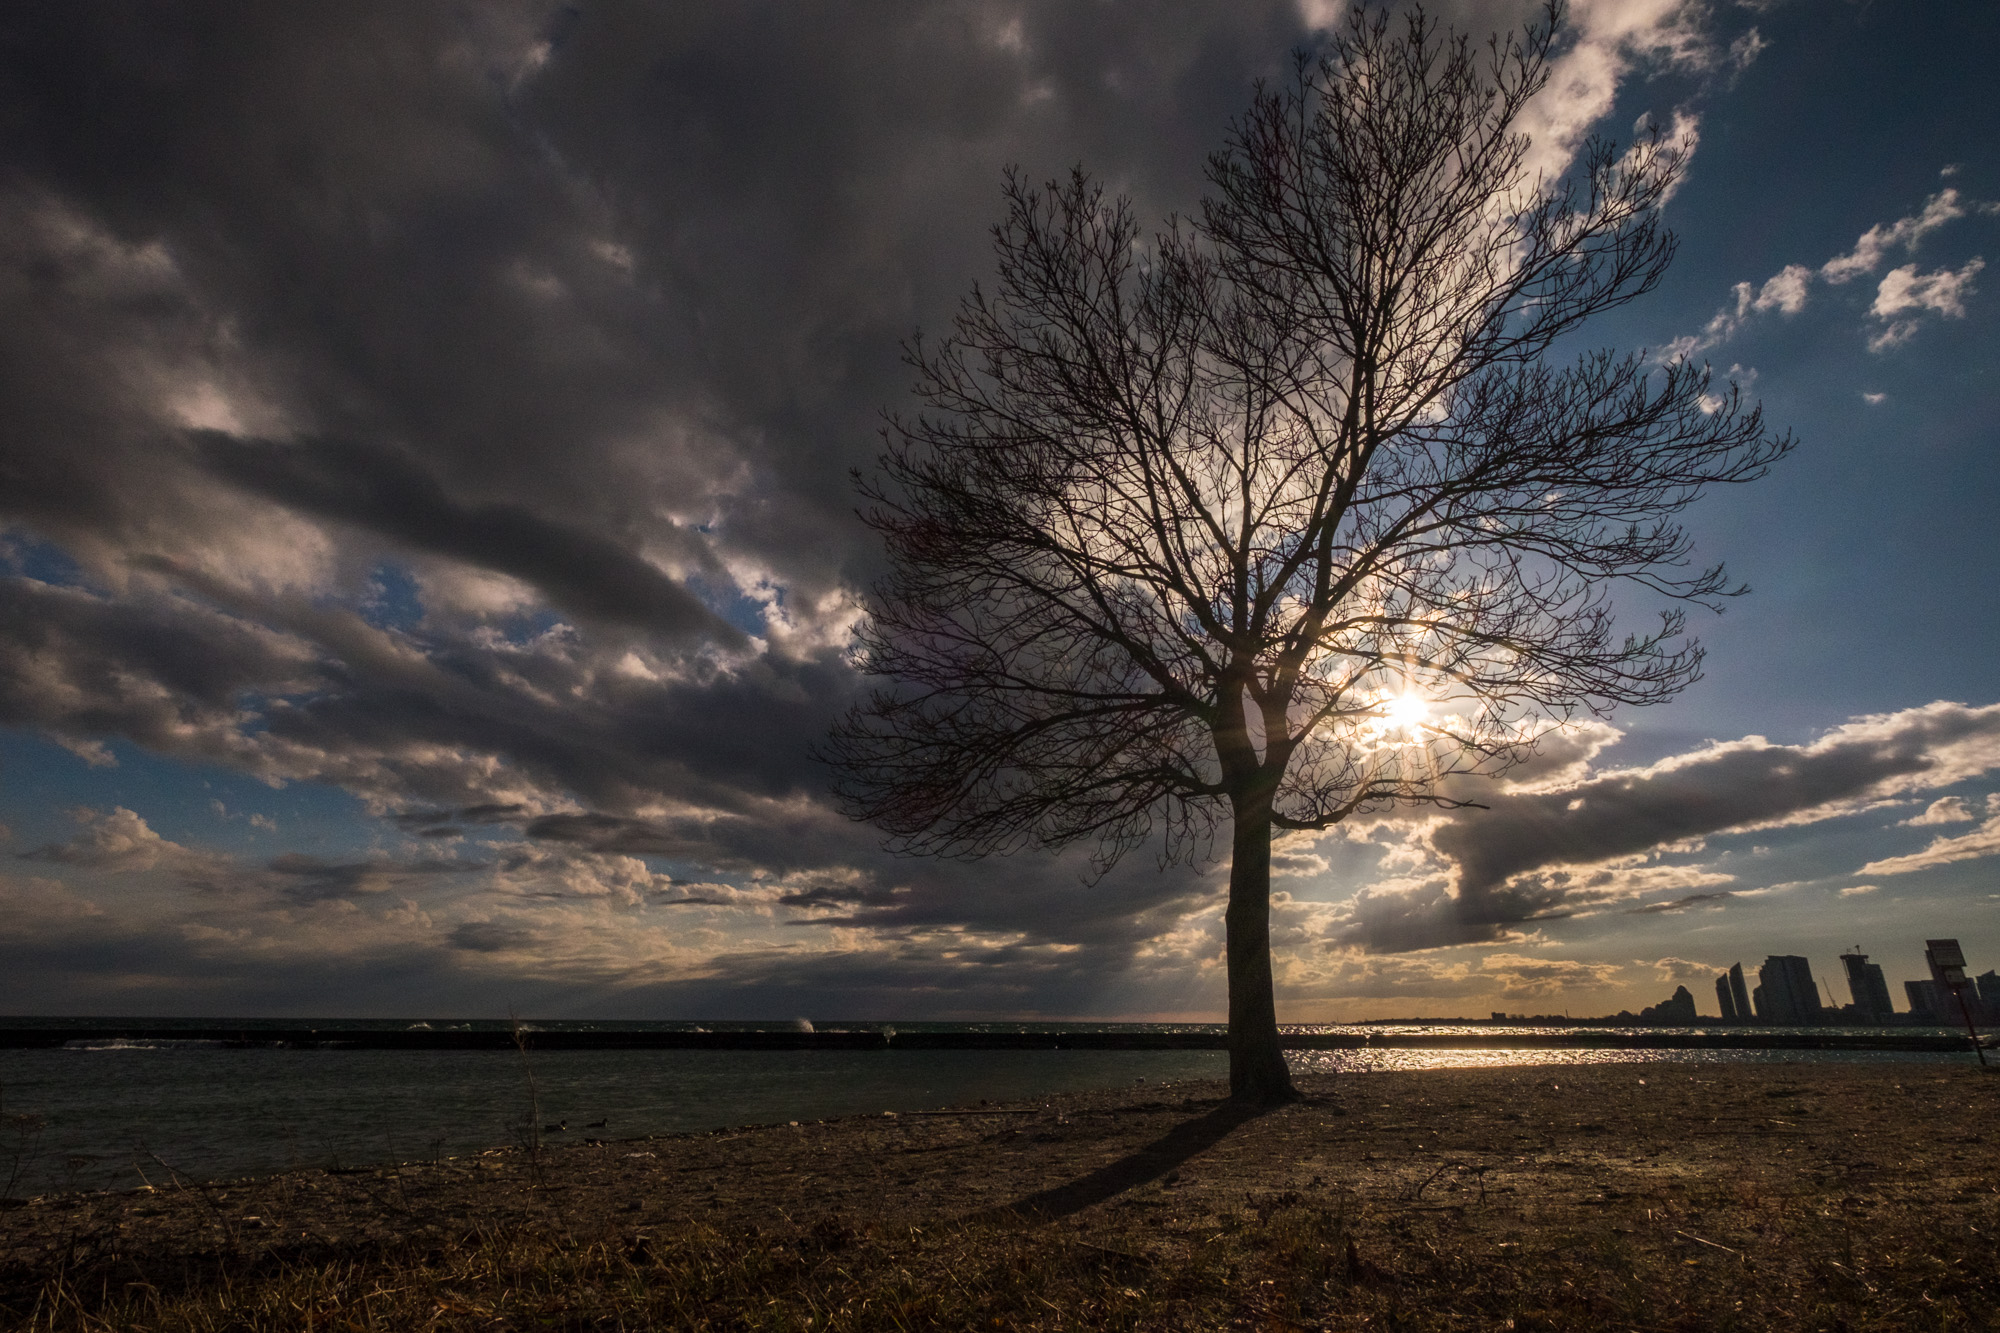
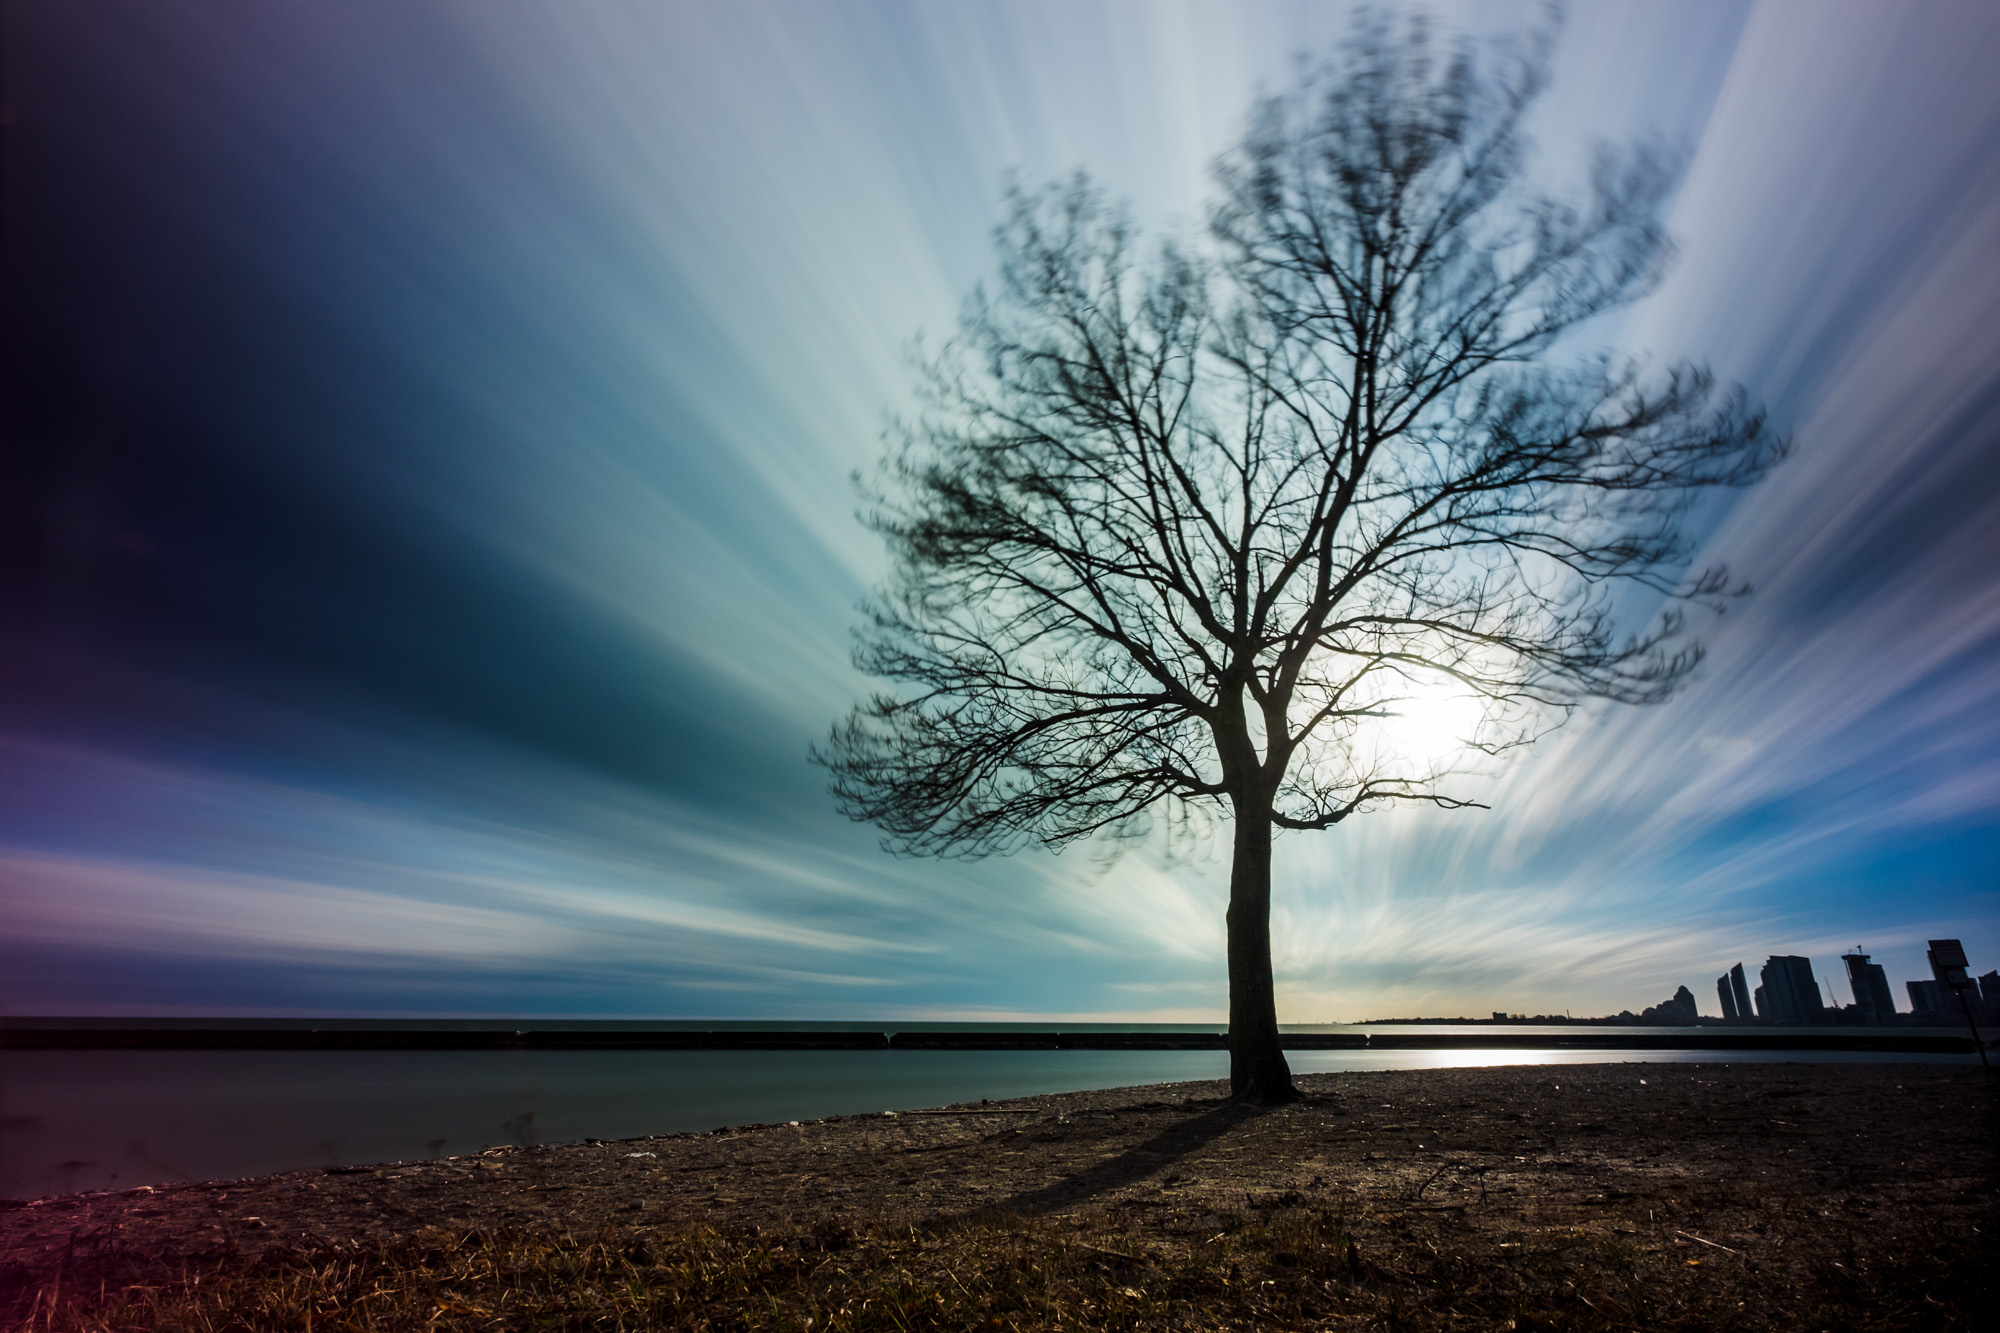
 Hi, So I have these two photos and I want to replace the tree in the long exposure shot with the tree that doesn't have the motion blur in it from the wind. I can't seem to figure out how to make a really good selection of the tree in either picture. It would take forever to do it with the quick selection brush and refine it. I'm sure there is a way to make this an easier process. Does any one have suggestions? Cheers, Jason
-
I´ve recreated an effect I saw on TV (DMAX). The Text is the background and everything around the text is blurred. I did that non destructively which is awesome. The only problem is that I can´t expand the compound to edit the text once I´ve used it to clip the gaussian blur. Could you resolve this? Thanks in advance! (maybe I´ve mixed up "clipping" and "masking" once more)
-
 Thanks for such a great product. I am having problem with the channel masking. Using any background image I am unable to bring options on the channels menu. Thus I am currently unable to create any channel masks. Watched the tutorial(s), but unlike what I have seen on the video channels stand untouched. I am usind a mac. I am missing something simple, but haven't figured out what it is yet.
 -
 Hi there, being a newbie to affinity photo I tried to follow the Affinity Photo-cutting out video with an own photo. Everything went fine, masking was in fact very easy and I succeeded in copying the masked area of the photo. But as I pasted it into another photo, there was no way to resize or turn it in any way, may it a photo or a new Document. It was always pasted without any anchors, where I could turn, resize, move up or down the object. Really annoying compared to what could be seen in the movie, Can anyone give a hint - I viewed the video over and over, looking if I could find any clicked option - nothing to see. Btw. searching the forum I didn't find anything about cutting except for AD. It could be helpful if the questions resp. answers could have a tag AP or AD Greetings from Berlin docesen
 -
 Hi, if I apply a shape mask to an image I can move the mask around above the image but how can I move the image to change the visible part (and leave the mask where it is)? Thank you.
 -
 Hi- I am new to affinity and loving it so far, I just have a super basic question. So I have a psd file which is a mockup of an iphone. I am trying to put my own image into the mockup, but I do not know how to drag the corners of my image to make it fit perfectly. Is there anyway to do this? Thanks!