Search the Community
Showing results for tags 'macro'.
-
 Hi, Iam trying macro in affinity photo to make iPhone designs using mock-up, please help me out for placing image and resizing the design. Something like this https://youtu.be/lWgF4uSkCR4 I am using affinity phote cause I have created mock-up and I get best out it in affinity photo. Thanks
 -
 Hi guys. I need an advice. I know there is no such a thing like "Faux Italics" or "Faux Bold" in Affinity products. I tried to find the way how to push Photo to do that... and there is way. ITALICS: In Character - Positioning and Transform there is an option Shear to slant selected text = set an angle. BOLD: Add the stroke to selected text Fine, it works, I could do it manually so let's make some macros and set couple of possible options which I can use in the future. I was able to record the macros for both, even for combo "faux bolditalic". It's not a rocket science, macros are really simple 1 or 2 steps. But it might helps you, guys... or inspire you to play with macros and set some other interesting text styles And my question is: Is there any other, more elegant way how to do this kind of trick? Edit: I uploaded macros for you FauxBoldItalics.afmacros
-
 Sorry, I'm new here. And I've searched the forum, and don't find any answers. What I want to know is that if I deleted my default macros in library, is there any way to get those macros back? I haven't delete them now, but this question is so distracting. And I'm afraid to lose them, so I don't dare to delete them then try to get them back.
-
 It would appear (from my limited experiments) that macros do not allow moving between documents when recording. I can start recording, copy from one document to paste into another but as soon as i move to the second document the recording appears to stop until i return to the original document at which time it continues. Can someone tell me if this is the case or is there something I am missing? As I'm using the trial version with a view to replacing other tools this appears to be a severe limitation.
 -
 So I am trying to edit a star lapse I took by recording my macro then re applying it to a batch. However the results are way different when I do this. How come? I know the Macro is good because when I run it on just a single image it looks great. However when I run it as a part of a batch it doesnt even look the same. Whats the point of the batch processor if it doesn't work? I was really hoping to use affinity over Adobe products but its looking like for mass image editing nothing beats adobe. Might have to just suck up and pay to stupid monthly cloud subscription. ugh. Anyways the first image is my original macro ran on just a single image and then the image on the right is from the batch, and yes I used the same macro for both. Image 1 https://www.dropbox.com/s/ikm4y3e0hh6sue4/PTRO5713.jpg?dl=0 image 2 https://www.dropbox.com/s/vkt8y5jnecfz7kx/PTRO5713b.jpg?dl=0
 -
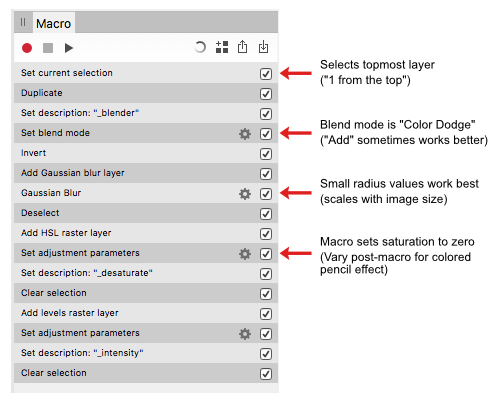
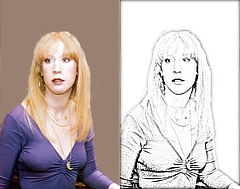
This Sketch effect.afmacro is my attempt to convert the technique demonstrated in the Affinity Revolution Transform any Photo into a Pencil Drawing (Affinity Photo Tutorial) into a useful Affinity Photo macro. These are the steps I came up with: Since the first step selects the top layer regardless of its name or type, for best results it should be the only layer in the document & a pixel layer. The macro does not alter this layer so if you don't like the effect you can delete the layers it creates. The two user adjustments adjust the radius of the Gaussian blur & the Black Level of the Levels Adjustment layer. They can be tweaked after the macro is applied in the usual way. Adding some saturation back to the HSL "_desaturate" layer creates a colored pencil effect. A couple of 'before & after' examples of what you can expect: Comments, criticisms, & questions welcomed.
-
 I enjoy using Affinity Photo on a Mac (OS X 10.12.6). I frequently need to resize a folder of images and run a small macro to place my studio logo on these lower-resolution images for use by the client, post them to social media, etc. I downloaded the update for Affinity Photo v1.6.7, and it's great. But is there still no way to run a batch job on a folder containing both landscape and portrait orientation images and end up with all of them properly resized to the same pixel dimensions without distortion? I saw a discussion about a complex macro for this purpose in another thread. However, this essential function should be included as a basic part of Affinity Photo's capabilities, yes? Has anyone had success with this sort of operation? I really love Affinity Photo and tell all of my pro colleagues about it as a potential replacement for Photoshop, but this simple issue could hold many pros back. Thanks very much for any insight that you developers and experienced users might have.
 -
Is there any way that Select by luminosity of Layer can be recorded in a macro. E.g. Ctrl, Shift an left clicking the layer gives you a selection based on luminosity (the brightest pixels) However if you try to record this as a part of a macro you get a warning that states layer selections cannot be recorded as macro. Basically, we should be able to record every action we do in a macro as in Photoshop. Come on Serif this is a basic requirement. Cheers in anticipation
-
 I'm recording a macro in AP windows to create a new fill layer and change the fill color. Macro recorder dies when I change the fill color. Error is "can't record set fill". Anybody know a way around this?
 -
 I have just used Affinity Photo (Windows Trial version) for about a week. It is really an amazing piece of software - I'm especially impressed by the easy to use user interface and how fast the software applies adjustments to the images. Great usability design! However there are a few things that bugged me and I'd not want to move to Affinity without them - maybe I've been ignorant on some hidden tricks - if anyone could advise, I'm willing to learn and reconsider: Cannot save Raw adjustments - I have to restart from zero if I have to stop working on a raw file in the middle Cannot save Raw adjustment as macros and apply to similar photos When doing raw stacking, it would be nice to be able to apply (previously) saved adjustments to each image, before Affinity Photo calculates the stacking result I'm not a professional but I do have my photo trips from time to time. Without the above capabilities I'd be wasting too much time on developing raw files. Thanks for the wonderful work. Looking forward to the good news.
 -
 Hello, there are times that I have to convert multiple images in a specific color format and size and then save them with specific file properties saved, but once I try to record the macro to do this I get an error when I try to export them that I can't record this action. Is there a way to do that? Thanks
 -
 Hallo allerseits.. Habe gerade gesehen, dass es hier im Forum auch Deutsch sprechende/schreibende kompetente Leute gibt; so kann ich mir evtl die Mühe sparen mein 'Problemchen' in Englisch zu beschreiben. Für die webseite meines Turnvereines verwende ich Logos/Piktogramme im png-Format die frei verfügbar sind. Allerdings passt das angebotene Rot nicht so recht zu unserer Corporate Identity An einem habe ich es per Makro recht gut hingekriegt. (Rottöne ausgewählt - angepasst - deselektiert- neu abgespeichert - fein) Gibt es eine Möglichkeit, die etwa 100 Icons in einem Rutsch -per Batch- umzufärben, ohne jede einzeln zu öffnen? Für Eure Hilfe schon jetzt vielen Dank Liebe Grüsse aus dem Rheingau adus
-
 Hello I need some explanations on macro recording. I am a new user (I registered the software a couple of days ago) I would like to record in a macro two simple operations starting from a camera picture of about 21 megapixels: a Bicubic resize to 1024 pixels and a Filter/Sharpen/Clarity of 0.3 All goes well during recording but when I play the macro to a new image the Clarity applied is 1.5 and not 0.3 as recorded. So if I compare the final image obtained with the macro with the image obtained with manual operation, I don't get the same result.... Can someone explain this behaviour?
 -
 When you click on a macro in your Library palette A. Photo always switches to the View tool (the hand) afterwards. This is really not what I usually want. Almost every time I want to use the Move tool. So every time I use a macro I have to manually press V or click on the Move tool icon. It kind of disrupts the flow. Please make it customizable which tool will be activated after clicking a macro. For example, you could add support for tool switching to the Macro editor (so activating any tool would be registered as a step). Or make the program remember the last active tool before using a macro. Or at the very least change the default automatic switching from View tool to Move tool. Similarly I would prefer the Move tool to be activated after I have created a new document. Now it also defaults to the View tool. I can easily navigate the view with the Move tool but I cannot select and manipulate objects on canvas with the View tool. So the Move tool is much more useful as a default. Thank you.
 -
 I'm fairly new to Affinity Photo and I've been figuring out how to do the things I learned in Photoshop in Affinity. One thing I had in CS6 was a macro that cropped an image, confirmed the crop, then finished by saving the image. I have figured out how to make most of my original macro, but adding 'Save' doesn't seem to be an option. If I stop the recording, save becomes an option again. Is this possible with Affinity Photo, or is there an alternative option for this?
 -
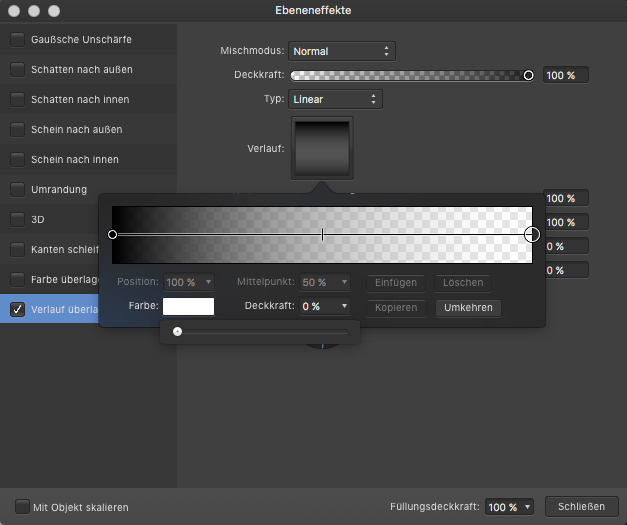
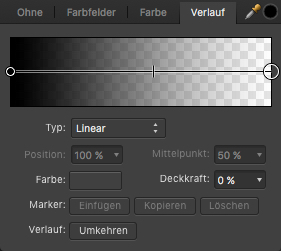
 I always wonder that in AP there is no direct way to apply a transparent color adjustment gradient fade, which would be pretty useful for macros to have. When recording macros one actually can only use an adjustment gradient or a fx gradient effect, but the first one (which I would prefer to use for quick turn arounds) doesn't allow to alter/setup a linear gradient color transparency ... ... the fx effect in turn allows to setup this but works on a whole pixel layer and not an adjustment mask level. Also the usual gradient tool allows to setup such color->trancparency fades, but isn't recordable in macros at all. Any reason why an adjustment gradient (see the top shown panel) doesn't offer to setup a opacity color aka transparent fade here? - That looks somehow like an option omission to me.
- 9 replies
-
- 1
-

-
- affinity photo
- macro
- (and 3 more)
-
 hi I am trying to write a macro based on the Orton effect but trying to drag Gaussian blur layer above brightness and contrast layer says it can be moved. any ideas
 -
 Hi, I would like to create a macro that resizes the canvas based on the actual image size. The canvas should be increased by 10pixels on each side, no matter what the image size is. How can this be done? Idea behind: create a macro, that makes borders/ frames around my images, but these images can have different dimensions/ orientations.. Thanks Mathias
 -
Hi, Here is a library of macros of various LAB operations. It can do - Selective desaturation of LAB channels - Separate LAB channels to greyscale layers without switching to LAB mode - Join back LAB greyscale layers to a composite image without switching to LAB mode - LAB color contrast boost Enjoy! As for the file size being 4MB for a few macros, I have no idea, it is probably a bug. SH LAB tools.afmacros
-
Hi, After recording a macro you can make blend mode modifications in the macro customizable by clicking the corresponding eye icon. However, unlike the opacity adjustment customization in macros, you can not assign a label to the blend mode dropdown that is displayed when the macro is played back. This is not particularly helpful, the macro dialog may have multiple blend mode drop-downs with no way to communicate their purpose or role. Please add a modifiable text label for blend mode customization in macros the same way as for opacity.
-
 Hi, I just got Affinity Photo and so far I love it. I found a few tutorials for using the Epic Skies Macro that came with version 1.6 back in November. I fully realize that I missed that free promotion. I'm cool with not getting it for free. I'll gladly pay for the macro and the photos. I know that I can buy the photos from Uplift at this link - https://www.upliftactions.com/products/epic-skies-cloud-overlays But Uplift only sells a Photoshop action, not the Affinity Photo Macro... does anyone know if I can buy the macro anywhere? Any help would be greatly appreciated. Thanks, Josh
 -
 I was trying to follow the tutorial from @MikaG on How to: Sharpening with Edge Masks from January 14th, 2016. This worked OK on a couple of trial images. I then tried to record his procedureas a macro. This involved merging three layers, the modified background layer and two adjustment layers. This worked fine in my macro-free trial, but would not work when recording as a macro. The message I get when trying to select one of these layers is quite opaque. I get the same message with each of the layers I seek to merge. Is selecting a layer in such circumstances a proscribed operation when recording macros? I note that @MikaG comments that: "Once the function of Actions is added to Affinity Photo it will become a task even faster". John
 -
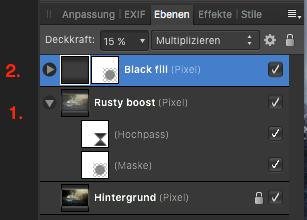
Photos of rusty motifs sometimes have a certain flair, which you can reinforce/enhance if desired. This Rusty Boost Macro just tries to do this in a reusable manner with some simple applied layers. LAYERS This macro creates two layers for you with corresponding layer masks: The macro makes first a copy (Ctrl/Cmd-J) of your background image layer and then applies a high pass filter on it (with a default setting of 20 px) and puts this layer into vivid light blending mode. You might adjust the layer's opacity to your taste here. There is also a layer mask applied so you can include/exclude certain image areas with a white/black brush here on demand. A 15% opacity black fill layer and mask are applied in multiply blend mode, in order to give blacks a slightly stronger go and darkens the image slightly. You can adjust the black fill layer opacity to your liking and use for the layer mask a white/black low to medium opacity soft brush and paint over the image, in order to include/exclude certain image areas from the black fill. THE MACRO rusty-boost.afmacro
- 3 replies
-
- 2
-
-
- affinity photo
- macro
- (and 1 more)
-
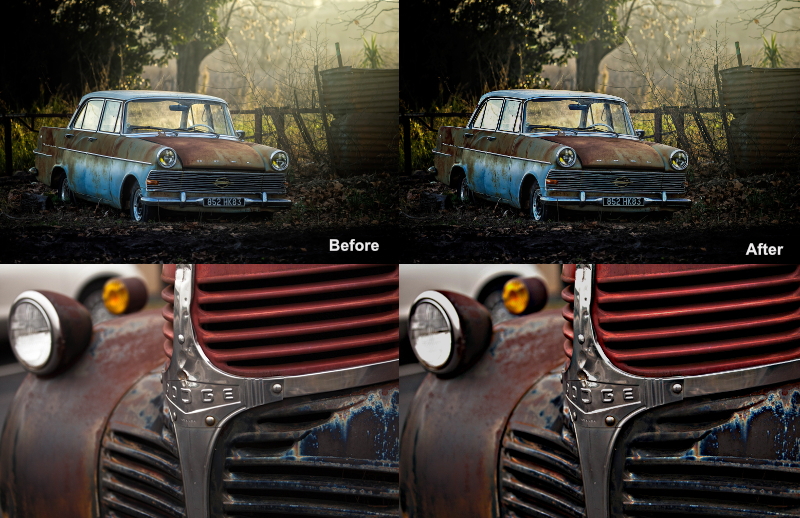
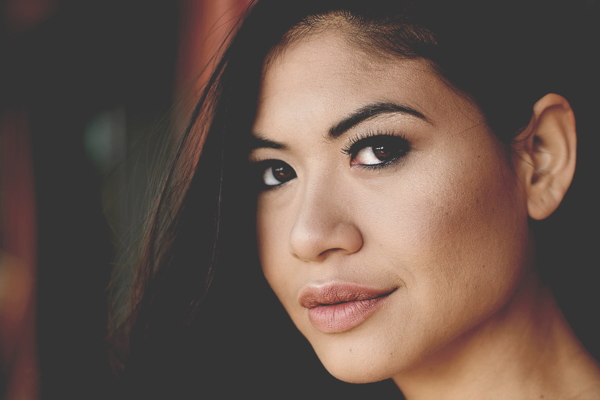
For certain photos like street, casual wear, but also sometimes for portraits, I tend to use matte color effects if those shots have to underline some more urban style. It is an easy task to apply some matte color effect to your shots, though if you need it quite often a reusable macro is the way to go for this. - Here is one adjustable matte color macro for Affinity Photo, which you can reuse for such matte effects for either color or b&w images. BEFORE AFTER LAYERS This macro creates three layers for you with corresponding layer masks: A curves adjustment layer which applies the main matte coloring to the image, which lowers contrast and flattens blacks. You can use the mask (draw with a white/black brush) to exclude/include specific areas from the matte color. For example you could exclude in portraits the eyes from being matte here etc. A contrast boosting layer which allows to give back a little bit of the contrast lost by the matte color effect. This is as default a copy of the matte layer with an applied soft light blending mode and half lowered opacity. Again you can use the mask to remove or reapply certain image areas here. Finally a desaturation layer which can be used to lower the saturation of possibly still too bright colors. You can use the mask here too in the same intended way as before mentioned for the other layers. THE MACRO matte_color.afmacro Matte color.afmacros
- 2 replies
-
- 8
-
-
- affinity photo
- matte
- (and 2 more)
-
 Hello, I just downloaded Affinity today and it came with a free Macro-pak which I also downloaded. When I follow the instructions to import the files it says no files found although I can see the files when I search my files through windows, I am pointing to the correct folder but it just does not seem to be able to see them, can someone help me?