Search the Community
Showing results for tags 'macro'.
-
 Do Affinity Photos macros not record text manipulation or effects like Photoshop does?
 -
Please request support for a problem with this extraordinary software. How do I record a macro with text in it. Record a macro with text editing to apply at the bottom of my photos and then be able to apply to multiple photos with batch processing. Thank you for your kindness
-
Sou cliente de vocês a um bocado de tempo e gostei do que vejo, mas solicito saber como faço para criar uma macro com texto no Affinity Photo, como eu fazia no Photoshop? Necessito da informação urgente, ou necessitarei voltar para o photoshop? (I've been a client of yours for a long time and I liked what I see, but I ask to know how do I create a macro with text in Affinity Photo, as I did in Photoshop)
-
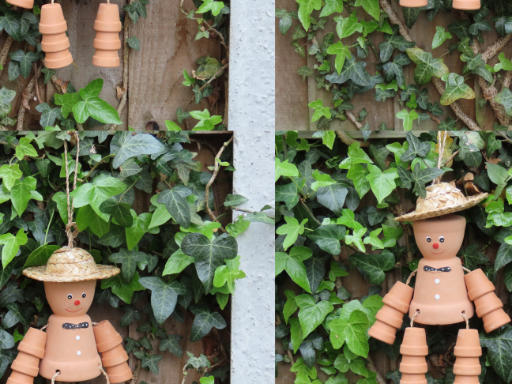
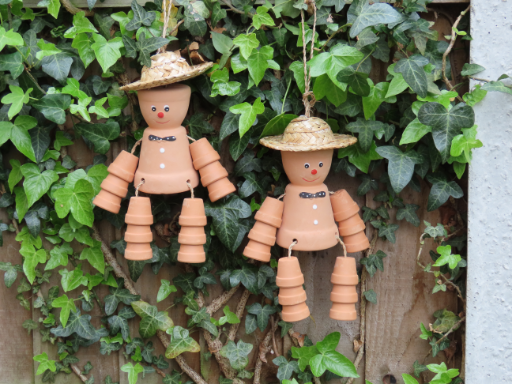
In a recent posting @skitchy enquired about shifting pixels using Procedural Textures. I was not able to help, but I realised that you could perform an Affine Transformation (Filters > Distort > Affine) using Equations (Filters > Distort > Equations) instead. I used two parameters which control the horizontal shift and the vertical shift. Here is a photo before applying the macro: and after applying the macro: The horizontal shift was around a half, and the vertical shift about 0.8. Here are the equations: x= irem(x+a*w,w)y= irem(y+b*h,h) As I said, they do not do anything that the Affine Transformation would not do (in a macro), but I offer them here as an alternative which might be more convenient within the context of a more extended procedure. Here is the macro, and the macro library: Macro: Affine Transform.afmacro Library: Affine Transform.afmacros John

- 13 replies
-
- 2
-

-
- affine transform
- macro
- (and 1 more)
-
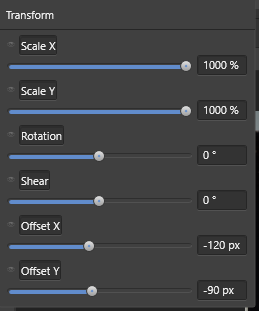
 When included in a macro, the move tool (Transform) dialog trying to change the 'Scale X' or the 'Scale Y' goes to 1000% when entering any value in the value box.
-

Set brush opacity and flow with an Affinity Photo action
Guest posted a topic in Feedback for Affinity Photo V1 on Desktop
Is it possible to set brush opacity + brush flow with an Affinity Photo action or with a keyboard shortcut? This enables a quicker workflow if one can just toggle between e.g. 20% opacity 20% flow and then go back to 100% opacity 100% flow without having to change it every time manually. Thank you for your advice how to do this or to take the time to add it to your feature request list. 😃 -
With a little help from my friends, I offer a fresh look at linear gradient procedural texture formula. Yes, it happened in a flash this morning, so, examples will have to follow. This is complete with some exceptions that I was experimenting with a little last night... V1.0 Creates very controllable R,G,B linear gradient with edge hardness, contrast, tint, tone, etc. V1.0 needs wants desires 1) Point of gradient spread. (It should be represented as a fraction from location point rx, ry -/+.) 2) Scale controls.(push left/right/up/down) 3) Skew controls.(angular push) 4) Rotate controls.(being able to use angle input or elevation/rotation controls would be great, my current rotation is very limited 45...yes, I know) grad 100 grad edge 25 grad edge 50 grad edge 75 grad edge 100 contrast 2 contrast 5 contrast 8 lines 2 lines 3 lines 4 lines 5 lines 5 edge 50 lines 5 edge 100 blue 100 blue 100 redt 50 blue 100 redt 100 redt 100 redt 100 edge 100 * It is important to note that red, green, blue (0,1) controls base or areas of gradient with no color, redt, greent, bluet controls gradient color. The gradient is expressed at a rate of 150 percent coverage of width. It could be removed or controlled by a variable. This macro is 100 percent non destructible and does not use the R,G,B image information in its calculations. Use transparency and blend modes to taste or add a white pixel layer under procedural texture layer, merge visible, and use that layer as a gradient. I am currently at a loss as where to insert the formulas for scale, skew, rotation without completely altering this in undesirable(controllable) ways...also, is it possible to batch process pixel layers? Macro will not export... Experiment and Enjoy - T V T V - LINEAR PT R,G,B V1.0.afmacros T V - LINEAR PT R,G,B V1.1.afmacros T V - LINEAR PT R,G,B V1.2.afmacros Examples to follow... ***V1.1 replaces fixed spread of gradient to 100 percent of width. Created variable r,g,b (0,1) controls shiftr, shiftg, shiftb for horizontal shifts creates multi color gradients. A limiter may be necessary to slow the shift progression. Offset rx, ry variables might be interesting for greater variation... >>Originally set for horizontal image. Running this just now on a vertical image the gradient just needed to be shifted over. Turn on edge hardness to hard. Use the edge(center of gradient) as location point that you center the gradient too. Dial it back to taste. 1.1 grad redt 25 redt 50 redt 75 redt 100 V1.2 creates R,G,B variables for hard edge and contrast to add more edges and brightness...Interesting since this has no (ry) I am not sure how to put in an (rx, ry) shift to create that 3D offset...looks like I can now have my own Rothko and Richter...new ideas keep coming... > NOTES - Experiment with R, G, B channels combinations by turning the channels on or off. Creates different color combinations. Change R, G, B channel formula rx to ry. Creates horizontal and vertical channel combinations. Rotation and offset would enhance angle of color. Rings or other shapes would be interesting. Combining using differing formulas on differing channels((R)rings, (G)linesH, (B)linesV),etc.. Question...How much is too much? Simplicity is probably the route to go when these get cleaned up(more digestible). One set of controls and have plug in effects... Examples to follow...
-
- 1
-
-
- macros
- linear gradient
- (and 2 more)
-
Some time ago I created a set of macros to resize an image to a fixed maximum size, as described here. Recently @DanThePhotoMan asked about resizing to a fixed minumum size here. I have revisited these macros and created two sets, one resizing to fixed maximum size and the others to a fixed minimum size. They are all based on the following sequence for the maximum set: Layer > Unlock Layer > Rasterize and TrimFilter > Distort > Equations Enter the following in the x and y fields, substituting your own maximum size, then Apply (x/MAXSIZE)*max(h,w) (y/MAXSIZE)*max(h,w)Document > Clip Canvas Layer > RasterizeSelect > Alpha Range > Select Partially Transparent Edit > Fill> Inpainting Select > Deselect Where MAXSIZE is from the following pixel sizes: 640, 800, 1000, 1280, 1600, 2000. The set to resize to minimum is similar except that it uses min(w,h) instead of max(w,h) in step 3 (Equations). There is also a pair of macros to resize to an arbitrary size (up to 4000px). This macro pauses to allow you to enter a parameter a. It is convenient to enter this parameter in the form of MAXSIZE/4000, where MAXSIZE is the maximum (or minimum) required size. For example, if you wanted to resize to 3000px, you would enter 3000/4000, which evaluates to 0.75. (You could enter 0.75 if you wanted.) Note that the resizing algorithm in the Equations process is not defined. Here are the macros as a library (.afmacros) file. Resize.afmacros John @Traveler @Gnobelix @affwin @firstdefence
-
 With a Macro in Affinity Photo I need to take a larger file and resize the short edge to 1000 pixels. Wherever the long edge ends up is fine. I tried making a Macro, but the long dimension is locked into the length created with the original image used to create the Macro. The crops will be different for all of the photos. Is there any way to do this with Affinity Photo? Photoshop has a Fit command that I used in the past. I'm trying to get away from Photoshop!
 -
I have put together a set of macros to change the dpi of an image without changing the pixel dimensions. The set comprises macros to change the dpi to 72, 96, 144, 150, 180, 192, 300 and 400dpi. These macros were recorded in Photo 1.6 because there were reports that similar macros recorded in 1.7 would always resample, even if the Resample box was unticked. I have checked that these macros work in 1.8, which they do. I also note that in 1.8 the Resize function will change the dpi without resampling. Here is the Library file: Change DPI 1.6.afmacros Thanks to @carl123 for setting the ball rolling with his macro here. EDIT: This macro library has been recreated (in 1.6) and re-imported into this message. EDIT: I have now re-recorded them in Photo 1.10, but they still do not work! John
-
 It would be great if variables/custom inputs in Procedural Texture were selectable in macros, rather than just Opacity. Thanks!
 -
Macro record. Draw shape (picks up current fill). Try to change fill colour. Flashes of hope then frustration of being pulled back to original colour.
-
When I run this macro, the app crashes every time. I have attached also a test image. Thank you! refine crash.afmacro
-
 HI I've checked the forum and did not find the answer to this, I'm trying to group several adjustment layers and standard layers while recording my macro, but I cannot select the layers individually in the layers panel to group them i get this popup asking me to pick a single layer. When i use the "select - select all layers" command it works, but when i run the macro (on a new file with multiple layers), any layer that is not locked gets placed in the group the macro created (i don't want this). Am i missing something, is there a better way to select the layers and group them while recording a macro? Forgot to mention i'm running affinity photo 1.7.3.481
 -
 I followed these instructions to batch edit my photos: https://affinity.help/photo/en-US.lproj/index.html?page=pages/Macros_Batch/batchjobs.html?title=Batch%20jobs as follows: save as Jpeg width = 1500 length left blank, PPI at 75 using a sample image The problem is, if the images in my batch are not exactly the same width as the sample to create the macro, my images are distorted. And vertical images become horizontal, or horizontal images become stretch out. I tried the same thing in Photoshop Cs6 using horizontal and vertical images but did not have this problem. Also, I can't find a save for web option that shows me what the image will look like when I reduce resolution size (as I can in Photoshop). Please advise. Thanks.
 -
 Hi I am following the workbook ...re create new macro. Unfortunately the "Create New Category" pane on the drop down preference does not respond. The other option on the drop down panel to "Import Macros" does respond no issues. I was trying to use my Huion Tablet Pen initially but given no response I tried the mouse on the mirrored computer screen...still no results. Fearing I may have erased the pathway with the pen toggle (as the bottom toggle is used to erase) I did a conditional factory reset...(Ctrl while launching) and just ticked the top 3 items to reset which includes the user preferences then restarted as well....but no change does this mean a re-install? is it a known issue? thanks for reading and any responses. Jude
 -
 Hi, I am trying to record Macro for creating Luminosity Mask with Affinity Photo, when I try and rename the Spare Channel to Lights 1 get an error message saying " Macro Recorder cannot record Set Spare Channel description " Lights 1". Any help in solving this would be appreciated Thanks Stuart
 -
Like playing with macro images, just not into expensive cameras. Took this at about 9:00 on a Sunday morning. Full sunlight, but the heavy growth behind this soon to be 3 headed flower literally looked black with very little adjusting. The L340 is completely autofocus --- or sometimes "auto-out-of-focus" might be a better description of this camera's ability. May post a few more of my macro images. I love looking for the unusual image. This one made me think of a three headed serpent. Thanks for looking.
-
 Currently, when using Apply Image in a macro, the image is hardcoded into the macro. It's hard to imagine a situation when this would be useful. I would really appreciate if the layer could be referenced instead...I believe that would make more sense.
 -
I've made a macro for frequency separation (my first macro attempt in this software, I'm an Affinity noob). In one of the steps I'm dragging a layer over to the Apply Image palette. When I reset the image and apply the macro everything is hunky dory. The problem occurs when I run the macro on a different image. When I do this the macro is using the original layer from the image within I created the macro, for the Apply Image step! I haven't used the Load Source From File, I just dragged the layer according to instructions displayed in the palette and the layers are named the same (they are named by the macro) There seems to be a problemen with Affinity Photo in this case, or am I just missing something obvious? I can't come up with a workaround for dragging the layer, I'm afraid... Fsep.afmacro
-
 Button mode with the ability to color code your macro's when veiwing them in the library would be a huge benefit. Even the ability to disable view of how many steps would help to save real estate in the library view. I'm a retoucher and have loads of macro's and find myself having to scroll up and down all the time to fine the macro i'm after.
 -
 howdy :) is there a way to save export settings in affinity photo — make user defined presets? for example, different size .jpegs, resample & quality settings for future use & applications? i dont see an option for this in the export window nor a way to edit/save the default presets thank you! :)
 -
 As I read somewhere in the beta forums, the functionality of macro in AP was extended. Where can I find the description of those new functions? And in addition to that I will ask why there is no capability of macro recording for "save" and "close" documents operations. When doing mass editings this would be a great help. Thanks in advance for your reply.
 -

Affinity Photo Crashes When Processing Batch Job
odyssey609 posted a topic in V1 Bugs found on macOS
Hey all-- I've been attempting to batch export a number of affinity files to jpeg. When I do so, the program crashes every time. I am running a batch with one macro--add watermark, which involves opening a file as a layer and adjusting its position slightly. I am running 1.7.2 and have a fully updated MacBook Pro: 10.14.6. I have attached a photo of the basic specs for my computer. I have also attached a .rtf file of the crash report. I have plenty of free space on my hard drive, considering my computer was only bought five days ago. I adjusted the settings in the affinity photo preferences so that there is PLENTY of RAM to which it has access (it is actually on the max setting) and the warning for CPU usage is quite high, as well. I am attempting to save to jpeg, as I mentioned, with quality at 100. Last night, when I built the aforementioned macro, I attempted to batch export several files (4) and the operation was completed successfully. Today, I am not able to batch process even one photo without the program crashing. I have attempted to process this with parallel processing AND without parallel processing--neither has any effect on the crash. I read in another post (listed below) that this problem had been rectified with an update to the software; however, I can assure you it is still a problem. One of the most important reasons I have for using Affinity Photo is the ability to batch export. If this doesn't work, it will affect my ability to do my job--I certainly can't export photos one by one. I will also add that I have tried closing all applications on my computer, shutting it down, allowing it a tiny bit of rest, and turned it back on. I found that these actions did not affect the crash; however, I could not call myself IT (or a fan of IT Crowd) had I not attempted such a solution. I would appreciate any help you can offer. Please review all the details of my post before responding. Affinity Photo Crash Report.rtf
-
 As a photographer, I create macros to make my life easier and save time on repetitive tasks. I've created a simple macro that resizes the image canvas and flattens the image. I want to also include saving and closing the image, but I keep getting a dialog asking if I want to save the flatten image. My answer to the dialog box question is always 'Yes'. Why can't I just record my dialog box choices into the macro?