Search the Community
Showing results for tags 'layers'.
-
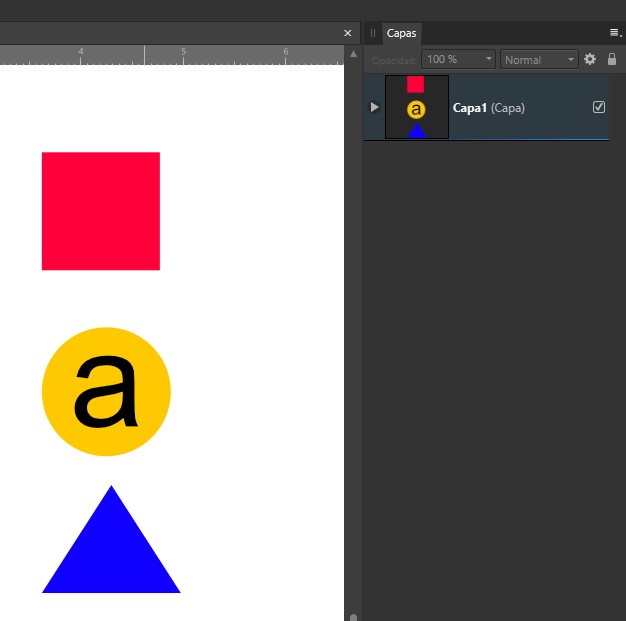
 Is there a way to merge multiple layers into one layer? Thanks
 -
 Someone can help? I'd really appreciate! Photoshop: select all layers to be aligned Edit / Auto-Align-Layers Affinity Photo: select all layers to be aligned nothing found... 🤔 Cheers, Roland
 -
 I would like to export separate layers of a file as png or jpeg to a specified folder. Is that possible and can It be done as a batch export command in or out of the Photo Affinity software? Thank you Justin --
 -
 Question, so no halftone filter in Designer? but it is in Photo, seems like it would be more helpful in Designer. Is there a convenient way to make use of the filters in Photo in Designer? I saw a video where someone created one ..
 -
I think it would be good if when we started to draw our designs, each figure was housed from the beginning within a layer, to start each project in a more orderly way. And I think they could save us the trouble of creating layer 1 ourselves. I think Illustrator does it like this, in the layers panel every new document has always "Layer 1" created by default and then all the shapes that are drawn are stored within that layer. *Also in every "Artboard" created, I think its "Layer 1" should be created automatically.

-
 I would suggest adding a feature (or changing the behaviour) of adding a layer to include the already selected objects. Say, you want to clean up your document structure and sort the objects into their respective layers. You have already made a selection but now you realise there is no layer for it yet. In Affinity, if you add a layer, this new layer is selected and the previous selection is gone. Possible Solutions: A: like Indesign: you press the add layer button and this doesn't affect your selection, so you can drag these objects onto the fresh layer. B: I would suggest a new command (which one could assign a shortcut to) similar to "group" where the actual selection gets moved into a new layer.
 -
 Hi there, In the Export persona, is there a way to include a specific layer for one slice only (between various other slices)? So far I know I can exclude a specific layer/group of layers for all slices by unchecking the eye mark. But I want to do like the opposite. For example: I have a usual project file with the original image, various changes in multiple layers and groups. On top of that is a soft-proof profile placed as well as some smaller tweaks for printing. Now if I export those image I want copys for the digital media without those printing tweaks, so I simply uncheck those. But for printing I want a dedicated filename_print.tiff with those printing tweaks applied on top. I know I can go the long road and do two exports but that somewhat defies the logic behind the export persona. And if I try to create a slice from a selection of layers it creates one slice per layer which obviously also isn't what I want.
 -
 “Half a league, half a league … ” – oh, you know the rest, right? Of course. Now to the matter at hand in Today’s Fun Yet Somehow Dumb Question: Why can I no longer create selections using the PEN tool on an image layer and then save them to a NEW layer using Cmd + J on a Mac? This was possible in Photos (1.9.3) as recently as last week. I could select a layer, select the pen tool, create an outline, and then select the ‘extras) - grow/shrink,feather, etc before saving it as either a spare channel or a selection in the image's folder. Today I attempted to create a fairly basic rectangular selection of a sign to be made into its own layer - and couldn't do that anymore. The ‘Assistant’ [sic] immediately popped in and added its own Curves adjustment layer, thus removing from me the image layer with the information I wanted to cut out to put on its own layer. Despite many tries, I could not - and CAN NOT - get around the damned Assistant’s dubious yet somehow pointless ‘assistance.’ Today’s BIG QUESTION: HOW can I regain use of the Pen Tool to create cutouts which are then saved to their own layer? Those ones are much more crisp than the pixel-based Selection Tool compromise layers. Steps followed are fairly basic: Select Pen tool, create path, click Cmd-J, and … nichts. Alles ist verschimmelt … All responses welcomed and appreciated, and thanks to all for entering this week’s Big Dumb Question session …
 -
 I just purchased Affinity Photo and can't figure out how to crop a layer. I have found some tutorials from a couple of years ago that walk mr through it but they want me to use the "Copy Flattened" feature under Edit, and that is not there. do I need to do something to get that feature to appear, or is there another way to crop a layer?
 -
 I opened up a PSD in AP and single lines of text import correctly but multi-line text seems to have the values stripped and all the lines collapse on top of each other. Basically the "leading" is set to zero but even if I go in and change the leading value, nothing happens. Am I doing something wrong? Please advise. Thank you.
 -
 I've imported a pdf technical drawing into Designer. I want to delete all the dimensions on the drawing. Each dimension is called DIMx (x being a number). Is there a way I can I select all layers with DIM in the name?
 -
 Hello everyone, I´m using Affinity Designer since a month or two and I´m wondering if there´s a setting or way to create multiple objects or vectors on the same layer. For example I´d like to use the Vector Paint Brush tool on one layer, without creating a new one every time I add a new vector. I know that you can group and classify layers, but that´s not really what I´m looking for. Well, AFD is not a ´traditional´ digital painting programme like Clip Studio Paint etc. (actually it´s totally not), but maybe you can use it as such in some cases. So, what I´m looking for is a feature to ´paint´ like in pixel-mode without ´separating´ each ´line´. I don´t really think that there´s a setting or feature like that, but maybe I´ve overseen something... (I´m sorry if there is a similar topic like that in the forums, but I didn´t find anything.)
 -
 Hey guys, I'm a bit lost with this one. I just bought Affinity Photo and worked with it for a few days. Unfortunately it 'stutters' without a clear rhythm. After a while (could be minutes or hours) the stylus sensitivity drops to basically 'do-you-even-hold-the-pen?' and shortly after my monitors go blank for a moment (like after restarting the system) and once the program is visible again, half of my picture is gone. All the layers are still there and visible, but it looks like someone stamped a huge eraser over half the page. Every layer is missing some of the info and since the program didn't really 'crash' I get no notification to restore my last save (crash folders are empty as well). I'm basically saving every 3 minutes manually just to make sure some data remains Another weird thing I noticed with the 'crashed' image files: The viewport looks different depending on how far I'm zoomed out. The attached pictures demonstrate what I mean. The first is my last save 2 minutes prior. The second shows what I see fully zoomed out. Scary, almost everything is gone from all layers (no layer missing, just partially erased). But if I zoom in or export the picture it looks like picture 3 - almost everything is still there except two huge square-shaped blank spaces and a weird smudge in a bunny ear. I did install a few brushes and fonts, but I don't think this would produce such a weird issue? No crashes beside that. My graphic card drivers are up to date, Windows is up to date as well and Affinity Photo runs on 1.9.1 Not sure if my rig matters, but this is what I'm working with: Tablet: Wacom Intuos 4 CPU: AMD Ryzen 9 5950X GPU: ASUS TUF Gaming GeForce RTX 3090 Mainboard: ASUS TUF Gaming X570-Plus WI-FI RAM: 64 GB Program runs on an SSD I hope this is an easy fix Thank you in advance!
-
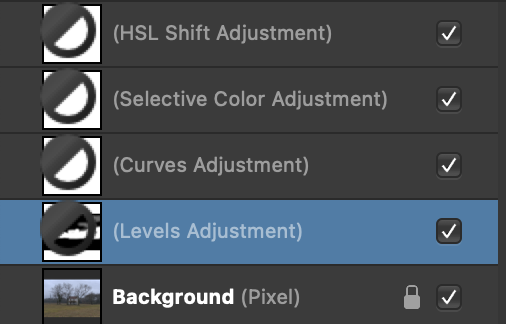
When the monochromatic iconography selection is ON the adjustment layer mask have a black/white circle overlay on them rather than being totally white or black (inverted). This circular icon blocks the users ability to see the strokes made by painting with the black or white (when inverted) brush. When the monochromatic iconography is OFF it shows the mask fully and any adjustments made by painting with the black or white (when inverted) brush is clearly shown. Attached is a screen shot of the Layers panel with the monochromatic iconography in the ON position. The highlighted Levels Adjustment layer shows an inverted mask with the center section painted in white. Everything is displayed perfectly when the monochromatic iconography is OFF. I'm using a MacPro laptop, Big Sur OS, Affinity Photo version 1.9.1
-
 Hey guys, im new to affinity photo and i have a big problem. You see i want to recreate this poster (credit : dribble) does somebody know how to make the colors of the background image match? so does the mix of the rounded square and the background looks clean. thanks
 -
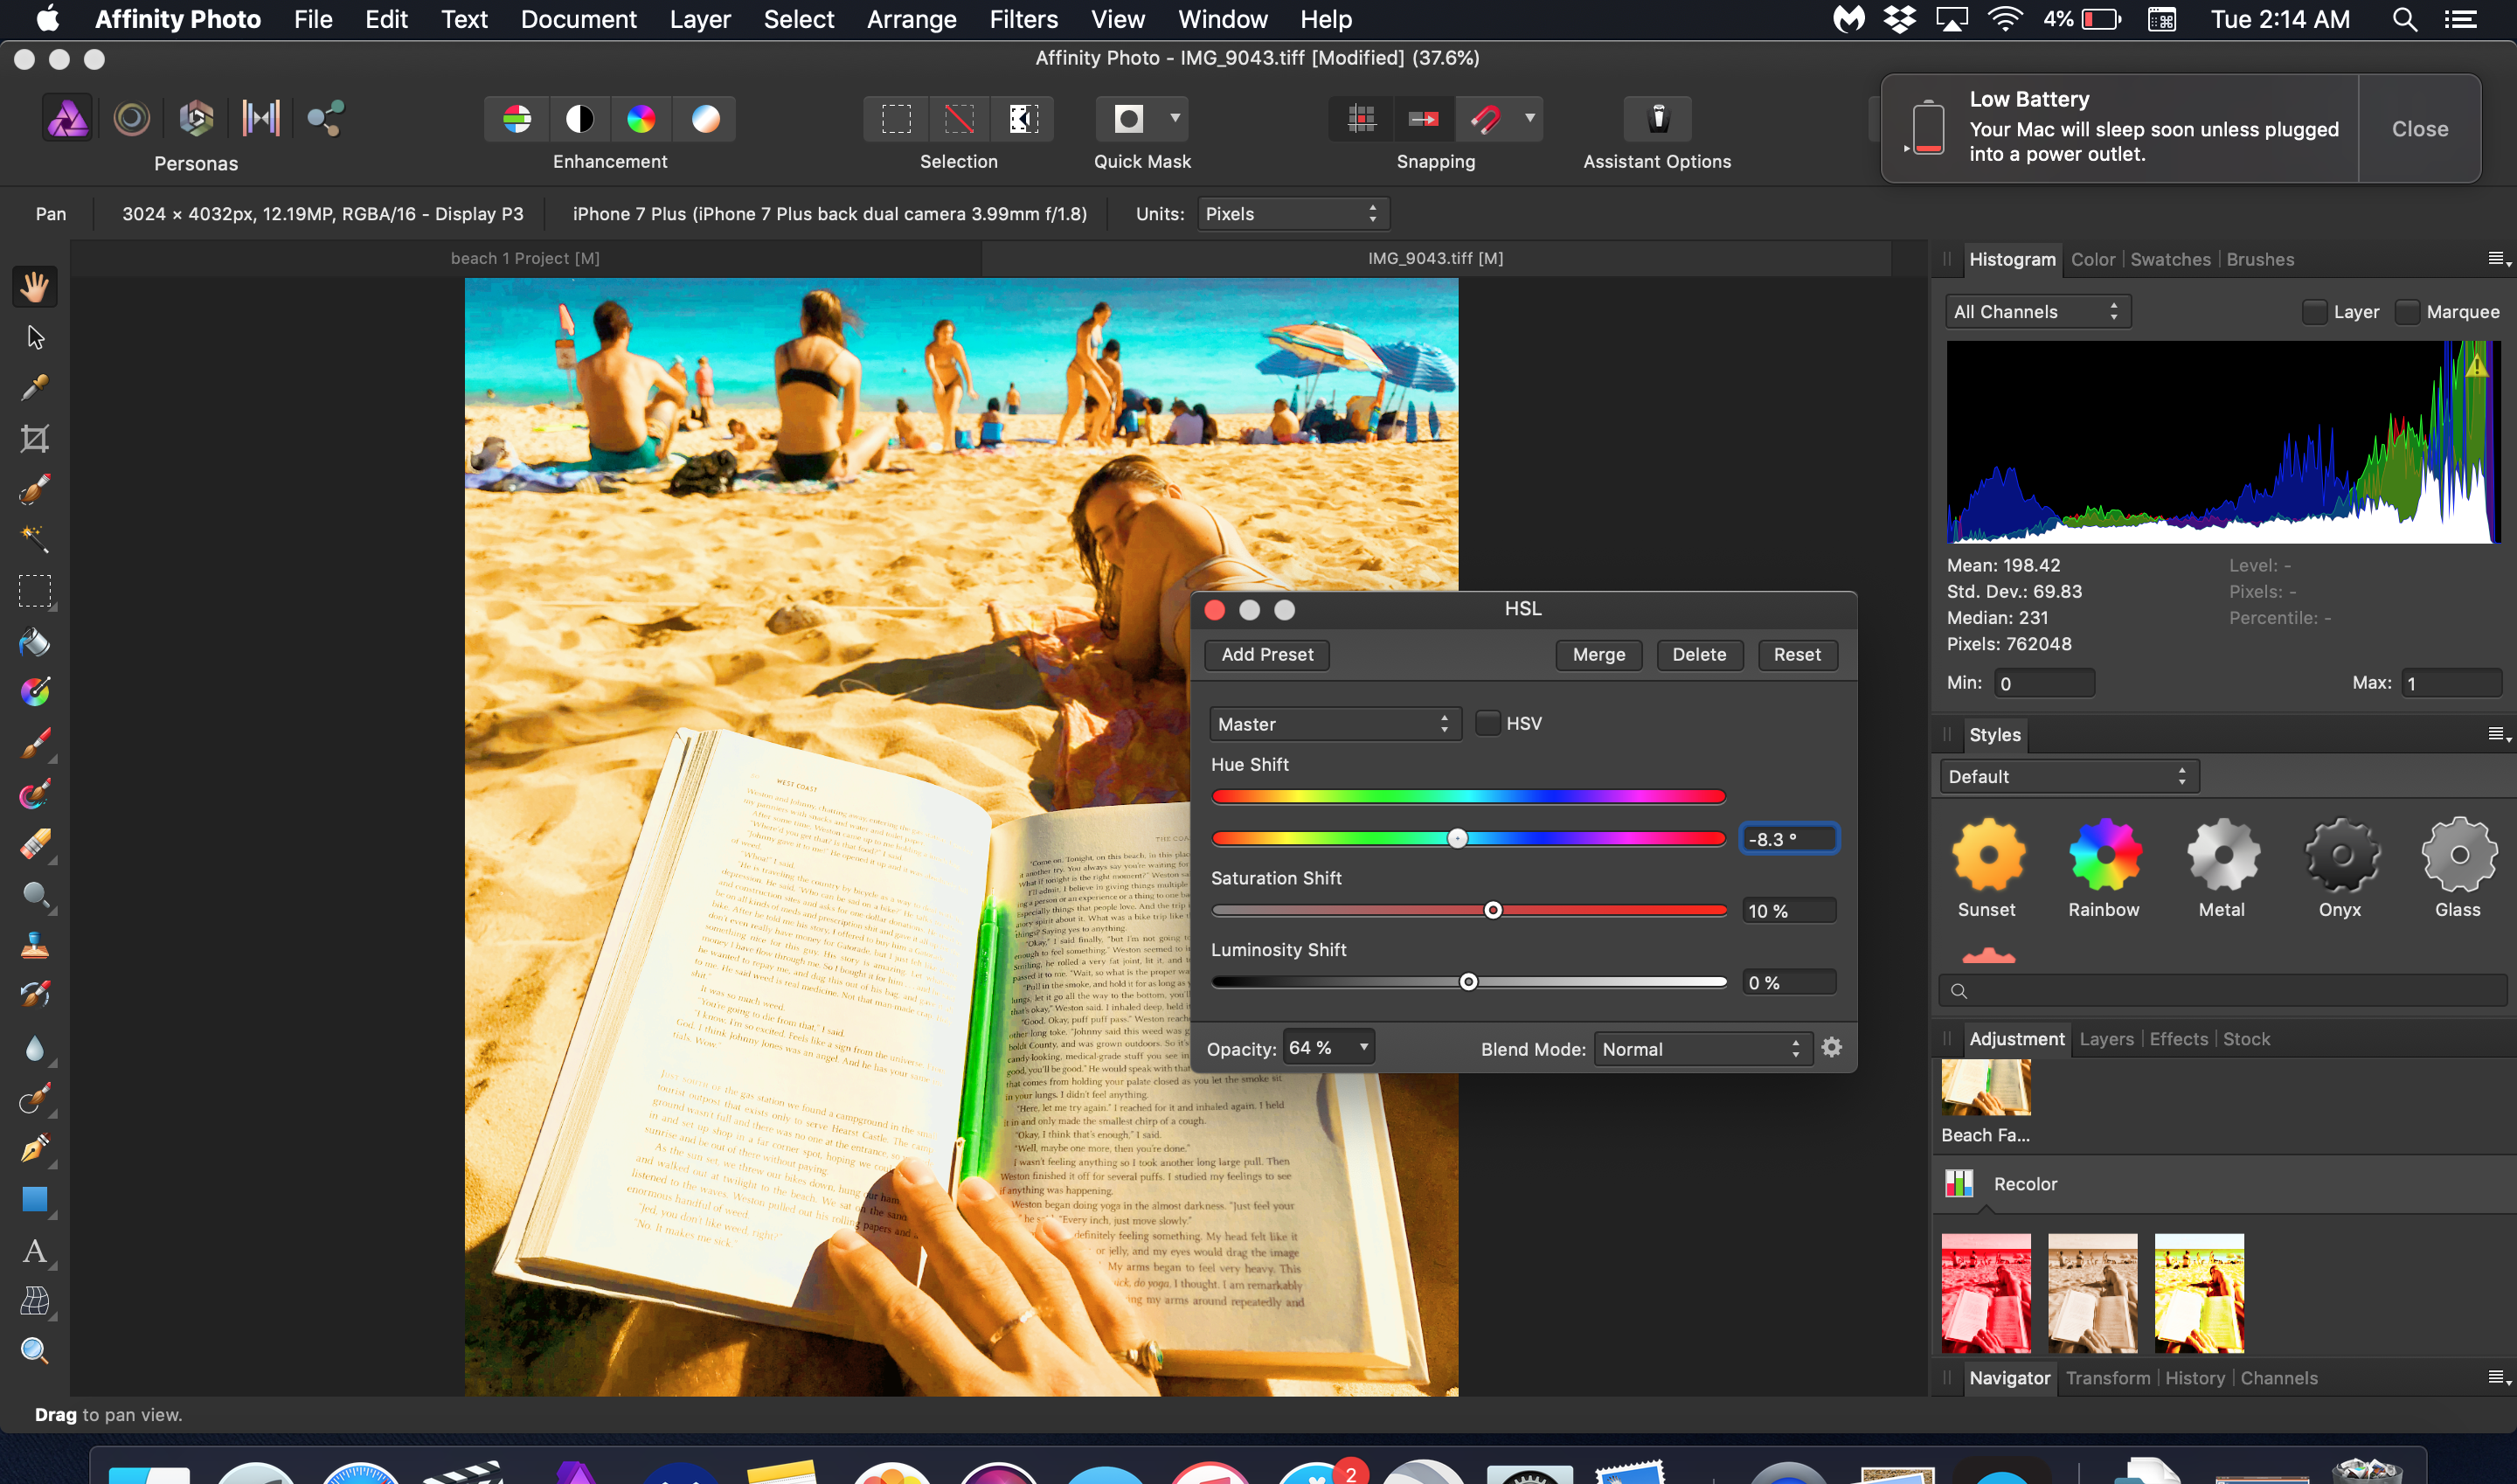
Since the 1.9.1 update, launching adjustment (Levels, White Balance, etc.) can require up to 40 clicks before the adjustment box launches. I have tried the rasterize and trim option in layers, constantly saving the document before trying to select an option, but nothing seems to solve this. I am using macOS Big Sur, v. 11.2.2 on an iMac.The issue was happening before Apple did an incremental OS update last week. Having to click up to 40 times per adjustment function has destroyed my productivity. I looked through Affinity preference categories to make sure I haven't changed anything but there aren't any direct options for layer adjustments. BTW, using the filters via the drop down menu also behaves wonky. Sometimes the selected change/adjustment is ignored and sometimes it works fine. I never had trouble using that filter adjustment portal previously. My usual working approach is to launch Affinity Publisher and then switch back-and-forth between the three personas. Before sending this bug report I tested the problem by launching my document directly with Affinity Photo, instead of within the Publisher suite method, and to my surprise adjustment panels launch either on the first click or second. Good work around but that negates the benefits of the connectivity within Publisher.
-
 This is my first post I'm new to this forum. Ive tried and looked for hours to find out how to save all my adjustment layers to Preset(s). From my understanding you have to save each layer and label it. For example, adjusting and then saving the Vibrance as a preset and naming it. After saving each layer preset on my finished picture and labeling them, I opened up another photo, which I want to have the exact same adjustments. I clicked on all the custom layer adjustment presets I just made but the picture doesn't turn out the same in the end? Even though when I click on each preset (in the new photo that I want to look like the previous) it says its tweaked the same as the one I saved, but the photo still looks drastically different? Do all NOT adjustments transfer over? Am I doing something wrong? Is there a better way to do this? (and im not talking about the background people photoshopped out, im aware of that) THANK YOU for reading this, this is so frustrating and it makes me want to switch back to Lightroom. (the picture without people is the look i want, the picture with people is what happens when i click on all the saved presets for the finished picture)
-
 I don't know if this is a terrible UI idea, but often I myself wanting some kind of indicator if the layers Blend Ranges have been modified. I can easily forget if I modified a layers blend ranges when opening up an old document.
 -
 Hi, There's a function hidden away in Illustrator that I actually use often. It's "Paste Remembers Layers." This is a frequent scenario I encounter: usually I work in separate documents in order to create a finished piece. Lots of layers. Then I paste what I've done into the one "Master" piece. I'd like to retain the layers I created. Is this functionality in the software and I'm missing it? Or perhaps slated for a future version? Thanks!
 -
 Hi. Please, I couldnt find the answer anywhere. What do the different color lines mean on the left hand side of some layers? I found out, orange is probably a symbol layer, but I came across a few others. Thank you.
 -
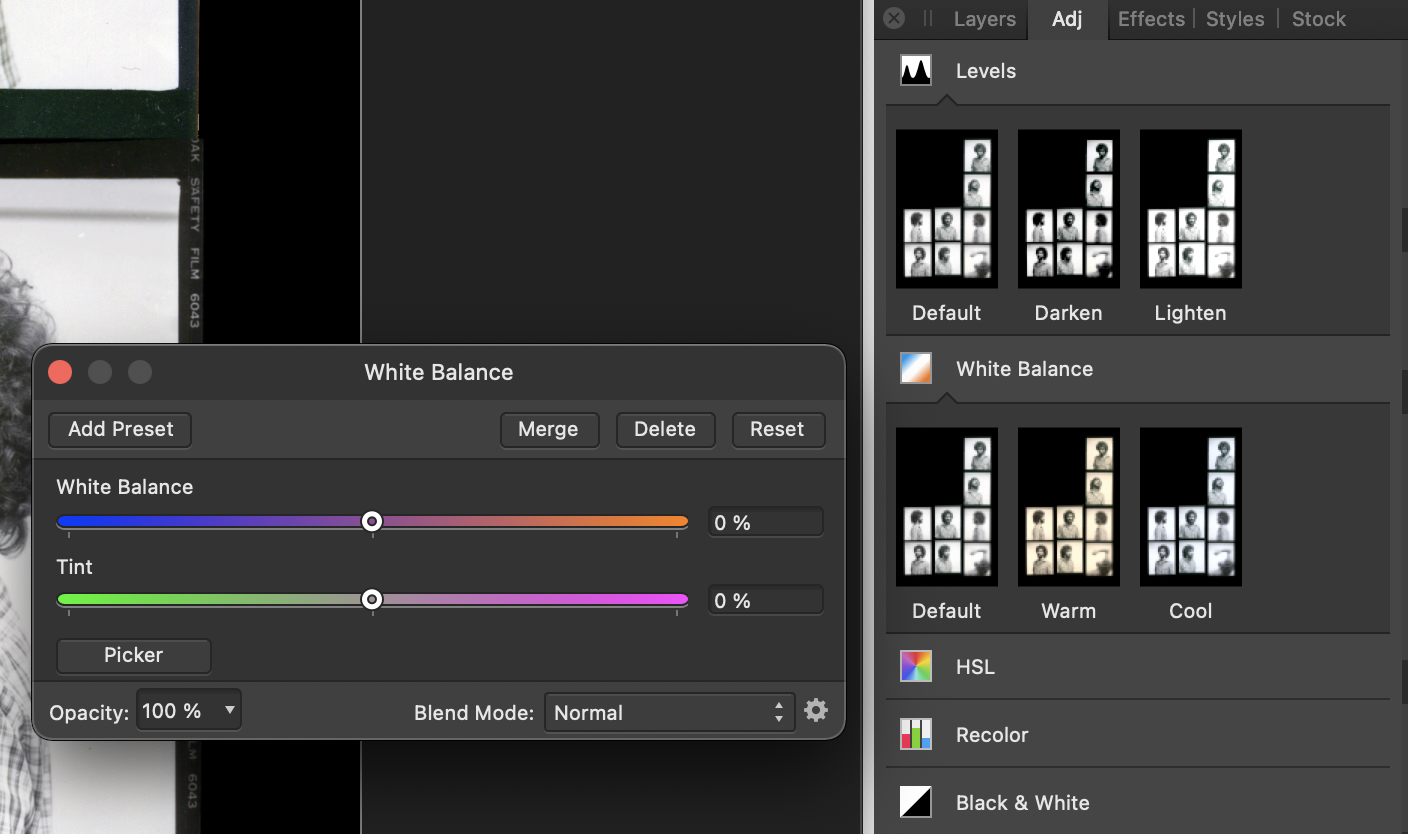
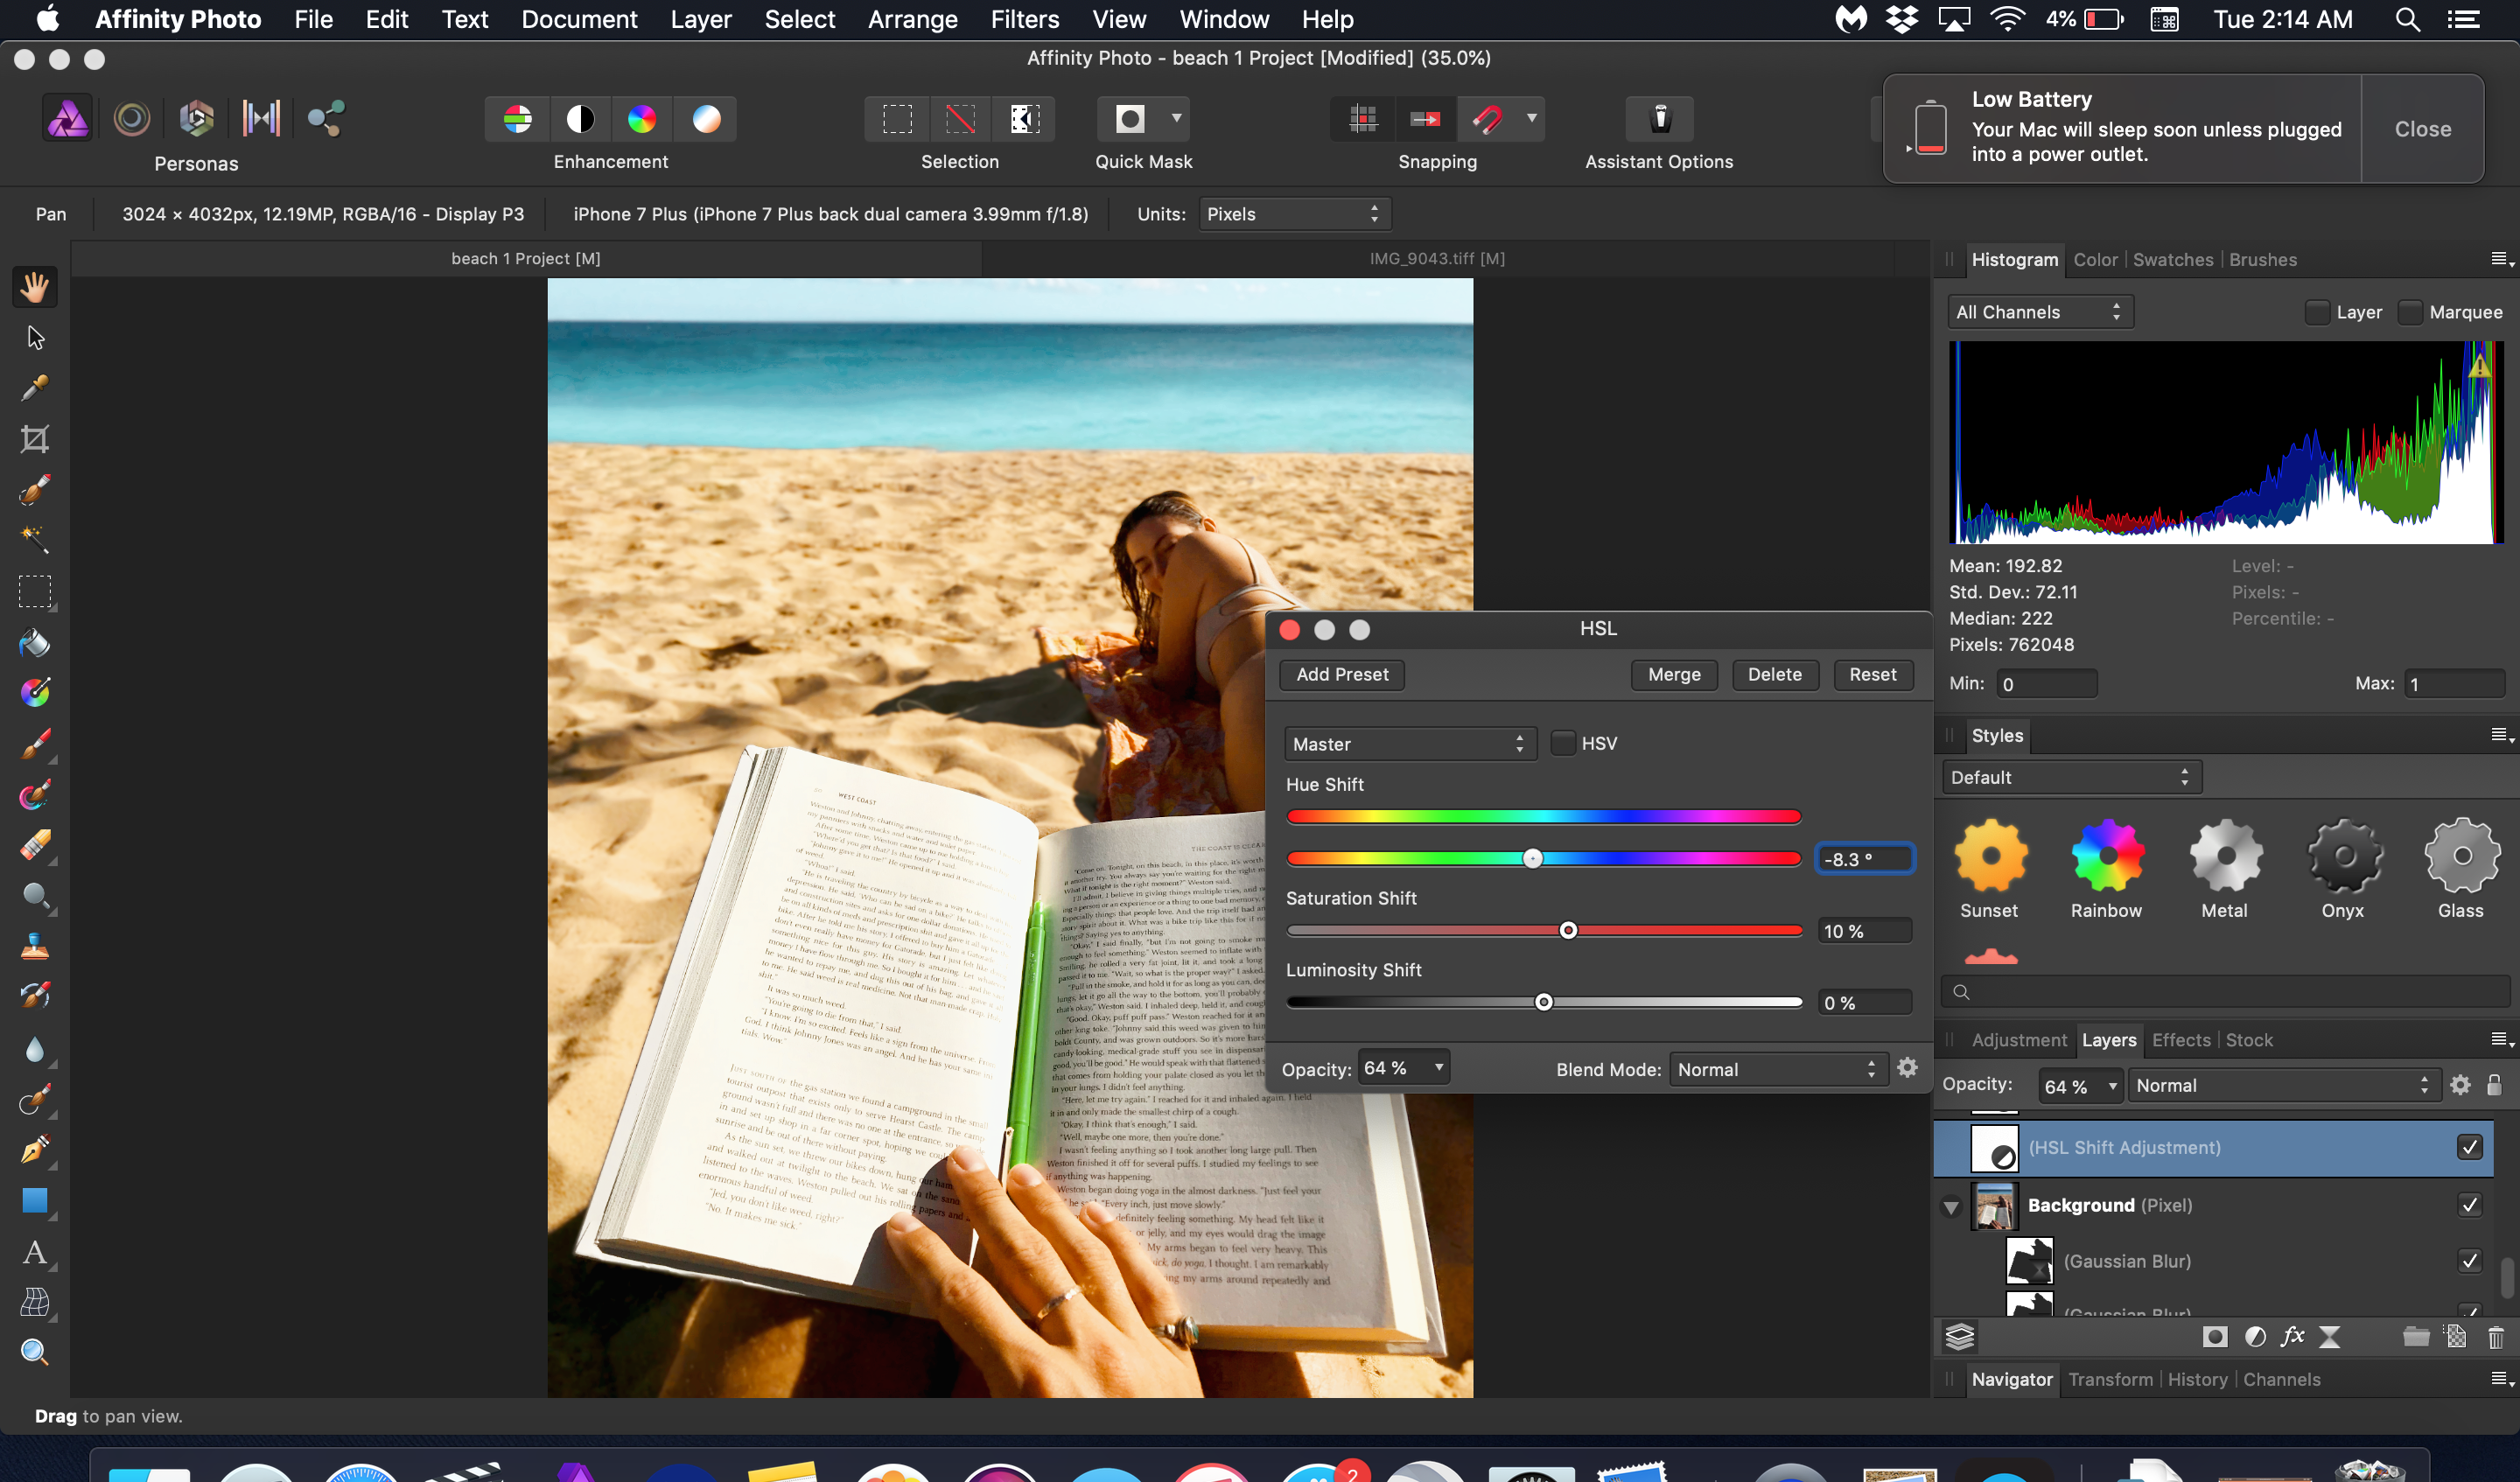
 In Designer 1.9 I stumbled across linked layers. I thought this was only a Photo feature(?). I can view a Links panel, and link / unlink between layers and change attributes. I only found this by accident when I noticed the 'linked to' icon in one of my adjustment layers. Is this some 'hidden' feature that's not documented? Searching for mention of it in help or on the internet only gives me results for Photo. There is no matching item in the Layers or Studio menus. So how would I explicitly enable the Links panel normally?
-
 Hi, I have a strange issue with layers and masks. After completing some editing I merged the layers into a new pixel layer. I then wanted to change the colour temperature so I added a new White Balance layer however this only applied the change to part of the image. The same thing happens with all layers meaning that I can't edit the main body of the image. It would appear that the that the White Balance Adjustment that I made to part of the image is now "stuck" in the merged image. To illustrate this I've taken a screen shot with an exposure adjustment maxxed out and the only part of the image affected is the bright bar above the middle of the cheetah's head. Any ideas about what I've done wrong and/or how to resolve the issue? If you think that this is a bug I can upload the .afphoto file but it's about 250MB.
-
 I wanted to ask if there is a way to create live filters not as child layer but directly as a new layer. I was trying to create a macro and macros do not allow moving. It was impossible to create a macro where a live filter is not as child but is directly applied. (I was trying to follow the orton effect tutorial and hoping to create it as an macro). Thank you for your help and time.
 -
 The Stacking option under File->New Stack etc. is great, what I really wish for though, would be the option to do this with already loaded layers and also the stacking tool taking any masking into account. This is vital when stacking milkyway images, since it usually aligns to the foreground and not to the stars, which can be compensated for when you mask out the foreground. Cheers
 -
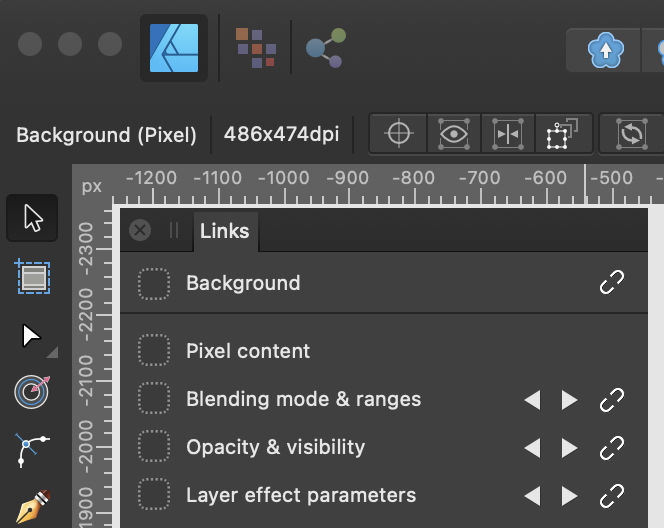
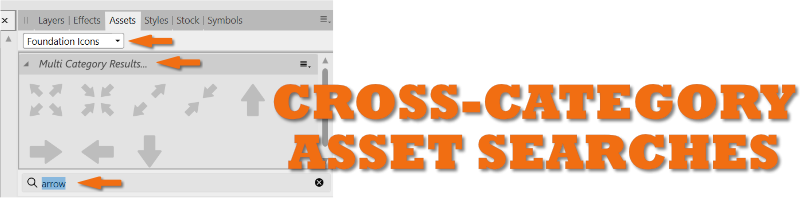
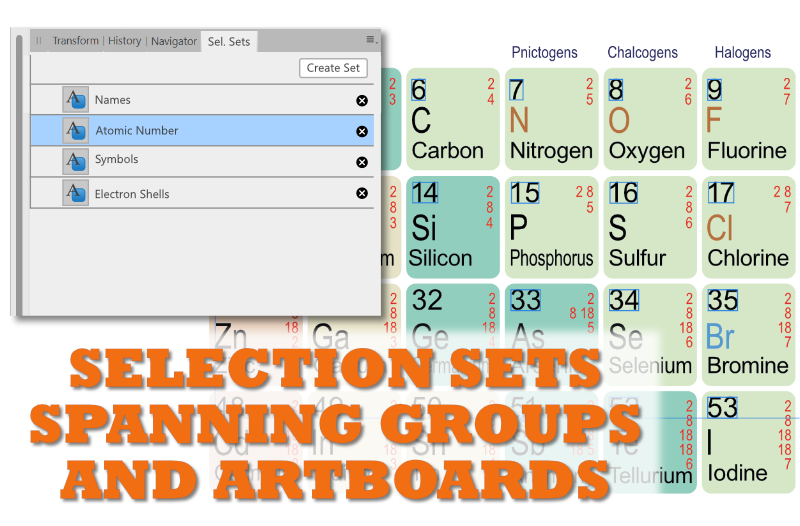
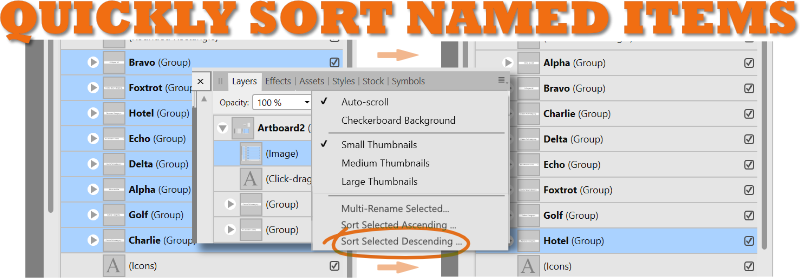
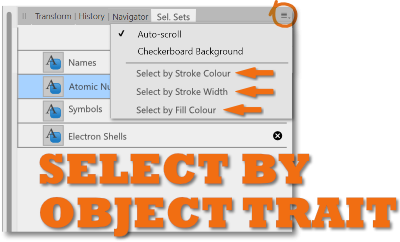
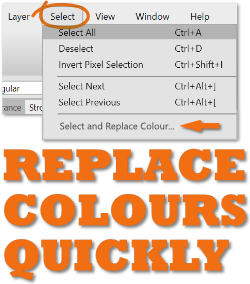
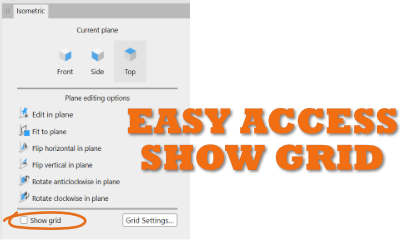
 I wanted to thank the Serif team for adding what I called "Select Object by Trait..." (listed as #6 in last year's post) to Affinity Designer 1.9. It definitely helps speed up the workflow. I certainly appreciate the added functionality; great job!!! Hopefully we can see a few more of these remaining 8 features. I listed them here again and would love to hear people's thoughts on them. Most of these suggestions can span all the affinity desktop products, but some are Designer specific: 1. Organize Assets, Swatches, Brushes, Style Libraries with an edit mode, using an interface like the the "Presets Manager" in Shapes, to allow for re-arranging, renaming, moving between categories. 2. Stoke Pressure Profiles can be saved on an application level. Organize and manage, with an interface like the "Presets Manager" in Shapes. It’s all about efficiency, and not having to reinvent the wheel (stroke!) every time. 3. Layers Panel – Select objects and groups and rename them with a multi-rename tool. Instantly get organized so you and even other people can understand the layer groups and objects in your Affinity document. Interface would allow the user to add a numerical counter as a prefix or suffix when renaming. Handy before using Export Persona to create some basic naming conventions. 4. Sort Layer Groups or artboards in the Layers Panel alphabetically, ascending, descending. Yes, it will change the arrangement order, but properly organized groups can make complex file layers much easier to navigate. Handy for PDF Exporting where the order of pages depends upon the artboard order. 5. Save selection sets that can select items spanning multiple artboards and also within groups. Often similar objects need to be adjusted or moved, but they are on multiple artboards or nested in other functional groups. This can quickly solve that problem. 6. Select by object trait (stroke color, stroke thickness, fill colour). A handy way to quickly select and adjust objects with similar properties. Otherwise selecting these can be a nightmare in complicated projects. YAY! THANKS FOR ADDING THIS AND MORE! 7. Select and replace non global identical colours. Does your client want all the red elements blue? What would they look like in teal or taupe? Play rapidly to your heart’s content. 8. Search Assets Panel ACROSS BOTH categories and subcategories, results displayed as filtered choices. Do you have multiple categories/libraries and need to find the right icon fast? This can save you time. Currently a search has to be made within each asset category, which can take some time if you have multiple asset categories. 9. Handy Show Grid checkbox in Isometric Studio Panel. True, you can use a keyboard shortcut, but it would be nice if this button was upfront. Handy when you are working in Isometric view you have to turn on and off the grid to see the artwork uncluttered. Chances are you have the panel open to constantly switch planes anyways… I hope this helps to add votes for the unsexy underdog features. 😊