Search the Community
Showing results for tags 'layers'.
-
 It would be very nice if you could collapse all layers at once in the layers panel. Layers become very difficult to work with when you have many of them since selecting objects expands the parent layer, so you have to scroll back up and manually collapse them yourself. Perhaps you could have it so that layers are only expanded for as long as the item within it is selected? That way, after deselecting an object, the layer expansion goes back to its previous state, which is ether expanded or collapsed. Am I making any sense?
- 77 replies
-
- 36
-

-

-
- layers
- collapse all
- (and 1 more)
-
 I am getting the message: Please select an RGB pixel layer before entering Develop, when I either attempt to close out photo project or access development persona. I'm new to Affinity and am basically listening it via on-line Vimeo videos and playing around with it. I have no idea how to address this or how to cancel it out. Help appreciated.
 -
 Scenario: I am working on creating a tileset for my game. In order to make my tiles seamless, I need to ensure that each side is able to match up with the opposite. So what I have is a single tile created, and I created copies of that tile on all edges that way I can see what needs changing. What I would like to do is have one 'master layer' per say, and have each of those copies just be representative of the original master layer. I think this is something you can do in photoshop but not sure. Anyways, is there any feature or assistance with this type of workflow?
 -
 I'm fairly new to the forums here, and I wasn't sure how to move a post to the bug topics. But this was discussed. I was wondering if there was a way to disable having a layer be brought to the top of the layer stack after using the tool add, subtract, intersect and xor in affinity designer? For more specifics, if its not in a Art-board, and in it's own group. It works fine when it's on an art-board But when it's off to the side in it's own group, it leaves and goes out of the group when using the tools. Thomaso " if all items of the group get merged, the resulting layer is moved upwards on top, while an empty "(Group)" layer remains at their initial position." Are you using the latest release version? Yes Can you reproduce it? Yes Does it happen for a new document? If not do you have a document you can share that shows the problem? Yes If you cannot provide a sample document then please give an accurate description of the problem for example it should include most of the following: What is your operating system and version (Windows 10, OSX Mojave, iOS 12 etc)? macOS Big Sur v11.3 What happened for you (and what you expected to happen) For the merged layer not to go to the top. And for the empty group layer to be automatically removed. Provide a recipe for creating the problem (step-by-step what you did) New File, Expanded Art-board using tools, made 3 circles on the artboard, copied the 3 circles and made 6 circles outside of artboard, brought layers below the artboard group, grouped 3 circles, ADD tool the 3 grouped circles and layers were brought to the top leaving an empty group folder. ADD tool the 3 circles not in group and it was also brought to the top. Screenshots (very handy) or a screen capture/video. Video provided Any unusual hardware (like tablets or external monitors or drives that may affect things) or relevant other applications like font managers or display managers. XP-PEN Artist 22 monitor tablet Did this same thing used to work and if so have you changed anything recently? (software or hardware) I probably didn't noticed until it started becoming tedious Screen Recording 2021-06-17 at 2.51.11 PM.mov DisableLayerStack.afdesign
 -
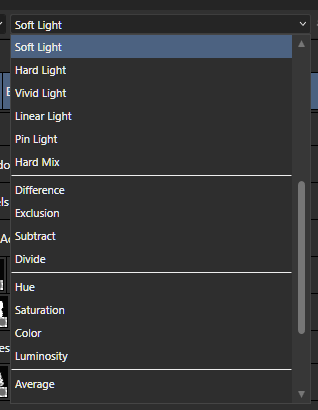
Hello, I tried to search and didn't find any related topic. I have been wondering why the Layer's blend mode's list is short and doesn't display all the modes at once. Is there a setting in the preferences that I might be missing? 🤔 Juan

-
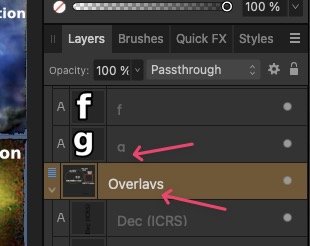
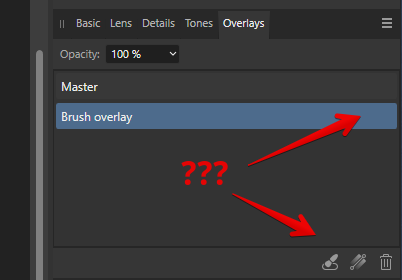
 First of all, congrats on the release of the new version. I got excellent value from Designer v1, so was happy to pay again. I am looking forward to playing with the new features. I noticed a minor glitch in text display in the Layers pane. Descenders get chopped off at the baseline. See the "g" and the "y" in this screenshot: Hopefully it won't be too hard to fix Best wishes Will
-
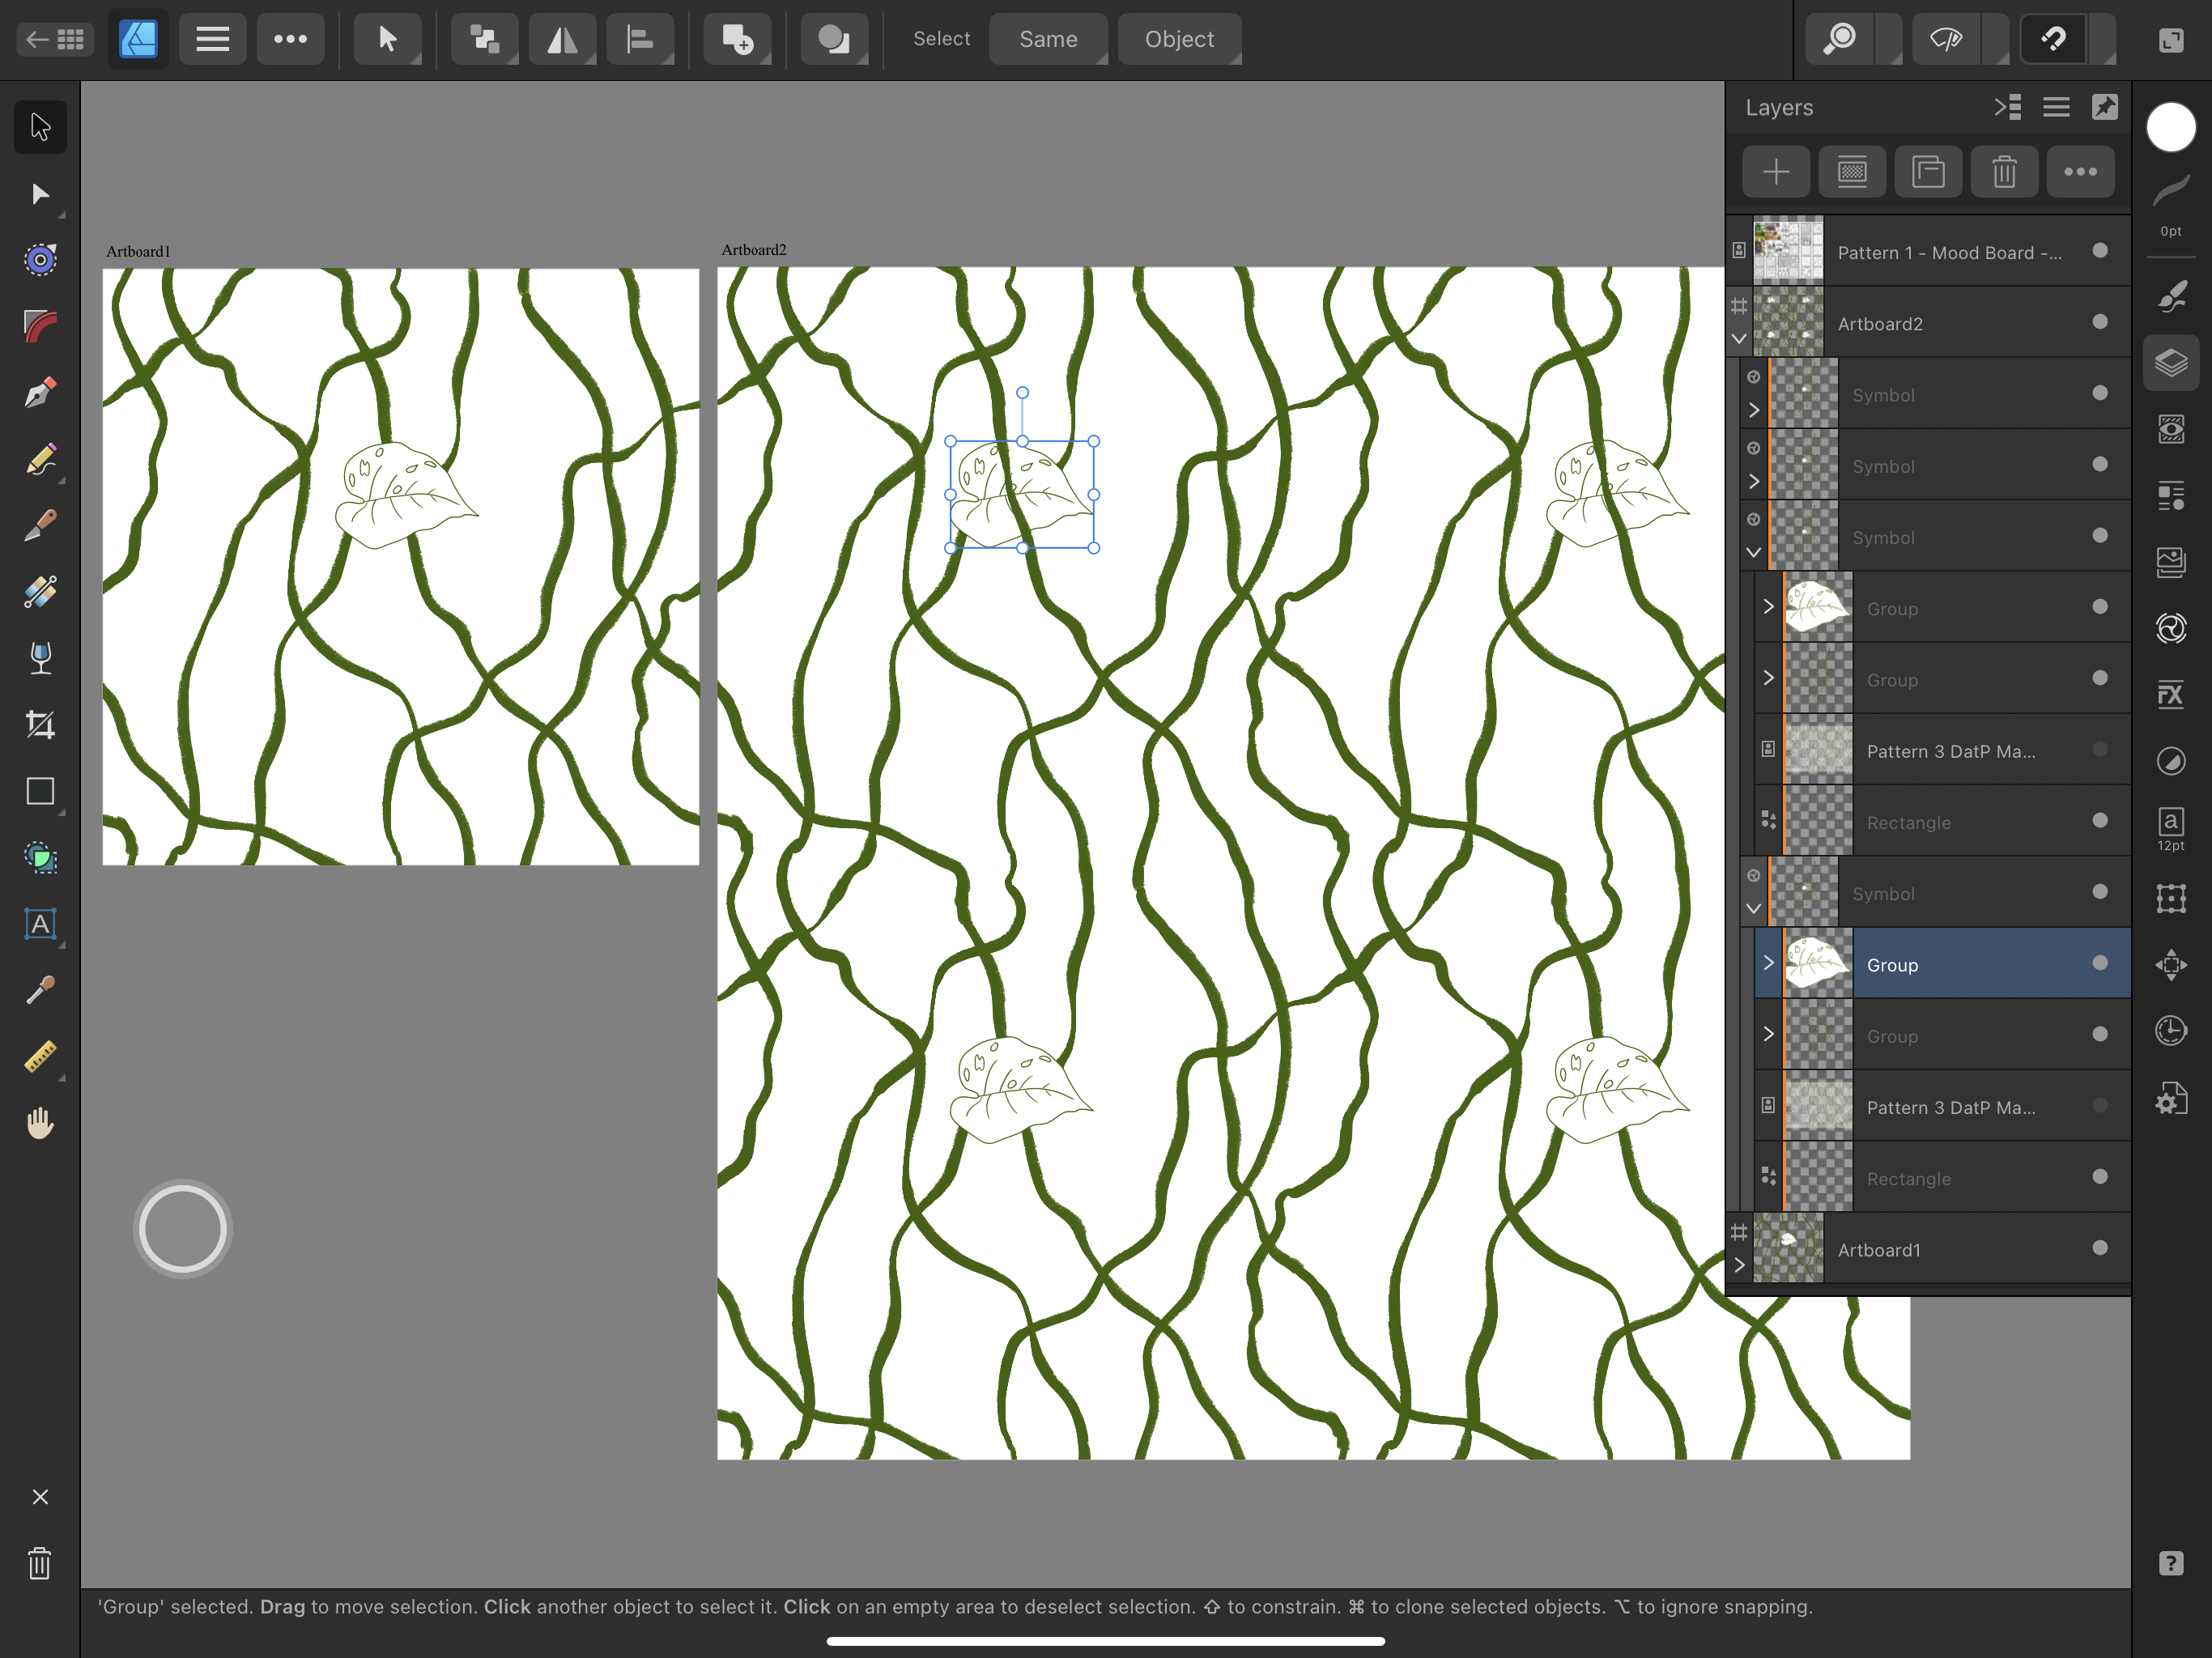
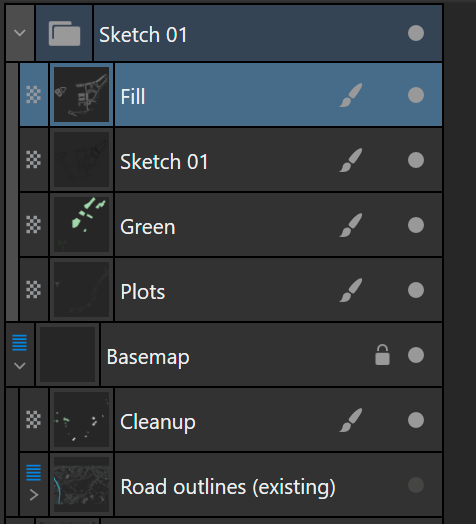
I am working on a repeat pattern utilizing the symbols capability. However, there is an object that is not syncing up properly and no matter what I try, it will not go all the way back or even underneath the symbol that it is crossing over. I am not sure what to do because I've tried sending to the back the initial object on Artboard 1. That did not work. I re-layered the objects so that the selected curve (and its whole group) are underneath the object I want on top, but that does nothing. I have no idea what I am missing or doing incorrectly. Not sure how to fix this. Included is a screen shot of what is happening. I wasn't able to find any FAQ topics that answered or mentioned my question. In the screenshot the object selected is the one I want on top. The vine crossing over it is definitely included in the group that is below that object. I have checked every section, grouping, and layer of each Artboard and every occurrence of that repeating vine. All the other occurrences of that vine are behaving as desired. Not sure what is happening with the top half of the repeat on the right. Hopefully it's an easy fix and that I am simply clueless. Affinity Designer 2, latest update, iPad Pro.
-
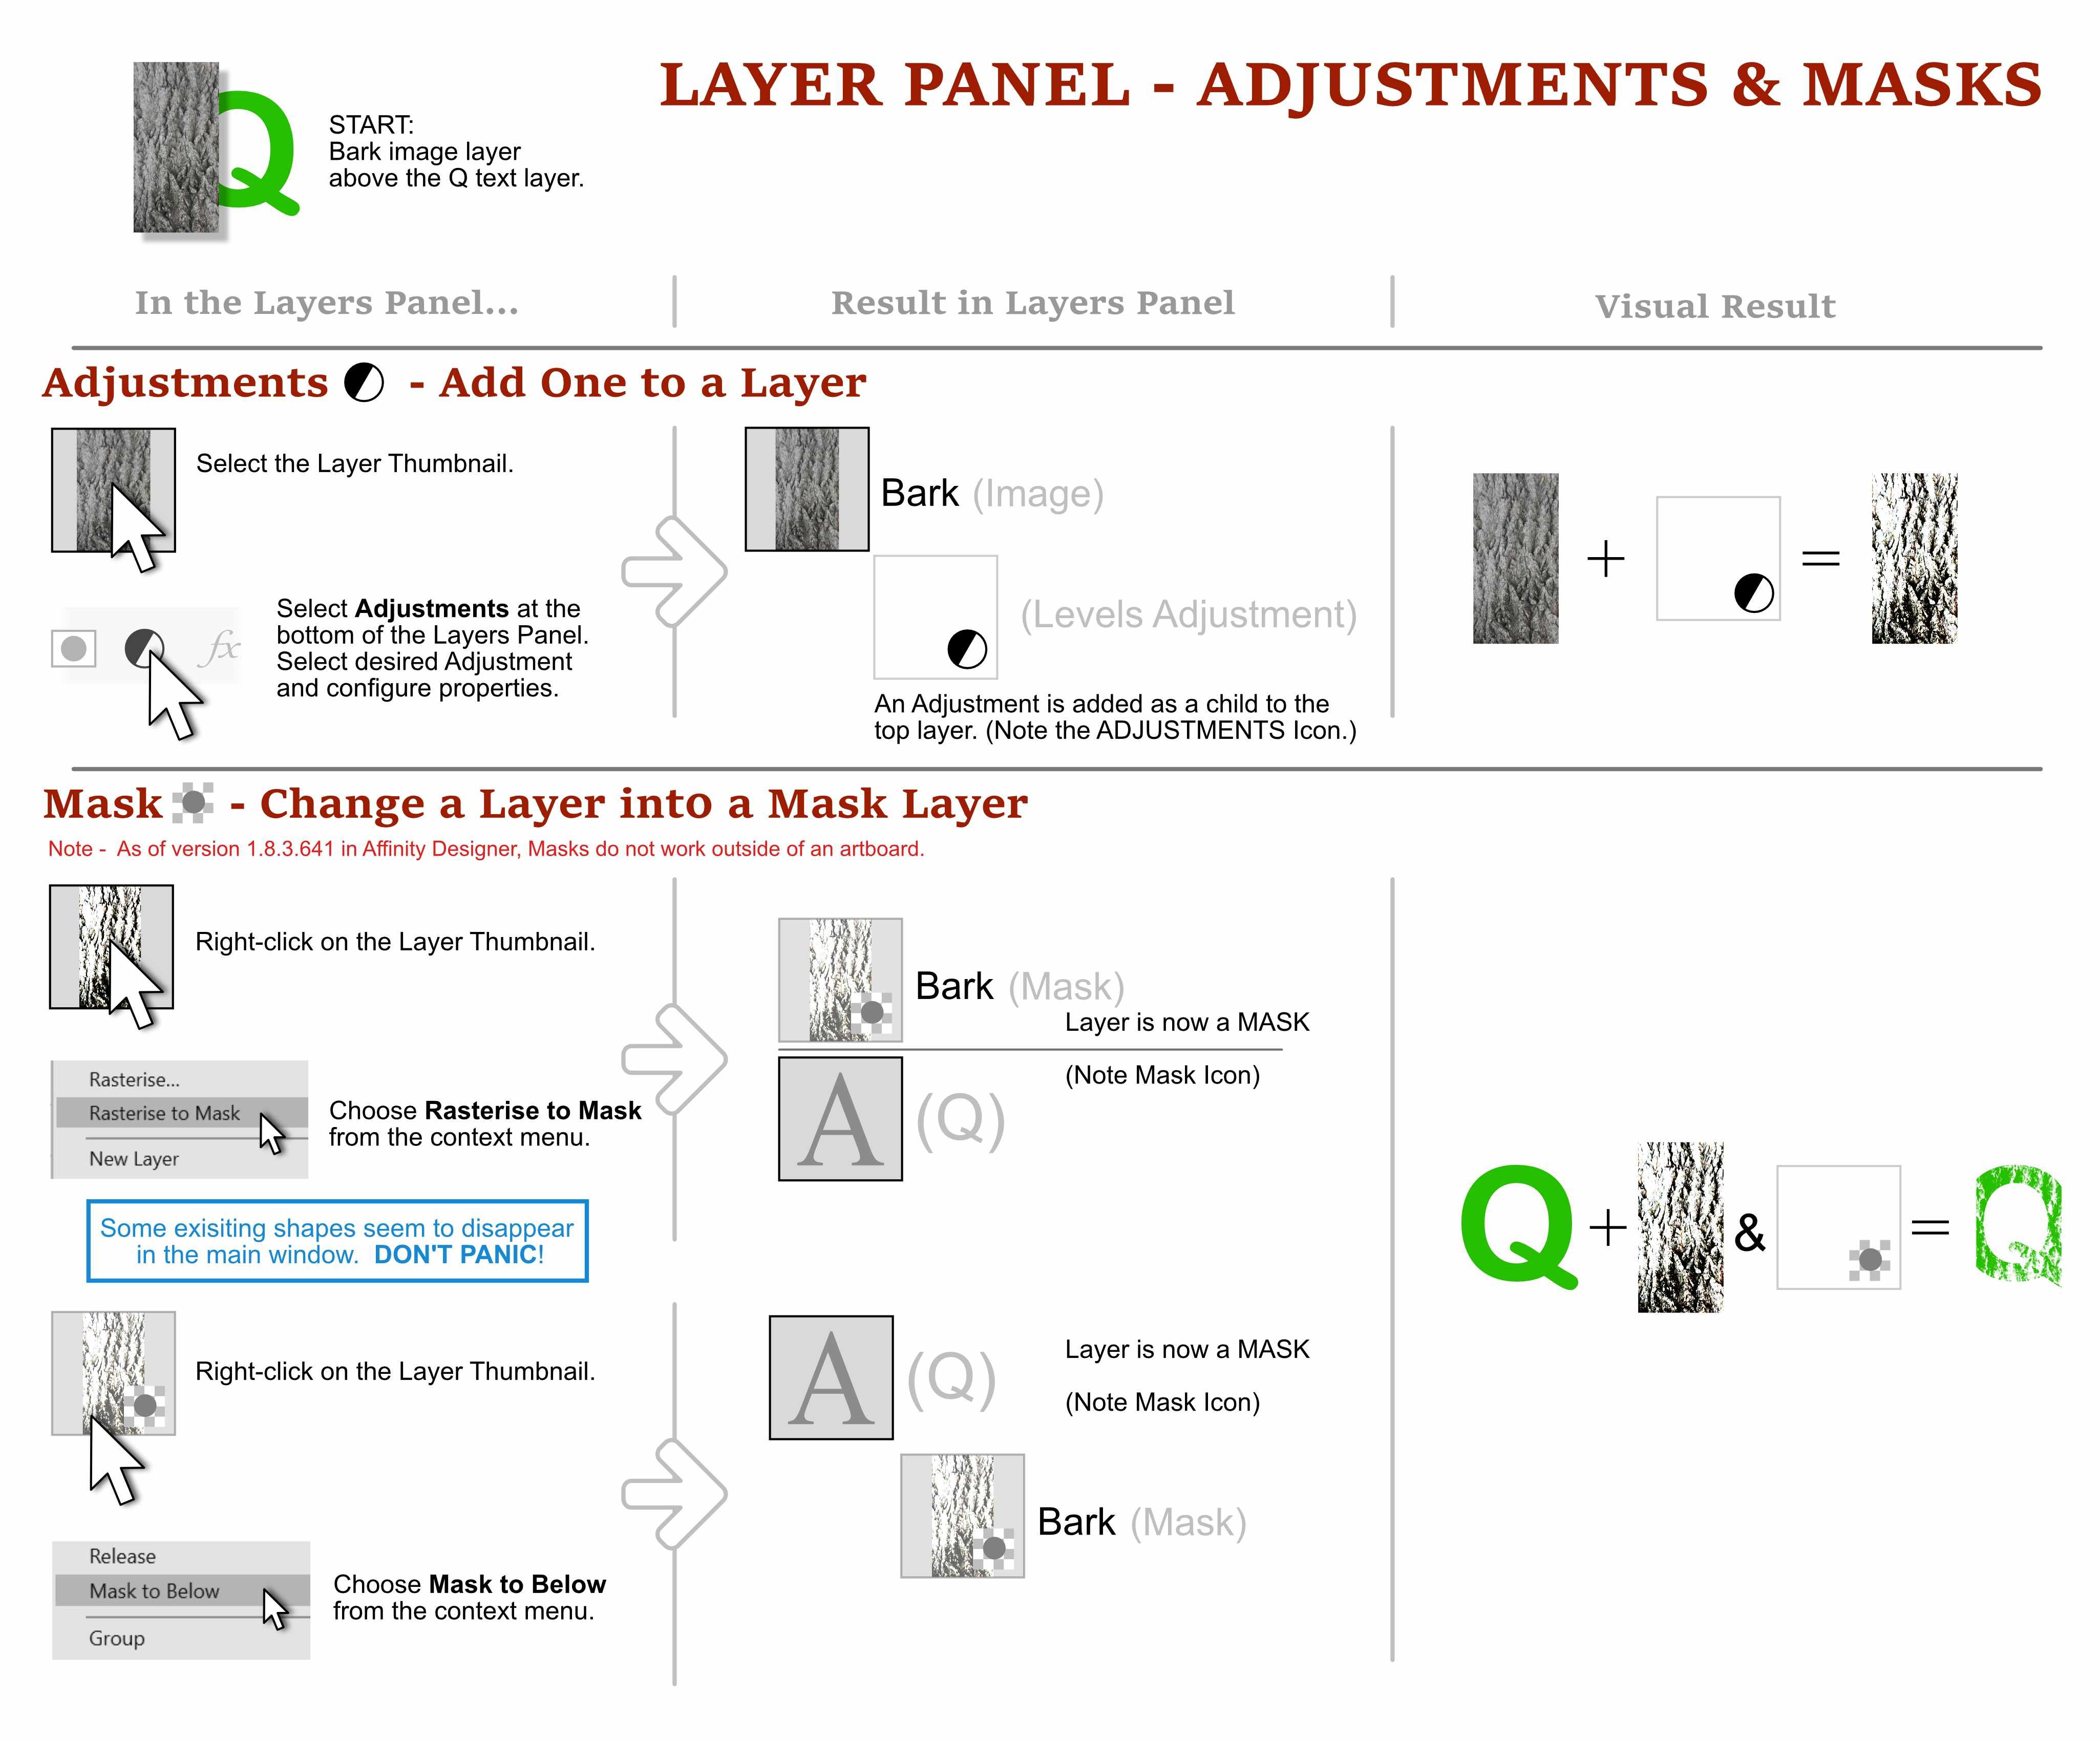
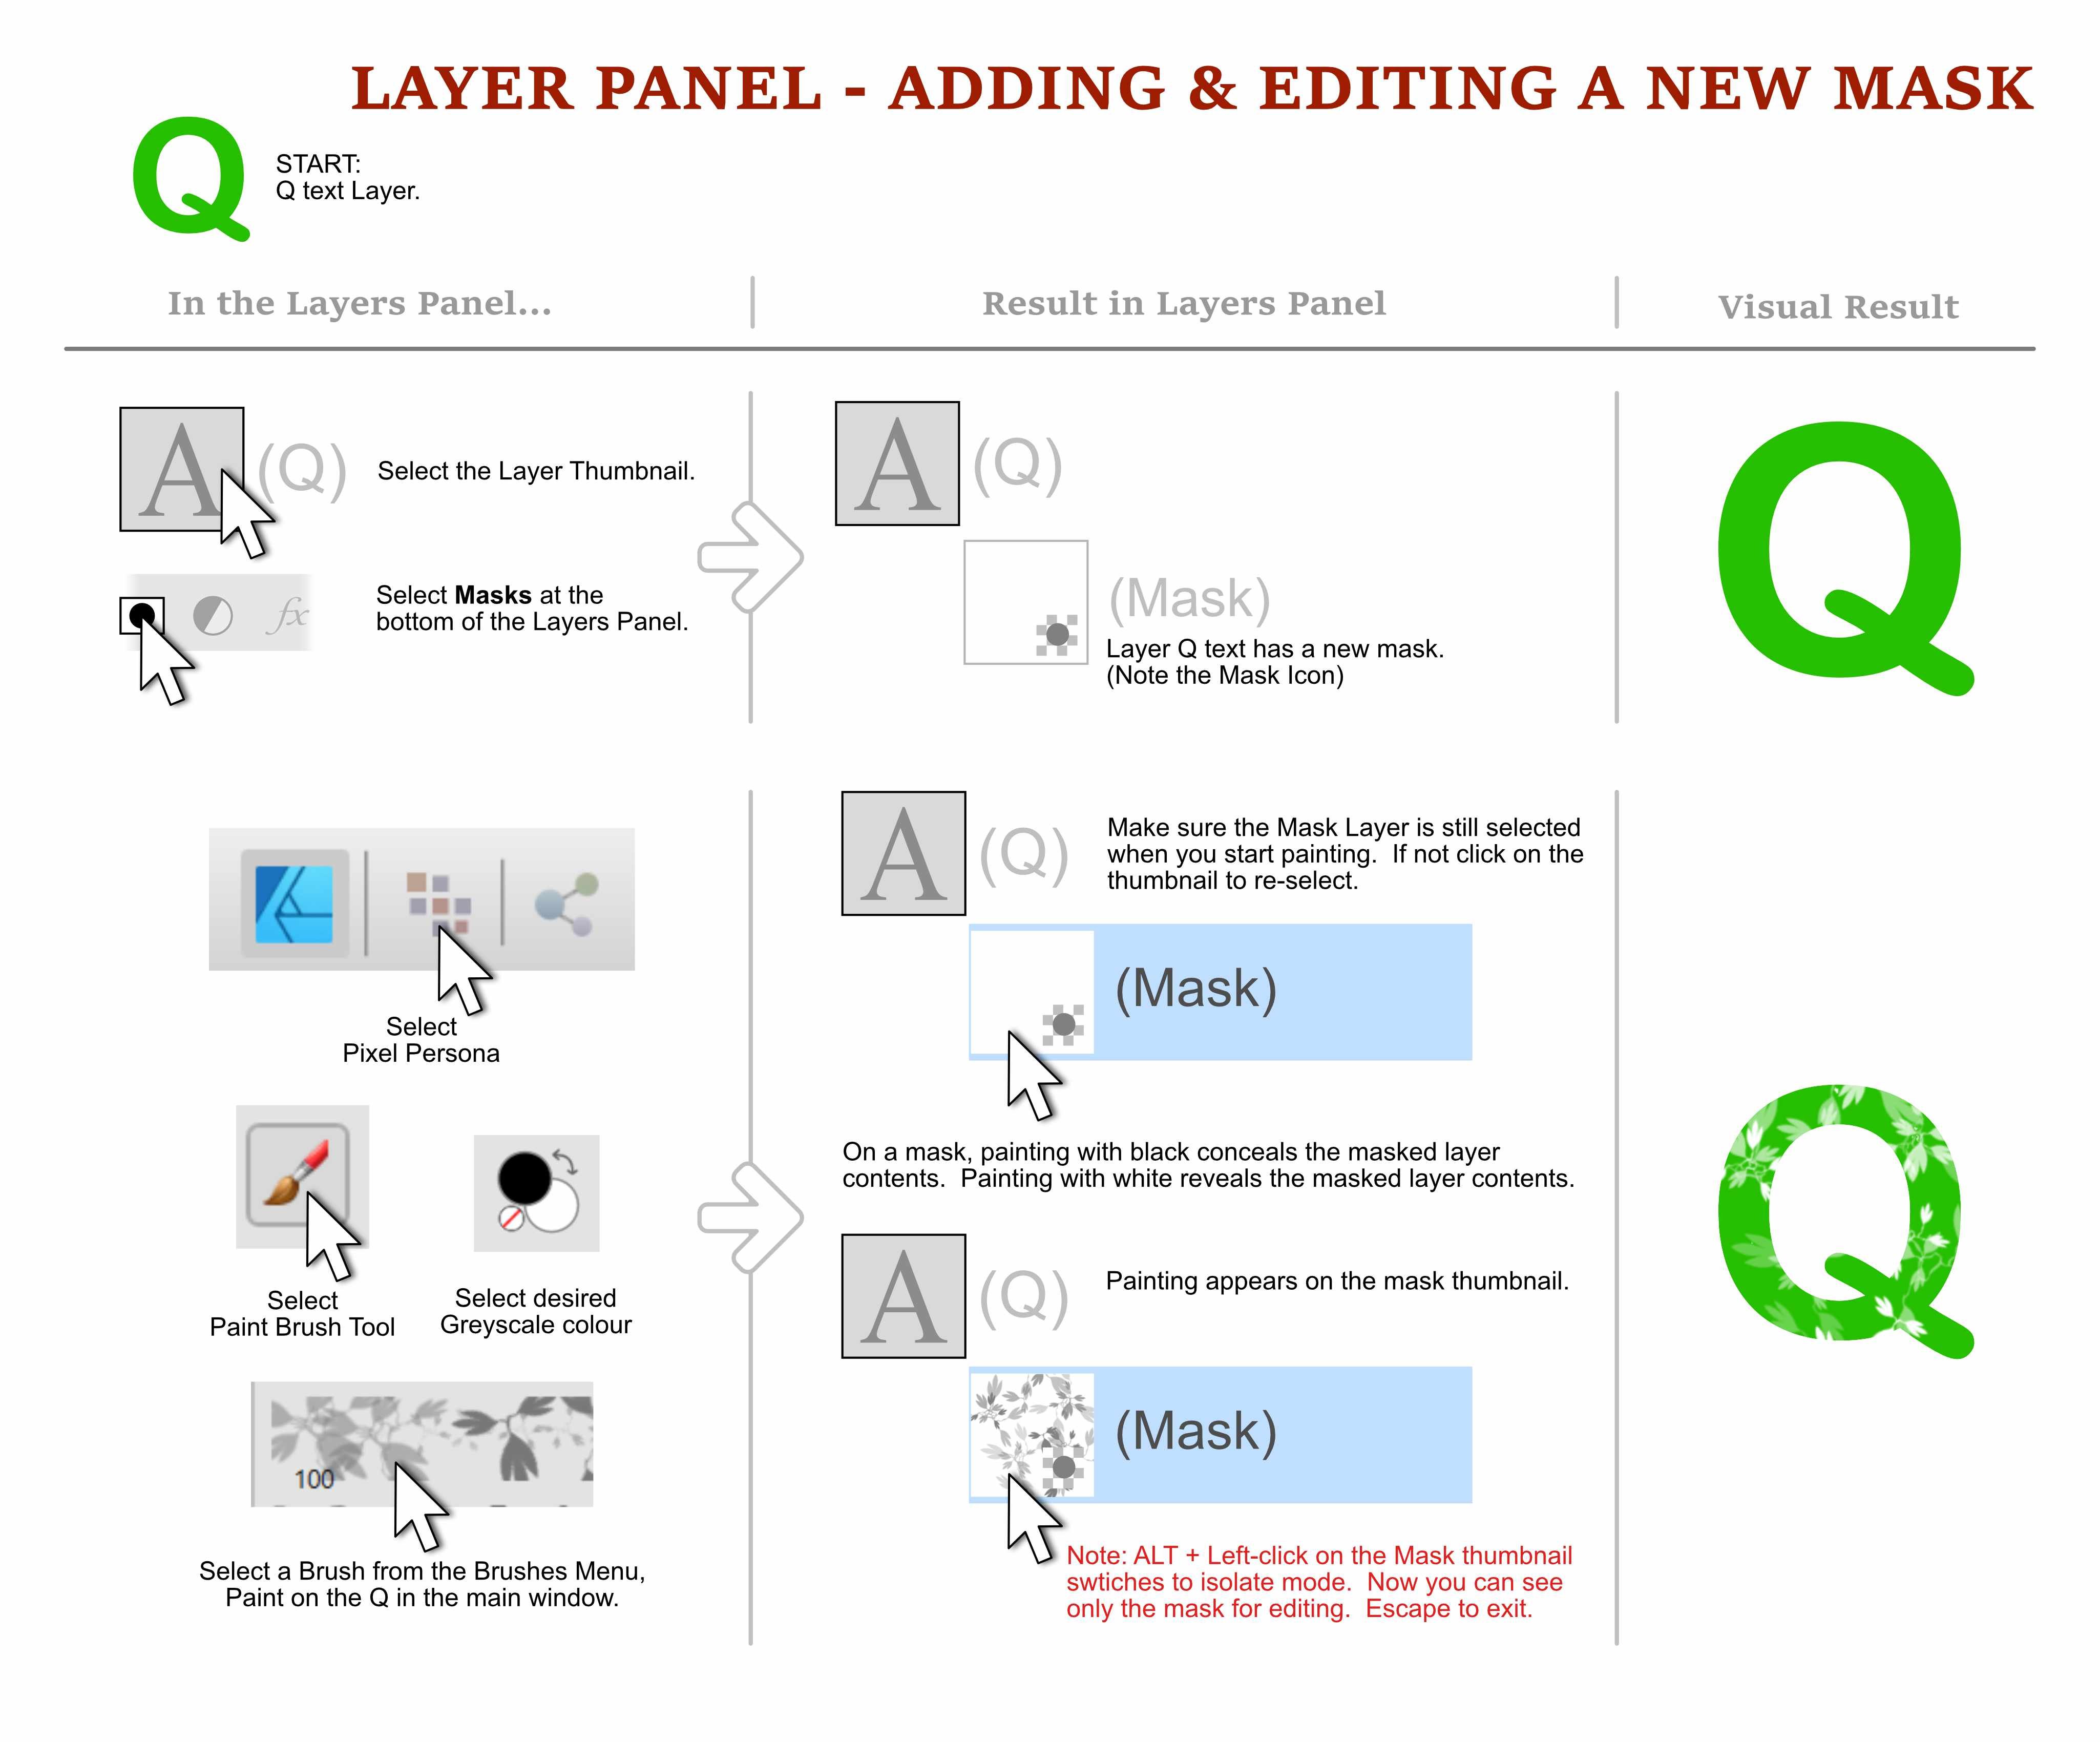
 Have you ever tried to arrange objects in the layers panel only to loose them, and then find it nestled in a collapsed group of objects? Ever try and move an object so it clips anther object and it ends up with an unexpected result? Ever wonder what those enigmatic icons in the layer thumbnails are trying to tell you? This guide is for anyone with those questions. From folks that are new to Affinity Products, to people who has been using it for years and struggled with the behaviour of layers. This 3-page visual how-to guide will hopefully help reveal any or all of the cryptic layer mysteries! The guide is in English for desktop versions of the products, designed the Windows version, tested mostly in Affinity Designer, but should translate well to Affinity Photo and Publisher. I would love to hear your feedback, if you notice any errors, have any additions, and/or let me know if it helps you, please chime in! NOTE: PDF DOWNLOAD AT THE BOTTOM. Please download it! Cheers, Dave Vector Affinity Layers Guide - Understanding Masks, Moves, Crops, Clips, Adjustments.pdf
- 46 replies
-
- 19
-
-
-
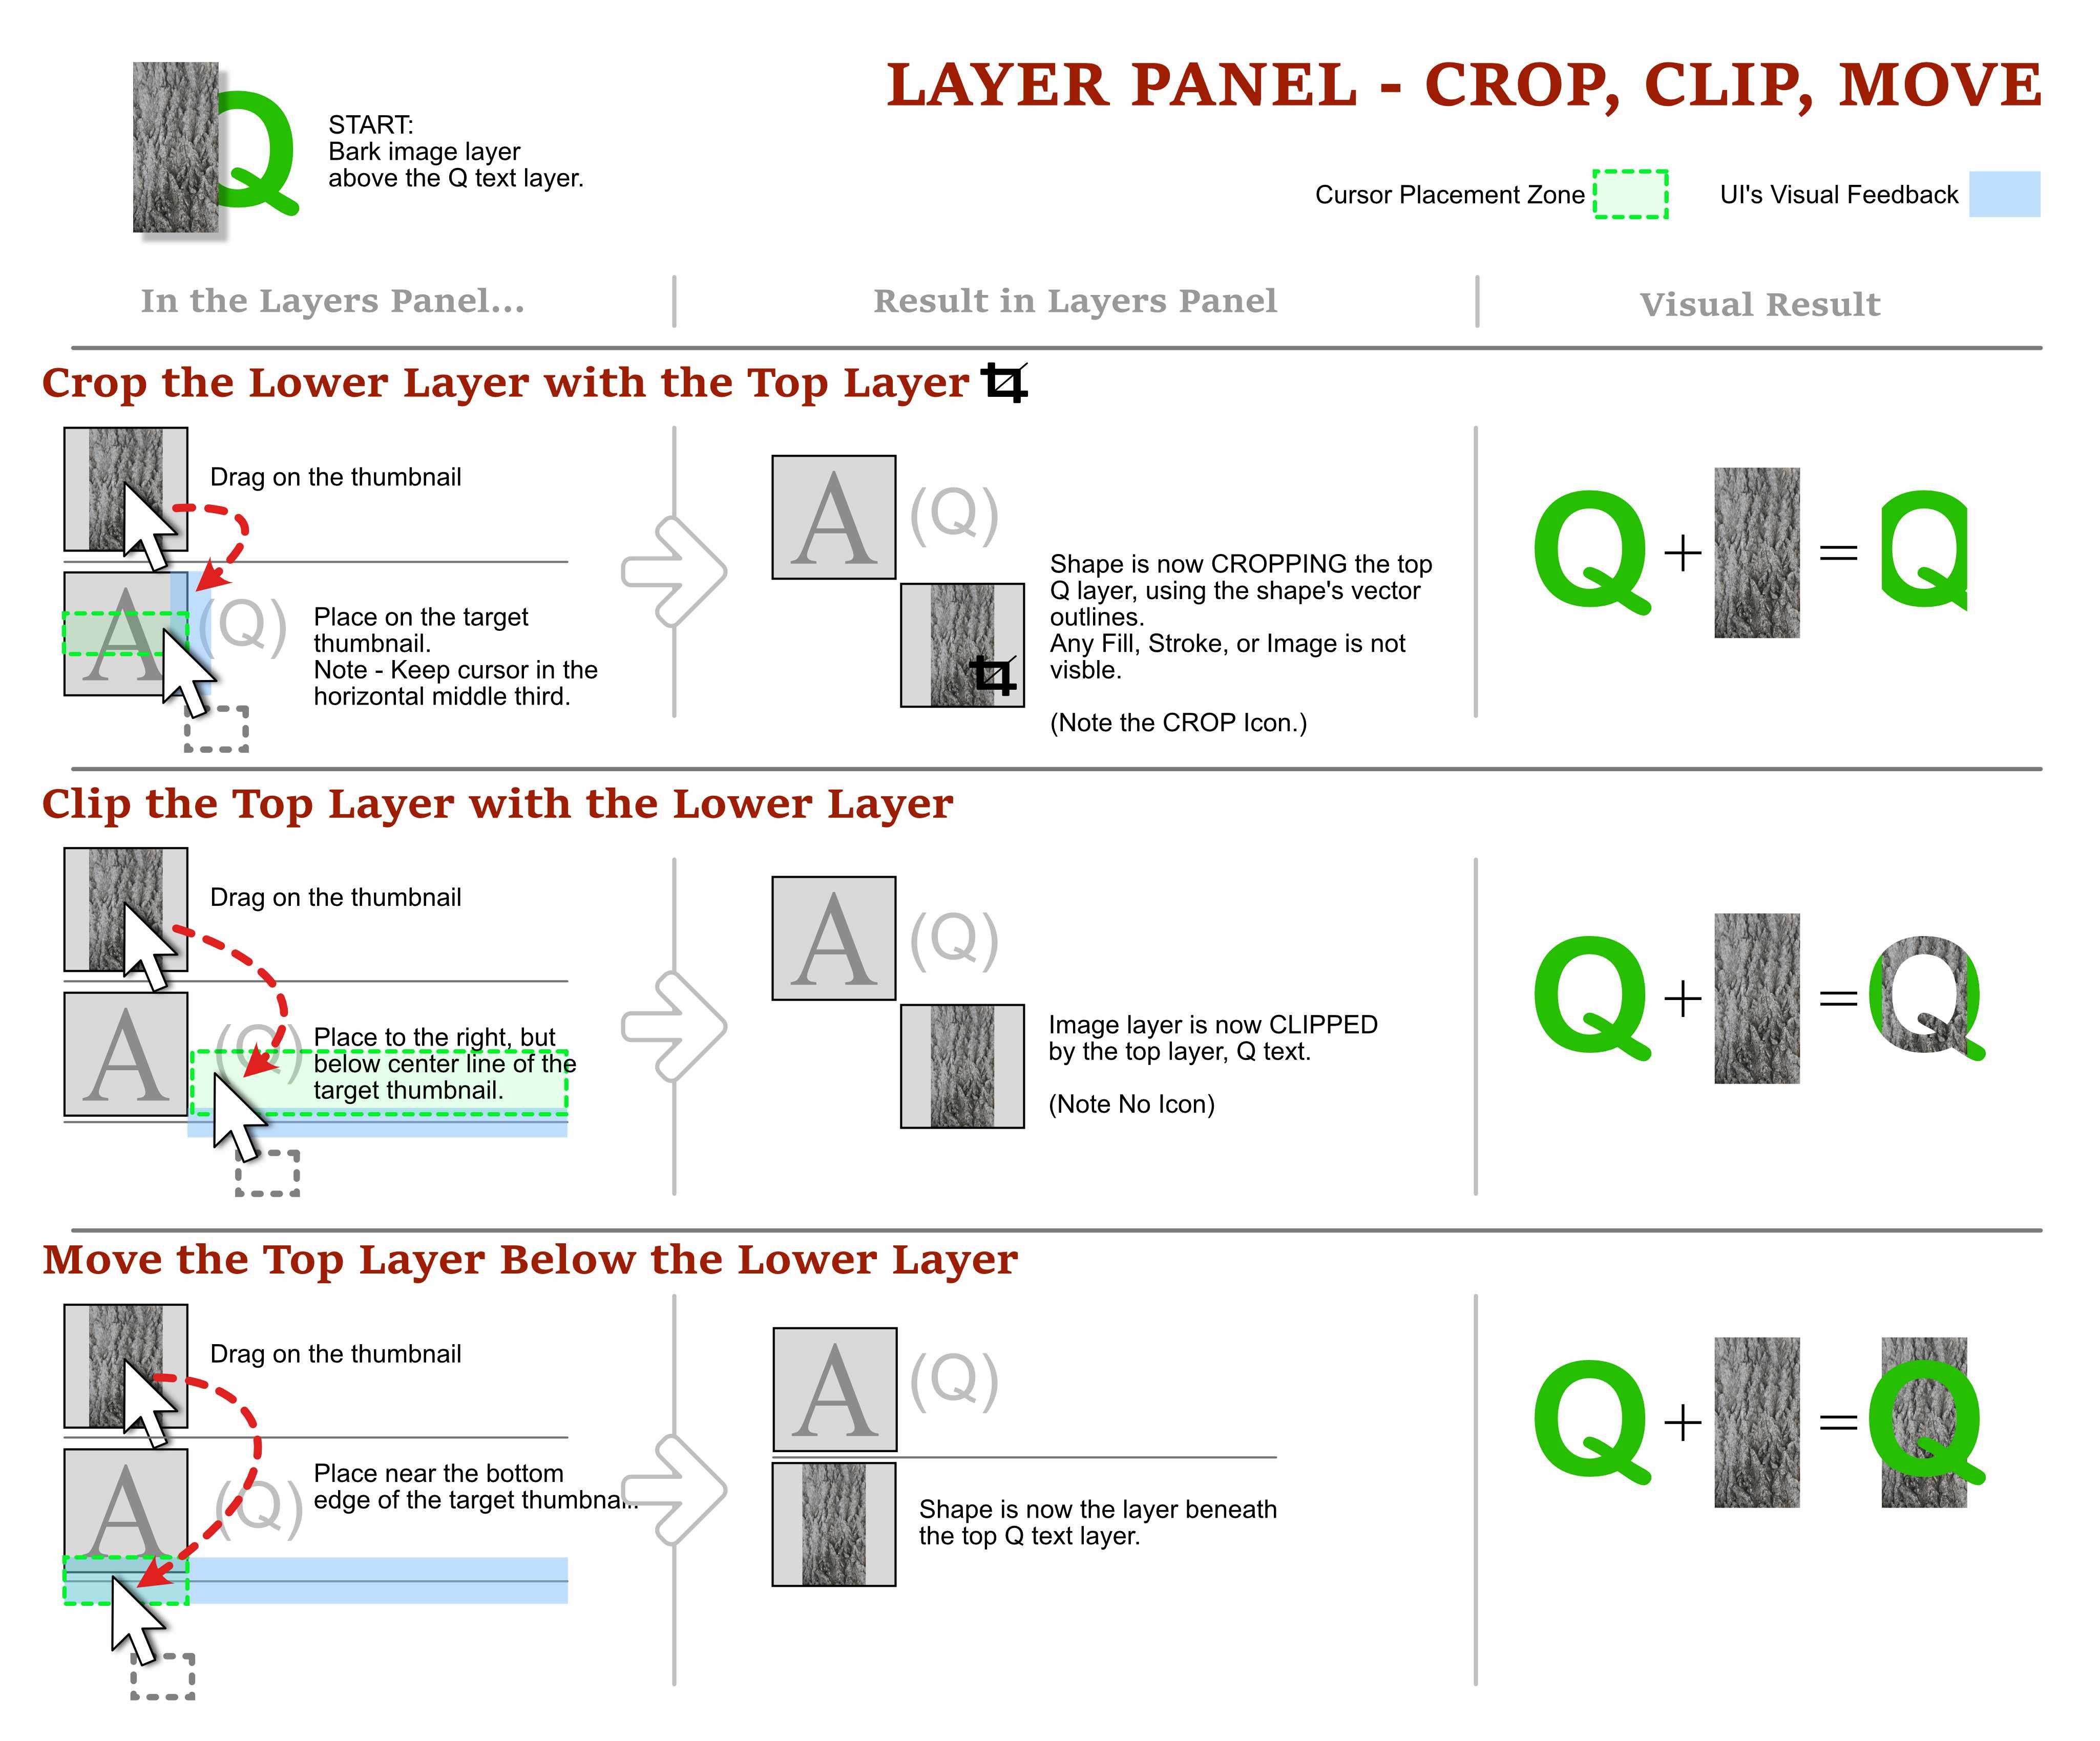
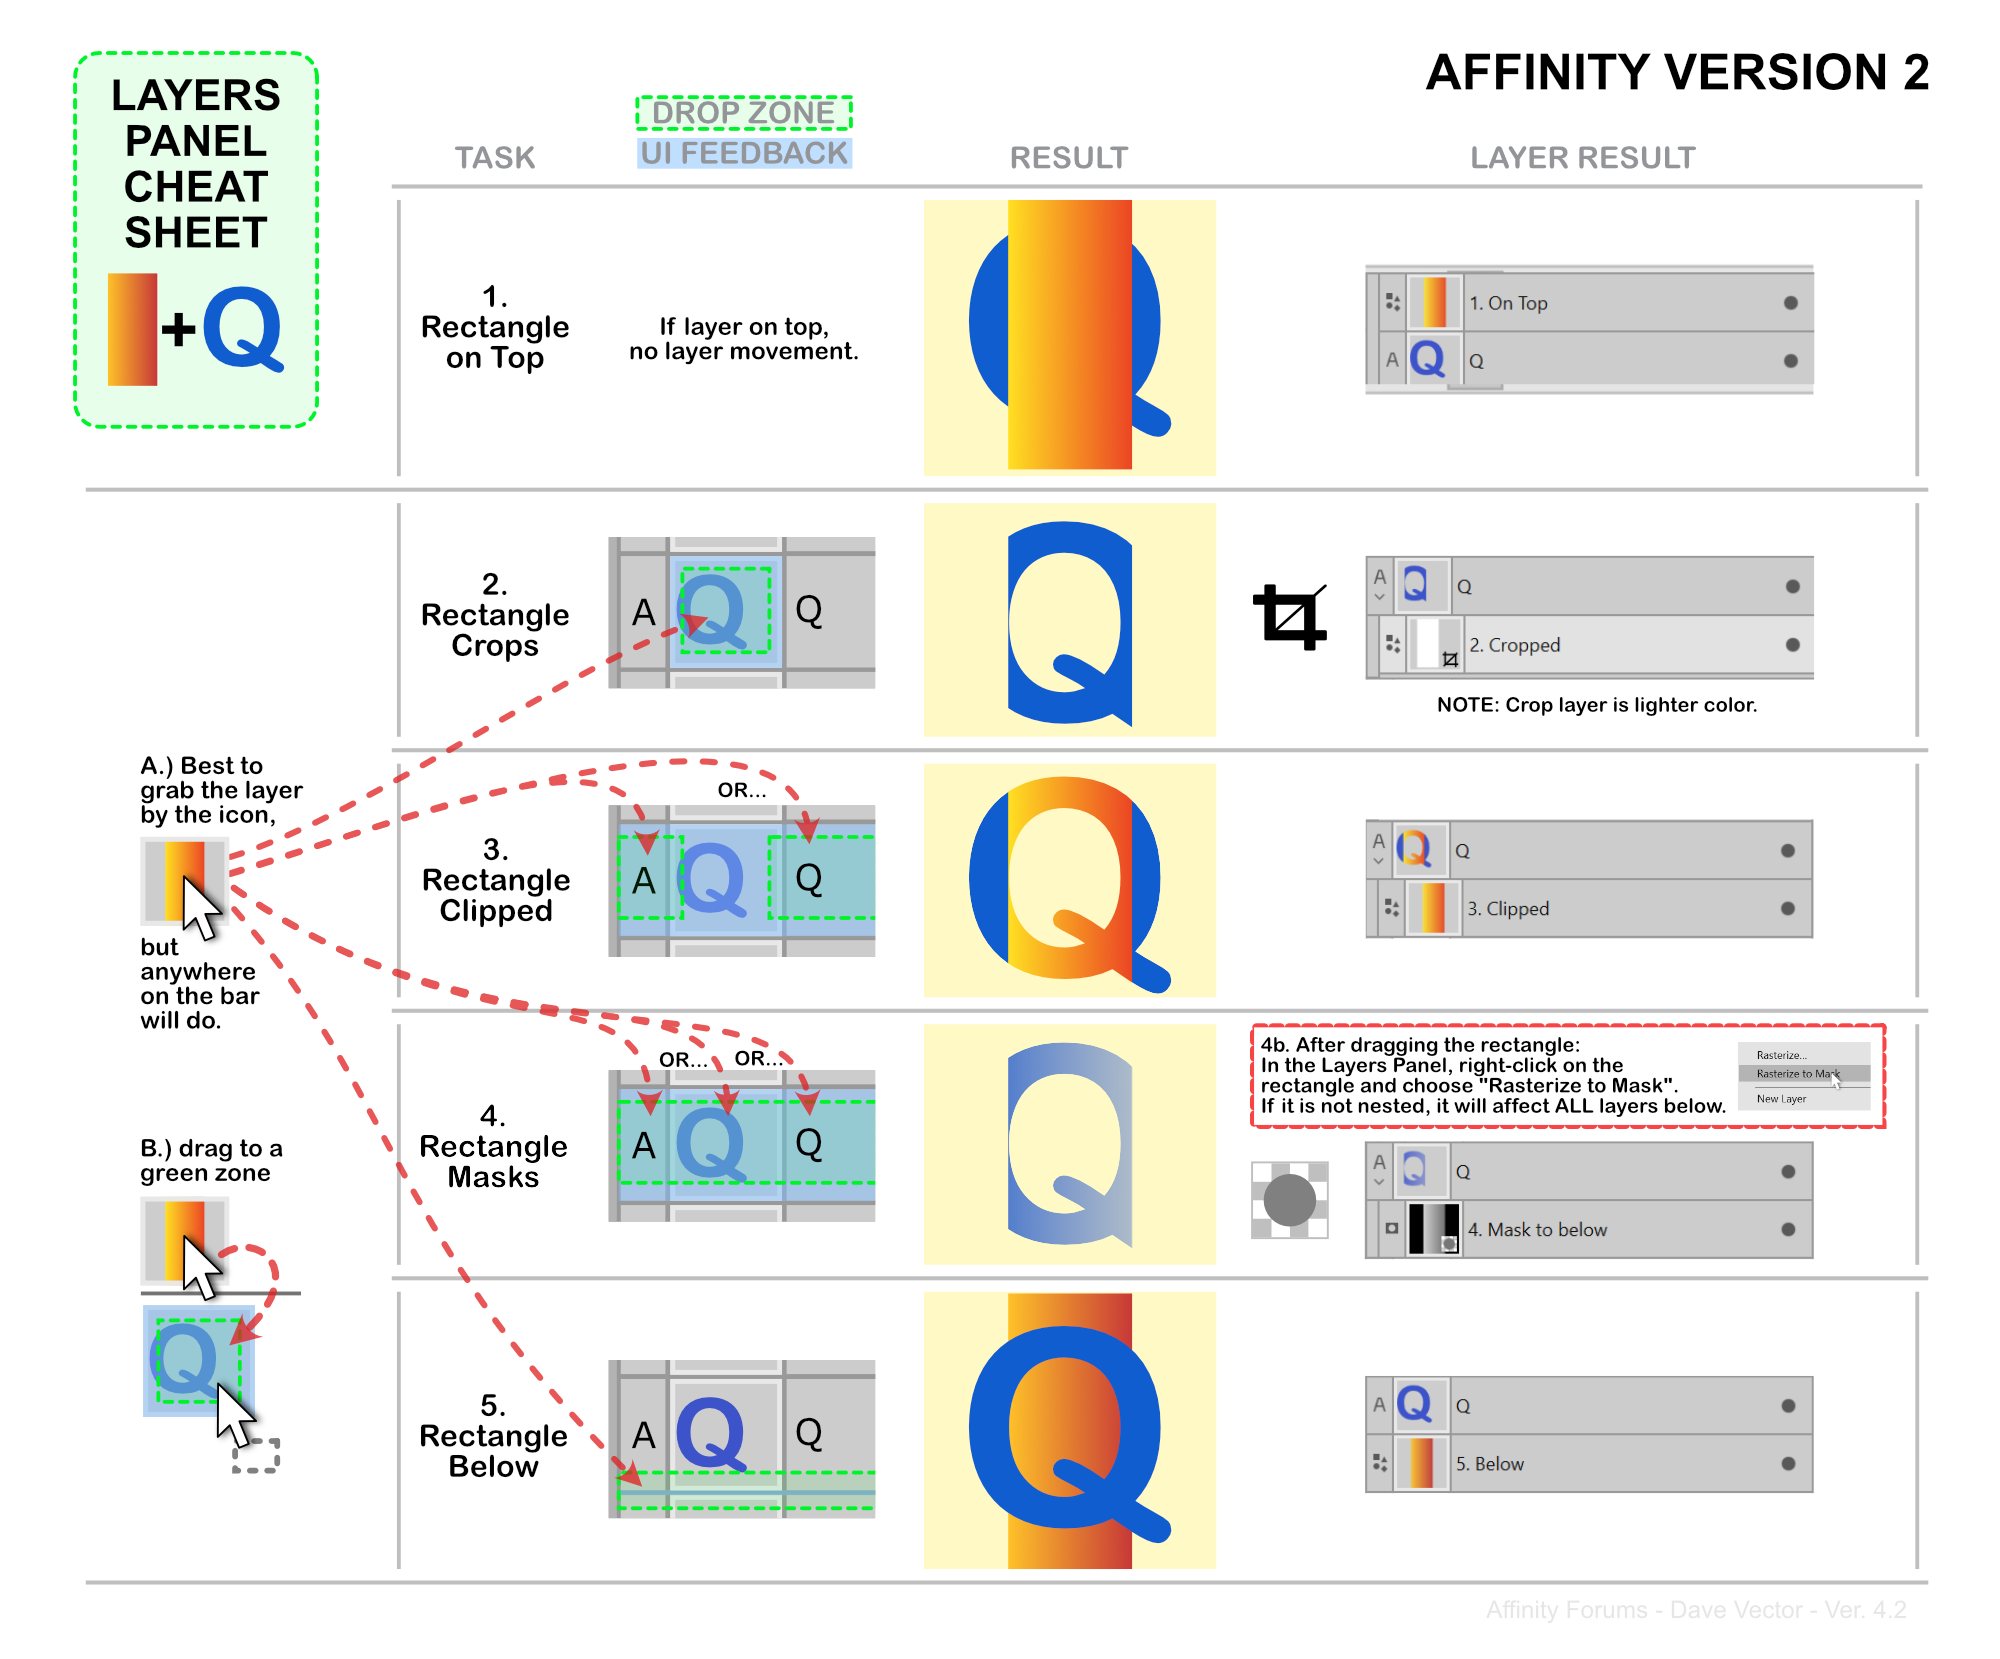
Hello, With version 2 of the Affinity apps comes with not only new layers interface, but also new layer drop zones and new UI feedback (blue highlights). I updated the cheat sheet to reflect these changes to help anyone who is looking for better understanding on how layers behave when dragged within the layers panel. Original post for version 1 of the cheat sheet here. This is a basic guide. It does not address all the possibilities of non-destructive masks, multi-nested layers, etc. There are many complex possibilities. I hope it serves to get you on the right track to understanding the foundations of layers in the Affinity Apps. Here is a PDF version: Layers Panel Cheat Sheet v4.2.pdf Note that my example uses the light UI. I did not create one for the dark UI, but the principles and feedback are the same.
-
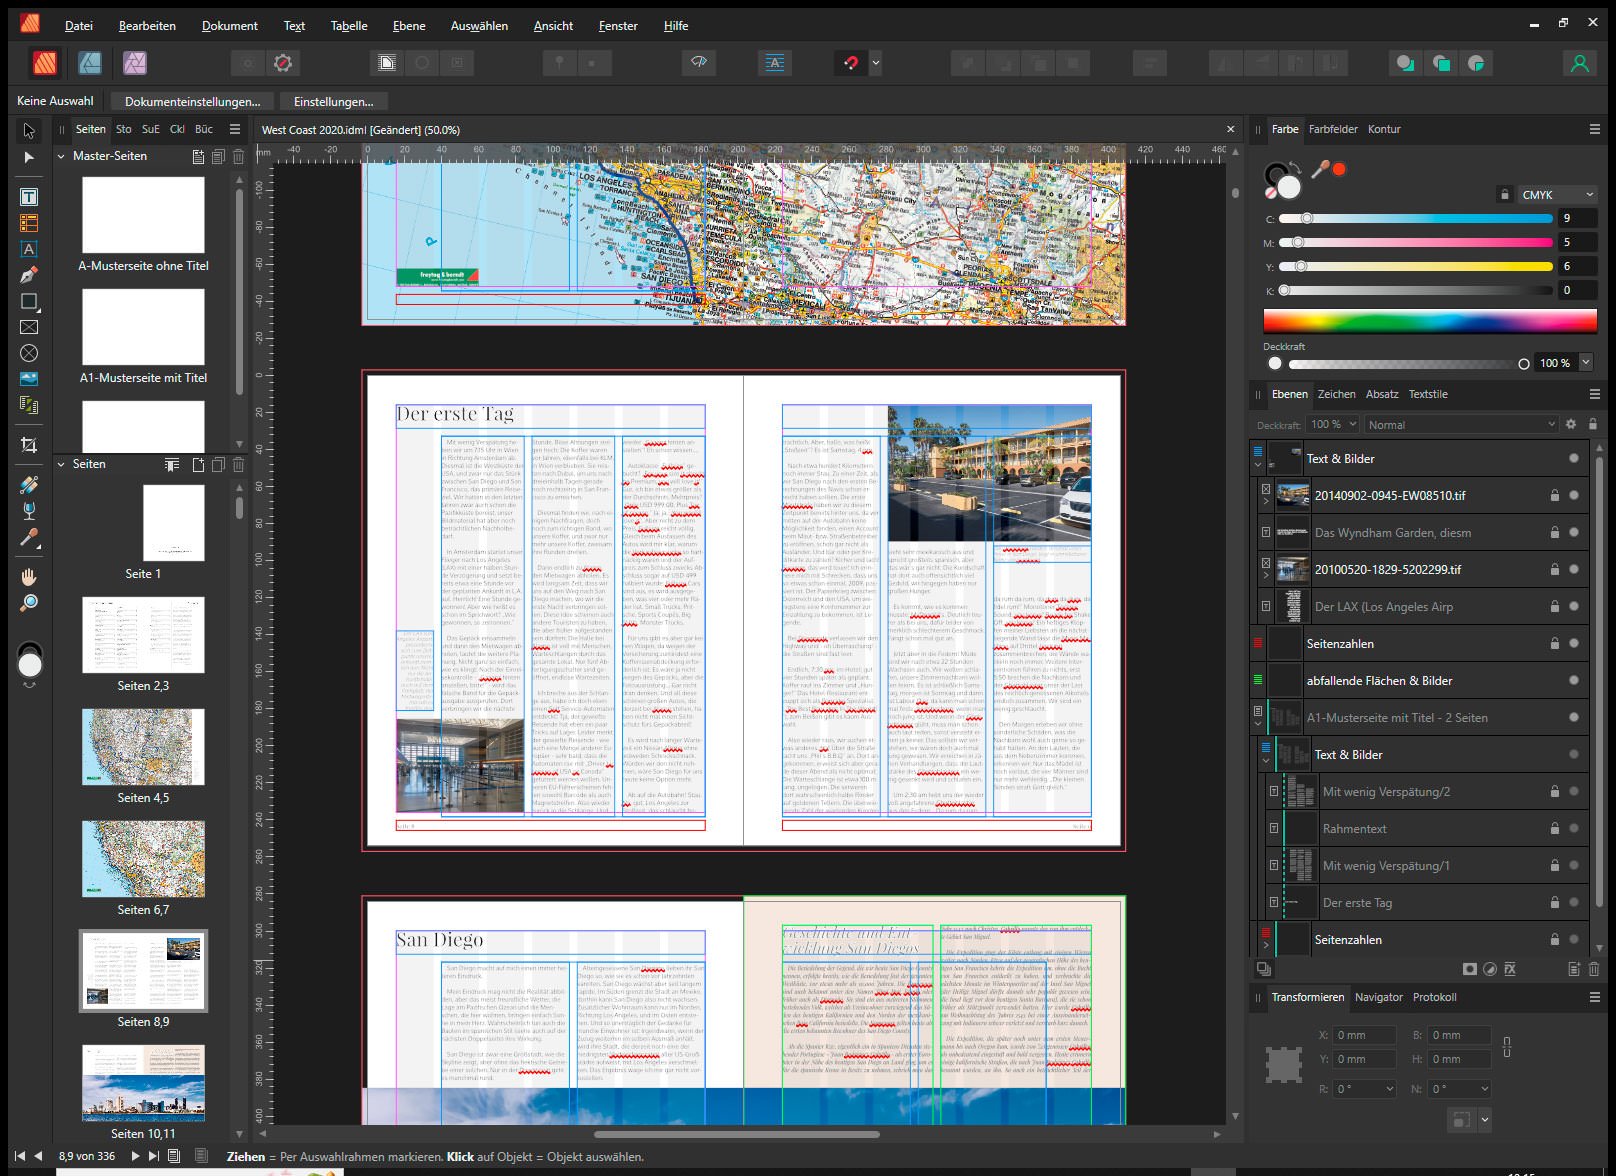
 My main problem at the moment: My documents are/were previously created in Indesign CS6. After having successfully implemented some smaller projects in Affinity Publisher, I wanted to migrate other projects as well. And in doing so, I encountered problems that I a) didn't expect and for which I b) didn't find any explanations or help in the form of tutorials. The tutorials and also the help files probably explain some of the affected details like master pages, layers, frame texts, but without addressing my problem or even touching on it. To migrate documents from InDesign to Affinity Publisher, I created IDML exports and opened them in Affinity Publisher. These are layered documents, with various, even hierarchical, master pages, with basic text frames on them, activated on the effective pages of the document using [SHIFT][CTRL] and then used. For InDesign, these text frames are then editable on the relevant effective page. Affinity Publisher apparently sees this quite differently. After IDML import, I can edit all text frames inserted directly in these pages (e.g. for image texts, info frames, etc.) that are on "regular" layers, but not the text frames that I have brought into the page from the master page. I hope this is understandable for outsiders. These text frames, which in my case contain headings and the main text respectively, I see on a strange layer, which on the one hand is labeled with the name of the master page, but on the other hand is grayed out. My question: How can I move these frame texts to one of the "correct" layer ("Text & Images")? And this in the whole document, not manually page by page; after all, these are documents with 200 to 450 pages, but they should be adapted to new circumstances year by year. Additional question: After using optical kerning in InDesign for text, I feel now like wet-shirted in the wind with Affinity Publisher. I would have to reformat or rewrite to appropriate length every single text on every single page. Is there a solution here? Because it looks like ignoring optical kerning for Sans Serif is almost a matter of faith. Which makes a feature update in this direction not likely. My considerations for switching to Affinity Software were: I could continue to work on these documents with Adobe InDesign until CS6 stops working at the current OS level. I could, but only very theoretically, afford an InDesign subscription from Adobe. But since I don't want to support subscription models at all, and on the other hand I've been financially supporting Sans Serif with the Affinity palette since the first version without using the products in any meaningful way so far, I thought the moment when my first InDesign tool no longer supported version CS6 was the right one to switch completely. This works quite well with Affinity Photo with a few sacrifices and some tedious conversions in terms of operation. Affinity Designer, like Adobe Illustrator, I will hardly use. And with Affinity Publisher, I'm quite far along, although the changeover is much more complex than with Affinity Photo. I'm still a bit behind there.
-
 Hi, I'm rather new to Affinity Photoshop- I'm not amazingly experienced in Adobe Photoshop, but I'm way more familiar with that.... I recently began shooting color negative film and dislike the color correction in my scanners software and the Vuescan software and wanted to learn how to do it myself in photoshop. I found a tutorial online, however, I cannot figure out how to do the "Levels Clipping Mask," ...here is the tutorial: https://petapixel.com/2017/02/01/edit-color-film-negatives-photoshop/ Basically, I know from the Affinity help page that I can press the "alt" key when I'm adjusting the Black and White levels when I'm in specific colors such as red or blue, but it just turns my image either all black or all white, and I'm not sure how to make it actually work like it's supposed to? It seems to do the job when I do it on the Master for the RGB levels, but not any specific color? Am I doing something wrong? I hope this makes sense! Thanks! -Jenny
 -
 Usually, I work with multiple layers: one is a trace-over background and then I have a group with design layers (line-work, fills and some other miscellaneous pixel layers). Something like this: I would like to have a 4th option in the Flood fill tool, which is: below, only within current layer/ group. This ensures that my trace-over layer will be discarded when filling, because it is outside of the design layer that I work in.
-
 Trying to export to pdf an artwork with different layers, i get pdf file with messed up layers: changed in order and nested and mixed with objects. Please see attached files. Can you help me? prova.afdesign prova.pdf
 -
 Hello! When working with the “Develop Persona” section, I was very surprised by the lack of elementary tools for working with mask layers! Namely, what is missing so far: There is no way to show, turn off, hide or fix a layer with a mask. I can't invert the layer mask. I can't copy the mask of one layer to another layer. There is no way to adjust the mask to select dark or light parts of the image for processing the RAW file. All data about layers and masks is deleted after I return back from the "Photo Persona" section to edit the raw file in the "Develop Persona" section. A huge request to developers is to implement in the next updates these elementary tools and functions that are available today in almost every raw editor and converter. Thanks! 😗👍
-
 In Design 2 can the color of multiple layers, in a group, be changed without changing each layer individually?
 -
 After I have filled several objects with styles that I have created, how can I later click on an object and reveal which style fills that object? I can reveal which layer it is on, but can't find the style that was applied to that object/layer.
 -
 I can't pin down exactly what's triggering this. Maybe hardware acceleration related? The strokes stop rendering when reaching the previous bounds of the parent vector layer. Hiding and showing the layer resets it. 2022-06-24 00-52-31.mkv
 -
It's hard to split this one up into several topics, because it all has to do with one and the same thing: layers. I have been going back and forth between Photo and Designer today for a complex file only because I am missing a couple of features in various parts of the software. These features can be are either available in Photo or Designer and not in the other. The same is true for their various personas or between personas in Publisher. I would argue that these basic layer manipulation and organisation features should be available in all of the personas and apps. That way, information is always displayed consistently in the layers panel, regardless of switching personas or programs. To be more specific, I cannot promote groups to layers in Affinity Photo, neither can I add symbols in Photo. In Designer, I cannot create linked layers. In Designer, if I go to the Photo persona, linked layers remain unavailable. In Publisher, I don't have symbols unless I go to the Designer persona. Linked layers are unavailable. For instance, the workflow with symbols in Photo becomes quite strange (same is true for Publisher when switching from the Designer to the Photo persona), because the Linked layer properties appear/ disappear between the two. Leading to different ways of interpenetrating the layer information. 2022-10-24 13-58-05.mp4 For instance, I could unlink the vector shape and it would still remain linked in Designer. Back in Photo, it shows as unlinked, but it is linked again. Though I presume this is a bug, reported here: 2022-10-24 14-03-41.mp4 I do however presume that there is much more prone to breaking the same way as this. Just because the implementation differs between one program and the other for no apparent reason. Anyways, I really think that if I switch programs for the sake of accessing features in one program that's not available in the other, I should at least be able to see my information displayed in the layers panel and the studios (linked layers and symbols) so I can opt to proceed working with them as I would in the other program I switched from. Symbols, linked layers and promoting groups to layers are all such general concepts that they can easily be used throughout the entire suite. Why shouldn't Publisher have symbols in the Publisher persona? Please evaluate these inconsistencies. It should, hopefully also help in having a cleaner and more robust code for the entire suite.
-
The city scale drawings I often work on are large files that necessitate the use of a single artboard for performance/ storage reasons. If I make several drawings on top of the same base layer (e.g. over the buildings), it would be helpful to link the visibility states of all layers that pertain to a particular drawing. However, with linked layers it is only possible to link two layers together. So I would like to request there being the possibility to link 3 or more layers for visibility. You may say, why don't you just toggle them on individually? The reason is that if I export several drawings, I may easily forget to turn particular layers on/ off during the process and thus make a mistake. As a result, I have to then go back and show/ hide lots of layers to re-export. If I could have linked the layers, that wouldn't be the case.
-
It may be nice to have inverted linked layer states, in which I can show one layer and thereby hide another. This would ease the showing/ hiding process of layers in a complex document. This request is in response to:
-
It would be helpful to link layer states (expanded/ collapsed) across layers. Sometimes you need to edit multiple layers and collapse/ expand several nested layers to make edits in two nested layers. In such instances, being able to have both of them expand and collapse synchronously, would ease navigating complex files.
-
In the Export Persona of Affinity Photo, I can't see that layers are linked by Visibility. I would like to be able to see this or have the links panel visible there. If I have linked my layers and colour coded the ones that are associated, it also doesn't show, because the Export Persona doesn't show layer colours. So this means that both means I have at my disposal to tell linked layer visibility from within the layers studio are absent... 2022-10-23 11-45-55.mp4
-
 Is there a quick shortcut key/combination I can push to expand/collapse all layers?
 -
 Hi! I have a problem best described by an example: I dragged an Afphoto picture of a car into the Publisher. I'd like to use the cutout car layer and another layer with a shadow underneath. But every time I switch the shadow on/off (in the photo persona) it (dis)appears on both inserted instances of the picture. Is there an uncomplicated way how to separate those two instances other than making two different images – one with the car and one with the shadow? Thank you, Stepaan
 -

Scroll Layers/Layer Shortcuts
Anton Deck posted a topic in Feedback for Affinity Photo V1 on Desktop
Hi, I'm a recent Photoshop convert. I'm generally a very happy chap but I am sorely missing the ability to: alt [ (or) alt ] to quickly move up and down from layer to layer. example, In Photoshop, if there are several layers and layer 1 is visible, alt ] selects the next layer and makes it visible, while deselecting and hiding the previous one. Yes, I can alt-click the thumbnail in Photo to do similar (which is a great feature), but the keyboard shortcut is a valuable tool, particularly if you need to a/b/c edits or if animating something. alt click a layers checkbox to show/hide all layers