Search the Community
Showing results for tags 'inking'.
Found 14 results
-
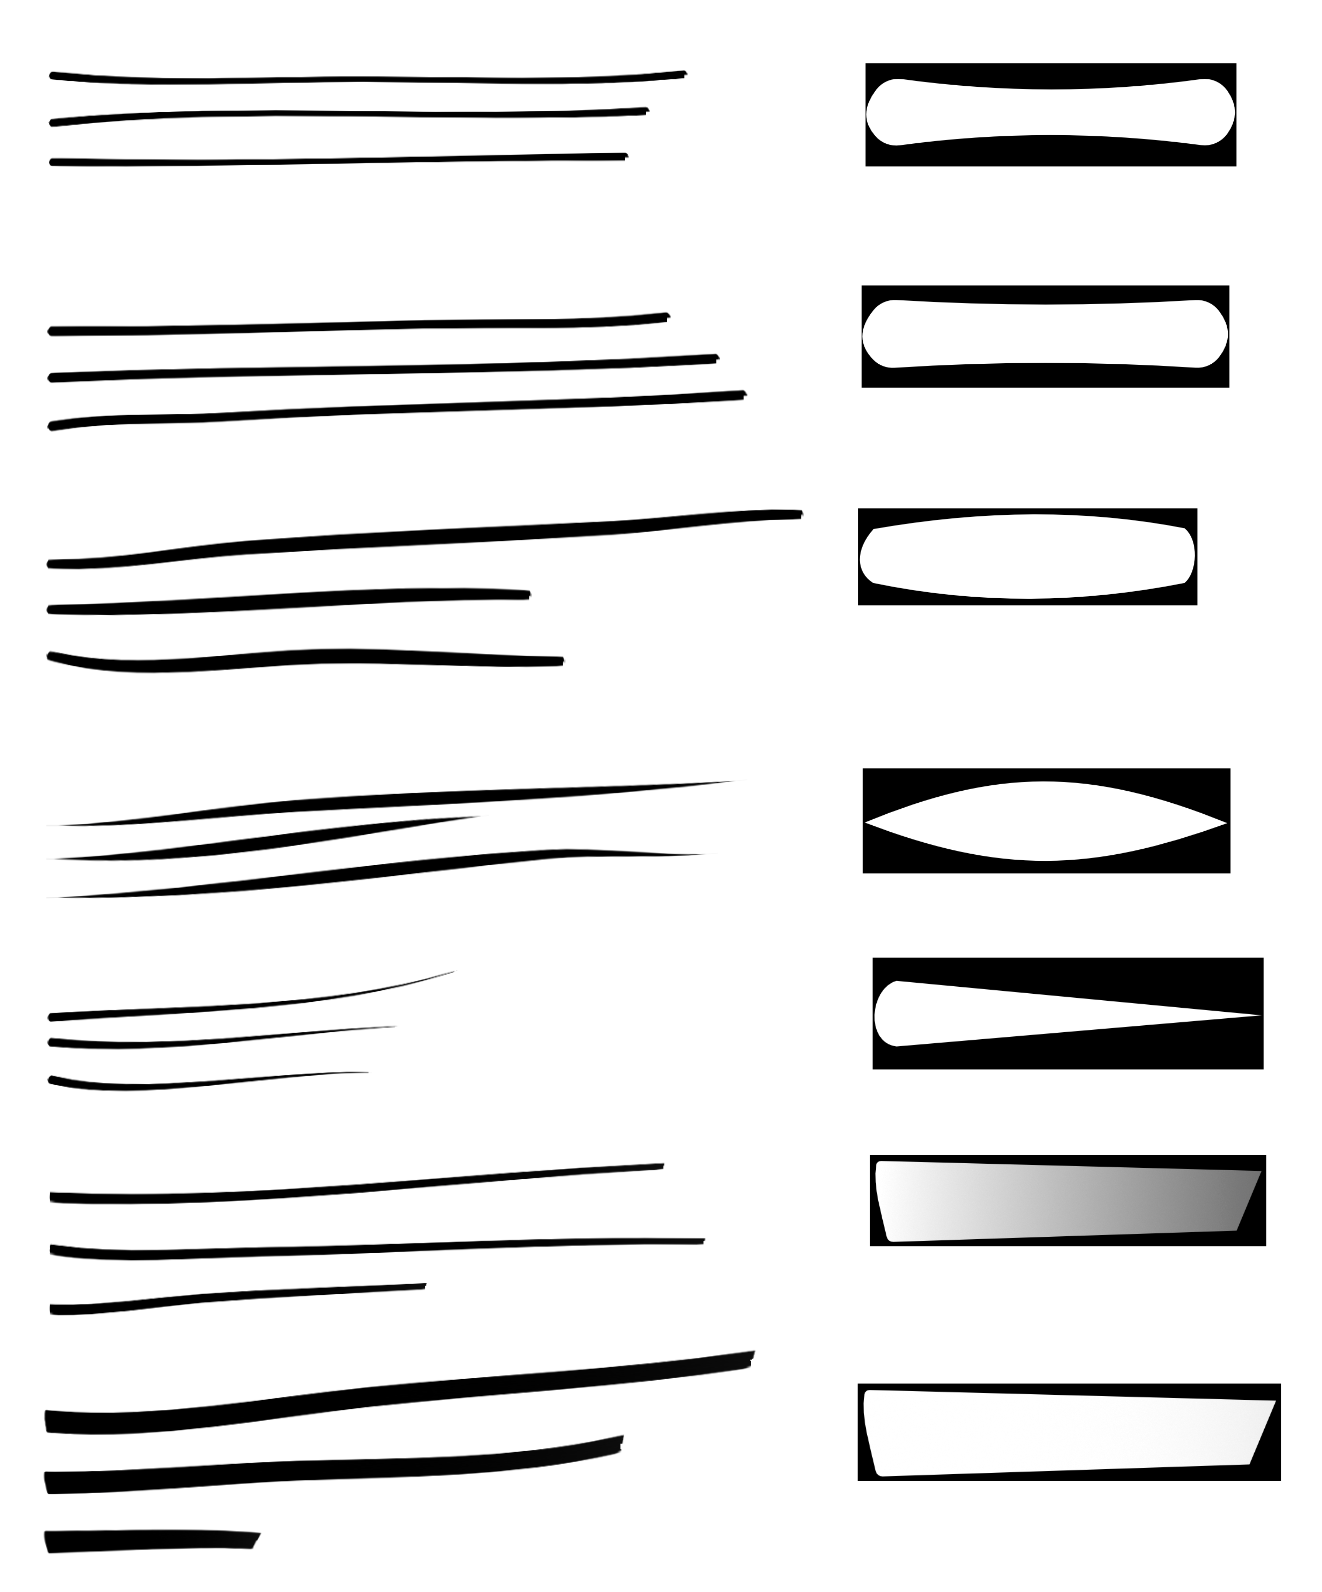
Infected This is my first drawing using Affinity Designer 2.0 (A revamped version of the colourful Lena which I have not uploaded!) It is really a test of the updates made to the Brush Dynamics in Affinity 2.0 Created a new set of inking brushes that makes use of interpolation and the new Distance options with the brush dynamics. I have found that the brushes are much smoother, faster and more responsive..I really like the ability of 'Distance' to allow for the tapering of the nozzle. Even though you have to adjust the direction of the graph! Affinity Designer 2.0 original 400 x 400mm | 300dpi Brushes inker | Comic Grunge and Concept Painter

- 51 replies
-
- 30
-

-

-
- affinity 2.0
- inking
- (and 3 more)
-
Decided to concentrate on some much larger drawings this year!....(Year 8)as I never seem to finish!😀 Used New Comic Book Brush Sets combined with PB 33 (Ink Blocking) have not uploaded these! but you can use these: Brush Sets: Inkers: Project Brush 19 'Inker' Patterns: Project Brush 19 'Pattern Toolkit' 01 Dream Affinity Designer | 1000 x 500mm | 300Dpi Tint Overlay Grey Original
-
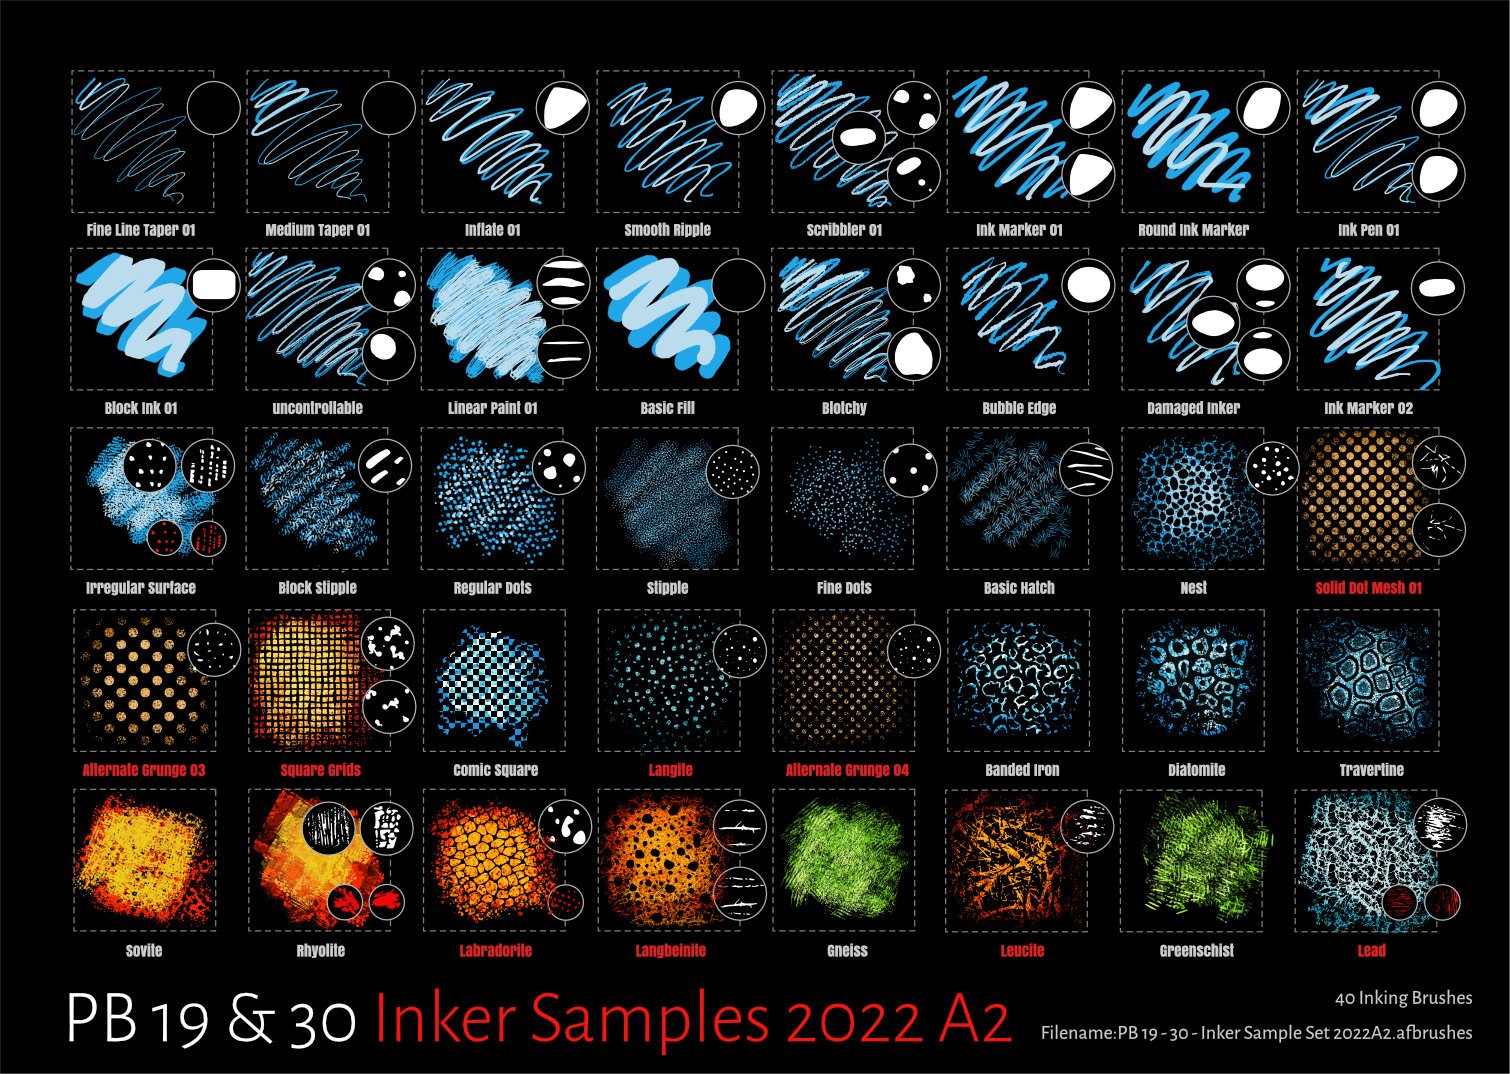
Project Brushes 19 & 30 mixed sample set A2 Uploaded a sample set of the latest brush offerings used for #Inktober 2022. Attempted to improve the brush set with the addition of PB 30 Comic Grunge and PB 19 Inker Texture samples Still Consists of 40 Raster brushes but extracted from 7 inker Brush sets. Updated for Affinity 2 but retained version 1 brush set Affinity 01 Affinity 01: Original Brush set (Sample sheet removed) Affinity 02 Affinity 02: Updated version 2 set with adjustment to dynamics to include Distance and Interpolate (Sample sheet as below). Replaced Linear Paint 01 with better nozzles! Extracted Brushes 1. PB Inker 19 (Used in 2020) from collection of 60...about to modify to version 3 so will be archived! 2. PB 19 Inker pattern (2020) 3. PB 26 Distressed Pattern (6) Blue 4. PB 26 Distressed Eraser (4) Orange 5. PB 26 Distressed Paint (4) Green 6. PB 19 Inker Texture (2022) 7. PB 30 Comic Grunge (2022) New Brushes highlighted in red! Updated using new Affinity 2 brush dynamics Samples as below: Affinity 01 PB 19 - 30 - Inker Sample Set 2022.zip Affinity 02 PB 19 - 30 - Inker Sample Set 2022 A2.zip
- 12 replies
-
- 20
-
-
-
- inktober inkers
- inktober
- (and 3 more)
-
 A funny cartoon of a proud bee to celebrate Pride Month. This image is the last cartoon made from a group of other elements (logos, menus, etc.) created as the communication design for a business visual concept.
-
- 3
-
-
- communication design
- cartoon
- (and 7 more)
-
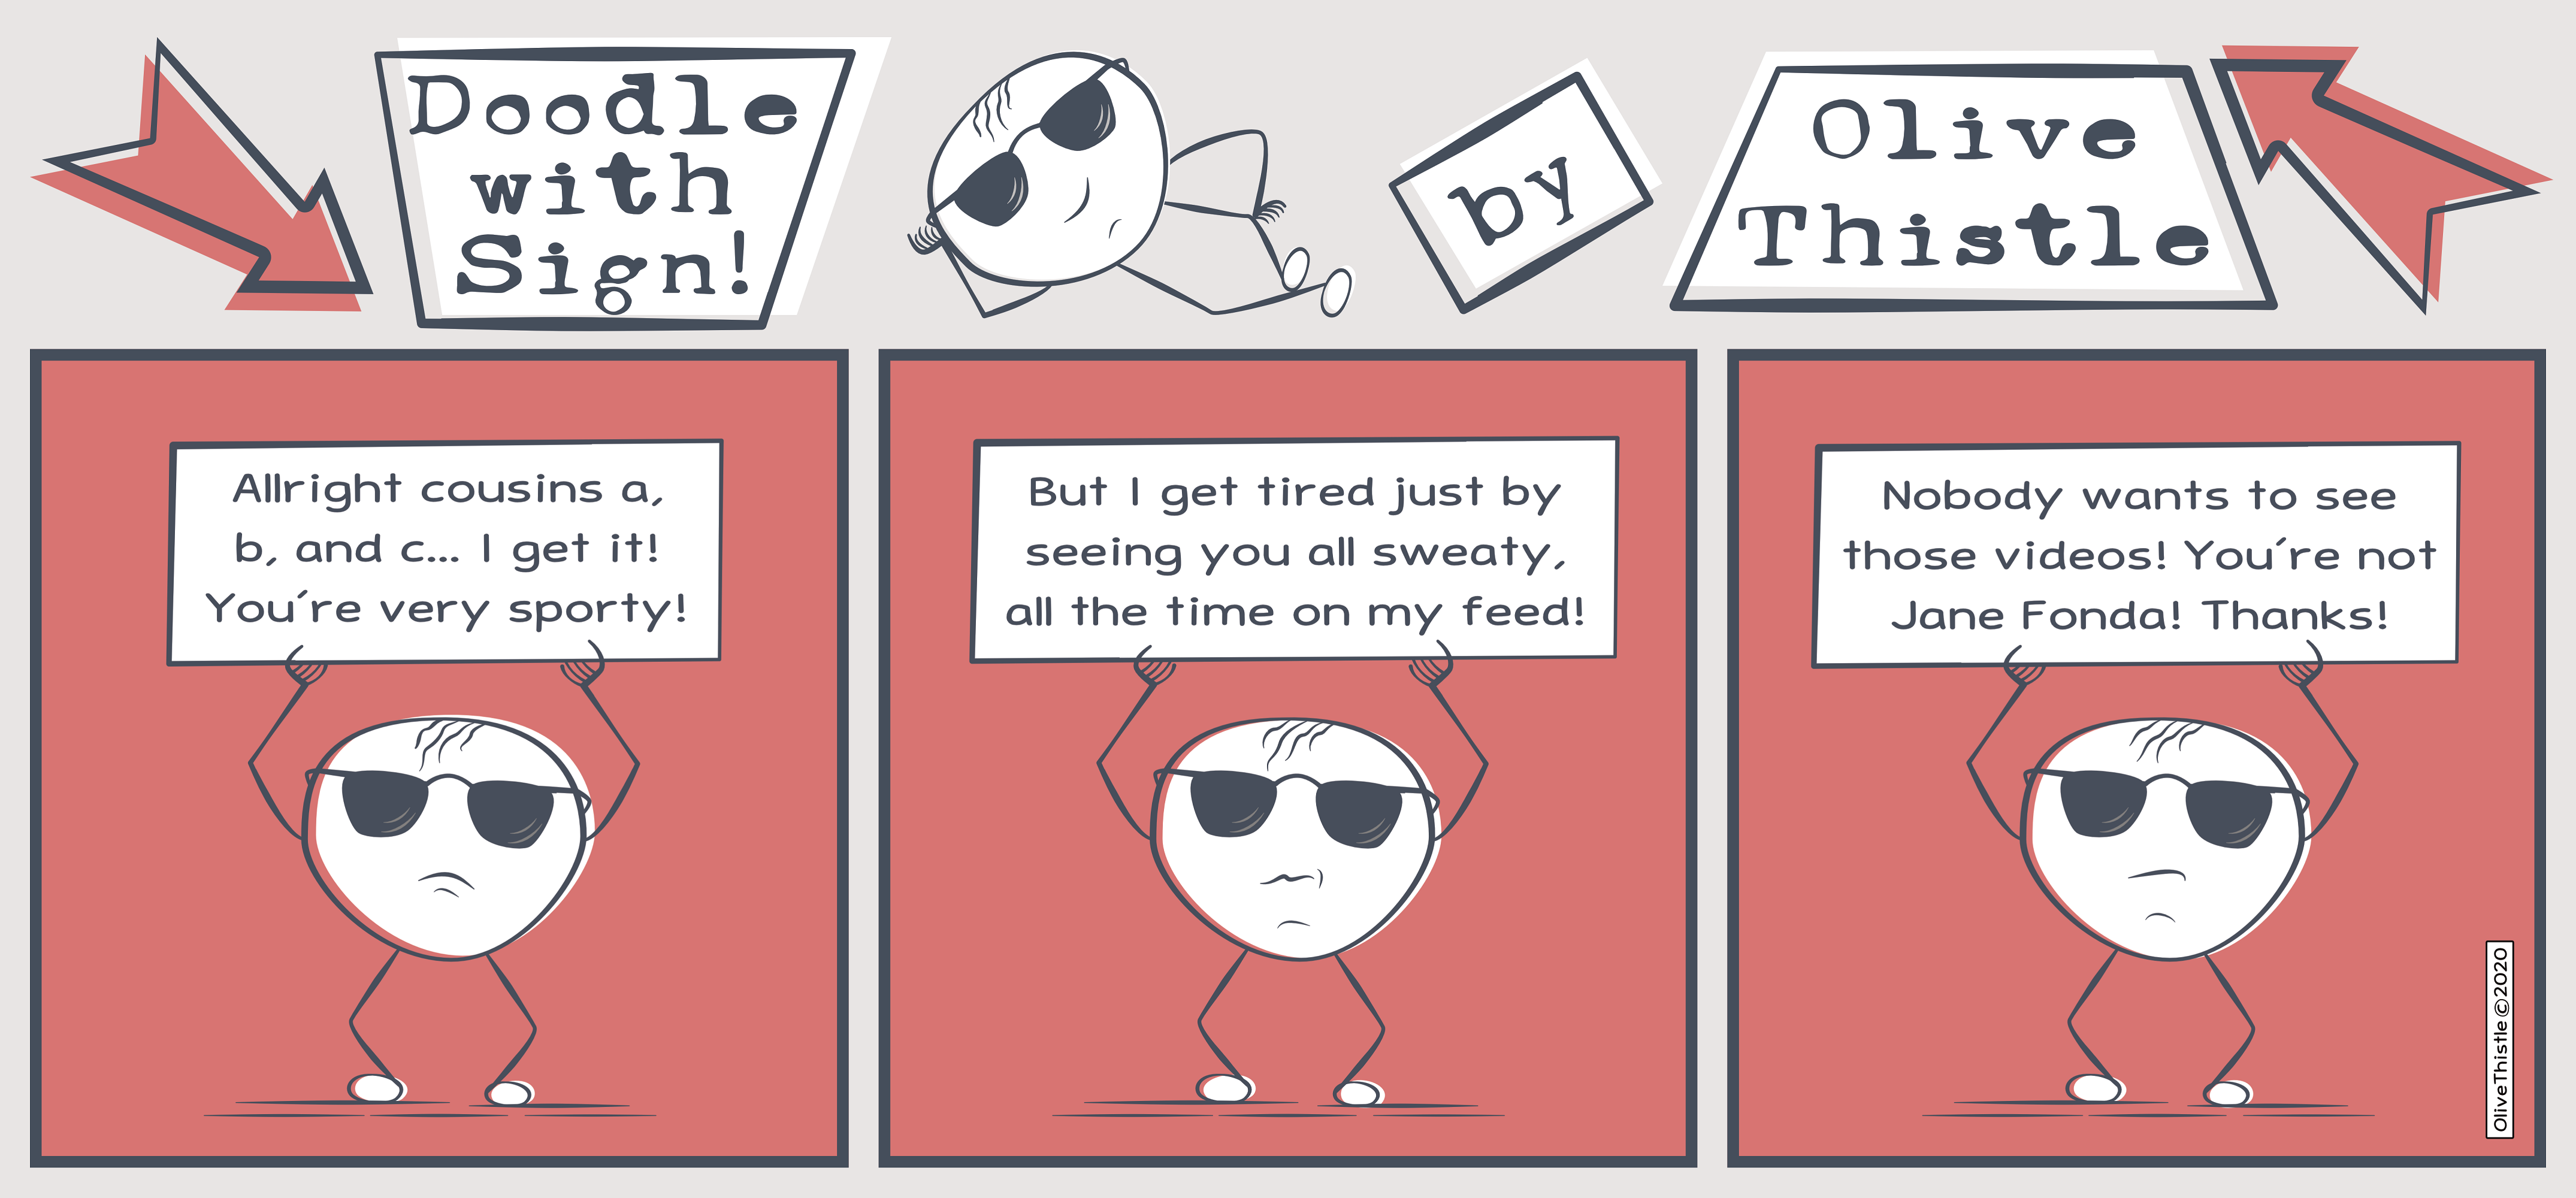
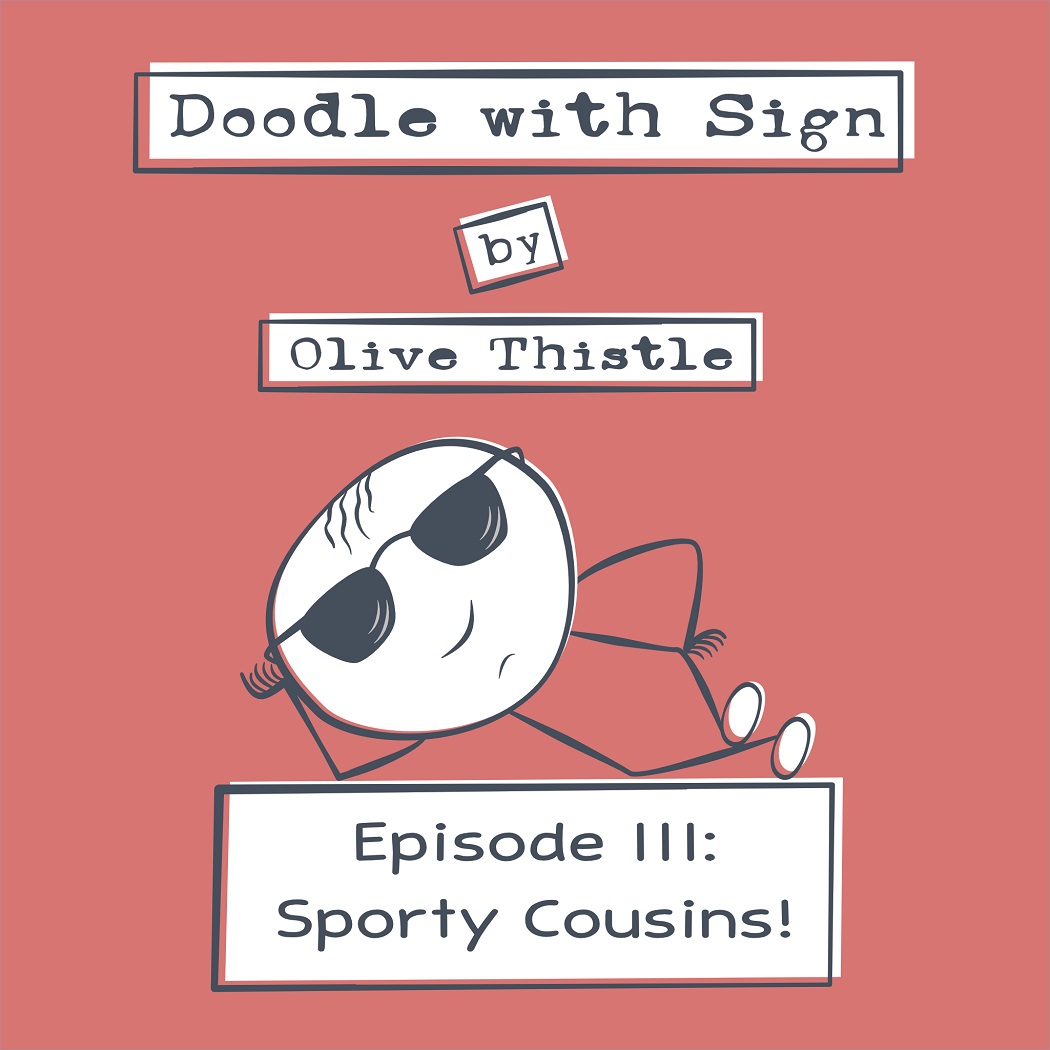
Besides using A. Designer tools to create more elaborate illustrations, I also like to use it in more simple designs, like for instance cartoons. I created “Doodle with Sign” as a comic side project, also inspired by the “Dude with Sign” viral street performance. The visual concept is defined by minimal ink lines and a vintage graphic aesthetic. The 2nd. image is the intro image I created for posting this cartoon in slide mode, in certain social networks. Note: “Olive Thistle” is my alias for cartoons. Enjoy!
-
- 2
-
-
- cartoon
- cartoon art
- (and 7 more)
-
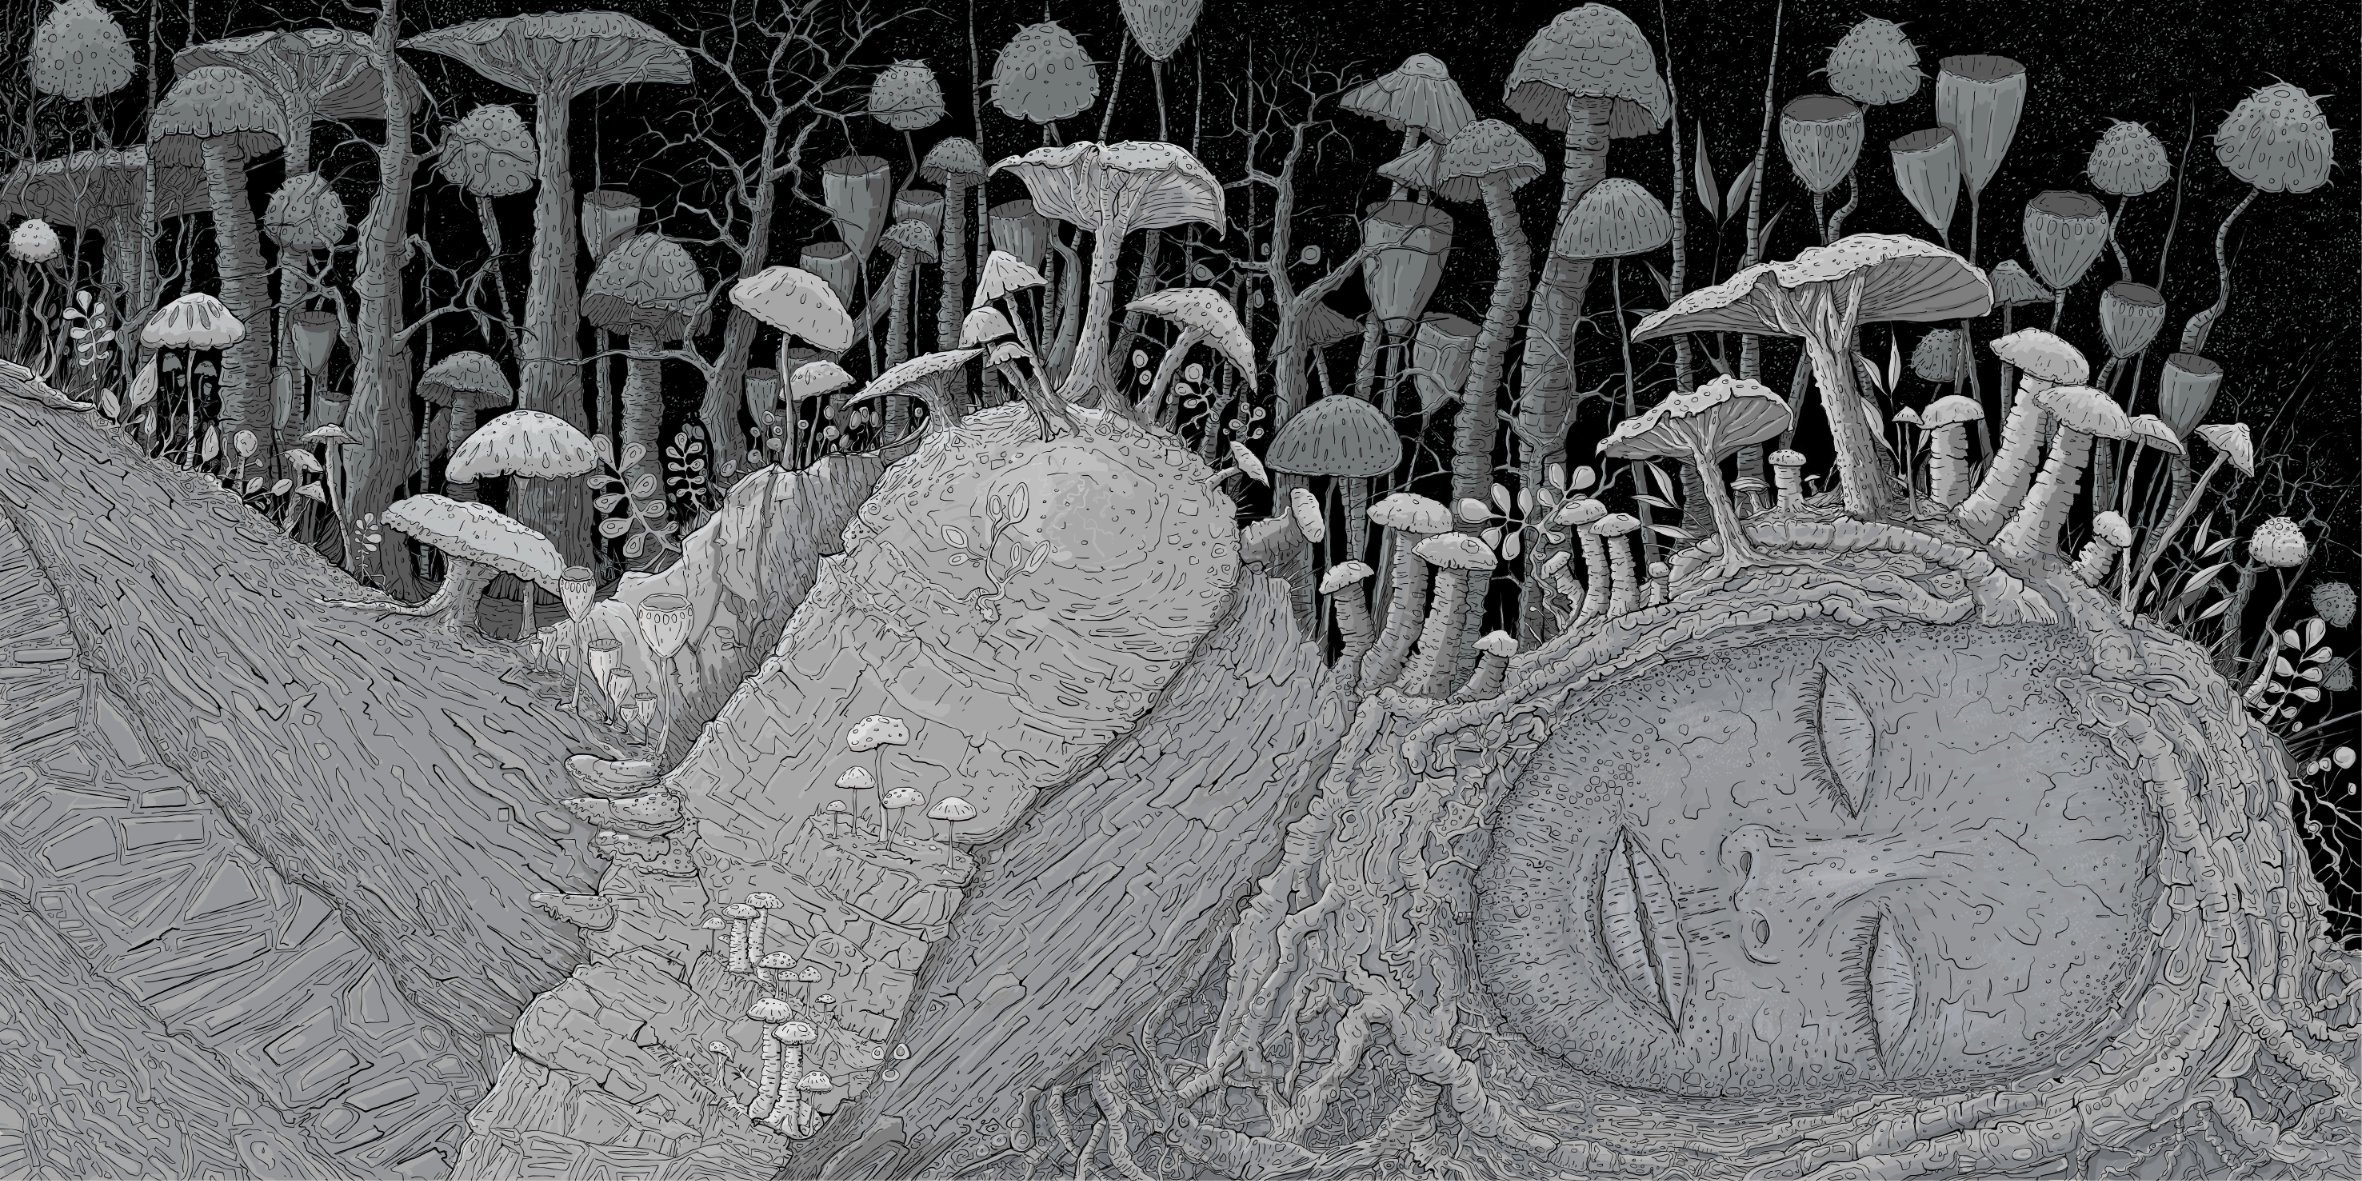
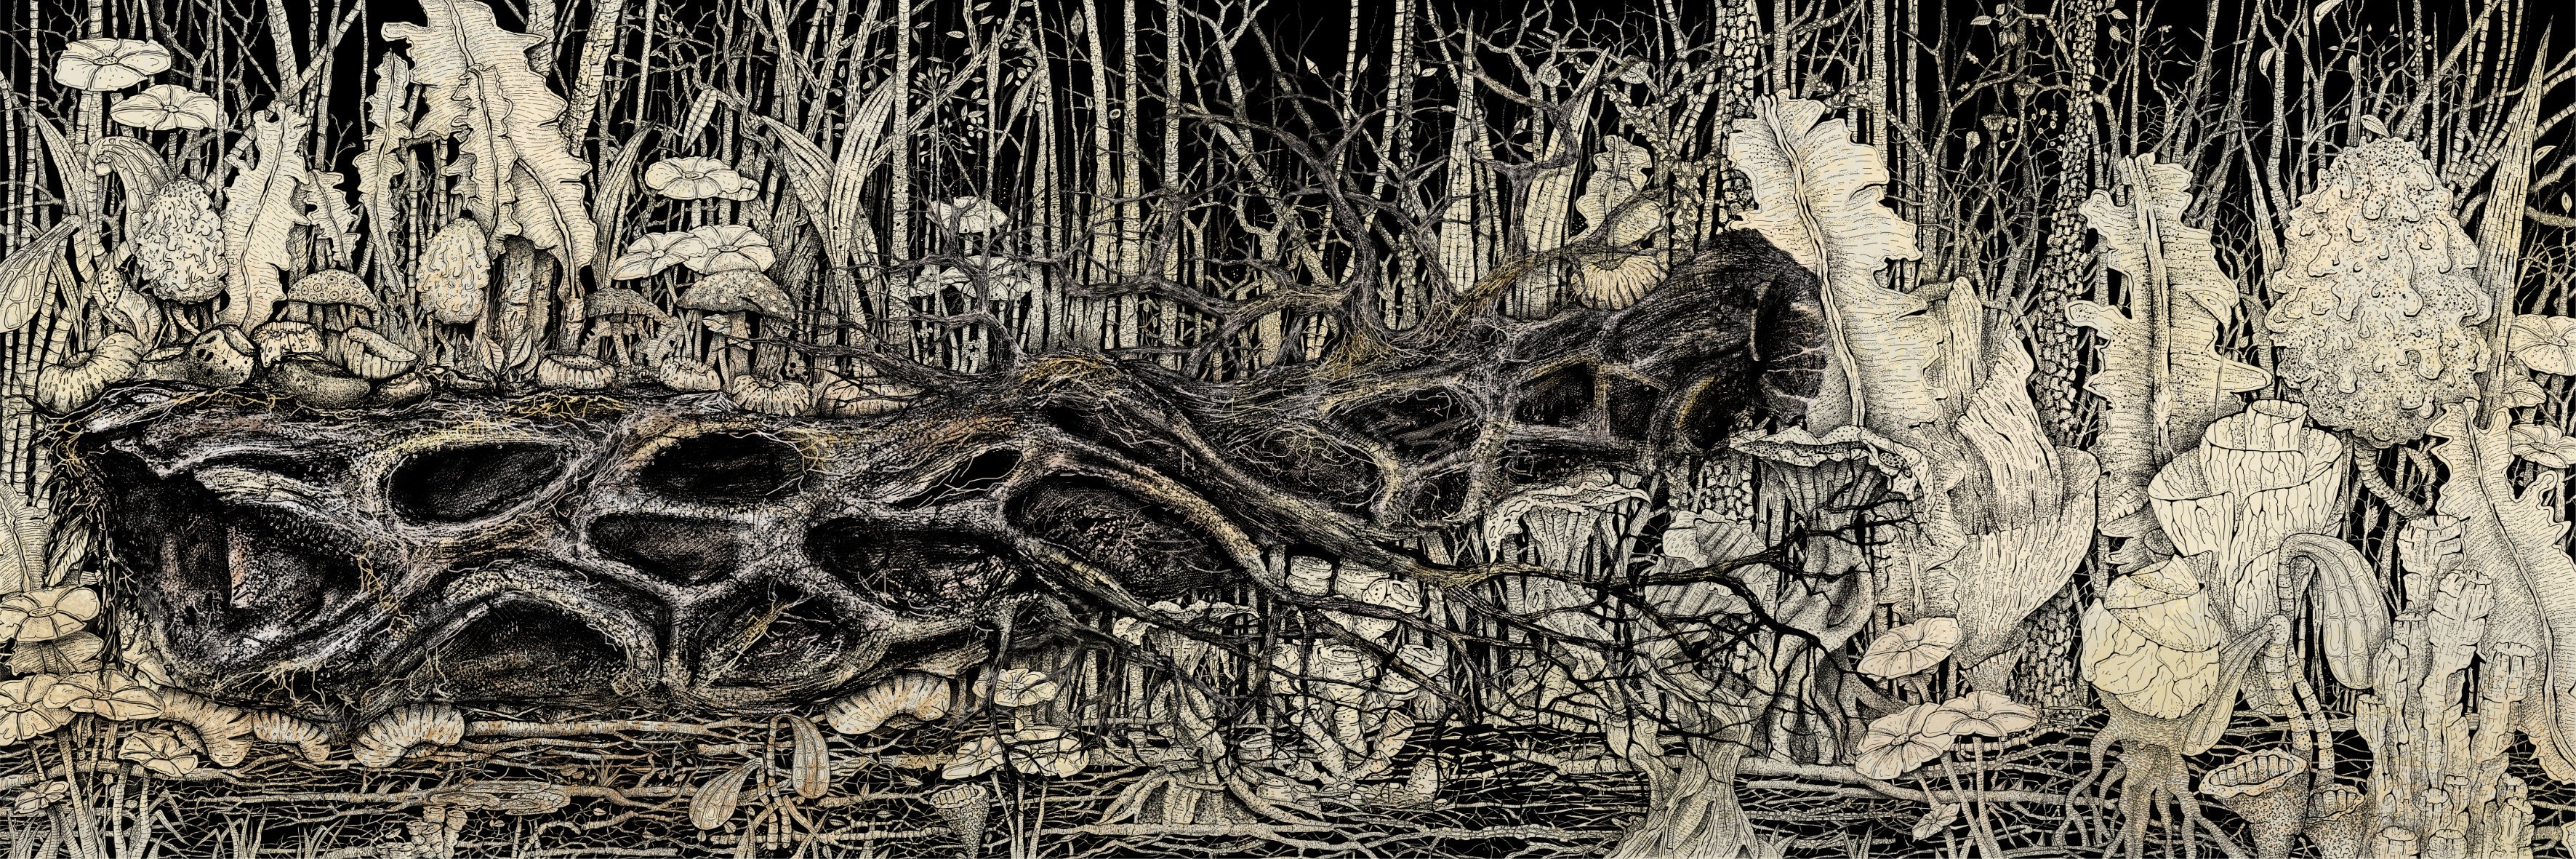
Ecosystem Second instalment of inked murals and follow up to 'Fallen' All Raster Drawing using Inktober Inker Brushes Full Size 3000mm x 800mm (A bit big!)..but hey! AD can cope! upload size (10%) 3543 x 944px
-
Fallen A return to inking....and a bit of experimentation AD 1.8 Original size 1500 x 500mm 300dpi Uploaded at 3543 x 1181 jpg Fallen:Sepia Version Fallen:Coloured Version
- 34 replies
-
- 31
-
-
 Leprechaun 2019 Initial inking This is the first in a series of videos detailing my process of vector inking my shirt design for the upcoming St Patrick's Day 5k. In these first two steps, I trace my approved sketch with a tapered vector brush in Affinity Designer, intentionally overlapping my lines so that in step two, I can divide them where they cross and delete away the excess portions. I've been making an effort to do more and more of my workflow in Affinity Designer instead of my standard Illustrator app so part of this process was exploration and trying out new tools and methods. I'm still hoping we get an eraser and a blob tool (amongst other features) to make this process a little easier. Also - the combine boolean leaves behind a TON of nodes in its wake... is that something being addressed?
 -
Finally had a chance to play with some of the brushes that were created this year and explore some techniques Original size A3 (300dpi)
-
The robot who was once destroyed and sometime after re-animated by the evil will of technomancer. This guy is like a zombie but made of steel. Used new for me method of inking - vector brushes without any pressure sensitivity at all. You just create the shape you need and make a brush out of it. Having some brushes made in this manner results in nice and natural looking inks. The reason for using them is actually better predictability of strokes and much higher speed. The brush engine just does not spend time calculating size and opacity variability and you get much faster inks. For many inking tasks this is more than enough. Have you been using this method? How you feel about it?
-
They just came to torture! Inked with brushes with new affinity stabilizer, they are cool! And as always my favorite EGA palette )
-
I would like to be able to use a tapered brush set to adjust its width and tapering effect based on the pressure I put on my stylus as I make the strokes. This works with some brushes - the ones that seem to have more of texture to them - but I can't get it to work for a standard solid brush. On the flip side - thos tapered fancy brushes when selected, will not expand to a fill (is this because they have a raster element to them?) meanwhile solid fill simple brushes will expand when selected and "expand" is chosen - but they are useless without the taper... am I missing something? I don't necessarily want to go through after inking the whole design and adjust the taper and wideth of a stroke afterwards
-
 Hello, Please, apologies if this type of video has been done already.... Is just the old technique of overshooting strokes, and later on deleting what is not wanted, as permits more confident lines and in certain way a faster work. is not a technique for everyone, is just one of the many ways to ink. I am using this without pressure, in this specific case, what you see is just the use of pencil, with a pre-set pressure profile (so it always starts thin, goes thick, ends thin) .The ideal thing is of course to do it with pressure sensitivity, but I just wanted to do a fast tut. Also, please don't judge the quality of the drawing, is extremely fast done, not caring about.. anything xD And a last thing... I made a dumb mistake, I did not explain the main step, haha. :D . After you draw your overshooting strokes, you need to pick the MOVE tool ( V key ) draw a marquee selection around ALL your line art piece, then go to layer top menu, and click on Expand Stroke. What this does is it converts the brush strokes in shapes with contours. Alowing so the later on applied technique. Oh! And don't forget to convert to curves any shape that was done with actual standard shapes (circle, star, etc) as those are that, "shapes" yet. For this, just select the shape, go to Layer at the top menu, and click on "convert to curves". (Alfred contribution --- > ) If you're a keyboard shortcuts person like me, you can convert to curves by pressing Ctrl+Enter on Windows (or Cmd+Return on a Mac). (then you would do the selecting all by doing a rectangle selection with Move tool, and then 'Expand Strokes'. ) In the operation, I use the node tool making rectangle selections, but, as we don't have yet lasso for this, what I do is use quite "shift" to add to selection, and perform it in 2 or 3 additions when needed (only a few times needed). That but doing clever rectangle selections : You want to leave some dots in the middle of the crossing stroke, so that you leave no empty gaps. This deletion of unwanted segments, like in other applications, requires you to use the node tool (not the move tool, now) , and go clicking on each segment to work on it. Is faster done than explained ;D. You could select all curves in the layers panel, and so, having all selected, but trust me in that doing so, would be much harder. :) Oh, BTW, you wont see anything unless you maximize the video to full desktop :) And for that, you would need to click on the "VIMEO" white text down below, and once in Vimeo, hit the 4 directions cross icon besides the "HD", to see it in full window. Sorry, I don't have the pro version of vimeo ;) EDIT : Also, i know the eyes are not done properly, I mean, not applied well the technique, but was just for showing the general trick. Just for completeness, the eyes, being circles, they have to be converted to curves, first (done in the second one, but not its iris, just sent a stroke to front to cover it, lol) . And it would get its curves expanded to contoured shapes, like everything else, in the select all with move tool, and expand strokes. Also, you will si that, yet with node tool, I just click in some points to add a vertex or two, when there's none inside the crossing stroke. Very fast to do, though, as you will see. Edit 2: For this to be comfortable like it is in other apps like in AI, what I do first is set in preferences the nodes and handles to have the smallest size there. It makes it doable. As this does not require a restart, I would change back to medium for , for example, making a logo. :) Edit 3: (last one, I promise) . You will see in his right eye (left side in the canvas), a sort of glitch, a straight diagonal crossing his eye. is not an AD glitch. I did the thing so fast that I hadn't yet cleaned well some stuff. Is just a shape badly closed by me, there's a pause (I needed to figure out a thing and also a phone call, so, paused the video there) , after that the glitch is gone as I fixed it. Nothing magic or trying to hide anything ;)