Search the Community
Showing results for tags 'import'.
-
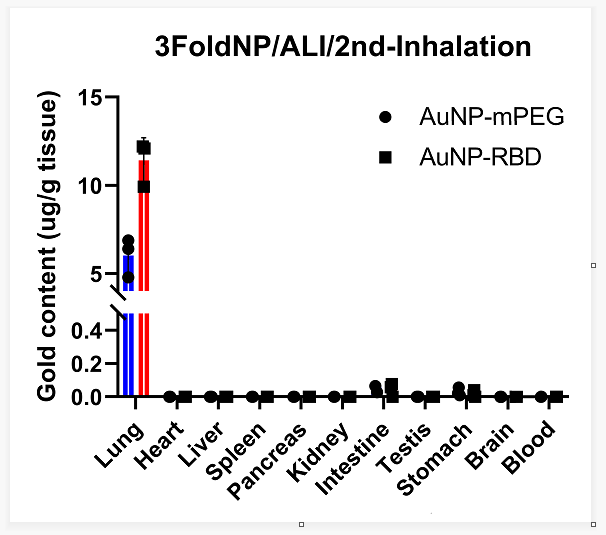
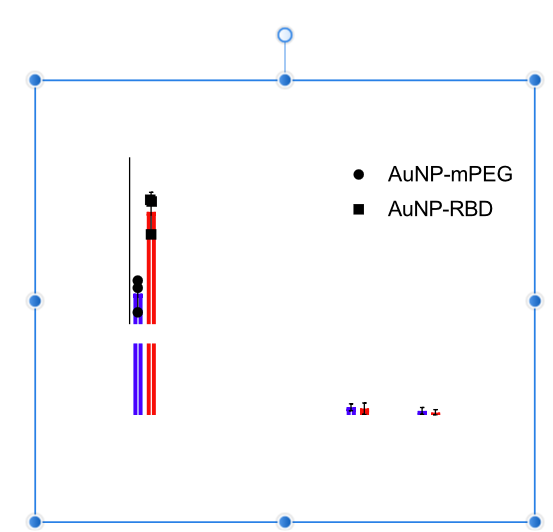
 Hi there, I tried to import several emf files into designer. but all of them cannot be displayed correctly: a lot of elements in the file were missing. f1.png shows what does the emf look like in other software (e.g., Windows Paint, Inkscape...). f2.png shows what does this file look like in Affinity Designer. I also attach tht original file for your reference. Thank you. 3FoldNP_ALI_Day1.emf
-
 Hi all, I am new to Publisher. I have written my autobiography in Word 2007 but am having trouble with Word rendering images correctly in the document, mainly brightness and colour. I purchased Affinity Publisher as it is a colour managed application. I have tried importing the Word document into Publisher, however the layoout is completely wrong in Affinity, the images are all in the wronlg place. Is this what I should expect, then have to adjust in Publisher, or is there a way to import the Word document and maintaind the same layout? Regards, Steve
 -
Hello, My RAW images imported and opened from the Canon R3 all look like the example shown (in all Affinity programs). Attached is a comparison between .CR3 and .jpeg. Where is the error here, with me or in the programs? 🙂 Gerhard
-
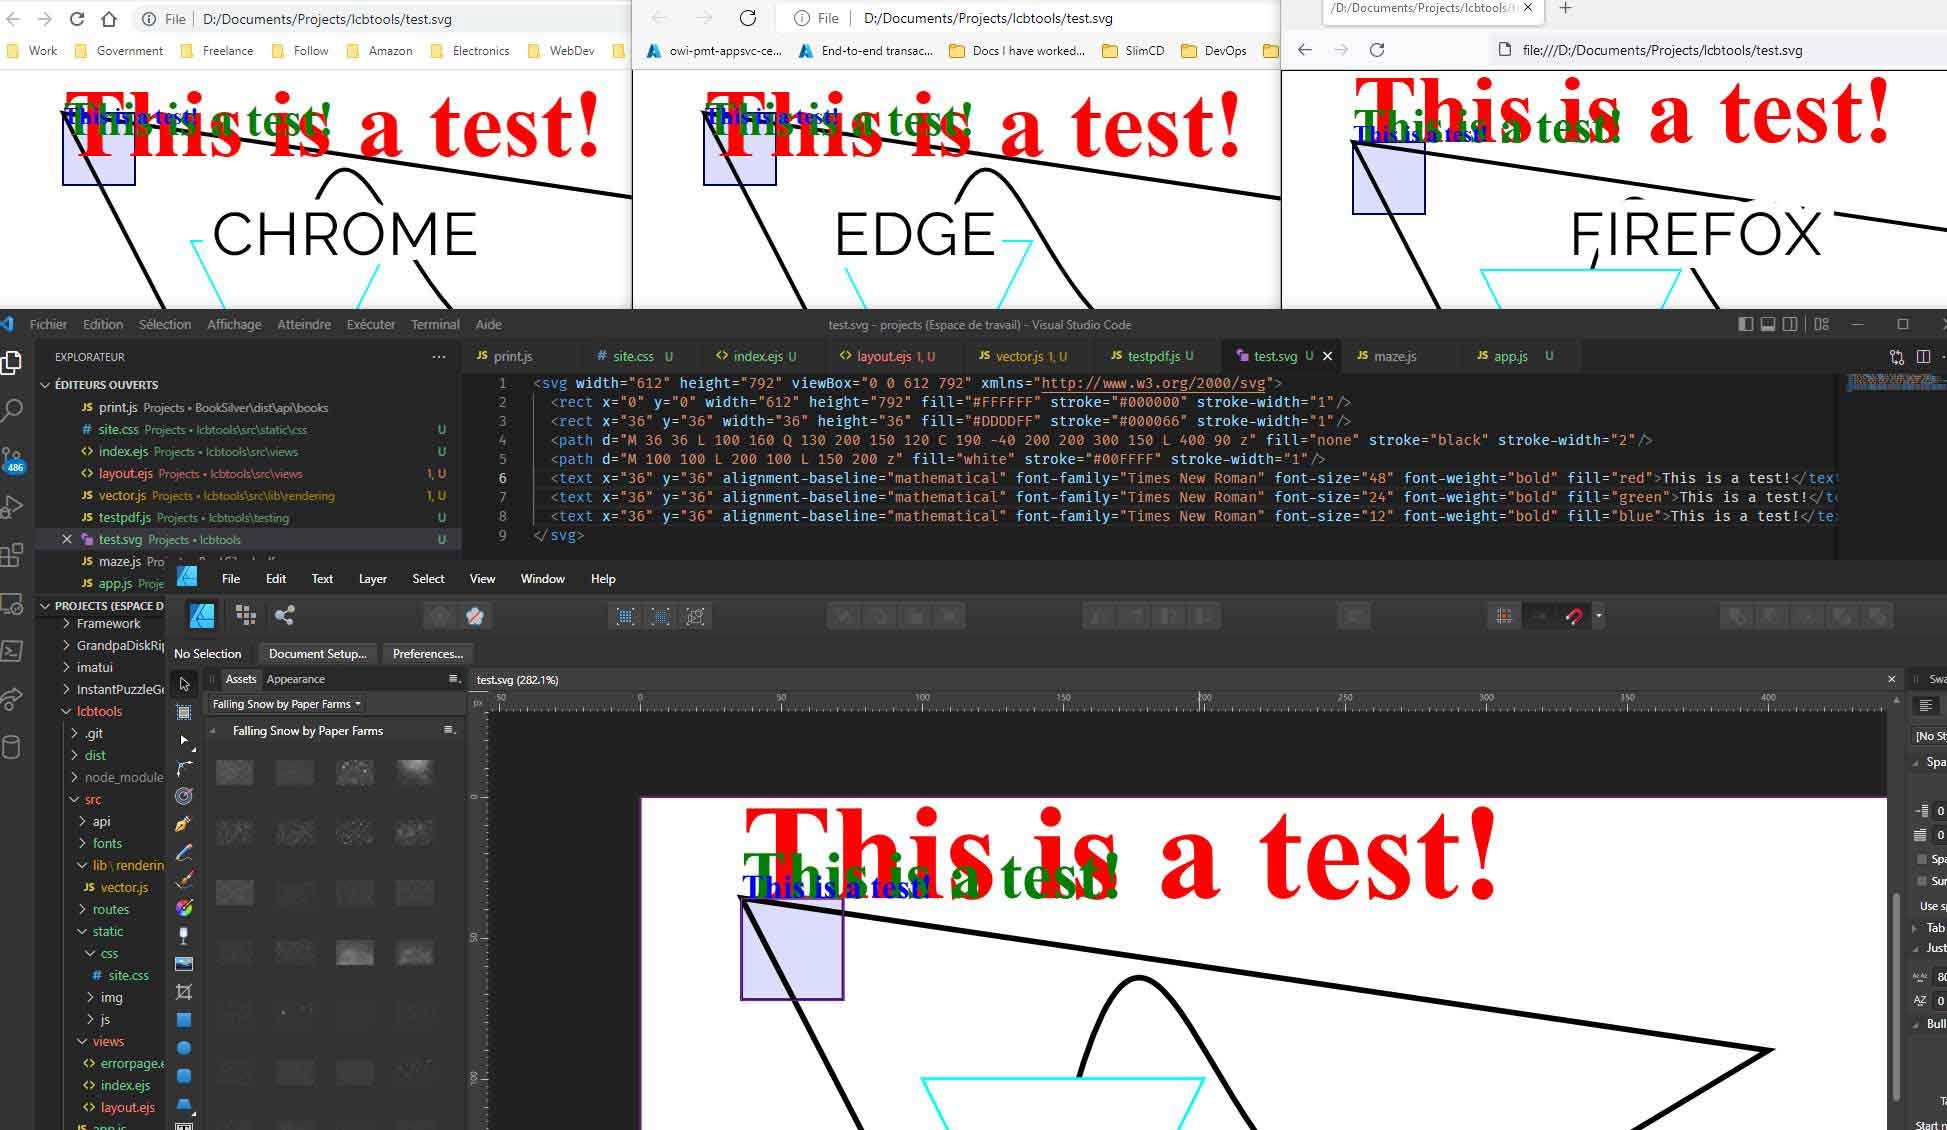
 Are you using the latest release version? YES 1.10.5.1342 Can you reproduce it? YES Does it happen for a new document? If not can you upload a document that shows the problem? Doc included If you cannot provide a sample document then please give an accurate description of the problem for example it should include most of the following: What is your operating system and version (Windows 10, OSX Mojave, iOS 12 etc)? Windows 10.0.1.19043 Is hardware acceleration (in Preferences > Performance) ON or OFF ? (and have you tried the other setting?) tried OFF and ON What happened for you (and what you expected to happen) The importation of text in an SVG does not properly support the alignment-baseline attribute and my text is placed at the wrong Y coordinate Provide a recipe for creating the problem (step-by-step what you did). The SVG that I have placed at the bottom of this message does not import correctly into Photo, Publisher or Designer. The Y coordinate is in the wrong place Screenshots (very handy) or a screen capture/video. Attached SVG Source code: <svg width="612" height="792" viewBox="0 0 612 792" xmlns="http://www.w3.org/2000/svg"> <rect x="0" y="0" width="612" height="792" fill="#FFFFFF" stroke="#000000" stroke-width="1"/> <rect x="36" y="36" width="36" height="36" fill="#DDDDFF" stroke="#000066" stroke-width="1"/> <path d="M 36 36 L 100 160 Q 130 200 150 120 C 190 -40 200 200 300 150 L 400 90 z" fill="none" stroke="black" stroke-width="2"/> <path d="M 100 100 L 200 100 L 150 200 z" fill="white" stroke="#00FFFF" stroke-width="1"/> <text x="36" y="36" alignment-baseline="hanging" font-family="Times New Roman" font-size="48" font-weight="bold" fill="red">This is a test!</text> <text x="36" y="36" alignment-baseline="hanging" font-family="Times New Roman" font-size="24" font-weight="bold" fill="green">This is a test!</text> <text x="36" y="36" alignment-baseline="hanging" font-family="Times New Roman" font-size="12" font-weight="bold" fill="blue">This is a test!</text> </svg> I have tested all of the alignment-baseline values and found several where your apps do not follow the rules. I am including several images that show the SVG in Chrome, Edge and Firefox as well as in Designer. (To test the different values change the value of alignment-baseline="hanging" to the each entry in the list of failing options at the end of this message) I will add that Firefox also seems to import these incorrectly. I have also tested these SVGs in Photo and Publisher and I assume you have the same import code for all three since they do the same things. Here is the link that describes how alignment-baseline is supposed to work https://developer.mozilla.org/en-US/docs/Web/SVG/Attribute/alignment-baseline List of values that are failing: mathematical hanging central text-before-edge middle baseline There may be others that depend on parent relationships, but this SVG does not dive that deep. Mike Collins CENTRAL HANGING MATHEMATICAL MIDDLE TEXT-BEFORE-EDGE
-
 Hi, I have a MacBook M1 Pro with Mac OS Monterrey. I have raw images from my Canon 80D in my Image/ Photo Library/ and in an album. From Affinity photo, I go to File/Open and select my raw image. But then it opens ir in Photo persona, not in develop persona, it created/imported an RGB .jpg image instead of using the raw I opened. In the pictures, you can see the raw images and in Affinity you can see the automaticaly converted jpg file. What is going on here how can I fix it? Thank you.
-
 When I attempt to import an MS Word *.docx file in Affinity Publisher, using File -> Open -> Open, I get the errors "Failed to open file" and "This file type not supported". This contradicts the info in Publisher Help which states: Importing Microsoft Word documents Microsoft Word documents saved in DOCX file format can be imported into Publisher. So what's happening here, and how can I successfully import my *.docx file? The file in question is an entire ebook of around 60 pages, so it's important I be able to transfer it to Publisher efficiently. Thanks.
 -
 Hey guys, I found this weird problem, while importing 32bit .tif files. Photoshop and Windows can preview them normally, but Affinity is adding white boarders around the white areas. Hope to get help here... Any idea what I am doing wrong? Thank you Jonny
-
 Hi, some years ago, I made already a video to this topic. Meanwhile the former method doesn't work with the updates/upgrades. But there is another method. 😊 And in this video, I show this. Ciao Jack
-
- 1
-

-
- affinity photo
- tutorial
- (and 5 more)
-
 Greetings, I have come simply to ask these two questions regarding the Windows 10 system. 1. Is it by any chance possible to disable floating windows? Trying to move them in the order that suits one better is starting to get quite difficult when the windows pop out non-stop. And if it isn't a possibility, please add it to the system. 2. I have heard of mac/ipad capabilities to import/export document setup, I use Designer most of the time where I create a bunch of new presets but once I come over to Photo I realise that they aren't saved over there as well. Any way to transfer them over on Windows?
 -
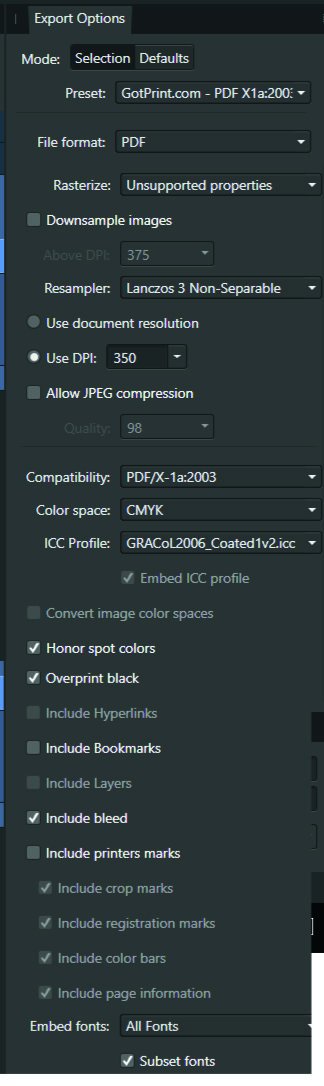
 Hi, The title is my problem. Here's how it's working. Example I make a CMYK document, and set the color of a black box to 30, 30, 30, 100. The color picker detects that exact color. I'll export the above into a PDF as PDF/X-1a:2003 or X4, and the included export setting image. Then when I import that PDF into Affinity Designer, the color picker detects different values... The box is now 79, 76, 70, 95. This same thing happens with every color. A 100, 0, 0, 0 cyan will be 72, 12, 0, 0, and so on. When exporting the same elements into a jpg, this problem doesn't happen. See for yourself in the afdesign file here. Question What can I do to get the exact values I set when printing via PDF, so I can still allow non rasterized elements to scale without losing quality?? I read around, and even InDesign seems to have this same problem... Maybe Affinity Designer is ignoring the embedded ICC profile of the imported image??... I just don't want $1,000 worth of prints to turn out bad over something so small. Thanks! problems with color values.afdesign
-
 Hi, I would love to be able to import blocks from CAD files (DWG/ DXF/ 3dm) as symbols. That way, I could severely reduce the file size and it would be a huge workflow improvement over Adobe Illustrator, because Illustrator is not capable of importing blocks as symbols either.
 -
 I imported an CS5 .idml document and *essentially* everything was perfect except there are some light gray boxes that appeared behind the text boxes that I can't seem to find to get rid of. Anyone else experienced this?
 -
 Two things. 1) On a MAC where the image has a black background, this terminal command I find works (in the directory where the JPG files are located) to convert them from JPG to PNG with a transparent background: for i in *.jpg; do convert -transparent black "$i" "${i%.*}.png"; done *(use at your own risk) which brings me to my next point. I now have 99 formerly JPG, PNG images with transparent backgrounds that I would like to import into their own category as Intensity Brushes. Is there any convenient way to do this by bulk import or is my only option one at a time? Selecting more than one assumes I want them all as the same intensity brush, which isn't what I'm after.
 -
 Hi everybody, I've searched for a similar question but I haven't found it. It's even difficult to express the topic exactly in a title. I hope I did nothing wrong and that I'll make myself clear as this is not my language. I'm painting some boards in Affinity Photo. I have to make 31 and I have to put 90 different labels on each for a total of 2790 different labels. Data merge feature in Publisher will help me populate the labels quickly. The problem is that I can't find a way to import them in Photo (and I'm not that much into Publisher yet). Actually I have found several ways but not the practical one I'm looking for, since Publisher cannot export pages separately in Affinity format, while importing an .afpub into Photo won't give you the chance to separate pages as you can do with PDFs. I came up with this: Dragging/placing the .afpub file in Photo document will show only one page. To have all the 90 labels displayed I should duplicate the layer 89 times and select the right page for each. Too long to repeat 2790 times. Copying/pasting every page in a new group in Photo would be at last as long as the previous method. Exporting every page in a raster format would prevent any further edit. It's not that I really need it, but if I'd need I should go back to Publisher and export/import again. Also I'd prefer to deal with text and shapes until the end. A more viable approach would be to export every single page in PSD format, but having to rely on an external file type instead of the proprietary one sounds cumbersome to me. Also there could be inconsistencies too. Any ideas on how to import quickly all Publisher document's pages into Photo as individual embedded documents or groups?
 -
Alert: Experienced worker - but AP newbie : ) AP 1.10.1 / Windows 10 /64 I want to use AP to edit multi-layer exr exports from a 3D CGI software. The EXR files typically contain up to 15 layers of information. Each of those layers contain full RGB data. I've attached a test file for your experimentation. + When AP imports these files it: Treats the first layer as an RGB layer = 'Layer one (pixel)' Treats all the other layers as though they were individual colour channels, rather than composite RGB layers..., ie: Layer two [blue] (Pixel) Layer two [green] (Pixel) Layer two [red] (Pixel) So I end up with 43 layers, rather than 15... Am I missing some preference or other setting here? EDIT: The file was generated by Maxon Cinema 4D version R21. The renderer in use was 'Redshift', but the file saving mechanism is through C4D itself using the 'Multi-pass' rendering option. ---------- What should happen: AP needs to interpret these files correctly - importing them with RGB layers - not individual greyscale channels. ---------- This is more than a little disappointing as I purchased AP specifically to work on these types of files. The help manual claims that it can. Rs_test_scene_210826_main_MP_.exr
-
 Alert: Experienced worker - but AP newbie : ) I want to use AP to edit multi-layer exr exports from a 3D CGI software. The EXR files typically contain up to 15 layers of information. Each of those layers contain full RGB data. When AP imports these files it: Treats the first layer as an RGB layer = 'Layer one (pixel)' Treats all the other layers as though they were individual colour channels, rather than composite RGB layers..., ie: Layer two [blue] (Pixel) Layer two [green] (Pixel) Layer two [red] (Pixel) So I end up with 43 layers, rather than 15... Two questions: 1. Is there a way for AP to interpret all these layers as RGB composite layers on import / open ? or, if not: 2. What is the most efficient way to take: Layer two [blue] (Pixel) Layer two [green] (Pixel) Layer two [red] (Pixel) and make it into: Layer two (Pixel) - ie, a full composite RGB layer. Thanks for any help.
 -
Download the SVG version of the shapes on this web page and open in Affinity Designer. The colours are consistently different from the ones that appear on the web page.
-
 I finally worked out how to achieve importing clip art as assets in Affinity Publisher. First of all, create folders on your computer to store the clip art files you wish to include in your assets. Each folder should be a different category. Then copy across the clip art files into each of the folders according to their categories. When you have amassed the files you wish to include, you are ready to fire up Affinity Publisher. When affinity Publisher has loaded, simply start a new blank document. Then, using the Assets panel, use the menu to Create a new Category and rename the category to one of your collection category’s names. You may also wish to use subcategories for related collections. For example, if you have an anatomy category you may wish to have subcategories of organs, eyes, ears, limbs … etc. When you have created and renamed your categories and subcategories according to your own taste and requirements you are ready to start the import process. Make a category active by selecting it from the assets panel. Then use the place image tool to import the images you wish to use for assets from the folders you have set up. You may multiply select the files from within to folder using the shift key in windows to select a range of files. When you have selected them, click on the open gadget/button and Affinity Publisher will attempt to import the files. When it has done so you will see the place tool panel with your images ready to import. Now the slow bit, repeatedly simply click on the blank document to place the images one by one on top of each other. They will appear stacked upon the page. Now select them all in your document using CTRL-A. Then go to the category panel and use the menu item Add from Selection. Affinity Publisher will import them all into the category automatically. You may then delete all the items which are stacked on the document page. Repeat until you have imported all your images. You may wish to export your assets files for backup purposes or importing them into other Affinity apps. If someone wishes to convert this into an official tutorial for users then be my guest.
 -
 Is there a way to import a lot of text (in my case, from an open source book on Google Gutenberg) into a new Publisher Document? I understand how one can create a text frame and place text into it. But is there a way to have Publisher automatically create new pages with linked text frames so that I don't have to this manually? Thanks. -KUrt
 -
The place tool is very powerful for importing multiple images into a document, they can be placed one after the other in the document. This can be good for importing images which can then be added to the asset libraries. It would be very useful if we could have an option to place multiple compatible images directly into the asset library for the purpose of building our own libraries for personal use. Maybe an import images to directly to an asset library option could be included. Then we would have a reserve graphics library similar to the ones that were available in Pageplus.
-
 Is it possible to open/import Mac files using the windows Photo app?
 -
 Hello! I cannot export a project correctly as eps. I have a shape in which another shape has been subtracted. This "final" shape has a gradient. After the export, the EPS looks good in "Mac Preview". However, when I import the eps into Publisher, the subtracted form is missing (see attachments). Without a gradient, it works without any problems. Unfortunately not with a gradient. Is this a general problem or have I set something wrong? I am also not sure whether it is an export or an import problem. Here are two sample images that illustrate the problem ...
-
 I can't import in Designer SVG made in Blender. The only way is importing those SVG to Inkscape and then import to Designer. monkeys-unsupported.svg
 -
 Hi! Isnt it possible to give a placed PDF-file a border and/or a background in Publisher 1.9.2.1024? I have to do a workaround by droping a (white) rectangle behind the placed PDF. But this is very timeconsuming and not handy. Choosing a border and a backgroundcolor on the marked PDF-box is not working. Nothing is happen. Thanks for any hints. Martin
 -
I found a bug after crating a document with some characters of the font "Winding" in a new document. After exporting the publisher file to pdf and reimport this PDF File in Publisher the characters of the Windings font are not visible. the characters of Windings are often used as Textboxes in formulars to choose an option. The behavior is reproduceable. Regards erdi12