Search the Community
Showing results for tags 'image brush'.
Found 9 results
-
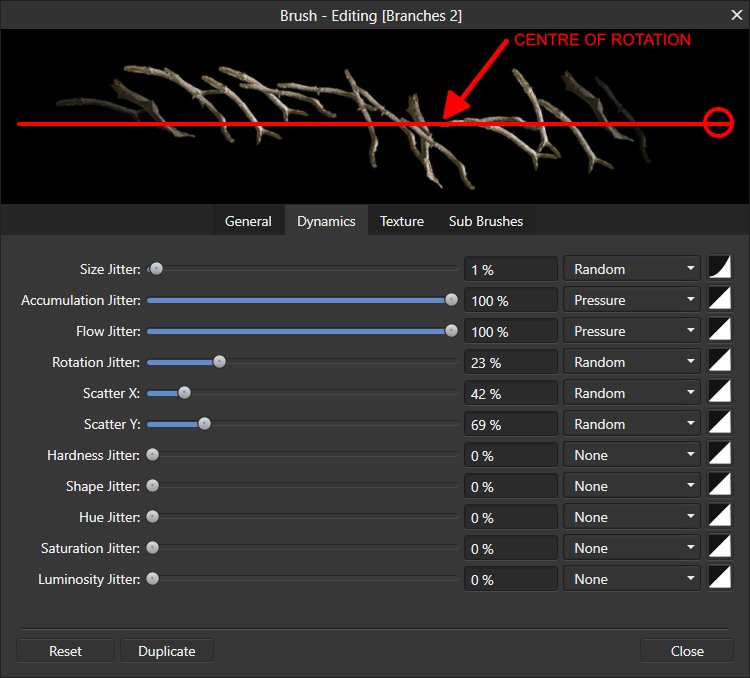
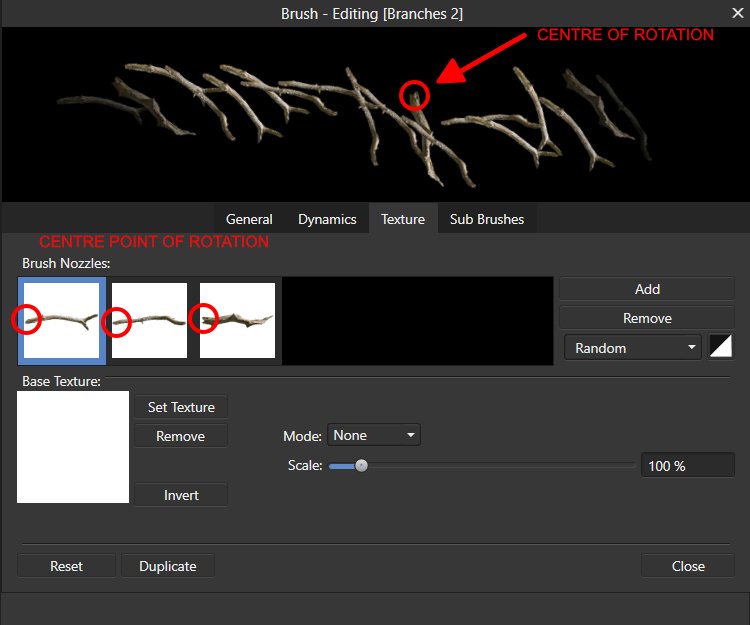
 Hi, I would like to make a suggestion for the 'New Image Brush from Selection' option in the 'Brushes' Panel I have created a few 'Tree Branch' brushes, but when I paint with them, although I can rotate them on the 'General' tab of the 'Brush Editing' box, what I would like to do is to be able to move the Object Centre of Rotation before I create the brush so that when it paints, it paints the image object(s) from this cente point out (ie the branch image object has its centre point at the branch end - at its widest point - so that when it paints, the branch image(s) fan out from this point and look more natural, rather than having its centre of rotation at the centre of the object. Or even better, to be able to adjust the centre of rotation of each image or image(s) at any time in the 'Brushes Editing' box. I hope this makes sense. I hope too that I have posted it in the correct forum - and apologise (again) if I haven't...
-
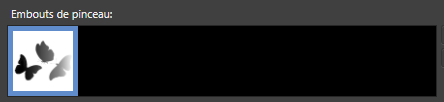
 Hello, I did a dispersal effect with butterflies and it worked (lucky guess). I wanted to do the same with triangular figures made by myself, then exported on PNG files before being integrated as a picture brush. This time it doesn't work like with butterflies : I have a transparent square around my brush that prevents me from making the dispersion effect on the white mask (no problem for the black mask). I notice when I compare the butterfly's brush and the triangles' one a difference in "brush tip", the image is not displayed in the same way, yet I don't know how I did the first time to get my butterfly brush correctly. Do you know how to correctly set up the "brush tip" to make the transparency square of the brush disappear ? Pictures : Menu with the brush tip that causes the square of transparency : "Brush tip" image of the butterfly (without the transparency square). A test image to show you the difference between the butterfly brush and the triangle brush when I do the dispersion effect on two squares of different colours :
-
 In this video, We are going to show you, how to create and import custom brush in Affinity Designer. You have to create some shape as well as you want, After creating your shape, Select all layer and export in PNG format as 'Selection without Background' and then import PNG image in brush menu as 'New Textured Image Brush'. I think this video tutorial will help you create a new custom brush in Affinity Designer. Thanks for Watching.
-
- 2
-

-
- create custom brush
- image brush
- (and 3 more)
-
 I'm new to Affinity Designer and trying to create custom image brushes. The process seems very straightforward, but I can't seem to get it to work properly for my brushes. In my screen shot, I've illustrated the pattern I'm trying to make into an image brush. From what I've read and seen in video tutorials, the process is to make a black background with the area to be the actual brush white. I saved my image as a .PNG file. Done. Now, when I create the image brush everything appears to have imported properly. I sliced up the image to make the center repeat. That appears fine, as well. The problem I'm running into and can't resolve is how the brush always draws a black background and the white area will not change to a color no matter which color I select. I'm at a total loss as to what to do to correct this problem. I've tried removing the black background and making the brush white with a transparent background. That produces a brush that only paints in white. I'm sure there is something simple I'm missing, but I can't pinpoint exactly what it is.
-
 In this short tutorial of a user request, I'll show you how to create an incision/ cut info graphic in Affinity Designer 1.6.1 and how to use it in Affinity Photo 1.6.7 as an image brush or as a vector graphic with the place function. Keep on drawin' Norbert
-
 I'm trying to create a color pattern image brush that would have a transparent background, so I save as a png without the background. When I create the image brush and select the image, the color has shifted. Really apparent in the blue/teal color. Why?
-
In this tutorial I would like to show you how to create a simple bicycle chain image brush with Affinity Designer. Even if the audio is in German I hope you can follow my way visually. Link to the tutorial Affinity Designer - Bicycle chain image brush [GERMAN] Keep on drawin' Norbert
- 3 replies
-
- 4
-
-
- image brush
- bicycle
- (and 1 more)
-
 Hi, Does anybody know how to make a non-repeating image brush? By this I mean, if I make an image brush with say 50 items as indivdual images (for example 50 different numbers), when I use the brush I am trying to get the images (or numbers in this case) to be placed either one image after the other in order or randomly placed, but I don't want any images (numbers) to be repeated when I place less than 50 images in one stroke of the brush. All images must only be placed once per stroke of the brush. Does anybody know if this is possible? Regards, Paul
-
Hi there, I'm having some problems with self created image brushes in AD Beta 1.2.1.25410. Creating a new image brush and using it works as expected. Then I save and close the design file and close Affinity Designer Beta. After reopening Affinity Designer Beta the brush + is still available in the brushes tab + all properties of the brush are correct -- except for the image preview which is missing (no changes were made to the image - it is still in the initial folder) Now opening the design file + the brush curve is still present -- but no image is shown along the brush curve Am I missing something? Do I have to save the image in a special folder? Please see attached design file. Kind Regards jah RoadBrush.afdesign