Search the Community
Showing results for tags 'groups'.
-
 I want to be able to clip an adjustment layer to another, so I can localise the effect. A typical example is clipping a HSL layer to Curves for dodging and burning. However, this doesn't look like it's possible in the typical way you would in Photoshop. Can AP2 do this as other apps can, and if not, how can it be achieved here? I want to be able to clip an adjustment layer to another, so I can localise the effect. A typical example is clipping a HSL layer to Curves for dodging and burning. However, this doesn't look like it's possible. Can AP2 do this as other apps can, and if not, how can it be achieved here? Also, I have a perhaps related problem. All of a sudden, adjustment layers within a group won't activate regardless of visibility. The only exception is if there is a filled layer underneath. See the video for a better showcase. group-layer-error.mp4
 -
 In AD sometimes when I read Layer it seems to refer to an object, other times a container in which to place multiple objects much like a group. Can you explain the difference between vector layers and groups as containers? Why would I use one instead of the other? Does one have certain properties and/or affects on the objects in them that the other doesn't? Any pros and cons? From reading the help I don't see really a difference. I appreciate it.
 -
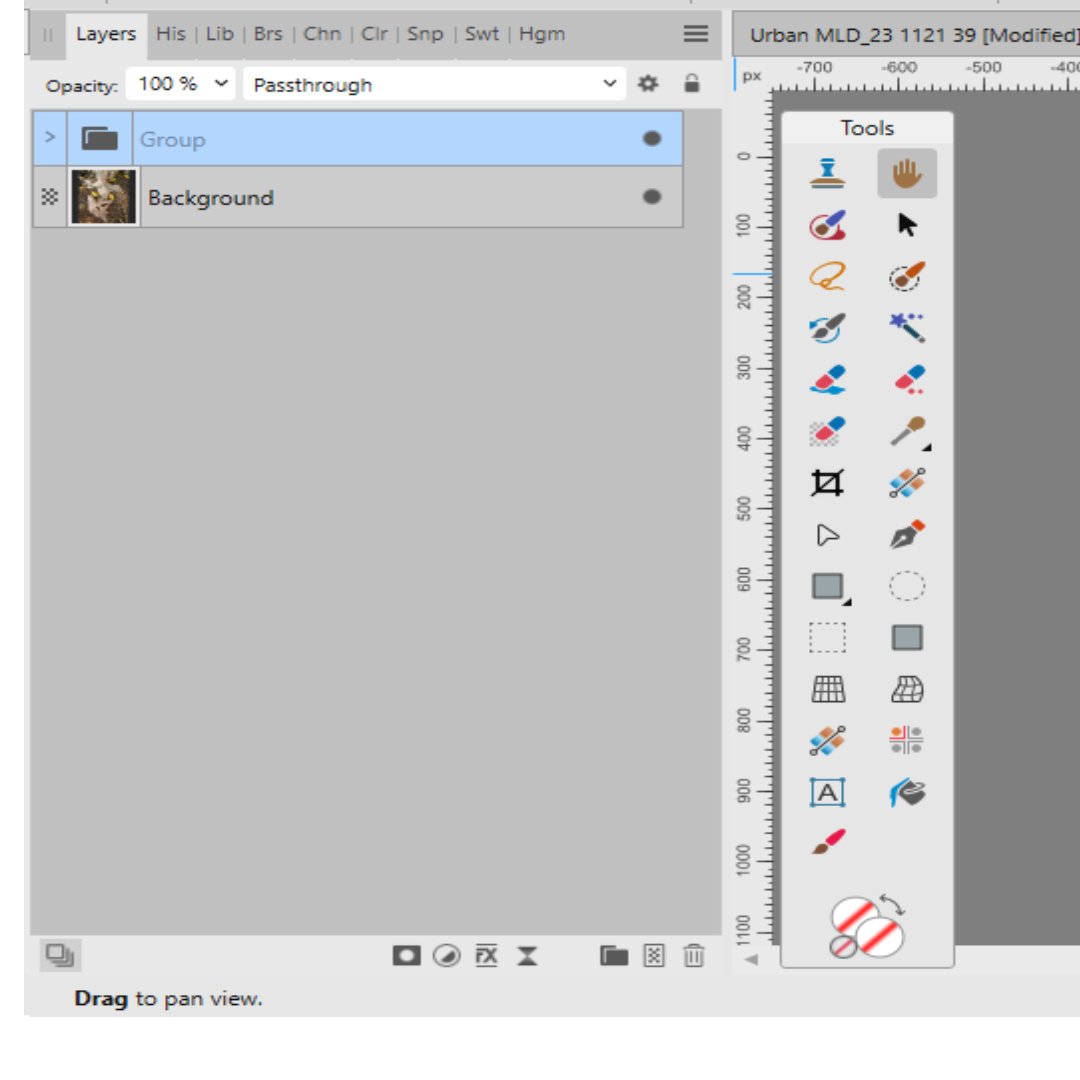
ANSWERED THANK YOU 😀 My turn for the dumb question , even if I say there are no dumb questions ; just something we don't know or understand . When making a group (Ctrl + G) I get a standard group icon as per screen shot . However I have seen videos where it's possible to have image of something inside the group . How it that possible please? Group in a macro : One thing I have learnt is how use a group into a macro . Lets say we want a group of adjustment layers in a macro >> open an adjustment layer or even an empty layer >make a group (Ctrl + G) and that adjustment layer will be in the group> continue to add the required adjustment layers one at a time , or masks into the group . You can make adjustments at the time or later or delete the mistakes. You can also move the layers inside the group with Ctrl + [ or ] . Note : you need to have "add adjustment based on selection" active >>assistant settings >third from bottom Back to my problem --- HELP!!

-
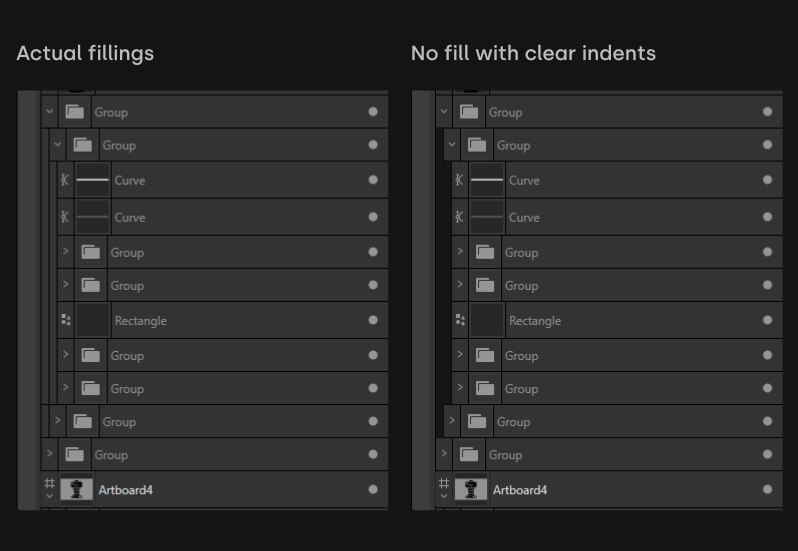
 Maybe i'm missing something but what's the reasoning for these fillings? It makes the whole panel seem more cluttered and adds cognitive load.
-
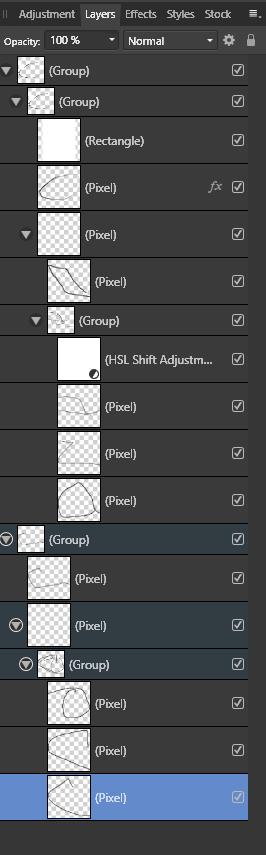
 Recently updated to Affinity Designer 2 and I love it except for one thing. It's very difficult to identify groups now and groups within groups now (which I have a lot of). This was so clear in Affinity Design 1. Could groups not be made bolder making them easier to identify? Have pasted 2 images to show the difference between the two.
-
 Usually, I work with multiple layers: one is a trace-over background and then I have a group with design layers (line-work, fills and some other miscellaneous pixel layers). Something like this: I would like to have a 4th option in the Flood fill tool, which is: below, only within current layer/ group. This ensures that my trace-over layer will be discarded when filling, because it is outside of the design layer that I work in.
-
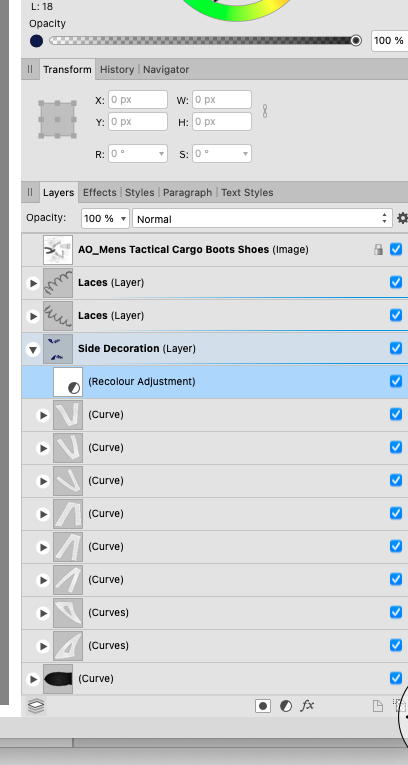
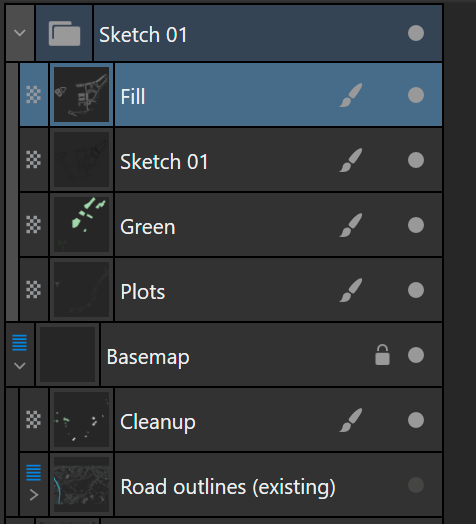
Not sure if this is a bug or intentional design, but groups no longer show thumbnails. Example screenshot to demonstrate why this might not be a helpful change. The new visibility marks are also unintuitive.
-
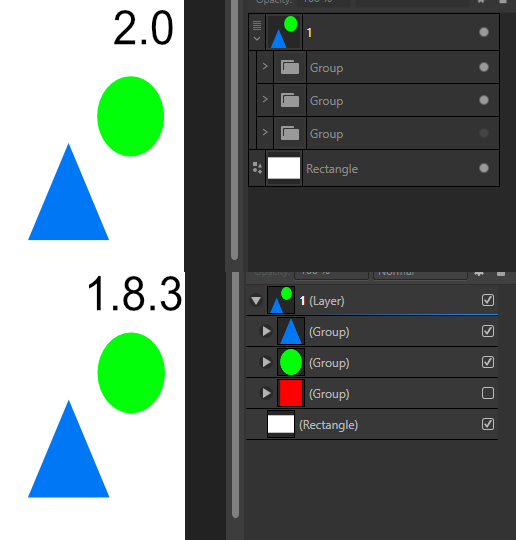
 Greetings! I'm here to propose the addition of an Affinity version of the Illustrator option called "Knockout Group" that prevents elements in a group from showing through each other, so that, even if two circles are transparent, if I put one at the top of the other, the one at the top will be at the top hiding what's beneath, like this: Even though both circles are transparent, the green is still at the top and doesn't show the purple line that should be beneath. With that option I can achieve this! The clock at the top is not showing what's beneath, instead, it's showing the background (which is transparent but this image shows a white color). Thanks! If there's an option like this already, please tell me! I've been searching this with no luck, so I guessed that it's not actually on Affinity Designer!
-
It's hard to split this one up into several topics, because it all has to do with one and the same thing: layers. I have been going back and forth between Photo and Designer today for a complex file only because I am missing a couple of features in various parts of the software. These features can be are either available in Photo or Designer and not in the other. The same is true for their various personas or between personas in Publisher. I would argue that these basic layer manipulation and organisation features should be available in all of the personas and apps. That way, information is always displayed consistently in the layers panel, regardless of switching personas or programs. To be more specific, I cannot promote groups to layers in Affinity Photo, neither can I add symbols in Photo. In Designer, I cannot create linked layers. In Designer, if I go to the Photo persona, linked layers remain unavailable. In Publisher, I don't have symbols unless I go to the Designer persona. Linked layers are unavailable. For instance, the workflow with symbols in Photo becomes quite strange (same is true for Publisher when switching from the Designer to the Photo persona), because the Linked layer properties appear/ disappear between the two. Leading to different ways of interpenetrating the layer information. 2022-10-24 13-58-05.mp4 For instance, I could unlink the vector shape and it would still remain linked in Designer. Back in Photo, it shows as unlinked, but it is linked again. Though I presume this is a bug, reported here: 2022-10-24 14-03-41.mp4 I do however presume that there is much more prone to breaking the same way as this. Just because the implementation differs between one program and the other for no apparent reason. Anyways, I really think that if I switch programs for the sake of accessing features in one program that's not available in the other, I should at least be able to see my information displayed in the layers panel and the studios (linked layers and symbols) so I can opt to proceed working with them as I would in the other program I switched from. Symbols, linked layers and promoting groups to layers are all such general concepts that they can easily be used throughout the entire suite. Why shouldn't Publisher have symbols in the Publisher persona? Please evaluate these inconsistencies. It should, hopefully also help in having a cleaner and more robust code for the entire suite.
-
For the city size files I am often working with, I notice a very heavy performance hit when I drag-move objects to a particular layer. Designer freezes, when I move just a ~50th of the objects to a layer. On the other hand, if I group all objects and promote the group to a layer, this happens instantaneously. This is on 10.5.1342 Here's a video, which shows that moving objects outside a layer (with a hotkey) is pretty fast. Moving objects into a layer (I purposely chose a small amount so that it wouldn't freeze up) is just as fast as grouping all objects. It's a bit hard to tell, since I can't show when I pressed a button though. 2022-07-05 08-09-55.mp4 I really need to move lots of objects over to other layers, so if that causes Designer to freeze (didn't let it run for longer than 5 minutes), whereas grouping > promote to group is just 10s, then there's some performance to be gained. Even if it's just grouping objects in the background > move the group to the layer I am dragging the objects to > ungroup.
-
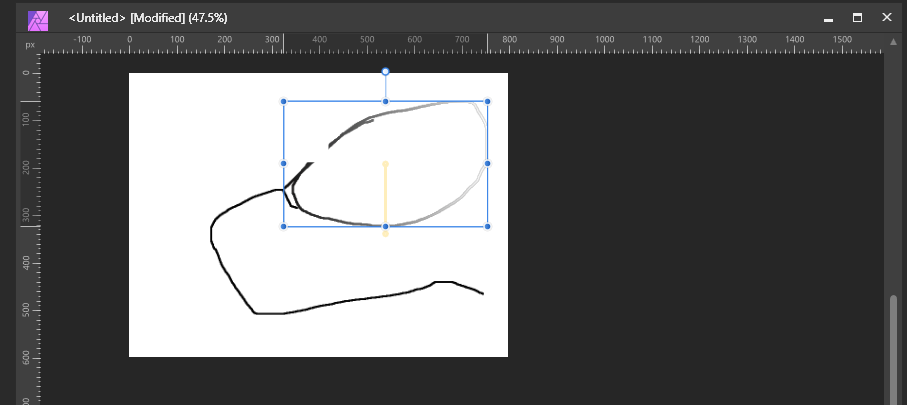
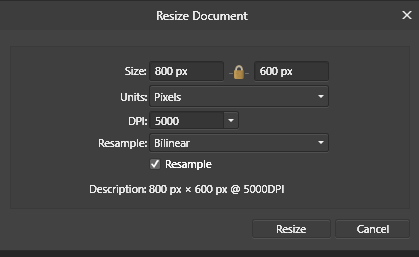
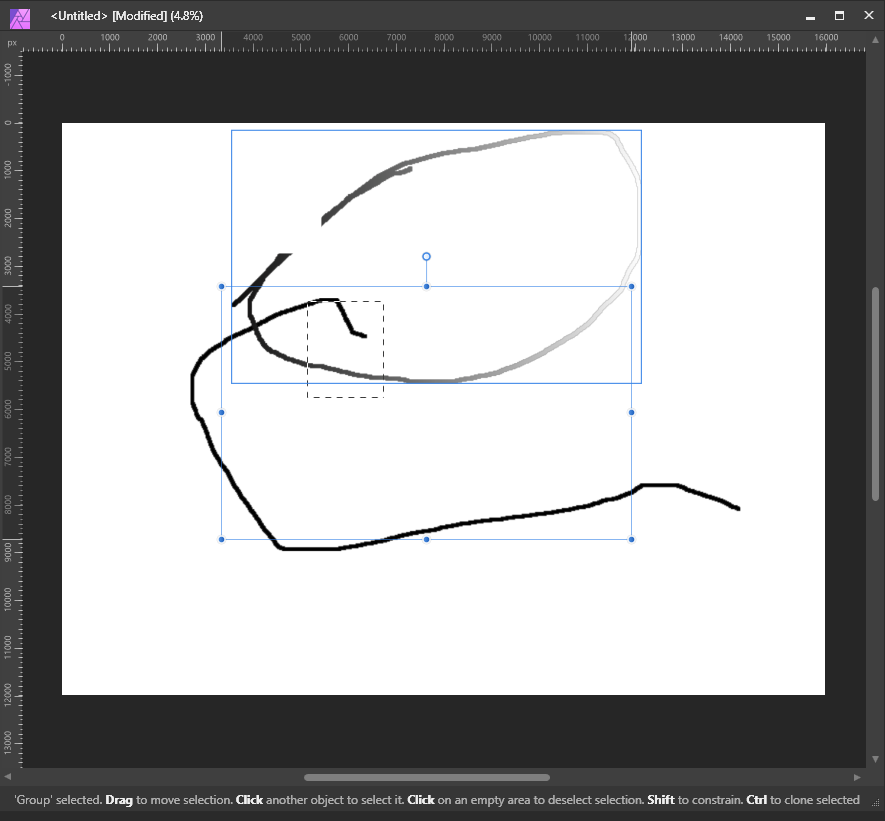
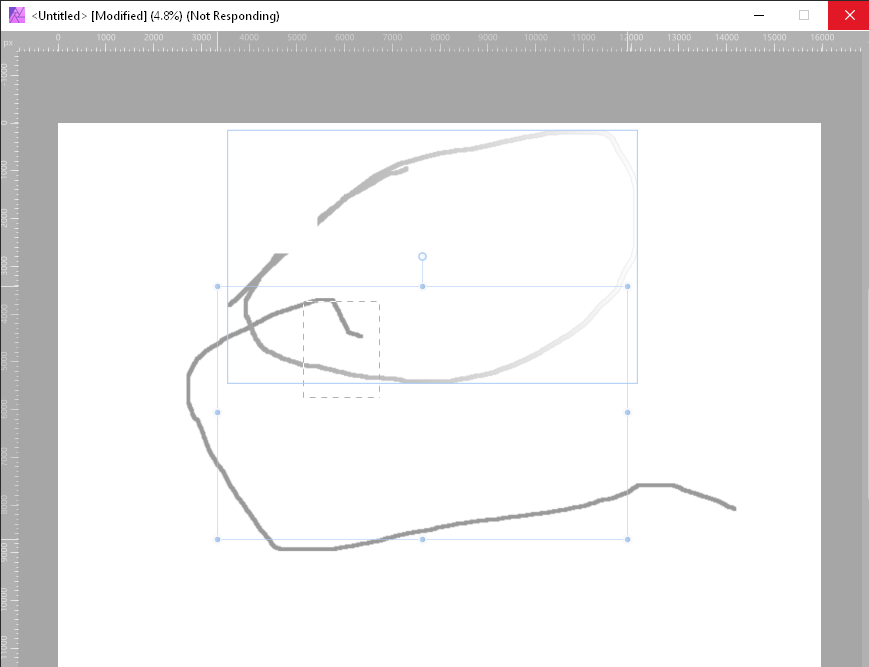
 Description: When moving complex layer objects (groups, children and added FX/Adjustments) Affinity Photo will regularly softlock. Details: Repro: Create new document: Create a complex layer group (nested groups, children, fx and adjustments) Select a group and hold shift to move it: Notice: this works fine Now change the size of the image (use more memory) Move the layers around some more - this might not soft lock, if it doesn't, increase the document further (10000 dpi) Keep moving individual layers and groups around When I made a selection and then moved a group, the application soft locked.
-
 So I had this multi-hour, intricate project with dozens of images, shapes, nested groups, and an embedded designer file. I had double tapped it to open it and make a few tweaks. I then left things as they were, with the embedded document still open, as I had to switch tasks and work in different apps entirely, which caused AP to be dumped out of ram. Upon launching AP again I noticed that the thumbnail of my project was replaced by one of the embedded designer file. When I tried to open it, AP returned an error message that said « loading failed. Unable to load document. » I have tried relaunching AP, rebooting the iPad. No effect: the document still won’t load. So I guess the file is permanently corrupted. Next, I experimented a bit. I have tried duplicating the document. Nothing happened. Trying to save it caused AP to just instantly crash. Renaming did work, but I still wasn’t able to save or duplicate the renamed document. I also created a new document that contained the same embed and a couple of dozen pictures to very roughly mimic the original project and tried to reproduce the bug. I managed to get AP dumped out of ram while the embedded document was open, but after relaunching AP, the thumbnail was the one of the project, and there was no corruption. Finally I stashed the embedded designer document in a nested group and tried again. Upon relaunch I was greeted with a thumbnail of the embedded document instead of one of the whole project. The document was corrupted: unloadable, unsavable, etc…
 -
One workflow improvement is direct node selection with the Node tool. Currently, you need to hold down Ctrl to do this, or have the object selected. However, holding down Ctrl is redundant in this case, because you already switched between the Node and Move tool. This is the way it works in Illustrator: holding Ctrl toggles the Node tool to become the Move tool. In Designer, both the Move tool and Node tool gain access to Node selection while holding Ctrl and have object selection enabled by default. By differentiating between the move and node tool, the node tool would get immediate access to node level editing, which is what the name of the tool suggests. Node tool select across groups.mp4
-
Contour tool does not work with groups properly. - dragging on the group won't be reflected on the number on context toolbar. - changing the number(slider) on the context toolbar does not work(can not slide the slider)
-
 The expanded/collapsed state of a layer/group should save. It's annoying to expand many nested layers when reopening a file, especially when the layer is a mask:
 -
 Sometimes it's useful to be able to apply a certain change to or involving a number of layers that for visual layering reasons one doesn't want to put in the same group (to tie this in with an earlier suggestion of mine, this can be important for snapping); symbols could theoretically do a lot of this, but they're kind of messy and inelegant to work with, especially for certain applications. What I am suggesting is to add another tab similar to the one used for layers, symbols, etc., this one being a list of special "groups" that unlike normal groups do not act as a layer (/influence the layering order) or appear as such in the layers menu. When one clicks on such a grouping's symbol in the tab, it is selected and the tab shows options for "add layer to group from layers menu" and "remove layer from group" (instead of its default option to create a new example of whatever these non-standard groups would be called, or the option when layers have been selected otherwise to create a group from said layers), and while this grouping is selected in this way, while one cannot reorganize any of the shapes involved layer-wise, it limits the context for most operations to just the layers grouped in this way, allowing for easier synchronization of certain effects.
 -
 Double Click #26 of Affinity Photo Powerful Tools. Using double click makes it easier and saves you time. This is an Affinity Photo beginner tutorial and number 26 of the Digitally Fearless Power tools of Affinity Photo playlist. https://youtu.be/chftxH7U7To
-
- 1
-

-
- double-click
- groups
- (and 2 more)
-
 Hello, <deutsch see below> I have constructed a Bavarian flag (diamond flag) in the designer: - many rectangles 30 x 1000 directly to each other, grouping - Copy the group, rotate by -51° - Rotate both groups by +67° - Colorize half of the resulting diamonds in blue, the rest in white or transparent, so that the laser does not perceive it as a shape afterwards. This worked so well. I save this as a future base for Bavarian flags. Now I need a strip 170 mm x 40 mm of it. Rest should disappear or be finally deleted. For this I marked both groups and cut them to size with the cut tool. Here is the first issue: The rest still exists, it's just not visible. How do I delete everything around it completely? Now I want to punch a rectangle in this remaining strip. A font is then to be embedded in this rectangle. The punched rectangle must become transparent again so that the laser does not do anything here. Unfortunately, I fail completely. I can't get the transparent "hole" punched through the many individual blue diamonds. How can I punch out a shape from a large number of individual curve objects that actually affects only a part of the objects? Or did I go about it the wrong way? The important thing is that I can end up exporting an SVG that can only export the blue diamonds and partial diamonds and the font as curve objects. This is the only way I can tell the laser where to laser at all and where "nothing" is. many thanks I can also post partial results as files here. I just didn't know what I needed and didn't want to upload too much here. deutsch: Hallo, ich habe mir eine bayerische Flagge (Rauten Flagge) im Designer konstruiert: - viele Rechtecke 30 x 1000 unmittelbar aneinander, gruppieren - Kopieren der Gruppe, drehen um -51° - Drehen beider Gruppen um +67° - Einfärben der Hälfte aller entstandenen Rauten in blau, Rest in weiß bzw. transparent, damit der Laser das nachher nicht als Form wahrnimmt. Das hat so gut funktioniert. Das speichere ich als zukünftige Basis für bayerische Flaggen. Nun brauche ich davon einen Streifen 170 mm x 40 mm. Rest soll verschwinden bzw. endgültig gelöscht werden. Dazu habe beide Gruppen markiert und mit dem zuschneiden Werkzeug auf Maß gebracht. Hier ist das erste Problem: Der Rest exisitiert immer noch, ist nur nicht sichtbar. Wie lösche ich alles umliegende vollständig? Nun möchte ich in diesen verbleibenden Streifen ein Rechteck stanzen. In dieses Rechteck soll dann eine Schrift eingelassen werden. Das ausgestanzte Rechteck muss dabei wieder transparent werden, damit der Laser hier nichts tut. Daran scheitere ich leider vollständig. Ich bekomme das transparente "loch" nicht durch die vielen einzelnen blauen Rauten gestanzt . Wie kann ich aus einer Vielzahl von einzelnen Kurvenobjekten eine Form ausstanzen, die auch nur einen Teil der Objekte wirklich betrifft? Oder habe ich das Ganze falsch angepackt? Wichtig ist, dass ich am Ende eine SVG exportieren kann, die nur die blauen Rauten und Teilrauten sowie die Schrift als Kurvenobjekte exportieren kann. Nur so kann ich dem Laser vorgeben, wo er überhaupt lasern soll und wo "nichts" ist. herzlichen Dank
 -
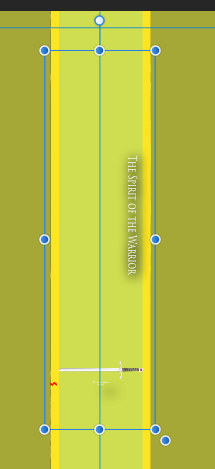
Hello, this bug appeared after the update. I've checked the last couple of forum pages as well as the resolved bugs section and couldn't find any similar topic. So I hope I don't run in any open doors. When I have two different textframes, with which I want to create a group, the font size changes drastically as well as the line spacing. This only happens, if you have two textframes with different fontsizes and then only to the text with the bigger fontsize. So, if you put to textframes in a group with different fontsizes the bigger text will change size. I couldn't reproduce this bug with the artistic text tool. Only with the frame text tool. Cheers from Germany
-
 I have of text objects that I want to group (first screen shot). When I group them, the point size changes (2nd screen shot). Is this a bug?
-
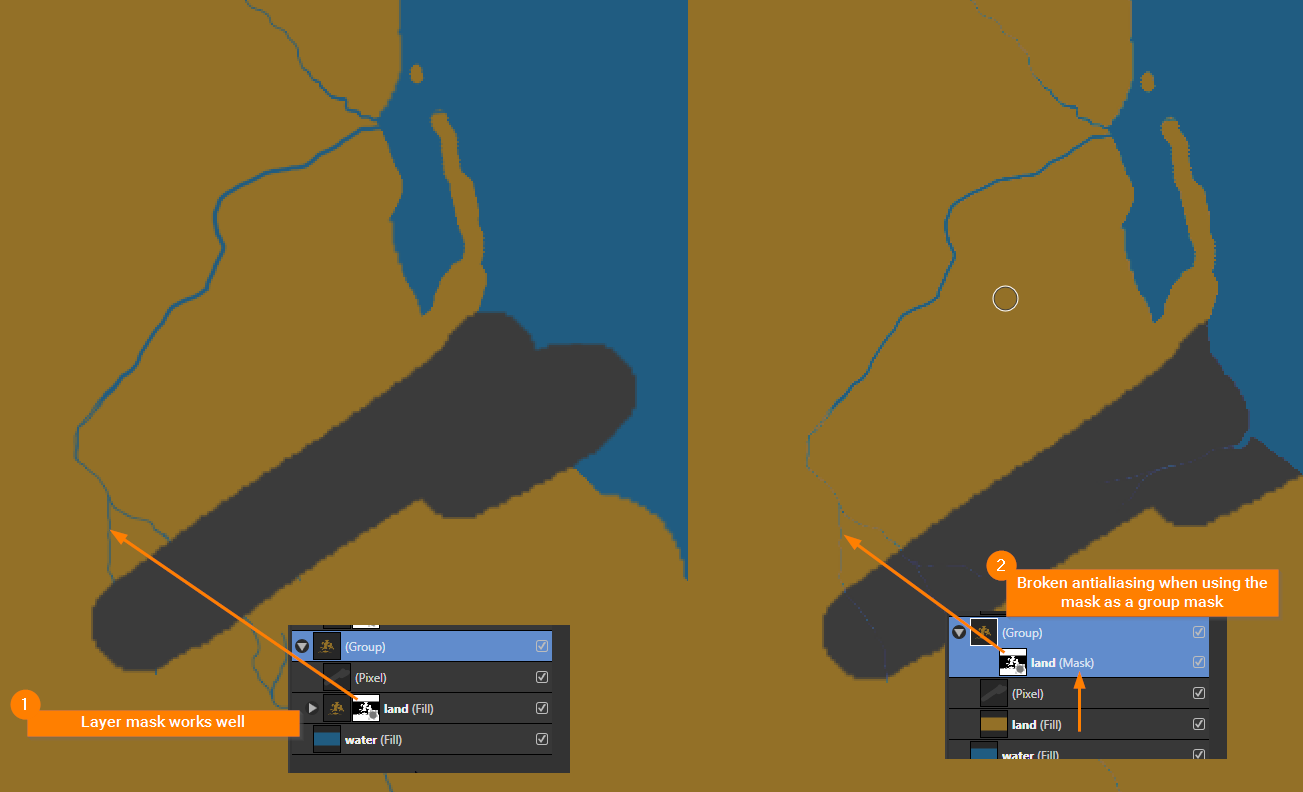
 Issue: The antialiasing of a painted group mask is broken. See my example screenshot below. Bug description: When using the a painted mask in a layer all works fine. Moving the same mask into a group results in destroyed stroke edges (broken antialiasing). Is this a bug or do I something wrong? Screenshot:
-
Adding a mask to a layer/group will multiply the end result's opacity by itself, since the mask inherits the opacity; so a 50% opacity layer/group will look like 25% opacity if a mask is added. In the attached file, the right layer and group are given a mask, and as such they look half as opaque as on the left (because 50% * 50% = 25%). (And the more masks you add, the less opaque it will end up being (so long as the opacity is not 100%), because each of them will inherit the opacity) Alpha Bug.afdesign
-
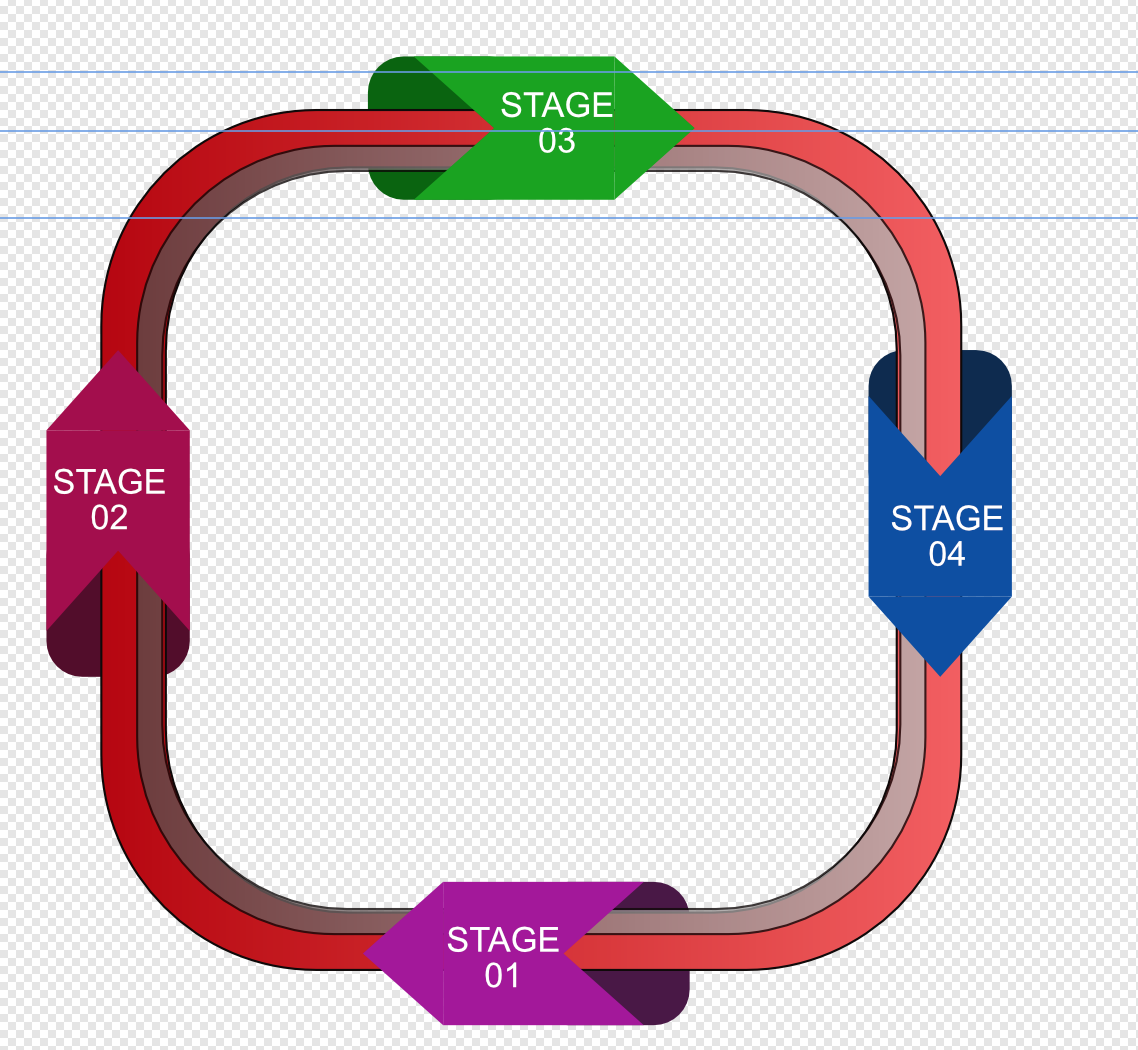
 I'm a fan of using groups to organise layers in Designer. However I've come across a situation where that doesn't work, because it seems that grouped layers have to be contiguous. I have a diagram where I need to show one layer behind others, to create a depth effect. I'm attaching a screenshot to show what I mean. In this diagram the "collars" around the frame contain multiple parts, two of which need to appear in front of the frame and one behind. If I try to group these parts (layers) together so that I can organise them the back layer gets promoted to the front, which kills the effect. Am I missing something? Is there another way to achieve the effect I'm trying to achieve? TIA.
-
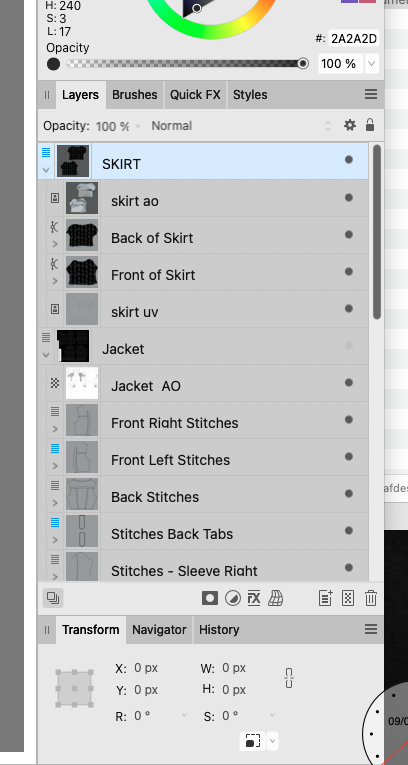
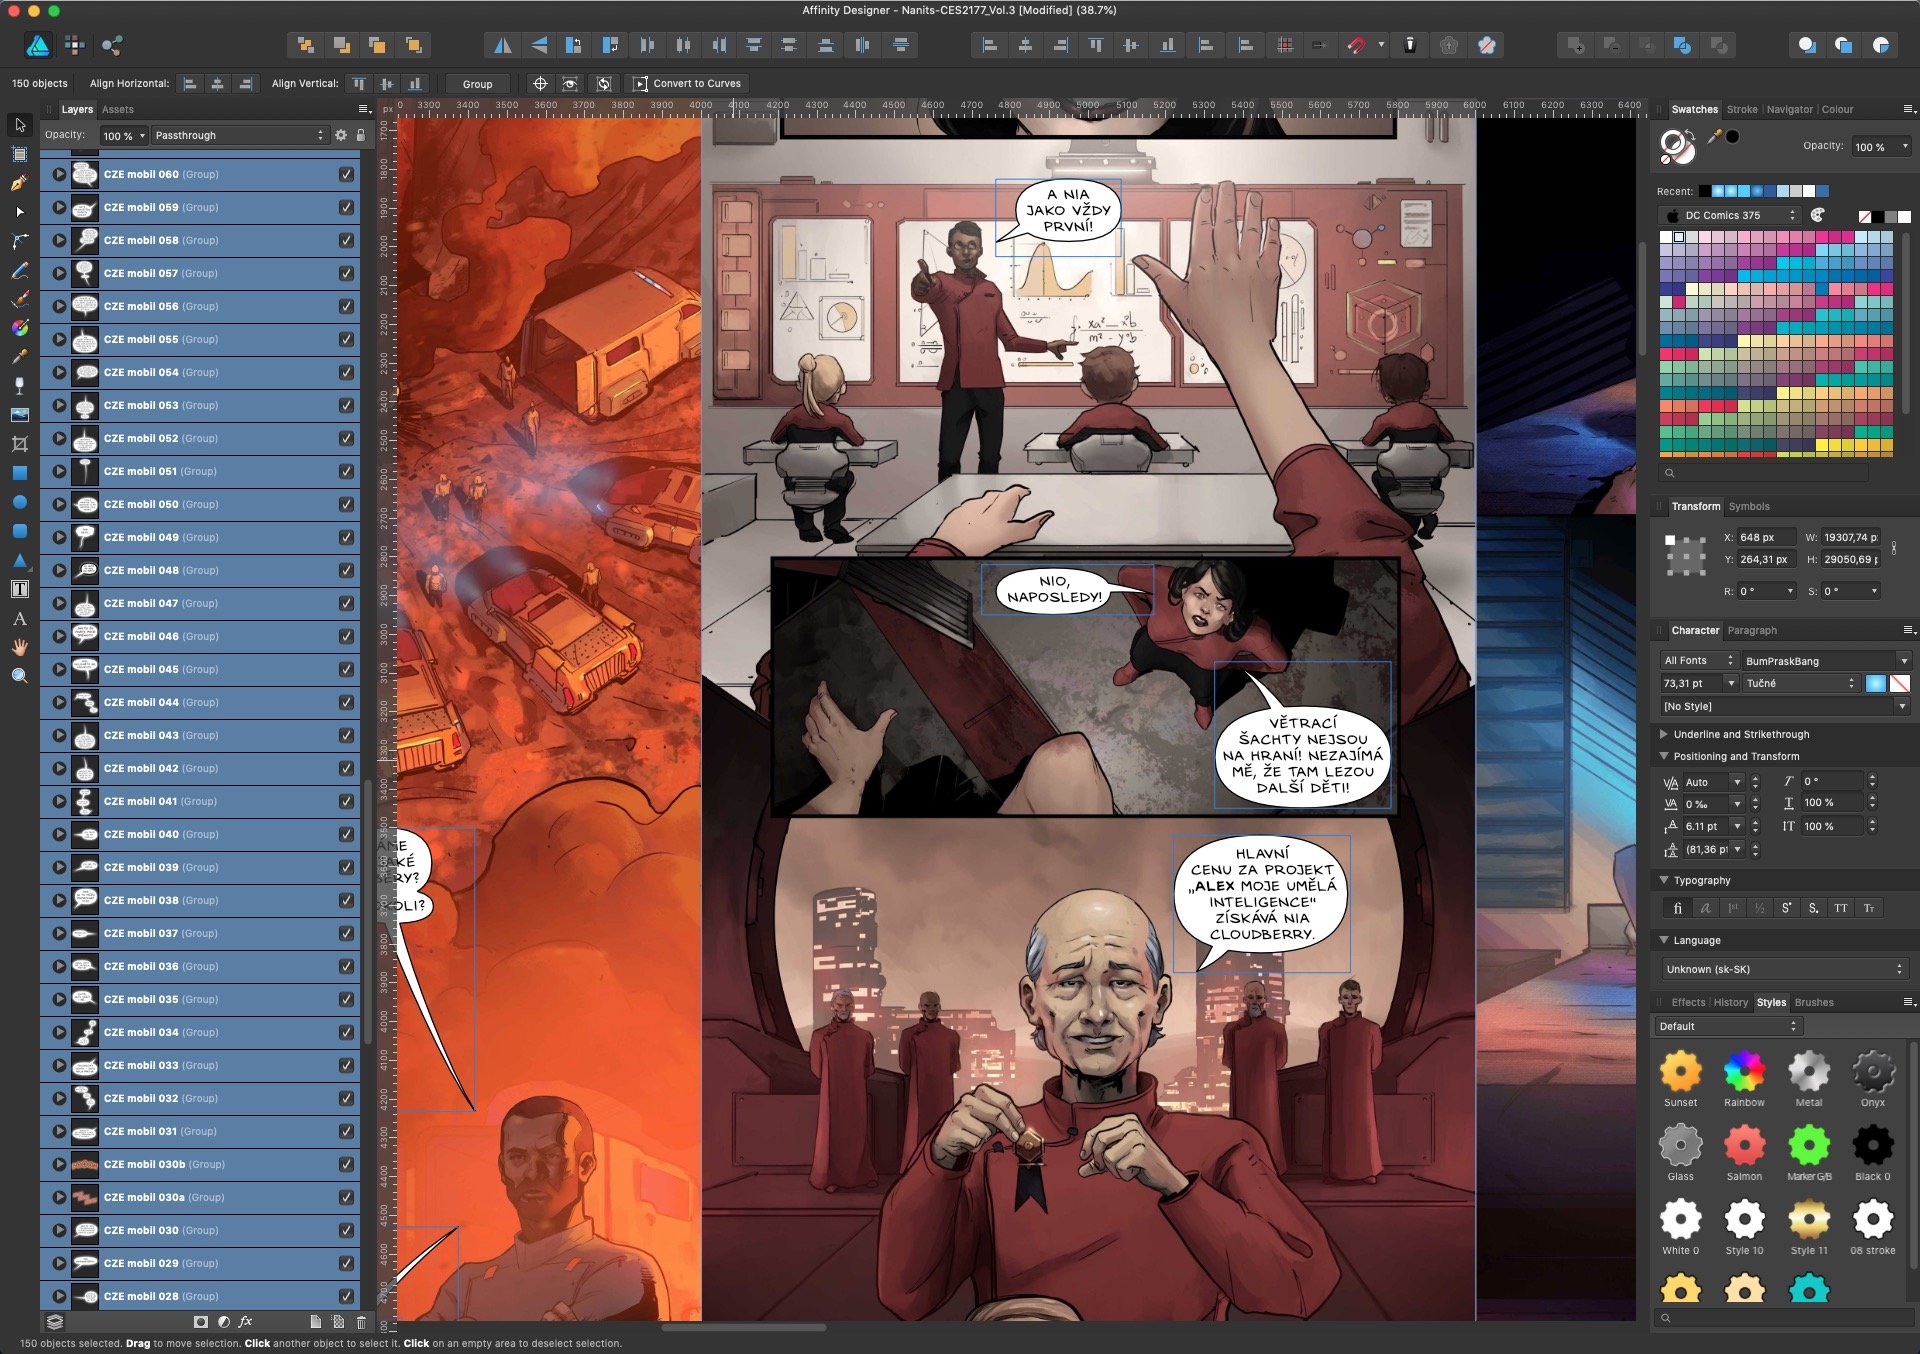
 Hello. I am working on comic book lettering and using Groups to prepare the balloons for future slicing to PNG format (they are inputs for comic book composer we are developing). I try to keep it clean and organized by using simple naming code "LANGUAGE platform ###" e.g CZE mobil 001, CZE mobil 002, etc. Sometimes I need to split the ballon and/or add new one which messing up the order. I usually put there an extra letter (001a, 001b...) but I would prefer to keep numbers only. Is there any chance to rename all groups in 1 step by defining syntax I described above? I found the batch renaming for Slices is not possible but what about the Groups, Layers...?
-
Hello Affinity. I have two group. I need distribute this group to 14 mm vertically. After that, when I click on artboard, two Groups align back... two-group-align.mov