Search the Community
Showing results for tags 'frame'.
-
Is there any way to create a picture frame to work in the same way they used to in Craft Artist? Using PNG with transparency, in Publisher, it simply converts it to a square frame (tried both just converting to frame, and converting to curves,then convert to frame. Attached is a screenshot of how it works in Craft Artist (yes I still have it installed and still use it !!

-
 Steps to reproduce: Create a new document Draw 2 or more picture frames Open the Layers panel Try to change the frame's stacking order Expected result is for the frame's stacking order to change, instead the moved frame will nest within the frame immediately below its new stacking order position. See attached video for a visual explanation. Bonus bug: if I actually want to nest the frames, I cannot trigger it intentionally. Trying to place a frame within another in the Layers panel never triggers the "filled layer" visual effect that indicates an object will be nested within another. This bug is, to the best of my knowledge, limited to picture frames, square and round. Other objects are unaffected and behave normally. Temporary workaround, use the layer arrange commands. Either on the application menu at Layer > Arrange (and their respective keyboard shortcuts), or the layer arrange buttons on the application toolbar. Both are imune to this bug. Thanks! Gravação 2023-07-13 112345.mp4
 -
 Hey everyone :-) I am wondering if there's a possibility to link custom frames (made in Affinity Designer) to a text style decoration? I've attached an example picture to show you what I mean. I built the frame in Affinity Designer and just put it on top of the text with a really low opacity. But because I have my text in a textbox on a master page I also can't put the frame (and its coloured background) BEHIND the text, as it is on the master page... To further tell you what I am working on: I am writing a rulebook for a RPG game. And some parts will be examples of how to play the game. I got my custom example text style but I would love to highlight it with a coloured background (that I can easily do in the decorations tab in the text style) AND a custom frame surrounding it. In the decorations tab I can only find a solution to frame it with a basic frame but no custom shapes. Does anyone know if there's a possibility to somehow link/import or do whatever to use a custom frame in combination with a text style? Thanks in advance. Cheers Michael
-
 Hello, When deleting a page, the picture and text frames on other pages veer off the columns they were originally placed in. This was a blank page I'm removing, and adding it back, locks the frames in position within the columns but breaks the text, I believe this has to do with the inner and outer margins that are different. Is there a way to lock all these frames within the columns rather than following the margins or spine when deleting or adding pages? Thanks a lot for your help.
 -
 Hey everyone, slowly but surely I'm losing my mind over here, haha. I think I've rebuild this master page at least three times by now, but every time I load images, some of them are mirrored. What's even more irritating: If I apply the same master page again, they get mirrored again. Now … what is going on here? Can someone please explain? Applying_Master_changes_single_frame_orientation.mov Even if the frame itself were mirrored (unfortunately this is not indicated anywhere, or is it?), it shouldn't be mirrored every time the master page is re-applied, at least from my understanding. I come accross this issue on almost (?) all the other master pages that use frames, hence why the master pages name ends with a 2. I tried to fix it several times now and feel like I’m running in circles, setting up the master pages from scrap over and over again. Is this a known bug? Am I doing something wrong? Any help would be greatly appreciated. Cheers!
 -
 Hello everybody, I am really a Rookie... but I hope to find help here... Can somebody help me to create the outer curve shape like in the attachement shown.... I don't know how to do it... 😞 I would appreciate every little help.... Thanks for your support in advance... with kind regards.. AD_Rookie49 Temperature_Level_Design_4.afdesign
-
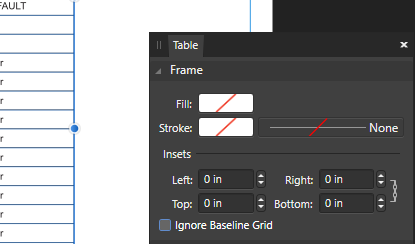
 I'm doing some work with tables for the first time in Affinity Publisher and I'm having trouble with it. I followed an official video on creating tables and it shows how to remove the frame around the table itself. Under Frame in the Table Properties, you change the stroked to none. It worked beautifully for him. It does not work at all for me. It says there's no stroke, but there really is. It shows it even in preview mode, and when I print it to a PDF, I see the stroke. I can't get rid of it! Is there something else I must do? Here's what the Frame properties look like when I have my table selected: I included a little bit of the table itself so you can see that the frame is there. I also noticed that any changes I make to cells don't seem to take. Like, changing the font size only applies to one cell and not all of them, even when you have multiple cells selected. It's frustrating.
-
 I searched a lot and I can't find anything about this, expect some workaround that doesn't work as expected. Is there a way to use a brush/pattern that follow a path ? It's a pretty basic feature on illustrator or photoshop. Thanks
 -
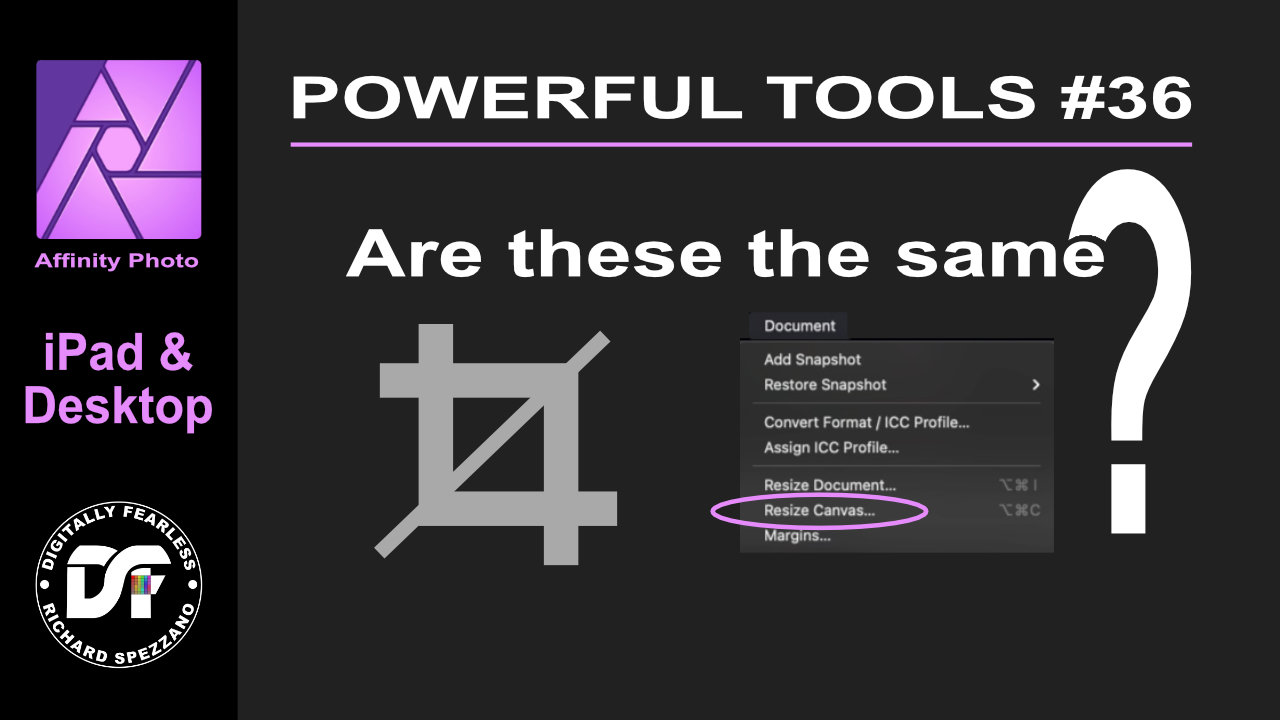
 Power tools of Affinity # 36 iPad and Desktop beginner Affinity Photo tutorial explaining resize canvas vs crop tools and how they are similar. https://youtu.be/qOq3798iSAw
-
 Hello, I just switched from the Adobe CC to Affinity and i run into a problem withing Affinity Publisher. In InDesign I'm used to making a mockup of my document using wireframes, and then filling it with text and picures. When i wanted to do the same thing within Publisher, I can't type in a picture frame. I seem to have to make a seperate textframe for typing. Can an empty pictureframe be used as a placeholder before filling the document with text and pictures? Or is it just an empty placeholder for pictures?
 -
 One of the features in page plus was the ability to increase or reduce the size of the text so as to fill a frame completely. Is that available in publisher?
 -
 Hi, I'm trying to create an old school ornamental stroke on a text frame for a book cover like, I think, used to be available back in the QuarkXPress world. I've attached an image of the type of thing I need (please excuse the lousy quality). I have all three Affinity apps on Mac. Ideally the frame would be in Publisher, but I'd be happy enough with a vector object brought over from Designer. I'm wondering what the best/easiset way of approaching such a need would be in the Affinity Apps. Any suggestions? Create a single vector and add multiple strokes in the Appearance panel? Another way? Thanks for any suggestions. Pat
-
 I'm hoping this is a quickie for a newbie question. I've exported my document to a pdf, and on some pages the boarders where I have pasted text in text frames are showing. What have a done wrong? It isn't every page, and I can't see what's different about these frames...
-
 Is it possible to have a frame text copy text from another? Almost like Fields, where you have a text frame copy from fields, but instead copy from another text.
 -
 Hello, For some reason I cannot switch between between artistic text and text frame ? How can I convert or switch modes between texts ? Thank you, Text_frame.mp4
 -
When placing smaller images into existing multi-layer Photo image, I sometimes see the frame edges visible as annoying thin white lines (sometimes dashed). I have tried copying and pasting, using File: Place, or dragging icon, but nothing seems to help. See attached JPEG, note line between red arrows. It doesn't seem to happen consistently, varying from one placed image to another; remains after import into Photoshop. I cure it using Inpainting brush tool but should I need to do this? Use is for large, fine art print. Late 2012 Mac Mini, 16 GB Ram, OS 10.14.6. Affinity Photo 1.8.3 intended to replace Photoshop CS6.
-
Hello, I have installed the new version of 1.8 for all of my Affinity product. However, the moment I press enter to go to the next line the text format changes ?? such a weird behavior after installing the update. The file is attached maybe someone can take a look at it. You can take a look at the video as well. Is it a bug or maybe I am doing something wrong ? Thank you, text-frame-bug.mp4 text-frame-bug.afdesign
-
 When I try to resize a picture frame, the content inside the frame is also getting stretched/distorted. Is this how it works on Affinity? Or it's a bug?
 -
 As title says - when object is selected, then it's boundaries are highlighted with blue outline. But sometimes, especially when working with small objects or fine outlines it's impossible to see what's going on. Is there a way to disable it, so selected object is indicated only by handles? If not can you make it a feature request?
 -
 Windows 10 Home 1903, Publisher 1.7.1.404. It will be easier for you to watch the attached GIF than me trying to explain what’s going on. Workflow to replicate: * Create a Rectangle; * Convert it to Curves; * Convert it to a Text Frame; * Add Filler text; * Give the Text Frame some Insets; * (Optional: Give the text frame a background colour and the text a different background colour); * Drag one vertex of the shape so the shape is significantly concave. Note where all of the text except the first word disappears when the shape becomes significantly concave. The insets may account for some of the text going missing but there is more than enough space remaining to put more text. I think it’s worth saying that I don’t think many people would want to actually do this but it’s possible. The effect doesn’t always happen, it just depends on which vertex you drag. In my example, dragging either of the bottom two vertices seems to be fine but dragging either of the top two vertices shows the problem. (Dragging both the top two vertices together is also fine.) I’ve tried this with Baseline on and off and get the same thing so that doesn’t seem to be a cause of the problem.
-
See the screen shot. This Box style is the built-in version with just a change in font color to black. The problem with this is several-fold. For one, the outline frame often does not match the actual "box" in size or alignment. This is especially difficult when first laying out the box. Then there is the distance from the frame versus the distance from the actual "box" - which are different. There is no way that I can see to select an accurate distance for the visible "box" - distance is only displayed for the misaligned frame. The last bit is just more of a question - is there a way to change the background color of the box itself. After spending lots of time going through the various Text Styles editors, I can find no way to change it from the light gray to another hue. Thanks!
-
 I started working with dropping photos into frames this week and ran into problems. Previously with some of the betas this worked but I noticed two issues with the MAS version. 1. When I try to select the slider Publisher won't let me grab it and disappears before I do so. 2. The slider will be located far off from the image. With some of the betas it was neatly positioned under the photo. Now there seems to be no rhyme or reason for it's position. I just end up using the preset framing positions located under the right click menu. At least this gives me some control but, or course, I can't be exact.
 -
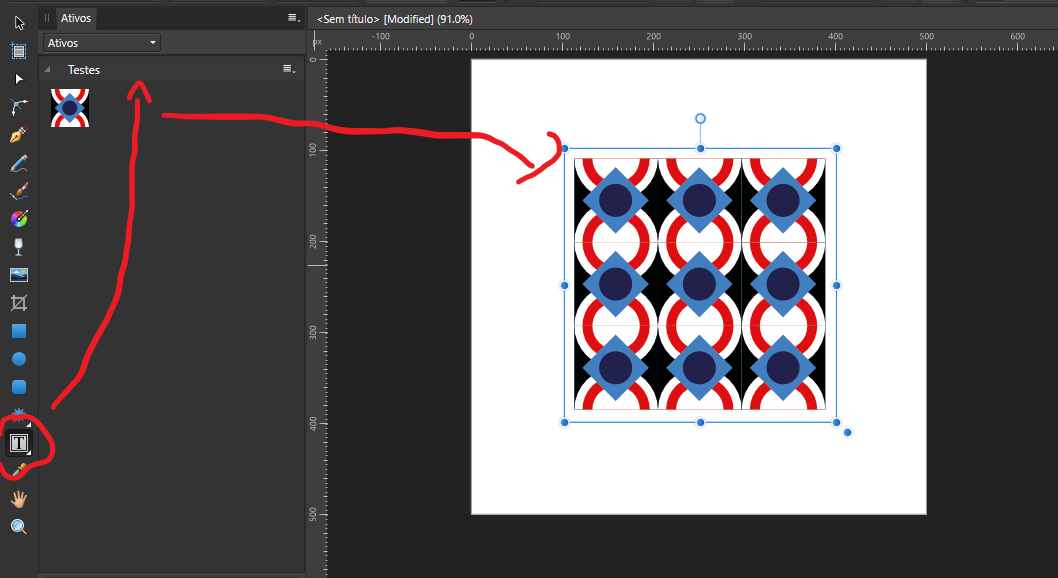
 Good afternoon people; I believe that, like me, everyone who makes patterns in Affinity uses the method to create Symbols > transform into Assets. At first I found it strange, but nowadays I confess that I prefer this than other software methods, especially by the easy editing of the Symbols tool. My only problem would be this: when it comes to replicating this as Assets, sometimes it's kind of annoying. I would suggest to the Affinity Group a Frame Tool option, similar to that of the Text Tool to facilitate the creation of Patterns. Something like that: the user selects his Asset as an individual object or a Frame; if the user chooses as a Frame, it selects the applied area and, as a result, the Tool replicates as many times as necessary to the appropriate size within the Frame Area. I made this horrible drawing/print to demonstrate, using the Frame Text to show something like I was thinking. Thanks guys, you're incredible.
-
 I'd love it if I could easily convert from Artistic Text to Frame Text with a click of a button or shortcut. I dislike having to create a new frame text and then copy the text out of the the artistic text box and past into the frame text box.
 -

Moving Photos inside the Frame
DkNkm posted a topic in Feedback for Affinity Publisher V1 on Desktop
Hi Publisher Users, i´m new here and have my fist question. If the answer was given in another topic feel free to share the link with me. My search wasn´t given me the answer. As an old Indesign user i missing something on handling placed photos. In Indesign i can move photos inside the frame. So i can resize or move photos inside the frame by not moving the frame from his default location. Is this not working, or do i something wrong here in Publisher? For a better understanding you can here see the effect in this Video on Youtube - starting at 2:51 Greetings