Search the Community
Showing results for tags 'filter'.
-
Hi! I have a black and white vector layer which I would like to use as a mask for another. However, Designer always sets it as a clipping path, instead of using black und white for masking. Is there any way to change that behavior, or at least to make all black parts of the layer transparent so can work as a clipping path? The reason behind this is that I‘m trying to rasterize a gradient for a monochrome print. I‘ve prepared a B/W mask using the Halftone Filter: Demo file for the above image: vector mask.afdesign

-
 I have attached a mask layer to a Gaussian blur live filter layer. After inverting the layer I begin painting over objects to be blurred. Some parts of those objects display "tiled", e. g. in you can see a vertical line under the period of the previous sentence. Look more closely and you'll see the tiles. I'm running Affinity Photo 1.7.1 on a 2018 MacBook Pro 15" and macOS 10.13.6. Turning Metal computing off and restarting didn't alleviate the problem.
-
The voronoi filter started out working fine, but it started getting worse at adding more and more black around the edges as I used it. I have no idea what is causing this, but I've restarted the program, and I'm still getting the same bad results.
-
So this one is a bit of a niche filter, but it is one of my favourites (it does an excellent job at breaking up hard edges, and helps bind layers together beautifully if you're going for the grainy look but don't want to introduce standard grain/noise) Especially when photobashing for concept art, "I use it on the daily".
-
 Hi, i just bought Designer as a potential replacement for my beloved Macromedia Fireworks (which was the best Vector/Pixel hybrid tool out there – shame on Adobe for killing it). The first thing i am missing in Designer (possibly just can't find it) ist, a Sharpen-Filter for imported pixel art. In Fireworks i could add a Sharpen od Unsharpen Mask Effect via the "Filter" Palette which was non-destructive and could easily be removed again from the image. I was hoping to find Sharpen in the Layer-Effects of designer, but it wasn't there. It's also not under Layer-Adjustments. Is a sharpen filter simply missing and if so, is that a planned feature? Note, i did see the "sharpen" Brush, but that is not what i am looking for as i want to apply the filter to the whole image in a non-destructive manner. Thanks for any pointers!
 -
 Hi, Just found out about this software and wanted to know if Affinity Photo software has a tool like Photoshop's Camera Raw Filter that works on jpegs. much thanks Darren
 -
 Is that a bug or a feature? I have tried to rework a tutorial in AP for which I need the Filter "Twirl". I noticed that this filter with the slider only allows 1024 px diameter and resets a manual input to 1024px. Then I tried another filter, Spherical, from the same menu and there I can manually enter a value greater than 1024 which will be applied and not automatically reset to 1024 px. Please watch the video below. So, what works right now? Is it possible to manually enter a higher value than the slider allows or not? In my opinion it would be better to enter the value for all filters manually afterwards or to allow a much higher value than 1024 px as standard. I wanted to twirl the entire image, which is 6000x4000 px, but that's impossible with the settings I can make at the moment or am i doing something wrong? The same beahavior is in 1.6.5.123. Perhaps someone can confirm this behavior. 2019-04-13-13-24-03.mp4
 -
 Hello ! this is not to mention a bug but more of a question and if it does not exist yet a suggestion. It is possible at this stage to draw a straight line with the pen tool then use some filter or options to create a Zig Zag from it ? Like one would do to make waves or to illustrate waters flowing/moving. i know it was possible with Ai but not yet tried to create it with Affinity Designer (Beta or Retail), so i ask. if it is not implemented (such a filter or a straight function to make zik zag of vector lines and smooth them or sharp them) then i would ask it (for both Windows and MacOS) because it is helpful and time saving and very useful for logos design. Blessings !
 -
Hello Everyone ! I would like to know what is the easiest way to match colors on a Photo Montage/Composition in Affinity Photo without going all this crazy and too technical way. Is Serif thinking about bringing in the Color Match Live adjustment ? it is needed and may help shorten too long workflow or steps. Blessings !
-
Hello People Hello Dev's and Team Well today i'll make it simple for this amazing product we love. I would suggest a new Special Filter to be developed and implemented on Affinity Photo. The Skin Tone Live filter This Special filter should take care of helping the user to process skin tone adjustment in a Pro way and with ease of use. it should come with a tonal range picking tool that allow to pick and a set the initial/reference point/color range we would like to apply into areas we wish to correct. The filters should be Live and Non Destructive allowing a anytime tuning. The same filter should also include slider that will help us achieve things like Smoothing etc... like existing Filters is should have a Mask in it so we can paint the adjustment on specific areas we think we need to correct. let's say i want to make a model skin uniform, i would select the skin color Filter, use its picking/tonal range selection tool and click on the area that i think is the good/best tonal reference point, once i get that point it becomes what i will paint using brush tool in areas i think should be corrected, then i paint into areas i want to uniform to see them updated with selected tonal range and from the same Filter i should also the able to slide left or right (starting from center) to smooth or sharpen the applied skin tone. This should help us spend less time working on model/portrait skin tone but gain great results. if others can learn from us then we too can learn from them but make it 1000 times better than how it offered/presented actually. That was my suggestion for Affinity Photo. Blessings !
-
Hello everyone ! I have some work to do and really want to process it with Affinity exclusively, almost 50% of the project requires me to understand and apply the Golden hour. if there are filters or tone map or even a simple settings please help me understand that and apply. Blessings !
-
 Is there a list of functions which can be used in the "Apply Image Filter" equations? The online manual and video only show simple channel arithmetic. In the Affinity Photo WorkBook - London Calling 2 - (p234) - lerp(SA,Sb,0.2) is used for "linear interpretation ... mapping the b channel to a mix of a and b channels " So I assume there would be other functions.
 -
 Hey beebs! I'm using the trial version, tried to use the Gaussian blur but it makes some edges when moved, I guess it made to after I merge the filter. I told my self it would be a rendering thing but it turned to be rendered with the edged as you can see in the photo attached. Please I need help with this error! Cheers!
-
 Is it possible / How to preset or trigger a Custom Sort Filter without using “SORT BY”? /&sortby=forums_topics.last_post&sortdirection=desc&page=1&filter=???????
 -
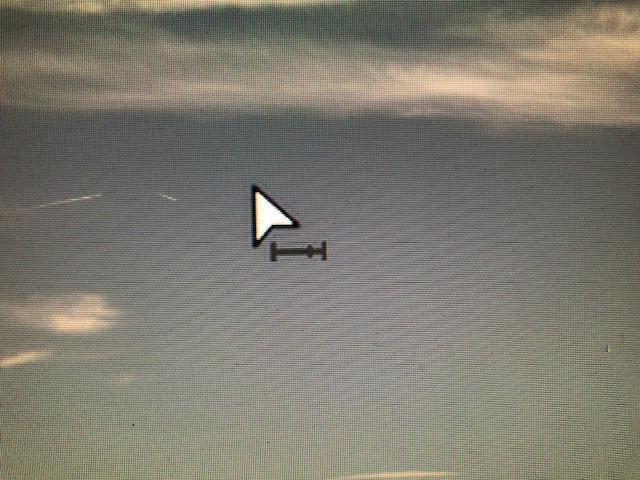
 Hi all, I am new here, but I have AP a long time. Since today it works perfectly. But today I had an issue. If I choose a filter, which normaly it opens a window with the settings (parameters), it shows me the attached icon / cursor. If I click and move the mouse, than I see, that the settings is changing. But I want to do that with the "normal" slider and numbers. I resettet all settings in AP, but it doesn't changes anything. It is maybe a windows 10 or affinity photo problem or can I change it in a setting? Windows 10 are with all updates. AP I tried also 1.6.93 and 1.6.103. I have a Surface Pro 4. Hope anyone can help me. Kay-Uwe
-
 Is there a way to save a live lighting filter as a "new" light? or preset? I've searched the forums and read everything I can get my hands on regarding lighting, but I can't seem to find any setting that allows you to do this, (as a similar function allows in Photoshop). If there is no function like this, are there any plans to develop this in the future?
 -
 I recently had difficulty in getting the Distort > Equations Filter to work as I thought it should, I was convinced that there was an error and posted a Bug report here. After comment from members @shojtsy and @walt.farrell and moderators @Andy Somerfieldand @Patrick Connor, I finally got it sorted. I thought that an item in the Tutorials might help for others coming to this problem anew. Consider a simple pair of Equations: x=x+y*0.2 y=y*0.7 My original thoughts were that these represented algebraic transformations, that the value of the pixel at position (x,y) would be moved to pixel position (x+y*0.2, y*0.7). Applying this to the image: gives: The bottom right corner of the image is transparent. My expectation was that the height of the text would be reduced to 70%, but it is actually expanded to approximately 140% (1/0.7). I originally expected the slant to be anti-clockwise, but it was clockwise. My original thoughts and expectations were wrong. What actually happens is quite different. For any pixel at position (x,y), Affinity Photo will find the pixel at (x+y*0.2, y*0.7) and use the value of the pixel value there to apply to the pixel at (x,y). Following this logic, the results are consistent with (revised) expectations. John
-
Photoshop user for 20 years, transitioning to Affinity Photo... Question regarding Depth of Field Filter: When resizing a document, the Depth of Field Filter does not seem to scale. The only way I have found to apply this is to scale the original image and then apply the Depth of Field Filter. Am I missing something or is this a feature not yet implemented?
-
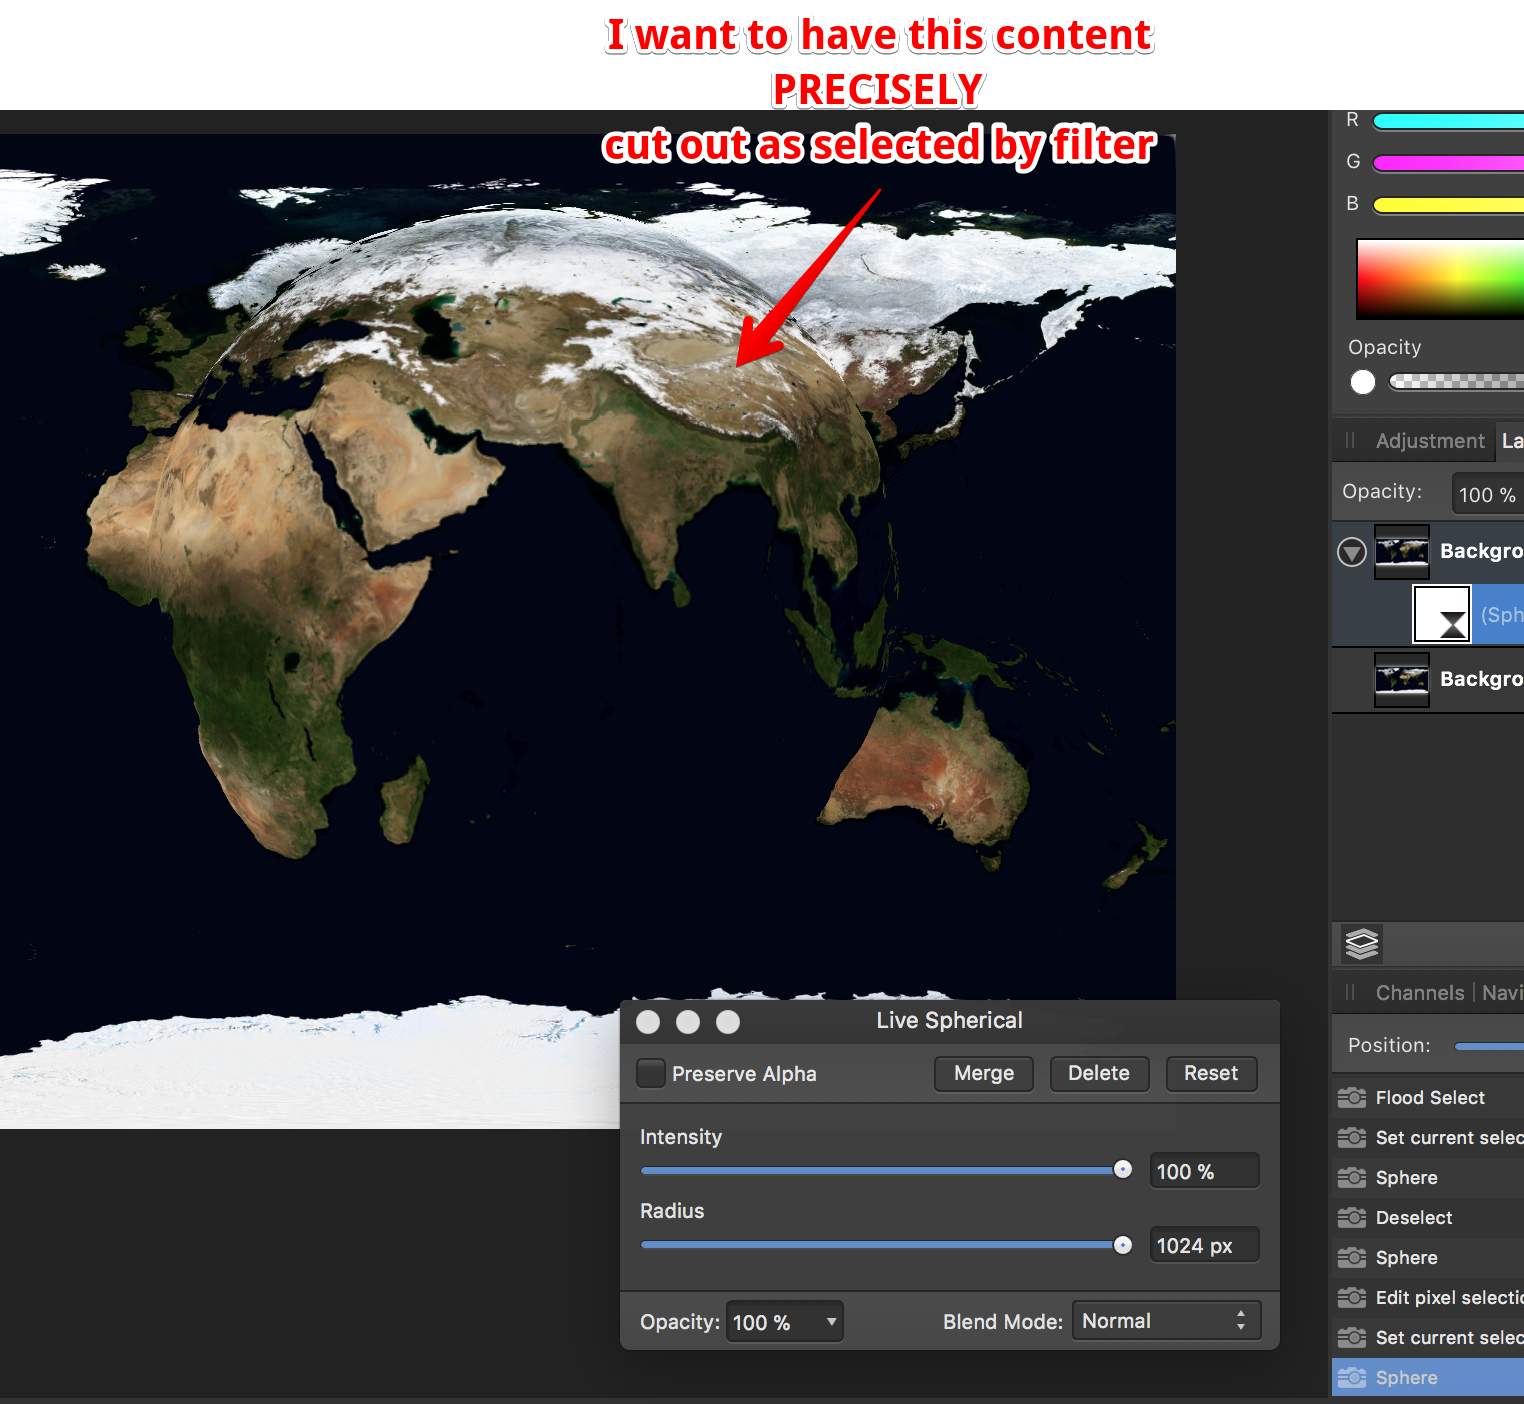
 How do I cut out precisely (!!!) the range I selected with the distortion filter "Sphere" - no matter live or destructive. I tried everything, giving up... FYC: if I make a circle selection first, I never get the range spherized I want to... Why is this filter limited to 1024 pixels??? Thanks for all reply in advance
-
Here's a set of traditional lens filters turned into a swatch. Includes solid colours and gradients. Hex values for colours taken from here: https://www.dpreview.com/forums/post/26765086 Installation: Click on Swatches (in tab next to Colour panel) Click on little box with lines in top right corner. Click Import Palette, then Application Palette, then find the file you have downloaded. Typical usage: Add new pixel layer (Layer/New Layer) Click on Swatches (in tab next to Colour panel) Click on drop-down and select Traditional Filters Click on desired colour filter (hover over colours to see the name) If you clicked on a gradient, click on Gradient tool in left hand toolbar and drag over image to paint in gradient. Reduce layer Opacity (often to fairly low) Optionally set Blend Mode (typically to Overlay) To limit the extent of the filter, add a mask to the pixel layer (Layer/New Mask Layer) and paint out unwanted area with black. To save file size with solid colours, you can use the Lens Filter adjustment Layer/New Adjustment Layer/Lenst Filter Adjustment. Click on Filter Colour, then top drop-down to get Swatches then second drop-down to select Traditional Filters. Click on chosen colour and adjust with Optical Density slider. To save file size with gradients, instead of using pixel layer: Select rectangle in left hand tool bar and drag to cover whole image. Grab corners and adust as needed. In top context bar, click on Fill, then Swatches, then drop-down to select Traditional Filters, then the gradient you want. Hit Esc on keyboard to dismiss drop-down. Click on Gradient tool in left hand tool menu, then click-drag to draw on image. Adjust with layer Opacity (often fairly low). Optionally set Blend Mode (typically to Overlay). Traditional Filters.afpalette
-
Dear Friends, I haven't used Affinity for a couple of months and I cannot find any more the 4-5 ready made filters from normal to sharp and sharper pictures. I have looked for it everywhere but cannot find the way any longer. sorry I am new in this program and still training. thank you! Enjoy Affinity! Mauj
-
 Another question comes to mind as I try to find a way to emulate as closely as possible in Photo the workflow I'm used to in PS: PS remembers most user settings, and it seems that Photo does not. For example, if I call up the High Pass filter in PS, it remembers the Radius value I used last time. Photo always seem to go back to its default value (zero pixel), thus making the user adjust the slider or type in the value again every time... Would there be a way to set Photo so that it remembers such things, or is that a feature to request? Many thanks in advance.
 -
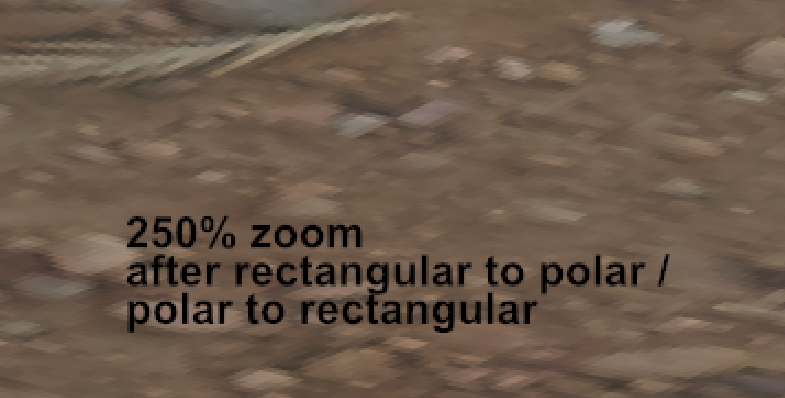
 Hello, First of all I have to say thank you for doing an alternative to photoshop (and illustrator) it is more than welcome! I am doing some 14k hdri panorama editing at the moment and found some things which unfortunately work not as well as in photoshop yet. Maybe there is a way to fix them!? The process: To get rid of the tripod in the picture it is necessary to do some clone stamping. So what you do is flipping the image vertically and then use the rectangular to polar filter to unstretch the floor. after clone stamping you use the polar to rectangular filter and flip the image vertically another time. The Problems: - after using the polar to rectangular filter the top of the image does a weird stretching (photoshop doesn't do that) what I do to avoid this is just making a mask and only paint in the edited (clone stamped) parts. Unfortunately the second problem is bigger: - after using the polar to rectangular filter the image is unsharp and has a weird jpeg like artifact pattern. First Problem (Stretching in the top of the image) Second Problem (Unsharp Artifacts) It looks similar to the artifacts in the following post: https://forum.affinity.serif.com/index.php?/topic/16741-rectangular-to-polar-good-results/ Thanks!
-
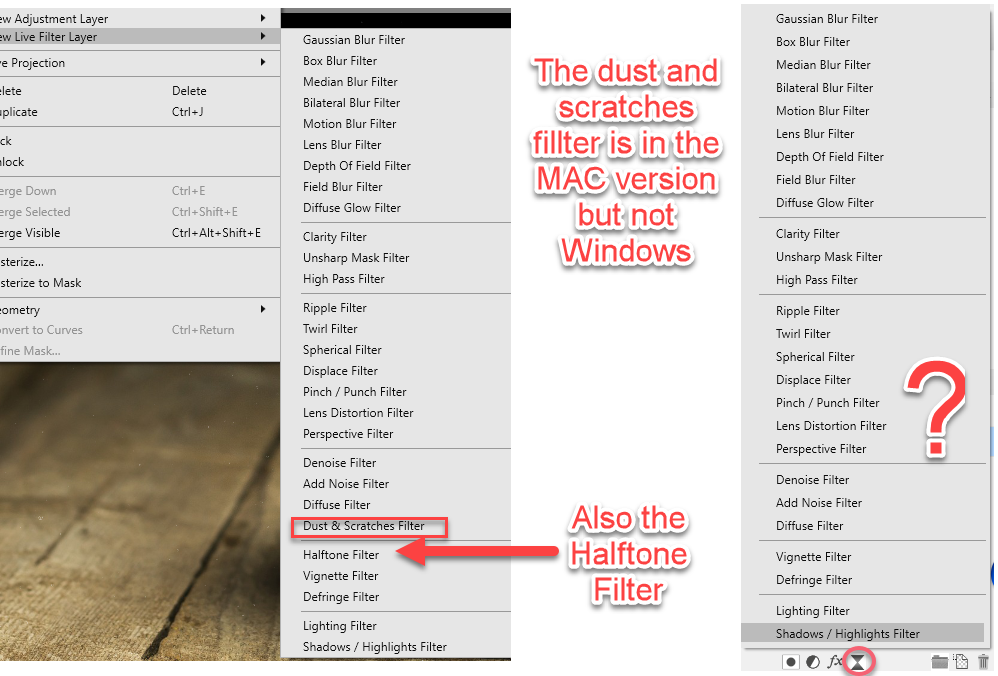
If you choose a filter via the menu Filters / New Live filter layer you get a complete list of live filters. If you use the drop down below the Layers module the list is missing 2 items Confirmations?
-
Hello, Just got Affinity Photo for iPad. Great app, thank you very much. I was wondering if there was any plans to create a Wave distortion filter, like Adobe Photoshop has. You can see an example of the Photoshop Wave filter in action right here: https://youtu.be/1CcdLwCRuQ0 You can create really cool glitch effects with this Photoshop filter. As a creator of glitch art I would love to see this added to Affinity Photo. I also think it would bring a lot of new users to Affinity Photo. Thank you.